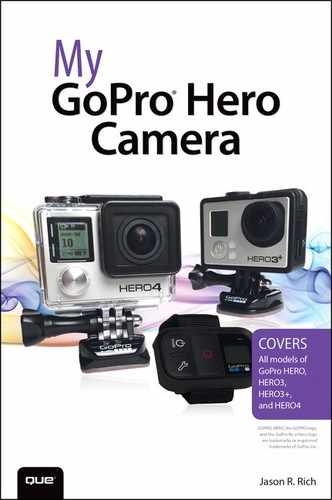
14. Troubleshooting Camera-Related Problems and Overcoming Common Shooting Mistakes
In this chapter, you discover how to overcome common problems and mistakes when shooting photos or video. Topics include the following:
![]() How to troubleshoot common camera-related problems
How to troubleshoot common camera-related problems
![]() Overcome common shooting mistakes
Overcome common shooting mistakes
![]() Where to turn for additional help and inspiration
Where to turn for additional help and inspiration
Before shooting, always try to invest a few minutes to preplan your shots and determine what you want to accomplish. With this insight, you can equip your camera with the appropriate housing, mount, and accessories. This also helps you to frame your shots; deciding what, where, and when to shoot; and what shooting approach to take.
Even if you set up all your equipment correctly, have everything you need on-hand, understand exactly how to operate your camera, and have goals in mind for what you want to accomplish, occasionally things may go wrong either with the camera or with related camera equipment (such as the battery, memory card, or another accessory).
Meanwhile, how your photos or videos ultimately turn out may not be as you envisioned because of an error on your part. You might have chosen the wrong camera settings or adopted the wrong shooting strategy for a particular situation.
This chapter can help you become familiar with the most common technical problems that can occur with your camera, and teach you how to avoid or fix them. In addition, you can become aware of common shooting mistakes that could potentially ruin your photos or videos, and prevent you from achieving the results you want.
Troubleshooting Camera-Related Problems
If something goes wrong with the GoPro camera or one of your mounts, houses, or accessories, this section should help you fix the issue.
The Camera Won’t Turn On
The most common cause of this issue is either that you forgot to put a fully charged battery into the camera, the battery that’s in the camera has died, or the battery no longer holds a charge. If the camera goes unused for an extended period, for example, the battery will drain, especially if you left the camera’s Wireless mode turned on.
The easiest fix (which is the most obvious one) is to plug in the camera (with the dead battery) to an external power source using the supplied USB cable and allow it to charge, or insert a different fully charged battery into the camera.

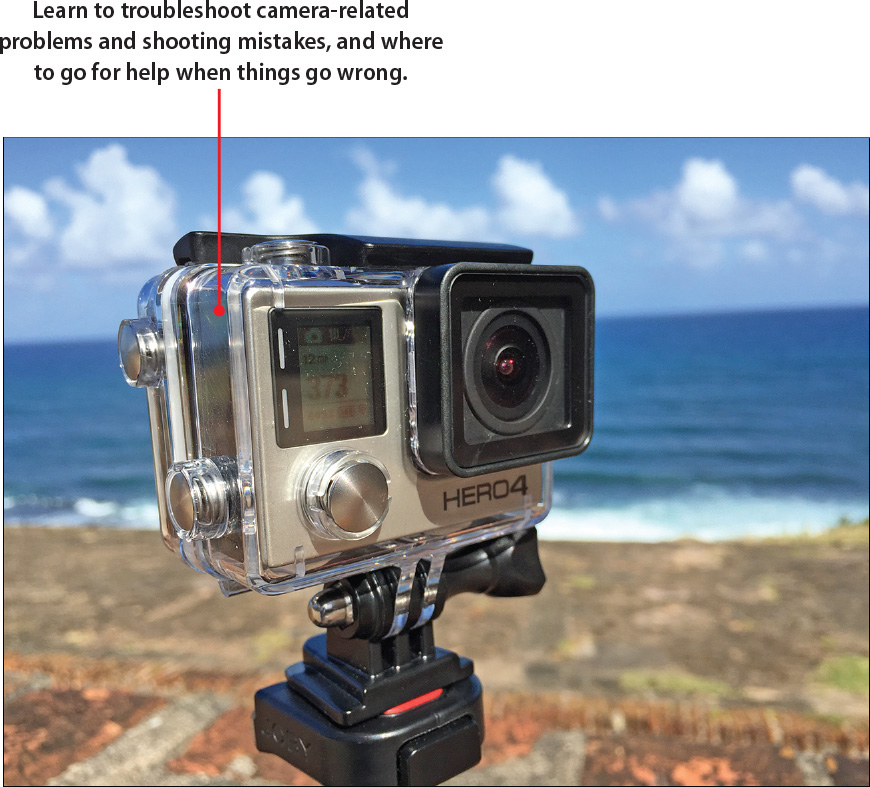
If the first time you attempt to insert a new GoPro or GoPro-compatible battery into a charger it refuses to charge after several hours, chances are the battery is defective and should be returned.
However, first make sure the battery is inserted into the charger correctly. Most chargers have a red LED light that indicates a battery has been inserted correctly and is charging. This light turns green when the battery is fully charged.
When you insert the battery into the charger, if no light comes on, this could mean there’s dirt or dust on the battery or charger’s connectors. Try blowing on the connectors, or use a dry cloth (not your finger) to gently remove dirt. Then reinsert the battery into the charger.
End of Life
Over time, like any rechargeable battery, its capability to retain a full charge will diminish, and its life between charges will shorten. When you notice this happening and the battery’s life becomes short, you must replace the battery with a new one.
The Camera Is On, but Unresponsive
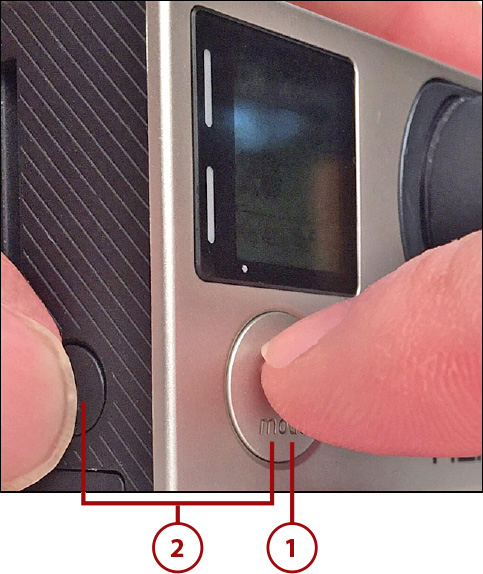
If the camera is turned on, but the camera is unresponsive, chances are it simply needs to be reset. This does not erase any content from the memory card, nor does it change any of the camera’s settings.
To reset the camera, press and hold down the Power/Mode button for approximately 8 seconds. After this time, the camera will turn itself off. Release the Power/Mode button, and then press it again for approximately 2 seconds to turn the camera back on.
If this problem persists, you should attempt to reset the camera to its factory default settings.
Reset the Camera to Factory Default Settings
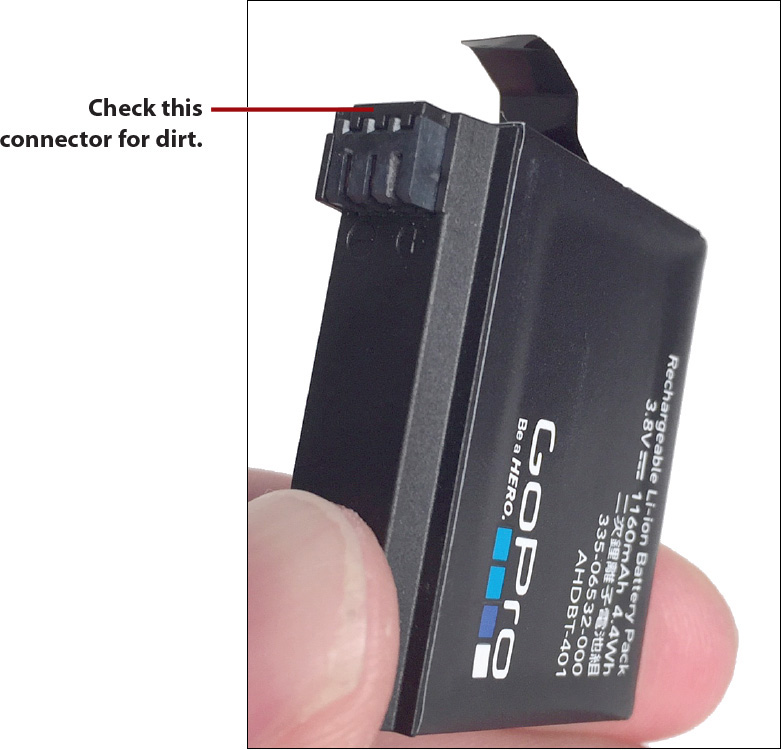
If you need to reset the camera to its factory default settings, follow these steps when using the Hero4 camera:
1. Turn on the camera and press the Power/Mode button repeatedly until the Setup (gear-shaped) icon displays on the Status Screen.
2. Press the Shutter/Select button to access the Setup menu.

3. Repeatedly press the Power/Mode button to scroll through the Setup menu options on the Status Screen until the Reset Cam (Reset Camera) option is highlighted.
4. Press the Shutter/Select button to select the highlighted Reset Camera option.
5. When the Cam Reset option appears on the Status Screen, press the Power/Mode button once to highlight and select the Reset option. To exit out of this option without resetting the camera, select the Cancel option.
6. Press the Shutter/Select button to activate the Reset command.

7. When the camera is turned back on, all its user adjustable settings return to their factory default settings.
The Camera Won’t Connect with the GoPro App or Smart Remote
After you pair the GoPro camera with the Smart Remote (refer to Chapter 5, “Must Have GoPro Camera Accessories”) or the GoPro App (refer to Chapter 15, “Using the GoPro Mobile App”), each time you want to establish a connection between your camera and the Smart Remote or GoPro App (running on your smartphone or tablet), the camera’s Wireless mode must first be turned on.
Then, if you use the GoPro App, be sure that you access the smartphone or tablet’s Wi-Fi menu (from within Settings on an iPhone or iPad), and select the camera’s wireless network. (The network uses the same name that you gave the camera when initially setting up the Wireless feature.) You may need to supply the camera’s password to access this network with your mobile device.

After launching the GoPro App (or turning on the Smart Remote), a connection should automatically be established. If this does not happen as it should, try turning off the camera and the Smart Remote, and turning them back on. If you use the GoPro App, shut down the app, turn off and then back on the Wi-Fi feature on your mobile device, and then relaunch the app.
Wireless Mode Enabled
For your camera to establish a wireless connection between the Smart Remote or the GoPro App, its Wireless mode must be turned on. This is indicated by the camera’s blue Status Light flashing, even if the camera is turned off.
After you initially set up the Wireless feature, to turn on/off the Wireless mode when using a Hero4, press and hold the Settings/Tag button on the side of the camera for approximately 2 seconds. (On other GoPro camera models, press and hold the Wi-Fi button on the side of the camera for approximately 2 seconds.)
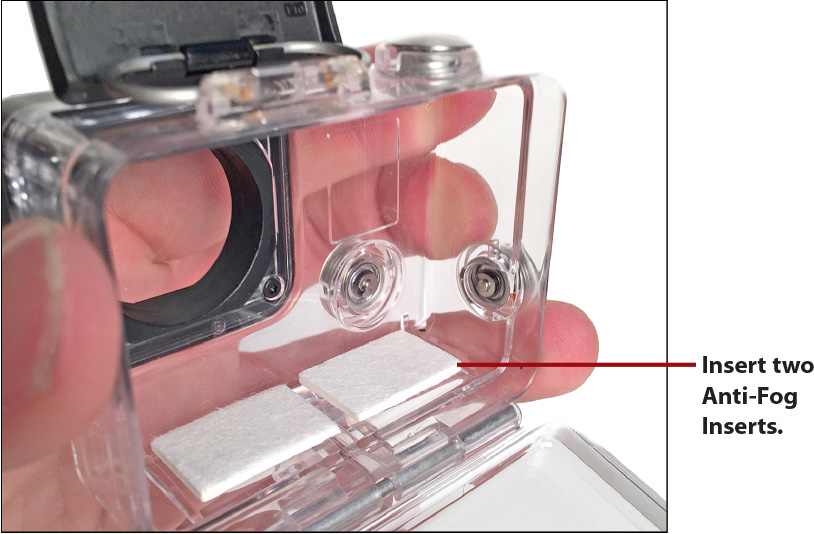
Clear Up Lens Fog
When shooting in a hot and humid climate and in and around water, it’s common for the camera’s lens to fog up when it’s fully encased within the Standard or Dive Housing.
To eliminate this fogging, purchase GoPro’s optional Anti-Fog Inserts, and insert two of them into the camera’s housing.
Make Sure Your Camera Is Fully Encased in a Housing
Remember, the GoPro camera is not waterproof. The camera becomes waterproof only when it’s fully encased within a properly sealed GoPro Standard or Dive Housing.
Before using the camera in or around water, make sure the camera’s housing is properly sealed and that the white rubber seal that surrounds the camera’s backdoor is clean and fully intact. Otherwise, the seal may not hold and the housing could leak.
Reset Your Camera Name and Password
During the initial Wireless setup process, you’re asked to name your camera and create a password for it. This camera name is also used when the camera later creates a wireless network so that it can connect (wirelessly) with the Smart Remote or the GoPro App that runs on your smartphone or tablet.
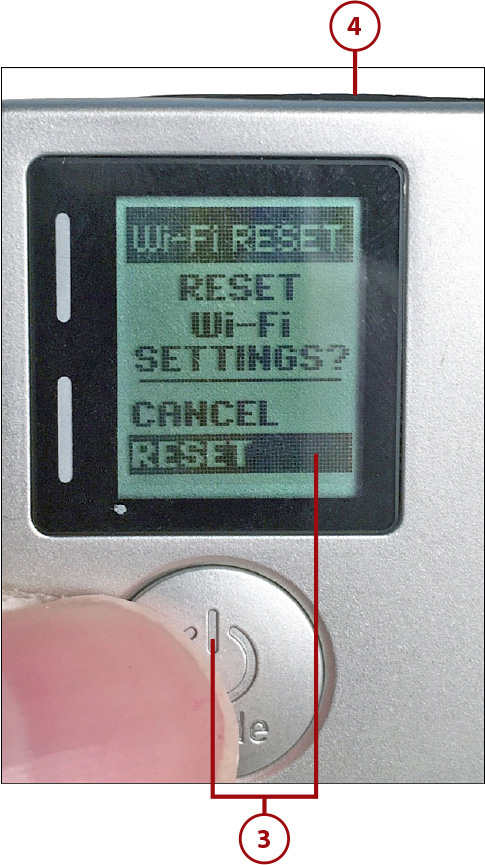
If you forget the camera’s name and password, here’s how to reset it:
1. Turn on the camera.
2. Press and hold down the Settings/Tag button (on the side of the camera). At the same time, press and release the Power/Mode button. On the Status Screen, the Wi-Fi Reset menu appears.
3. Press the Power/Mode button once to highlight the Reset option.
4. Press the Shutter/Select button once to select this option and reset the camera’s Wireless feature.
Re-Pairing Your Camera
After you reset the Wi-Fi settings, you need to again go through the pairing process between the camera and the Smart Remote or the camera and the GoPro App. To do this, follow the steps outlined within Chapter 5 or 15, respectively. During this process, you need to create a new camera name and password.
The Status Screen Says No SD, Full, or SD ERR
The camera can generate three memory card-related error messages should something go wrong with the memory card.
• The NO SD message means that there is no memory card currently inserted within the camera. You need to insert one prior to shooting photos or video.
• The Full error message means that the card has reached its storage capacity. At this point, you either need to transfer content from the memory card to your mobile device or computer and then delete that content from the memory card; delete memory card content directly from the camera, without first transferring it; or replace the memory card within the camera with one that has storage space available.
Transfer Content Before Deleting It
You must transfer any content that you want to keep from the memory card to your computer or mobile device before you delete it from the memory card or reformat the memory card. Otherwise, this content is lost forever.
• The worst of the memory card-related error messages is SD ERR. This means that content stored within the memory card has been corrupted; or for some reason, the memory card has been damaged and is no longer working.
The File Repair Icon Appears on the Status Screen
During the filming process, if the photo or video doesn’t properly get saved to the memory card, the File Repair icon (which looks like a band aid) appears on the Status Screen. When this happens, simply press the Power/Mode or Shutter/Select button, and the camera should automatically fix the problem and repair the corrupted file, as needed.
This problem rarely happens, but when it does, it typically fixes itself. Only on rare occasions might you lose the last photo or video you shot as a result of a corrupted file.
The Camera Has Overheated and the Temperature Icon Displays on the Status Screen
When the Temperature icon (which looks like a thermometer) appears on the Status Screen, this indicates that the camera has overheated. All your content is saved to the camera’s memory card, but the camera shuts down automatically.
You then must allow the camera to cool down before you resume normal operation.
Water Spots Have Formed on the Housing
If you allow water drops to dry on the camera’s housing, these can ruin your images if they form on the portion of the housing that surrounds the lens. Especially if you’ve been using the camera in or around salt water, you must rinse off the housing using fresh water as soon as possible, and then gently dry off the housing using a micro fiber cleaning cloth.
If water spots form on the housing, you can wipe these clean using the same micro fiber cleaning cloth. To prevent water spots from forming in the future, consider applying a small amount of Rain-X to the outside of the camera housing, especially around the area that covers the lens. (Do not use Rain-X or any other solution on the actual camera or lens.)
Video Playback Is Choppy on the Computer
When playing video shot with your GoPro camera on your computer screen, if the video is choppy, this is probably an issue with your computer, not with the video file. Make sure the video player you use supports H.264 codec video files and that the computer meets or exceeds GoPro’s minimum hardware specifications. This becomes more of an issue when attempting to play back video recorded at high resolutions and frame rates.
To review the minimum hardware requirements for your computer to playback 4K resolution video, for example, visit GoPro’s website (http://gopro.com/support/articles/minimum-system-requirements-for-4k-editing-and-playback).
If you have trouble playing back video shot at other resolutions, visit this page of GoPro’s website (http://gopro.com/support/articles/how-to-correct-choppy-broken-up-playback) to discover minimum system requirements for your PC or Mac.
Video Doesn’t Play Back Properly Using the GoPro App
Due to the resolution of your smartphone or tablet’s screen, it cannot display extremely high resolution photos or video. For example, if you set the camera to record at 4K or 4K Superview resolution, the GoPro App cannot serve as a viewfinder, nor can you play back the video on your mobile device’s screen.
In these situations, the video file is fine. You just need to view it on a compatible computer monitor or HD television set. Visit the following web page of GoPro’s website (http://gopro.com/support/articles/gopro-app-supported-resolutions-for-playback-and-copy) to learn what file formats and resolutions are supported by the GoPro App and which ones are not.
The Camera Is Off, but the Blue Status Lights Are Flashing
A flashing blue Status Light on the camera means that the Wireless feature is turned on and active. This light continues to flash even when the camera is turned off. When Wireless mode is active, you can remotely turn on or off the camera via the Smart Remote or GoPro App.
To turn off Wireless mode, press and hold the Settings/Tag button (Hero4) or Wi-Fi button (other GoPro camera models) for approximately two seconds. When the blue Status Light stops flashing, the Wireless mode is turned off.
The Menus on Your Camera Are Different from This Book
Throughout this book photos are showcased that depict the various Hero3+ or Hero4 camera menus and screens. If, as you follow the steps described within this book, some menu screens look slightly different, this is because you’re either using a different GoPro camera model that does not offer the feature or function described, or the version of the Camera Software running on your camera is different from the version used in the book’s examples.
To ensure that your camera operates correctly, and it offers you all its available features and functions while shooting, be sure you have the most current version of the camera software (its operating system) installed.
Refer to the “Updating Your Camera’s Operating System” section of Chapter 2, “Getting Started with Your GoPro Camera,” for more directions on how to update the camera software.
The Computer Doesn’t Recognize Your Connected Camera
The most common reasons why your camera is not recognized by your computer when you connect the two devices via the supplied USB cable include
• The USB cable is not properly connected to the mini-USB port of the camera and the USB port of the computer. Try removing and reconnecting the cable.
• The cable or its connectors have somehow been damaged, resulting in a faulty cable. Try using a different USB cable.
• The camera needs to be powered on and its Wireless feature needs to be turned on as well for the camera to be recognized by the computer. (The computer also needs to be turned on.)
• There is a compatibility or technical problem with the microSD memory card installed within the camera. Refer to the section “What to Do When the SD ERR Message Appears” earlier in this chapter.
The Camera Is Physically Damaged
When it’s properly encased within an appropriate housing, the GoPro camera is well protected against water, dirt, dust, physical abuse, and extreme temperatures. However, if you decide to use the camera without encasing it within a proper housing, or you’ve been using the Frame Housing (which offers minimal protection), the camera can easily be damaged if it’s dropped, exposed to water, or exposed to extreme temperatures. The camera’s lens can also easily be scratched if not properly protected.
Should you happen to damage your camera as a result of misuse, this is not covered by GoPro’s one-year warranty. Thus, you need to pay to repair any damage.
Before sending your camera to GoPro for repair, you must first contact the company’s Customer Service Department. Within the United States, call (888) 600-4659, or visit https://gopro.com/contact-us.
Be sure to request a Return Merchandise Authorization (RMA) number. Then, fully complete the RMA Form that the GoPro Customer Service agent provides, and include it within the package when sending in your camera for repair. Also, write the supplied RMA number on the outside of the shipping package.
After an RMA number has been issued, if you’re within the United States, the camera can be sent to: GoPro Warranty Service, 2111 Eastridge Avenue, Riverside, CA 92507. You can find additional information online at http://gopro.com/support/articles/warranty-information.
Overcoming Common Shooting Problems
Beyond what could go wrong technically with your GoPro camera, you can make a variety of mistakes as a photographer or videographer that result in poor-quality photos or videos. This section can help you avoid these common mistakes.
Your Photos or Videos Are Overexposed
A variety of reasons could cause images or video to be overexposed, including:
• The camera’s settings are incorrect. For example, you have Auto Low Light, Spot Meter, or Night mode turned on when you shoot in daylight or a brightly lit area.
• The Protune feature is turned on, and one or more Protune options are incorrectly set based on your shooting situation and the available light.
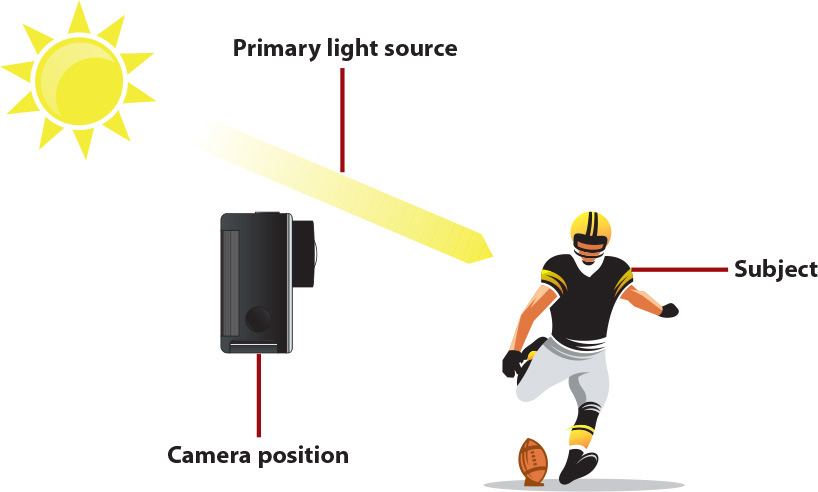
• Your primary light source is positioned in front of the camera, not behind the camera. Thus, the camera’s lens is exposed to too much direct light. Try changing your shooting angle and positioning your primary light source (such as the sun), behind you, the photographer/videographer, and the camera.
Video Playback Is Too Shaky
Even though the GoPro cameras are designed to shoot high-action activities, if while shooting the camera is shaken too much or is mounted on something that’s continuously vibrating, this excessive movement can make your video footage difficult to watch.
Especially if you shoot in low-light areas, excessive camera shaking or movement can result in blurry images or video. The easiest fix is to securely attach the camera (within a housing) to a mount, and make sure the mount is attached to something stable.
When attaching the camera to yourself, the Head Strap/QuickClip mount enables you to mount the camera directly on your head or on a cap. However, your head will probably move around a lot more than your torso when you’re engaged in an activity. This can result in additional jerky or quick motions, in addition to the motion your whole body is experiencing as a result of the activity you engage in.
Instead of using the Head Strap/Quick Clip mount in these situations, to cut down on excessive shaking or motion, consider mounting the camera on your chest, using the Chesty Mount or the captureP.O.V. mount from Peak Design. (Refer to Chapter 4, “Overview of GoPro Camera Mounts,” for more information about camera mount options.)
Whenever possible, mount your camera on something stable that does not offer a continuous shake or vibration. Instead of holding the camera in your hands while filming, consider mounting the camera on a handheld grip or use Tiffen’s Steadicam Curve (www.tiffen.com/steadicamcurve) to help compensate for excessive camera movement and shaking.
The Camera Mount You’re Using Won’t Maintain Its Position
The purpose of using a mount with your GoPro camera and a housing is to allow you to attach the camera to something at a specific angle or position. If due to excessive movement or activity, the mount isn’t keeping the camera locked at the exact angle you want, try tightening the mount using GoPro’s optional accessory, called The Tool Thumb Screw Wrench + Bottle Opener. It’s available from GoPro’s website ($4.99) and is listed under Accessories.
Use this tool to tighten the Thumb Screw onto the Quick Release Buckle that’s associated with your selected mount so that the Thumb Screw is extra tight. This prevents unwanted vertical movement of the mounted camera.
Keep in mind that some mounts come with different size Thumb Screws—so make sure you’re using the one that was supplied with the mount, and you don’t mix and match them with various mounts. If a Thumb Screw is slightly too short, for example, it won’t hold the camera tightly in place.
Low Light Photos or Video Are Blurry or Under Exposed
As with any camera, when you shoot in low light, any movement of the camera could result in a blurry image. There are several ways to compensate for this using a GoPro camera.
• Instead of holding the camera, mount it onto a tripod or something stable.
• Add more light to your shooting area so that the light shines evenly onto your intended subject.
• When shooting photos turn on the Night shooting mode.
• When shooting video turn on the Auto Low Light feature.
• Consider turning on the Protune feature and manually adjusting the ISO Limit and EV Comp (Exposure Compensation) settings.
Photos or Videos Have Excessive Fishesye
The fisheye effect is a byproduct of your camera’s ultra wide angle lens. You can minimize or get ride of this effect while shooting in several ways, as well as during the photo or video editing process.
While shooting, instead of choosing the Wide Field of View (or Superview), switch to a Medium or Narrow Field of View. When shooting video, using a Narrow FOV results in the least amount of fisheye. You can also try moving farther away from your subject.

Narrow FOV Is Offered Only When Shooting Video
When shooting photos, you can typically choose between Medium or Wide FOV based on which resolution the camera is set at. When shooting video, Narrow, Medium, or Wide FOV options are available with some resolution options.
During the photo editing process, use an optional app, such as GoFix or Lens Corrector for GoPro, on your mobile device, or use a fisheye effect removal tool built in to some photo editing software applications for PCs and Macs to reduce or remove this effect.
The Colors in Photos or Video Aren’t as Vibrant as They Should Be
This is typically a result of too much light shining directly into the camera’s lens. Again, reposition the camera so that your primary light source is behind the camera and shines evenly onto your subject.
Dull colors can also be caused by incorrect camera settings. For example, if your camera is positioned in a dimly lit area, but you shoot something in the distance that’s well lit, be sure to turn on the Spot Meter feature. This can make the colors within the well-lit area appear vibrant.
You can also turn on the Protune feature and then adjust the White Balance and Sharpness options based on your shooting situation.
The Memory Card Fills Up Too Fast When I’m Shooting
How much storage space each digital photo or your HD video takes up is directly related to your shooting resolution. In addition, when shooting video, your Frames Per Second Rate also impacts the file size associated with video, as do any Protune features you manually adjust.
The easiest way to reduce file sizes is to reduce your shooting resolution. This does, however, impact the quality of your photos or videos. Depending on how you plan to showcase your content, the difference between shooting video at 1080p and 2.7K, for example, may not be significant to your project.
Recover Deleted Photos or Video
When you delete a file from your camera’s memory card or prior to reformatting the memory card and erasing its content, you’ll always be prompted to confirm your decision. After you confirm that decision and the content is deleted from the memory card, however, there’s no “undo” command.
Before you save anything else to the memory card or somehow alter its contents, if you need to recover accidentally deleted content, immediately turn off the camera and remove the memory card. Then, insert the memory card into an optional memory card reader that’s attached to your computer, and try running data recovery software to retrieve the accidentally deleted content.
Where to Find Data Recovery Software
Refer to the section earlier in this chapter, “What to Do When the SD ERR Message Appears,” for a few data recovery software options for PCs and Macs.
Prior to deleting any content from your camera’s memory card, always first transfer the content to your mobile device or computer. Then, when you know a copy of the content is saved, it’s safe to delete it from the memory card.
The Memory Card Is Full, but I Want to Keep Shooting
This is where preparation is essential. Always carry with you an extra memory card for your camera. Then, when you fill up one card, you can switch it out and immediately continue shooting without having to delete content while on-the-go.
Alternatively, you can transfer content from the camera’s memory card to your mobile device or notebook computer, and then delete the memory card while you’re out shooting. As an absolute last resort, you can delete files from the camera’s memory card without first transferring them elsewhere, but that content will be lost forever.
Improve Poor Audio Quality
The microphone that’s built in to your GoPro camera is sensitive and can pick up and record good-quality audio that’s in the vicinity while you shoot video. However, if the camera is fully encased within the Standard or Dive Housing (with a Standard Backdoor), the audio will be muffled by the housing.
Depending on your shooting situation, consider using a Skeleton Backdoor with the Standard Housing, or using the Skeleton Housing or Frame Housing.
The Skeleton Backdoor or Skeleton Housing enables more sound to reach the camera’s built-in microphone because the camera is no longer fully encased and sealed within a housing. Using the Frame Housing allows the microphone to be completely exposed, allowing you to capture even better quality sound.
Refer to Chapter 11, “Capturing Sound and Using Artificial Light While Shooting Video,” for tips on how to achieve higher-quality sound based on the housing you use and whether you connect an external microphone to the camera.
Avoid Recording Sounds from Your Hand Movements
When using the Frame Housing or no housing, if you hold the camera in your hands while shooting video, sounds associated with your fingers and palms touching the camera and rubbing against it will be recorded. Consider using the Frame Housing and attaching it to a handheld grip so that your hands remain clear of the camera.
Wind Noise Is Ruining the Audio
If your camera will be in motion while you film video, using the Frame or Skeleton Housing allows too much air to directly hit the microphone, which can result in unwanted wind noise. To compensate for this, use a Standard Housing with a Skeleton Backdoor.
Another option is to use an external microphone designed for the type of audio recording that you’ll be doing, and then attach a foam windscreen to the microphone.
Seeking Out Creative Inspiration
When taking pictures or shooting video with your GoPro camera, the housing, mount, and accessories you use directly impact the type of shots you can capture. Depending on what activity you shoot, chances are many other GoPro users have encountered the same challenges and obstacles you’re about to face.
One way to easily determine the best GoPro equipment to use for a particular shooting situation is to visit the GoPro website, click the Products option at the top of the page, and then select the Shop by Activity option.
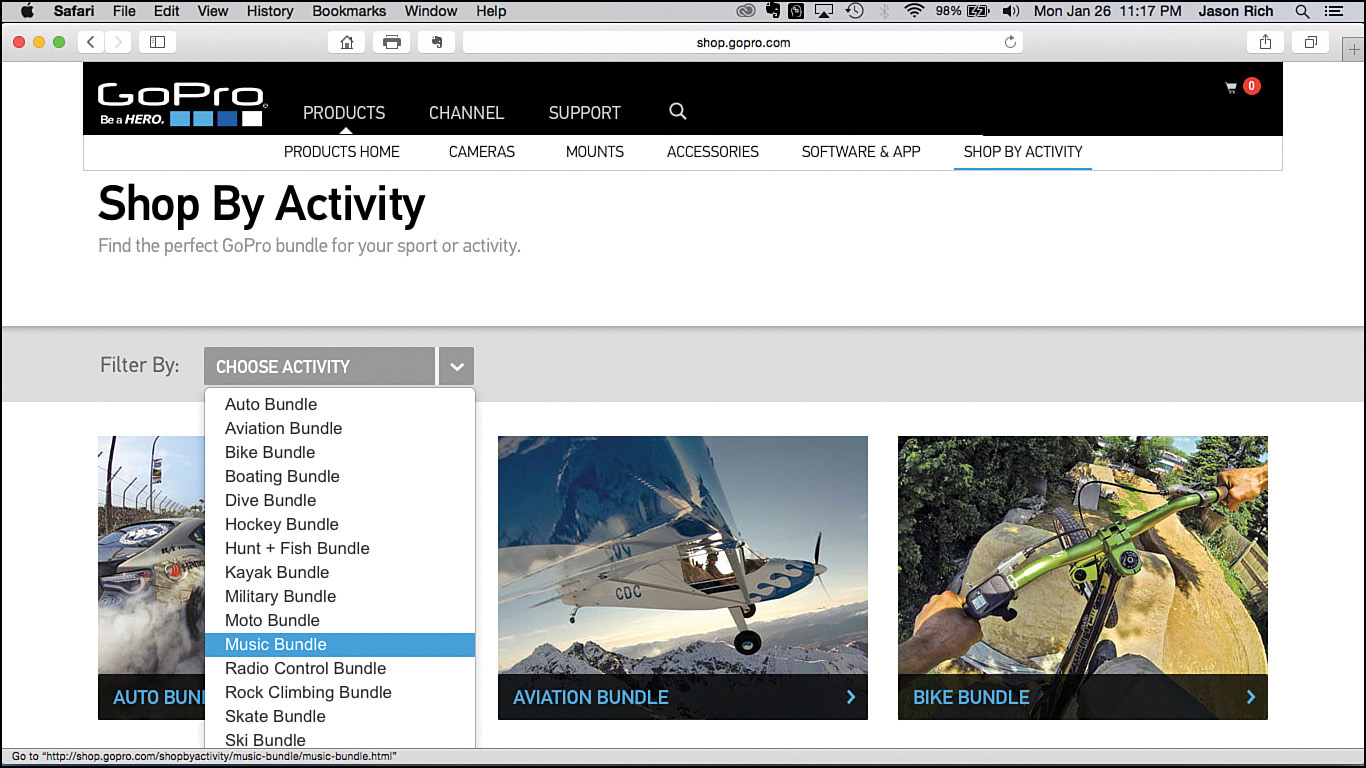
From the Shop by Activity web page, click the activity you want to shoot, and then use the recommended equipment. There are also thousands of free tutorial videos available on YouTube that demonstrate how to use the GoPro camera in specific shooting situations.
In addition, seeing what other GoPro users have accomplished, by looking at their photos and videos, can provide creative inspiration and technical insight.
The GoPro Channel, available from the GoPro website, as well as the GoPro App, enables you to watch videos produced and shared by the global GoPro community. You also can find additional videos on YouTube and on the various GoPro pages on Facebook.
If you want to capture awesome video of yourself snowboarding, biking, skiing, surfing, or off-roading, watch similar videos produced by others, and pay attention to their shooting approach. This can help you determine what camera angles and perspectives work best. You can then apply this knowledge and creative insight while you film with your own camera.