
6. Crop Farming
In This Chapter
![]() Become self-sufficient with your first crops and optimize your farm.
Become self-sufficient with your first crops and optimize your farm.
![]() Learn the secrets of hydration; it doesn’t take much to do a lot.
Learn the secrets of hydration; it doesn’t take much to do a lot.
![]() Harvest your farm with one click of a button.
Harvest your farm with one click of a button.
![]() Build a fully automated water harvester.
Build a fully automated water harvester.
Farming is fun. There, I said it. I’m not talking about turning your Minecraft character into Farmer Joe and chomping on a stalk of wheat while slopping out a pigsty. I mean farming the Minecraft way.
Farming in Minecraft refers to any system that creates renewable resources. This concept goes well beyond a simple wheat field. It includes growing a host of different crops that all have specific purposes and creating fully automated hands-off harvesting systems. This chapter takes you through the elements of a crop farm and how to transform harvesting from a multi-click chore to one push of a button or twitch of a lever.
Choosing a Crop
Given that you can farm just about anything, you might be wondering where to start. Let’s talk about the basics first because you can easily branch out from there.
Wheat is the most useful crop to farm initially as three wheat sheaves crafted into bread forms a useful food staple, and wheat is also used for breeding cows, sheep, and mooshrooms, as well as for taming horses. It’s also easy to get started for two reasons:
![]() You can find the seeds just about anywhere by knocking down tall grass. Besides planting wheat fields, you can also use seeds to breed chickens.
You can find the seeds just about anywhere by knocking down tall grass. Besides planting wheat fields, you can also use seeds to breed chickens.
![]() Wheat will grow quite happily without water, although it does grow faster with hydration available.
Wheat will grow quite happily without water, although it does grow faster with hydration available.
First find your seeds. You don’t need many. When harvested, all growable crops drop up to three times as many seeds as they take to plant. This means you can start with a small stock and quickly expand your plantation as the plants mature. Just harvest, replant, and repeat until the crop reaches your target size. Under optimal conditions, the crop will reach maturity in two to three day/night cycles.
Before you get started, here are some tips to keep in mind:
![]() All crops except cocoa beans grow faster when planted near water.
All crops except cocoa beans grow faster when planted near water.
![]() All crops except cocoa and sugar cane need their soil prepared with a hoe, to convert dirt or grass blocks into farmland blocks.
All crops except cocoa and sugar cane need their soil prepared with a hoe, to convert dirt or grass blocks into farmland blocks.
Caution: Watch Your Step
Walking on farmland soil blocks can cause them to revert to ordinary soil, unless you’re sneaky. Planting a raised bed makes harvesting easier because you don’t need to worry about stepping on the soil and can therefore run down the aisle, quickly lopping off the produce.
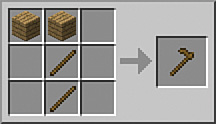
![]() The hoe is your mainstay farming tool, so we should quickly review its crafting recipe. Essentially, a hoe is simply two sticks combined with two wood planks (any variety), cobblestone, iron ingot, gold ingot, or diamond.
The hoe is your mainstay farming tool, so we should quickly review its crafting recipe. Essentially, a hoe is simply two sticks combined with two wood planks (any variety), cobblestone, iron ingot, gold ingot, or diamond.
![]() Use a perimeter fence at least one block high—or two of any other type of block—to prevent mobs from overrunning your farm and trampling your carefully grown produce. The fence won’t keep out spiders, but they don’t trample crops.
Use a perimeter fence at least one block high—or two of any other type of block—to prevent mobs from overrunning your farm and trampling your carefully grown produce. The fence won’t keep out spiders, but they don’t trample crops.
![]() All crops grow better in light. Use torches to keep the area well lit at night and to prevent mob spawning.
All crops grow better in light. Use torches to keep the area well lit at night and to prevent mob spawning.
![]() Crops can also be grown underground, as long as you provide plenty of light.
Crops can also be grown underground, as long as you provide plenty of light.
![]() You don’t need an enormous farm to become completely self-sufficient. Figure 6.1 shows an example of a farm with every possible crop planted, as well as pens for chickens, pigs, cows, and sheep. It’s about as close as you’ll get in Minecraft to having your own supermarket.
You don’t need an enormous farm to become completely self-sufficient. Figure 6.1 shows an example of a farm with every possible crop planted, as well as pens for chickens, pigs, cows, and sheep. It’s about as close as you’ll get in Minecraft to having your own supermarket.

FIGURE 6.1 A farm this size provides more than enough produce and has every component required for every Minecraft recipe.
![]() Once a farm is established, it doesn’t require constant tending. Mature crops don’t rot or decay and can be harvested any time you need to top up your pantry.
Once a farm is established, it doesn’t require constant tending. Mature crops don’t rot or decay and can be harvested any time you need to top up your pantry.
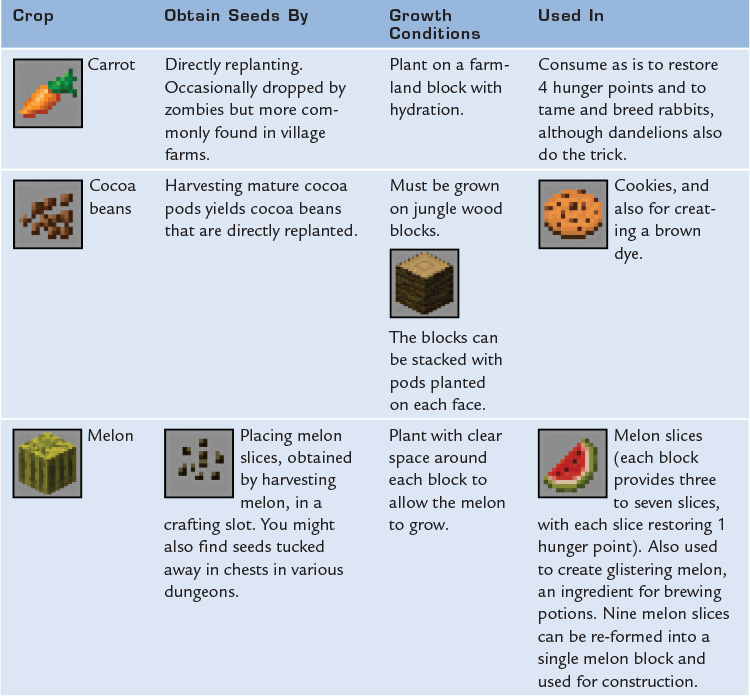
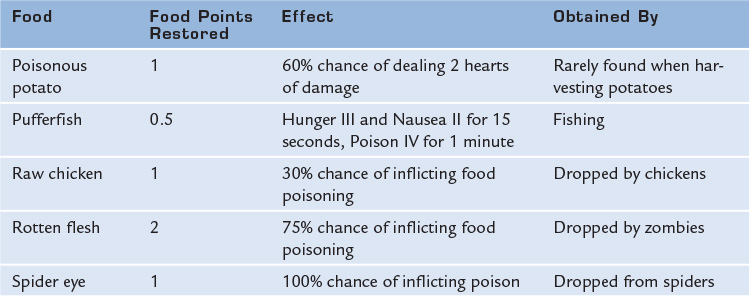
Each Minecraft crop has some unique characteristics. Table 6.1 provides a full rundown of them all. (Minecraft v1.9 has added a beetroot crop, and you’ll find it in village farms. Harvest and replant it the same way as wheat. Beetroot cures hunger, but not health.)

Cooking with Minecraft
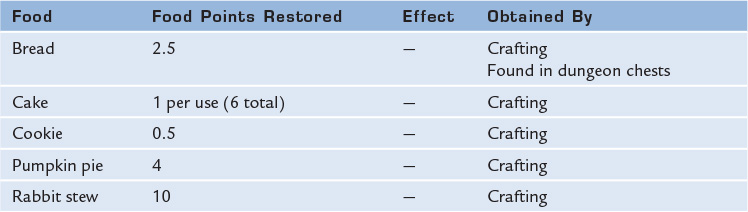
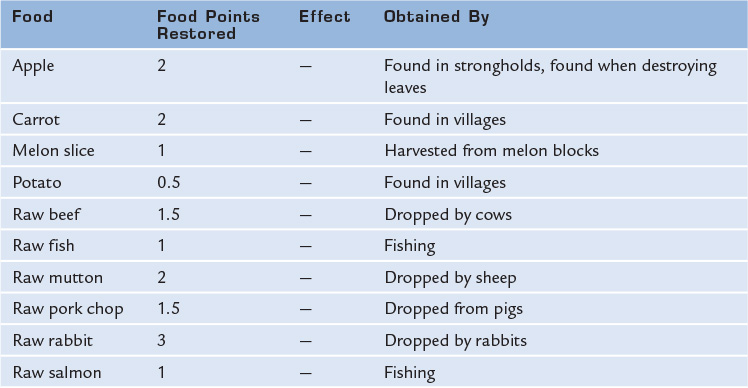
Minecraft provides numerous recipes that deliver varying levels of hunger restoration. Tables 6.2 through 6.6 provide a complete guide that will help you optimize your efforts so you aren’t left on the verge of virtual starvation.


Minecraft Bakery
Who doesn’t love the smell of fresh baked bread? You can cook up your own without an oven, surprisingly, using just the crafting table.
Minecraft BBQ
There’s no need to dial down the heat on your furnace after a bout of smelting. Just pop in the raw meat and you’ll get a juicy and nutritious cooked meal in less than a minute.
Raw Food Diet
Ever considered going raw? There’s a Minecraft equivalent ready for the taking.
Eat at Your Own Risk
Sometimes a bite of something bad can save you from starvation. Use these food items as a last resort.
Establishing a Farm
The first step in building a new farm is choosing a suitable location. You’ll probably want something fairly close to your house, and in a reasonably flat area, although you can also adjust the landscape as required by removing any stray blocks. Figure 6.2 shows the outer edge of the same farm from Figure 6.1. The entire rear quarter of the farm is essentially suspended on a floating platform one block deep.

Caution: Stay Close for Growth
As you may have noticed, Minecraft worlds are enormous. If the game kept the entire lot in memory at once, and kept all the different crops, mobs, and other blocks updating...well, let’s just say you’d need a wicked-fast computer (so tricked out you might find it getting coopted by the Meteorological Bureau to run its weather simulations).
Instead, Minecraft keeps just a small section of the world active in memory at one time—and that’s the part that’s around you to a distance of a few hundred blocks, although this does vary depending on your movement speed and the render distance selected under Video Settings in the Options menu. (In Multiplayer mode, the default setting keeps a swathe of 441 blocks active around each player.)
This chunk updating therefore becomes quite important for farms. You could build a gigantic, fantastic grow-everything farm on a nice flat piece of land, but nothing will grow if you wander too far away because that area will be unloaded from memory, although there are some mods that will keep distant chunks ticking away. Until you install those, keep your friends close and your farms closer.
To begin, mark out an area sufficient to fit your wheat farm. (Don’t worry, we’ll expand it to other foods later.) A single block of water can hydrate a 9×9 square of farmland blocks, if it is positioned in the middle (see Figure 6.3). You end up with 4 blocks of farm space in each direction from the water block, which means you have a total of 80 farmable blocks (remember that the one in the center is occupied by the water). Each block provides 1 bushel, or a total across the plantation of 26 loaves of bread each harvest. That’s a lot of produce—more than you need—so you might consider starting with something a little smaller. A benefit here is that a smaller area is also easier to fence.

In Figure 6.4, I’ve laid out a smaller field of 35 farmland blocks. The lake provides hydration down one side, extending in a total of three rows from the fence bordering the lake. The single water block on the other side hydrates the rest. Placing a path up the middle isn’t strictly necessary because there’s no reason you can’t trample up and down the field during the harvest, working your way in from the edges while holding down the left Shift key to sneak across the fields, but I prefer touches like this for aesthetic reasons. Also, particular blocks will mature earlier than others, and the path ensures access to mature blocks in the middle of the field so you don’t have to walk over planted ground to reach them.

FIGURE 6.4 The seeds that come from harvesting crops allow a plantation of almost any size to quickly multiply. There’s no need to plant every block when you’re starting your first field.
The first harvest in this 35-block farm provides a total of 16 bushels of wheat and 27 seeds. The bushels produce 5 loaves of bread, with 1 bushel left over. The 27 seeds are almost sufficient now to plant the entire field; just 8 blocks are still vacant. They’ll be planted with the seeds from the next harvest, shown in Figure 6.5.

FIGURE 6.5 The wheat field now produces enough seeds to be self-sustaining, allowing the complete field to be planted and leaving plenty left over for bread and other uses.
The steps for creating your own field are quite easy:
1. Find a suitable area, or create your own by flattening the landscape and adding dirt blocks where needed.
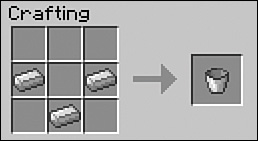
2. If a water source isn’t available nearby, craft a bucket from three iron ingots, place it in a quick access slot, and then fill it from a source. You’ll need to right-click the bucket on a water source block to successfully fill it.
Water source blocks are present anywhere there is water, but water can also flow seven blocks from the source, so you may need to try clicking several times to get to the actual source block. You also need to be playing in Survival mode because buckets don’t fill in Creative mode.
Tip: Creating a Permanent Watering Hole
Give yourself a constant source of water by digging out a 2×2 hole and filling the two diagonally opposite corners with water. The water source becomes self-sustaining, replenishing indefinitely no matter how many times you fill your bucket. This trick does not work for lava.
3. Use a hoe to till any grassy or dirt blocks into farmland.
4. Put up a fence or erect any other barrier two blocks high to keep out mobs. To create a fence that’s three panels, you need a set of two sticks and four planks. While it can be difficult to spot the visual difference between a gate and a fence, especially if you’re making a dash for safety, fences and gates take on the color of the wood from which they are made, so try using one material for fences and another gates. You can also build fences from stone, including mossy blocks for that slightly rundown look.

5. Fences are actually 1.5 blocks high and so can’t be jumped. Add a gate for easy access.

6. Add some torches to the perimeter to ensure that mobs don’t spawn inside the field and also to keep the crops growing through the night.
7. Plant the seeds you collected previously by right-clicking on the tilled blocks.
Give the crop a little time to grow. It can take a few day/night cycles, depending on light conditions, although it might take just two if lighting and hydration are optimal. Wheat bushels are only produced from mature wheat crops that have reached their final stage of growth. When the tops of the crop turn brown, they’re ready.
Tip: Grind Dem Bones
Bone meal, crafted at the table by placing regular old skeleton bones, gives almost every crop a boost. The growth spurt won’t take a crop instantly from seedling to mature plant, but it does push the crop forward one or more stages. Although bone meal can help melon and pumpkin plants grow to maturity, it won’t speed up their crop formation. However, one dose of bone meal on a grass block will encourage tall grass to grow in a 10×10 space. This is a great way to collect all the seeds you need to start a wheat field. A little bit of fertilizer can go a long way.

You can use any tool to harvest the wheat because harvesting does not impact durability. Just left-click each crop block and pick up the results.
Figure 6.5 shows the second crop ready to harvest; it produces 27 bushels and 43 seeds.
It won’t take long until you are producing more than enough wheat and seeds. Keep them handy. You can use wheat to lure and breed cows, sheep, and mooshrooms, and you can use seeds to do the same with chickens. See Chapter 7, “Farming and Taming Mobs,” for more information.
Tip: Tread Lightly to Save Your Crops
Walking across a crop bed can destroy those crops or turn tilled dirt to dust. If you need to get to the other side, tread lightly by holding down the left Shift key as you move so that you sneak over your crops. It will work a lot better than hurtling across in the usual stampede.
Figure 6.6 shows an alternate farm layout with two raised beds to make harvesting easier. You can just run up and down the aisle with the left mouse button held down, quickly collecting the wheat. When planting, do the same with the right mouse button held down. The central water troughs collect any harvested bushels and seeds that fall into them and sweep them to the end of the rows for easier collection, although you’ll need to run around to pick up any strays that didn’t get knocked in. Arranging this system correctly is quite important. Follow these steps:
1. Make two raised beds, each 17 dirt blocks long, leaving a single row in between. I generally make the beds 2 blocks wide.
2. Place 2 blocks on top of each other directly in the middle—that’s 9 blocks from the end—and attach a torch to each side of the top block that faces water. Leave the other sides free so that you can plant crops on the two adjacent farmland blocks. The additional light will help your crops grow. In Figure 6.6, I’ve also placed a jack-o’-lantern on the center block because lanterns throw out a bit more light than torches, and if you squint hard, they look a tiny bit like a scarecrow’s head.

3. Place a water source on either side of this block. Each water source creates a river that runs down the central channel, ending after exactly 8 blocks, directly aligned with the end of each row.
Tip: Leveling Up Your Hydration Skills
Water can hydrate one level down but never up, so always ensure that your water flows either on the same level as your crops or just above them. In both cases, it will still hydrate up to four horizontal blocks away, even with a gap in the middle.
4. Build a nice cobblestone path all the way around, as shown in Figure 6.6, if you like. It’s not necessary but nice to do it. For a more rustic look, you may want to use pressed dirt, introduced in Minecraft v1.9.
5. Fence the area any way that works for you and hoe and plant the blocks. You’ll find it easiest to work on the inner section of each bed, first running along the edge, holding down your left mouse button to till the blocks and then, with seeds selected, using your right mouse button to quickly plant them.
6. When harvest time comes, use any tool to quickly knock out the wheat and seeds. Most that are flung away from you will wind up in the water and wash down toward each end of the beds. Because the beds are hydrated, you can also run up and down them to pick up any seeds or wheat left behind without too much worry about reverting the beds to dirt blocks. Dry beds revert much faster than hydrated ones!
7. Knock the mud out of your shoes (just kidding) and go make some bread.

FIGURE 6.6 Raised beds make it easier to plant and harvest, and the central water supply never dries up and conveniently washes harvest crops down to collection points at either end.
Tip: Greenhouse Effect
Want a farm that’s protected from trampling by mobs yet gets all the sun and water it needs? Try building a greenhouse. All you need is sand, which is plentiful, that you smelt into glass blocks in your furnace. Add a door, a path between the crops using whatever is readily available, and water...and your food supply is safe. You can even forgo the door and instead add an underground path.
Automated Farms
Automated farms can save you from a lot of the tedium involved in harvesting crops, even if they don’t help with the planting. There are an essentially endless number of ways to build these, with some variations according to the crop, but each primarily relies on one of three methods:
![]() Pistons cut across the top of the crop, sweeping the harvest into a channel of water that carries it to a convenient central collection point.
Pistons cut across the top of the crop, sweeping the harvest into a channel of water that carries it to a convenient central collection point.
![]() Pistons move the block on which the crop stands, shaking the harvest loose.
Pistons move the block on which the crop stands, shaking the harvest loose.
![]() A torrent of water floods the entire crop, carrying the harvest down to a single location. The water can be controlled using pistons or a water dispenser and, if set up in a farm adjacent to a village, receives the added bonus that villagers will replant the crop for you with a combination of wheat, potatoes, and carrots.
A torrent of water floods the entire crop, carrying the harvest down to a single location. The water can be controlled using pistons or a water dispenser and, if set up in a farm adjacent to a village, receives the added bonus that villagers will replant the crop for you with a combination of wheat, potatoes, and carrots.
Note: Want to Be Moved? Use a Piston
Pistons are one of the most useful features of Minecraft’s redstone system. I show you how to use them here for farming, but you’ll also find a lot more detail on these and all the other juicy redstone equipment in Chapter 9, “Redstone, Rails, and More.”
Figure 6.7 shows a piston farm that uses the first two methods mentioned earlier: using a piston to cut the top of the crop and shaking the farmland itself to break loose the harvest.
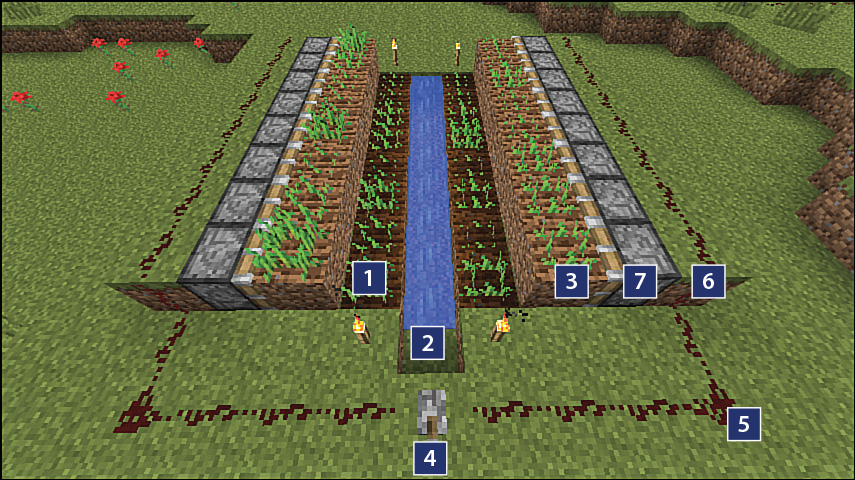
FIGURE 6.7 This wheat farm uses two types of piston farming to automate the harvest.
1. A row of standard farmland block, hydrated by the water flowing from a water source block positioned up the far end of the central channel
2. Collection point for the harvest
3. The raised row of farmland blocks
4. Lever that provides an on/off switch and power to the pistons
5. Redstone dust placed on the ground to deliver power to the pistons
6. Pistons placed on their side that are powered by a raised block behind them that carries the redstone current the rest of the way
7. A row of sticky pistons
The principles used in Figure 6.7 are simple. Pulling the lever with a right-click of the mouse causes the sticky pistons to extend (see Figure 6.8). This pushes the raised farmland across the top of the lower rows, harvesting those crops by scraping them into the central water channel. At the same time, the movement of the raised farmland causes its crops to shake loose. Return the lever to its off position, and the pistons retreat. Because they are sticky, they also pull the attached farmland block back to its original position.

FIGURE 6.8 The happy harvest. It’s a bit messy, but it gets the harvest done more or less instantly.
The only problem with this method is that a lot of the harvest falls outside the collection channel. Also, as you can see from Figure 6.9, once the pistons retract, the entire lower section has to be hoed again, and the upper farmland blocks revert quite quickly because they’re not hydrated. There’s a fairly easy fix, though: Strategically position water blocks at each end of the upper rows, as shown in Figure 6.10.

FIGURE 6.9 After harvesting, a lot of the farmland reverts to dirt or grass blocks. The water harvesting method described here solves this issue.

FIGURE 6.10 The corner water blocks help hydrate the upper farmland rows. In this layout, water in one corner is able to hydrate the nearest raised blocks on the other side because they are still just four blocks away. The gap in the middle is ignored.
Note: Semi- and Fully-Automated Farms
Automated farming doesn’t mean quite the same thing for every crop. Melons, pumpkins, and sugar cane can be farmed in a fully automated manner because the stem of the plant stays behind. With a timer-delayed circuit, you can just set it all up and walk away. It will operate indefinitely. All the other automated farms (those for wheat, carrots, potatoes, and cocoa pods) really only handle the harvesting for you. You’ll still need to replant seeds for the next crop if the farm isn’t adjacent to a village, and you’ll have to break out the hoe to repair any farmland that has reverted to standard grass or dirt block after harvesting.
Building an automated farm can be quite resource intensive. The basic piston used for cutting a crop requires three wood plank blocks, four pieces of cobblestone, an iron ingot, and one redstone. If you’ve mined extensively and knocked out enough wood, you’ll likely have plenty of materials at your disposal, but it may get trickier when you build the sticky piston used for pushing farmland. You build this from a standard piston and a block of slime. If you haven’t come across any slime mobs during your travels, you’ll need to find a way to get to a swamp biome for the slime spawning grounds or head into a cave structure where you may be lucky enough (if fighting a giant blob of slime can be considered such) to find a few oozing their way across the floor.
However, building an automated farm can also be a great way to learn about some of Minecraft’s advanced features. It may all seem a bit confusing at first, but once you have the basic moves down, the rest is really just a repetition of those building blocks. It won’t take you long to start developing some quite amazing layouts. Let’s look at the different methods step by step.
Tip: Getting Creative with Farming
Practice makes perfect, right? Automated constructions can definitely take some time to build and understand. If you’re low on resources but really want to try building the examples shown in this chapter, consider starting a new world in Creative mode and run riot with the unlimited resources. You can then switch back to your current world and continue in “Survivor or Bust!”
If Minecraft automation deeply sparks your interest, you’ll want to check out my book Advanced Strategy Guide to Minecraft (ISBN 9780789755735) as well. In that book, I delve into automation broadly and deeply.
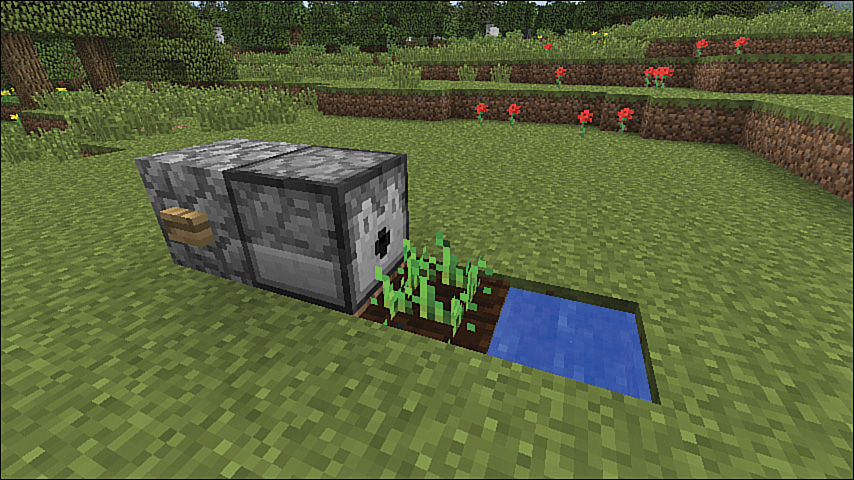
Creating a Piston Harvester
The simplest piston harvester is quite easy to build. Figure 6.11 shows a push-button-operated harvesting piston. Levers and redstone provide a way to connect multiple systems so they all operate together, but let’s take a look at this first design.

FIGURE 6.11 Automated farming can be quite simple, schematically speaking. No need to get up to your ears in an electrical engineering degree. Maybe next chapter....
1. Water hydration and collector
2. Farmland with crop
3. Piston facing the crop
4. Cobblestone block, although almost any block will work
5. A wooden push-button crafted from a wood plank block
Building this is easy, and it’s a great way to get a basic understanding of how all this automated stuff works. Just follow these steps:
1. Dig a hole for your water supply and fill it from a water bucket.
2. Hoe the grass or dirt block to turn it into farmland and plant some seeds.
3. Create a standard piston. Minecraft always places pistons so that the face of the piston points toward you, snapping toward the closest of the six possible degrees of orientation, so place this one by standing on the block next to the water supply, facing the farmland block. Right-click to place the piston on the far side of that block.

4. Place a dirt, wood, cobblestone, or other kind of solid block behind the piston.
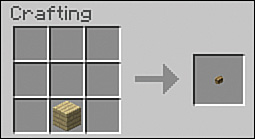
5. Craft a wooden button from wood planks and right-click to place it on the side of the block behind the piston.
Position yourself close to the button and right-click it to operate the piston. The piston powers up, sweeping the crop off its farmland block. The harvest may spring directly into your inventory, depending on how close you are standing, or it might float around waiting for you to collect it. The piston automatically retracts after a brief delay because buttons send just a brief pulse of power.
Well done! That’s all there is to creating a simple piston harvester.
One piston an automated farm does not make, but it’s remarkably easy to extend this design into one that is much more effective. Follow these steps:
1. Replicate the same pattern right next to your first harvester, minus the button on the side of any but the first block.
2.  Run a little trail of redstone dust (right-click on the top of each block with redstone selected in your quick access bar) to create a circuit that links each from the first to the last. Figure 6.12 shows what this ends up looking like.
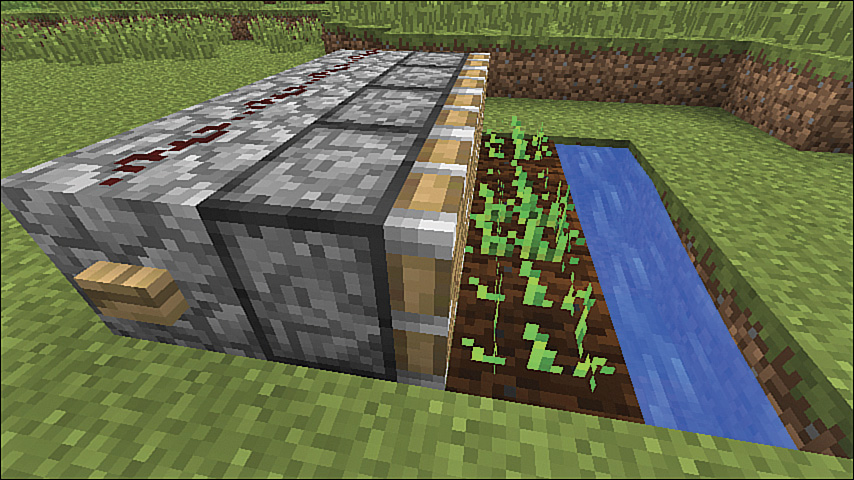
FIGURE 6.12 Set up a row of pistons with a line of redstone dust to create a synchronized one-click harvesting row.
3. Click the button again to push the pistons out in unison.
4. For extra props, create the sticky piston harvester and add an extra block of harvesting to each piston on every click of that button.
Sticky Piston Harvesting
Sticky piston harvesters work on the same principle as the simple piston harvester, but they offer one key advantage: The harvesting power of the piston is doubled because it can also push and pull back a farmland block to shake its harvest loose (see Figure 6.13).


FIGURE 6.13 A sticky piston sticks like glue to the block in front, keeping it attached as the piston moves back and forth. This means using sticky pistons is an easy way to construct sliding doors, windows, and all kinds of other fascinating machines. More on that in Chapter 9.
Start by crafting a sticky piston using a standard piston and a slimeball (the sticky part). Then follow the same routine as for a simple piston harvester but place an additional dirt block directly in front of the piston, hoe it to turn it into farmland, and plant seeds on it and the farmland block in front.
There’s just one problem with using the button system. It’s fine for a single row of crops, but it can’t handle an entire farm’s harvest. What if you wanted to create a system where the entire farm’s harvesting is automated with a single click?
Running redstone along the ground provides a central control panel and a coordinated system across multiple crop rows. It has many benefits and takes only a few more steps.
Just decide on a central point, put the button on a block, and run a redstone trail back to the pistons from either side of that block. Redstone currents run for only 15 blocks. Insert redstone repeaters if the trail is longer.
Creating a Water Harvester
Using water to harvest wheat has a major advantage over using a regular piston harvester: The water washes away the crops but doesn’t revert the farmland to a regular dirt block.
There are two basic methods:
![]() Use a piston to drop water from a raised water source so that it flows out over the farmland.
Use a piston to drop water from a raised water source so that it flows out over the farmland.
![]() Use a dispenser containing a filled water bucket to send out a stream of water.
Use a dispenser containing a filled water bucket to send out a stream of water.
Figure 6.14 shows a farm built using the first method.

FIGURE 6.14 A water-harvested wheat farm; the glass blocks are just for illustrative purposes and can be replaced with dirt, cobblestone, or any other type of block.
1. Hydration source
2. Collection stream
3. Lever set to On because this type of harvesting drops water only when the power goes off
4. Row of pistons in their extended position, holding back the water
5. Redstone repeater required to amplify the power due to the length of the circuit
6. Water source used for harvesting, suspended by the extended pistons
The layout of the piston system is a little difficult to detect in a completed working farm, so Figure 6.15 shows a simplified view. The water source is held in place by the surrounding blocks. In Minecraft’s geometry, the extended piston beneath also prevents it from flowing down. However, as soon as that piston is retracted, the pathway through the block under the water opens, allowing the water to flow out over the crops.
Levers work better than buttons on this type of layout because you want the water to keep flowing until the crop has been washed away. Make one with a block of cobblestone and a stick.

When creating this type of farm, make sure you build up all the surrounding components, including the pistons—powered and therefore extended—before you place the water sources in the upper reservoir. Otherwise, you have to wade through a constant flow of water, fighting the current, as you build the rest of the farm. You also can’t place redstone dust in water, and that can make the wiring somewhat challenging if any water has escaped to places it shouldn’t.
The other method described earlier relies on a dispenser block. Figure 6.16 shows a simplified view that you can easily extrapolate into a complete farm.
The dispenser layout is easier to build than the water-drop used previously but also more resource-intensive because dispensers require redstone, an undamaged bow, cobblestone, and, in this case, a bucket filled with water.

Place the dispenser with its outlet facing the crops. Then right-click the dispenser to open its own inventory window. Place a full water bucket in one of the slots. Your dispenser is locked and loaded!
Tip: More Fun with Dispensers
Dispensers are a lot of fun. You can load them with all kinds of items and then shoot out arrows at mobs, pump out lava or bone meal, or shoot fire and fireballs. They’re great for traps because they can operate with trip wires and pressure plates—a popular feature in jungle temples, where they’re pretty good at transforming anyone in mere moments from intrepid explorer to something more akin to a skewered kebab.
Finally, rather than using a lever, I’ve used a wooden button attached to the side. Just right-click the button to start the flow of water and right-click again to stop it. Connect a number of dispensers in sequence by running redstone dust along the top of each block. That single button still controls them all.
Harvesting Other Crops
Sugar cane, pumpkin, melons, and cocoa pods all work best using a slightly different and nondestructive method of farming.
Harvest sugar cane using a standard piston raised above ground level (see Figure 6.17). This piston is operated from a lever made from cobblestone and a stick.
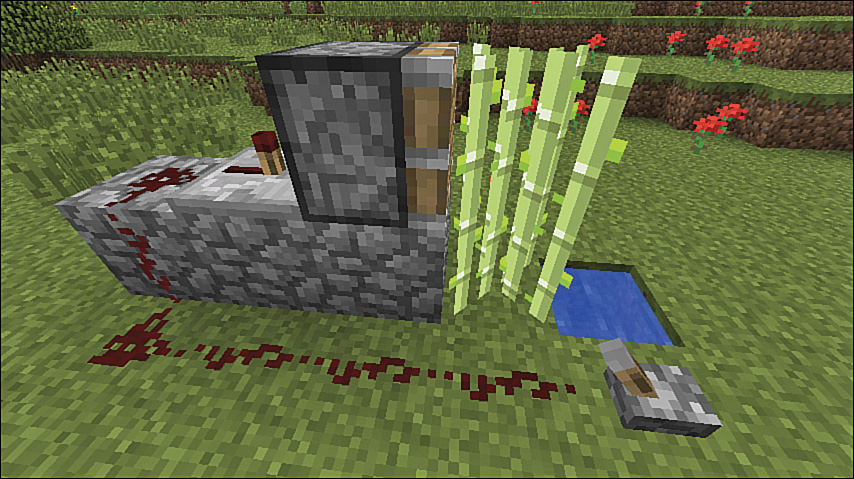
The piston shears off the sugar cane, leaving the original stalk still planted so that it can grow again.
Harvest any other crop by placing pistons beside the main stem’s growth blocks. As with sugar cane, the piston shears off the crop, leaving the original plant untouched.
Tip: Underground Farming
If you prefer to spend most of your time building a mine, try creating an underground farm. The principles are the same as for an aboveground farm. The only real difference is that you need to hollow out a large enough space, as shown in Figure 6.18, and place plenty of torches to keep things well lit and to prevent mobs from spawning. Underground farms have the advantage that they can be properly secured from hostile mobs so that you can tend the crops day or night without fear of being sniped by a skeleton over the fence or straying too close to a lurking creeper.

FIGURE 6.18 Underground farms can keep you thoroughly supplied. This one is next to my massive mine down at layer 11.
The Bottom Line
Crop farming is an important part of Minecraft because the results play a huge role in crafting, brewing potions, and satisfying hunger. A full hunger bar restores health, so you absolutely shouldn’t contemplate venturing out for extended periods without also carrying a good supply of food—and maybe even some potions for a faster fix.
Start farming with very simple layouts, choosing the crops according to whatever you can gather from nearby biomes. If there’s no tall grass for wheat seeds, look for a nearby village and pinch some potatoes and carrots while you’re there. Avoid food poisoning by baking your potatoes in a furnace before consuming them—unless you are in desperate straits. Only poisonous potatoes are dangerous, and you can usually tell the difference, but why take the chance? Melons also provide a steady source of nutrition, although they satisfy only 1.2 hunger points per slice. Cocoa beans, pumpkins, and sugar cane all require at least wheat to become food grade, so it’s best not to start with them.
Of course, cows, pigs, rabbits, and chickens are all good sources of food, and there is one other natural harvest worth mentioning: fungi. Find some small red and brown mushrooms or break up a couple of the giant ones that pepper the landscape, and you can make a hearty mushroom stew that also provides a huge 7.2 points of saturation. First create a wooden bowl from three wood plank blocks (bonus: you’ll get four bowls from this) and then arrange the mushrooms and bowl on the crafting table. Yum!
