
4. Using Collections for Organization

In the previous chapters I’ve made a big deal about the fact that your photos only ever exist in folders on your hard drive and that those folders form the first level of your organizational system for your photos. Now, let’s take a look at a second level of organization. One significant advantage of using a catalog to manage the data about your photos is that you can use collections (think of them as virtual folders) as a tool for helping you further organize and gain easy access to your photos.
The Case for Collections
Before database-driven programs like Lightroom, you were limited to using folders to group and organize your photos. For instance, you could create a new folder for each shoot and put all the photos from that shoot into it. However, what if you wanted to do a project using your photos? For example, what if you wanted to create a photo album for a family member to give as a gift? .
You might start by creating a new folder for the album, and then you might place a copy of each photo you wanted to include in the album into that folder. Pretty simple and straightforward, right? The downside to this approach is that you’re most likely going to create duplicates of all the album photos on your drive, which takes up more disk space. Suppose you wanted to create an album for every holiday or every vacation, or perhaps a “best of” album of your favorite photos. Over time you would end up dedicating more and more disk space to duplicates of your photos in these new album folders. Now imagine that you decide you want to go back and reprocess some album photo using a new technique you learned; you’ve got to reprocess the original and then update all of those folders with duplicates of the new version too. What a headache!.
Because Lightroom uses a catalog to manage your photos, you can instead create collections, which are like “virtual folders,” for each photo album and avoid wasting disk space on duplicates. Lightroom uses the power of the catalog to simply reference the source photo in its original folder but have it appear in a collection’s virtual folder.
The Collections panel (Figure 4.1) gives you the power to create an infinite number of collections (or virtual folders or photo albums, if that’s easier to visualize) based on whatever needs you may have for gathering a bunch of photos together. Because it uses the catalog to reference the original source photo each time, you are not creating any duplicates of your photos, and you have the power to place any individual photo in as many collections as your heart desires. That is a really useful and powerful feature. But wait, there’s more! Because the collection references the original source photo, any time you make a change to that source photo (no matter whether you are viewing it in a collection or its home folder), that change instantly appears on that photo in every collection it belongs to as well—because it is all the same photo.

Figure 4.1 The Collections panel gives you the ability to create an infinite number of virtual folders to suit your organizational needs.
The Collections Panel
There are actually three types of collections you can use inside Lightroom: .
![]() Regular collections are useful for manually grouping photos together based on a common theme or purpose
Regular collections are useful for manually grouping photos together based on a common theme or purpose
![]() Collection sets are essentially containers for other collections and enable you to create an organizing structure for your various collections
Collection sets are essentially containers for other collections and enable you to create an organizing structure for your various collections
![]() Smart collections are basically saved searches that automatically gather photos together based on criteria you choose
Smart collections are basically saved searches that automatically gather photos together based on criteria you choose
You can click the plus sign (+) in the header of the Collections panel to access the menu command for creating each type of collection (Figure 4.2).

Which type of collection you use depends on its role in your organization and on how you like to work. For example, you might have a collection set named for a trip or event, and then within that set you could have a combination of regular collections and smart collections that contain relevant photos grouped together based on any criteria that suit your needs, such as dates, names of people, locations, and so on.
I typically use regular collections when I am choosing specific photos that I want to manually group together for some reason, but I use smart collections when I want to automatically gather up a group of photos that all meet the same criteria. For example, I might create a regular collection to hand-pick a small group of photos I want to print as photo cards for birthday presents or create a smart collection to automate the gathering up of all photos taken in a given year that have at least four stars and have been processed in the Develop module. I organize those various collections inside relevant collection sets.
Collection use is entirely optional inside Lightroom, but collections do provide one major advantage over folders: You can get at them in more places. The Collections panel appears inside all modules, whereas the Folders panel exists only in the Library module. You can create collections based on your needs and then have easy access to them when processing in the Develop module or preparing different forms of output with the Print, Web, Slideshow, and Book modules.
Beyond increasing accessibility inside Lightroom, collections are also the means by which you can sync photos between your catalog and Lightroom Mobile. I’ve dedicated Chapter 10 to Lightroom Mobile integration, so I won’t dive too deep now, but suffice it to say that the only way to get your photos from your desktop catalog to the Lightroom Mobile app is through your regular collections.
The Catalog Panel
There is one other place where you can find a special set of collections: the Catalog panel (Figure 4.3) This panel is intended to provide you with a series of shortcuts to certain groupings of photos that Lightroom creates based on your activity within the program. For example, the All Photographs choice at the top of the panel gives you a one-click way to call up every photo (and video) that has been imported into Lightroom. Aside from providing you with an at-a-glance tally of how many photos are in your catalog, All Photographs is useful when you want to perform a search or filter of your entire library. The Quick Collection choice is just that: a quick way for you to put some group of photos aside for easy access later on (we’ll cover this in more detail later). The Previous Import choice (it’s called Current when an import is in progress) is intended to give you a way to see the last batch of photos to pass through the import process.

Figure 4.3 The Catalog panel gives you access to special collections such as All Photographs, Quick Collection, and Previous Import.
The panel shown in Figure 4.3 is for a new (and empty) catalog to show the three default collections you’ll find in your catalog, but as you do more things in your catalog you may start to see other collections appear there as well.
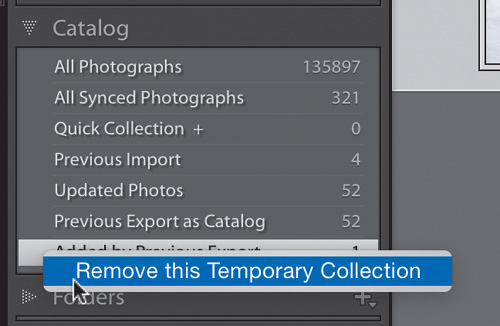
For example, in (Figure 4.4), I have collections named All Synced Photographs, which represents all the photos I have synced with Lightroom Mobile; Updated Photos, which is a collection of photos for which I had Lightroom update metadata; Previous Export as Catalog, which contains photos I exported as their own catalog; and Added by Previous Export, which was created when I exported a single photo and added it to the catalog as part of that process. You may have other collections or just the default collections.

If your Catalog panel is getting cluttered with these extra collections and you no longer need them, you can always right-click one and choose “Remove this Temporary Collection” from the context menu that appears (Figure 4.5).
Now that you have a sense of what collections are and where to find them, let’s dig deeper into how to use them.
Collecting Your Photos
Keeping in mind that the Collections panel is available in all modules (and to a certain extent Lightroom Mobile) can help you determine your approach to how you might use collections. There really is no one right way to use them, and I’ve worked with a lot of photographers and seen all kinds of approaches. All that matters is that, like your folder structure, it has to make sense to you. Let’s go through the mechanics of using each type of collection.
Creating Structure with Collection Sets
Collection sets are the tools you can use to collect your collections. They can hold both regular collections and smart collections, and they can also hold other collection sets. For example, in (Figure 4.6) you can see I have a collection set named Peachpit, and inside of that are collection sets for each book I have written for Peachpit Press as part of the Snapshots to Great Shots series on different camera models (Nikon D600, D750, D3200, and so on). Inside the D600 collection set you can see a regular collection holding the photos used in each chapter of the book, potential cover photos, and so on. Pretty straightforward, yes? .

Note
In Figure 4.6 you can see that all the collection sets have solid disclosure triangles and that the collections have dotted ones. Lightroom uses the same convention for folders and collections, which is that when one contains a sub-level, then it has a solid disclosure triangle, whereas the base level has a dotted disclosure triangle. That way, you have an additional clue as to whether or not there is another level down.
When starting a new project, I like to create a parent collection set by clicking the plus sign at the top of the panel and choosing Create Collection Set from the menu. This opens the Create Collection Set dialog (Figure 4.7), where I can give the collection set a name and even choose to include it within an existing collection set (or not, if it is a top-level collection set). Once I enter a name, I click the Create button to add the set to the panel.
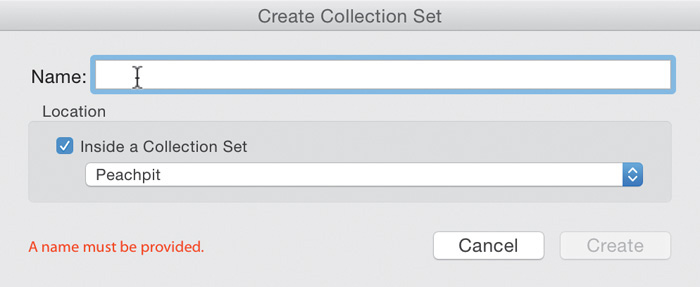
Figure 4.7 The Create Collection Set dialog is where you can create collection sets and assign them to existing collection sets.
Collection sets can also be dragged and dropped into other collection sets if you need to reorganize things or if you just forget to check the box to include a collection set within another.
Grouping Photos with Regular Collections
Once you’ve created a collection set, you may find it easiest to start by creating a regular collection to gather up the photos for that set. I think of regular collections like baskets—you can just drag and drop photos from any folder into them. You can create a regular collection from the same plus sign button at the top of the Collections panel that you used to create the collection set, or you can choose Library > New Collection. The bonus of using the menu bar at the top is that you can also see the keyboard shortcuts associated with various collection-related tasks (Figure 4.8).
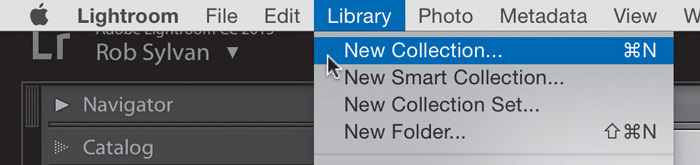
Figure 4.8 The Library menu also contains commands for creating new collections, smart collections, and collection sets (among other things).
Whichever route you take to it, in the Create Collection dialog you can name the collection, add it to a collection set, and configure additional options (Figure 4.9). For example, I created a collection for all the photos from my 2015 trip to Yosemite and added it to my existing Yosemite collection set that contains photos from a previous trip.

In the Options section of the dialog you can:
![]() Include selected photos in the collection you’re creating
Include selected photos in the collection you’re creating
![]() Make new virtual copies (see the sidebar “Virtual Copies”)
Make new virtual copies (see the sidebar “Virtual Copies”)
![]() Set the collection you’re creating as a target collection (more on this in a bit)
Set the collection you’re creating as a target collection (more on this in a bit)
![]() Sync the collection you’re creating with Lightroom Mobile (more on this in Chapter 10)
Sync the collection you’re creating with Lightroom Mobile (more on this in Chapter 10)
If you have the foresight to select all the photos you want to add to the new collection first, then selecting the “Include selected photos” checkbox is a real help.
After you create a new, empty collection, such as mine inside my Yosemite Trip collection set, you can easily add the photos to it. Select them in Grid view, and then drag them into your collection (Figure 4.10).

Regular collections are helpful, but you can, however, make your collections a little smarter. Take a look.
Automating with Smart Collections
Smart collections (think saved searches) enable you to automate the process of finding, grouping, and organizing your photos in meaningful ways by leveraging the information contained in your photo’s metadata, plus any additional data you may have added to the catalog. To help illustrate this saved search functionality further, Lightroom comes preinstalled with a collection set named Smart Collections, which contains six starter smart collections:
![]() Colored Red: Contains all photos in your catalog with the red color label applied.
Colored Red: Contains all photos in your catalog with the red color label applied.
![]() Five Stars: Contains all photos in your catalog with a five-star rating
Five Stars: Contains all photos in your catalog with a five-star rating
![]() Past Month: Contains all photos in your catalog whose capture date is within the last month
Past Month: Contains all photos in your catalog whose capture date is within the last month
![]() Recently Modified: Contains all photos in your catalog whose edit date is within the last two days
Recently Modified: Contains all photos in your catalog whose edit date is within the last two days
![]() Video Files: Contains all video files that have been imported into your catalog
Video Files: Contains all video files that have been imported into your catalog
![]() Without Keywords: Contains all photos within your catalog whose keyword field is empty
Without Keywords: Contains all photos within your catalog whose keyword field is empty
The very simple smart collections in this “starter kit” are intended to give you a sense of how you can use different types of criteria and image metadata to smartly gather up matching photos. You can also remove any or all of them, if you like. Even better, by looking at how these collections are constructed, you can learn a lot about how to create your own. For example, let’s take a look inside the Colored Red collection. Double-click the collection name or its smart collection icon to open the Edit Smart Collection dialog (Figure 4.11).

The Edit Smart Collection dialog features a name field at the top and a list of rules Lightroom uses to create the collection underneath. This collection is based on a single rule being applied to the entire catalog: Label Color is red. Lightroom essentially scans the entire catalog for photos matching that criterion and automatically adds them to the collection. Click Cancel to close the dialog without making any changes. Take a moment to double-click the preinstalled smart collections to view the rules they contain. As you can see, a smart collection is nothing more than a saved search that can be as simple or complex as your needs demand.
To create a new smart collection, you can use the Create Smart Collection menu in the panel header, choose Library > New Smart Collection, or simply right-click anywhere inside the Collections panel to access the same Create Smart Collection menu (yet another way to access all those Create Collection options). The Create Smart Collection dialog is similar to the Edit Smart Collection dialog, but it has the addition of the Location section, which allows you to add this new smart collection to an existing collection set or leave it at the top level of the Collections panel (Figure 4.12). Remember, you can always drag and drop collections into collection sets later.

When it comes to creating the rules for the smart collection, you first need to decide if you want the photos added to this collection to match all, any, or none of your rules. Simply choose the option you prefer from the Match drop-down menu. Leaving match set to “all” is the most straightforward (and default) way to get started (which I’ll use in the example that follows). Choosing the “all” option means that only photos matching every single criterion are added to the collection. Setting Match to “any” means that any photo matching any rule will show. Setting to “none” means only photos that don’t match any of the rules will show. Experimenting with each setting is the best way to get a handle on how they affect the results.
To see all of the possible rules at your disposal, click the rule drop-down menu and scroll through the list. For example, when I am writing books on a specific camera model, I create smart collections that pull together all the photos I’ve taken with that specific camera as the first rule, and then I might add additional rules for specific camera settings, capture dates, ratings, focal length, and so on (Figure 4.13). This automates the process of pulling those photos together in groups that fit my needs for that project.

Figure 4.13 This is a smart collection I use when looking for photos from a specific camera and camera settings.
Create an Example Smart Collection
To help you better understand the power of smart collections, let’s build one that you can use to pull together your best unedited photos from a trip. Imagine you know you will be on a shooting assignment from February 21 to February 24, 2017 (or send yourself on vacation for those dates, if you’d rather). You also know that you will want to pull together all the photos to which you assign a star rating of 4 or higher and that you have not yet worked on in Develop. By collecting them in one place, you can easily find all of your 4-star or higher photos from this trip that still need processing in the Develop module before you export them. To create your collection set and smart collection, follow these steps:
1. Create a new collection set by clicking the plus sign in the Collections panel header and choosing Create Collection Set. Give your set a name, and unless you are putting the set inside another set, leave “Inside a Collection Set” unselected. Click Create.
2. Select the collection set you just created; then click the plus sign again and choose Create Smart Collection to open the Create Smart Collection dialog. Give the smart collection a name.
Starting with the collection set selected expedites the process of adding the new collection to the selected collection set, so that when you select “Inside a Collection Set,” your collection set should be used automatically.
3. Click the drop-down arrow for the first rule, and choose Date > Capture Date. Set the condition to “is in the range,” and enter the start and end dates of the range you want to target. I used 2017–02–21 to 2017–02–24 for this example (Figure 4.14).

Tip
Hold the Alt key (Mac: Option), and the plus signs all change to pound signs. Click a pound sign, and you can add additional advanced conditions to your set of rules for that smart collection.
4. Click the plus sign at the end of the first rule to add a second rule. Rating, the next rule you need, appears by default because it is at the top of the list. Leave Rating and “is greater than or equal to” set, and click the number of stars you want defined for your rule.
Now that you have more than one rule, a minus sign also appears at the end of each rule, which allows you to delete a rule.
5. Click the plus sign at the end of the second rule to add the third. Click the rule drop-down menu, and choose Develop > Has Adjustments. Change the condition to “is false” so that only photos without any Develop settings will be added (Figure 4.15).

6. Click Create.
As soon as you click Create, the dialog closes, Lightroom adds the smart collection to the set, and photos matching the criteria automatically appear in the collection. Because the example trip is in the future, however, don’t be surprised when no photos appear.
Removing Photos from Smart Collections
The only way photos can be removed from a smart collection is when a particular photo no longer matches the defined criteria. So in the example, as soon as any photo gets adjusted in any way, it will no longer match the rules; Lightroom automatically removes it from that smart collection. Similarly, if I change my mind on a photo’s rating and reduce it to three stars, it too would be automatically removed. This is just one of the many ways smart collections can leverage the power of the Lightroom catalog and make your life simpler.
Maintaining Collections Over Time
As you play around with ideas for collections, you will undoubtedly need to move photos between collections, remove photos from collections, remove collections entirely, rename collections, and so on. You can never escape housekeeping chores, and keeping the Collections panel clean will only help you in the long run.
Moving Things Around
Because any photo can be in any number of collections without duplicating the original photo on your drive, it makes sense that you’ll have situations where you have a photo in one collection and decide to add it to another. Smart collections handle this sort of situation automatically; photos appear in a smart collection when they meet all of a smart collection’s criteria, and Lightroom removes them when they no longer meet the criteria. When it comes to regular collections, however, you have to manually add or remove photos from the collections.
Note
Because Lightroom is only referencing the original when you view a collection, the Delete key acts as a “remove from collection” button and does not delete the photo from your drive. If you need to delete an image from your drive, do so when viewing the source folder.
If you are viewing a photo in one regular collection and decide to add it to another, you can simply drag and drop the photo onto the other collection. Remember, however, that doing so does not remove the photo from the original collection; it only adds the photo to the destination collection. If you want to remove the photo from the original collection, you have to select it while viewing that collection and press Delete.
Likewise, you may need to move a collection into a collection set or even move an entire collection set into another collection set. In each case, you select the collection and then drag and drop it into the destination collection set, all within the Collections panel.
Using a Target Collection
Setting a regular collection as the target collection gives it a special keyboard shortcut that enables you to quickly add photos to that collection with a single keystroke. Only regular collections can have this honor, and the original default target collection is the Quick Collection, found in the Catalog panel. Before you delve deeper into how to use a target collection, it can help to understand the role of the Quick Collection.
The purpose of the Quick Collection is to provide a simple way to quickly gather together a group of photos for whatever reason that makes sense to you. Perhaps you need to temporarily round up several photos that are stored across a range of folders for a quick export, or maybe you need to print them to give to a family member or have some other short-term reason that doesn’t quite justify creating a long-term collection for that group of photos.
You can drag and drop photos into the Quick Collection just like a regular collection, but the real benefit of the Quick Collection is its keyboard shortcut (the B key), which enables you to send selected photos to the Quick Collection with a single keystroke. If you prefer, a click of the small round button that appears in the upper-right corner of thumbnails when you move the cursor over the photo does the same thing (Figure 4.16). The button stays visible on photos in the Quick Collection to provide a visual clue to their status.

Figure 4.16 This button allows you to send photos to the target collection, which in this example is the Quick Collection.
You can remove photos from the Quick Collection by selecting them and pressing the Backspace key (Mac: Delete), by pressing the B shortcut, or by clicking that round button.
As you can see, the functionality of the Quick Collection is very useful, and now we come full circle back to another way to use the target collection. You can assign any regular collection to be the target collection (only one target collection can be assigned at a time). When you assign a regular collection as the target collection, the B key and the round button send selected photos to that collection instead of to the Quick Collection. To assign a collection as the target collection, right-click the collection and choose Set as Target Collection from the context menu that appears. The chosen collection will be marked with the same small + icon that was previously showing on the Quick Collection as a visual reminder of its new status (Figure 4.1). Or, when creating a new collection, you’ll see the option “Set as Target Collection” appear in the Create Collection dialog.
One way I love to use the “Set as Target Collection” feature is when I need to sort through large numbers of photos to add them to different collections, such as when I am working on a book project and I need to choose photos for the various chapters. I start by creating a collection set for the book, and then I create a regular collection for each chapter. I’ll assign the chapter I want to work on as the target collection, and then it is easy to go looking through my catalog and quickly add photos to that target collection just by selecting the photo and pressing the B key. It is a simple little feature, but one that saves me a lot of time, and I think you’ll find it just as useful in your workflow.
Renaming and Deleting
For one reason or another you will eventually come upon the need to rename existing collections and collection sets, or even delete them outright. You can delete any collection from the Collections panel by selecting the collection and clicking the minus sign that appears in the panel header (Figure 4.1). Deleting the collection removes it from the panel (but remember that it does not delete the photos from the drive).
My go-to option, however, is the context menu that appears when you right-click. This trick works all over the place inside Lightroom, so when in doubt anywhere, right-click and see what context options appear. For example, suppose your February trip got postponed to April, so now you need to rename your collection set and update your smart collection relating to that trip. All you need to do is right-click the collection set and choose Rename from the context menu (Figure 4.17).

Tip
Collections sort alphanumerically inside the Collections panel, so if you want a collection to appear at the top of the list, you can start its name with a number or non-alphanumeric character, like an underscore, to force it to the top.
Choosing Rename from the menu opens the Rename Collection Set dialog, where you can update the name and click Rename to commit the change. There is a Delete option in that menu too, and that’s the route I usually take when I want to delete a collection.
The right-click trick comes in handy on a photo when you are viewing it in a collection and you want to quickly jump to its source folder for some reason (such as to delete it from disk). Just right-click the photo and choose the “Go to Folder in Library” option to quickly jump to the folder view. Alternatively, you can choose “Go to Collection” from the menu and jump to another collection that the photo belongs to as well (Figure 4.18).

Now that you have a better appreciation for how the information you add to your photos (aka metadata) in Lightroom can begin to help you in your organizational efforts, let’s move on to the next chapter to learn all the ways that info can actually be added.
