
10. Integrating with Lightroom Mobile

Adobe knows that we spend a lot of time on our mobile devices creating content, managing content, and consuming content. In 2014 the company released the first version of Lightroom Mobile, an app designed to extend your Lightroom experience beyond the desktop to your mobile devices. While the first iteration of Lightroom Mobile was available only for the iPad, Adobe has since expanded its support to iPhones and Android devices. Lightroom Mobile has evolved rapidly since its release, and I look forward to seeing how much functionality will be added to our mobile devices in the future. For now, I want to introduce you to what is currently possible so that you can start exploring this app on your own and using it to your advantage.
What Is Lightroom Mobile?
Lightroom Mobile is an app for your iOS or Android device that enables you to extend your desktop Lightroom catalog to your mobile devices through the use of regular collections that you manually create and maintain (Figure 10.1).

Note
You’ll hear references to a “desktop catalog” a lot in the context of Lightroom Mobile, and the term is meant to differentiate what happens in Lightroom on your computer (whether it’s a laptop or desktop computer) from what happens on your mobile devices.
Within the Lightroom Mobile app you can:
![]() View/display photos in the synced collections from your desktop catalog
View/display photos in the synced collections from your desktop catalog
![]() Import photos on your mobile device into the app and have them automatically transferred to your desktop catalog
Import photos on your mobile device into the app and have them automatically transferred to your desktop catalog
![]() Apply star ratings and flags to photos, which sync back to your desktop catalog
Apply star ratings and flags to photos, which sync back to your desktop catalog
![]() Process photos using (a subset of the) Develop module tools and have that work sync back to your desktop catalog
Process photos using (a subset of the) Develop module tools and have that work sync back to your desktop catalog
![]() Export copies of photos to other apps on your mobile device or share photos directly on social media
Export copies of photos to other apps on your mobile device or share photos directly on social media
Understanding an application’s boundaries is equally important when trying to get the most out of it, so let me also clarify what Lightroom Mobile is not intended to do (at the time of this writing anyway). For instance, you cannot tether your camera to your mobile device using Lightroom Mobile. You cannot apply keywords, color labels, captions, or titles to your photos in the app. Most significantly, although Lightroom Mobile is free and you can use its editing capabilities without a Creative Cloud subscription, you do need to be a Creative Cloud subscriber (or using the free trial) in order to sync Lightroom Mobile with your desktop catalog.
With that said, it is important to remember that this is a fluid environment where upgrades and new features are released on a rolling basis. The Lightroom Mobile app we have today is not the Lightroom Mobile that we’ll have a year from now. I expect that by the time you are reading this there may already be new features or upgrades to existing features.
A few key capabilities have been fairly consistent throughout the versions and will remain so. These are also the aspects that will be the most help to you in your efforts to tame your photo library: connecting the mobile app to your desktop catalog, creating the collections that will serve as the conduit between the app and the desktop catalog, and applying ratings and flags to your photos while on the go. Let’s take a closer look at each of these.
Note
The processing of photos using Lightroom Mobile’s editing tools is beyond the scope of this book, but to get up to speed with the latest editing capabilities of Lightroom Mobile, head over to bit.ly/LRmobileEdit.
Syncing Your Desktop Catalog and Mobile Device
Suppose you are a Creative Cloud subscriber and are signed in with your Adobe ID in the desktop version of Lightroom CC. If you want to use Lightroom Mobile, you next need to download the Lightroom Mobile app to your mobile device from the App Store (iOS) or Google Play (Android) and sign in to it using those same Adobe ID credentials. At this point you are ready to start syncing collections in this catalog with Lightroom Mobile.
Lightroom on the Desktop
Note
You can sync only one desktop catalog with Lightroom Mobile at a time.
In your desktop copy of Lightroom (which I’ll call Lightroom Desktop in this chapter), click the app’s identity plate; it acts as the gateway to starting the Lightroom Mobile experience on your desktop (Figure 10.2). Click the Start option to begin.

Note
Only regular collections can by synced at this time, but there is hope that the ability to sync smart collections will come in the future.
Now you’re ready to start choosing what collections you want to sync with Lightroom Mobile. Here’s how:
1. Expand the Collections panel, and find the collection you want to sync.
2. Click the box to the left of the collection name to enable synchronization (Figure 10.3).

Just as the initial importing of photos into your Lightroom catalog requires a bit of patience, you’ll need to call on that patience as Lightroom begins the process of uploading this data into the cloud before it can then download it onto your mobile device. Synchronization is automatic, but it is not instantaneous. You will see collections start to appear in the app (once you are logged in to it), and that is when the mobile part of the process begins.
Lightroom on Mobile
While your data is on its up- and downloading journey, take a look at some important info under the app’s hood. After logging in to the app, notice the Lr logo in the upper-left corner. Give that a tap to access some additional settings, such as Sync Only Over WiFi (enabling this one will help protect your mobile data plan’s monthly allotment), as well as Auto Add Photos and Auto Add Video (the latter is on iOS devices only at the time of this writing). Another helpful tidbit in there is a link to a demo of all the gesture shortcuts available in the app (Figure 10.4). I highly recommend checking out the gesture shortcuts and learning how they work in each view.

Looking to the rest of the app interface (Figure 10.5), you’ll see your collections appear as columns of square thumbnails running down the screen. Above the synced collections is an automatically created collection named Lightroom Photos, which puts all your photos a tap away.

Working with Collections on Your Mobile Device
OK, you’ve started syncing collections from your desktop catalog and installed the app on your mobile device (or even multiple mobile devices if you have them). Now, let’s look at how to create collections on your mobile device and start adding photos to those collections so that they sync back to your desktop.
Adding Photos
The bulk of your photos will come from your desktop catalog, but at times you may want to bring the photos created on your mobile device into the app as well. To create a new collection in the app and import photos from your device’s camera roll, tap the plus sign (+) in the upper-right corner of the app. Alternatively, you can add photos from existing collections. Here’s how to create a new collection and import photos on your device:
1. Tap the plus sign to open the Create Collection dialog, give the collection a name, and tap OK (Figure 10.6).

2. Tap the new collection’s icon to open the collection, and tap Add Photos at the bottom of the screen to choose where you want the photos to come from (Figure 10.7).

Figure 10.7 You can choose to add photos from your camera roll or from the existing pool of synced
photos via Lightroom Photos.
3. Tap Camera Roll, then select individual photos by tapping each thumbnail (Figure 10.8), or tap and hold on any thumbnail to access a pop-up menu that provides the options for selecting all or a range of photos.

Figure 10.8 After selecting the photos you want to add, tap the Add [number] Photos button to complete the process.
4. Tap the Add [number] Photos button at the bottom of the screen to add the selected photos to the collection, which will then be synced back to your desktop catalog automatically. Any photos that have already been added will display the Lr logo in the upper corner.
Speaking of automatic, you can also enable an auto import of your camera roll into any of your collections in the app. First, make sure Enable Auto Add is selected under the app’s preferences; then find the three dots to the right of each collection’s thumbnail (Figure 10.9).

Figure 10.9 Tapping the dots next to any collection reveals a context menu of options for that collection.
Tap the three-dot icon to access the collection’s context menu, which allows for enabling auto import, manually adding new photos from the camera roll, enabling offline editing, renaming and removing the collection, as well as some sharing options. Offline editing is useful for those times when you know you are going off the grid but still want to be able to edit your photos. Once you are back online, those edits will automatically be synced.
Viewing Photos
To view all of the photos in a collection, simply tap the collection’s thumbnail and the display will switch to a grid of all photos in that collection. A single tap of any thumbnail takes you to a Loupe view of that photo (Figure 10.10). From there you can swipe left or right to move through the collection. Tap the left-facing arrow at the top of the screen to return to the Grid view (and one more tap of that arrow returns you to the main screen). You’ll use that Loupe view for accessing the editing tools as well as for applying ratings and flags (more on that later).

Segmented View
One of the ways I use Lightroom Mobile is to manage all the photos I take with my iPhone. I have a special collection just for iPhone photos, which is set to automatically import new photos from my phone’s camera roll, and as a result that collection has photos from many different years. The Segmented view gives me the ability to view the contents of a collection by grouping the photos by date. To access this view, you first need to open a collection and then tap on the name of the collection at the top of the screen to open the menu for filtering the way it is viewed (Figure 10.11).

Here you’ll see the default view option, named Flat, and the other view option, Segmented. When you choose Segmented, the photos are automatically grouped by date (Figure 10.12). You can long-tap any date heading to see a list of alternative date groupings (year, month, day, and hour).

Figure 10.12 Segmented view is useful for quickly changing how your photos are grouped within a collection.
Presentation Mode
Another useful display option is called Presentation mode. There are probably times when you hand off your mobile device to another person to let them scroll through a set of photos. To avoid the inadvertent changing of flags, ratings, or develop adjustments, you might want to consider switching the collection into Presentation mode before handing it over. Start by opening the collection you want to show, tap the Share icon in the upper-right corner, and choose Present at the bottom of the menu (Figure 10.13).

In Presentation mode you can manually scroll left and right through the photos, or tap the Play icon in the upper-right corner to launch an automated slideshow. When your friend hands your phone back, you can exit Presentation mode by tapping the X in the upper-left corner. (If the slideshow is running, just tap the screen once to reveal the application bar to exit.)
Exporting Photos
You can export copies (based on that smart-preview-sized image, unless it was a photo imported from your device, which should be full size) right from the app by tapping the arrow icon in the upper-right corner of the interface and then choosing Share (Figure 10.14).

The app can output directly to any of the core apps you have configured in the device’s settings (such as Mail, Twitter, Facebook, and so on). You can also save the photo back to the camera roll and choose from other options that are device dependent (Figure 10.15).

In addition, Adobe has been developing other mobile editing apps, and one in particular, Photoshop Fix, has a bit of integration with Lightroom Mobile. If you tap the Edit In option, you’ll see the options Liquify in Photoshop Fix and Healing in Photoshop Fix (Figure 10.16), which enable you to access some of the retouching power of Photoshop in a mobile app. To learn more about Photoshop Fix, head over to www.adobe.com/products/fix.html.

Figure 10.16 Photoshop Fix has a level of integration with Lightroom Mobile to bring edited versions back to your catalog.
Lightroom Web
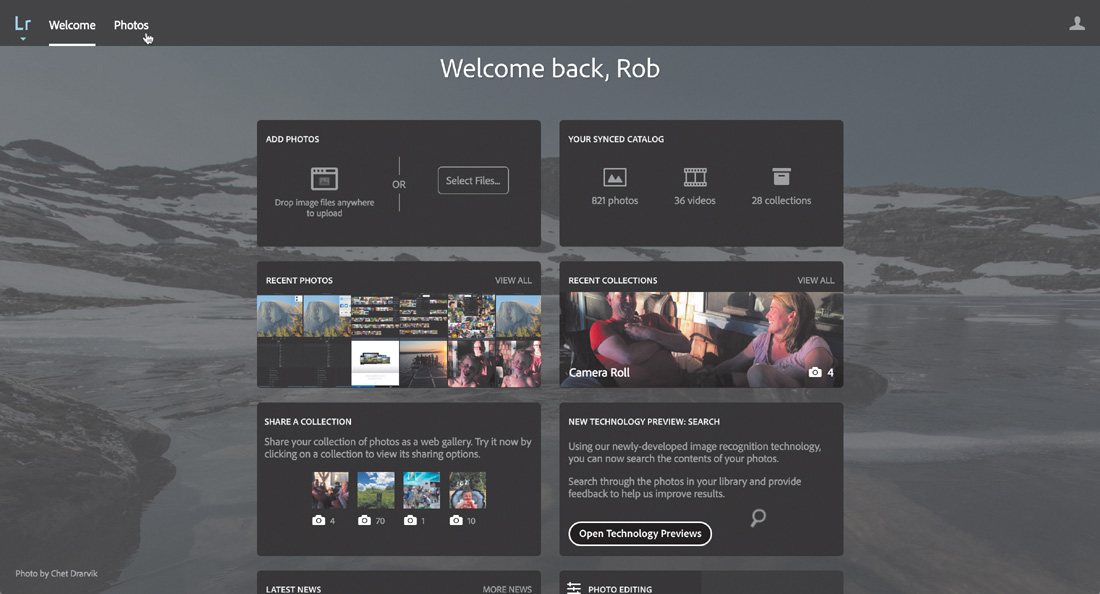
A final way that you can view and share your synced collections on the web is by logging in to Lightroom Web View, at https://lightroom.adobe.com/. Once logged in, you’ll be able to get to your synced collections and add photos through the web, and you’ll have access to news, tutorials, and more (Figure 10.17).
To share a collection, either privately or publicly, click the Photos tab at the top and then click the collection you want to share (Figure 10.18).

Once you click into a collection, you’ll see a Share button along the top (refer to Figure 10.18) that facilitates the process of serving up a link with options that you can share on your social networks or copy to your clipboard (Figure 10.19).

You can also share a collection from within Lightroom Desktop by clicking the Make Public button at the top of the synced collection (Figure 10.20) or from within the mobile app via the Share menu by choosing Share Collection (Figure 10.21). You get those additional options only on Lightroom Web itself, however.


Once you make a collection public, you can send a link to another person for viewing via his or her web browser, which is great. However, if that person logs in with an Adobe ID, he or she then has the ability to leave comments and “like” the photos. Any comments and likes are then synced back to the app and Lightroom Desktop, where you can view them and even reply. Back in Lightroom Desktop, you’ll see that there is a special badge for when comments are left on a photo. You can view and reply to the comments themselves via the Comments panel.
Applying Ratings and Flags on the Go
When it comes to helping you tame your Lightroom library, the main functionality inside Lightroom Mobile you can leverage is the ability to apply flags and star ratings to your photos and have that information automatically sync back to your desktop catalog. How you use this is entirely up to you, but the general philosophy behind Lightroom Mobile is for a more on-the-go, relaxed, kicked-back-on-your-couch type of workflow. So the real-world scenario might look like importing a shoot from a memory card into your desktop catalog, adding those photos to a synced collection, and then later grabbing a tablet or phone and reviewing the photos with your feet up somewhere. All the work you do in Lightroom Mobile is then automatically synced back to your desktop catalog, and you can pick up where you left off with the next step in your process.
Here’s how it works after the photos have synced with your mobile device:
1. Choose the collection on your device; then tap the first photo to enter Loupe view.
2. If you see the Crop, Presets, and Edit options below the photo, tap the three vertical dots at the bottom left to switch to the flag and rating options (Figure 10.22).

3. To apply a flag, simply tap the desired flag state. To apply a star rating, tap the desired star level (Figure 10.23).

A faster way to work is to enable Speed Flagging, Speed Rating, or Speed Review Combined, depending on which attributes you want to apply. To do this, tap and hold on the photo in Loupe view to bring up the context menu (Figure 10.24).
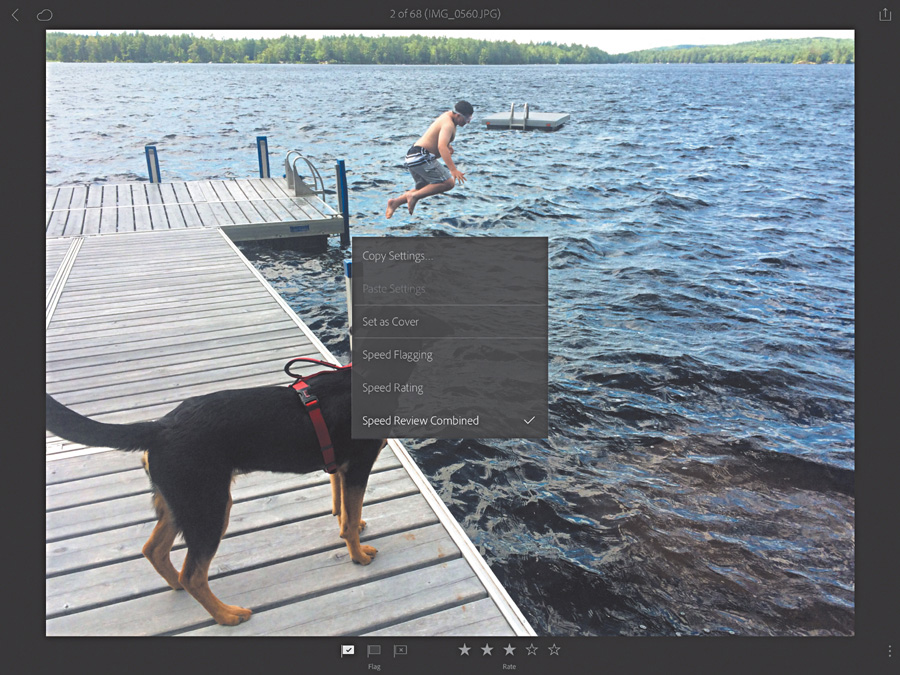
In my case, I enabled Speed Review Combined, which allows me to apply a flag or star rating simply by swiping up and down on the photo. Swipe up or down on the left side of the photo to change the flag state, or do the same on the right side to change the star rating (Figure 10.25).

Figure 10.25 Using Speed Review Combined I changed the flag state and rating by swiping on the photo.
Chapter 5 talked about how powerful Lightroom can be when you start adding metadata (flags, ratings, keywords, and so on) to your photos, and Lightroom Mobile extends that functionality to wherever you are at the time. So whether you are applying flags to a new shoot to determine which photos to keep or delete or applying star ratings to determine which photos you want to prioritize for post-processing, this aspect of Lightroom Mobile is yours to leverage for your own needs.
The mobile editing space is clearly a high priority for Adobe, and I think developers have only begun to scratch the surface of what is possible in this environment. If you are a Creative Cloud subscriber, I highly recommend taking the time to get to know the Lightroom Mobile app.