8. Common Organizational Workflows

I completely understand the impulse to just start doing things before fully learning all there is to know about what you are doing (I am a guy, after all). There is a lot to be learned through experience (even if it is painful). Besides, the whole point of using Lightroom is to get stuff done, right? To that end, this chapter is all about doing things in Lightroom that make use of the panels, features, and tools I’ve covered in other chapters of this book. I’m not going to teach you about the ins and outs of those panels, features, and tools here, but I will refer you to the chapter where you can learn more if you need to dive deeper on any one topic. So, if you just opened the book to this chapter or if you’ve been reading steadily through chapter by chapter (gold star for you), you are covered either way. Let’s get to it.
Importing Photos
The one task everyone has to tackle in Lightroom is importing photos. Chapter 2 took a deep dive into understanding the import process and getting oriented to the Import screen, so please refer to that chapter if you want to learn more. You might also check out the section in Chapter 7 on creating an import preset. If you just want to get to work or try a way to work more efficiently, check out these workflows.
Adding Photos on Your Hard Drive
I’m guessing that you already had photos on your hard drive before you started using Lightroom, so the most common scenario for adding the photos already on your drive is that first import. That said, there may be occasions when you get photos from some other source (email, download, FTP, and so on) and, after putting those photos in a folder of your choosing, you’d like to add them to your Lightroom catalog without moving or copying them to a new location. These steps work for any scenario in which the photos are where you want them and you just want Lightroom to take note and add them to the catalog.
1. Click the Import button to launch the Import screen.
2. Select the Add option at the top of the screen (Figure 8.1).

3. Expand the Source panel, and choose the folder containing the photos you want to import (Figure 8.2). Select the Include Subfolders checkbox to include photos in any subfolders.

Tip
You can “dock” folders by double-clicking the parent folder to collapse the unwanted folders above it and just see the contents of the folder you are looking for, as shown in Figure 8.2.
Quickly Find a Folder.

Figure 8.3 The “Select a source” drop-down menu is faster than drilling down through all folders.
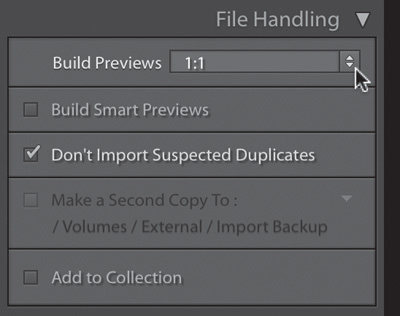
4. Expand the File Handling panel, and configure your desired options for building previews, building smart previews, preventing the import of duplicates, and adding these photos to a collection (Figure 8.4).
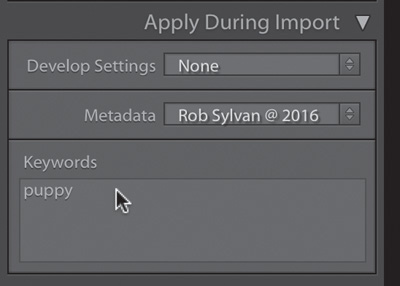
5. Expand the Apply During Import panel, and configure your desired options for applying Develop settings, applying a metadata preset, and applying keywords (Figure 8.5). Keep in mind that anything you choose in this panel is applied to all photos imported at this time, and you can always do any of these tasks later too.
6. Double-check your settings, and click Import to start the process.
That’s all there is to it. Now you will see those photos in the Library module, and the folder will appear in the Folders panel.
Copying Photos from a Memory Card
Note
You can directly connect your camera to your computer and import photos that way, but I believe a memory card reader is a better option because it is usually faster, has fewer computer-driver–related issues, and doesn’t drain your camera battery. Card readers are cheap too.
Most of your Lightroom experience will involve bringing photos from your memory card to your primary storage location (internal, external, or network drive). Lightroom can assist in this process by copying the photos to a location of your choosing as part of the import process.
1. Click the Import button to launch the Import screen.
2. Select the Copy (or “Copy as DNG”) option at the top of the screen (Figure 8.6).
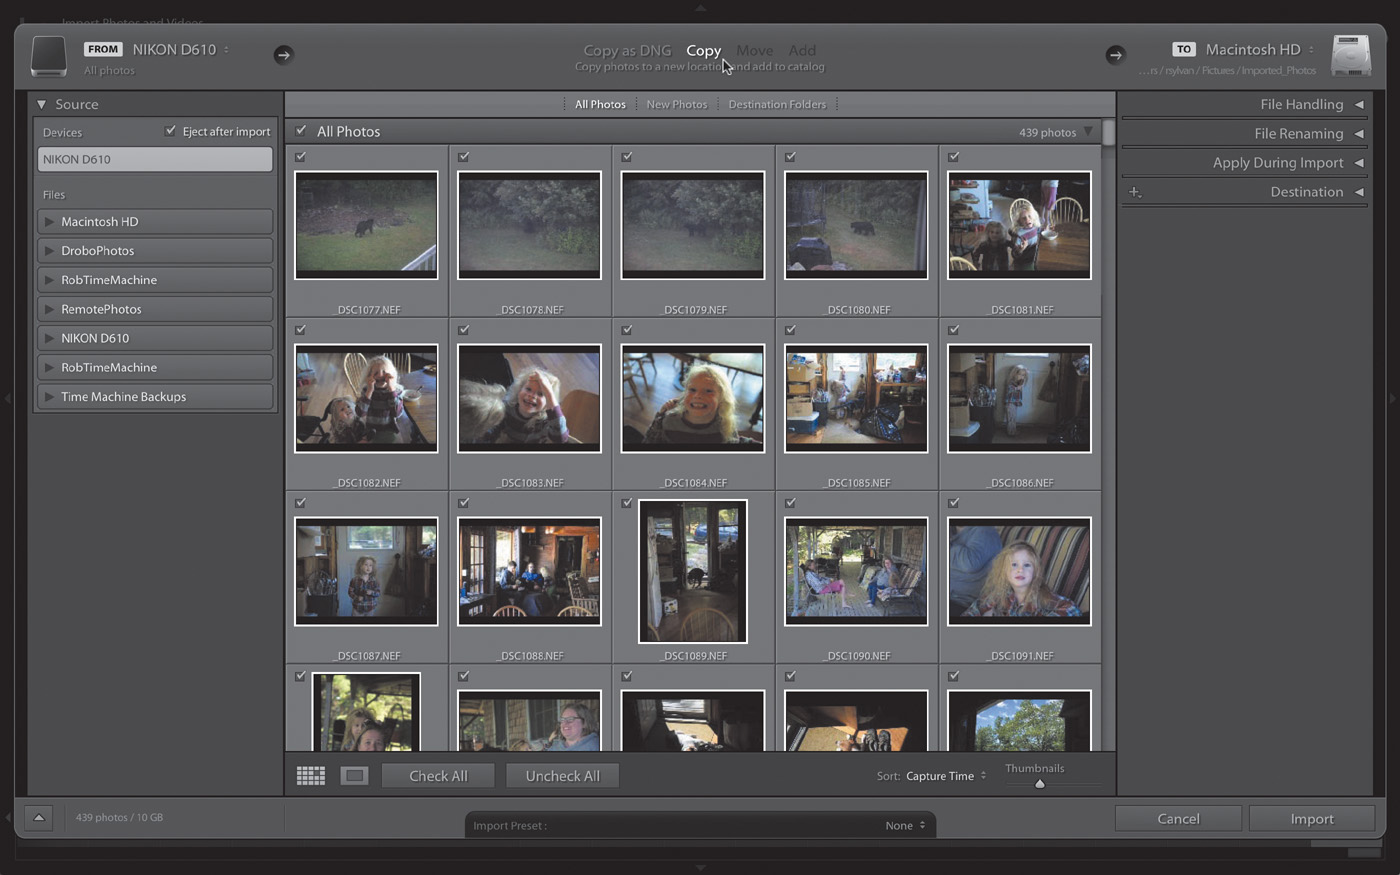
3. Expand the Source panel, and choose your memory card (Figure 8.7).

4. Expand the File Handling panel, and configure your desired options for building previews, building smart previews, preventing the import of duplicates, making a second copy (backup) of your memory card, and adding these photos to a collection (Figure 8.8).

Tip
You can invoke Solo mode on the right-side panels by right-clicking any of the panels on that side and choosing Solo Mode from the context menu.
5. Expand the File Renaming panel, and choose your desired renaming template (or leave Rename unselected to keep the camera-generated names). Alternatively, you can rename later.
6. Expand the Apply During Import panel, and configure your desired options for applying Develop settings, applying a metadata preset, and applying keywords.
7. Expand the Destination panel, select the folder you want these photos to be copied into, and (very important) configure the Organize option to suit your needs (Figure 8.9).

Figure 8.9 I like to have the Organize option set to By Date so that Lightroom creates date-based folders within the selected parent folder.
8. Double-check your settings, and click Import to start the process.
Note
Some people like to manually copy the photos from a memory card to a folder on their drive and then use the Add option to add those photos to the catalog. There’s nothing wrong with that workflow, and if you want to try it, you can follow the steps in the “Adding Photos on Your Hard Drive” section.
At this point Lightroom begins copying the photos to the location chosen in the Destination panel and in accordance with the way you configured the Organize option. Lightroom only does what it is told, so make sure you know what you are telling it to do each time. If you chose the “Copy as DNG” option, you should know that the conversion to DNG doesn’t start until all the photos have been copied to the destination, so give it some time.
A word about the Move option: You may have noticed that I don’t devote much space to the Move option on the Import screen, and this is because I really don’t think you should use it. Move is disabled for memory cards and is available only when your drive is the selected source. Moving photos involves copying them to a new location and then deleting them all in one action. The problem is that if anything goes wrong during that action (power goes out, drive gets disconnected, and so on), then you risk losing data. My recommendation is to stick to the Copy option as far as Lightroom is concerned, and once the copies are safely created in the new location you can always manually go back and delete the source. That said, if you were to use Move, the steps are essentially the same as for using the Copy option.
Compact Import Screen

Evaluating Photos
We photographers spend a lot of time evaluating our photos, from “chimping” at the back of the camera to peeking at the Import screen once we get them inside of Lightroom. I can’t help you break the chimping habit, but I will share some workflow tips for during and after import to help you separate the keepers from the clunkers.
Note
Chimping is the habit of staring at the back of the camera in wonder immediately after taking each photo. Remember: Spend more time taking photos and less time staring at the camera.
During Import
I don’t recommend spending a lot of time going through photos on the Import screen. My workflow is to just bring them all in and then sort them out later. At times you might want to be more selective, however; or perhaps some obvious lens cap shots leap out at you that you’d rather not even copy off the card. Once the Import screen is open and your source is selected, you can control which photos enter the catalog. Here are some tips:
![]() If you have a large batch of photos but want to bring in only a few, start by deselecting all the images using the Uncheck All button on the bottom (Figure 8.11), and then just select the photos you want to include
If you have a large batch of photos but want to bring in only a few, start by deselecting all the images using the Uncheck All button on the bottom (Figure 8.11), and then just select the photos you want to include

Figure 8.11 Click Uncheck All to make it easier to select only a few photos for import out of a large batch.
![]() You can select a contiguous group of photos by selecting the first photo and then holding the Shift key while selecting the last in line. Click the checkbox for any selected photo to select them all for import (Figure 8.12). You can also use this technique to deselect a group of photos
You can select a contiguous group of photos by selecting the first photo and then holding the Shift key while selecting the last in line. Click the checkbox for any selected photo to select them all for import (Figure 8.12). You can also use this technique to deselect a group of photos

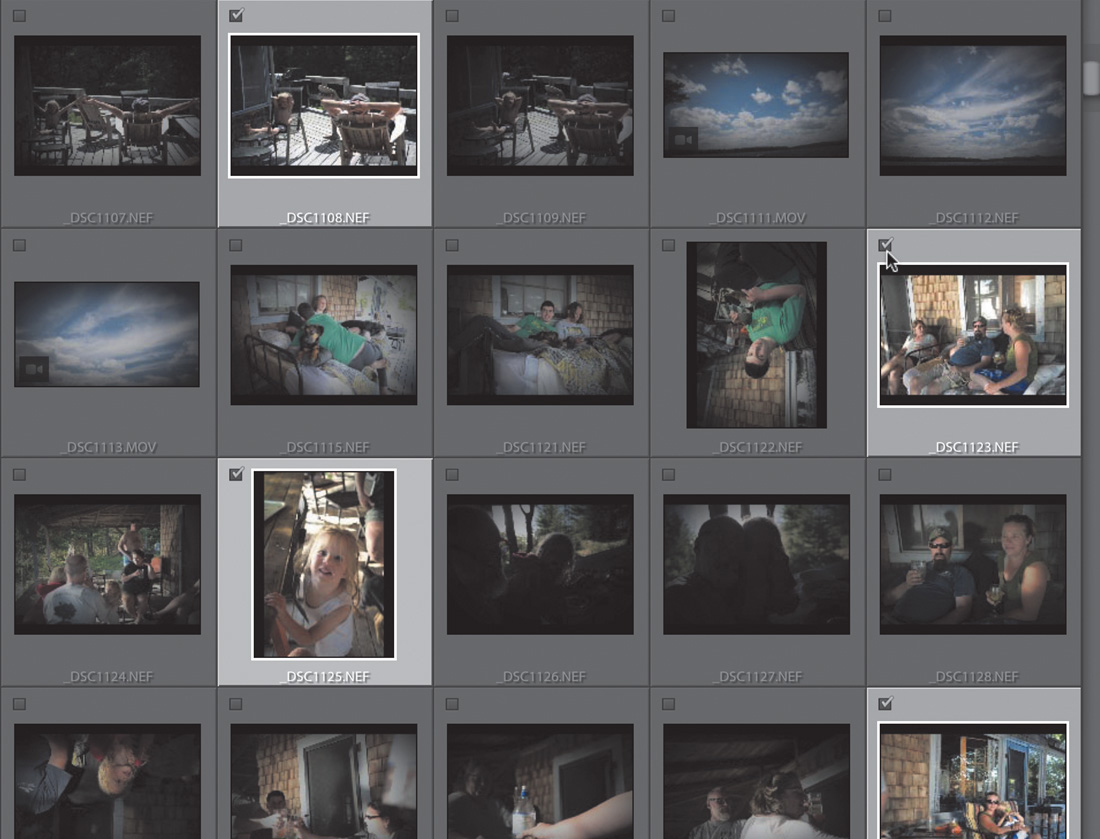
![]() You can select a noncontiguous batch of photos by holding the Ctrl key (Mac: Command key) while you click each thumbnail. Click the checkbox for any selected photo to check them all for import (Figure 8.13). This tip works in reverse for deselecting photos too
You can select a noncontiguous batch of photos by holding the Ctrl key (Mac: Command key) while you click each thumbnail. Click the checkbox for any selected photo to check them all for import (Figure 8.13). This tip works in reverse for deselecting photos too
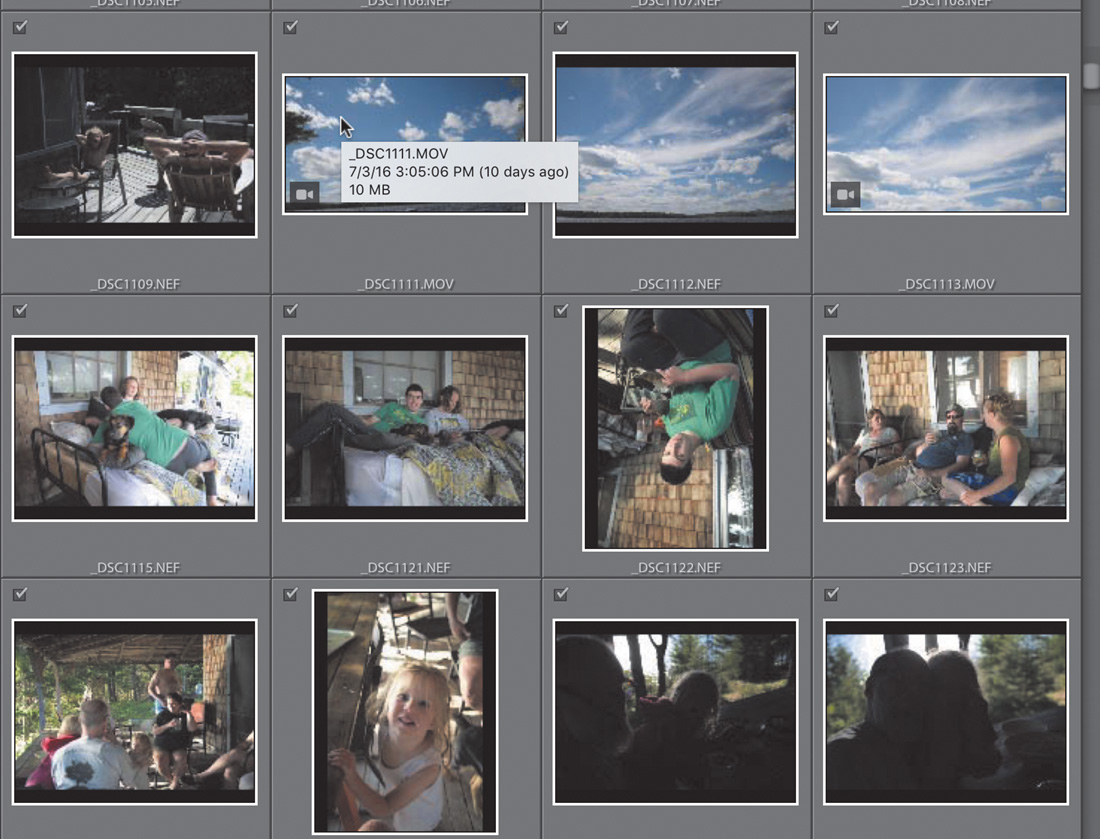
![]() Hover your cursor over a thumbnail to see the date it was taken appear in a tool tip.
Hover your cursor over a thumbnail to see the date it was taken appear in a tool tip.
![]() Double-click a thumbnail to see a larger version (if one is embedded in the source photo). Double-click again to jump back to the grid. There are also buttons below the thumbnails to jump between these views
Double-click a thumbnail to see a larger version (if one is embedded in the source photo). Double-click again to jump back to the grid. There are also buttons below the thumbnails to jump between these views
![]() Video files display a video camera icon on the thumbnail to help them stand out from the stills (Figure 8.14). Scan for these to more quickly select (or deselect) videos
Video files display a video camera icon on the thumbnail to help them stand out from the stills (Figure 8.14). Scan for these to more quickly select (or deselect) videos
After Import
The reason I like to wait to do major photo evaluations until after import is that then I have a lot more tools at my disposal to get the job done. Specifically, I can leverage rating stars, pick or reject flags, and even add color labels to help me identify my keepers, get rid of my clunkers, and begin organizing with colors.
I want to point out that you can apply ratings, flags, and color labels from their respective buttons on the Library module toolbar (Figure 8.15). If you don’t see them on your toolbar, click the disclosure triangle on the right end and select the ones you want to appear in the menu that appears. You can also find each of these grouped together under the Photo menu along with their keyboard shortcuts (Figure 8.16). That said, it is the keyboard shortcuts that we are really after, as those are the “keys” to making this workflow fly.

Figure 8.15 Ratings, flags, and color labels can be applied by clicking the desired button on the toolbar.

Figure 8.16 The Photo menu also gives access to the ratings, flags, and color labels and their shortcuts.
Note
In a pinch, you can also find ratings, flags, and color labels nestled in the context menu when you right-click a photo or click the attribute on the thumbnail.
The keyboard shortcuts for these are really easy to learn (well, maybe not color labels so much, but they are the least important of the three) because they are intuitive. For example, the 0 to 5 keys correspond to the 0- to 5-star ratings. Color labels start at the 6 key and go up to the 9 key (only purple has no shortcut). When it comes to flags, the P key corresponds to Pick, X corresponds to Reject, and U corresponds to Unflag. Commit those to memory, and I promise it will make your life easier.
As far as assigning meaning to each of the rating systems, well, that is entirely up to you. From movies to restaurants to hotel rooms, traditionally the higher the star rating the more the reviewer likes it. I prefer to keep things simple: I give an image 3 stars if I really like it and want to process it further as a way to make it stand out from the pack. I don’t tend to use the other rating levels very much. When it comes to color labels, I’ve seen systems where people apply, say, a red label to all photos intended to be used as part of a panorama and a yellow label to all photos that were part of an HDR bracket, or a blue label for client favorites and a green label for personal favorites. The meaning you assign to them is really only important to you, so take some time to experiment and come up with a system that you can apply consistently over time.
Tip
If you didn’t render 1:1 previews on import, select the photos and go to Library > Previews > Build 1:1 Previews.
Let’s dive into the workflow. In the previous sections on importing you may have noticed that I consistently have the Build Previews setting on 1:1. The reason for this is that I want Lightroom to get right on rendering out those 1:1 previews so that when I sit down to review my photos I can zoom in to 1:1 (100%) without any delay. So, with your 1:1 previews rendered and your keyboard shortcuts memorized, here’s how to go through a shoot in no time:
Note
When Auto Advance is enabled, as soon as you apply a star rating, flag, or color label, Lightroom will automatically advance focus to the next photo. This lets you focus on applying your metadata without delay.
1. Press G to jump to Grid view, and select the first photo in the batch.
2. Go to the Photo menu, and select Auto Advance.
3. Press Shift+Tab to hide all panels and give maximum room to your photos (Figure 8.17). Start with a focus on flags with the goal of applying a Pick flag to all keepers and a Reject flag to all the ones you want to delete.
Note
If you just tap the Z key, it will toggle you into 1:1 view. Tap again to toggle back to Grid view.
4. Press and hold the Z key to zoom to 1:1 view to check focus; then release the Z key to return to Grid view. If you keep the Z key down, you can still drag in the photo to pan around while zoomed in.
5. Press the P key to mark the photo as a keeper, press the X key to mark it as rejected, and if you really can’t decide at that moment, press the U key to keep it marked as unflagged and still trigger Auto Advance to move on to the next photo.
6. Repeat steps 4 and 5 until you get to the last photo in the shoot.
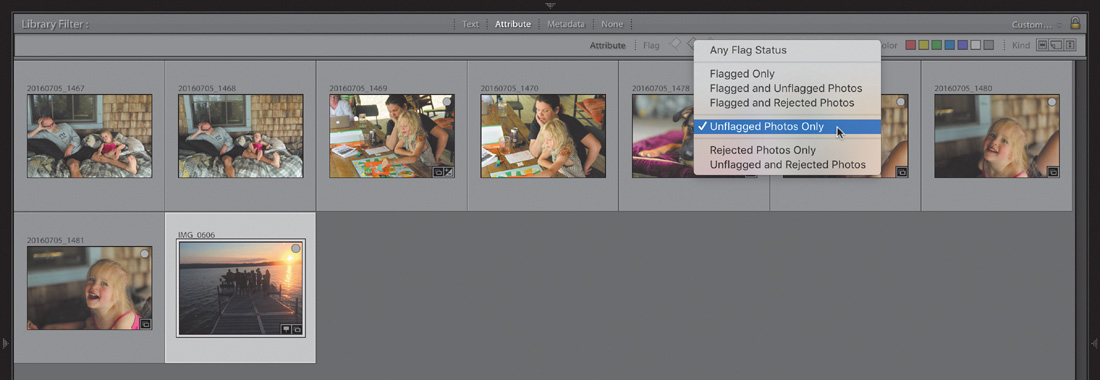
7. When you get to the last photo in the shoot, click the Attribute button on the Library Filter bar (more on the Library Filter later in this chapter). When the Attribute options appear, right-click the flag icons and choose Unflagged Photos Only (Figure 8.18). This tells Lightroom to hide all photos marked with a Pick or Reject flag and show only the unflagged photos. Now you have to fish or cut bait and decide on each remaining photo if you want to keep it or mark it for deletion. By turning on this filter, as soon as you flag a photo it will be hidden from view.
Tip
Holding the Shift key temporarily disables Auto Advance, which can be helpful if you want to apply a star rating or color label in addition to a flag before moving on to the next photo. So hold Shift, apply the flag, release Shift, and apply a rating, and then Lightroom auto-advances to the next photo.
8. Repeat steps 4 and 5 until there are no photos left in view.
9. Press Ctrl+L (Mac: Command+L) to disable the filter and return all photos to being visible. They will all have a flag and possibly even a rating or label (depending on what you decided), and every photo will have been evaluated.
This last step is optional. If you are prepared to delete the photos you marked as rejected, Lightroom makes it easy. Go to Photo > Delete Rejected Photos, and Lightroom will gather up all photos marked as rejected and give you the prompt for carrying out the deletion (Figure 8.19). If you’ve come this far, then my suggestion is to choose “Delete from Disk” to get rid of them completely. Choosing Remove removes them only from the Lightroom catalog and leaves them on the drive.

Now you can move on through your workflow with just your keepers.
Applying Keywords
There are actually a lot of different ways you can apply keywords to your photos, and which route you take is largely a matter of personal preference. I’ve touched on some already in this chapter (such as the Apply During Import panel of the Import screen) and on others in the keywording section of Chapter 5. In this section, I want to show you a couple of alternative workflows you can add to your repertoire.
Using the Keyword List Panel
Chapter 5 covered many aspects of the Keyword List panel, but the one part I left out was how you can use it to apply keywords to and remove keywords from your photos. The key to using this technique is to already have a keyword list in place (which you learned how to create in Chapter 5).
Applying Keywords
This is how I usually end up applying keywords to my photos:
1. Select the folder or collection containing the photos you want to keyword, and press G to jump to Grid view (if not there already).
2. Select the photo(s) you want to tag with keywords.
3. Expand the Keyword List panel.
4. Locate the keyword you want to apply in the Keyword List panel. If you have a large keyword list (like me), type the first few letters of the keyword into the Filter Keywords field at the top of the panel to filter the list to just the keywords that match what you’ve entered (Figure 8.20). In my case, I’m looking for swim-related words.

5. Once your keyword is visible, you can drag the selected photos to the keyword or drag the keyword to the photos (Figure 8.21).
Alternatively, you can just select the box to the left of the keyword to apply it.

Note
Thumbnail badges appear only if they are enabled in the Library View Options > Cell Icons section.
Notice that once a keyword is applied to a photo, you get visual confirmation in the form of a tag badge appearing on the thumbnail(s), as well as, in the Keyword List panel, a checkmark appearing to the left of the keyword and a photo count appearing to its right (Figure 8.22).

6. Repeat steps 4 and 5 until all desired keywords are applied to the selected photos, then move on to the next batch of photos.
OK, so you may be wondering why I prefer this method as opposed to just typing in the Keywording field, or any other method. With my large keyword list, I like being able to see the keyword hierarchy so that I know which meaning of the word I am applying, and I like all of the visual confirmations that appear after it is done. It is a very hands-on method, and that just suits my style.
Removing Keywords
You can use basically the same steps to remove a keyword from a photo. This is helpful anytime you’ve accidentally applied the wrong keyword or you need to clean up your keyword list.
1. Select the folder or collection containing the photos you want to remove the keyword from, and press G to jump to Grid view (if not there already).
2. Select the photo(s) you want to remove the keyword from.
3. Expand the Keyword List panel.
4. Locate the keyword you want to remove in the Keyword List panel. Use the Keyword Filter if needed.
5. Once your keyword is visible, just click the checkmark to the left of the keyword to remove it from the selected photo(s).
6. Repeat steps 4 and 5 until all keywords are removed.
The following technique can be especially useful when cleaning up a messy keyword list. I’ve encountered people who end up having multiple forms of a word in their keyword list, with different photos applied to each form of the word. They don’t want to lose the work they’ve done, but they want to unify under a single form of the word. For example, let’s say in my haste I created a keyword with a typo, misspelling “water” as “watre” (hey, I was in a hurry), and I applied that bad version to some photos. I had previously applied the correctly spelled “water” to other photos. Realizing my mistake, I want all of the photos to be tagged with the correct spelling and then delete the typo. Here’s what you’d do in this situation:
1. Locate the keyword you want to remove in the Keyword List panel.
2. Hover your cursor over the keyword and you’ll see an arrow appear to the right of the word; click that arrow to bring up all photos with that tag in Grid view (Figure 8.23).

3. Select all photos (Edit > Select All).
4. Locate the keyword you want to keep in the Keyword List panel.
5. Select the box to the left of the correct keyword to apply it to the selected photos.
6. Remove the checkmark from the bad version of the keyword to remove it from the selected photos.
7. With the bad keyword selected, click the – sign at the top of the Keyword List panel to delete it.
Painting Your Photos with Information
The often-overlooked Painter tool can be a real time-saver when working with large groups of photos in Grid view in the Library module. I always find myself forgetting about the Painter tool. Then I come up against a project where I need to work through hundreds of photos for some reason—such as assigning a new keyword—and then I remember the Painter tool! Do you see that little spraypaint icon in the Grid view toolbar (Figure 8.24)?.

1. Select the Painter tool from the toolbar to enable it (or go to Metadata > Enable Painting).
2. Click the Painter tool drop-down menu, and choose Keywords from the list (Figure 8.25).

Note
You can also load it with a color label, flag state, star rating, metadata template, develop preset, rotation setting, or even a collection. It’s like a Swiss Army knife!.
3. Click into the Keyword field and enter a keyword. If you have a keyword list, Lightroom will auto-complete as you type.
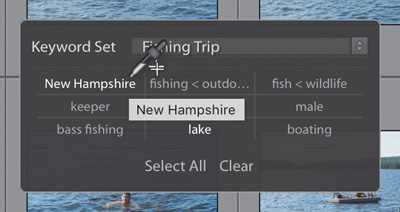
Alternatively, hold the Shift key to open a pop-up dialog containing your keyword sets, choose a set from the drop-down menu, and click any keywords from that set that you want to apply (Figure 8.26).
4. With the Painter tool now loaded with keywords, drag over the photos you want to assign those keywords to. You’ll notice that the cursor has changed to the Painter icon when you place it over a photo, and as you drag, the can animates to appear as if it is spraying. A message will also appear to verify that you have assigned the keyword to that photo.
If you “overspray” and hit a photo you didn’t want to add to that collection, you can hold the Alt (Mac: Option) key to change the painter to an eraser and drag over those photos to remove them from the target collection. A message will appear to verify that you have removed the keyword from the photo.
5. When you have finished with the Painter tool, you can click the Done button in the toolbar, put the Painter cursor back into its docking circle, or press the Escape key to exit the Painter tool.
The basic process works the same with whatever item you have loaded in the Painter tool. However, if you are painting with a metadata preset, rotation, or develop preset, you can’t erase the overspray with the Painter tool, but Ctrl+Z (Mac: Command+Z) does undo it if you catch it right away.
Finding Photos
With all your keywords, ratings, flags, tagged faces, and other metadata in place, now you can put that database to work to help you filter and find the photos you need when you need them. You’ve had a few peeks at the Library Filter bar so far, but let’s dive a little deeper into how it can be used. I’ll wrap up this section with a useful way you can employ smart collections.
Using the Library Filter
The Library Filter bar appears above the thumbnails in Grid view (Figure 8.27), and its purpose is to help you find and focus on just the photos you want to see by harnessing the data contained the Lightroom catalog.

Note
The Library Filter bar is accessible only when you are in Grid view. If you don’t see the Filter bar, press the key to toggle its visibility back on (the same key will also toggle its visibility off to get it out of the way).
The three types of filters—Text, Attribute, and Metadata—can be used independently or in combination to help you drill down into your catalog. The Text filter searches any of the indexed metadata fields, such as keywords and filenames, as well as some of the IPTC and EXIF metadata. The Attribute filter allows you to filter your photos based on flag state, rating, color label, and copy status. The Metadata filter displays customizable columns of metadata pulled from the catalog, based on the currently visible grouping of photos.
Each of these filters provides a slightly different means to home in on a desired grouping of photos, and they can be incredibly powerful when used together. Let’s walk through a basic example of how to find all photos in a catalog that match a specific keyword, star rating, and capture date to see how this works.
1. Expand the Catalog panel, and select All Photographs.
The Filter bar works on the pool of photos you make available. If you want to search your entire catalog, then start here. However, you can select any folder or collection and filter from there in the same way.
2. Click the Text label on the filter to activate the input field, and set it to Keywords.
3. Start typing the desired keyword (Figure 8.28).

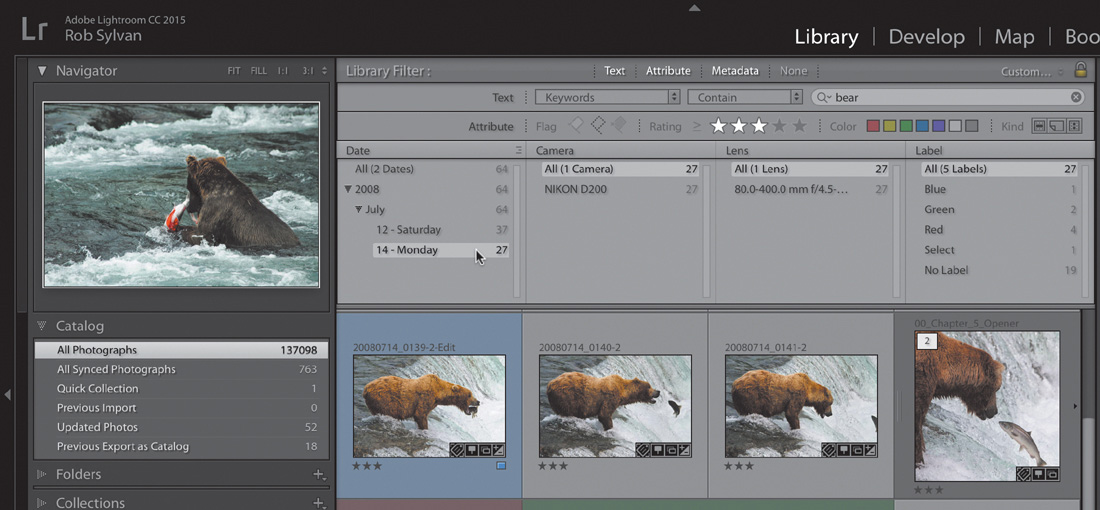
I wanted to find all photos tagged with “bear.” As soon as I start entering the first letters of the keyword, the filter kicks into action and displays only photos tagged with words that match what I have typed.
4. Hold the Shift key and click the Attribute label. This expands the Attribute section of the Filter bar.
5. Click the number of stars you want to filter by (Figure 8.29).

I chose 3 stars or higher by clicking the third star and leaving the rating set to “greater than or equal to.” You can choose as many attributes as you want to refine your filter.
6. Hold the Shift key and click the Metadata label to expand that section of the Filter bar.
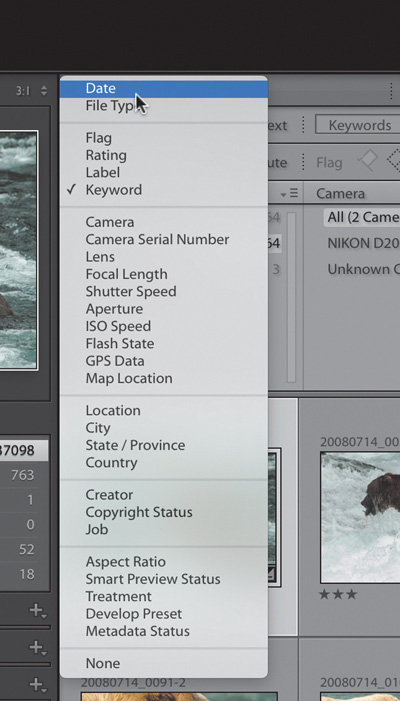
If you don’t see a Date column at first, click the drop-down menu on the top left of any visible column and choose Date from the list (Figure 8.30).
7. In the Date column, click the desired capture date (Figure 8.31).
Note
You can customize the Metadata filter by adding up to eight columns or reducing down to one by clicking the drop-down menu on the top right of any visible column.
You can, of course, click any piece of metadata to drill down to just the photos that match the criteria you require.
In my example, I wanted to find all my bear photos that were rated 3 stars or higher and were shot on July 14, 2008, which required a combination of all filters, but as you can see, there are a lot of ways to drill down into your photo catalog to home in on just the photos you want to find. When you are done, press Ctrl+L (Mac: Command+L), or click the None button, to turn off all filters.
Now that you know the basics, give the Filter bar a test-drive and don’t be afraid to experiment to get a feel for what it can do.
Creating Smart Collections
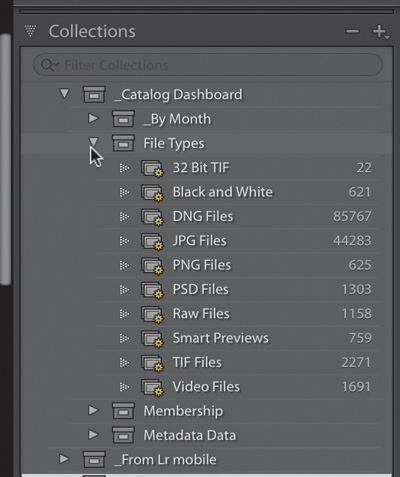
You learned the basics of smart collections in Chapter 4, so here I want to focus on some methods for leveraging the power of smart collections to help you in your workflow and to help you manage your photos. One way I’ve found smart collections to be useful is to create a collection set of them using various parameters that provide a level of insight into what I have in my catalog. I call this my catalog dashboard. For example, within my so-called dashboard I have a collection set named File Type, and then within that I have a series of smart collections that are based on file type parameters (Figure 8.32). This gives me an at-a-glance view of the contents of my catalog based on file type.
Note
Collection sets are not required, but they help you keep your collections structured and organized.
These collection sets are simple to create:
1. Click the drop-down menu in the Collection panel header, and choose Create Collection Set. Give that collection set a name, and click Create.
2. Click that same drop-down menu, and choose Create Smart Collection.
Give the collection a meaningful name, select the box to have it put inside a collection set, and then click the associated drop-down menu and select the collection set you just created.
Note
You can always drag and drop collections into collection sets later too.
3. Create your first rule by clicking the drop-down menu next to the first criterion. Choose File Name/Type > File Type (Figure 8.33) and then configure the type of file you want this smart collection to gather (for example, JPEG, TIFF, PSD, and so on).

4. Click Save to save this smart collection and put it to work.
I repeated that process to create a smart collection for each of the supported file types and then also added one for 32-bit TIFF files (they can take up a lot of disk space), files that have smart previews rendered, and files that have been converted to black and white in Lightroom. What you find useful may vary.
As soon as you click Save and the Edit dialog closes, Lightroom begins to automatically populate the smart collection based on that set of criteria. Remember that the only way to remove files from a smart collection is to either change the rules so the files no longer match or change the files so they no longer match the rules.
Exporting Copies for Output
Typically, the main goal of getting photos into Lightroom is to, eventually, get processed versions out of Lightroom to share with the world. Maybe you are creating copies to send to clients or friends, or perhaps you want to upload photos to your blog, social media, or an online print service. In all of these cases, whenever you want to create copies of your photos, it is time to export. Exporting is the moment where all the work you’ve done in Lightroom is applied to copies of your source photos (because Lightroom never changes the pixels of your source photos).
The Export dialog box is where you can configure all of the particulars about a given set of copies, such as where you want it save to, what file type, any resizing specifications, and so on (Figure 8.34).
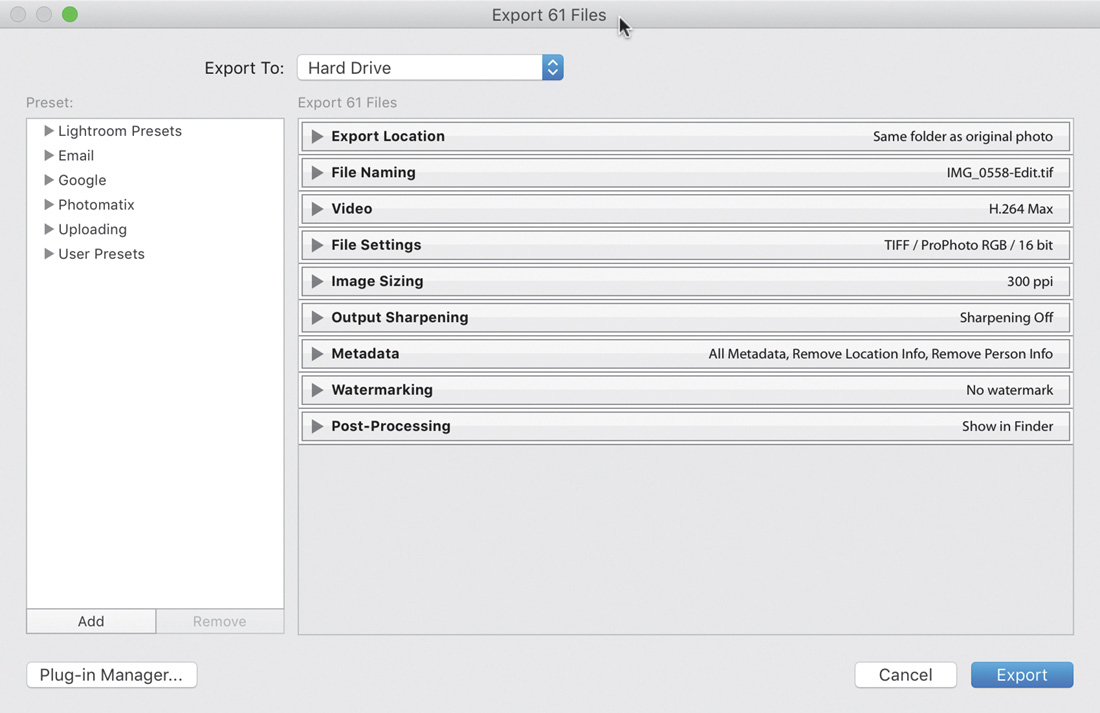
Figure 8.34 The Export dialog is where you configure the parameters for how the copies will be created.
Note
It is good to glance at the top of the Export dialog to verify that the number shown matches how many photos you wanted to export.
For any export, you need to know the purpose for creating the copies before you start. Let’s go through the steps for exporting copies of processed photos to be delivered as JPEGs to a client.
1. Select the photo(s) you want to export. You can select any number of photos at a time for export.
2. Click the Export button to open the Export dialog.
3. Set the Export To drop-down to Hard Drive.
4. Expand the Export Location panel, and choose where you want these copies to be saved on your drive (Figure 8.35).

Note
I generally don’t add exported copies back to my catalog, but it is an option for those who need to use it.
I chose my Desktop, and I selected the “Put in Subfolder” checkbox to create a new subfolder at that location with a name of my choosing.
5. Expand the File Naming panel, and choose how you want these copies to be named (Figure 8.36).

Leave Rename To unselected if you want the copies to have the same names as the source photos.
6. (Optional) If you selected video files for export, select the Include Video Files checkbox. I didn’t have any video, so I deselected that option (Figure 8.37).

Note
Only the H.264 video format will include the edits you made in Lightroom in your video clips.
7. Expand the File Settings panel, and configure the desired file type settings (Figure 8.38).

I needed JPEG files, so that was my choice for Image Format. The Quality slider appears only for JPEG files, and it controls how much compression is applied. When you are not sure of the needed color space, it is always safest to go with sRGB.
8. Expand the Image Sizing panel, and configure how you want Lightroom to resize the copies. This is where you can choose to have Lightroom resize the pixel dimensions of the copies smaller for web use, to resize to a specific print size for uploading to a print service, or to leave the pixel dimensions the same as the source files (by leaving Resize to Fit unselected).
I wanted to resize all copies so that the long edge of each photo was no more than 3000 pixels. The Resolution field really only matters when sending to a printer, but I left it at 300 pixels per inch because that makes people happy (Figure 8.39).

Figure 8.39 Image sizing considerations are extremely important, so give this one some thought based on your output needs.
9. (Optional) Expand the Output Sharpening panel, and configure what type of output sharpening, and its amount, that you want applied to your copies. I left it unselected (Figure 8.40).

The need for output sharpening is largely driven by your taste and the destination. This option mostly serves the needs of people sending photos to an online print service and lets them apply a sharpening algorithm based on the media surface they are printing to (glossy or matte) and its amount. It does work for screen display too, but in any case you should test each setting to see which results you personally prefer.
10. Expand the Metadata panel, and configure the metadata you want saved to your exported copies (Figure 8.41).

Like all other settings here, this is driven by your reason for export. If I need to keep all original metadata with the copies, I choose All Metadata, but if I don’t need it all, then I might choose All Except Camera & Camera Raw Info, which retains custom metadata I added (like keywords, titles, and captions) but strips the camera-generated EXIF metadata and the Develop module processing instructions.
As a rule for myself, I keep the Remove Person Info and Remove Location Info checkboxes selected. The first option removes any people tags I’ve applied to photos to protect privacy, and the section option removes any GPS coordinates.
11. (Optional) Expand the Watermarking panel and configure your choice for applying a watermark to each exported copy. I opted to skip the watermark (Figure 8.42).

12. (Optional) Expand the Post-Processing panel, and configure any action you want Lightroom to take once the export is complete (Figure 8.43).
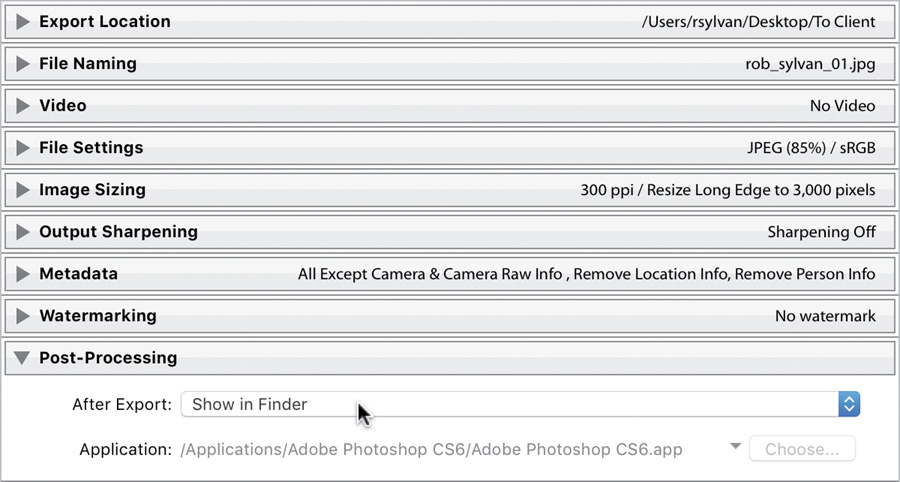
I find it very useful to set this panel to “Show in Explorer” (Mac: Show in Finder) so that once the export is done a new Explorer (or Finder) window opens right to those exported copies. That way, I can verify that the job was done and that the right number of files is present. Plus, moving those files to wherever they are headed next is easier.
13. Give the dialog once last double-check, and click the Export button to start creating the copies to your specifications.
You can save any combination of these settings as a custom preset to make reusing the same settings a snap! Refer to Chapter 7 for details on creating presets. As long as you always let your export needs dictate your settings, the Export dialog is pretty straightforward. In the next chapter, we move on to some less frequently used, yet still important, workflows.