
Chapter Two Get yourself Organized
Some people like to jump right in to the software and start laying out the slides; others prefer to spend some time getting their thoughts organized.
I, too, love to jump right in to the software, but I have to admit that by doing so I get bogged down in what the presentation looks like much too soon and end up redesigning the whole thing several times as I add more content. So I’ve learned to control myself and get organized first. Write the story first.
Once you’ve got the data organized, then you can use the four guidelines in the next section to clarify the information; find or create relevant graphics, video, or sound; consider appropriate animation that will help reveal the information; and pull your thoughts together into a cohesive unit with a beginning, middle, and end.
Plan, organize, outline, write
Perhaps organization is one of your strong points and thus you feel perfectly competent in developing your presentation; maybe you even have some preferred tools and methods. You’re lucky because organization is one of the most important foundations for a successful presentation.
Or maybe you’ve got all kinds of ideas flying around in your head and need some way to focus them. You’re lucky too, because there are several tools you can take advantage of to harness your ideas.
If you’re using Keynote or PowerPoint, make sure you find the “Outline” mode (see the following pages). It allows you to type headlines and bullet points without worrying about what the project looks like. Trying to design the presentation at the same time you’re organizing it can get you sidetracked, so the outline mode lets you focus on just that one thing—organization.
BUT before you even start the outline, whether you are a natural organizer or not, I strongly suggest you read Chapter 3 so you can avoid the sin of writing your presentation onto the slides, which then forces you to read your slides. At the most, you want a heading or a few words on the screen that alerts the audience to what you will be talking about, and your notes can go in the “Presenter Notes” area of your software, as shown below.

Old technology sticky notes
In these days of remarkable technology, don’t neglect good ol’ sticky notes. It’s wonderfully easy to scribble notes by hand and move them around on the table or the wall. Any kind of sticky notes work great as a simple in-person collaborative tool as well. And their size forces you to limit the number of words per heading.
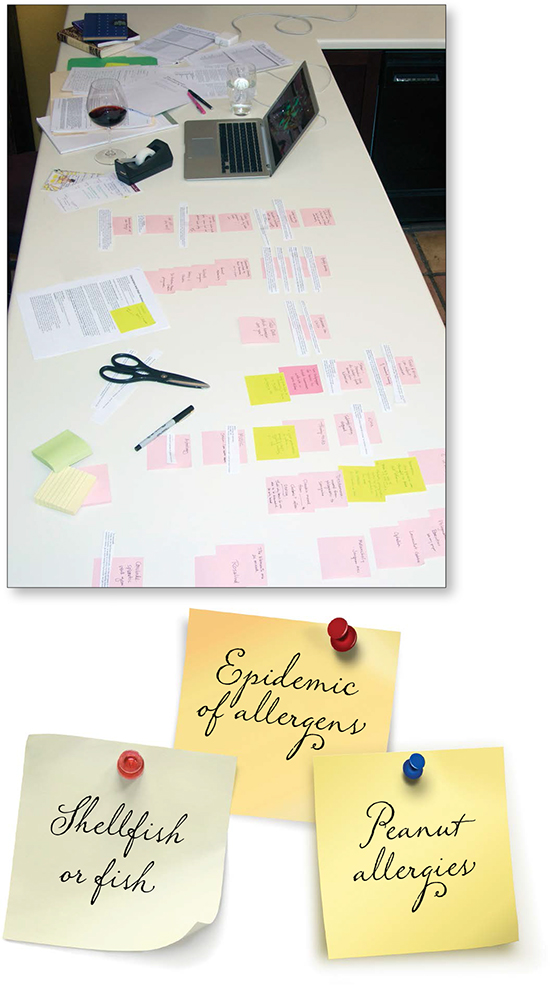
This is an example of my preparation for a particular presentation, before opening the software. I wrote on lots of sticky notes, cut out important points from a paper I had written and pasted those in position, etc., while organizing the information. I like to see the whole thing visually.
Outline features in presentation software
PowerPoint and Keynote have outline views (from the View menu) in which you can create the structure of your presentation in plain text and not worry about what it looks like yet. If you’ve ever worked with the outline feature in your word processor, you’ll feel very comfortable with this.
In the outline view, you can type up your thoughts as quickly as you can think; at any time, grab the tiny slide icon (not the text) and drag that slide to another position to rearrange it. As you type, that headline appears on the slide automatically.

Consider opening the outline area so wide that you can see very little of the slide—it keeps you from being distracted by the visuals.

You can select the outline in the sidebar, copy it, and paste it into your word processor to develop your topic further.
Or you can print that outline, if that’s useful for you, as shown below.


Mind maps and idea clouds
If you like to use concept maps, mind maps, idea clouds, or idea webs (all of which are variations on a visual representation of your outline) to develop your project graphically instead of textually/linearly, check out one of the many mind map software apps. Some are free, some are downloadable, some are used online. Search for mind mapping software.
An advantage of a digital tool (as opposed to a hand-drawn mind map or idea cloud, as on the opposite page) is that you can move topics from one place to another easily, drag lines to disconnect or reconnect topics, insert images and multimedia files, sometimes record your voice directly in the application, and often collaborate around the world. The application can collect your thoughts into a text document once you’ve got all your ideas in place. Some software will export your information as an outline that you can open in PowerPoint and build from.

The flexibility of the software can actually inspire more ideas and greater organization. This is a quick mind map drawn in the software called Inspiration; see www.Inspiration.com.
Or just grab yourself a pen and piece of paper. To see visual examples of hand-drawn maps, search images.google.com for mind map examples (see Chapter 15). Don’t be discouraged by all the fancy and elaborate ones shown—stick figures, text, simple lines, and one color can be just what you need. The process is simply a modest way to get your thoughts and ideas in one place for your presentation: put your primary topic in the middle, draw a bubble around it, and branch out with subsidiary topics from there. You might be surprised at what shows up, ideas that surprisingly becomes useful or even critical. I have become convinced over the years that something happens when the pen is in your hand, some connection to parts of our brains that we don’t use as often anymore.

At an ad sales meeting, I started a mind map to figure out why I treasure my morning latte and local print newspaper so much. I work until midnight every night so my mornings are precious, and I hate to have my time with my coffee and newspaper interrupted! Seeing it visually helped me understand myself.
Then type up your presentation
You generally don’t want to read your presentation aloud, although some conferences do expect that of you, in which case, that’s what you gotta do.
But if you are creating a digital presentation that you will use to accentuate your live talk, it can be extremely useful and informative (to yourself) to write it out before you ever open your presentation software. Because our brains find visual images so attractive, we can get too bogged down in the visual presentation of the information before we have the information itself nailed down.
Once you have created your outline or made a storyboard with sticky notes or created your mind map, write out your entire talk. This will also help with your timing. On the printed page, you can highlight comments you particularly don’t want to forget, put colored dots where you want to move to the next slide, write notes to yourself about when to expect a transition, when to ask questions, etc.
The most important use for this document, besides practicing, is when you post your presentation online or send it to someone, you can include the document so your presentation actually can make sense to someone who was not there at your live performance.
SlideShare.net provides a “Notes” field, and most of the online slide creators have an area where you can include a document to go along with the deck. Some few decks, of course, are built to be stand-alone presentations and don’t need the extra file, and that’s great too.
Slide sorter or light table view in software
Once you’ve got some slides to work with, you can check the overall structure in the “Slide Sorter” view in PowerPoint or the “Light Table” view in Keynote. This is a great place to take a look at all the slides in your presentation and see how the organization is progressing. You can drag slides around to reorganize them.

This is a 150-slide deck for a 100th birthday party, designed to be a stand-alone presentation with useful animations.
Once you start designing the slides, this Slide Sorter or Light Table view will help you see where you need to be more consistent, which slides need more contrast, whether the type is large or bold enough, etc. Take advantage of it.
In PowerPoint, open the Slide Sorter from the View menu.
Now that you’re organized
Okay, once you’ve got all your material gathered for the initial creativity session in which you’ll start building your deck, consider the four principles in the next chapter—Clarity, Relevance, Animation, Plot—to make sure you’ve got a good structure; you’re not putting more words on your slides than necessary; that you’ve got a story to tell that has a beginning, middle, and end; that every phrase and graphic on your slides is relevant to your topic; and you can consider where animation might augment your information. Have at it!