Chapter 18. Network Address Translation (NAT)
This chapter provides information and commands concerning the following topics:
Configuring dynamic NAT: One private to one public address translation
Configuring PAT: Many private to one public address translation
Configuring static NAT: One private to one permanent public address translation
Private IP Addresses: RFC 1918
Table 18-1 lists the address ranges as specified in RFC 1918 that anyone can use as internal private addresses. These will be your “inside-the-LAN” addresses that will have to be translated into public addresses that can be routed across the Internet. Any network is allowed to use these addresses; however, these addresses are not allowed to be routed onto the public Internet.
Table 18-1 RFC 1918 Private Address Ranges
| Internal Address Range | CIDR Prefix | Traditional Class |
| 10.0.0.0–10.255.255.255 | 10.0.0.0/8 | A |
| 172.16.0.0–172.31.255.255 | 172.16.0.0/12 | B |
| 192.168.0.0–192.168.255.255 | 192.168.0.0/16 | C |
Configuring Dynamic NAT: One Private to One Public Address Translation
Caution
Make sure that you have in your router configurations a way for packets to travel back to your NAT router. Include on the ISP router a static route defining a path to your NAT addresses/networks and how to travel back to your internal network. Without this in place, a packet can leave your network with a public address, but it cannot return if your ISP router does not know where the public addresses exist in the network. You should be advertising the public addresses, not your private addresses.
Dynamic Address Translation (Dynamic NAT) maps unregistered (private) IP addresses to registered (public) IP addresses from a pool of registered IP addresses.
Figure 18-1 shows the network topology for the Dynamic NAT configuration that follows using the commands covered in this chapter.

Figure 18-1 One Private to One Public Dynamic Address Translation Configuration
| Step 1: Define a static route on the remote router stating where the public addresses should be routed. | ISP(config)# ip route 64.64.64.64 255.255.255.192 s0/0/0 |
Informs the ISP router where to send packets with addresses destined for 64.64.64.64 255.255.255.192 |
| Step 2: Define a pool of usable public IP addresses on your local router that will perform NAT. | Company(config)# ip nat pool scott 64.64.64.65 64.64.64.126 netmask 255.255.255.192 |
The private address will receive the first available public address in the pool Defines the following: The name of the pool is scott (but can be anything) The start of the pool is 64.64.64.65 The end of the pool is 64.64.64.126 The subnet mask is 255.255.255.192 |
| Step 3: Create an access control list (ACL) that will identify which private IP addresses will be translated. | Company(config)# access-list 1 permit 172.16.10.0 0.0.0.255 |
|
| Step 4: Link the ACL to the pool of addresses (create the translation). | Company(config)# ip nat inside source list 1 pool scott |
Defines the following: The source of the private addresses is from ACL 1 The pool of available public addresses is named scott |
| Step 5: Define which interfaces are inside (contain the private addresses). | Company(config)# interface gigabitethernet 0/0 |
Moves to interface configuration mode |
Company (config-if)# ip nat inside |
You can have more than one inside interface on a router. Addresses from each inside interface are then allowed to be translated into a public address | |
| Step 6: Define the outside interface (the interface leading to the public network). | Company (config-if)# exit |
Returns to global configuration mode |
Company(config)# interface serial 0/0/0 |
Moves to interface configuration mode | |
Company (config-if)# ip nat outside |
Defines which interface is the outside interface for NAT |
Configuring PAT: Many Private to One Public Address Translation
PAT maps multiple unregistered (private) IP addresses to a single registered (public) IP address (many to one) using different ports. This is also known as overloading or overload translations. By using PAT or overloading, thousands of users can be connected to the Internet by using only one real registered public IP address.
Figure 18-2 shows the network topology for the PAT configuration that follows using the commands covered in this chapter.
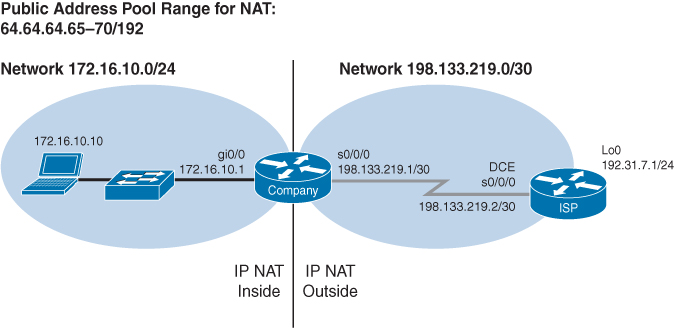
Figure 18-2 Many Private to One Public Address Translation Configuration
| Step 1: Define a static route on the remote router stating where public addresses should be routed. | ISP(config)# ip route 64.64.64.64 255.255.255.192 s0/0/0 |
Informs the Internet service provider (ISP) router where to send packets with addresses destined for 64.64.64.64 255.255.255.192 |
| Step 2: Define a pool of usable public IP addresses on your local router that will perform NAT (optional). | Company(config)# ip nat pool scott 64.64.64.65 64.64.64.70 netmask 255.255.255.192 |
Use this step if you have many private addresses to translate. A single public IP address can handle thousands of private addresses. Without using a pool of addresses, you can translate all private addresses into the IP address of the exit interface (the serial link to the ISP, for example) Defines the following: The name of the pool is scott (but can be anything) The start of the pool is 64.64.64.65 The end of the pool is 64.64.64.70 The subnet mask is 255.255.255.192 |
| Step 3: Create an ACL that will identify which private IP addresses will be translated. | Company(config)# access-list 1 permit 172.16.10.0 0.0.0.255 |
|
| Step 4 (Option 1): Link the ACL to the outside public interface (create the translation). | Company(config)# ip nat inside source list 1 interface serial 0/0/0 overload |
The source of the private addresses is from ACL 1 The public address to be translated into is the one assigned to serial 0/0/0 The overload keyword states that port numbers will be used to handle many translations |
| Step 4 (Option 2): Link the ACL to the pool of addresses (create the translation). | Company(config)# ip nat inside source list 1 pool scott overload |
If using the pool created in Step 2 . . . The source of the private addresses is from ACL 1 The pool of the available addresses is named scott The overload keyword states that port numbers will be used to handle many translations |
| Step 5: Define which interfaces are inside (contain the private addresses). | Company(config)# interface gigabitethernet 0/0 |
Moves to interface configuration mode |
Company(config-if)# ip nat inside |
You can have more than one inside interface on a router | |
| Step 6: Define the outside interface (the interface leading to the public network). | Company(config-if)# exit |
Returns to global configuration mode |
Company(config)# interface serial 0/0/0 |
Moves to interface configuration mode | |
Company(config-if)# ip nat outside |
Defines which interface is the outside interface for NAT |
Note
You can have an IP NAT pool of more than one address, if needed. The syntax for this is as follows:
Corp(config)# ip nat pool scott 64.64.64.70 64.64.64.75 netmask
255.255.255.128
You would then have a pool of six addresses (and all their ports) available for translation.
Note
The theoretical maximum number of translations between internal addresses and a single outside address using PAT is 65,536. Port numbers are encoded in a 16-bit field, so 216 = 65,536.
Configuring Static NAT: One Private to One Permanent Public Address Translation
Static Network Address Translation (Static NAT) allows one-to-one mapping between local (private) and global (public) IP addresses.
Figure 18-3 shows the network topology for the Static NAT configuration that follows using the commands covered in this chapter.
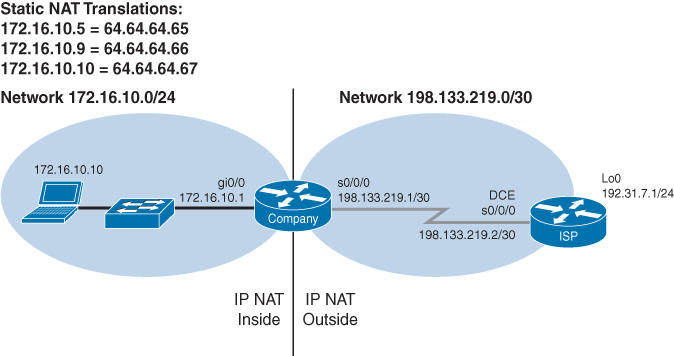
Figure 18-3 One Private to One Permanent Public Address Translation Configuration
| Step 1: Define a static route on the remote router stating where the public addresses should be routed. | ISP(config)# ip route 64.64.64.64 255.255.255.192 s0/0/0 |
Informs the ISP router where to send packets with addresses destined for 64.64.64.64 255.255.255.192 |
| Step 2: Create a static mapping on your local router that will perform NAT. |
|
Permanently translates the inside address of 172.16.10.5 to a public address of 64.64.64.65 Use the command for each of the private IP addresses you want to statically map to a public address |
| Step 3: Define which interfaces are inside (contain the private addresses). | Company(config)# interface gigabitethernet 0/0 |
Moves to interface configuration mode |
Company(config-if)# ip nat inside |
You can have more than one inside interface on a router | |
| Step 4: Define the outside interface (the interface leading to the public network). | Company(config-if)# interface serial 0/0/0 |
Moves to interface configuration mode |
Company(config-if)# ip nat outside |
Defines which interface is the outside interface for NAT |
Verifying NAT and PAT Configurations
Router# show access-list |
Displays access lists |
Router# show ip nat translations |
Displays the translation table |
Router# show ip nat statistics |
Displays NAT statistics |
Router# clear ip nat translation inside 1.1.1.1 2.2.2.2 outside 3.3.3.3 4.4.4.4 |
Clears a specific translation from the table before it times out 1.1.1.1 = Global IP address 2.2.2.2 = Local IP address 3.3.3.3 = Local IP address 4.4.4.4 = Global IP address |
Router# clear ip nat translation * |
Clears the entire translation table before entries time out |
Note
The default timeout for a translation entry in a NAT table is 24 hours.
Troubleshooting NAT and PAT Configurations
Router# debug ip nat |
Displays information about every packet that is translated Be careful with this command. The router’s CPU might not be able to handle this amount of output and might therefore hang the system |
Router# debug ip nat detailed |
Displays greater detail about packets being translated |
Configuration Example: PAT
Figure 18-4 shows the network topology for the PAT configuration that follows using the commands covered in this chapter.
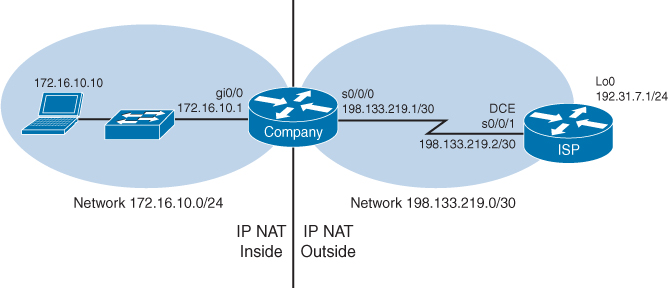
Figure 18-4 Port Address Translation Configuration
ISP Router
Router> enable |
Moves to privileged EXEC mode |
Router# configure terminal |
Moves to global configuration mode |
Router(config)# hostname ISP |
Sets the host name |
ISP(config)# no ip domain-lookup |
Turns off Domain Name System (DNS) resolution to avoid wait time due to DNS lookup of spelling errors |
ISP(config)# enable secret cisco |
Sets the encrypted password to cisco |
ISP(config)# line console 0 |
Moves to line console mode |
ISP(config-line)# login |
User must log in to be able to access the console port |
ISP(config-line)# password class |
Sets the console line password to class |
ISP(config-line)# logging synchronous |
Commands will be appended to a new line |
ISP(config-line)# exit |
Returns to global configuration mode |
ISP(config)# interface serial 0/0/1 |
Moves to interface configuration mode |
ISP(config-if)# ip address 198.133.219.2 255.255.255.252 |
Assigns an IP address and netmask |
ISP(config-if)# clock rate 56000 |
Assigns the clock rate to the DCE cable on this side of the link |
ISP(config-if)# no shutdown |
Enables the interface |
ISP(config-if)# interface loopback 0 |
Creates loopback interface 0 and moves to interface configuration mode |
ISP(config-if)# ip address 192.31.7.1 255.255.255.255 |
Assigns an IP address and netmask |
ISP(config-if)# exit |
Returns to global configuration mode |
ISP(config)# ip route 64.64.64.64 255.255.255.192 s0/0/0 |
Creates a static route so that packets can be sent to correct destination |
ISP(config)# exit |
Returns to privileged EXEC mode |
ISP# copy running-config startup-config |
Saves the configuration to NVRAM |
Company Router
Router> enable |
Moves to privileged EXEC mode |
Router# configure terminal |
Moves to global configuration mode |
Router(config)# hostname Company |
Sets the host name |
Company(config)# no ip domain-lookup |
Turns off DNS resolution to avoid wait time due to DNS lookup of spelling errors |
Company(config)# enable secret cisco |
Sets the secret password to cisco |
Company(config)# line console 0 |
Moves to line console mode |
Company(config-line)# login |
User must log in to be able to access the console port |
Company(config-line)# password class |
Sets the console line password to class |
Company(config-line)# logging synchronous |
Commands will be appended to a new line |
Company(config-line)# exit |
Returns to global configuration mode |
Company(config)# interface gigabitethernet 0/0 |
Moves to interface configuration mode |
Company(config-if)# ip address 172.16.10.1 255.255.255.0 |
Assigns an IP address and netmask |
Company(config-if)# no shutdown |
Enables the interface |
Company(config-if)# interface serial 0/0/0 |
Moves to interface configuration mode |
Company(config-if)# ip address 198.133.219.1 255.255.255.252 |
Assigns an IP address and netmask |
Company(config-if)# no shutdown |
Enables the interface |
Company(config-if)# exit |
Returns to global configuration mode |
Company(config)# ip route 0.0.0.0 0.0.0.0 198.133.219.2 |
Sends all packets not defined in the routing table to the ISP router |
Company(config)# access-list 1 permit 172.16.10.0 0.0.0.255 |
Defines which addresses are permitted through; these addresses are those that will be allowed to be translated with NAT |
Company(config)# ip nat inside source list 1 interface serial 0/0/0 overload |
Creates NAT by combining list 1 with the interface serial 0/0/0. Overloading will take place |
Company(config)# interface gigabitethernet 0/0 |
Moves to interface configuration mode |
Company(config-if)# ip nat inside |
Location of private inside addresses |
Company(config-if)# interface serial 0/0/0 |
Moves to interface configuration mode |
Company(config-if)# ip nat outside |
Location of public outside addresses |
Company(config-if)# |
Returns to privileged EXEC mode |
Company# copy running-config startup-config |
Saves the configuration to NVRAM |