Chapter 4
Azure Queue Storage
Overview
A distributed application should not rely on data transfer using direct communication between components at all times. Network outages between components, bandwidth limitations due to changing demands, and other infrastructure issues could cause one or more of the components to go temporarily offline. When this happens, your application could lose data or break down completely.
A far better approach is to set up the application so that its various components post and consume messages based on resource and system availability. Azure Queue Storage supports such an approach. Azure Queue Storage stores and consumes a large number of messages over HTTP or HTTPS in a secure and resilient manner.
Azure Queue Storage consists of three main components:
Azure Storage account To use Azure Queue Storage, you need a standard type v1 or type v2 general-purpose Azure Storage account. You cannot use a different type of account, such as an Azure Blob Storage account. This storage account provides a unique namespace that you can use to connect to the queue(s).
Queue Queues facilitate the storing, retrieving, and deleting of messages. A queue can contain millions of messages and scale to 500 TB in size.
Message A message, in any format, can be stored in the queue for between 1 second to 7 days. A message could be text, a variable, or some other type of message that requires processing. If the message is not retrieved before the end of its expiry period, it is deleted from the queue. You can also set a message to never expire until it is processed and deleted from the queue by the application. Messages must be smaller than 64 kilobytes (KB).
Each queue has a unique endpoint URL that is based on the storage account and queue name. For example, suppose you have a storage account, named app01storageaccount, and two queues, named messages and images. In that case, the URL for each queue would be as follows:
Messages queue https://app01storageaccount.queue.core.windows.net/messages
Images queue https://app01storageaccount.queue.core.windows.net/images
Once messages are in a queue, an application can use HTTP or HTTPS to connect to the queue and retrieve and process the messages asynchronously. The oldest messages are always retrieved first.
You can configure multiple queues per storage account to handle the needs of different applications or APIs. The maximum total number of messages across all the queues in a storage account is limited by a standard account’s total capacity, which is currently 5 petabytes (PB).
Key features
Some key features and benefits of using Azure Queue Storage include the following:
Simple to use Azure Queue Storage supports the use of multiple interfaces and methods to create and manage queues and messages, including the Azure portal, Azure PowerShell, Azure CLI, and REST APIs.
Support for multiple programming languages Developers can integrate the Azure Queue Storage service using .NET, Java, Python, Node.js, C++, PHP, and Ruby-based applications. It is not limited to certain application builds, so it can be used extensively.
Scalability Azure Queue Storage is extremely scalable. You can store millions of messages in a single queue and maintain multiple queues in a single storage account. Each storage account can be up to 5 PB and each queue can scale up to 500 TB.
Security Azure Queue Storage is accessible using secure HTTPS endpoints. Each queue supports multiple methods to authorize access by applications or users before any messages are made visible.
Resiliency Because Azure Queue Storage uses an Azure Storage account for message storage, the resiliency and redundancy options for Azure Storage accounts—geo-redundant storage (GRS), zone-redundant storage (ZRS), read-access GRS, geo-zone-redundant storage (GZRS), and read-access GZRS—are supported for Azure Queue Storage, too.
Reliability Scalability, security, and resiliency, combined with the correct storage architecture, make Azure Queue Storage extremely reliable for use in application development. With Azure Queue Storage, messages can be safely stored and securely retrieved without data loss.
Cost-effective With Azure Queue Storage, charges are levied based on actual storage consumption per month and on queue operations such as message creation, retrieval, reads, deletions, and so on. For example, 10,000 message read operations on queue storage hosted in the Azure West US region currently cost $0.0004. Microsoft’s website includes detailed, up-to-date pricing options to help you estimate your monthly spending using Azure Queue Storage.
Key concepts
Following are some key concepts that explain in more detail how the components of Azure Queue Storage work.
Azure Storage account
As discussed in this book’s introduction, Azure provides multiple types of storage services, such as standard general-purpose v1 and v2 Azure Storage accounts, Azure Blob Service, Azure Files, Azure Managed Disks, and so on. Each of these supports different types of storage, such as blob, file, queue, and table storage. Of these, only standard general-purpose v1 and v2 Azure Storage accounts support queue storage.
Azure provides a set of unique service endpoints for each of its various storage offerings. The service endpoint enables you to access data in the storage using tools and APIs.
For Azure Queue Storage, the unique endpoint naming format is a combination of the storage account name and a static suffix (queue.core.windows.net). For example, a storage account named myaccount would have the following queue storage endpoint: https://myaccount.queue.core.windows.net.
You can create a maximum of 250 storage accounts in a single Azure region, with each storage account having its own corresponding blob, file, queue, and table endpoints.
Create Azure Storage account walkthrough
The following sections step you through the process of creating a standard general-purpose Azure Storage account for use with Azure Queue Storage using the Azure portal and the Azure CLI.
Using Azure Portal
To create a standard general-purpose Azure Storage account using the Azure portal, follow these steps:
Log in to the Azure portal, type storage accounts in the search box, and select Storage Accounts from the list that appears. (See Figure 4-1.)
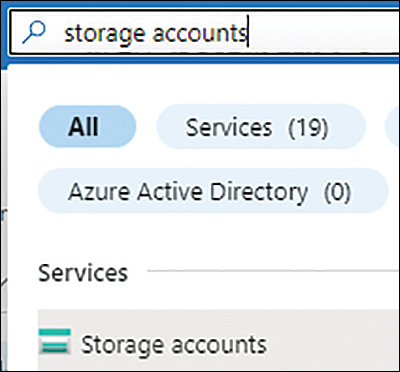
FIGURE 4-1 Storage accounts search.
On the Storage Accounts page, click Create Storage Account. (See Figure 4-2.)
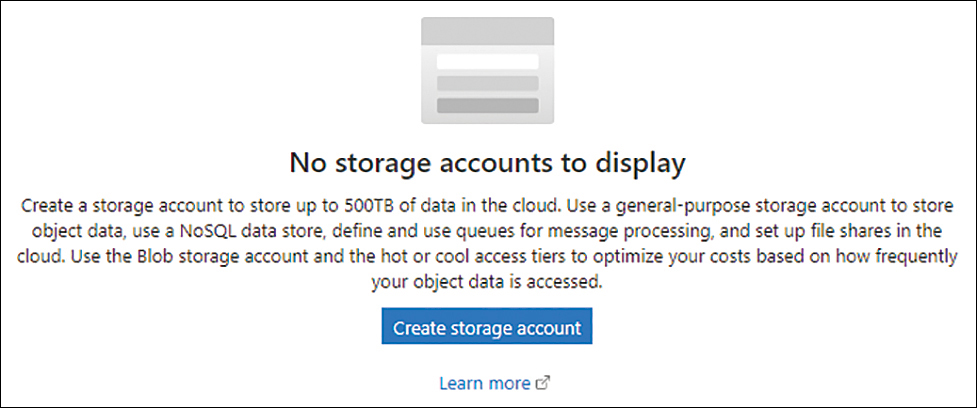
FIGURE 4-2 Click the Create Storage Account button.
In the Basics tab of the Create a Storage Account wizard (see Figure 4-3), enter the following information and click Next:
Subscription Select the subscription in which you want to create the Azure Storage account.
Resource Group Select an existing resource group or create a new one in which to create the Azure Storage account.
Storage Account Name Enter a unique name for the storage account.
Region Select the Azure region in which you want to host the storage account.
Performance Select the Standard option button.
Redundancy Select the redundancy type you want to use for the storage. In this case, select the Geo-Redundant Storage (GRS) option.
Make Read Access Data Available in the Event of Regional Unavailability Select this check box.
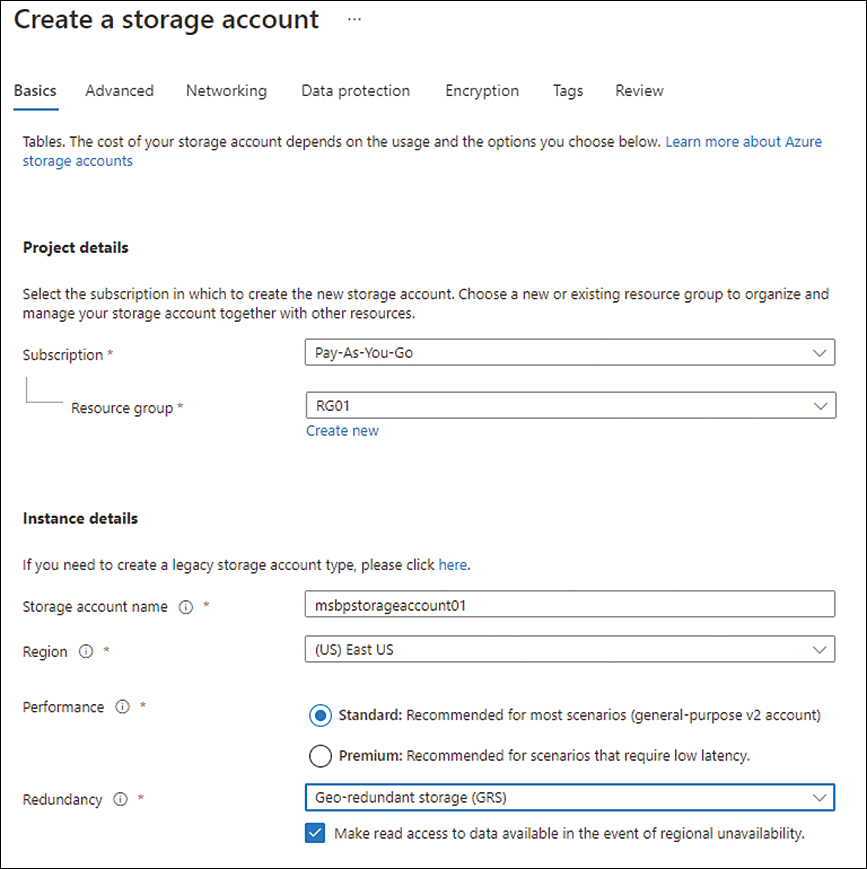
FIGURE 4-3 The Advanced tab of the Create a Storage Account wizard.
In the Advanced tab of the Create a Storage Account wizard (see Figure 4-4), optionally deselect the Allow Enabling Public Access on Containers check box (this account won’t host containers) and select a higher setting for the Minimum TLS Version option, leave the other options set to their default values, and click Next.
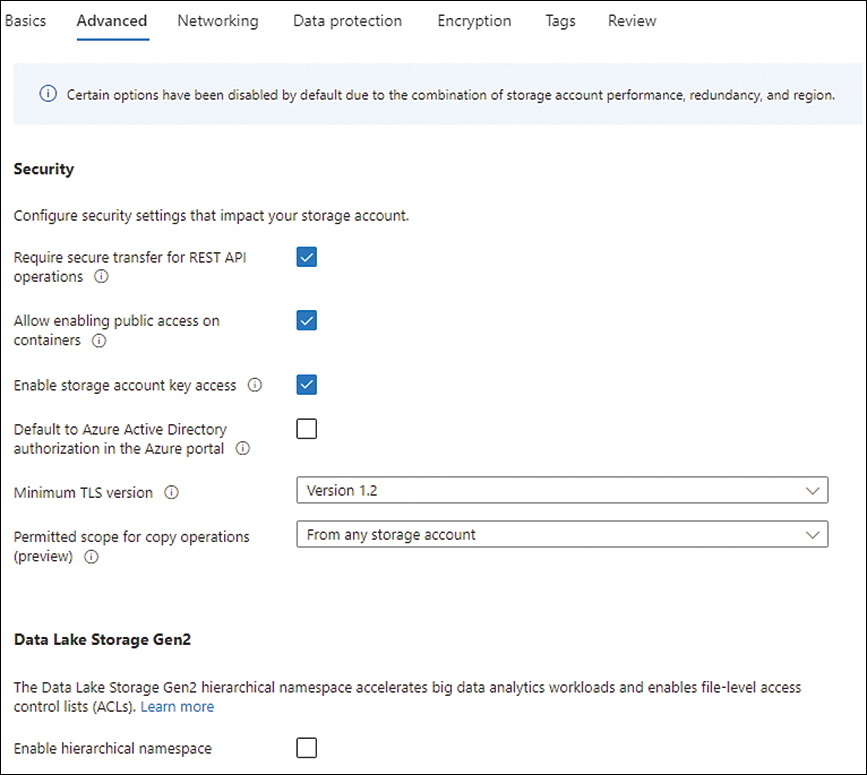
FIGURE 4-4 The Advanced tab of the Create a Storage Account wizard.
In the Networking tab of the Create a Storage Account wizard (see Figure 4-5), leave both options set to their default values and click Next.
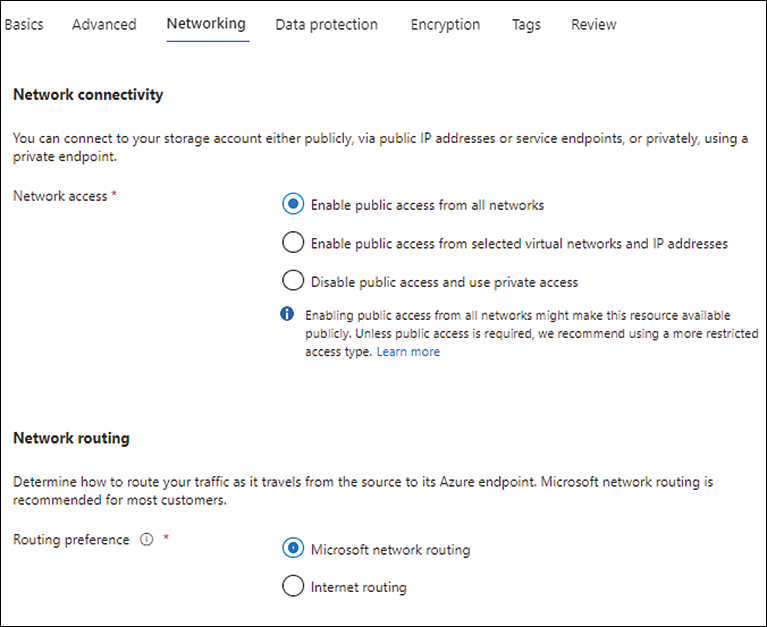
FIGURE 4-5 The Networking tab of the Create a Storage Account wizard.
In the Data protection tab of the Create a Storage Account wizard (see Figure 4-6), leave all the check boxes unchecked and click Next.
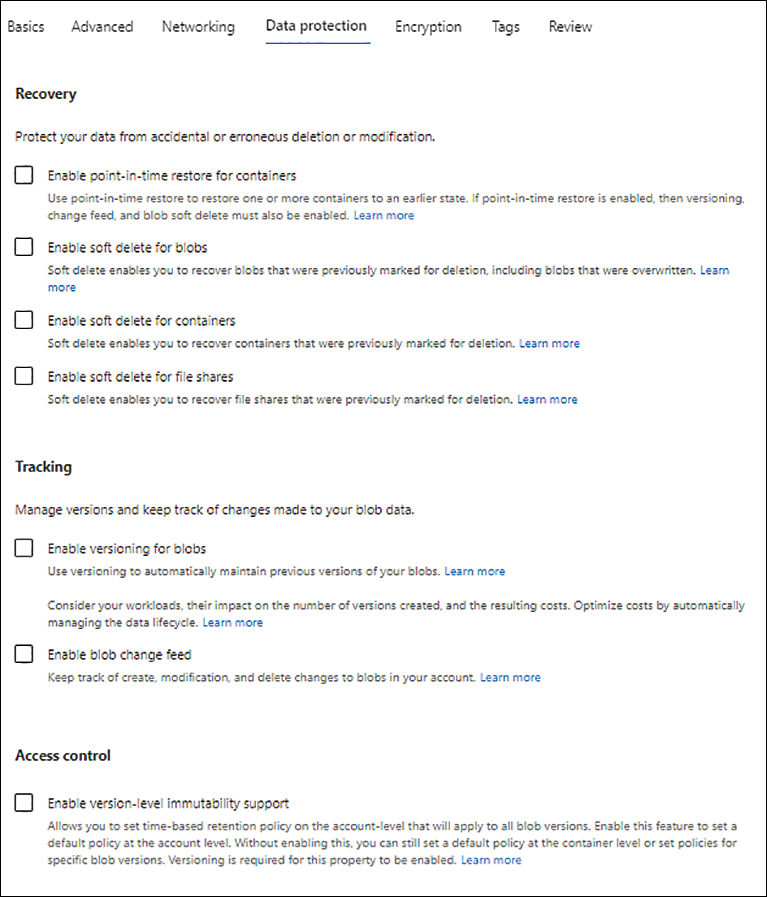
FIGURE 4-6 The Data Protection tab of the Create a Storage Account wizard.
In the Encryption tab of the Create a Storage Account wizard (see Figure 4-7), enter the following information and click Next:
Encryption Type Leave this set to Microsoft-Managed Keys (MMK) (the default).
Enable Support for Customer-Managed Keys Select the All Service Types (Blobs, Files, Tables, and Queues) option button.
Enable Infrastructure Encryption Select this check box to enable double encryption using infrastructure encryption. (This is discussed in more detail later in this chapter.)
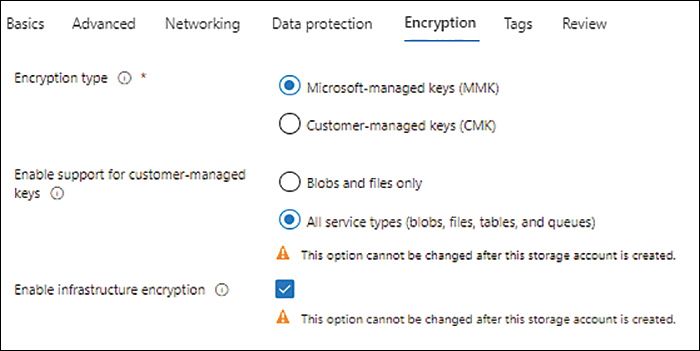
FIGURE 4-7 The Encryption tab of the Create a Storage Account wizard.
In the Tags tab (see Figure 4-8), enter the tags you want to associate with the Azure Storage account and click Next.

FIGURE 4-8 The Tags tab of the Create a Storage Account wizard.
In the Review tab (see Figure 4-9), review your settings. Then click Create to create the Azure Storage account.
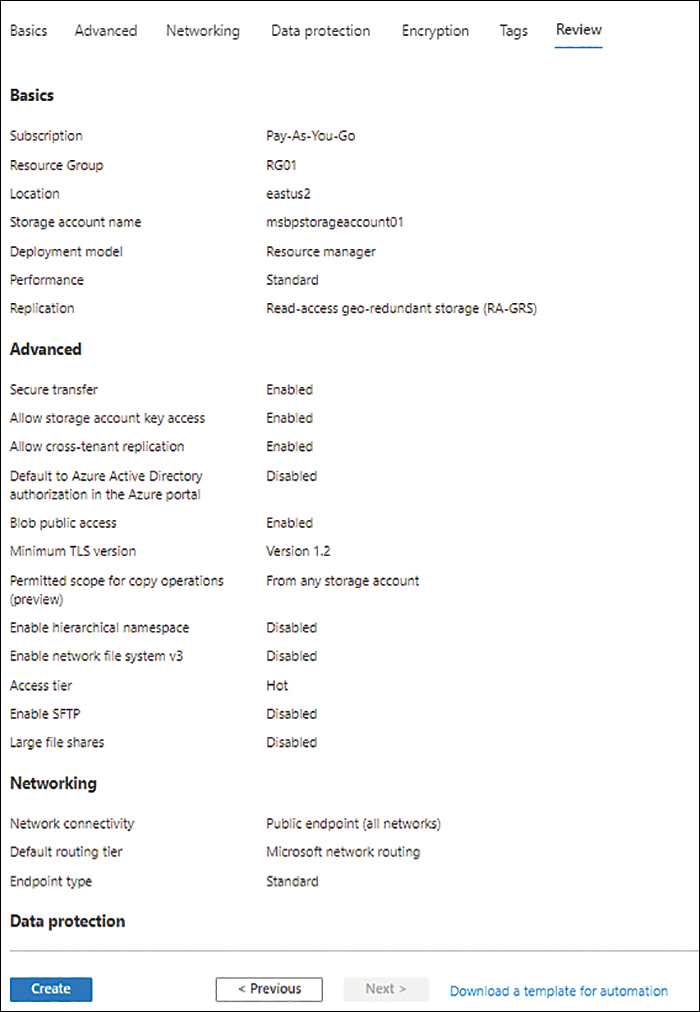
FIGURE 4-9 The Review tab of the Create a Storage Account wizard.
After the account is created, click Go to Resource to access the new account’s page. (See Figure 4-10.)
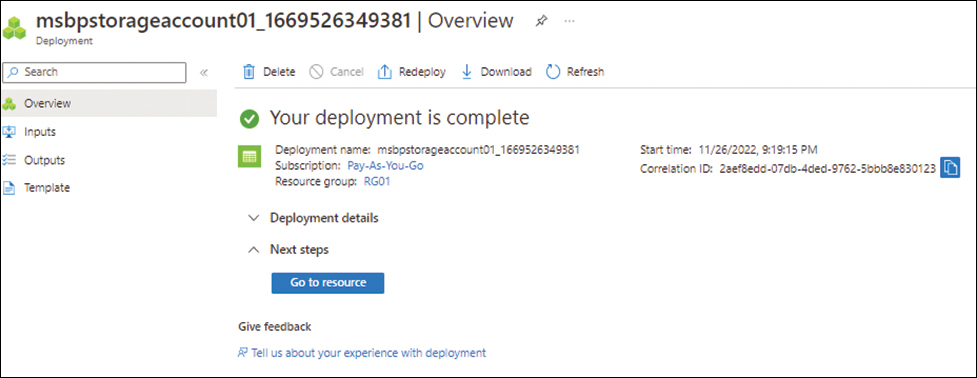
FIGURE 4-10 Storage account deployment.
Using the Azure CLI
Use the following code to create an Azure Storage account in the Azure CLI:
#Define variables
stgname="mbspstorageaccount01"
rg="RG01"
region="eastus2"
queuename="primaryqueue"
vnet="vnet-01"
subnet="default"
#Create storage account
az storage account create -n $stgname -g $rg -l $region --sku Standard_GRS
Queues and messages
Now that you know how to set up the storage account used by Azure Queue Storage, let’s discuss in more detail are and then proceed to creating and managing queues and messages.
Queues store messages from different application components and retrieve them for processing or to trigger additional workflows based on their input. Messages can be retrieved in the order in which they arrived in the queue. When there are multiple application components retrieving messages from the same queue, a message being retrieved by an application component is made invisible to all other application components for a predefined period called the visibility timeout. After the visibility timeout expires, the message reappears in the queue for processing by other application components unless the component that retrieved it earlier deletes it from the queue after.
Queues are extremely scalable and reliable. You can access queues from any geography (unless restricted by you). This helps in designing distributed applications across multiple geographies to increase reliability and redundancy. In addition, Microsoft provides built-in fault tolerance and failover for the Azure Queue Storage service.
Manage queues and messages walkthrough
The following sections step you through the process of managing queues and messages using the Azure portal and the Azure CLI.
Using Azure Portal
To manage queues and messages—including adding queues and messages, dequeuing messages, and clearing the queue—using the Azure portal, follow these steps:
In the left pane of the Azure Storage account page, under Data Storage, click Queues. Then click the Queue button along the top of the Queues page that opens on the right. (See Figure 4-11.)
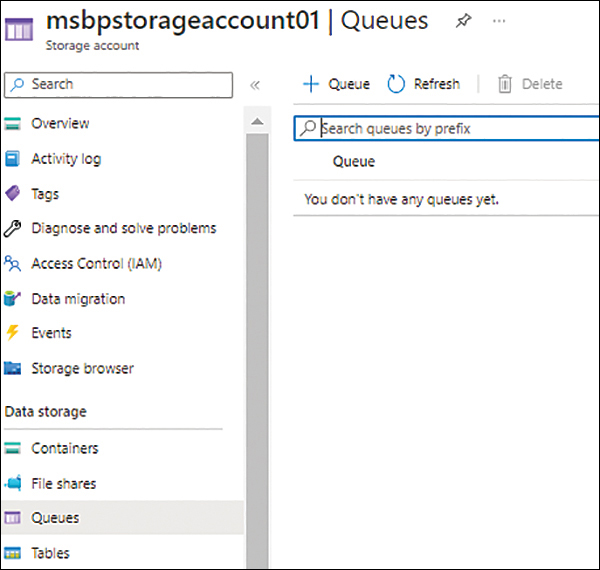
FIGURE 4-11 The Queues page.
In the Add Queue dialog box (see Figure 4-12), enter a unique name for the queue and click OK.

FIGURE 4-12 The Add Queue dialog box.
The new queue appears in the Queues page. (See Figure 4-13.) Click the queue to open it.

FIGURE 4-13 The queue is added to the Queues page.
On the queue’s Overview page, click Add Message. (See Figure 4-14.)

FIGURE 4-14 The new queue’s Overview page.
Enter the following information in the Add Message to Queue dialog box (see Figure 4-15) and click OK.
Message Text Enter the text for your message.
Expires In Select a value between 1 second and 7 days.
Message Never Expires Select this check box if you don’t want the message to ever expire.
Encode the Message Body in Base64 Leave this check box checked (the default) to encrypt the message in the queue.
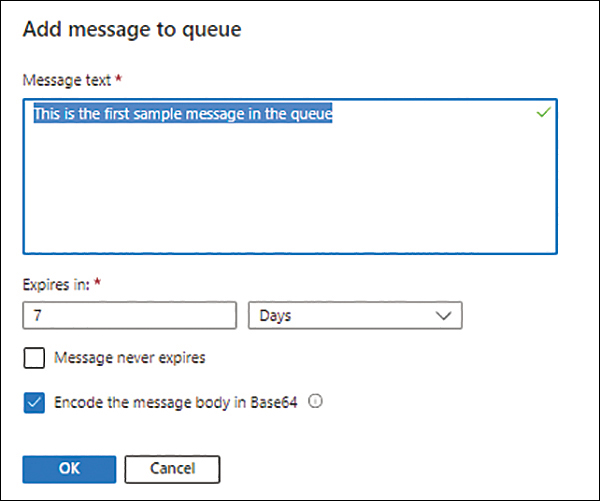
FIGURE 4-15 Add a message to the queue.
The new message appears in the queue’s page, meaning that the message is in the queue. (See Figure 4-16.)

FIGURE 4-16 The message is in the queue.
Repeat steps 4 and 5 to add another message to the queue. (See Figure 4-17.)

FIGURE 4-17 The queue now contains two messages.
Now let’s dequeue one of the messages.
In the queue’s page, select the check box next to the first message. Then click Dequeue Message.
In the Dequeue First Message dialog box (see Figure 4-18), click Yes.
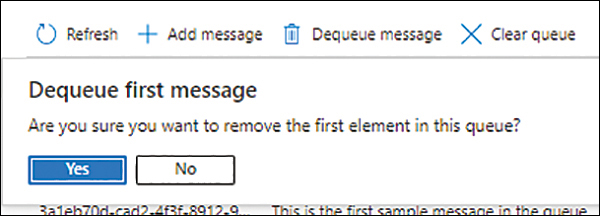
FIGURE 4-18 Dequeue the first message.
The first message in the queue is deleted. (See Figure 4-19.)
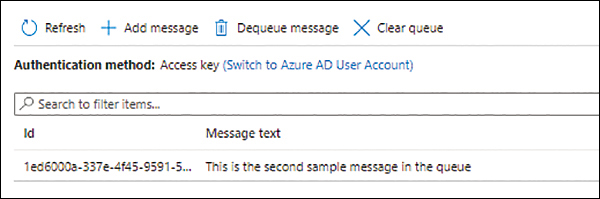
FIGURE 4-19 The message is deleted.
Next, let’s clear the whole queue.
In the queue’s page, click Clear Queue.
In the Dequeue All Messages dialog box (see Figure 4-20), click Yes.

FIGURE 4-20 Dequeue all messages.
The entire queue is cleared. (See Figure 4-21.)
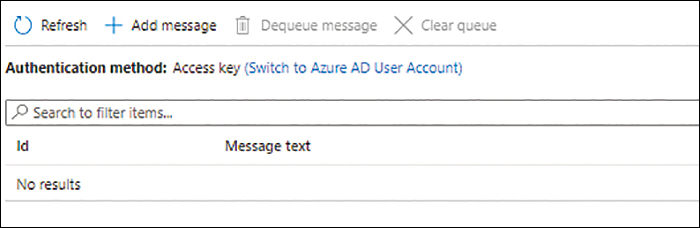
FIGURE 4-21 The queue is cleared.
The next steps show you how to create an access policy for the queue:
In the left pane of the queue’s page, under Settings, click Access Policy.
On the Access Policy page (see Figure 4-22), click Add Policy.
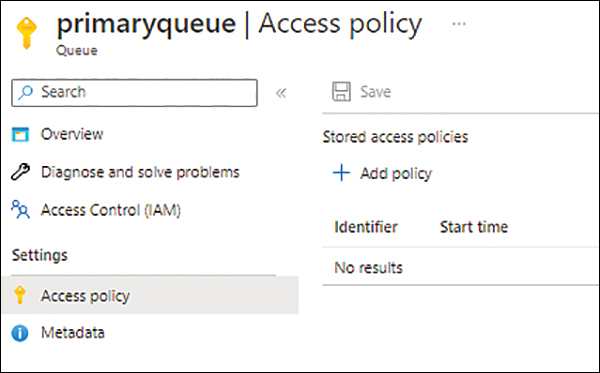
FIGURE 4-22 The queue’s Access Policy page.
In the Add Policy dialog box (see Figure 4-23), enter the following information and click OK:
Identifier Enter a unique name for the access policy.
Permissions Select the permissions you want to apply to the access policy.
Start Time Select a start date, time, and time zone for the policy.
Expiry Time Select an expiry date, time, and time zone for the policy.

FIGURE 4-23 Add policy.
The policy is listed on the Access Policy page. (See Figure 4-24.) Click Save.

FIGURE 4-24 ViewOnly access policy.
Using the Azure CLI
Queues and messages can be created and managed using the az storage queue create and az storage message Azure CLI commands. You can create and manage the queues and messages discussed in the Azure portal walkthrough using the following script in Azure CLI:
#Define variables
stgname="mbspstorageaccount01"
rg="RG01"
region="eastus2"
queuename="primaryqueue"
vnet="vnet-01"
subnet="default"
policyname=”ViewOnly”
#Create queue
az storage queue create -n $queuename --metadata key1=value1 key2=value2 --account-name
$stgname
#Create message
az storage message put -q $queuename --content "This is the first sample message in the
queue" --time-to-live 86400 --account-name $stgname
az storage message put -q $queuename --content "This is the second sample message in the
queue" --time-to-live 86400 --account-name $stgname
#get message ID
az storage message get -q $queuename --account-name $stgname
#Get message ID from the output of the above command and replace below BEFORE executing
the below command
#Delete specific message from queue
az storage message delete --id 84219a6c-f4a1-46c1-9975-1024e45418eb --pop-receipt popre-
ceiptreturned -q $queuename --account-name $stgname
#Delete all message in queue
az storage message clear -q $queuename --account-name $stgname
#Create storage access policy
az storage queue policy create --name $policyname --queue-name $queuename --account-name
$stgname --expiry 2023-11-26’T’00:00:00’Z’ --permissions read
Networking considerations
Azure Queue Storage supports various types of network security configurations. These enable you to secure and restrict access to the associated Azure Storage account depending on your organizational and compliance needs. The options are as follows:
Storage firewall and virtual networks
Private endpoints
Requiring secure transfers
Enforcing TLS versions
Storage firewall and virtual networks
The storage firewall and virtual network restrictions are the same as the ones covered in Chapter 1 for Azure Blob Storage. To recap, the storage firewall offers four settings to restrict access to the queue storage account:
Enabled from All Networks When you select this option, the storage account is accessible from any public network. This configuration is the least secure.
Enabled from Selected Virtual Networks and IP Addresses With this option, you can configure the storage firewall to allow connections from selected Azure virtual networks or public IP addresses over the public internet. If you choose to permit connections from virtual networks, Azure prompts you to select the subnets you want to allow and creates service endpoints on each of those subnets. If you decide to allow connections from public IP addresses, you’ll have to specify which addresses to allow.
Disabled This disables access from all connections via the public internet. Only private endpoint connections are allowed. (More on private endpoints in a moment.)
Storage firewall and virtual networks walkthrough
The following sections step you through the process of setting up a storage firewall that allows access to the Azure Storage account associated with Azure Queue Storage from a specific virtual network and IP address using the Azure portal and the Azure CLI.
Using Azure Portal
To set up a storage firewall that allows access to the Azure Storage account associated with Azure Queue Storage from a specific virtual network and IP address, follow these steps:
In the left pane of the Azure Storage account page, under Security + Networking, click Networking.
On the Networking page, under Public Network Access, select the Enabled from Selected Virtual Networks and IP Addresses option button.
The Networking page expands to display additional options. (See Figure 4-25.)
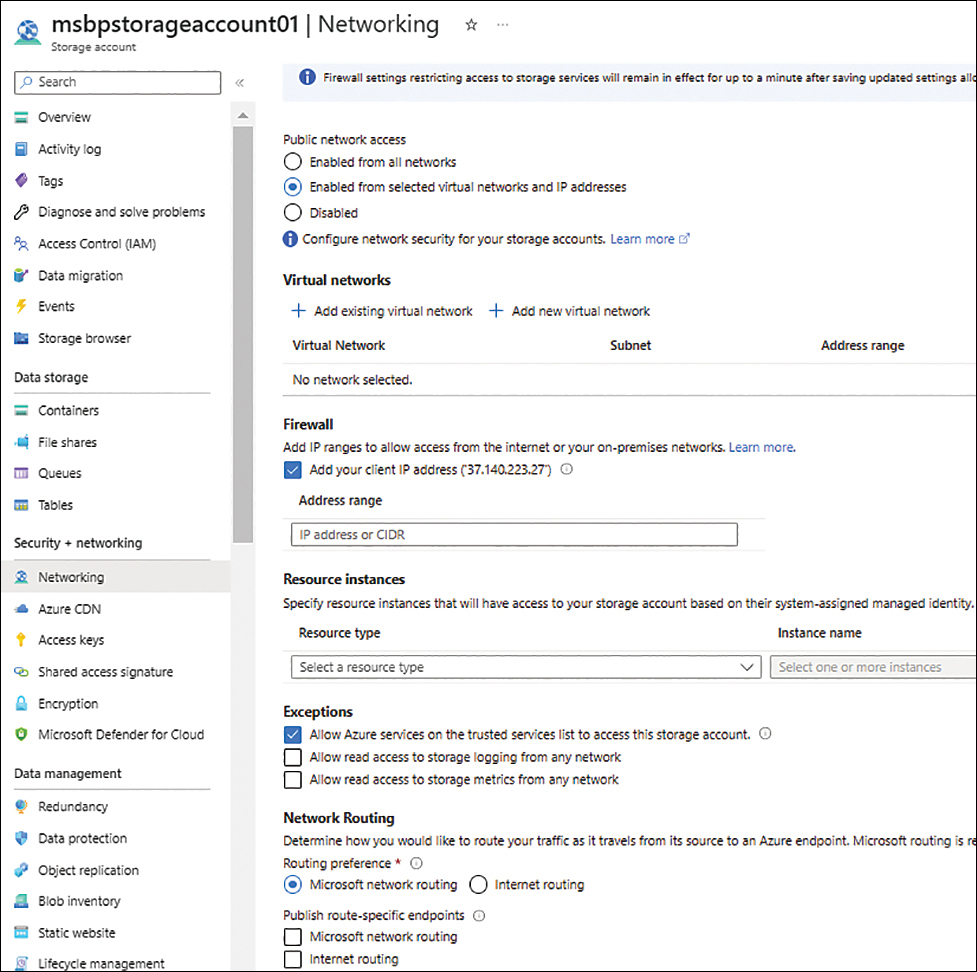
FIGURE 4-25 The Networking page expands to show additional options.
In the Virtual Networks section, click Add Existing Virtual Network.
In the Add Networks dialog box (see Figure 4-26), enter the following information and click Enable:
Subscription Select the subscription that contains the virtual network for which you want to allow access to the Azure Storage account.
Virtual Networks Select the virtual network for which you want to allow access.
Subnets Select the subnets for which you want to allow access.
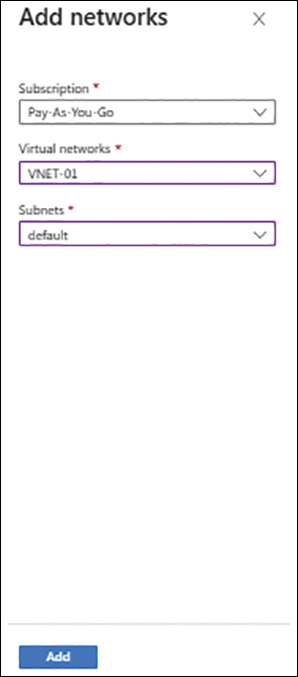
FIGURE 4-26 Add existing virtual networks.
The virtual network is added to the Virtual Networks section of the Firewalls and Virtual Networks tab. (See Figure 4-27.)
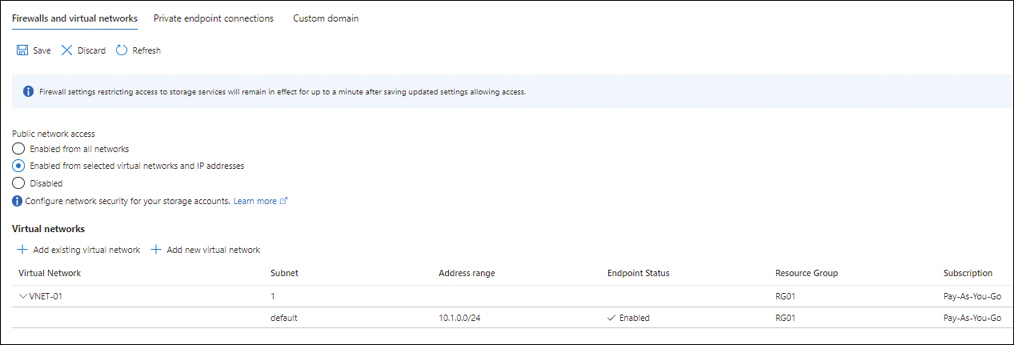
FIGURE 4-27 The virtual network is added.
Under Firewall, select the Add Your Client IP Address check box to allow your public IP address to access the storage.
Optionally, to allow additional public IP addresses or specific resource instances specify them in the Address Range box and Resource Instances settings.
Select all three check boxes in the Exceptions section. (See Figure 4-28.) Then click Save.
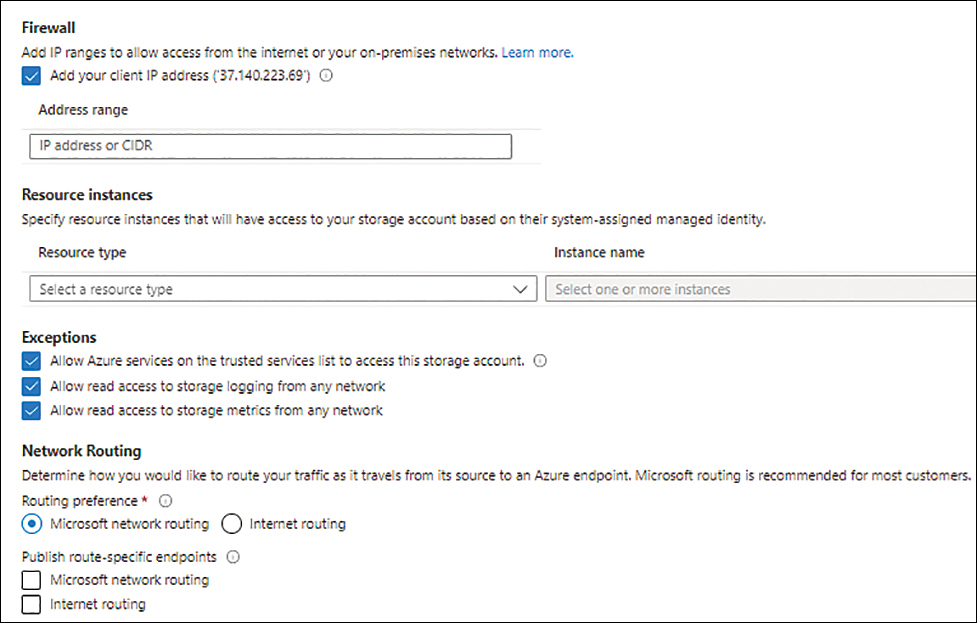
FIGURE 4-28 Finish configuring the storage firewall.
Using Azure PowerShell
Use the following Azure PowerShell code to set up a storage account firewall:
#Define required variables
$resourceGroup = "RG01"
$region = "eastus"
$storageaccname = "mbspblobstorage01"
$container = "container"
$vnet = "vNET01"
$subnet = "default"
#Setting up Storage account firewall

#Setup access from Subnet
Update-AzStorageAccountNetworkRuleSet -ResourceGroupName $resourcegroup -Name $storage-
account -DefaultAction Deny
Get-AzVirtualNetwork -ResourceGroupName $resourcegroup -Name $vnet | Set-AzVirtualNet-
workSubnetConfig -Name $subnet -AddressPrefix "10.0.0.0/24" -ServiceEndpoint "Microsoft.
Storage" | Set-AzVirtualNetwork
$subnet = Get-AzVirtualNetwork -ResourceGroupName $resourcegroup -Name $vnet | Get-AzVir-
tualNetworkSubnetConfig -Name $subnet
Add-AzStorageAccountNetworkRule -ResourceGroupName $resourcegroup -Name $storageaccount
-VirtualNetworkResourceId $subnet.Id
Using the Azure CLI
You can manage the storage firewall and virtual networks using the az storage account network-rule add and az network vnet subnet CLI commands. You can make the storage firewall and virtual network changes discussed in the preceding walkthroughs using the following script in Azure CLI:
#Define variables
stgname="mbspstorageaccount01"
rg="RG01"
region="eastus2"
queuename="primaryqueue"
vnet="vnet-01"
subnet="default"#Set up Storage Firewall
az network vnet subnet update --resource-group $rg --vnet-name $vnet --name $subnet
--service-endpoints "Microsoft.Storage"
az storage account network-rule add –resource-group $rg --account-name $stgname --vnet-
name $vnet --subnet $subnet
Private endpoints
Azure Queue Storage supports the use of private endpoints to connect to the storage via Private Link. So, all traffic from a private endpoint to the storage account traverses the Microsoft backbone network rather than the public internet.
You create a private endpoint within a subnet. The private endpoint then uses an IP address from the subnet’s IP range. You can set up a static IP address for the private endpoint or have Microsoft dynamically assign an unused one from the subnet range.
Private endpoint walkthrough
The following sections step you through the process of creating a private endpoint for use with Azure Queue Storage using the Azure portal.
Using Azure Portal
To create a private endpoint using the Azure portal, follow these steps:
In the left pane of the Azure Storage account page, under Security + Networking, click Networking.
On the Networking page, click the Private Endpoint Connections tab.
Click Private Endpoint at the top of the tab. (See Figure 4-29.)
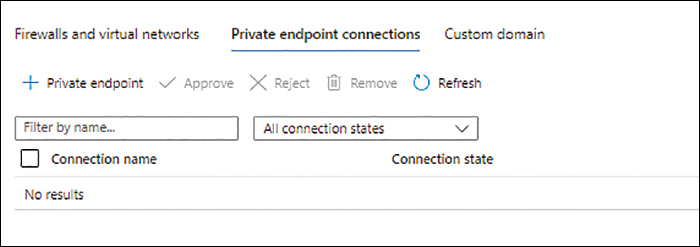
FIGURE 4-29 The Private Endpoint Connections tab.
In the Basics tab of the Create a Private Endpoint wizard (see Figure 4-30), enter the following information and click Next:
Subscription Select the subscription in which you want to create the private endpoint.
Resource Group Select an existing resource group or create a new one in which to create the private endpoint.
Name Enter a unique name for the private endpoint.
Network Instance Name Enter a unique name for the private endpoint network interface.
Region Select the Azure region in which you want to host the private endpoint.
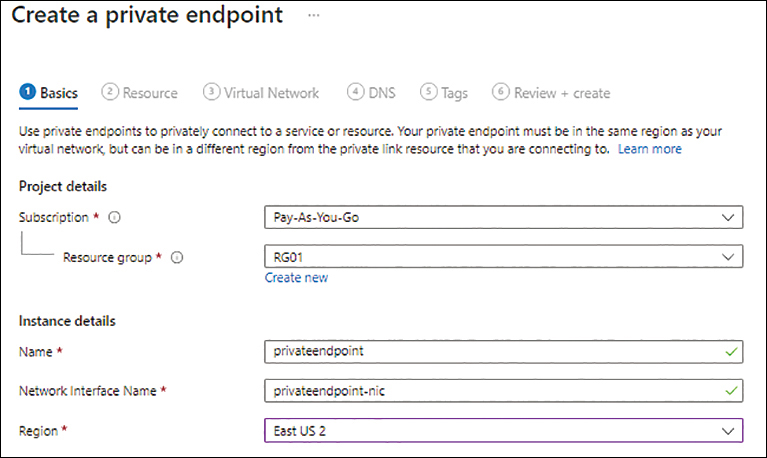
FIGURE 4-30 The Basics tab of the Create a Private Endpoint wizard.
On the Resource tab (see Figure 4-31), in the Target Sub-Resource drop-down list, select the Queue. Then click Next.
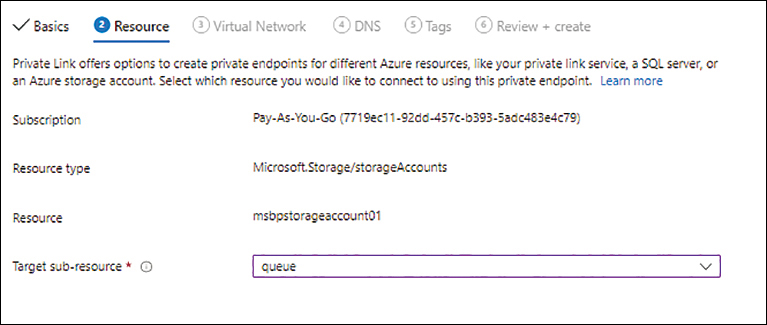
FIGURE 4-31 The Resource tab of the Create a Private Endpoint wizard.
On the Virtual Network tab (see Figure 4-32), enter the following information and click Next:
Virtual Network Select the virtual network in which you want to deploy the private endpoint.
Subnet Select the subnet on which you want to create the private endpoint.
Private IP Configuration Select the Dynamically Allocate IP Address or Statically Allocate IP Address option button, depending on your needs. If you select Static, define the private IP using the next two settings (
NameandPrivate IP).Name Enter a unique name for the private endpoint.
Private IP Enter an IP address for the private endpoint.
Application Security Group Leave this blank (the default) for this example.

FIGURE 4-32 The Virtual Network tab of the Create a Private Endpoint wizard.
On the DNS tab (see Figure 4-33), enter the following information and click Next:
Integrate with Private DNS Zone Select the Yes option button.
Subscription Select the subscription to use for the private DNS zone.
Resource Group Select the resource group to use to create the private DNS zone.
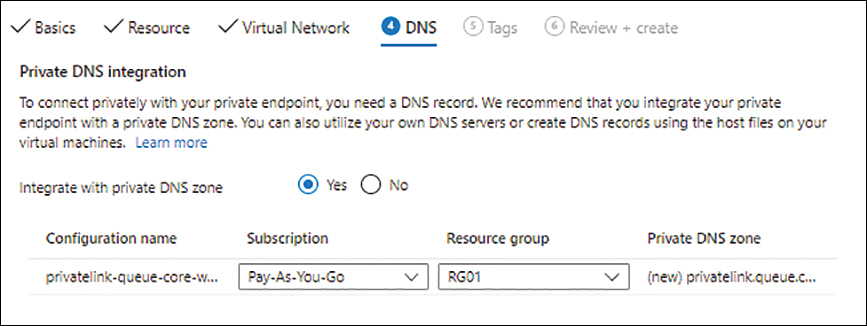
FIGURE 4-33 The DNS tab of the Create a Private Endpoint wizard.
On the Tags tab (see Figure 4-34), add any tags you want to associate with the private endpoint, and click Next.
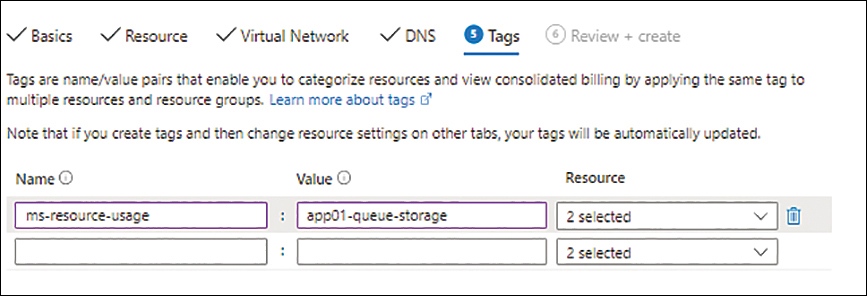
FIGURE 4-34 The Tags tab of the Create a Private Endpoint wizard.
On the Review + Create tab (see Figure 4-35), review your settings. Then click Create to create the private endpoint.
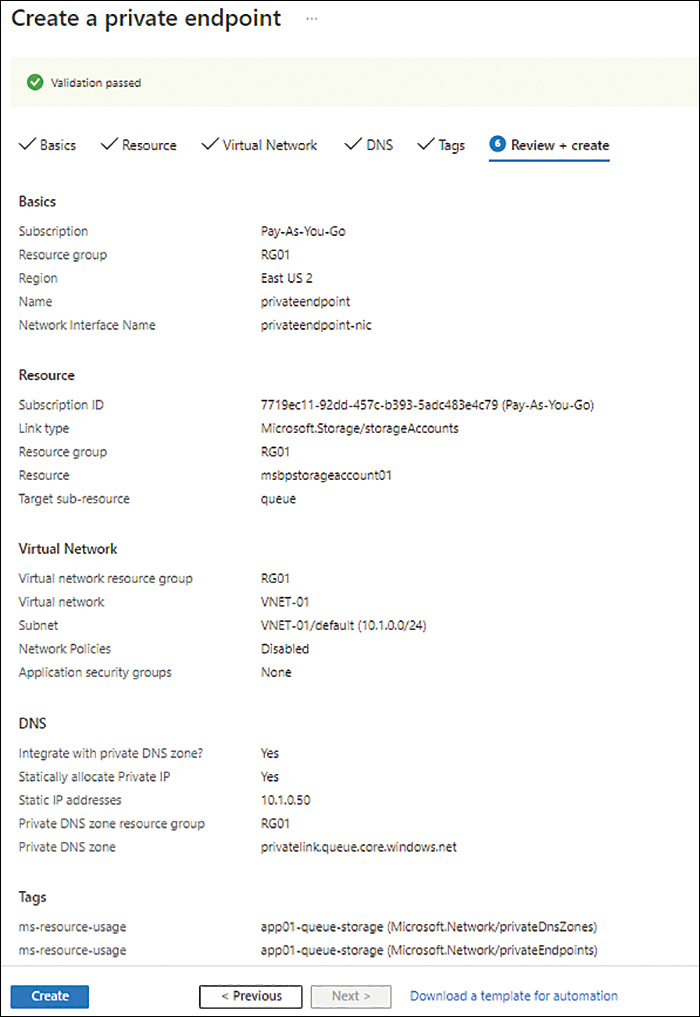
FIGURE 4-35 The Review + Create tab of the Create a Private Endpoint wizard.
After you set up your private endpoint, you need to add its fully qualified domain name (FQDN) to any internal DNS servers you may have in your environment. The next steps show you how to find the private endpoint’s FQDN.
On the Networking page, in the Private Endpoint Connections tab, click the private endpoint you just created. (See Figure 4-36.)
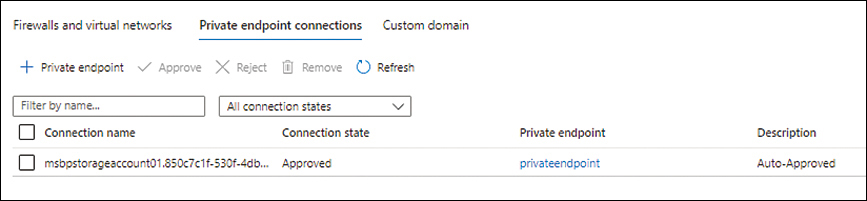
FIGURE 4-36 Private endpoint connections review.
On the private endpoint’s page, under Settings, click DNS Configuration.
On the DNS Configuration page, under Customer Visible FQDNs, note the entry in the private endpoint entry’s FQDN column. (See Figure 4-37.)
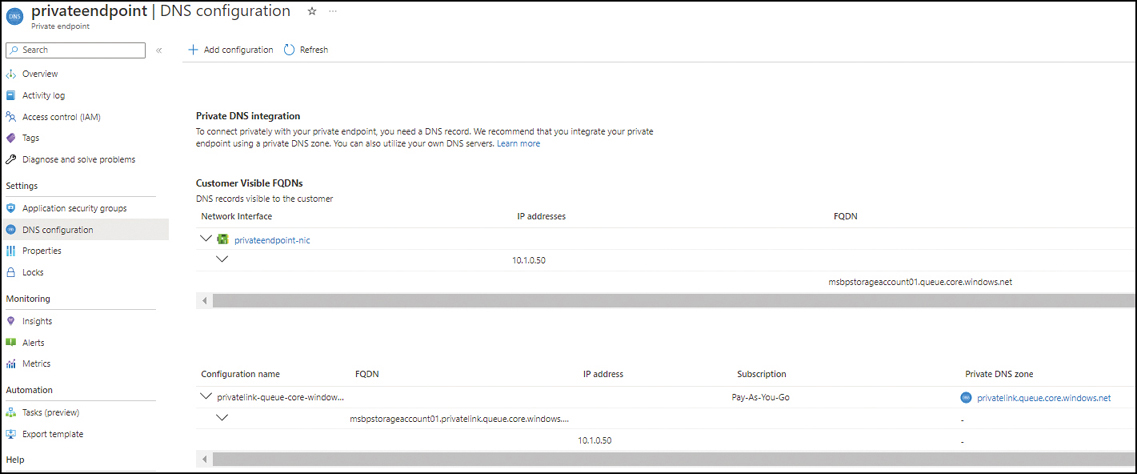
FIGURE 4-37 The private endpoint’s DNS Configuration page.
Using Azure PowerShell
You can create a private endpoint using the New-AzVirtualNetworkLink Azure PowerShell command. You can apply various switches to specify the parameters for the service. To create the same private endpoint as the one covered in the Azure portal walkthrough, use the following script in Azure PowerShell:
#Define required variables
$rg = "RG01"
$vnet = "vNET-01"
$subnetName = "default"
$endpointname = "PrivateEndpoint"
$privateendpointlink = "privateendpointlink"
$storagename = "msbpstorageaccount01"
$location = "East US 2"
# Create the Private Endpoint and Private link service connection
$storage = get-azstoragequeue -name $storagename
$PrivateLinkSvcConnection = New-AzPrivateLinkServiceConnection -Name $privateEndpointCon-
nectionName -PrivateLinkServiceId $storage.Id -GroupId "queue"
$privateEndpoint = New-AzPrivateEndpoint -Name "$endpointname" -ResourceGroup-
Name $rg -Location $location -SubnetName $subnet -PrivateLinkServiceConnection
$PrivateLinkSvcConnection
# Create the Private DNS zone
$PrivateDnsZone = New-AzPrivateDnsZone -Name "privatelink.queue.core.windows.net"
-ResourceGroupName $rg
# Create the Private DNS link
$PrivateDnsLink = New-AzPrivateDnsVirtualNetworkLink -Name $privateendpointlink `
-ResourceGroupName $rg `
-ZoneName "privatelink.queue.core.windows.net" `
-VirtualNetworkId $vnet.Id
# Create the Private DNS config
$PrivateDNSConfig = New-AzPrivateDnsZoneConfig -Name "privatelink.queue.core.windows.net" `
-PrivateDnsZoneId $PrivateDNSZone.ResourceId

$dnsZoneGroup = New-AzPrivateDnsZoneGroup -Name "PrivateDNSZoneGroup" `
-ResourceGroupName $rg `
-PrivateEndpointName $privateEndpoint.Name `
-PrivateDnsZoneConfig $PrivateDNSConfig
Using the Azure CLI
Private endpoint can be created using the az network private-endpoint create Azure CLI command. Different switches can specify the initial parameters for the service creation. The preceding private endpoint can be created using the following script in Azure CLI:
#Define required variables
rg="RG01"
vnet="vNET-01"
subnetName="Subnet01"
endpointname="PrivateEndpoint"
privateendpointlink="privateendpointlink"
storagename="msbpstorageaccount01"
location="East US 2"
# Create and configure the Private Endpoint
az network private-endpoint create
    --name PrivateEndpoint
    --resource-group $rg
    --vnet-name $vnet --subnet $subnet
    --private-connection-resource-id $storage.id
    --group-id storage
    --connection-name PrivEndpointConnection
# Create the Private DNS zone
az network private-dns zone create
    --resource-group $rg
    --name "privatelink.queue.core.windows.net"
# Create the Private DNS link
az network private-dns link vnet create
    --resource-group $rg
    --zone-name "privatelink.queue.core.windows.net"
    --name privateendpointlink
    --virtual-network $vnet
    --registration-enabled false
# Create the Private DNS config
az network private-endpoint dns-zone-group create
   --resource-group $rg
   --endpoint-name PrivateEndpoint
   --name PrivDNSZoneGroup
   --private-dns-zone "privatelink.queue.core.windows.net"
   --zone-name "privateendpointzone"
Requiring secure transfers
You can force Azure Queue Storage endpoints to work only over HTTPS by requiring secure transfers. When you require secure transfers, any client requests over HTTP (rather than HTTPS) are automatically rejected. You can use another Azure service called Azure Policy to enforce this requirement across all storage accounts in your organization. (Azure Policy is outside the scope of this book series. However, it will be covered in future editions.)
Enforcing TLS versions
By default, Azure storage accounts use Transport Layer Security (TLS) version 1.2. However, TLS 1.0 and TLS 1.1 can also be used. This is to support backward compatibility for client applications that use these versions of TLS. If this describes your client application, Microsoft highly recommends that you update it to use TLS 1.2 for all storage communications, and to enforce the use of that version on the storage account level to prevent future connections over those older protocols.
Identity and access considerations
When a user or a client application attempts to connect to Azure Queue Storage, the client request is authorized before the queue data is made available to the requester. This is done using Azure Active Directory (AD), storage account keys, or Shared Access Signature (SAS) tokens. The authorization process validates the client application’s permissions for accessing the queue storage account.
Authentication comes into the picture when using Azure Active Directory (AD) for access. With Azure Active Directory, the identity of the user or application service principal used by the client application is authenticated by Azure AD, which issues an OAuth 2.0 token when authentication is successful. The OAuth 2.0 token can then be used to authorize a request against the Azure Queue Storage service.
Azure AD
Azure AD handles authorization using role-based access control (RBAC). You can use RBAC to assign access to users, groups, or managed identities. You can also limit access on the level of an individual queue, storage account, resource group, subscription, or management group. This makes it easy to delegate access based on your organizational needs.
RBAC grants access based on built-in pre-defined roles in Azure AD. Built-in Azure AD role groups for queue storage include Storage Queue Data Reader, Storage Queue Data Contributor, Storage Queue Data Message Processor, and Storage Queue Data Message Sender, among others. You can also create custom roles to meet your application requirements.
Storage account access keys
By default, Microsoft generates two 512-bit access keys for every storage account when that account is created. You can use these keys to access all data in the storage account. This makes it extremely critical to secure and protect these keys.
You should not use access keys in client applications to access storage accounts. A breach in the application code could expose these keys to malicious third parties, who could gain full access to your storage account. You should also periodically rotate these keys manually or integrate them with Azure Key Vault so they are rotated automatically.
Shared Access Signature (SAS)
You can use a Shared Access Signature (SAS) token to provide delegated access to the queue storage account. The delegation provides granular control on what resources are accessible, what level of access is allowed, and for how long the access is available.
A SAS token is a more secure method for accessing queue storage using a client application because you control the token parameters. Any user, group, or service principal that has been assigned the permission Microsoft.Storage/storageAccounts/listKeys/action can generate a SAS URL using the account keys.
Shared Access Signature walkthrough
The following sections step you through the process of creating a SAS token for use with Azure Queue Storage using the Azure portal.
Using Azure Portal
To create a SAS token for use with Azure Queue Storage using the Azure portal, follow these steps:
In the left pane of the Azure Storage account page, under Security + Networking, click Shared Access String.
In the Shared Access Signature page (see Figure 4-38), enter the following information. Then click Generate SAS and Connection String:
Allowed Services Select the Queue check box.
Allowed Resource Types Select the Service and Object check boxes.
Allowed Permissions Select the check box next to each permission you want to allow.
Blob Versioning Permissions Leave this check box unchecked. (This setting pertains to blob storage, not queue storage.)
Allowed Blob Index Permissions Leave this check box unchecked. (This setting pertains to blob storage, not queue storage.)
Start and Expiry Date/Time Select the start and end date, time, and time zone for the SAS token.
Allowed IP Addresses Enter any public IPs that should be allowed.
Allowed Protocols Select the HTTPS Only (recommended, if your client application supports this) or HTTPS and HTTP option button.
Preferred Routing Tier Leave this set to Basic (the default).
Signing Key Select the signing key to use (key1 or key2).
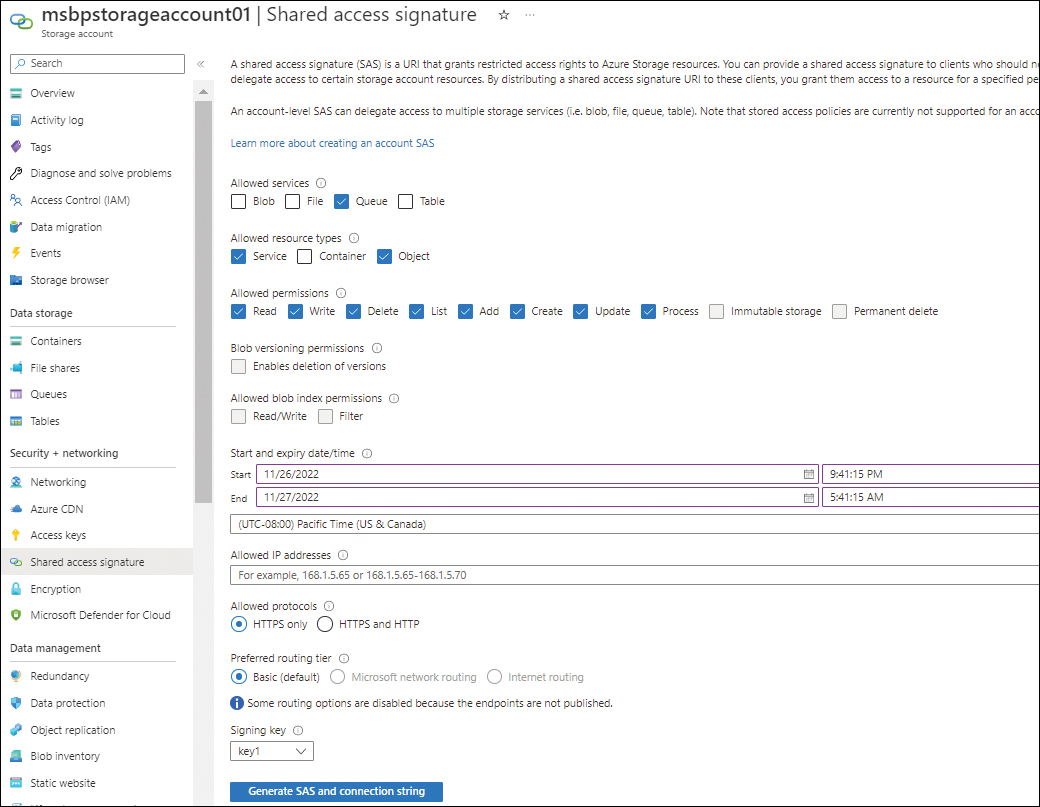
FIGURE 4-38 Creating a SAS token.
Data redundancy
Azure Storage accounts provide different levels of data redundancy and resiliency to enable you to access queue messages in the event of an outage. Chapter 1 covered these in detail, but let’s do a quick recap here:
Locally redundant storage (LRS) With LRS storage, Azure maintains three replicas of your data in a single datacenter within your primary Azure region to protect against local storage hardware, server rack, or network component failures. However, because all three replicas are stored in the same datacenter, if that datacenter experiences some type of disaster, all three copies of your data could be lost.
Zone-redundant storage (ZRS) Like LRS, ZRS synchronously commits and maintains three replicas of your data in your primary Azure region, but instead of storing each replica in a single datacenter, they are spread across three availability zones. So, if a disaster occurs in one availability zone, your data will generally still be accessible.
Geo-redundant storage (GRS) With GRS, Azure synchronously commits and maintains three replicas of your data in your primary Azure region in LRS. Then, three more replicas of your data in a secondary Azure region are updated to match the three replicas in the primary Azure region, again using LRS. If the datacenter in your primary region experiences an outage or disaster, then your data will be available in the datacenter in the secondary region. (This assumes all updates to the three replicas in the secondary region are complete. Otherwise, there could be some amount of data loss in the event of an outage or disaster.)
Geo-zone-redundant storage (GZRS) GZRS is just like GRS, but the three replicas of your data in the primary region use ZRS, while the replicas in the secondary region use LRS. So, there is additional redundancy in the primary region.
Read-access geo-redundant storage (RA-GRS) RA-GRS works like GRS. However, unlike GRS, where the secondary region is not available for read or write operations until a failover occurs, with RA-GRS, the data is available in a read-only state and can be used by your application if a failure occurs in the primary region.
Read-access geo-zone-redundant storage (RA-GZRS) RA-GZRS works like GZRS except like RA-GRS, data is available in a read-only state and can be used by your application if a failure occurs in the primary region.
Table 4-1 shows which standard general-purpose Azure Storage accounts support which redundancy options.
TABLE 4-1 Standard general-purpose Azure Storage account support for data redundancy
Standard Azure Storage account type | Data redundancy options supported |
|---|---|
Standard general-purpose v1 | LRS GRS RA-GRS |
Standard general-purpose v2 | LRS GRS RA-GRS ZRS GZRS RA-GZRS |
Depending on which data redundancy option you choose for your Azure Storage account, the associated queue storage will provide the same level of redundancy. Therefore, it is important to identify your queue storage redundancy requirements before setting up the Azure Storage account. If you attempt to do so at a later stage, after you have started using the account, you will have to either migrate the data on your own or with Microsoft’s support. Alternatively, if there is no data in the storage account as yet, you will need to delete and re-create the storage account to match the requirements.
Disaster recovery
Disaster recovery is a critical component of any application architecture. The higher the criticality of the application, the more redundancy is required to ensure minimal to no downtime or data loss.
Setting data redundancy options can enable you to recover queue messages in the event of an outage. However, you must take into account other application components in your disaster recovery planning, too. This ensures that in a disaster scenario, while the queue storage is online, all other related components are also online and can read the storage with minimal interruption.
Storage redundancy options such as GRS and GZRS can replicate your data asynchronously to another Azure region on an ongoing basis. When the secondary region is brought online and the corresponding DNS entries for the storage are up-to-date, your applications can start their read/write operations. You cannot perform read operations until the failover to the secondary region is complete.
You saw earlier that the primary queue storage endpoint points to https://<storage-account-name>.queue.core.windows.net/<queue-name>. Similarly, the secondary storage endpoint would be reachable at https://<storage-account-name>-secondary.queue.core.windows.net/<queue-name>. (The -secondary suffix is appended automatically by the secondary endpoint.) You can use this endpoint to connect to the secondary storage. The storage account access keys would remain the same in both the primary and secondary endpoints.
Storage account failover
There are two ways a GRS or GZRS storage account can be failed over to a secondary region:
Microsoft-managed failover In the event of a region-wide outage, Microsoft performs a full region failover to the secondary region. In such cases, you need not perform manual failover operations on your storage accounts. You would only have to ensure that when the DNS entries for the storage are updated, your applications are ready to resume normal operations.
Customer-managed failover When an outage occurs, Microsoft attempts to restore the data and operations in the primary region. If Microsoft is unable to do so, that region will be declared unrecoverable, and Microsoft will initiate the failover to the secondary region. If you cannot wait until such time, you can perform a manual failover from your storage account properties to bring your storage account online and make it accessible to your applications.
In either scenario, DNS entries must be updated automatically or manually before write operations to the storage can begin. Also take into account any private endpoints you may have created in the primary region; you need to make sure the same endpoints are set up in the secondary region, too.
Last Sync Time
Data synchronized using GRS is often behind data in the primary region. The data sync is asynchronous to avoid affecting write operations and storage performance in the primary region. This allows write operations to be committed on the primary storage without waiting for the same operations to be written and acknowledged by the secondary storage. However, at the time of a disaster, some data written and committed to the primary store might not yet have been committed to the secondary storage—in which case, that data would be lost.
You can determine whether this has happened by checking the Last Sync Time property for your storage account. This value is a GMT date/time value that you can query using Azure PowerShell, Azure CLI, or one of the Azure Storage client libraries. Any write operations performed after this Last Sync Time property value are most likely missing in the secondary region and might not be available for read operations. Incorporating this into your application logic can allow you to plan in advance how to handle such contingencies.
Last Sync Time walkthrough
The following sections step you through the process of checking the Last Sync Time property on a storage account using Azure PowerShell and Azure CLI.
Using Azure PowerShell
Use the following Azure PowerShell code to retrieve the Last Sync Time property for a storage account:
#Define variables
$rg = "RG01"
$storageaccname = "mbspstorageaccount01"

#Retrieve the last sync time
$LastSyncTime = $(Get-AzStorageAccount -ResourceGroupName $rg `
    -Name $storageaccname `
    -IncludeGeoReplicationStats).GeoReplicationStats.LastSyncTime
Using the Azure CLI
Use the following Azure CLI code to retrieve the Last Sync Time on a storage account:
#Define required variables
rg="RG01"
storageaccname="mbspstorageaccount01"

#Retrieve the last sync time
$LastSyncTime=$(az storage account show
    --name $storageaccname
    --resource-group $rg
    --expand geoReplicationStats
    --query geoReplicationStats.lastSyncTime
    --output tsv)
Data encryption
Azure Queue Storage supports multiple levels of data encryption for data that is persisted to the cloud to ensure customers can meet any regulatory or compliance requirements they may have. This includes infrastructure encryption, service-level encryption, and client-side encryption.
Infrastructure encryption
Azure Queue Storage automatically encrypts all data in a storage account using 256-bit Advanced Encryption Standard (AES) encryption and supports the same level of encryption at the infrastructure level. This double encryption protects against scenarios in which one of the encryption algorithms or keys gets compromised.
In general, you can enable infrastructure encryption when you create the storage account or when you create the encryption scope. However, for storage accounts meant for use with Azure Queue Storage, you must enable infrastructure encryption at the storage account level when you create the account.
After you create a storage account, you cannot change the infrastructure encryption configuration. If you require infrastructure encryption at a later stage, you will have to create another storage account with infrastructure encryption enabled and migrate the data to that account.
Service-level encryption
You can set up service-level encryption using Microsoft-managed or customer-managed keys with Azure Key Vault or using the Key Vault Managed Hardware Security Model (HSM) service (currently in preview).
Although you can choose which key your storage account should use, you cannot disable service-level encryption. It is automatically enabled, and if you do not specify any custom configurations, it is protected by default using Microsoft-managed keys.
Even if you select Microsoft-managed encryption on both the infrastructure and service level, the keys used for the encryption are always different. This ensures that if one key is breached, the second key can continue to protect the resource.
Client-side encryption
You can set up client-side encryption for queue storage using Azure Queue Storage client libraries for .NET and Python. With client-side encryption, you set up the application to encrypt data within the application layer before uploading it to the queue storage and to decrypt data when a client downloads it. The Azure Queue Storage client libraries support integration with Azure Key Vault for encryption key management.
There are two versions of client-side encryption:
Version 1 This uses Cipher Block Chaining (CBC) mode with AES 256-bit encryption.
Version 2 This uses Galois/Counter Mode (GCM) mode with AES 256-bit encryption.
Due to security vulnerabilities with the client library’s implementation of CBC mode, Microsoft recommends upgrading to version 2 as soon as possible.
Best practices
Following are some general best practices for setting up, securing, and managing the Azure Queue Storage service in your environment:
Monitor storage metrics using Azure Monitor To get a better understanding of queue storage usage so you can determine whether your message volumes are too high for your applications to handle, use Azure Monitor to monitor storage metrics. This will enable you to plan any changes in application architecture or storage account parameters to optimize the storage performance and ensure messages are being handled in a timely manner.
Plan for data redundancy Depending on your application requirements and budgetary constraints, choose the right data redundancy option so you can recover your queue storage data in case of a disaster. RA-GRS and RA-GZRS data redundancy have the added benefit of enabling you to spread the read-access loads to the secondary instance of the storage, thereby improving application performance. Take this into consideration during the application design and architecture phase so you can incorporate it into your storage build planning. Although you can switch data-redundancy levels at a later stage, this might require a full migration of the data account and a complete reconfiguration of the application to work with it, depending on the type of storage and features involved. Review the redundancy conversion limitations in place at the time of your planning to identify the right options for your scenario.
Plan for disaster recovery Depending on which data redundancy option you choose, your storage account data might already replicate to another Azure availability zone or Azure region. However, it is important to plan how you will handle a failover in case disaster strikes the primary Azure region where your queue storage is located. Familiarize yourself with the process of initiating a customer-driven failover in case the outage is limited to your storage account or availability group. (In the event of a disaster that affects an entire Azure region, Microsoft will perform failovers on its own.) Documenting the disaster-recovery plan enables you to identify any single points of failure in the application architecture and address them in advance.
Use customer-managed keys with Azure Key Vault Microsoft-managed encryption keys use AES 256-bit encryption and are highly secure. However, some organizations require the use of their own custom-managed encryption keys for all their data. If your organization has such a requirement, use Azure Key Vault to store your personal encryption keys, and use those to encrypt your storage accounts. Using this in combination with Microsoft-managed infrastructure encryption offers the highest level of security for storage data.
Use private endpoints for secure application data exchange Azure Queue Storage supports the use of private endpoints to access the storage for read and write operations. It is a good practice to use private endpoints for all your storage accounts that exchange application data within your environment, and to disable all public access to the storage. This reduces the attack surface area for your storage infrastructure because all traffic traverses a highly secure Microsoft backbone network.
Set up a storage network firewall Allow access to the storage account only from known public IP addresses or virtual networks. This prevents the public endpoint from being accessible from unknown networks unless that is a core requirement. Review this access list on a scheduled basis and remove any unwanted access points. This ensures that public IPs no longer in your control can no longer access the storage account to initiate attacks.
Audit control and data plane operations You can monitor and audit Azure Queue Storage account activity at the control plane and data plane levels. Control plane operations are those that pertain to creating, configuring, or modifying a storage account. Data plane operations relate to queue storage service endpoint requests, such as listing a queue message, deleting a queue message, and so on. You should monitor both types of operations and, depending on your regulatory requirements, store them in long-term storage accounts for audit or reporting purposes.
Use Azure AD when possible Using Azure AD for storage authentication and authorization allows you to monitor and audit storage logs with the principal name of the user carrying out the operations. This can be critical in cases of investigation and compliance audits. Based on your application design and compliance requirements, you should consider transitioning to Azure AD authentication as soon as possible.
Use Log Analytics to store and query logs Log Analytics natively provides rich log querying capabilities. You can export storage logs to a Log Analytics workspace and perform extensive querying against those logs for compliance, audit, and ongoing performance or security monitoring purposes.
Use Azure Synapse to optimize log querying costs If your log querying requirements are minimal, you can leverage Azure Synapse instead of Log Analytics to run queries on an as-needed basis. Azure Synapse can use an Azure Storage account for log querying. This allows you to export storage logs to a diagnostic storage account. In combination with Azure Synapse, this can significantly reduce your overall costs compared to Log Analytics.