17
Tweaks
Computer programs always have options that allow you to tweak how they work so that you can make them easier to use. Cool Edit Pro is no exception.
17.1 Mouse options
Your choice of mouse will make a difference to Cool Edit Pro, as it exploits a wheel mouse – the wheel can be used to zoom in and out in the single wave view and to move up and down the tracks of the multitrack view. Within the Effects transform windows you can use the mouse wheel to alter settings. This is done simply by holding the mouse cursor over a slider and rotating the wheel.
Syntrillium have changed the way the right mouse button works in version 2 but have generously catered for those of us who feel that the old way was better. The Options/Settings/General tab has the options for ‘Edit View Right Clicks’ of the Pop-up Menu or ‘Extend selection (Hold Control for pop-up menu)’ (Figure 17.1).
The default action is that when you right-click in the wave editor you will get the pop-up shown in Figure 17.1, giving useful options. The downside of this is that the massively useful right click to extend a selection is accessed by having to press control as well. The options in the pop up are available directly from the top menu, so many people prefer to use the original Cool Edit option of reversing the functions so that a right click extends the selection and you press control to get the pop-up.
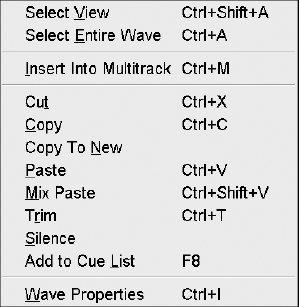
Figure 17.1 Right click pop-up
17.2 Hardware controller
The disadvantage of all computer-based editors is that you only have one ‘finger’ – the mouse pointer. With the availability of USB and Firewire ports it is becoming increasingly practical to have an external control surface to provide you with extra controls that are dedicated to your program. Windows 98 onwards provide ‘Human Interface’ drivers that are allowing a degree of standardization.
Controllers can actually be full-scale mixers with faders and EQ controls, but these are understandable expensive.
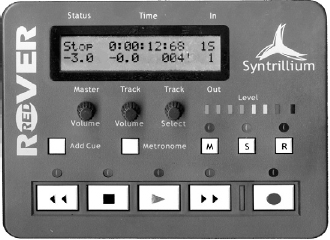
Figure 17.2 ‘Red Rover’ controller for Cool Edit Pro
Syntrillium provide an optional extra of a dedicated controller for Cool Edit called ‘Red Rover’ (Figure 17.2). This is largely aimed at users who want to record themselves with Cool Edit. For example, a guitarist would have problems with the electric pick up, also picking up the electrical interference from the computer monitor or even the computer itself. Moving a few metres away can eliminate this. Red Rover provides transport controls and level indication, and these can also be useful when editing. Additionally, cue markers can be added on-the-fly and Cool Edit’s metronome switched on or off.
In the Multitrack view, it provides an easy direct control of the master volume. Another knob is used to select any single track, and that track’s volume can also be changed. Its Mute, Solo and Record enable buttons are available, along with indication of their current settings.
The ‘Ext Controller’ tab in the ‘Options/Device Properties’ allows you change the settings of hardware controllers. At the time of writing, Red Rover has just the one option that allows you to change the step value of the gain control knobs between 0.1 dB and 0.5 dB in 0.1 dB steps.
17.3 Keyboard shortcuts
Cool Edit Pro comes with some keyboard shortcuts already defined (Figure 17.3a). You can change these or add more with the ‘Options/keyboard dialog’. Set up the actions you use most as simple key press combinations.
If you do a lot of editing it be useful to give yourself some spool controls on your keyboard. The settings I use are shown in Figure 17.3b. This allows me to play a file and then go into continuous fast forward with a single press of the ‘3’ key on the numeric keypad. Hitting ‘1’ reverts me to play; ‘7’ and ‘9’ do the same for reverse wind; and ‘4’ and ‘6’ become momentary reverse and forward spool buttons. I also allocate the ‘+’ and ‘–’ keys on the numeric keypad to operate the vertical zoom controls.
You may also wish to consider reallocating the ‘Selection anchor left when playing’ and ‘Selection anchor right when playing’ controls from ‘[‘ and ‘]’ to ‘0’ and ‘.’ on the numeric keypad (‘.’ is shown as ‘decimal’ on the shortcut list). These keys are easier to find than ‘[ ]’, which sit on little-used keys.
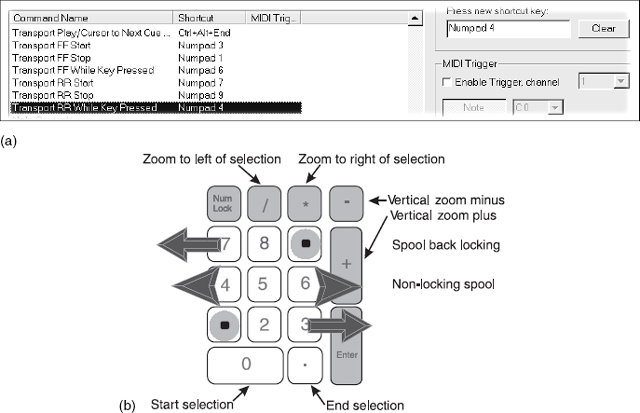
Figure 17.3 (a) Transport keyboard shortcuts; (b) Suggested layout for numeric keyboard ‘spool’ controls
17.4 MIDI triggering
Shortcuts can also be set to MIDI commands. These could be from a specialist MIDI controller box, a sequencer like Cubase, or even a MIDI keyboard.
In effect, you can turn Cool Edit Pro into a simple Sampler (trigger playback from a MIDI keyboard), or even Save your files with a foot pedal if you really want to.
To set up MIDI triggering:
- To assign a MIDI event to a shortcut, choose ‘Shortcuts (Keyboard & MIDI Triggers)’ from the Options menu and select the function that you would like to trigger from MIDI. Tick the Enable Trigger box to the right and set the channel and note, or MIDI controller, and click OK. If you are triggering from a MIDI controller you will need to select the controller ID and the Value that will trigger the event. (Example: the default is controller 64 – the Hold pedal. For on/off controllers like this, a value of 127 will trigger the event in the ON position, 0 the OFF position).
- To enable MIDI triggering, choose ‘MIDI Trigger Enable’ from the Options menu. You should now be able to trigger Cool Edit Pro from your MIDI device. You can get visual feedback of MIDI activity in the lower left corner of Cool Edit Pro’s main window.
17.5 SMPTE/EBU synchronization
Through SMPTE time code you can effectively control Cool Edit Pro’s transport from a device such as a MIDI sequencer or, with the appropriate hardware, a VCR or tape deck. When slaved to SMPTE, Cool Edit Pro will synchronize with frame accuracy to the master device that is generating the time code.
To setup SMPTE sync:
- Set a SMPTE offset (a time code location for Cool Edit Pro to begin playback/record). In Multitrack View select ‘View/Advanced Session Properties’. Enter a SMPTE location where you would like Cool Edit Pro to begin playback, in the format hours:minutes:seconds:frames.
- Tell Cool Edit Pro to wait for SMPTE.
- From the Multitrack view, choose ‘Options/SMPTE Slave Enable’. Start playback on the master device, and Cool Edit Pro will pick up the time code and give a running update in the SMPTE readout at the lower right of the main window. Playback in Cool Edit Pro will then begin at your SMPTE Offset location.
Cool Edit Pro requires about 5 seconds of time code, or pre-roll, to establish synchronization. The readout in the lower left corner of the main window will read ‘Synchronizing’ when establishing lockup, and ‘Playback synchronized’ when actually established. (See also Appendix 1.)
17.6 Favorites
The Favorites menu can be built to make a collection of your most commonly used actions. Use Edit Favorites to create, delete, edit, and organize items appearing in the Favorites menu.
Edit Favorites can instantly call up any customized Cool Edit Pro Effect Transform or Generate effect, Script, or even many third-party tools. The menu can also contain submenus for easy organization.
Figure 17.4a shows an example of how Favorites can be laid out using sub-menus, and Figure 17.4b shows the edit dialogue that created that menu. The ‘’ character creates a sub-menu. Further entries in that sub-menu are created by repeating the text up to the ‘’ and then adding a new name. A menu division is created by using multiple dashes as a name. Thus the …
Noise ReductionCEPNoise Set
Noise ReductionCEPNoise Reduce
Noise ReductionCEP––––––
Noise ReductionCEPDeclick Set
Noise ReductionCEPDeclick
… entries produce the sub-menus illustrated.
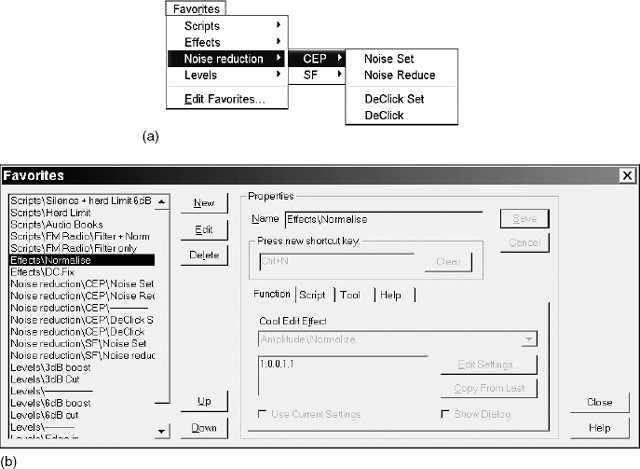
Figure 17.4 (a) Dialog showing how sub-menus can be created; (b) Edit Favorites dialog
17.7 Settings
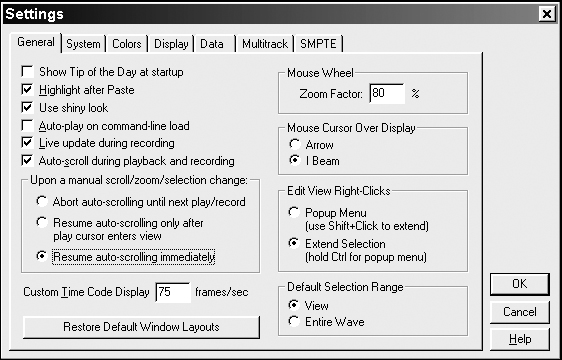
The Settings tabbed dialog (Figure 17.5) is the key to customization of Cool Edit Pro. This varies from what colours are used by the display to the arcane settings of MIDI and SMPTE parameters. The General tab shown contains most of the settings that can annoy. It is here that the action of the right click in the waveform editor can be changed to the way it worked in version 1. Using the right mouse button to extend the selection is such a frequent event that having to press control is a major slow down. If you have a mouse with a wheel, then the ‘Mouse Wheel Zoom Factor’ controls how much the window zooms for each turn of the mouse wheel. The default is ‘80%’, but I prefer a less abrupt change of zoom and use a 20% setting.
‘Default Selection Range’ selects what happens when you double-click on a waveform to select it. The area that is highlighted can be limited to the area you can currently see on screen or select the entire waveform, even if you’re only viewing a portion of it.
If it irritates, you can switch off the ‘Tip of the Day’ that appears when you start Cool Edit. It is often useful to have something you have just pasted highlighted, as you will usually want to do more work on it, so ticking ‘Highlight after Paste’ makes sense. The ‘shiny’ look is a matter of taste; it’s one of the few appearance changes that Cool Edit offers. Other programs go to great lengths to allow users to tweak their look by loading different ‘skins’ files.
Cool Edit can change its layout, as its screen is made up from ‘dockable windows’. Figure 17.6 shows the sort of changes that can be made.
The general settings tab has a button, ‘Restore Default Window Layouts’, that does just that. Version 2.0 of Cool Edit Pro does not make any provision for saving different layouts, but maybe later revisions will.
Screen components like the Transport controls, the Time display window, the Level meters, and Rulers may be detached from their current location to float above Cool Edit Pro’s main window, or they may be repositioned and resized within the main window so they better suit your requirements.
Dockable windows are indicated by two thin vertical or horizontal lines; these lines are the ‘handle’ of a dockable window (Figure 17.7). Move your mouse over a handle, and your mouse cursor looks like a plus sign with arrows at each end (Figure 17.8a).
Some docked windows can be resized. If resizing is possible, the docked window will have a single, thicker horizontal or vertical bar, known as a resize control. If your mouse moves over a resize control, your mouse cursor takes on the appearance of two lines with two arrows (Figure 17.8b, c). If you find that despite the mouse changing appearance you cannot resize, then this might be due to other non-resizable windows in the same row. A docked window’s right-click menu contains an option called ‘Force New Row’. If this item is clicked, a new, empty row to dock windows is created.
To select a docked window, left-click when you’re over a handle (the window becomes outlined when selected). To move, select it and drag its hollow shape while holding down the left mouse button. As you move it around the Cool Edit Pro interface, two things will happen. If the outline of a dockable window retains its original dimension, releasing the left mouse button will cause the window to ‘materialize’ as its own standard floating window. However, if you notice the resize bar of another docked window ‘light up’, this designates a docking location. If this is where you’d like the dragged window to appear, release the left-mouse button and the window will snap into its new location.
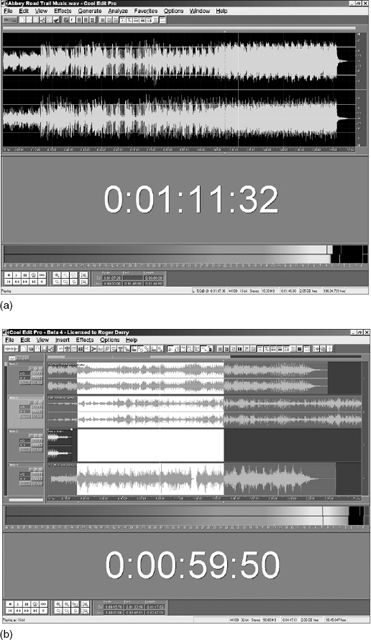
Figure 17.6 (a) Different layout of multitrack editor; (b) Different layout of wave editor
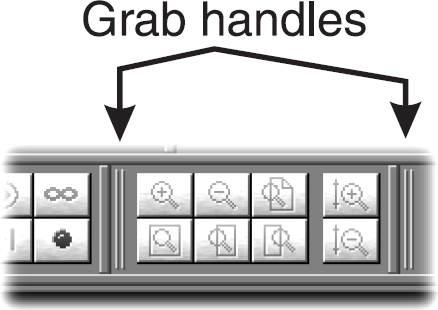
Figure 17.7 Two of Cool Edit’s grab handles for moving dockable windows
To close a docked window, right-click on its handle to see a pop-up menu with a ‘Close’ option. Check this option and the window will disappear. You can bring back any closed dockable window by checking its name on Cool Edit Pro’s View menu.
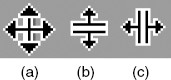
Figure 17.8 (a–c) Mouse cursor appearance when over a grab handle and over vertical and horizontal resizing controls
To move a floating window, left-click on its title bar and, while holding down the left mouse button, drag the window to the desired location. Close a floating window by left-clicking on the ‘X’ control in its title bar.
To dock a floating window, left-click it and drag it while holding down the left mouse button. As you move it around the Cool Edit Pro interface, potential docking locations will appear; you’ll see the resize bar of dockable windows ‘light up’ wherever docking is possible. If this is where you’d like the floating window to dock, release the left mouse button and the window will snap into its new home. If you press the Ctrl key while moving a floating window around, then it will be prevented from docking.
17.8 Device properties
It is here that the input and output of the single wave view editor can be selected to different sound cards if required by selecting the card and ticking the ‘Use this device in Edit View’ box (Figure 17.9). You can also view what formats your card supports.
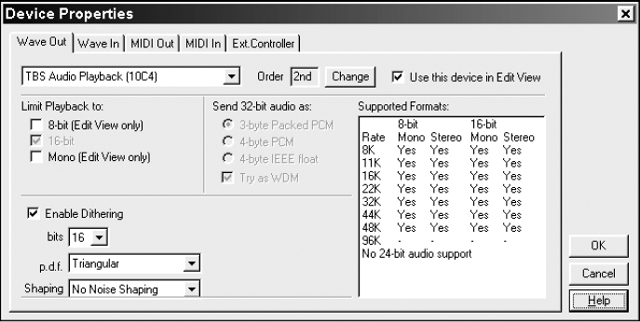
Professional cards often just support the standard Pro bit rates at 16-bit or greater depth (Figure 17.10).
You can also see what order the device appears in Cool Edit’s list. You can change this by clicking the change button. This takes you to the same dialog that you get from the menu ‘Options/Device order’ described in the next section.
There are also options to enable you to handle higher bit-rate files than your sound card is capable of. Optionally you can add dither to ‘fill in’ the waveform to improve the apparent quality when a 16-bit file is played through an 8-bit card.
The ‘Wave In’ tab has the option to correct for any DC offset while recording. Quite a lot of sound cards have a DC offset on their output – they shouldn’t, but they do – and ticking the ‘Adjust to zero DC when recording’ box fixes this. Leaving the DC means that you will have constant problems with clicks, especially at the end of files. CDs, for example, will usually go to digital silence in the gaps between tracks, and a click will be caused by the sudden transition from the DC level to zero.

Figure 17.10 Supported formats
The Multitrack Latency is a fix for the delay within most sound cards when recording. This shows up when you are playing back one track while recording another. You can find that the two tracks are out of synchronization by some milliseconds. This delay is constant for each card. Once you have worked out what it is, largely by trial and error, you can put the correction in and the tracks will line up.
Device order
The order of the devices in Cool Edit’s list at first glance may seem trivial (Figure 17.11). The order is used by the track input and output selectors. Provided the list remains the same, then the order is not that important. It is most likely to be useful when you change or add sound cards. You can adjust the allocation so that existing session files do not have to be altered. An important consequence of the order is that it selects which sound card will be the default one when you open a new session file.
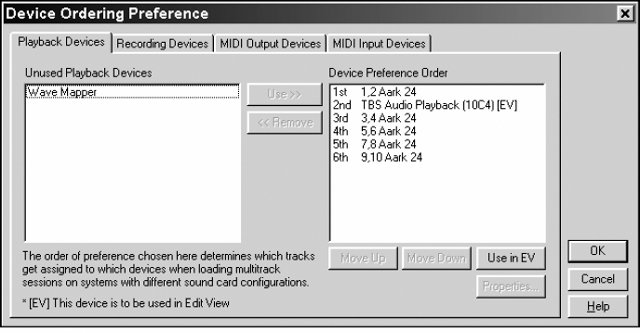
Figure 17.11 Device ordering preference
17.9 Help
This book is not intended to be a Cool Edit Pro manual – Syntrillium have already written that. It even comes in printed form when bought as a CD rather than a download. The program does come with substantial help files, which will hold your hand through the various options.
17.10 Icons
Some people love icons, others stare at them uncomprehending. If you like icons, then you can choose which groups of icons for shortcuts will be shown at the top of the screen. At the very least you will probably want to keep the file group, as this includes the icon to toggle between single wave view and multitrack. If you hate icons, then you can remove them altogether. Normally the easiest way to tweak the icons is right-clicking on the toolbar, but if you have no icons selected this is not possible and you need to use the Options/toolbars menu item.