9
Multitrack
9.1 Loading
Figure 9.1 illustrates the same four files loaded into three different multitrack editors; (a) Cool Edit, (b) Cubase and (c) Pro Tools. They have much in common, but differ in the way they operate and in appearance. In practice they are more similar than they are different, although this is not to say that they do not have different strengths and weaknesses, particularly in regard to the emphasis they give to MIDI (Musical Instrument Digital Interface). Cubase is a MIDI sequencer that can also handle audio, whereas Cool Edit Pro is an audio editor that can also handle MIDI. Pro Tools comes somewhere between the two.
At first, even a simple music balance such as in Figure 9.2 can look intimidating.
However, on initial loading a much simpler appearance is shown, as in Figure 9.3. Beside each of the four tracks shown are the individual controls for each track (see Figure 9.4). These are the default ‘Vol’ controls. Two other sets of controls can be selected by the ‘EQ’ and ‘Bus’ tabs at the top, and these are covered in Chapter 12 because they are concerned with controlling the real time effects available for each track. The ‘Lock’ and ‘FX’ buttons appear in each view, and are used to call up and hold FX. If the left-hand column is dragged wider then more controls will appear, giving a greater overlap between selections.
The essential ability of a multitrack recorder is that it can record on all of its tracks simultaneously, on only one, or on any number of them. So, in addition to the transport record button, each track has a red record enable button marked ‘R’. If this is not selected then the track is in ‘safe’ mode and will not go into record when the main record button is selected. Additionally, already recorded tracks can be played back as a guide to the new recordings.
With multiple tracks, you are not restricted to stereo recording. Cool Edit Pro could record up to 128 tracks simultaneously, provided that the computer was equipped with adequate sound card inputs, fast enough processing and sufficient hard drive capability.
The button marked ‘Out 1’ is pressed to select which sound card output the track will be sent to. The ‘1’ shows that it is being sent to the first stereo output in the list. The ‘Rec 1’ button controls where the record input comes from. Unlike some audio editors, Cool Edit Pro can handle both mono and stereo files. Others can only provide stereo by linking mono track together – if they import a stereo file, then that is split to two separate mono tracks. With Cool Edit you can use a mixture of mono and stereo tracks within the same session.
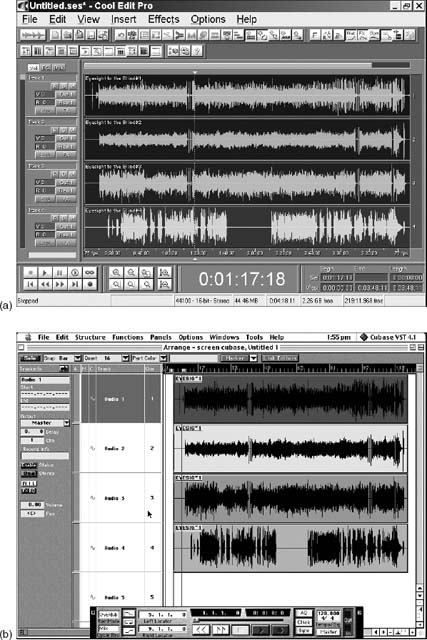
Figure 9.1 The same four files loaded into: (a) Cool Edit Pro; (b) Cubase;

Figure 9.1 The same four files loaded into (c) Pro Tools

Figure 9.2 Multitrack start up view

Figure 9.3 Multitrack opening screen

For playback, each track, be it mono or stereo, is fed to a stereo output on the selected sound card (Figure 9.5(a)). A mono track is selected to only one output, by panning fully left (odd-numbered output) or fully right (even-numbered output). Although this may seem odd, this is fully in line with the convention used on multitrack music mixing consoles.
Each track can be individually panned between left and right. In the main window, this can be done in two ways. The first is to click on the Pan box (illustrated in Figure 9.4 showing ‘Pan 0’) and enter a value on the numeric keypad between 0 (centre) and 100 (fully right). Minus numbers will give you left pans, with fully left being –100. The alternative is to use the mouse to ‘drag’ the numbers. This is a method used by other editors, such as Cubase on Apple machines. Place the mouse cursor over the Pan box, press and hold down the left mouse button, and drag it to the left to pan left or to the right to pan right.
The volume box (showing ‘V0’ in Figure 9.4) is altered in a similar way. Here the normal level is ‘0’. Volume is reduced when negative numbers are shown. Volume level is increased with positive numbers.
Right-clicking on the background of the box containing these controls gives you an actual slider to operate (Figure 9.5(b)). If you right-click on the track itself (not an audio waveform block), then clicking ‘track properties’ on the pop-up will give you the same dialog.

Figure 9.5 (a) Cool Edit selects devices by their order in a list. The ‘Options/device order’ menu item gives you a tabbed dialog for changing the device orders for playback, recording, MIDI in and MIDI out.

Figure 9.5 (b) Selecting track properties
The record input can be fed from the left (odd) or right (even) card input or in stereo (Figure 9.6).
When starting a ‘New session’, you can also select either 16- or 32-bit recording. The sampling rate is fixed for the entire multitrack session. The 16-/32-bit option in the New Session dialog (Figure 9.7) selects what the mix down output will be. You can mix 16- and 32-bit wave files simultaneously. You can set up a default session that will preload wave blocks and settings that you have come to rely on.
Important though multiple ins and outs are, they are likely to be little used outside music mixing, where the multiplicity of outputs are useful mainly for feeds to an external mixer.
For us, the power of the non-linear editor is the ease with which it can merge and mix our mono and stereo audio into a continuous mono or stereo final mix. Our audio items are added and laid out, as required, on any number up to 128 of mono or stereo tracks. They can be regarded as a large number of play-in machines in a studio. Without our intervention, all the material will be mixed together at full level with no panning.

Figure 9.6 Selecting play back output for audio

Figure 9.7 ‘New session’ dialog
It is time to look again at those tiny squares on the left of each track. We have already described the record button, the record and the playback selects. The two squares labelled with ‘M’ and ‘S’ are again mainly useful in music balancing. The ‘M’ mutes a track. This can be useful for switching off a track without losing all of its settings. The ‘S’ button is the solo facility. When selected, this mutes all the tracks except that one, and any others that also have their solos selected. Their pan settings are maintained, and so this is equivalent to ‘solo in place’ on a multi-track mixing console. You can solo more than one track at a time by clicking while holding down the control button.
9.2 Pan and volume
The two vital boxes are the ‘P’ and ‘V’ windows for panning and track volume. These can be operated in three ways: the first is to place the mouse cursor over the box and then drag it up or down to change the setting; the other two involve using a pop-up obtained by double-clicking on the box. The pop-ups each have a slider that can be dragged by the mouse, or moved by holding down the left-hand mouse button with the cursor placed on the slider on the side you want the ‘knob’ to move. Right-clicking on the slider will animate the knob, which will move to where you clicked.
Alternatively, the value can be edited in the box. Positive pan values can be up to 100 per cent (fully right), and negative values can go down to –100 per cent (fully left). These pop-ups set the overall level, and pan, of the track so that every item on it is affected by this.
Block
You can also set the volume and pan for individual blocks on a track. These may be separate wave files, or they may be wave files that have been split by the multitrack editor. These look like separate wave files but are, in fact, sections of a wave file. Setting is done by right-clicking on a block. Within the pop-up menu, ‘Adjust wave volume’ gives you a vertical slider that adjusts the volume of just that block (Figure 9.8a), while ‘Adjust wave pan’ gives a horizontal slider to adjust the pan (Figure 9.8b). The settings are shown in text at the start of the block with the letters ‘V’ and ‘P’, standing for volume and pan (Figure 9.9). These setting are in tandem with the track settings, and do not override them.
A good use for this is to make successive wave blocks consistent in level so that the master track level works for all the blocks. The block pan can be used to create a consistent pan setting for individual speakers in a documentary feature. If you split a wave block, the two sections carry the same volume and pan settings.

Figure 9.8 Windows for (a) panning, and (b) track volume
Envelopes
As well as these ‘global’ settings for the whole track or block, you can control volume and pan on a moment-by-moment basis. This is done using ‘envelope’ controls within the track. To be able to see the envelopes, you have to set the ‘View/Show pan envelopes’ and ‘View/Show volume envelopes’ menu options so that they are ticked.
Until changed, the pan envelope is a straight line down the centre of the track, and the volume envelope is a straight line along the top of the track. These represent pan centre and full volume (as modified by the track settings on the left). Clicking on a line will produce a small blob where you clicked. This is a ‘handle’, which can be dragged by the mouse to change the setting. You must select the track by clicking it before this works.
To produce a simple fade-out, create a handle where you want the fade to start, and another one to the right of it. Drag this second handle to the bottom of the track (representing zero volume) and left or right to the point you wish the fade to finish. (You will not be allowed to drag it to before the start of the fade handle. However, this can be a useful ‘end stop’, if you just want to switch off the track.) You will discover that the level immediately begins to increase after the fade, because the end of the envelope line is attached to the handle at the end of the track. This needs to be dragged to the bottom, so that the whole of the rest of the track is faded out.

Figure 9.9 Three wave blocks with different volume and pan settings indicated by text at the top left of each book
Now you have your basic fade you can adjust it for timing by listening and, if necessary, moving the handles. A simple straight-line fade is often inadequate, but you can add as many intermediate handles as you like to make the fade curved, or to give it several sections (see section 9.6, Fades and edges).
You only need to use the pan envelopes where you want the sound from a track actually to be heard changing. You should beware of doing this to speech, as it is a distraction and reduces communication; the listener is likely to react on the lines of ‘Oh they’ve started moving. Why? … er … what did they say?’
The pan envelopes are set in entirely the same way as the volume envelopes, although for much of the time a single pan setting for the overall track is all that is needed.
In both cases, a handle can be removed by dragging it off the top or the bottom of the track.
Figure 9.10a shows a short section of a mono track. This starts at full volume and ends with a fade. The pan setting starts at centre. Then there is a sudden pan full left followed by a slow pan from full left to full right. The next two sections are panned fully right and then fully left with the track ending panned centre.
When you want to move a handle, you position the mouse cursor over the handle until the cursor becomes a pointing finger. You can now drag the handle to where you want it, positioning it anywhere between the previous and next handles. You can see the value, which will pop-up beside the cursor (Figure 9.10b) It takes a little while to get used to this, and it is very easy to create new handles rather than moving an existing one. UNDO can correct this, or dragging the unwanted handle off the track will remove it.
This use of envelopes is a common way of overcoming the imposition of ‘one-finger’ operation by using a mouse. While you can only change one thing at a time, all the changes are remembered exactly. While simpler and less impressive than a screen filled with a pretty picture of a sound mixer, it can be much more effective.

Figure 9.10 (a) Moving envelope handle; (b) Producing a simple fade-out
To get rid of one-finger operation you need either an external mixer or an external control device that may look like a mixer but controls the software settings with the program. Many Digital Audio Workstations work this way, but at a price.
9.3 FX tracks
You now have complete control of the audio levels and timing of your material. Like many editors, Cool Edit allows real-time processing of audio, applying equalization and special effects such as reverberation. This requires a lot of processing and a correspondingly fast machine, but some sound cards have Digital Signal Processors that take the load off the computer’s processor and have software to allow effects to be added in real time. Where this is not possible, the technique is to make additional tracks that contain the effects.
For example, to add reverberation to a soloist’s voice, load the soloist’s track (which is likely to be mono), convert it to a stereo track, and save it with a different name such as ‘Soloist Reverb’. Now run a Reverb effects transform on a short section of your new track, and adjust the settings until you have the sound you want. Next set the ‘dry’ sound to nothing, and adjust the ‘wet’ sound so that it modulates the track at a sensible level. Now transform the whole track. This Reverb track can now be added in with the original when mixing (see section 12.5, Reverberation and echo).
Cool Edit Pro can also provide a ‘halfway house’ by ‘locking’ real-time effects. This is a way of preprocessing the real-time effects so that the processing power is released for other uses when mixing. Effects are more fully described in Chapter 12.
9.4 Multitrack for a simple mix

Figure 9.11 Using the ‘Insert into Multitrack’ option
It is very easy to see the non-linear multitrack mode as a complication to be avoided. For simple cut and paste editing this is often true; however, as soon as mixing becomes involved it is invaluable. It gives you the ease of multi-machine mixing with quarter-inch tape, combined with absolute repeatability and flexibility.

Figure 9.12 Moving the second part of the audio to track two
Because of the integrated nature of the editor, it can be convenient to ‘pop in’ to the multitrack editors when all that is required is to make a simple mix.
The following example takes a section of Berlioz’s Damnation of Faust, which has one bar repeated in it. A simple cut edit does not work as a retake has been cut in that does not match the original. The answer is to cross-mix between the two takes during the one-bar overlap.
This is simply done by entering the multitrack mixer. If the wave file is already in the linear editor, it will already be in the editor’s organizer list (Alt/9). All that needs to be done is to right-click it, and click the ‘Insert into Multitrack’ option (Figure 9.11). (To make the illustrations clearer, I have zoomed in vertically to show just two tracks.)
Next, the end of the first take of repeated section is selected with the mouse, and the track is split at that point. This is done by right-clicking on one side of the cursor and selecting the option to split the track (Figure 9.12).
Now that the audio is in two parts, the second half can be dragged, using the right mouse button, down to track two. In Figure 9.13 I have highlighted the first take of the repeated section.

Figure 9.13 ‘Faust’ file split and second section moved to track two
The next thing to be done is to slide the second section to the left until the overlapping section matches musically that of the track above (Figure 9.14).
At this stage, the rhythm matches but the level bumps and a crossfade needs to be implemented. This can be done manually with the volume envelope, but it is much easier to use the automatic crossfade facility.
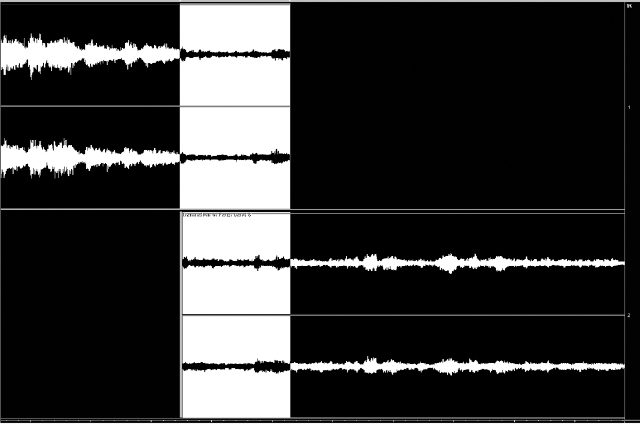
Figure 9.14 ‘Faust’ slid to correct timing, ready for crossfade
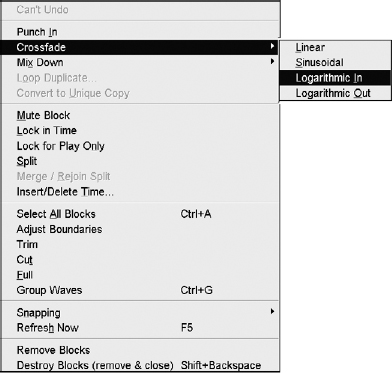
Figure 9.15 Selecting the crossfade option
First highlight the crossfade, and then both sections, by clicking with the shift key held down. Now select the crossfade from the menu (Figures 9.15, 9.16).
There are four types of crossfade to choose from (Figures 9.17–9.20). They all have their uses. However, linear crossfades tend to give a boost to the level in the middle of the fade, whereas logarithmic fades should give a better approximation to equal power thoughout the transition. Because of their asymmetrical shape, there is a choice of ‘direction’. Sinusoidal is another equal power option. There is no substitute for trying the different options. The UNDO option is one menu click away (or ALT/Z). Playing the different transitions will soon convince you as to which is best for any edit.

Figure 9.16 Crossfade has been implemented
To transfer this edit back to a file in the linear editor, you merely mix down your tracks and then save the file. If you are confident with your editing, you will select a short section with a little each side of the crossfade and mix down just that section. This can be copied and pasted in to your original in seconds.
Track bounce
There are times when you want to undertake a quick mix to make a composite track – for example, you may have two versions of a vocal track and want to mix the good bits together into a single track. You can ‘track bounce’ selected tracks by using the ‘Mix Down to Empty Track N (Bounce)’ menu option. N is the number of the next empty track. If you enable the ‘Lock in time’ option on the newly created wave block right-click menu, then it will stay in exact synchronization when you move it. This speeds up background mixing and helps clear up your work area, as you can now delete the originals from your session (although not, for safety, from your hard disk). The contents of all or selected enabled (unmuted) tracks are combined, with track and waveform properties (such as volume and pan) affecting the way the final mix sounds. Session elements such as looping, images and envelopes are all reflected in the mixed waveform.

Figure 9.17 Crossfade (log in)

Figure 9.18 Crossfade (log out)

Figure 9.19 Crossfade (linear)

As track bounce also picks up your real-time FX it is also a way of ‘locking’ a track so that it is saved to hard disk, and so is quickly reloaded (rather than having to be regenerated) when you reload a session. It is not possible to select a locked FX block, so you should solo the track and choose the ‘All Waves’ sub menu option.
9.5 Chequerboarding
Once a programme item becomes much more than a simple interview or talk, then mixing becomes necessary. While mixing is possible with linear editors using Mix Paste, it usually involves a lot of UNDO cycles to get it right. The multitrack non-linear editor makes it so easy.
In the days of reel-to-reel tape, programmes of any complexity would be split into banded ‘A’ and ‘B’ reels, with odd-numbered inserts on the ‘A’ reel and even-numbered inserts on the ‘B’ reel. Each insert could then be started over the fading atmosphere at the end of the preceding insert. Where both items had heavy atmosphere, the incoming band would start with atmosphere and a cross-fade made. Where necessary, a third ‘C’ reel would be made up to carry continuity of atmosphere over inserts with tightly cut INs and OUTs (Figure 9.21).

Figure 9.21 ‘Chequerboarding’ on tape.
In a multitrack editor, this technique is often known as chequerboarding. Figure 9.22 shows a programme of music linked by a presenter. Some of the music is segued, and so the chequerboard principle is invaluable. (Segue is an Italian music term adopted by radio and show business to mean one item following another without a break. It is pronounced ‘seg-way’.) For convenience, the links are given their own track (track 1) and the music tracks their own ‘A’ and ‘B’ reels.
A degree of extravagance in allocating tracks is not a problem. In the days of reel-to-reel tape, studios were often limited by the number of physical play-in tape machines available (and by how good the tape operator was!). Here, each track is effectively a different play-in machine. We can have up to 128 of them – rather better than a four-machine radio studio (Figure 9.22).
Even better, we are no longer reliant on the tape operator. Each ‘play-in’ is automated; fixed until we change it. No longer does one muffed play-in require a whole take to be redone. If an item comes in slightly late or early, it only takes a moment with the mouse to slide the track until it is right (drag using the right mouse button).
While totally dominant in music recording, reel-to-reel multitrack was never a very useful device for drama and features because of this one limitation; you could not slide tracks relative to one another. There are ways to emulate this, but only by adding considerable complexity to the process.

Figure 9.22 ‘Chequerboarding’ on Cool Edit Pro
9.6 Fades and edges
However, a little more than simple chequerboarding is required. Together, a studio manager on the mixing console and a good tape operator would make material merge seamlessly by skilled and instinctive use of faders, both on the console and on the play-in machines. Often inserts would be started not with an actual fade-in but with edge-ins, where the item was started with a sharp fade-up to ‘half fader’, and then a fade-in over a second. Sound balancers have also learned that most items sound better if they are started 2 dB to 4 dB low, and edged up over a second or so.
On a PC, all these instinctive skills have now to be defined. This is why many people, with the necessary money, will pay for an external mixing device to control the computer’s mixer. This preserves the power to adjust levels minutely within an item merely by having your fingers on the faders. This ‘pinky-power’ can control up to 10 sources simultaneously, whereas a computer mouse can only control one. However, because of the automation provided by a PC, each change can be made individually and cumulatively.
It makes sense to preserve the old split of duties between the sound mixer and the tape operator. When preparing your material, pay attention to how each file begins and ends; put a rapid fade-out on the atmosphere at the very end of the file. Put an edge-in on the front. You can set this up as a ‘Favorite’. Starting values of –6 dB and –3 dB fading up to zero are useful here.
Edge-ins should be inaudible to the listener. They are there to smooth the seams. Actual fade-ins and fade-outs – ones that are going to be perceived as such by the listener – are best done using the envelope controls of the multitrack mixer.
Fades usually have the role of establishing a passage of time. The old convention, from the ‘golden age of the wireless’, was a slow fade-out followed by a slow fade-in. These days, the fades are much faster and the fade-in is more of a steep edge-in.
Fades also have the function of allowing voice-overs to be heard over music. Very rarely should the listener be aware that this is being done. What will sound particularly horrible will be a mix where the music is audibly dipped to make a hole for the voice to enter, with another hole following the end of speech before the music is faded back up.
Most important is that the voice-over should fit the music. The music should return at the start of a musical sentence. The dip-down is less critical in the context of pop music, but with more formal features the voice should pick up from a cadence, or the end of the musical sentence.
When mixing voice-overs ‘live’, I used to say to presenters that I would ‘go on the whites of your tonsils’. By this I meant that the music would dip on the very first syllable of their link. Equally, it sounds better if the fade back up starts about a syllable before the end of the link. This is less critical if the presenter has hit the beginning of a musical phrase as you are fading up in the micro-pause between notes.
Music fade-outs are often done badly. A vital thing to realize is that any fade-out consists of three separate parts (Figure 9.23):
- Warning listeners they are about to lose the music
- Fading down
- Fade-out.

Figure 9.23 A fade-out consists of three parts
This applies as much to a clean fade as to one where the presenter comes in over the end. The classic example of the latter is the opening signature tune, a feature of so many audio items, from broadcast programmes to cassette promotions. The music starts full level, and then towards the end of a musical phrase the level is dipped slightly to warn the listener, followed almost immediately by a fade-down so that the presenter can start his or her link at the end of the phrase with the music running under. The music is then lost under the presenter, and brought out on a cadence, or end of phrase.
Fading classical music badly can cause real offence, but pop music deserves equal care. Again the three-part fade applies; a slight dip at the start of the last phrase and then a fade towards the closing cadence, with the music taken out at the end of the cadence. A common mistake – especially when the fade is made while looking at the score – is to leave the start of the fade too late so that the listener is not prepared for the music to end.
Where the fade has to be quick, say because the illustration is about the words of a song, then, rather than lose the last few words on a fade to cadence, a 4–6 dB dip at the beginning of the last line can provide the psychological warning and make the quick exit far less offensive.
9.7 Prefaded and backtimed music
A common technique to bringing a programme out on time – especially a live one – is to have ‘prefaded’ closing music. A piece of music is dubbed off, say of 1 minute’s duration, and started with the fader shut exactly 1 minute before the end of the programme. As the presenter makes the closing remarks, the music is faded up behind the words to bring the programme to a rousing and punctual close.
A technique used by some producers is to end the last item with music, which is then run under the presenter’s close and then faded up so that it ends. This effectively offsets the prefade back to the last item. However, it sounds so much better if that last piece of music actually begins at a musically satisfying place, rather than just emerging arbitrarily. A cheat that works most of the time – although I remain offended that it does – is to dub off the item’s closing music to the end, and run that separately as a backtimed prefade closing music. The two recordings will not be in synch, yet because they are the same music they can be crossfaded under the presenter’s closing link without being audible to the listener.
These techniques may seem unnecessary for a recorded programme, as it can be edited to time. However, time to edit can be a scarce resource, and it may be much more cost-effective to use prefaded closing music than to spend another hour looking for cuts. Of course, you do not have to do any actual backtiming. All you have to do is slide your closing music until its end is at the duration that you want. You then use the amplitude envelope control to fade it in at the right point.
9.8 Transitions
Transitions are the stuff of dramatic effect – not only in drama itself, but also in documentary. Crossfading from one acoustic environment to another or from one treatment to another can be extraordinarily effective.
The first type of transition, going from one location to another, is simply managed. Two tracks are used, and the incoming track slid along to overlap the end of the exiting track. You can use Cool Edit Pro’s automatic crossfade generation, as described earlier in this chapter, or you can manually create the envelopes if this does not produce the effect you want. Always remember that you can modify the crossfade that Cool Edit Pro did for you, by moving the envelope ‘handles’ with the mouse. With a transition, you are rarely going to use a perfectly engineered equal loudness crossfade.
The second type of transition is from one type of treatment to another on the same material. Examples include an orchestra playing in another room. The music is treated to remove all the high frequencies. The characters move into that room, and you want the high frequencies to return as they make that move, or they open the door. Sometimes you want to go from music or speech apparently heard acoustically – a juke box playing in a coffee bar – to music heard directly off the recording. Here you need to take the good quality original and treat it, literally by playing it on a loudspeaker and recording it with a microphone (or, in a studio, playing the music on the foldback loudspeaker). A small room effect may be used instead.
With the example of the orchestra, your treated track is identical in length with the original and is inherently in synch with it. Within the multitrack editor, place the cursor roughly where you want the treated track and, without moving the cursor, insert it. They will both line up on the cursor. Now they need to be grouped together so that you can move them without losing synchronization. Click the first track so that it is selected and any other selection lost. Now, holding down the control button, click the other. They should now both be selected. Right-click on one of the waves, and click group waves on the pop-up. You can do this from the ‘Edit/Group waves’ menu item as well. Now when you move them about they will move together, until you match the dialogue in the best way.
You now take the handles at each end of the volume envelope on the good quality track and move them to the bottom, so that there is no output from the track. Listening to the mixed output, adjust the track gain for the treated track so that it fits behind the dialogue. If it is supposed to be coming from behind a door, then you may wish to pan the track to one side or the other.
At the point in the dialogue where you wish to make the transition, create a crossfade by adjusting the envelopes on both waveforms. You can adjust the gain of the incoming untreated track with the track volume control, or by using the volume envelope.
In the second example, the music recorded off a loudspeaker, the two files will be of different lengths. However, it is very easy to slide one file with respect to the other until you can hear that they are in synch. Now you can group the two files and treat the transition in the same way as before.
9.9 Multitrack music
Music recorded on a multitrack recorder can be transferred to your computer very easily, if you have a multitrack sound card with enough inputs. This can even be done digitally with the right gear. A common interface is a variant on the optical TOSLINK connector. The same plug is used, but an eight-channel digital signal is sent instead. An increasingly common type of multitrack recorder is the video cassette-based machine, which records eight digital audio tracks instead of a picture. These can be linked together to become 16-, 24-, 32-track etc. recorders.
In cases of desperation, short pieces of music – say up to 5 minutes – can be transferred using only stereo equipment. The multitrack tape must be prepared by having a synchronizing ‘slate’ recorded simultaneously on all of the tracks just before the music. A convenient way of doing this in a studio is to use the slate talkback – the talkback that goes to the multitrack and not to the artists. A short ident, and a sharp sound like a coin tapping the talkback mic, should be adequate. At the end of the music, a similar slate is recorded. The tracks can now be copied two at a time, either directly to the computer or to a stereo recorder, preferably digital. When the tracks have been transferred to your computer, they should be split into their corresponding mono files. This will have been done automatically if you have used the multitrack facility to record them as two mono files rather than a single stereo file. Each wave file will begin with identical recordings of the slate. Each file is edited so that it starts with the most recognizable part of the ‘sharp’ sound. Sample accuracy editing is advisable (and practical) here.
Once loaded into the multitrack editor and lined up at 0:00:00:00, the files should now be back in synch. How much error has been introduced can be ascertained by examining the end slates.
Usually, in my experience, the error, even with an analogue multitrack, is better than two EBU frames (2/25th second), which for many types of music (and performance) is good enough. Better accuracy can be obtain by using Cool Edit Pro’s effects transforms to varispeed tracks digitally so that the error is corrected. The mix down can now be undertaken within Cool Edit Pro.
MIDI and video
Both MIDI and AVI video files can be loaded in to the multitrack file and can be used as references for audio tracks (Figure 9.24). The picture is represented by a graphic of 35 mm film on the multitrack display itself. Its track has no operational controls at the left. The actual picture can be seen in a separate window by clicking ‘View/Show Video Window’. The audio has the full range of operational controls.
A MIDI file’s notes are represented graphically, but this has only the mute and solo buttons available at the left. There is an additional ‘Map’ button that allows you to adjust the MIDI device and channel assignments. The MIDI part also has a volume envelope for adjusting it within the mix.

Figure 9.24 AVI video and a MIDI file open in Cool Edit Pro
Loops
Wav files can be configured as loops. To do this, right-click the block and select ‘Loop properties’. Once so configured, they can be dragged out to repeat for as long as required. The prime function for this is to use samples of drumbeats etc. to make up a rhythmic background for music balances. For speech and drama work this can be very useful for looping small sections background effects or actuality to extend them. However, beware that short loops soon set up their own rhythm. Longer loops can also become recognizable if run for a long time. For example, a horn sounding in a traffic noise loop will become startlingly obvious the third or fourth time around!