6
Editing
6.1 Introduction
Cool Edit Pro is two editors in one; linear and non-linear. You simply toggle between them by clicking the icon at the top left-hand corner of the screen. It changes in appearance depending which mode it is in.
When it shows a stylized view of three tracks you are in the linear single wave view mode, and clicking it will take you to the non-linear multitrack mode. It will then change to show a representation of a single wave, indicating that clicking it will return you to the linear mode (see Figures 6.1 and 6.2).

Figure 6.1 Cool Edit Pro non-linear editor icon

Figure 6.2 Cool Edit Pro linear editor icon
We’ll look first at the linear editor, which physically changes the audio files so that data are changed when the files are saved.
When you first run Cool Edit Pro, you see a blank centre screen surrounded by a large number of icons (Figure 6.3). This should not be a cause for panic! The icons at the top can be ignored until you are familiar enough with the editor to find them useful. The most important controls are the transport and zoom icons at the bottom, and we will come to them as soon as we have loaded a file.
6.2 Loading a file
OK, maybe you have not recorded anything yet, but you will find that your computer already has a number of wave files. They have the file extension WAV (if you have set Windows to show extensions). You will find a lot of them in your C:WINDOWSMEDIA directory. These are the sounds that Windows can make when it is asked to undertake various actions. You may have turned some (or all) of these off, but the wave files are still there. Indeed you may decide that your first exercise with the audio editor is to make some new sounds to personalize your computer. Loading JUNGLEWE.WAV gives the display illustrated in Figure 6.4, which is a clap of thunder. On some versions of Windows it is called JUNGLE WINDOWS EXIT.WAV. The length is very slightly different owing to the non-audio data being changed. There are probably as many different installations of Windows as there are machines running it, and while the file I have chosen is available on Windows 95, 98 and ME CDs, it is possible that it was not copied to your hard disk when it was installed. This depends on what sound scheme options were selected. It is part of the Jungle Sound scheme.

Figure 6.3 Entering Cool Edit Pro
In Figure 6.4, the status line at the bottom of the screen reveals that the recording uses 324 k of disk space, is 3 seconds and 19 frames long, stereo, at 22 050 samples per second (CEPs display in the illustration is set to the European TV standard of 25 frames per second. Don’t confuse this with the compact disc digital structure, which has 75 frames per second).

Figure 6.4 Display when JUNGLE WINDOWS EXIT.WAV is loaded
This particular recording looks as if it is low level, but in fact it is only 0.11 dB short of full modulation. How do I know this? Because I can get Cool Edit to tell me!
Selecting Effects/Amplitude/Amplify (Figure 6.5) will give the amplify dialog (Figure 6.6).
You will see the DC Bias and Normalization options in the bottom left-hand corner of the display. Clicking the calculate button shows the amount of boost required for full normalization.
In practice, most of the time you do not need all the options of the amplify dialog and can use the Normalize option (Figure 6.7).
This allows you to set the normalization level, choose whether to apply DC bias correction and, for stereo files, choose whether you want the left and right channels separately normalized or to keep the level change the same for both (this preserves sound images’ positions in the sound stage).

Figure 6.5 Select Effects/Amplitude/Amplify
Close examination of some waveforms can reveal that they have what is called a DC offset. I have simulated a 10 per cent offset in Figure 6.8. If you look at the detail, you can see that the whole waveform is offset slightly below the centre line. Offsets like this are highly undesirable, as they will produce a click every time the track is started or stopped and can cause clicks on edits.

Figure 6.6 Selecting Effects/Amplitude/Amplify gives the amplify dialog
A good quality sound card should not introduce an offset, but a lot of the cheaper ones do. This is not a disaster, as the offset can be removed by the editor. In Cool Edit Pro this can be done as part of the normalization process, when the level is corrected to produce full level. It has also an option to remove DC on-the-fly during recording. Beware that if you leave this switched on ‘just in case’, this will prevent you from doing bit-for-bit digital clones via Cool Edit.

Figure 6.7 The normalize option
If you actually want a DC offset, you can change the value from 0 per cent to the value you require. This may seem an unlikely need, but could be useful to correct an offset manually. Cool Edit Pro’s DC correction introduces a bass cut. If your recording has a deliberately extended bass response, you would not want to lose this (however, a sound card poor enough to have a DC offset is unlikely to have an extended response).
The Decibels format option sets the values entered into the ‘Normalize to’ box to show decibels rather than percentages.
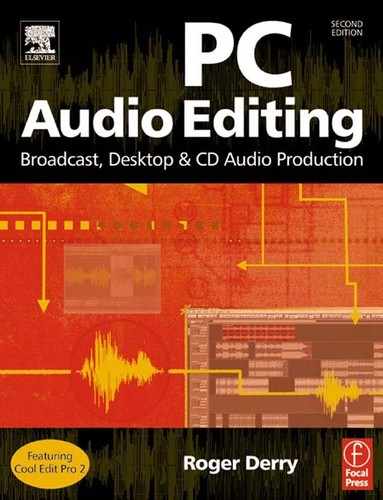
The reason the audio looks so low level is that there is a brief moment at the start of the thunder where the level virtually reaches the peak. By zooming in on the detail, we can see that it is literally one cycle of audio from negative to positive. Because the stereo sound is not coming from the centre, the right-hand channel (bottom display) is even lower in level (Figure 6.9).


Figure 6.9 Thunder peak selected

Figure 6.10 Thunder peak reduced by 6 dB
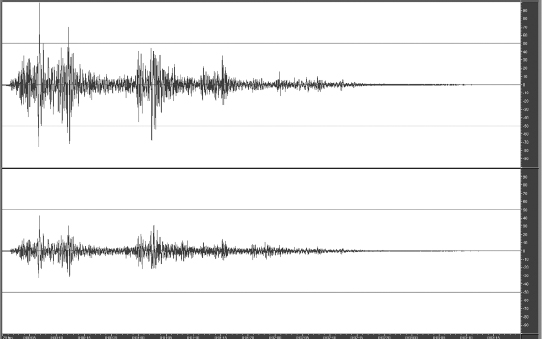
Figure 6.11 Thunder, renormalized with ‘normalize L/R equally’ set
Short peaks are a common problem with level adjustment. It is one of the prime skills of mastering engineers in the record industry to modify these so that the resulting CD can be made louder.
In this case, we can make a louder file by highlighting the section, reducing it by 6 dB and then renormalizing. We can also, if we wish, untick the Normalize L/R Equally box, to bring up the right-hand channel. Using the Edit/Zero crossings options can ensure that our selection does not stop or start in the middle of a cycle, which can introduce a click (Figures 6.10 to 6.12).

Figure 6.12 Thunder, renormalized with ‘normalize L/R equally’ not set
By doing this manipulation we achieve a louder recording, although the peak level remains the same. However, we have brought up the background noise as well, which may or may not be a good idea. You may like to try this, if you have this file on your hard disk. The process has now revealed two more peaks that are holding down the level. When do you stop? That’s where skilled ears come in.
A similar process is gone through when music is mastered for CD. Removing a few peaks can make a commercial disc sound louder. This has become rather competitive, as no company wants its discs to sound quieter than those of its rivals.
While a full level recording is ideal for production use, this may not always be the case for the version heard by the end user. Windows sound effects are a case in point; it is generally desirable to set these 6 dB to 12 dB below the maximum recording level. This allows the PC speakers to be set at a good level for when they are reproducing music from a CD – or even your editing session, without the Windows sound effects blasting you out of the chair!
To modify recordings, we need to be able to navigate round a sound file. Cool Edit Pro presents the whole of the file when loaded. Personally I find this reassuring, and I have never got on with other editors that only show the beginning of a loaded file.
The keys to navigation are the transport and zoom icons at the bottom left of the screen (Figure 6.13).
The left-hand block is for the transport, and is reassuringly like a cassette recorder with a few extra options. Stop, Play and Pause are followed by the triangular play icon in a circle. The last icon has an infinity sign. Clicking the standard play triangle symbol plays the file, as you would expect. However, it will stop when the playback cursor reaches the end of the screen – or the selection, if one has been made. In our present case this will be the end of the file. If, however, we were zoomed in, it would not be.
The triangle in a circle play button will also start the playback, but this will continue to the end of the file. The last icon sets up a loop mode so that playback never ends but loops round, either to the start of the file or to the start of the selection.
The second row of icons behaves like those on a CD player. The double arrow buttons ‘spool’ the cursor along the file (audibly if in the play mode). The other spool buttons take you to the beginning or end of the file, or to the next marker if you are using them. The final button, with the ‘red LED’, is the record button.
The playback ‘head’ is represented by a vertical line. This can be moved to where you want, merely by single-clicking the point with the mouse. If you are already playing the file, then a cursor line will appear where you clicked but playback will not be interrupted. Clicking the play triangle will instantly move the playback to the newly selected point. The space bar toggles playback mode on and off. If you are using this, then it toggles through stop before going to the new location on the next press.
You can select an area by dragging the mouse over the area you want. The alternative is to click one end with the left mouse button, and then click the other end with the right mouse button. The selected area can be modified with right mouse clicks. The selected edge nearest the mouse click is the one modified. By default, version 2 of Cool Edit Pro requires you to press control to change the selection with a right click, otherwise it gives you a pop-up menu. This can be reversed by clicking the Extend Selection option within the Edit View Right Clicks section in the General tab of the Option/Settings dialog. This reversed operation was how version 1 worked, and is, in my view, preferable.
You can also select the edit area ‘on-the-fly’ as you play the file. There are two keyboard short cuts, called ‘Selection anchor left when playing’ and ‘Selection anchor right when playing’. ‘Out of the box’, Cool Edit sets these to the ‘[‘ and ‘]’ keys. This means that if you press the ‘[‘ key while you are playing a file, the start of the selection will be set to the point playing at that moment. At the same time, the point where Cool Edit starts playing from when play is pressed is moved there as well. Pressing the ‘]’ key marks the end of the selection. Pressing ‘Delete’ will then delete that selection while Play is continuing. Pressing the spacebar twice will stop and then restart play from your edit. You can then ‘spool’ back and check from before your edit. The spool controls are not allocated a keyboard shortcut by default, but this can be done (see section 17.3, Keyboard shortcuts). Being able to use the keyboard rather than the mouse can vastly improve the efficiency of a session where a great deal of edits are made. This is more typical of a speech editing session than a music one. This also transforms the use of the program for blind users, who can now edit by ear rather than being frustrated by the visual nature of PC audio editing.
The right-hand group of three icons controls zooming. The top three are absolute controls: ‘+’ zooms in and ‘–’ zooms out. This only affects the horizontal magnification. If you have a wheel mouse, then the wheel will also control zooming. The final icon restores the view to the whole of the file.
The bottom three icons of this block deal with the selected area of the file. The first fills the window with the selected area. The second icon zooms in on the left edge of the selected area and the third, correspondingly, zooms in on the right-hand edge of the selected area. This is particularly useful for fine trimming the start and finish of edit points.

Figure 6.14 Waveform zoomed-in to show samples

Figure 6.15 Five sample square pulse drawn onto waveform showing computer’s interpretation of the result
There are two more zoom icons to the right of this group of icons. These ‘+’ and ‘–’ buttons control the vertical magnification of the audio. This is not needed very often, but can be useful to examine the character of low-level sounds such as noise.
It is very easy to examine a section of audio quickly. Click on the point you are interested in, and define a selected area by dragging or using the right mouse button and clicking on the ‘Zoom to selection’ icon. You can repeat this as many times as you like to get into really fine detail. You can even set the magnification to be so large that you can see the individual samples (Figure 6.14).
These are represented as dots, and are joined by a line generated by the computer. This line is not simply dot-to-dot for cosmetic reasons, but will show what will happen to the audio after the output filter.
If necessary you can move the dots, literally to redraw the waveform. This can sometimes be the only way to eliminate a very recalcitrant click that has slipped through declicking software.
In Figure 6.15 I have drawn a five sample click this way, to illustrate that the line joining the dots is more intelligent than it first appears; the wavy lines show what is known by audio engineers as ‘ringing’.
6.3 Making an edit
Editing on a PC is best done visually. Some editors have a ‘scrub’ editing facility where the sound can be rocked backwards and forwards as on a reel-to-reel tape machine. People used to quarter-inch tape ask for this, probably out of fear or sentiment, but in practice nearly everybody edits visually. The technique is very simple, and the eye and the ear work together easily. It is much easier to learn from scratch than is scrub editing. Very soon you become able to read the waveform. For example you may know a particular point is overlapped three times, and it is often possible to spot the individual retaken sections and select the last one without listening to the intervening audio. If, on performing the edit, you find that you are wrong, then UNDO quickly restores the cut. By making ‘bets’ like this you can considerably speed up the editing process, particularly with scripted speech editing.
Editing audio is surprisingly similar to editing text in a word processor. If you use a word processor, then you already know the basics of editing audio. You use your mouse to select a start and finish point. The space between is highlighted by reversing the colours, and pressing DELETE removes the highlighted section. Alternatively, clicking Edit/Trim (or Control/T) will eliminate everything except the selected area (ideal for ‘topping and tailing’).
As already described, the selected section can be created in many ways. The most obvious is to place the mouse at the start of the section you wish to cut and drag the pointer to the end of the cut section. Cool Edit Pro also allows you to select the other end of the selection from the cursor by right-clicking on the point (while pressing control, unless you have reversed the action of the right-click). This works forwards or backwards.
6.4 Visual editing
This is all very well, but how do you find a phrase within an item? Here you use the zoom facility already described.
Figure 6.16 shows a short section of speech – ‘The um start of the sentence’. The text has been added to the picture, and is not a feature of current audio editors!
How do we go about removing the ‘um’? Clicking the play button with the mouse (or pressing the space bar) will play the section. A vertical line cursor will traverse the screen, showing where the playback is coming from. Your eye can identify the section that corresponds to ‘um’.
Using the mouse, click at the start of this section. The cursor will move to this point. Press play again and the playback will start from where you clicked. You can hear if you have selected the right place, as if you have not there will be something before the ‘um’ or it will be clipped. Reclicking to correct is very fast.
Now identify, not where the ‘um’ ends, but where the next word starts – the ‘s’ of ‘start’. This time click with the RIGHT mouse button. This sets the end of the section to cut (Figure 6.17).
Hit play again and just the highlighted section will be played. Is the end of the ‘um’ clipped? Can you hear the start of the ‘s’? If not, then the edit is probably OK.
Now press the delete key. The highlighted section is removed (Figure 6.18).


Figure 6.17 ‘Um’ selected for removal

Click a little before the join and play the edit. Is it OK? If so, go on to the next edit. If it is not, then click UNDO and you will be restored to the previously highlighted set-up.
You can adjust the edges of the selected area, by right-clicking near them.
At first you may well have to cycle round several times, but soon you will be getting edits right first time. Remember, even redoing the edit three or four times is still likely to be quicker than it used to be with using a razor blade.