
3
Transfer
3.1 Reviewing material
Some material will arrive already in a form readable by your computer (such as the audio material provided on the CD-ROM accompanying this book). Other audio will have been recorded on an analog or digital recorder that needs transfer to your computer. This may have been recorded by someone else or acquired by you. In Chapter 13 there is some advice on originating material but in a book called PC Audio Editing let's get on with that: having acquired all your material, how do you transfer it onto your computer?
There are recorders that plug in to a USB port and appear as a disk drive. Here the audio files will already exist and can be copied across to your work folder. This can often be done on the desktop but it can be useful to copy them via Audition so that the files can be ‘topped and tailed’ so that the file starts and finishes cleanly. The file format can be changed to .WAV if a different format is used by the recorder. This is particularly important if a compressed format has been used. Changing to a .WAV format will stop further quality loss due to data compression. Most material will have to be copied, in real time, through the sound card of your computer, preferably if the source is digital, using the digital inputs to preserve the best quality.
You should not waste this time, for it is now that you can review the material and make notes. You can save time if there are session notes by skipping the false takes. This is especially easy if you have a note of ident points if you were using DAT or Minidisc.
Logging speech recordings can save an immense amount of time. Your notes should have a convention so that they mean something to you several days, or weeks, later. Write down who the speaker is and what tape or disc they are recorded on – you did label the recordings didn't you?
Be consistent as to how you log where things are in the recording. With reel-to-reel or compact cassette, you are usually stuck with arbitrary numbers produced by the playback machine's counter. These can be wildly different on a different make of machine.
Digital machines log progress as time but there are different options. Quite a few portable machines actually record date and time of day continuously. This does mean that, on location, you can use your wristwatch and a notepad to identify points. However, a lot of mains machines do not handle this information.
DAT machines usually have different counter modes:
• Counting time from when last reset
• Counting absolute time from the beginning of the first recording on the cassette
• Counting time starting from 00:00:00 each time a new track marker is encountered.
Minidisc recorders usually offer:
• Time elapsed of track
• Time left of track
• Time left of disc.
Once you have established which timing system you are going to use, make your notes. Unless you have good shorthand you will not be able to transcribe what is said. Instead, log each question with the time and then list the major points made in the answer. There are many formats possible, one such is:
| Joe Smith 29th March | ||
| 0’00 | ?Why has this organization been set up? | |
| 0’10 | Fulfil need by public | |
| 0’20 | Contact point for victims | |
| 0’35 | Money not available from government | |
| 0’50 | ?Should public money be provided? | |
| 0’55 | Not a practical proposition | |
| 1’05 | Get on with it | |
| 1’20 | 500 people already involved | |
| 1’30 | ?How long before organization effective? | |
| 1’35 | First effects within 6 months | |
| 1’45 | 90 per cent after two years | |
| 1’55 | Complete after three years | |
| 2’10 | OUT…‘Everyone needs this now’. |
When you are editing something that is scripted, then most of the edits will be overlaps (going back to the beginning of a sentence at the time) or retakes (sections redone after the main recording). It should not be necessary to edit fluffs as they should be covered by overlaps and retakes. Pauses may need adjusting. Beware of misreads. ‘These mighty heralds that make the Gods tremble’ is what is intended and more effective than ‘These mighty herons…’. Spell checker artefacts are a growing hazard where, during a spell check, an entirely correctly spelled but entirely wrong word is absentmindedly substituted.
Better results are often achieved by not cutting at the beginning of an overlap but cutting, instead, a few words into it, because speakers tend to overemphasize the start as they are angry with themselves for making the mistake. With this in mind when making notes, mark where, in the overlap, you think will be a good return point.
When marking an overlap, mark where it begins and how many times the speaker went back. There is nothing more irritating than editing an overlap and then discovering another one a few seconds later. Some people put brackets, the number of brackets indicating the number of repeats. I prefer to mark the point and place an ‘E’ in the margin. This I subscript with the number of repeats: E1, E2, E3 etc. By E3, the performer is usually quite annoyed with themselves and definitely tend to overemphasize the first few syllables, In this case I mark a likely late in-point with a Δ.
You can play out at speed by holding down the mouse button on the ‘fast forward’ button during playback. Easier – use a keyboard shortcut. Identifying the repeats should be relatively easy, even at speed. In practice professionals rarely listen at normal speed while searching for edits. About 150 per cent is usual.
One of the advantages of a visual display is that you can see small pauses and often breaks in rhythm. This means that it is usually quicker to ‘bet’ on an edit, make it and play from there. If there is another overlap then a click can select from the last edit to the new point. If the wagered edit is wrong then UNDO instantly restores.
It is amazing just how easily edits can be missed. The ear is sensitive to a break in the speech rhythm. It is always a mistake for the speaker to apologize or to swear at themselves when they fluff. This has the uncanny ability to maintain the speech rhythm and it is these edits that are most likely to be missed, especially in a news and current affairs situation. The professional way is to stop, give three-beats pause, and then go back to the start of the sentence without comment. This will sound more natural if the edit is missed but, ironically, that three-beat pause will usually mean that it is not missed.
3.2 Head alignment
If you are using an analog recorder, a compact cassette machine or a reel-to-reel quarter inch tape machine, then try to use the same machine that you used to record to dub your material onto your computer. This is because analog tape systems are very sensitive to head alignment differences between machines. This gives a muffled sound. On a cassette, Dolby C doubly emphasizes this sensitivity. In practice Dolby B noise reduction will reduce tape hiss to below the ambient noise in your recording environment without being hypercritical of head alignment.
Head alignment can be an issue with digital machines as well and can mean that a recording will play on one machine but not on another. Try always to have the original machine available, just in case.
3.3 Digital
In some ways, these recordings are the easiest to transfer. You do not have to worry about setting levels as you did that on the original recording. If you got them wrong then there is nothing that you can do to correct this until the digital audio data is on your computer. This is because the digital interface is merely transferring the numbers representing the audio that the original recorder laid down at the time of recording. Some sound cards allow you to alter the digital level but this leaves you vulnerable to digital overloads. Correcting within the audio editor is much more flexible.
There are several standards for digitally interfacing your computer to a recorder. The most common is known as S/PDIF which stands for Sony/Philips Digital Interface. This comes in three main variants, one electrical and two optical.
Electrical
The electrical connection uses standard RCA phono plugs, as used for audio on a lot of domestic equipment (Figure 3.1). A single connection is used for both the left and the right sides of a stereo signal. Unfortunately many domestic digital recorders, while having an electrical S/PDIF input, do not have an equivalent output.
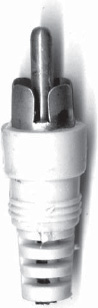
Figure 3.1 RCA Phono plug
Mains-operated machines will usually have an input and output in optical form but many portable machines have no digital output at all. A cynic might believe that manufacturers think that their machines will only be used for copying CDs, rather than for creative work.
For best results you should use phono leads designed for digital connections. While any old audio leads, you happen to have lying around, may get you out of a jam, they can lead to unpredictable problems by introducing errors. This is because they are not designed for the supersonic frequencies involved in digital transfer. Purpose-designed digital leads tend to be thicker than audio leads.
Professional set-ups will use balanced AES/EBU connections using XLR plugs. There are high end sound cards that can use this format. However, S/PDIF inputs and outputs are usually also available.
Optical
Instead of electricity, optical connectors use modulated red light to transfer the data. This light is visible to the naked eye when a connector is carrying an output. This is extremely useful in avoiding confusion between input and output leads.
There are two physical standards. The original, usually found on mains-operated equipment, is known as TOSLINK (from TOShiba Link; Figure 3.2). Small portable machines use optical connectors the same shape as audio 3.5 mm minijacks (Figure 3.3). Some machines have dual function sockets where the socket can either be used for audio or for optical digital. Both connectors use the same signal, which is S/PDIF in light form, so machines using different connectors can be joined using a minijack to TOSLINK lead.
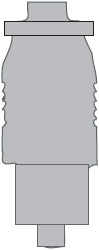
Figure 3.2 TOSLINK optical plug
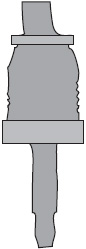
Figure 3.3 ‘Minijack’ optical plug
Some early DAT machines had a proprietary connector at the machine end and a lead terminating with a TOSLINK plug. This can lead you to find yourself wanting to copy from recorder to recorder to ‘clone’ a tape but are faced with joining two TOSLINK connectors. While not recommended, this can be done. Here the plastic tube containing the ink in a cheap ball-point pen can come to the rescue. Snipping the ink-free centimetre off the top will provide you with a suitable ‘gender-changer’. Make sure that you trim it short enough for the ends of the TOSLINK connectors to touch (Figure 3.4). This technique can also allow you to join two optical leads together. Yes, of course, you should have bought a longer one and you will tomorrow but it can save the day today!

Figure 3.4 Joining two TOSLINK plugs
Optical leads are relatively fragile in that they will fracture if bent too far, as they are made of transparent plastic not copper. They are surrounded by opaque plastic. Because the signal is conveyed by light the connection is immune to interference from electrical equipment. However, because of the internal reflections in the fibre, the waveform received by the sound card is less pure than with an electrical connection which should, therefore be preferred. Inputs that ‘re-clock’ the signal can correct the waveform distortion and remove the ‘jitter’ that otherwise results.
SCMS and copy protection
As well as the numbers representing the audio signal, the S/PDIF signal contains extra data including various ‘flags’. Normally these need not concern the user, except for the flags indicating copy protection. Literally, the system is specified so that a digital flag can be raised that will tell a well-behaved digital recorder input not to accept the data.
The all-or-nothing approach of a single flag was thought to be too crude and the SCMS (Serial Copy Management System) was devised. This allows a single generation digital copy to be made. However, if an attempt is made digitally to copy that digital copy then that is prohibited. This is an attempt to reduce multiple digital cloning of commercial recordings. Annoyingly, it is made to apply to your own recordings as well. This only becomes a problem when copying from an SCMS recorder to another SCMS recorder. Digital interfaces on computer sound cards ignore the system. Analog copies always remain possible.
However, the original copy protect flag can be a problem when copying from a professional DAT machine to a domestic DAT. Professional machines use a variation on S/PDIF called AES/EBU which is almost, but not quite, compatible when fed to a phono plug like an S/PDIF signal. The flags are different; a professional machine will often set the flag which means copy protect to a domestic machine, but not to itself. This leads to a situation where you can copy from the domestic machine to the professional machine but not in the other direction!
Clocks
Stereo sound cards are relatively straight forward but If you are using a multiple input sound card you will need to set the card to be controlled by the external data by switching it to the external incoming data clock. (See Appendix 1.)
USB/Firewire
There are digital audio recorders that record onto their own hard drive or a memory card. The one illustrated (Figure 3.5) can transfer via the USB port giving all the advantages of digital transfer along with being able to do it at around 40 times faster than real time. Effectively, for the time of connection, the recorder becomes part of your computer and you are copying a files from one storage device to another. With USB or Firewire you can connect or disconnect the recorder without having to reboot.
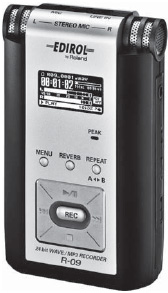
Figure 3.5 Edirol R-09 by Roland; an example of a modern small audio recorder using SD (Secure Digital) memory cards of up to 2 Gbyte capacity to record MP3 or 16/24-bit stereo .WAV files using internal capacitor microphones or external feeds. Playback is by audio jack or USB connection to a computer
Memory cards
Audio equipment is benefiting from the massive market for memory cards provided by the digital camera. Capacities of 512 Mbyte and 2 Gbyte are now easy to obtain at inexpensive prices. They take little space. Because the memory cards have no moving parts, microphones can be built into the recorders without the old motor noise problems. Many computers come with drives built in as well as the software. USB connectors to card drives are cheap and easily available. There are quite a few different types on the market, In practice, it is down to the customer to choose their cameras and audio equipment to use the same kind of card! (Figure 3.6)
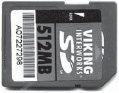
Figure 3.6 SD memory card shown actual size. The tag at the top is a write protect switch
Flash drives
These are ‘key-ring’ devices designed to be carried around and are more robust than bare memory cards. They plug directly into USB sockets. They appear as drives to the computer and need no adapter. Modern XP computers already have the drivers for this sort of device (Figure 3.7).
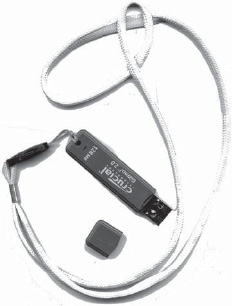
Figure 3.7 Key-ring device
SCSI/IDE
Some recording systems allow direct connection to a computer via a SCSI bus or a proprietary connection of their own. Alternatively they may use removable hard disks. Contained in caddies, these can be unplugged from the recording device and slotted into the computer you use for editing. These often use the SCSI connection system but IDE systems also exist. In the best implementations the inserted hard drive is allocated a drive letter by Windows and can be edited directly by Adobe Audition 2.0 or any other editor. This disks can contain many gigabytes of data and hence many an hour of work. A backup copy should be a high priority. Carrying 20 hours of original audio across town on a single disk is quite frightening as it is vulnerable to so many possibilities of damage from being dropped to being stolen. For the first hazard carry them in a small foam filled flight case available from camera shops.
CDs
CDs can be played by the Windows CD player. This is fine for listening to select material, but transfer is best done digitally. This is done either by using CD ‘ripping’ software, often supplied by the manufacturer of the CD-ROM drive, or by having your machine set-up so that Windows ‘sees’ the audio tracks as wave files (see ‘Blue bar blues’ Page 42). Adobe Audition 2.0 has CD ripping built in and can read audio CDs directly; but you may find that setting your CD-ROM to see CD audio tracks as wave files is much quicker and convenient as then every audio program you use can read CDs.
When they were introduced, there was a lot of hype that CDs were indestructible. Most people have discovered that they are not, except compared with LPs. Unlike LPs, which will always produce something no matter how crackley, CDs share with other digital media, the tendency to work perfectly or not all. While inevitably the best advice is to look after your CDs and to handle them by their edges, failed CDs can often be recovered.
CDs play from the centre outwards. This is to allow easy compatibility between 3-inch and 5-inch discs. The beginning of the recording contains a ‘table of contents’. While this is particularly heavily error corrected, it means that if the table is covered by a mark, the CD will fail even to be recognized by the machine. If this happens examine the playing surface for a mark or marks at the inside of the playing surface.
CDs slow down as they track towards the outside. This gives the digital track a constant linear velocity. The LP had a constant angular velocity, and the speed of the playing surface past the stylus decreased as it went towards the centre. This means that half way through the playing time of a full CD is not half way across the disc but further out. Incidentally, the transfer speed of the CD-ROM is usually specified as a multiple of the standard playing speed of an audio CD. So ‘x52’ implies that the device can extract the data from a 52 minute in 1 minute. In fact it won't. The CD-ROM runs at a linear angular velocity and only reaches its specified speed at the outside of the disc.
If the CD is jumping and skipping a section, then this is likely to be a scratch or an opaque mark. If the CD repeatedly sticks at a section then this is likely due to a transparent mark (like jam). This bends the laser and thus confuses the player as to where it is.
Armed with this information, it soon becomes possible to work out where to look, and what to look for. Because of the nature of the digital track, scratches radiating from the centre are much less likely to cause problems compared with scratches running along the line of the track. This is why CDs should be cleaned with radial movements rather than the instinctive rotary action (Figure 3.8).
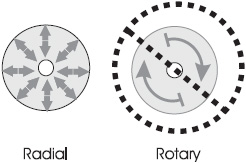
Figure 3.8 Always clean CDs by wiping radially
The first emergency treatment is to wash the CD. Smear washing-up liquid over the surface and then run water over it from a tap, helping the washing-up liquid off with inside to out radial movements of your fingers. Cold or warm water is fine but it is probably best to avoid hot water: if it is too hot for your fingers then it is too hot for the CD. Shake the remains of the water off the CD and look to see if there are any obvious marks remaining. These may need individual attention, again with the washing-up liquid. Try the CD in the player (any slight remains of water will be spun off in the player).
A really persistent mark or scratch should now be identifiable. If rescue has still failed then the mark can be cleaned with brass cleaning wadding (Brasso Duraglit wadding in the UK). Remember to rub radially.
It may be that this still doesn't work for you. If your CD player's laser lens is dirty this will make it less able to correct errors. Regularly clean the lens with a special lens cleaning CD. This has little brushes on it which clean the lens as the track is changed – usually between 1 and 3. Cleaners using the same principle are also available for Minidisc machines.
If there is still a problem then try a different make of CD player, as different manufacturers have different error correction strategies. If you are ‘ripping’ the audio digitally straight off the CD, see if the CD-ROM has management software that will slow down the process. A CD that will not rip at x12 speed may be OK at x4, x2 or x1. If all fails try the audio output of the CD-ROM drive.
3.4 Analog
Provided care has been taken to get the levels right on the original recording, analog transfer can be entirely satisfactory. You should make sure that your system is connected satisfactorily and well earthed. The playback should be checked for hum pickup. This can be due to electrical equipment on the desk or to the computer itself.
Running the dubbing lead near to a power supply (including the playback machine's own) is likely to introduce hum. Running the lead near to the computer's monitor is likely to introduce not only hum but also buzzes and whistles.
Keep the dubbing lead as short as it practical, as very long runs will lead to loss of high frequencies unless you are using fully professional equipment using ‘balanced’ connections with tip, ring and sleeve jacks or XLR connectors (Figures 3.9 and 3.10).
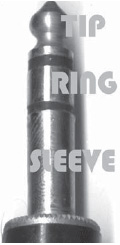
Figure 3.9 Tip, ring and sleeve jack
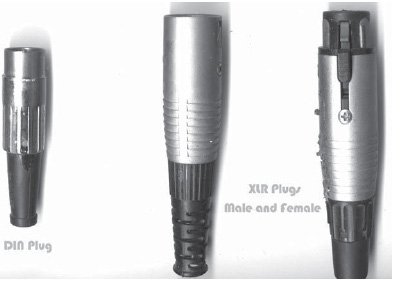
Figure 3.10 XLR connectors
Normally you will connect the ‘LINE OUT’ socket of the playback machine to the ‘LINE IN’ socket. The most common connectors at each end are 3.5 mm minijacks (Figure 3.11). However, the better quality sound cards have ‘breakout’ boxes. These either sit at the end of a thick flying lead or are mounted in one of the disk drive compartments of the computer. These will have phono, quarter inch jack or XLR connectors often with a balanced connection option for use with professional machines.
Figure 3.11 Stereo and mono 3.5-mm minijacks with 2.5-mm plug for comparison
The LINE OUTs of playback machines are of a fixed level so level control has to be done on the computer. Using the headphone output instead is an option and can give excellent quality. It can also produce crackles and distortion if the volume control is dirty!
Gramophone records
Despite the popularity of CDs, there are still occasions when old LPs are the only available source of a piece of music, or even actuality. It makes sense, therefore, to get the best possible sound out of them before resorting to software solutions within the computer.
Gramophone turntables cannot just be plugged straight to a computer sound card. Not only do they have an output much lower that the line level required by the sound card, but they also need what is called RIAA equalization. This is a standardized fixed top boost and bass cut made on recording that has to be corrected at playback.
In the past, this was done by the ‘phono’ input of a Hi-Fi amp. Nowadays, many do not even possess such an input. Maybe you have an old Hi-Fi amp that can be pressed into service. The TAPE output can be fed to the computer's sound card.
However, such a complicated device is not needed. Cheap battery-operated amplifiers are available; they deliver an equalized line level output suitable for your sound card. Being battery operated, they should have a lower hum level than conventional amplifiers. A typical example is illustrated in Figure 3.12.
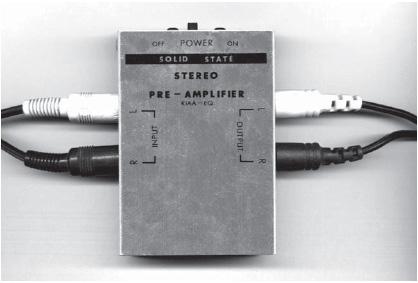
Figure 3.12 Typical record turntable preamplifier
Some can double as simple mic amplifiers, if required, by switching off the RIAA equalization.
It can be useful to bypass the RIAA top cut when transferring old recordings. The top cut softens clicks and de-clicking software can work better without it having been applied. You then correct the recording afterwards.
Http://sound.westhost.com/project91.htm has a circuit board project for building your own RIAA amplifier.
Http://www.a-reny.com/iexplorer/restauration.html has very useful advice about transferring gramophone records.
If you are transferring 78rpm recordings then RIAA should then definitely be left out as they did not use this system. They did use some form of equalization but there were more than a hundred different ones used by different companies over the half century reign of the medium. As a compromise the FFT filter on AA can be set to apply RIAA or Reverse RIAA setting. (See Appendix 4.)
3.5 Recording
Before making a recording you have to tell the program how you want to record. Some audio programs like Pro Tools will also ask you where you want to record before you start. Adobe Audition 2.0 uses buffer files and you can decide on file names and paths after the recording. You can set where these buffer files are by changing the temporary directories to be found in the system tab of the settings dialog. (When you first install Adobe Audition 2.0, it will suggest where to put them based on the disk space available). There is a speed benefit by having them on physically separate hard drives. This means that copying is achieved by two heads moving across their separate drives rather than one head clacking back and forth between different parts of the same disk.
Click on ‘New’ and you will see a dialog asking you to set various options (Figure 3.13). This will be based on what you set previously, so, for most people, this becomes a simple matter of clicking OK.
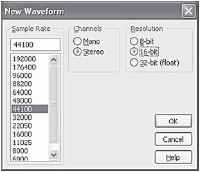
Figure 3.13 Setting recording options
The sampling rate is how many numbers per second are used to define your audio. For high quality use, there are two main standards. 44 100 is used by CDs. If your material is going to end up on CD audio then this is the rate to choose (CD-ROM data can be any sampling frequency).
The other commonly used sampling rate is 48 000. This is required by some broadcasting companies that accept data files. If your material is sourced from, or is going to end up on DAT then this is the frequency to use. Many non-pro DAT machines will only record analog signals at 48 000 (or 32 000 at their Long Play speed). If you are making a digital transfer then it is vital that the sampling rate set matches the rate used on the recording. The sampling rate of a recording can be converted within Adobe Audition 2.0 but this is relatively a time-consuming process.
The mono/stereo option is straight forward. Operationally it is much simpler to record everything stereo, even mono sources. A stereo transfer of a mono recording can help identify problems such as head alignment. Sometimes the left and right channels will be of different quality. You can choose the better one. Much of the noise in a gramophone transfer appears as the difference between left and right and will disappear if the left and right channels are summed together but being able to get at this difference signal can materially help noise reduction software.
However, mono files are half the length of stereo files and, if everything is in mono and good quality, then make the saving. Beware that CD audio has no mono mode so burning to CD may need stereo files. However, many CD writing programs have the ability to convert mono to stereo on-the-fly, thus removing this constraint on the use of mono files. Minidisc does have a mono mode and a 74-minute Minidisc can record 148 minutes of mono, an 80-minute disc 160 minutes at full quality.
Hi-MD has higher capacities. Old style minidiscs can be reformatted to have 305 Mbyte capacity. Hi-MD blanks have 1 Gbyte capacity. Taken from Http://www.minidisc.org/ the following capacities are possible.
| 305 Mbyte | 1 Gbyte | |
| Linear PCM 1.4 Mbps | 28 m | 1 h 34 m |
| ATRAC3plus 256 kbps ‘Hi-SP’ | 2 h 20 m | 7 h 55 m |
| ATRAC3plus 64 kbps ‘Hi-LP’ | 10 h 10 m | 34 h |
| ATRAC3plus 48 kbps | 13 h 30 m | 45 h |
| ATRAC3 132 kbps ‘LP2’ | 4 h 50 m | 16 h |
| ATRAC3 105 kbps | 6 h 10 m | 20 h 50 m |
| ATRAC3 66 kbps ‘LP4’ | 9 h 50 m | 32 h 50 m |
ATRAC is Sony's own audio compression system comparable to MP3.
With data compression systems, the number of bps represent the quality possible. The actual output rate from a player will usually be 44.1 kHz.
With linear recording, the resolution sets how big the numbers that represent your audio can be and, thus, the number of separate discrete levels that can be represented. This directly affects the noise level of your recording. Eight bit only has 256 levels and is, as a result, very hissy. It should be regarded only as an end-user format. With suitable control and processing 8-bit files can sound surprisingly good. however, that processing has to be done at a higher resolution.
Sixteen-bit files are the standard, match CD and DAT and will be your normal choice. Thirty-two-bit files give the highest quality and, while taking up twice as much data space, give superior results when being modified. The floating-point format used by Audition gives almost complete protection against overload. If your acquisition source has higher than 16-bit resolution, or you are dubbing from an extremely high quality analog source (e.g. 15/30 ips Dolby reel-to-reel tapes) then, provided that your sound card has better than 16-bit analog to digital conversion, 32 bit will give extra quality. Similarly, if it can cope, doubling the sampling rate to 88 200 or 96 000 will further improve the quality but your resulting wave files will be enormous. The floating-point format also allows recovery from higher than 0 dB peaks.
The disadvantage of working at 16 bit is that this is what the domestic consumer has at home. A 16-bit recording will have to have some headroom left in case of unexpected loud peaks. Quiet passages may have to be amplified. This can mean that your final recording is, in parts, only equivalent to a 14 bit or less recording. Working at 32 bits allows you to correct levels, normalize and then reduce to a full 16-bit master.
Setting the level
Oddly programs for audio rarely have input gain controls. The job is usually done either by a utility provided by the sound card, or by the Windows sound mixer. Some installations have an icon on the task bar that will call this up (often via the playback mixer. Audition will call the windows mixer from the menu option options/windows recording mixer. You can then select which source you wish to record from. If you have a specialist card, maybe with several separate inputs, then it is likely to have its own manager for routing the audio. here you will have to tell the editor which card to use.
In Adobe Audition 2.0, this is done using the Edit/Audio hardware Set-up menu and clicking on the Edit View tab. This will provide information on the card's selection of input and output channels.
Multi-channel sound cards usually present themselves to Windows as a number of separate stereo sound cards. So a card with eight analog inputs and outputs plus a stereo digital in/out will appear as five separate cards. This is for the single wave view mode. In multitrack mode, each track can be separately selected to a sound card input or output (see Chapter 9, ‘Multitrack’, Page 000).
Because running level meters requires a fair amount of processing time, most editors leave them off except when actually recording (playback is less of a problem as the system already ‘knows’ what the levels are). It is this processing overhead that makes programmers avoid emulations of analog meter pointers like VU meters and peak programme meters.
In Edit View, Options/metering/monitor record levels (F10) selects the mono or stereo meter in Adobe Audition 2.0.
Recording a file
Having clicked the “New” dialogue, click the record button to begin recording. The waveform of the recorded audio will be drawn on the screen. Just as the waveform is getting towards the right of the screen there will be a redraw to move the window along to keep up with the pointer which will remain static (this can be switched off if you wish). You can ‘crash’ start into record from a blank window by clicking record and pressing ENTER to the dialog requesting the record parameters. This will use the settings that you last used. The recording is stopped by clicking the stop button.
Figure 3.14 Audition disk usage display
At the bottom of the screen can be listed your disk resources (Figure 3.14). In the illustration all the disk related boxes are enabled. The first box shows the sampling rate, bit rate, mono or stereo. The next box shows how many megabytes your recording has used, followed by how many hours, minutes, seconds and frames. These two increment in blocks, rather than by the second or frame, as Audition allocates the space this way. The next two boxes give you the equivalent figures but for how much space you have left (Figure 3.15).
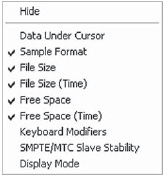
Figure 3.15 Disc usage selection
Right clicking on the bar allows you to choose to show only what you are interested in. You have the additional options of showing the data under the cursor; the instantaneous level for that channel. You can see keyboard modifiers; Shift, Control, etc. The lock stability is available if you are using time code synchronization as is the display mode (waveform, spectral) which is probably quite obvious anyway (Figure 3.16).
Figure 3.16 Time code synchronization
How much space is available?
This raises a vital issue. What is actually meant by how much space is left? Some editors like Pro Tools insist that you define where you want to record at the beginning of each session. In its Edit View, Adobe Audition 2.0 records to its own buffer. This is different from where you intend to put the finished recording. An ideal set-up system will put Audition's two buffers on separate disk drives. Finished recordings can be saved to different folders or partitions on the same disks (or, indeed, to other drives on the system). Personally I have two SCSI drives which are used as audio work files with IDE drives used for storage and non-audio programs. however, these days, with so much development the practical advantages of SCSI are probably marginal.
Topping and tailing
Once the recording has been finished, top and tail it by removing any extra material at the front and end. Ends usually sound cleaner if you use a fade out transform on the last half-second or so. This guarantees that your recording ends on absolute digital silence and removes a potential source of clicks when transferring to CD.
Mobile phones
Mobile phones have become almost universal. They are invaluable, especially in a business where gigs can be set up at short notice. however, you should be aware that they can cause severe interference with audio gear. Semi-pro equipment is particularly vulnerable as it uses unbalanced circuits, but even the most expensive professional products can be affected. This why they are banned in hospitals where they can interfere with medical equipment. When you are transferring your audio to the computer, you should avoid having your mobile phones switched on nearby.
Each phone has a radio transmitter and it is this that causes the interference. The interference shows up as burbling noises or even semi-musical arpeggios. Therefore, it is best practice to turn off mobile phones while in the same room as audio equipment in use. It is particularly impolite not to turn off your phone if the audio gear is being used by someone else! Interference can be caused even in standby mode although this will come in short bursts spaced minutes apart.
Essentially a mobile phone has five modes:
| 1 | Off | This is the only safe mode. |
| 2 | Calling | The phone is transmitting to attract the attention of the cell transmitter. |
| 3 | Ringing | Although the ringing is incoming, the phone is transmitting data to the network to tell it where it is and that it is responding to the call. |
| 4 | Talking | The transmitter is sending your side of the conversation to the network. |
| 5 | Standby | Here the transmitter is usually off; but every now and then, it wakes up and sends a ‘Hi there!’ message to tell the network that it is still about. These messages can be even more frequent, if the phone is out of range of the network, as it will be trying to re-establish contact. PC Audio Editing with Adobe Audition 2.0 |