
CHAPTER 4

Introduction
Computers aren’t yet very good at understanding and interpreting images. Presented with two images, one of a horse and another of a tree, in the absence of any other information, a computer would not be able to tell you the difference, or very much else useful about them.
And so we have metadata – literally data about data; textual information that tells us everything we need to know about our images and helps us find them. Metadata allow us to say ‘show me all the pictures of horses, but not the ones with trees in’ and to ask other questions that go well beyond the equine and arboreal.
Broadly speaking, metadata fall into one of two camps. Either they’re added by the camera at the time the image is shot or they’re added afterwards. The first kind are sometimes referred to as Exif metadata are easy to deal with because, for the most part, they’re added automatically and you can’t edit them, but you can use them as the basis for searching for photos.
The second kind, usually known as IPTC metadata, are added and edited manually, after the event. Consisting, among other things, of caption and credit information, location data and keywords, which describe the image content, they are the stuff that helps to differentiate between foals and foliage.
Aperture provides powerful tools for adding, editing and searching metadata. Using them to organize and identify the content in your image Library will help you locate it when you need it without wasting time. This chapter will show you how to do that.
Rating Images
Arranging the Workspace
Apart from assigning keywords, rating images is the best way to organize your image library and place a relative ‘value’ on individual shots. Aperture’s rating system goes from zero to five stars. Images in the five star category are denoted as ‘Picks’ and there is also a Reject category.
Initially, at least, you’ll want to skim very quickly through a Project, attaching star ratings to images, tagging obvious rejects and short-listing definite Picks. There are a number of ways to do this and you’ll develop your own preferred method; here are some suggestions that you might like to use as a start.
First, select Quick Preview mode by clicking the Quick Preview button on the Control Bar. Quick Preview displays the JPEG preview, rather than the high resolution image data. Especially if you’re working with Raw images, this will speed things up considerably. You don’t need high resolution detail to make ratings assessments at this stage – the JPEG preview is easily good enough.
If you’re working on a single screen, choose Browser and Viewer mode from the View pop-up menu on the Toolbar, selecting View > Browser & Viewer or pressing the ![]() key to cycle the View modes. If Filmstrip mode isn’t already set, select it by clicking the Filmstrip View button on the Browser.
key to cycle the View modes. If Filmstrip mode isn’t already set, select it by clicking the Filmstrip View button on the Browser.
If you’ve already stacked your images, press ![]()
![]() , or select > Stacks Open All Stacks so that you can see them all. As you’re unlikely to need it while rating, you can make more space for the Browser by getting rid of the Inspectors panel: press
, or select > Stacks Open All Stacks so that you can see them all. As you’re unlikely to need it while rating, you can make more space for the Browser by getting rid of the Inspectors panel: press ![]() or click the Inspector button on the Toolbar. Unless you’re using it to apply ratings, do the same for the Control Bar by pressing
or click the Inspector button on the Toolbar. Unless you’re using it to apply ratings, do the same for the Control Bar by pressing ![]() (Fig. 4.1).
(Fig. 4.1).
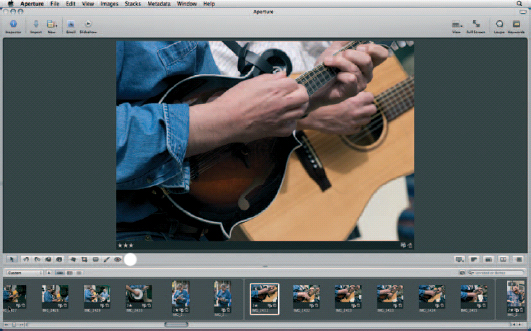
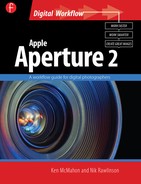
Fig. 4.1 This is a good single-screen setup for rating images, providing large enough thumbnails and maximizing available screen space for the Browser. Quick Preview provides good enough quality at this size to make ratings judgements. If you’re working with a dual-screen setup, the selection will preview on your second monitor if View > Secondary Viewer is set to Alternate. But in this case, you’re better off setting your primary screen to Browser Only view.
Using the Keyboard
The quickest and simplest way to apply ratings is using the keyboard. The keyboard commands for applying ratings are as follows:
![]() to
to ![]() : Apply one to five stars to the current selection.
: Apply one to five stars to the current selection.
![]() : Reject the current selection.
: Reject the current selection.
![]() : Apply five stars to the current selection (select).
: Apply five stars to the current selection (select).
![]() : Unrate the current selection.
: Unrate the current selection.
When you’ve rated an image, use the ![]() key to advance to the next image. If you change your mind, navigate back to the previous image using the keyboard and apply a new rating. Applying a new rating automatically overwrites any existing rating.
key to advance to the next image. If you change your mind, navigate back to the previous image using the keyboard and apply a new rating. Applying a new rating automatically overwrites any existing rating.
Fig. 4.2 The Control Bar ratings buttons. From the left: Reject, Decrease Rating, Increase Rating, Select, Move Selection Left and Move Selection Right.
Using the Mouse
If you prefer to use your mouse rather than the keyboard to apply ratings, you have two options. You can apply ratings from the Metadata menu or you can use the Control Bar. To display the Control Bar, press ![]() . The Control Bar has six buttons (Fig. 4.2), which are used to apply ratings; from left to right they are:
. The Control Bar has six buttons (Fig. 4.2), which are used to apply ratings; from left to right they are:
Reject
Decrease rating
Increase Rating
Select
Previous image
Next image
One of the problems with using the Control Bar is that it doesn’t have buttons so that you can apply, for example, a three star rating with a single click. On an image with no rating, you have to press the increase rating button three times, which can get a bit tedious. One thing the Control Bar is very useful for is adding keywords, which we’ll deal with in the following sections.
When you’ve gone through and rated an entire Project or folder or when you return to re-evaluate a batch of images, you’ll need to adopt a slightly different approach. For one thing, you’ll probably want to make a more careful comparison of similar images; for another, Aperture is more flexible when it comes to editing ratings and there are some keyboard modifiers that will help speed the process even more.
Comparing Images
Use the Browser to select the first image you want to rate and press the ![]() key to set it as the Compare item. The Compare item appears on the left of the Viewer surrounded with a green border and the subsequent image – we’ll call it the Alternate – is displayed alongside on the right with a yellow border. If you’re not working in Quick Preview mode the Alternate border is white.
key to set it as the Compare item. The Compare item appears on the left of the Viewer surrounded with a green border and the subsequent image – we’ll call it the Alternate – is displayed alongside on the right with a yellow border. If you’re not working in Quick Preview mode the Alternate border is white.
To change the Alternate, just select a new thumbnail in the Browser – you can do this using the keyboard arrows. Any time you want to select a new Compare item press the ![]() key. Whenever you set a Compare item in this way, the image to the right of it is automatically selected as the Alternate (Fig. 4.3).
key. Whenever you set a Compare item in this way, the image to the right of it is automatically selected as the Alternate (Fig. 4.3).
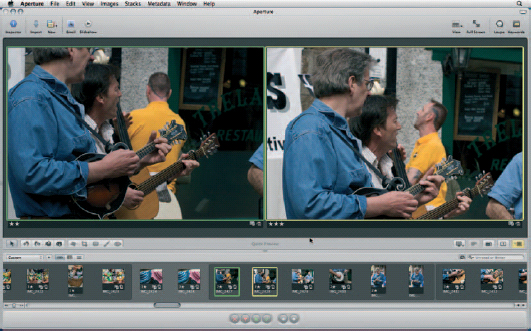
Fig. 4.3 Press ![]() to designate a selected image as the ‘Compare’ image – the image to its right is automatically selected as the Alternate, but you can select any other image(s) in the Browser using either the keyboard or mouse.
to designate a selected image as the ‘Compare’ image – the image to its right is automatically selected as the Alternate, but you can select any other image(s) in the Browser using either the keyboard or mouse.
Use the following keys to change the rating of the compare image:
![]()
![]() : decrease rating
: decrease rating
![]()
![]() : increase rating
: increase rating
And to edit the rating of the Alternate:
![]() : decrease rating
: decrease rating
![]() : increase rating
: increase rating
To select more than one Alternate, ![]() or
or ![]() select them in the Browser. If you have Primary only on, ratings edits will apply only to the selected Alternate which is displayed with a thick yellow (white if Quick Preview is off) border. If Primary Only is off, subsequent Alternates are displayed with a thin yellow border and ratings edits apply to all of them (Fig. 4.4).
select them in the Browser. If you have Primary only on, ratings edits will apply only to the selected Alternate which is displayed with a thick yellow (white if Quick Preview is off) border. If Primary Only is off, subsequent Alternates are displayed with a thin yellow border and ratings edits apply to all of them (Fig. 4.4).
Fig. 4.4 The Compare image (top left) is shown surrounded by a green border; Alternates have a white, or, in Quick Preview mode, a yellow border. This is the one to which your ratings changes will apply if you have Primary Only turned on. Otherwise, the change will apply to all of the Alternates – probably not what you’d want in most circumstances.
Adding IPTC Metadata
Adding metadata to images can be a time-consuming chore; but by adopting a systematic approach, you can minimize the effort involved considerably. As a general rule, try to add metadata at the earliest opportunity; this will avoid additional work down the line – adding missing information to versions or spending time searching for images that lack it.
Work from the general to the specific. Some metadata, for example photographer credits, copyright notices, location information, generic keywords and, in some cases, captions, can be batch added to all images in a shoot as soon as you’ve imported them or even on import. You can then go through adding specific information such as individual captions and keywords once you’ve rated images and chosen Picks.
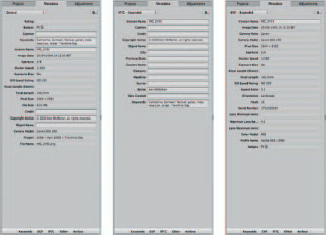
Fig. 4.5 Three of the Metadata views available from the Metadata pane: L to R – General, IPTC – Expanded and Exif Expanded.
To add metadata to your images, you can use either the Metadata Inspector or the Metadata HUD. To display the Metadata Inspector, click its tab in the Inspector pane and select a view using the pop-up menu. The General view displays a combination of Camera and IPTC metadata as well as other information including rating, badges, the file name and the Project to which it belongs (Fig. 4.5).
Take a look at some of the other metadata views available. Generally, metadata fit into one of two categories: they are generated by the camera or added afterwards. Camera-generated metadata include the image date and time, information about the camera model and lens, exposure information and other technical information such as the ISO setting, image resolution and so on. These kinds of data are often referred to as Exif data in reference to the file structure (Exchangeable Image File format) used to contain them. Exif data aren’t editable in Aperture or most other applications so you can’t, for example, change the indicated ISO speed setting or lens focal length. These and the other Exif fields are grayed out in Aperture.
The second kind of metadata, that is added and edited in software after the image file is created, is referred to as IPTC metadata. The International Press and Telecommunications Council is a consortium of news agencies that developed the standard for added image metadata of this kind.
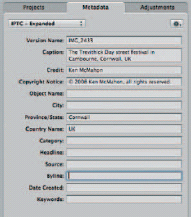
Fig. 4.6 The IPTC – Expanded Metadata view includes Caption, Credit and Copyright Notice fields as well as Keywords.
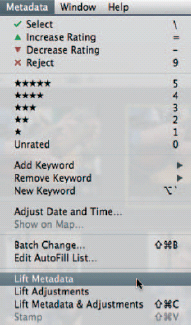
Fig. 4.7 Use Lift and Stamp to copy metadata and apply them to multiple images.
IPTC metadata fields include Caption, Copyright Notice and Credit. The list is quite lengthy and, as well as fields for general press and publicity use, includes specialized fields such as standard location identification codes and audio specifications. For the full list of available IPTC fields, click the IPTC button at the bottom of the Metadata Inspector.
Using the Metadata Inspector
To add IPTC metadata to a single image, select IPTC – Expanded from the pop-up menu on the Metadata Inspector. Select the first image and enter your Copyright Notice into the Copyright Notice field (press ![]()
![]() for the © copyright symbol).
for the © copyright symbol).
Continue to enter as much metadata as you want for the selected image. In this instance, The Caption, Credit, Copyright Notice, Province/State and Country Name categories have been completed (Fig. 4.6).
Using the Lift and Stamp HUD
To apply the same metadata to all of the images in the project, choose Lift Metadata from the Metadata menu, the Lift and Stamp HUD will appear showing the completed metadata fields and their contents in two columns. Press ![]()
![]() to select all of the images in the project (or select just those you want to stamp), then click the Stamp Selected Images button to add the metadata to all of the selected images (Figs 4.7 and 4.8).
to select all of the images in the project (or select just those you want to stamp), then click the Stamp Selected Images button to add the metadata to all of the selected images (Figs 4.7 and 4.8).
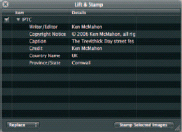
Fig. 4.8 Use Lift and Stamp to copy metadata and apply it to multiple images.
Don’t worry about captioning all of your images with a ‘generic’ caption. Even if you intend to add specific captions at a later stage, adding a generic caption to all the images now will ensure that every image is captioned and none falls through the cracks (Fig. 4.9).
Using Metadata Views
There are two views that display IPTC data exclusively – IPTC Expanded, which we’ve seen and IPTC Basic, which displays a small subset of the IPTC Expanded view. In all likelihood neither of these will provide the exact IPTC fields you need. It’s also likely that you’ll want to display and edit different views for different jobs or clients. For example, you may supply images to both sports and news agencies and require different IPTC metadata for each (Figs 4.10 and 4.11).
You’re not restricted to adding metadata from a single category. You can combine fields from the Exif, IPTC and Other metadata panes to create whatever combination of information you find useful. You can also edit the existing Metadata views in this way.
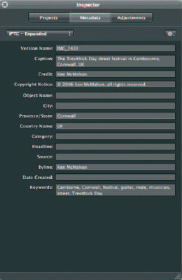
Fig. 4.9 You can use the Metadata pane of the Inspectors HUD to add metadata to images in exactly the same way as with the Metadata Inspector.
Creating Metadata Presets
Much of the metadata you need to add to images is the same for every job – Copyright Notices, Credits, Bylines and so on are unlikely to vary. You don’t want to be keying in this information every time you add a new project to your Aperture Library; metadata presets provide a way for you to add everything in one go.
By creating several presets for different clients, you can automate the process of metadata editing. This is useful if you only have one metadata set; if you include different metadata on images for different clients, it’s an even bigger time saver.
In the example in Fig. 4.12, the Caption & Credits Metadata view has been used to apply Byline, Credit and Copyright Notice information to the selected images.
To create a Metadata preset using this information, select Save as Preset from the Action pop-up menu on the Metadata Inspector, enter a preset name and click OK (Fig. 4.12).
To add the preset to other images, first select them, then choose either Append with Preset or Replace with Preset from the Metadata Action pop-up menu and select the saved preset from the list. Append and Replace affect only fields in which there is existing metadata in both the preset and the image to which you are applying them and do exactly what they say.
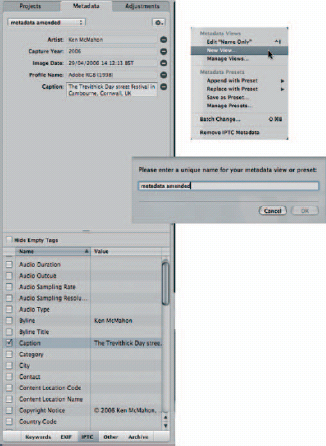
Fig. 4.10 You can create bespoke metadata views in one of two ways. Select New View from the Metadata Action pop-up menu, enter a name for the view and click OK. This creates an empty metadata view which you can populate by clicking the buttons at the bottom of the Inspector pane and checking the boxes next to the fields you want to include.
If, for example, you have added captions to all of your images, it’s safe to subsequently apply a Metadata preset that does not include caption data using Replace with Preset; the existing caption data will not be replaced by a blank caption field. Having said that, it’s best from a workflow standpoint to first add metadata using any presets you have defined, and then progress to captioning and other metadata tasks that require an image-by-image approach. If you accidentally overwrite existing metadata fields, press ![]()
![]() to undo the operation (Fig. 4.13).
to undo the operation (Fig. 4.13).
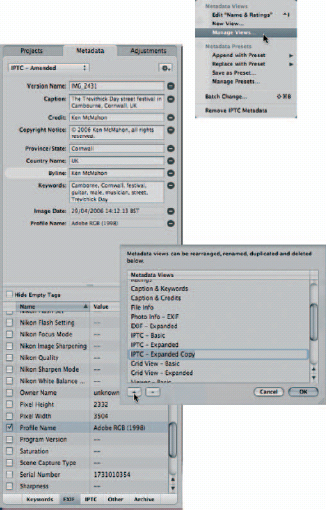
Fig. 4.11 Alternatively, choose Manage Views from the Metadata Action pop-up menu and select IPTC – Expanded or any other view that has at least some of the fields you want. Click the plus sign to create a copy of the view, rename it IPTC – Amended and click OK. Now select the IPTC – Amended view from the Metadata Views pop-up menu, click the IPTC button at the bottom of the Inspector pane and add and remove fields as required.
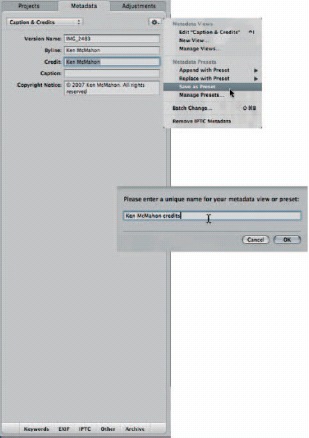
Fig. 4.12 Select Save as Preset from the Action pop-up menu on the Metadata Inspector to create a Metadata preset that you can easily apply to other images.
Use Append with Preset to add metadata to fields in which there is already existing information: for example, if you have Metadata presets that add keywords to images that already contain keywords.
Batch Operations
Another way to apply metadata changes to multiple images is to use Batch Change, one of the options on the Metadata Action pop-up menu. If all you want to do is add or append metadata to images, Batch change doesn’t really offer any special advantages and you’re better off simply applying a Metadata preset directly. Batch Change does offer some other options that you might find useful in special circumstances though.
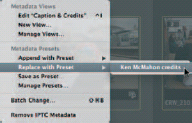
Fig. 4.13 Replace with Preset overwrites existing metadata for completed fields only.
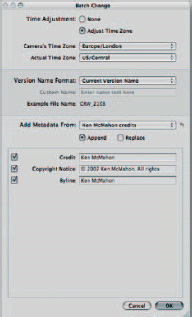
Fig. 4.14 Batch Change provides time adjustment as well as comprehensive tools for renaming files. You can append an index number, the date and time, a sequence number (e.g. one of four) to the existing version name or a new custom name.
Changing the Time
If you require accurate time metadata in your images and your camera’s clock was incorrectly set you can adjust the time stamp in the Image Date Exif field (this is one of the few Exif fields that are editable). This problem most commonly occurs if you’ve travelled to a location in a different time zone and omitted to adjust the camera clock setting.
Check the Adjust Time Zone radio button at the top of the Batch Change dialog box and select the time zone that was set on camera from the Camera’s Time Zone pop-up menu. Then select the actual time zone of the shoot location using the Actual Time Zone pop-up menu. For example, if you travelled from London to New York select Europe/London from the first menu and America/New York from the second. In this case, 5 hours would be subtracted from the original time stamp.
Adjust Time Zone adds or subtracts time in hour increments. If you know the time difference between you camera setting and the shoot location you can enter it manually using the options on the GMT submenu. Selecting UTC sets the time to UTC (Coordinated Universal Time), which is essentially the same thing as GMT (Greenwich Mean Time). One other thing to be aware of is that these changes only apply to Versions. If you want to change the Time metadata on your Masters you need to use the Adjust Date and Time option on the Metadata menu.
The bottom panel in the Batch Change dialog box contains an ‘Add Metadata From’ pop-up menu which allows you to add Metadata subsets contained in some of the Metadata views. This is useful if, for example, you only want to add caption and keyword metadata. You can also add any of your Metadata presets which appear at the bottom of the pop-up menu. As with the other metadata editing methods, you can choose to either replace the existing metadata or append to them.
Adding Metadata on Import
Once you’ve defined Metadata presets, you can further automate the process and save yourself extra work by adding metadata during the import process. The Import dialog box provides the same options for adding metadata from a Metadata view or preset as those discussed earlier. See Chapter 3 for more details.
Keywords Overview
More than any other kind of metadata, keywords define the content of your images and help you locate them. Effective keywording of your images can make the difference between finding the perfect shot for a job or page upon page of also-rans. More importantly, it can mean finding the shot you know you have within a couple of seconds, as opposed to spending hours in a tedious trawl through folder upon folder of the wrong stuff.
Keyword Strategy
You might think that applying keywords to images is something that requires an individual approach and, to a degree, you’d be right. Regardless of the nature of a shoot, there will inevitably be some images that require unique keywords. The average soccer match doesn’t have an abundance of goals, not many wedding shots include the priest (hopefully) and not all product shots are cutouts.
These are the exceptions, though in many situations, you’ll find that most of the keywords you apply to images can be applied to all of them. Location, main subject, client, orientation – these and other generic keywords can be applied to an entire shoot. So adopt a top–down approach with keywording, first applying generic keywords to all, or most of, your shoot, and then making selections of images to which common keywords can be applied and finally adding unique keywords to individual images.
Don’t be under any illusions – keywording your image library is a major undertaking. It requires a well-thought-through approach and systematic application. Adding a few hastily thought-up keywords every time, you import a shoot which is better than nothing, but will take longer than applying them from a prepared list and won’t yield the full search potential of applying them in an organized fashion.
Fortunately, Aperture provides some excellent tools that make keywording less of a chore that it might otherwise be. There are three ways to add keywords to images in Aperture; which of these you choose to use will depend on the nature of the task in hand as well as personal preference (Fig. 4.15).
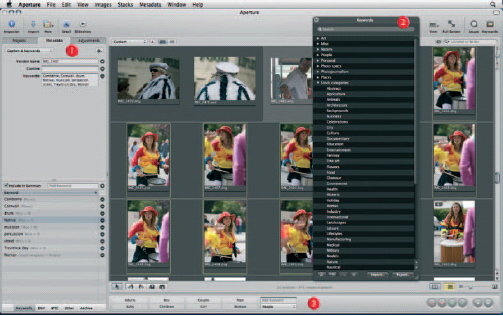
Fig. 4.15 Aperture’s three Keyword tools: The Metadata Inspector (1), Keywords HUD (2) and Control Bar (3).
The Metadata Inspector shows a keywords field in certain Metadata views, for example, General, Caption and Keywords, IPTC Basic and Expanded and List Basic and Expanded. You can add keywords to selected images simply by typing them in here, separating individual keywords with a comma.
The Keywords HUD displays all of the available keywords organized into keyword groups. You can apply keywords by dragging and dropping them from the HUD onto selected images. You can also add keywords to the list and search for keywords to apply (but not search for images containing those keywords – for that you use the Query HUD).
The Control Bar has 14 keyword buttons which can be applied to selected images with a single click. The Default buttons display keywords from the predefined Aperture keyword – sets but can be configured to display your own keywords.
Adding Keywords Using the Metadata Inspector
As we’ve seen, you can add keywords to selected images by typing them into the Keywords field in the Metadata Inspector. Separate individual keywords with a comma. Click the Keywords button at the bottom of the Metadata Inspector to see the keywords for a selected image. You can also add keywords by typing them into the Add Keyword field and clicking the ‘+’ button or pressing ![]() . To remove a keyword from the selected image, press the ‘−’ button that appears to the right of it in the keyword list.
. To remove a keyword from the selected image, press the ‘−’ button that appears to the right of it in the keyword list.
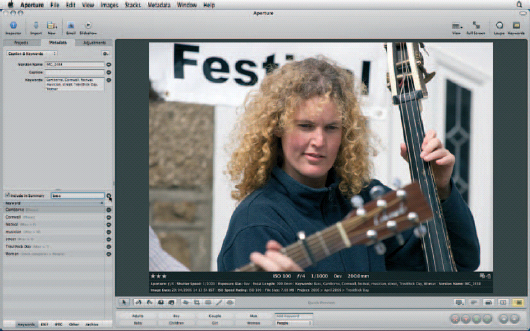
Fig. 4.16 Adding keywords using the Metadata Inspector.
Adding Keywords Using the Keywords HUD
To display the Keywords HUD, select > Window Show Keywords HUD or press ![]()
![]() . Unless you’ve previously added keywords to images, or imported images containing keywords, the HUD will list only the predefined Aperture keywords organized into keyword groups.
. Unless you’ve previously added keywords to images, or imported images containing keywords, the HUD will list only the predefined Aperture keywords organized into keyword groups.
If you haven’t yet added any keywords of your own, take a look at these; they will help you avoid duplication and provide some useful ideas on how to organize your own keywords. There are comprehensive keyword groups for wedding photography and photojournalism – even if these don’t contain exactly what you need, they may provide a useful starting point.
To add a new keyword to the list, click the Add Keyword button at the bottom of the HUD and overwrite the Untitled entry that appears. To add a keyword to a keyword group, first select the keyword group, then click the Add Subordinate Keyword button and overwrite the Untitled entry that appears below the keyword group and is indented.
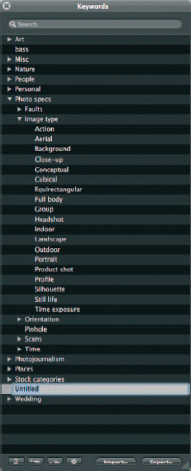
Fig. 4.17 The Keywords HUD. To add a new keyword, click the Add Keyword button at the bottom of the HUD and overwrite the Untitled entry.
A keyword becomes a keyword group when subordinate keywords are added to it, but the keyword group still behaves like an individual keyword. For example, the Wedding keyword group contains many subordinates, some of which are themselves keyword groups. Nonetheless, you can still drag the ‘Wedding’ keyword onto an image. Doing this adds the keyword ‘Wedding’ to the image not, as you might expect, all of the subordinate keywords within the Wedding keyword group.
If you want to add more than one keyword to selected images either ![]() click or
click or ![]() click to select them in the Keywords HUD then drag and drop them onto the selected images in the Browser.
click to select them in the Keywords HUD then drag and drop them onto the selected images in the Browser.
Adding Keywords Using the Control Bar
The Control Bar provides a very efficient way of adding keywords to images in the Browser. To display the Control Bar press ![]() and to display the Control Bar’s keyword buttons press
and to display the Control Bar’s keyword buttons press ![]()
![]() .
.
You can add a keyword to selected images simply by typing it into the Control Bar’s Add Keyword field. The AutoFill editor helps you by producing a pop-up list with previously entered keywords. To edit the AutoFill list, select Edit AutoFill List from the Metadata menu (Fig. 4.19).
One advantage of using the Control bar over the Metadata Inspector is that you can apply keywords to multiple selected images. Unless you have Primary Only turned on, a keyword typed into the Keywords field of the Metadata Inspector will be applied to all of the selected images.
The Control Bar also contains a selection of Keyword buttons, which can be applied to either a single image or a selection of images. The displayed buttons form a preset group which you can select from the Keyword Preset group pop-up menu just below the Keyword field. Select Stock categories from the Preset group pop-up menu to see the buttons from that group. These keywords on the Control Bar buttons also appear in the Add Keyword and Remove Keyword submenus of the Metadata menu.
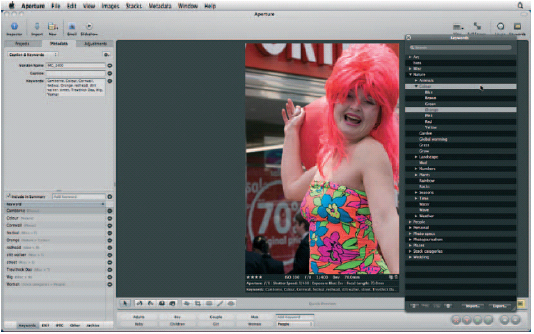
Fig. 4.18 Keyword groups and subordinates behave in exactly the same way when you drag and drop them from the Keywords HUD onto an image in the Viewer or Browser. Both the Keyword group Color and its subordinate Orange have been added to this image.
While Stock Categories are useful, they are not the most useful group of keywords to have on the Control Bar because it’s unlikely that you’d be adding keywords to a group of photos with such wide ranging subjects (unless you’re keywording submissions to a stock Photo Library that is). But it does demonstrate one thing, and that is that the Control Bar can accommodate up to 20 keyword buttons in a preset group.
Select the Wedding preset group from the Preset groups pop-up menu. This provides a better example of what the Control Bar is best at. With this group of related buttons under your mouse, you can quickly skim through a Project adding appropriate keywords to groups of photos or individual shots. A two-pass approach works well – first select groups of images to which you can apply common keywords and then go through them individually.
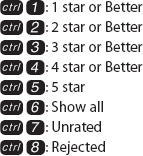
You can speed the process by using the keyboard to select images sequentially and you can also add keywords from the Control Bar using the keyboard. The first eight buttons are assigned keystroke ![]()
![]() through
through ![]()
![]() , the top left being 1, the bottom left 2, and so forth (Fig. 4.21).
, the top left being 1, the bottom left 2, and so forth (Fig. 4.21).
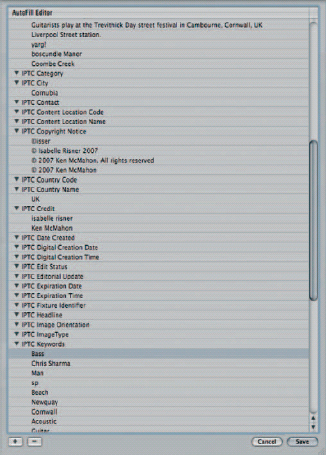
Fig. 4.19 AutoFill completes text fields in the Metadata Inspector, Control Bar and other places based on previously entered words. You can ignore and overwrite these, but they can save time and help you avoid entering keyword variations for the same thing (e.g. Bird and bird). Select Metadata > Edit AutoFill List to edit the list.

Fig. 4.20 The Control Bar can contain up to 20 keywords in a preset group – in this case from the Stock Categories preset.
Removing Keywords
Adding keywords is easy; removing them isn’t always so straightforward. Removing keywords from individual images is easy enough, but removing them from a selection of images can be more problematic. The Control Bar provides some of the best options for doing this.
Fig. 4.21 Keyword buttons on the Control Bar can also be applied using the keyboard. Hover over the button with your mouse to reveal the tooltip with the keyboard shortcut (make sure you have ‘Show tooltips on controls’ enabled in Preferences).
Given that the subject matter in an image isn’t all that liable to change; the most likely reason for wanting to remove a keyword is that it was applied in error. If you realize your mistake immediately ![]()
![]() or Edit > Undo Change Keywords is the simplest remedy.
or Edit > Undo Change Keywords is the simplest remedy.
As we’ve seen, to apply a Control Bar keyword button using the keyboard you press ![]() and one of the number keys
and one of the number keys ![]() to
to ![]() to apply the Keyword button at that position. To remove a keyword, press
to apply the Keyword button at that position. To remove a keyword, press ![]()
![]() and the appropriate number key.
and the appropriate number key.
You can also remove keywords by ![]()
![]() clicking the buttons. This doesn’t restrict you to the first eight keyword buttons; you can remove any keyword that appears on the Control Bar by
clicking the buttons. This doesn’t restrict you to the first eight keyword buttons; you can remove any keyword that appears on the Control Bar by ![]()
![]() Clicking it. If the keyword you want to remove doesn’t appear in group preset, just add it to one. All of these options are also available from the Remove Keyword submenu of the Metadata menu.
Clicking it. If the keyword you want to remove doesn’t appear in group preset, just add it to one. All of these options are also available from the Remove Keyword submenu of the Metadata menu.
Creating and Editing Preset Groups
As you’d expect, you can edit the existing Preset Groups and create new ones. The final item on the Preset Groups pop-up menu, Edit Buttons, opens the Edit Button Sets dialog box. This dialog box is divided into three vertical panels. The available Button Sets are listed on the left, the contents of the selected Button Set are listed in the middle and your Keywords Library is shown on the right. A check box next to each preset determines whether it appears on the Preset pop-up menu or not.
Select the Stock Categories Preset Group from the list on the left and click the disclosure triangle to expand the Stock Categories Keyword Group in the list on the right. The Contents list in the middle tells you what buttons will appear on the Control Bar for this Preset group. There are exactly 20 of them, the maximum that the Control Bar can display (Fig. 4.22).
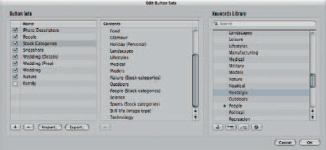
Fig. 4.22 Select Edit buttons from the Preset groups pop-up menu to edit the Keyword button sets that appear on the Control Bar. To add keywords to a Button set, first select the Button set in the left column, then drag the keywords from the right column and drop them in the middle one.
Scroll down the list and add the Nostalgia subordinate keyword to the Stock Categories Preset Group by dragging and dropping it onto the middle column. Because the group already had 20 buttons, Nostalgia replaces the 20th item on the list. You can reorder contents by dragging and dropping items; to remove a keyword from the list, click the minus button underneath it. List order is important because only the first eight items can be applied using the keyboard. Even if you don’t plan to use the keyboard, it’s helpful if you place the most often used keywords at the top of the list.
The contents of a Preset Group aren’t confined to the equivalent Keyword Group in the Keyword Library; you can add any keyword to any preset group within the maximum limit of 20.
To create a new Keyword Group, click the plus sign underneath the Button Sets list and rename the untitled group, and then drag the keywords you want to add from the Keywords Library to the empty contents list. The check boxes in the Button Sets list determine whether or not Button Sets appear on the Control Bar’s Preset Groups pop-up menu.
Displaying Metadata on Images
Viewer and Browser Sets
We’ve already seen how you can display metadata in the Metadata Inspector and HUD; metadata are also displayed on image previews in the Browser and Viewer. What you see and how they are displayed is determined by settings in the Metadata tab of the Preferences dialog box. To open it, select Preferences from the Aperture menu or press ![]()
![]() and click the Metadata button at the top of the Preferences dialog box.
and click the Metadata button at the top of the Preferences dialog box.
The panel is divided into three sections which determine how metadata are displayed in the Viewer and Light Tables, in the Browser in Grid and List modes and in the tooltips that are displayed when you mouse over an image. Changes made in the Preferences dialog box take effect immediately, so you can see what you get when you experiment with different views.
The Viewer check box determines whether metadata are displayed in the Viewer. Below this are two Radio buttons – Set 1 and Set 2. Check the Set 1 Radio button and if it isn’t already selected choose the Viewer – Basic Metadata set from the popup menu. If the Viewer isn’t visible, display it by selecting Viewer Only from the View menu or cycle views using the ![]() key – you can do this with the Preferences dialog box open.
key – you can do this with the Preferences dialog box open.
From the Viewer Set 2 pop-up menu, select Viewer – Expanded; don’t check the Set 2 Radio button just yet. Now take a look at the image. The default Viewer Basic metadata set displays the Badges and rating.
Now check the Set 2 Radio button to display the Viewer – Expanded Metadata set. This displays a lot more information including exposure information, the Version name and the lens focal length as well as the rating, badges and keywords.
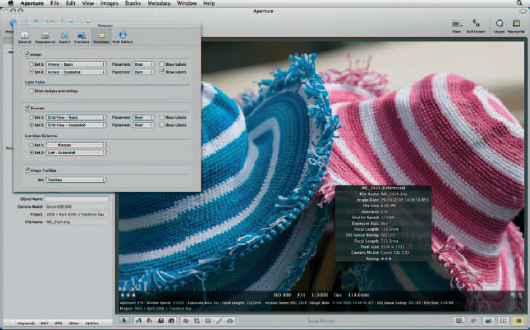
Fig. 4.23 Use the Metadata tab of the Preferences window to configure the display of metadata overlays in the Browser, Viewer and Light Tables. Here, Viewer Set 2 has been configured to display the Viewer – Expanded Metadata set.
The Placement pop-up menu controls positioning of the metadata, and Show Labels toggles the display of the metadata label, for example, ‘Aperture, Shutter Speed, etc.’ that accompanies the metadata (Fig. 4.23).
Now switch to Browser Only view; if it isn’t already selected choose Grid View – Expanded from the Browser Set 2 pop-up menu and check the Browser Set 2 radio button. Grid View – Expanded displays Rating and Version name on the Browser thumbnails. You can select any of the Metadata views for the Browser overlay, but it’s best to avoid those that include lots of fields or caption, keyword and other text – the information will be truncated if there isn’t room to display it. If you need to see this information on an overlay assign it to the Image Tooltips set so that it appears when you hover over a thumbnail in either the Viewer or Browser. To turn off any of the Metadata overlays uncheck the Viewer, Browser or Image Tooltips check box (Fig. 4.24).
You can’t display a lot of metadata on a Browser overlay – there isn’t room and anything too long will be truncated. More detailed information can be added to the Image Tooltips set which appears when you hover over a thumbnail with your mouse.
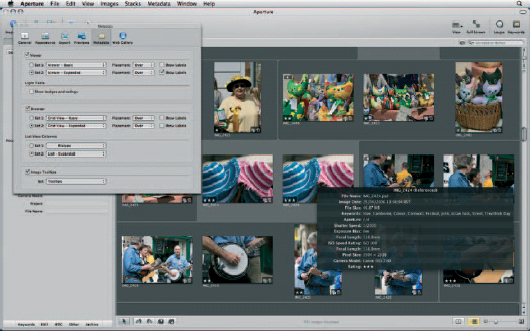
Fig. 4.24 You can’t display a lot of metadata on a Browser overlay – there isn’t room and anything too long will be truncated. More detailed information can be added to the Image Tooltips set which appears when you hover over a thumbnail with your mouse.
All of the Metadata views that appear in the pop-up menu on the Metadata Inspector, including custom and edited views, are available in the set pop-up menus on the Metadata tab of the Preferences window.
It would be more than a little inconvenient if you had to open Preferences every time you wanted to switch Metadata overlay sets. You can toggle between the two Metadata sets by selecting View > Metadata > Change Viewer set and View > Metadata Change Browser set or by using the keyboard shortcuts ![]()
![]() for the Viewer and
for the Viewer and ![]()
![]() for the Browser.
for the Browser.
Sorting and Searching
The location and retrieval of images can, without doubt, be one of the most time consuming and frustrating of all photo management tasks. Whether you need to locate an image that was shot on a specific date, for a particular client, by an individual photographer, or containing specific subject matter, Aperture can help you find what you’re looking for quickly and almost effortlessly.
The success of your image searching depends to some degree on how rigorous you are in your application of metadata. Many of Aperture’s search filters work on the basis of ratings and IPTC metadata fields including keywords, caption and copyright. The inclusion of these data in all of your images will make subsequent search and retrieval operations that much simpler.
Even if your images lack appended metadata, Aperture still provides you with plenty of options. Exif metadata recorded by the camera at the time of shooting can provide the basis for locating images shot on a particular date or time of day, or pictures shot with a certain lens. If you connect a GPS receiver to your camera, you can even track down images to a specific location.
Aperture’s search filters can be put to work on an individual project containing only a few images or your entire Library. Either way, Aperture 2’s newly rewritten database engine will return results swiftly, even on very large Libraries containing many thousands of images.
Search Tools
Although you may not be aware of it, the image thumbnails displayed in the Browser are constantly filtered. By default, Aperture filters out and does not display any image that had a Reject rating applied to it. This is the default setting for viewing the entire Library and individual Projects, Albums and folders (Fig. 4.25).
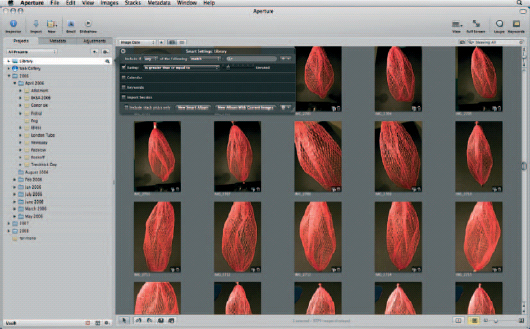
Fig. 4.25 The Library Query HUD is set by default not to display rejects.
Click the Library at the top of the Projects panel, then click the Query HUD button that appears to the right. Any search criteria you set in the Library Query HUD applies to the entire Library as displayed in the Browser when you select Library at the top of the Projects Inspector.
In its default setting, the Rating box is checked and the Rating slider is set to the second of six tick marks on a slider. The ticks correspond to the following ratings:
Reject
Unrated
1 star
2 star
3 star
4 star
5 star
The Rating pop-up menu is set to greater than or equal to, so the Library is configured to display all images with a rating of unrated or higher. Rejected images are not displayed. If you drag the slider as far to the right as it will go, you will see only the five star images in your Library. To display all the images, including reject, drag the slider to the extreme left under the first tick mark; and to display only the rejects, select ‘is’ from the Rating pop-up menu.
Search criteria that you apply using The Library Query HUD only affect what’s displayed in the Browser when Library is selected in the Project Inspector. This HUD allows you to carry out library-wide searches using all kinds of criteria, but there’s another HUD – the Query HUD that is used for more general purpose searching and which has almost identical controls.
For now, return the Rating slider and pop-up menus to their default settings and close the Library Query HUD.
The Query HUD
The Query HUD is situated at the top left corner of the Browser. Alongside the Query HUD button is the Query search field. You can use the Query HUD to search within individual Projects, Albums or folders, and you can also use it to search the entire Library (Fig. 4.26).
For quick searching, the Query search field provides a pop-up menu with some useful search filter presets. As with the Library Query HUD, the default is set to display ‘Unrated or Better’ images – so you won’t see rejects in this view (Fig. 4.27).
Search options on the pop-up menu include showing all images of a specific star rating or better, Show All, Unrated and Rejected. To return to the default Unrated or Better view, click the Reset button on the right of the search field.
Searching by Rating
To activate the Query HUD, click the Query HUD button to the left of the Query search field, select Edit > Find or press ![]()
![]() . As with the Library HUD, the default setting for filtering rated images is greater than or equal to unrated, which is displayed in the search field as ‘Unrated or Better’. You can use the Rating pop-up menu and slider as already described to search for images with a rating equal to, greater than or equal to or less less than or equal to the slider value. A more immediate way to search for images of a given rating or higher is to use the keyboard:
. As with the Library HUD, the default setting for filtering rated images is greater than or equal to unrated, which is displayed in the search field as ‘Unrated or Better’. You can use the Rating pop-up menu and slider as already described to search for images with a rating equal to, greater than or equal to or less less than or equal to the slider value. A more immediate way to search for images of a given rating or higher is to use the keyboard:
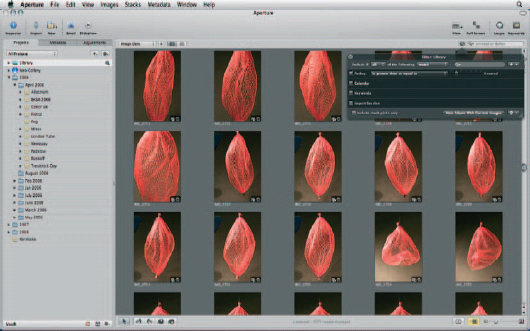
Fig. 4.26 The Query HUD.
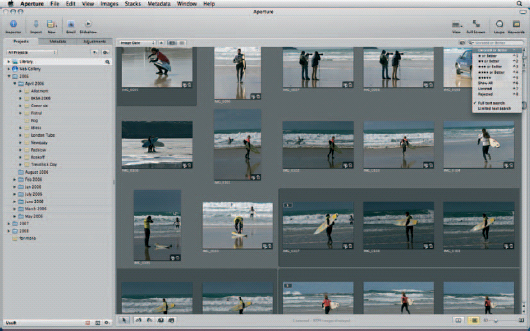
Fig. 4.27 The Query HUD Search pop-up menu provides some useful preset ratings-based searches.
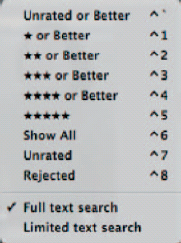
Fig. 4.28 The Query HUD Search pop-up menu provides some useful preset ratings-based searches.
As we’ve seen, all of these options are also available on the Query HUD pop-up menu, so you don’t need to open the Query HUD at all to perform a ratings search. The Rating search criteria is included in the HUD so that you can search multiple criteria including ratings. We’ll cover using multiple search criteria a little later.
Text Searching
You can, of course, do a text-based search by entering the text you want to search for into the search field. Aperture offers two kinds of text search, Full and Limited, which appear at the bottom of the Search field pop-up menu. Full text search includes everything – all IPTC and Exif metadata, file name, version name, anything associated with the file (Fig. 4.29).
Limited text search omits a lot of the stuff you are unlikely to need including most of the metadata other than keywords, aspect ratio, orientation, pixel size, processed pixel size, Master location and Import group. Unless you have quite specialized text search requirements, limited text search is good for general use and it’s faster than full text searching. We’ll look at searching for multiple text entries in a while.
Keyword Searching
Probably the majority of searching that you’ll do in Aperture will be keyword searching. Provided you are methodical in your approach to adding keyword metadata to imported images, keyword searching provides one of the fastest and most direct ways to find what you’re looking for.
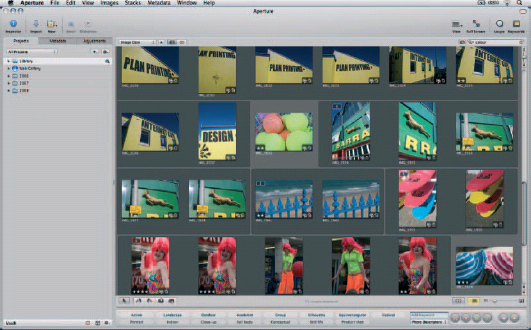
Fig. 4.29 Type in the Query HUD search field to locate all images that contain the text in metadata. Full text search looks deeper, but for general use, limited text search is more than adequate.
To search by keyword, first make sure that all other search criteria are unchecked and check the Keyword box in the Query HUD. This displays all of the keywords attached to images displayed in the Browser in alphabetical order. If none of the images contains keywords, the Keywords section of the Query HUD is grayed out.
Sometimes, you’ll find it simpler to use a text search rather than a keyword search. This is particularly true when searching large Projects or the entire Library. The Keywords section of the HUD lists every keyword in the selection in alphabetical order in two columns. The HUD can’t be resized to include more, or longer columns, so you might have to hunt through a very long list to find what you’re looking for.
To display images containing a keyword, simply check the box next to it in the list. The Keywords pop-up menu provides several search options. ‘Are applied’ simply shows images that have keywords and ‘Are not applied’ those that don’t. The remaining options are fairly self-explanatory. For anyone not familiar with Boolean search operators, the following explanation may prove helpful.
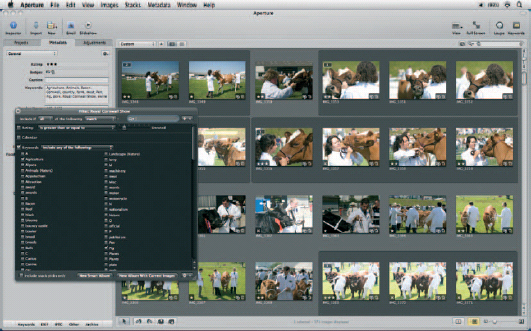
Fig. 4.30 Searching for images that contain either ‘Agriculture’ or ‘Pig, or both keywords using ‘Include any of the following’.
All or Any
The Query HUD can operate using multiple search criteria. At its simplest, this might involve searching for images that contain two or more keywords. When this is the case you have two options: to search for images that contain ANY of the keywords or to search for images that contain ALL of the keywords (Fig. 4.30).
In this example, the keywords Agriculture and Pig are checked and ‘include any of the following’ has been selected from the Keywords pop-up menu. The result is that the Browser displays images that contain only the keyword Agriculture, images that contain only the keyword Pig and also images that contain both keywords, a total of 371 images (the number is displayed in the center of the tool strip at the bottom of the Browser) (Fig. 4.31).
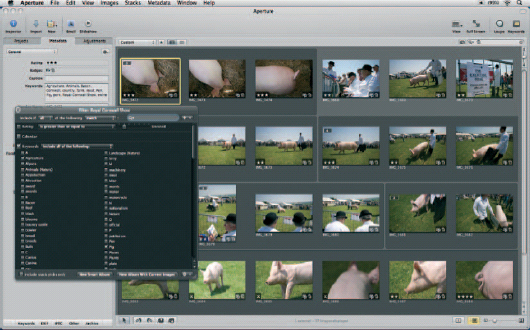
Fig. 4.31 Searching for images that contain both ‘Agriculture’ and ‘Pig’ keywords using ‘Include all of the following’.
Selecting ‘Include all of the following’ results in only the 27 images that contain both keywords being displayed.
The Keywords pop-up menu also allows you to search for images that don’t contain all or any of the selected keywords.
Searching by Date
Check the Calendar search criterion to search for images taken on a particular date or within a given period. The calendar display shows a 3-month period with dates on which images were taken highlighted white. Dates for which there are no images are grayed out. If you are viewing an individual Project, it’s likely that all the images will have been shot on the same day. The Calendar is most effective when used to search either Projects containing images shot over a long period or the entire Library.
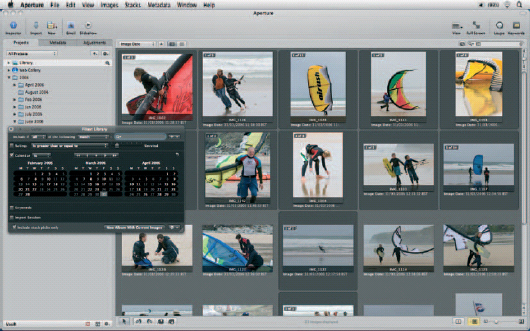
Fig. 4.32 Use the Calendar to display images taken on a specific date or within a date range. Note that, for any search, you can elect to include Stack Picks only using the check box at the bottom of the Query HUD.
The VCR buttons above the calendar display control the displayed months and allow you to skip back and forth through the months. Click the center diamond to display 1 month either side of today’s date. To display all of the images taken on a specific day, click the date on the calendar display. ![]() click to select a continuous calendar period or
click to select a continuous calendar period or ![]() click to select multiple non-continuous dates.
click to select multiple non-continuous dates.
For most date-based searches the pop-up menu setting ‘is’ will give you exactly what you need. The alternative, ‘is not empty and is not’, shows all the images that were not taken on the specified dates (Fig. 4.32).
Searching by Other Criteria
The Query HUD is not limited to the displayed search criteria. The Add Filter pop-up menu shows the other options that are available including Adjustments, Exif, IPTC, File Status and Other metadata. You can explore what’s available by selecting any of the options from the pop-up menu. This adds a new search section to the HUD. A text search can work equally well for some of these categories, but they can help to narrow the focus of the search (Fig. 4.33).
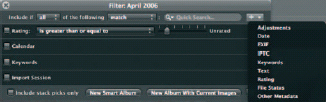
Fig. 4.33 Search using other criteria selected from the Add Filter pop-up menu.
For example, a full text search for ‘300 Spartans’ will find images with that text in any metadata field including the caption, file name and Exif metadata including the shutter speed and lens focal length, and it’s unlikely that you’re going to want included all the images numbered 30000 – 30099 plus 300, 3000, 1300 and all the others. But if you are looking only for images with 300 Spartans in the caption, an IPTC search is a better option. Alternatively, if you want to find all the shots using a 300 mm lens, use an Exif Search (Fig. 4.34).
The Adjustments search criteria is a new addition to Aperture 2 and allows you to search for images that have had adjustments applied using the Adjustments Inspector. It could usefully be used to search for all vignetted images, monochrome Versions produced using the Monochrome mixer, cropped images or various other adjustment criteria. You can also use the Adjustments search to locate images produced using different Versions of the Raw Decoder (Fig. 4.35).
Using Multiple Search Criteria
While quick searching using a single text entry, a keyword or a rating can often get you what you want, using multiple search criteria can really help you narrow the focus to find the handful of images or the single shot that exactly fits your needs.
A multiple search often begins with a ratings selection, though it doesn’t have to. It can include any of the existing default search criteria plus any that you want to add from the Add Filter pop-up menu. For example, you might want to search for all three-star and-above images shot in a particular calendar month by a certain photographer (Fig. 4.36).
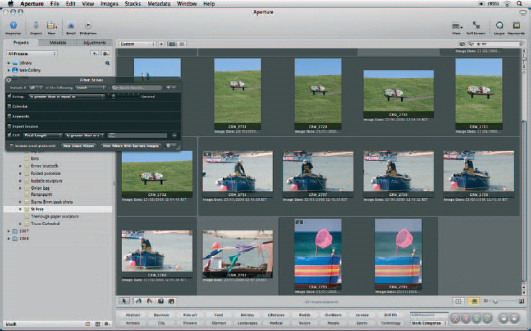
Fig. 4.34 This Exif search displays all images in the St Ives project shot with a telephoto lens of 200 mm or longer.
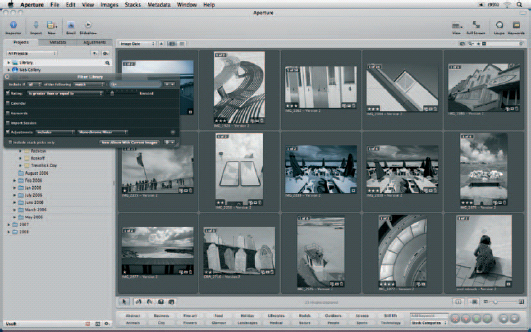
Fig. 4.35 Aperture’s new Adjustments filter lets you search for images that have had any adjustment applied – here, black and white Versions produced using the Monochrome Mixer.
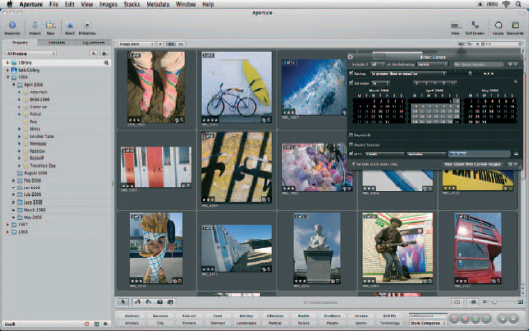
Fig. 4.36 A multiple search to locate all three star images in the Library shot by Ken McMahon during April 2006.
To do this, first check the Rating criteria, select ‘is greater than or equal to’ from the match criteria pop-up menu and drag the slider to the three star position. Next, check the Calendar search criteria, navigate to the required month, click the first date on the calendar and ![]() click the last date. Finally, select IPTC from the Add Filter pop-up menu, check the IPTC search criteria, select Credit includes from the match criteria pop-up menus and enter the photographer name in the IPTC text field.
click the last date. Finally, select IPTC from the Add Filter pop-up menu, check the IPTC search criteria, select Credit includes from the match criteria pop-up menus and enter the photographer name in the IPTC text field.
Multiple Text Searching
To search for multiple text fields, Select Text from the Add Filter pop-up menu. Check the Text search criteria and enter the first search term in the text field. Add second and subsequent text fields as required.
Note that the match criteria for multiple text searching are determined by the pop-up menus at the top of the Query HUD, which apply to all of the selected search criteria. Generally, you’ll want these set to the default ‘include if all of the following match’. But it’s also possible using the available menu combinations to search for a match with any of the criteria and to search for exclusions, for example, ‘do not match’.
Unlike Keyword searches, you cannot use ‘all or any’ options exclusively for multiple text searching within a wider multiple criteria search. For example, you can search for images that are rated three stars and above that contain the text Agriculture and Pig, by selecting the relevant rating and text criteria and choosing ‘include if all of the following match’. But you can’t find three star images that contain either word. Selecting ‘include if any of the following match’ will find those images but will also display three star images that contain neither word. In this instance, you’re better off with a Keyword search (Figs 4.37 and 4.38).
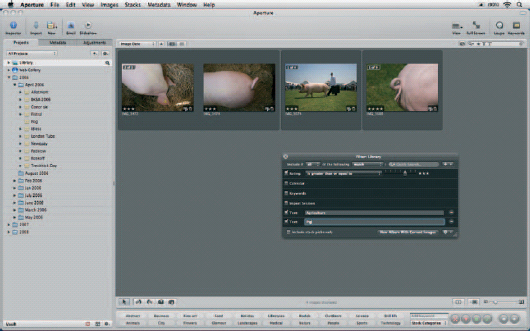
Fig. 4.37
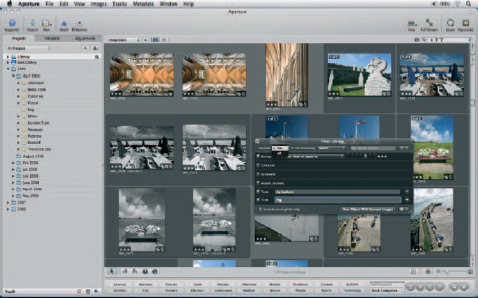
Fig. 4.37 & 4.38 Be careful what you search for. Using ‘include if any of the following match’ can widen the catch to include images you probably don’t want. Use a Keyword search instead.
Fig. 4.39 Click the New Smart Album button on the Query HUD to create a Smart Album using the selected search criteria.
Fig. 4.40 Troubleshooting. If at any time you don’t see what you expect to see in the Browser, (e.g. fewer images than you were expecting, or none at all) one possibility is that a search filter has been inadvertently applied in the Query HUD, or applied and not removed. Aperture retains search filters applied using the Query HUD, so if you navigate away from a Project that you’ve searched, when you return to it, the search filters will be applied as you left them. A quick check of the Query HUD Search field will tell you if this is the case. It will show the text or icons for rating, Calendar, Keyword or Import Session searches that have been applied. To clear the search filters, click the Reset button on the right of the search field.
Saving Search Results
You can save search results to an Album or Smart Album using the buttons at the bottom of the Query HUD. The New Smart Album button doesn’t appear when the Library is selected in the Projects Inspector. By saving search results as a Smart Album, you can ensure that any images added in future that fit the search criteria will also appear (Fig. 4.39).
For example, if you create a Smart Album from a search for all three star or better images and re-rate your images later, the Smart Album will update to reflect the new ratings. See Chapter 2 for more about how Smart Albums work. Don’t forget that, unless you reset the Query HUD to its default ‘Unrated or Better’ position, it will continue to filter the contents of the selected Project or folder according to the last used search criteria (see troubleshooting; Fig. 4.40).