CHAPTER 6
Using Projects, Albums and Folders
As explained in Chapter 2, Aperture subdivides your assets into various different groups. These groups can contain further subgroups, helping you to quickly navigate to the precise photos you need; they also help the software to perform searches on the basis of your specified criteria.
Sometimes this is done automatically, such as when you import a series of folders as a Project; sometimes it is done manually, as when you create a folder yourself and drag images into it. Occasionally it is done passively, such as when you create a Web page, which uses photos from an existing collection to create an entirely new one while you work on a related creative Project.
These groupings are set to cascade, so that each superior group – whether that be a Project, folder, Album or the whole Library, also gives you access to all of the contents of the inferior groups. As such, viewing the contents of a folder will also show you the contents of the Projects that go to make up that folder. If that folder contained four Projects, though, clicking on any one of them individually would show you only its own specific contents and not those of the other three Projects within the overall folder.
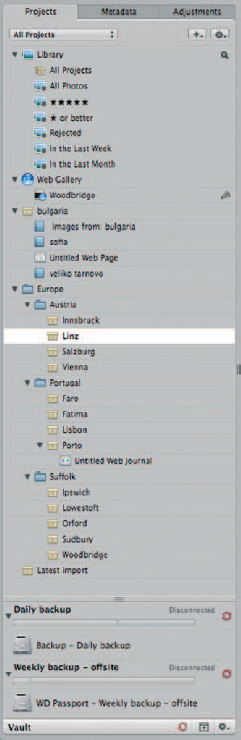
Fig. 6.1 The Projects Inspector is used purely for organizing your projects, folders and creative products. It works hand in hand with the Browser, which displays the contents of each item in the Inspector.
The easiest way to visualize this is as a top-down view of an open box, inside of which there are several smaller boxes. From your aerial vantage point you can see the large box – the folder, in our analogy – and the contents of all of the smaller boxes – the Projects, Albums and so on. However, if you were to lower yourself so that your face was close to one of the small boxes, you would no longer have an overview of all of the constituent parts, but only those of the smaller box directly in front of you.
The only anomaly comes in the fact that when you have a top level folder or a Project selected in the Projects Inspector, then the Browser – whether in grid, list or film strip mode – shows only the contents of the constituent subdivisions, and not the subdivisions themselves, so you will have no way of knowing whether all of the images you are looking at appear in the same Project or Album, or in different ones. There is good reason for this: the Browser and Viewer are focused entirely on the processes of sorting and editing your work, whereas the Projects Inspector is focused solely on organization (Figs 6.1 and 6.2).
However you look at them, these subdivisions remain the most powerful tools at your disposal when it comes to visualizing how your assets relate to one another, and they back up the metadata-based filtering carried out behind the scenes by Aperture itself.
Folders
Folders work on two levels. First, they sit above your projects, in the root of the Library, and act as a loose container into which you can throw everything with which you are working, including your Projects, sub-folders, Light Tables, Books and Web Projects. These top-level folders, and any folders they contain that are not also a part of a Project, are colored blue.
On the second level, you can create folders that act as subdivisions within a Project. These are colored brown and again they are used for organising assets, although at this level you cannot use them to store projects. Brown folders buck the trend for hierarchical viewing of your assets, as they expose their contents to blue folders, but not to Projects. So, you may have a Project called 2009, containing four folders for spring, summer, autumn and winter. This Project is itself contained in a blue folder called Events. Clicking the Events folder would show you the contents of every organizational element it contains – Projects, Albums and sub-folders.
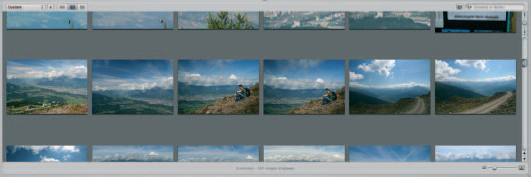
Fig. 6.2 The Projects Inspector is used purely for organizing your Projects, folders and creative products. It works hand in hand with the Browser, which displays the contents of each item in the Inspector.
The only thing you can’t store in any folder, regardless of its color, is images themselves.
Projects
After the overarching Library, which contains every asset in your collection, Projects house the largest group of assets at your disposal. They are the first level in which you can store images, but they can also contain products such as Web Pages, Web Galleries, Journals and Books. They can only be created inside either the Library’s root level or in blue folders: they can’t be created within brown folders or inside existing Projects.
Projects will usually be organized along subject lines, and should be seen both as a collection of assets and of the output of those products right up until the point just before they become physical printed items. A Project can exist only within the Library and not inside any of the smaller divisions, such as a folder.
A Project will be the initial point of entry for items in your Library, however you bring them into the application. As such, they should be the most generalized collection of images at your disposal. Despite this, they can remain useful delimiters, allowing you to differentiate between, say, different clients, or the countries in which a series of travelog photos were taken.
Because you can only import images in Aperture into Projects (and a new Project will be created inside whichever other organizational entity you try to use), they are the ideal means of organizing related images, and so are the best defining block to use when you want to move pictures en masse from one installation to another.
Many professional photographers will work with two machines: one powerful desktop set-up in the studio, which they use for editing and output, and one smaller, lighter, less powerful portable machine that they use on the move. If you are importing your images into this mobile machine on location you will need to transfer them to the desktop machine when you return to the studio. Likewise, if you’re half way through an editing job at the end of the day, you may want to transfer your work to the portable to continue at home, or during a commute.
In these instances, you would use Project Exports to move whole batches of images, including Versions and Digital Masters, from one computer to another. You would not use Image Exports, as these would include only individual photos, and not all of their supporting assets, or the directory structure you have put in place.
Exporting Projects is a simple case of choosing that option from the File menu and picking a name and destination folder. If your Project uses referenced images stored elsewhere on your Mac, you should check the option to consolidate these so that they are exported along with the rest of your work. The exported file can then be copied to the new computer and integrated into that machine’s existing Library by picking File > Import > Projects.
Projects are the key to quickly accessing your assets, in much the same way that motorway signs point to towns, and that only once you’ve finished with them you will start looking for individual road signs.
Projects are also important when it comes to organizing the Inspector, as they are the highest filing element that can be collapsed. In this respect there are benefits to producing highly generalized conceptual Projects that encompass enormous subject areas, as they allow you to quickly show and hide their contents using a disclosure triangle and so save you from a lot of dragging and scrolling.
In this way, you might like to create folders rather than Projects for every country you visited on a European tour, and drop these inside a single Project called Europe. You can still store individual folders for cities inside each country folder, but by organizing your work in this way you can shrink the whole continent down to a single line in the Inspector when you want to work on something else.
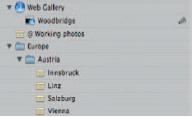
Fig. 6.3 By using intelligent leading punctuation, such as @ and ! in conjunction with regular names, you can manually sort the order of items in the Projects Inspector. Here, we have forced an item beginning with W to appear before another one beginning with E.
Aperture organizes the Projects Inspector alphabetically, so you can easily order your folders (Projects and so on) by using prefixes. Punctuation, such as !, @ and come first, followed by numbers and then characters. Using appropriate leading characters should therefore enable you to separate out your Projects and top-level folders if you don’t want them mixed together (Fig. 6.3).
Favorite and Recent Projects
The All Projects drop-down menu at the top of the Projects Inspector conceals two further options: Favorite Projects and Recent Projects. The latter of those two is the ultimate smart folder, as you don’t even have to define any attributes that qualifying items should satisfy. It is simply a list of the projects you have accessed most recently, allowing you to quickly skip back to them.
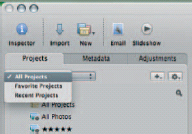
Fig. 6.4 The Projects Inspector can be quickly slimmed down by using the Recent and Favorite Projects selector on the drop-down. Favorite projects are added and removed manually.
Favorite Projects are defined by the Add to Favorites option on the Shortcut menu, and they stay there until you select the Remove option from the same menu. This menu could be either somewhere to temporarily store ongoing Projects that you will access periodically over a certain amount of time or a space to permanently reference long-term works. Either way, it lets you skip straight to Projects that might otherwise be buried inside folders without cluttering the Projects Inspector by promoting them to root-level items for speedy access (Fig. 6.4).
Albums and Smart Albums
Albums are the purely organizational elements within Aperture’s Library structure, since their only purpose is to keep a collection of images contained, allowing you to manually define the limits of that focused collection within a larger whole. So, you might have a Project containing 450 images from a wedding assignment, with Albums holding the various parts of the day, split into logical sections like arrival, ceremony, reception, speeches and party. Each of these would have an individual Album, allowing you to focus on just one aspect of the day at any time, or zoom back out to the event as a whole by clicking back to the umbrella Project or folder.
Inside Aperture, an Album is a collection of references to images elsewhere in your Library. When you click on one you see the images referenced within it, but they don’t actually exist there. You can see this when you delete an Album and get no warning that you’re going to lose your pictures. This is true even if you’ve been working on an image while it was selected in an Album.
They generally sit inside Projects and reference the images in that Project, but they don’t have to. They can call on pictures from anywhere in your Library, and you can add images to an Album by dragging them there. They can therefore contain images from several Projects and folders at once, which is useful when you’re building a portfolio book or website and want to present a selection of work spanning several years.
Smart Albums share a common base principle with regular Albums, in that they are used as an organizational device for defining boundaries between different sets of images. However, rather than being defined manually as a result of the user dragging their images into them, they are constructed using variables, like search terms, entered using the Smart Settings dialog. This is called up from the menus (File > New Smart > Album) or using the shortcut ![]()
![]()
![]() . Once the album has been given a name and its variables have been defined, its entry in the Projects Inspector will sport a magnifier. Clicking this will let you go back in and redefine the search criteria on which it is based (Fig. 6.5).
. Once the album has been given a name and its variables have been defined, its entry in the Projects Inspector will sport a magnifier. Clicking this will let you go back in and redefine the search criteria on which it is based (Fig. 6.5).
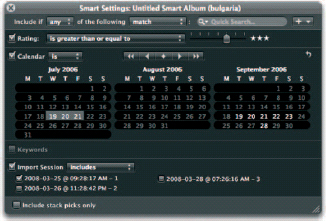
Fig. 6.5 Smart Albums are created using an intuitive search interface that draws on the metadata attached to the images in your Library.
In this respect, Smart Albums are similar to Smart Folders in Mac OS X, or Smart Playlists in iTunes. They are reference collections built by Aperture itself on the basis of parameters that match each image’s metadata. So, if you were a frequent traveller and wanted to maintain an Album showing your best pictures from around Europe without having to spend 2 hours at the end of each trip dragging your best photos from your Europe folder into a ‘Best of’ folder, you’d create a new Smart Album inside your Europe folder and specify that it should contain only those pictures rated four stars and above.
Now, every time you import a new collection of images into a Project or an Album within your Europe folder you need only to navigate through them using the cursor keys and rate them with the numbers ![]() to
to ![]() on your keyboard. Anything marked four or five would then show up in your new Smart Album. A 60-minute job has just been cut down to
on your keyboard. Anything marked four or five would then show up in your new Smart Album. A 60-minute job has just been cut down to ![]() .
.
If you later change your mind about a picture and dock it two stars down to three or below, Aperture will remove it from the Smart Album without any further intervention from yourself, ensuring that it really does contain nothing but your best work.
Besides ratings, Smart Folders can be organized on the basis of import dates, keywords, search terms or the date on which each photo was taken.
We will explore setting up Smart folders later in this chapter.
Real Life Workflow from Camera to Export
Aperture has powerful editing tools that can really help you to get the best from your photos. However, its emphasis is at least as much on organization and workflow as it is on editing. Its classic three-pane interface centralizes every task from import to output, keeping every tool within easy reach in an environment that changes very little, saving you from learning different setups for each task you want to perform.
However, getting the best out of it involves a certain amount of pre-planning, and although your workflow will evolve over time as you become more familiar with the application, establishing a set way of working in harmony with Aperture from the very start will pay dividends.
The first step, then, is to plan an import strategy.
Defining Your Metadata Presets
If you already know enough about the kind of images you’ll be importing as you use Aperture, you can build an extensive general purpose Metadata set to apply to them at the point of import right now. The chances are, though, that over time your assets will be too varied to fit within a single defined Metadata set, and so at this point you will be able to specify only the barest basics that you know will be true of all of your work. These will be your credit and copyright notice.
Click the Metadata tab and use the Shortcut button at the top of the dialog to pick New view…. Give your view a meaningful name, and click OK. The Metadata area will switch to a blank view, and the Tag Selection dialogs will slide up from the bottom of the screen. Click IPTC and check the boxes beside Byline, Credit and Copyright Notice, which are the only variables we want to add to our view at the present time. They will appear in the order they were selected and can be rearranged by dragging their names (Fig. 6.6).
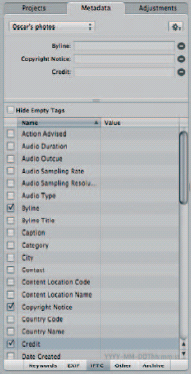
Fig. 6.6 Create your own Metadata Views and Presets to speed the application of metadata to your photos at the point of import, and to tailor what you see in the Metadata panel when you select them in your Library.
You have now defined your first Metadata view. Click the IPTC button again to close the Tags dialog and save the view. You now need to convert it to a preset for use when importing images.
Fill in the relevant details in the boxes that define your Byline, how you’d like to be credited and what copyright notice you want to see appended to your images. If you include a date in this copyright notice – as you should – you will obviously need to update it on an annual basis as you continue to add photos to your Library.
Now click the Shortcut button again and choose Save as Preset …. You’ll be asked to give your preset a unique name so that you can pick it from a menu in the Import dialog at a later point (Fig. 6.7). Note that it really must be unique; if you pick a name that you’ve already saved at an earlier point the OK button will be deactivated until you change it. If you want to edit an existing preset, therefore, you should make your changes and then use Manage Presets (again, in the Shortcut menu) to delete the existing preset before returning to the Metadata Inspector’s Shortcut menu and choosing Save as Preset…using the same name to save. This time around your changes will be written to disk.
You are now ready to import your first photos.
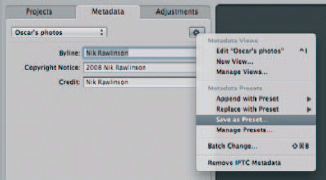
Fig. 6.7 Only ever enter generic details that you know can be safely applied to images imported as a batch, and save your metadata view as a preset.
Importing Your Photos
If you are importing your photos from a media card or camera, you should now attach them to your Mac. If Aperture is set to launch whenever a device is attached it should open the import dialog, but if it does not, or if you are Importing from a folder somewhere else on your system, click the Import button on the Toolbar and select the source of your photos in the Import Source area that appears above the Projects dialog.
Where you want to store your photos is perhaps the most important decision you have to make in the whole workflow. As we explain in detail elsewhere, the decisions you make here will have a profound impact on the way you will back them up later on. By storing them inside Aperture’s Library file, you will be able to rely on the Vaults system for backing up your Versions and Digital Masters simultaneously. Recovery from a fatal hardware fault is then a simple matter of restoring from your intact backup by installing Aperture on a new or repaired machine, connecting the external drive containing your Vault and using the tools built into the Vaults panel to restore your last working state.
If you choose not to store your images in the Library, but elsewhere on your hard drive, you will enjoy the benefit of being able to manually navigate your assets through Mac OS X’s Finder. You will also be able to share these files with other users on a network. However, you will have to formulate your own backup routines and ensure that you regularly safeguard your work. Further, as your Digital Masters will be kept separate from your edited Versions, which will be stored inside the Library, any breakdown in this routine – whether through human error or otherwise – means you will lose not only the originals but also your edited products. This could impact not only on individual adjusted images but also books and Web products in which they are used. Recovering from this kind of failure would be difficult, and could be impossible.
There is no reason why you need to adopt the same strategy for every set of images you import. You could, for example, store all commercial work in your Aperture Library to take advantage of the Vaults system, and import personal work as referenced images on an external drive, allowing you to remove that drive when not in use, and to save space on the drive storing your Vaults by restricting this to ‘business’ use.
Whether you choose to save your photos in Aperture’s Library or reference them from an external source, you still have to save them in a Project. If you haven’t yet set any up and you were to just click the Import button at the bottom of the dialog, Aperture would create a new untitled Project for you to rename and drop the images there. This is fine, but a better way of working would be to create the Project first or, if you already have Projects set up, to click on them in the Projects Inspector to move the output of the Import workflow – indicated by the arrow pointing out of the dialog and into the Inspector – to that location.
You should consider here how you want to organize your working area. If you only envisage ever having a limited number of Projects, then there is no problem creating them in the root level of the Library using the shortcut ![]()
![]() and entering a project name. However, for the professional photographer this is an unlikely scenario, and so you should consider setting up folders to house Projects with similar attributes. These could be as specific as subject areas, such as weddings, sports and travel, or as general as years. You can embed folders several layers deep, and name them however you feel most appropriate, mixing subject-based and chronological descriptors in a chain. So, you may have a top-level folder called 2009, inside which you keep two folders for flora and fauna, within each of which you have 12 numeric sub-folders for the months and only inside these you would store your Projects, which could be given titles that reflect the plants or animals they contain. A study of the flowering and fruiting progress of a quince tree would therefore be found in 10 Projects, each called ‘Quince’, in folders ‘03 March’ to ‘10 October’ in the folder flora, which itself would be embedded within 2009.
and entering a project name. However, for the professional photographer this is an unlikely scenario, and so you should consider setting up folders to house Projects with similar attributes. These could be as specific as subject areas, such as weddings, sports and travel, or as general as years. You can embed folders several layers deep, and name them however you feel most appropriate, mixing subject-based and chronological descriptors in a chain. So, you may have a top-level folder called 2009, inside which you keep two folders for flora and fauna, within each of which you have 12 numeric sub-folders for the months and only inside these you would store your Projects, which could be given titles that reflect the plants or animals they contain. A study of the flowering and fruiting progress of a quince tree would therefore be found in 10 Projects, each called ‘Quince’, in folders ‘03 March’ to ‘10 October’ in the folder flora, which itself would be embedded within 2009.
Would this be an appropriate structure? It is impossible to tell. The most appropriate arrangement of folders and Projects will vary from user to user, depending on their own specific needs.
Work your way through the right-most pane of the Import dialog, correcting any time offset to compensate for a mis-set camera clock that may still have been set to your home time when you travelled overseas, and then use the drop-down beside Add Metadata From to select the Preset that you set up in the first stage of this workflow. It can be found at the very bottom of the drop-down. Don’t confuse it with the Metadata view that you have set up and will be found at the bottom of the Views section. This will be empty of any data.
If you have any other metadata to add to your images, use the same drop-down to pick alternative data sets and fill in their variables, ensuring that the Append radio button is selected so that this data is added to what is already in place, rather than replacing it.
The more often you add data in this way, the more Aperture will learn about the way that you work, and over time it will start to automatically complete the data that you are entering based on common values you have used before. You can pre-empt this by adding your own values from the outset, or correcting inaccurate suggestions that appear as a result of you having mis-typed an entry in the past through the Edit Autofill List option on the Metadata menu. Here you can add and delete entries entirely using the + and − buttons at the bottom of the dialog, and edit those already in place by double-clicking them and making your amendments.
With your metadata set, use the Stacks slider to group together consecutive images taken in quick succession where appropriate. Most images taken within a few seconds of each other will be the result of attempts to capture a better view of the same scene, but not always. Sports photographers may find that they take several pictures of different horses or cars in quick succession as they pass by a finishing post. On occasions such as these it would be inappropriate to stack them all together as their subjects are fundamentally different. As such, manually selecting matching images by clicking with the mouse while holding down the ![]() key will let you manually stack them by clicking the sticky tape icon in the lower right of the Import dialog’s Browser window.
key will let you manually stack them by clicking the sticky tape icon in the lower right of the Import dialog’s Browser window.
Fig. 6.8 The slider that appears on the bottom of the Import dialog lets you stack images at the point of import, on the basis of the interval between each one being taken. The sticky tape, razor blade and no entry buttons manually stack, split and unstack your images.
If you have used the slider to stack your images automatically, you may find that what is right for one set of images is too verbose for another, and that while some stacks do indeed group together related images in one part of your Import group, in another they manage to snare completely separate pictures that you nonetheless took within a very short space of time. In these instances, click within the Stack at the point where the subject changes and use the Split Stack command (![]()
![]() or the razor blade button at the foot of the interface) to split them into two (Fig. 6.8).
or the razor blade button at the foot of the interface) to split them into two (Fig. 6.8).
You are now ready to import your images. If you want to take all of the pictures in the collection into your Library, ensure that none is selected, and use the Import All button or click the arrow that connects the dialog to the Project in which you want them to appear. If you want to import only a selection, then pick them using the mouse and use the same buttons to bring them into the Library.
Perform Your First Backup
Now that your images are in Aperture, and before deleting them from your memory card, you should perform a backup. If you chose to store your images in the Aperture Library, rather than referencing them from elsewhere on your hard drive, you should use the Vaults system by opening the Vaults panel at the foot of the Inspector and connecting an external hard drive by either FireWire or USB.
If you have already set up a Vault on this drive, Aperture will recognize it and mount it automatically. You can then perform a backup by clicking the Synchronize button beside its capacity gauge.
If you have not yet set up your first Vault, use the Shortcut button at the foot of the Inspector and pick Add Vault. Aperture will tell you how many images it is going to back up and, once you have clicked Continue, ask you for a name for the Vault. This will be used in the Vaults pane to help you identify multiple backup sets, if you use them. As such, this name should be both unique and descriptive. Perhaps this Vault will be used every day, in which case Daily Backup would be an appropriate name. If you also maintain a weekly backup cycle, with that drive being taken offsite to save your files from possible fire damage, you would call that copy Weekly Backup. Use the drop-down menu beside where to choose the attached drive as the destination for the backup and then click Add.
Aperture will never automatically back up your images – not even the first time you create a Vault, so as with the instruction above for backing up to an existing Vault, click the Synchronize button, which is two arrows in a circular formation chasing each others’ tails. It will be red at this point to show that there are Digital Masters in your Library that have not yet been stored in a Vault. If all of your Masters had been backed up, but some of your Versions had not, it would be amber.
Aperture will show you a progress meter as the backup completes. Once it is done, you can disconnect the Vault – remembering to first unmount the drive by clicking the Eject button in the Finder or Vaults panel – and delete the original images from your memory card.
Sorting Your Images
With your photos successfully imported into your Library, your first management task is to break them down into a finer-grained series of collections and groups that will make them easier to manage. Select images that relate to one another and use ![]()
![]() to create a new Album for each set. These Albums can be named as you go along, and while clicking on each will show only its own contents, and none of those from the other Albums, you can still see all of the photos you have imported to that Project as a whole by clicking on the Project’s name in the Inspector and exposing the contents of every Album (and any images not yet placed in Albums) at the same time in the Browser.
to create a new Album for each set. These Albums can be named as you go along, and while clicking on each will show only its own contents, and none of those from the other Albums, you can still see all of the photos you have imported to that Project as a whole by clicking on the Project’s name in the Inspector and exposing the contents of every Album (and any images not yet placed in Albums) at the same time in the Browser.
No photographer – not even the best – could hope for every image in a shoot to come out the way they wanted, and even the best photos often benefit from some minor adjustments. The trick is to identify those photos with the best potential to use as a starting point.
There are a number of ways to do this in Aperture. The first would be to step through each Album and apply ratings to the photos they contain. Another would be to physically delete photos from the collection, which while destructive does at least offer the benefit of slimming down your Library and avoiding bloat on either the drive holding your Library or the one you use to store your Vaults.
However, the most inspirational way, and the method that most closely matches the way in which we work in real life is to use a Light Table. This lets you scatter your images across the screen, and sort them into groups, helping you to get your head around the way in which they work together and relate to one another. This lets you create finer distinctions between your images rather than the broad-brush divisions created by Albums.
Select the images you want to use on your Light Table, either from a single Album or the Project as a whole and pick Light Table from the Toolbar’s New menu. Note that if, in future, you create new Albums in a Project that use images not stored in that Project, you can still create a Light Table using those images, so long as the Album holding them is selected at the point of creation. If you instead have the Project selected, which doesn’t hold the images themselves but is just a symbolic link to them in the Album, then even if you choose the option to include all images, only those that appear in the Project will be included and not those drawn into it by Albums referring to other Projects.
Drag your images from the Browser onto the Light Table and start to organize them however seems most logical. Use the resizing handles to change their dimensions, and stack those that go together, bringing the best of each group to the top of the pile (Fig. 6.9).
As you work with your Light Table, you will start discarding the shots that are not up to scratch, and keeping others in Stacks so that you can go back to them later on to make a second assessment. Slowly your collection should start to filter down to just the best pictures in your collection, which you can then begin to rate.
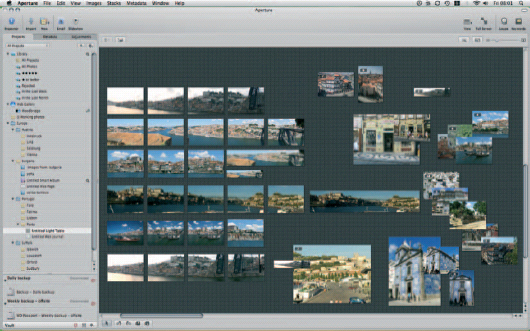
Fig. 6.9 Use Aperture’s Light Tables to organize, sort and filter your images. Images can be stacked in the same way as in the Browser, dragged into logical groups and resized. This closely mimics the way photographers would traditionally scatter images on a table, or examine slides on a Light Table.
Giving your images ratings is key to identifying your best and most saleable work. It also gives you another series of parameters that you can use when searching or setting up Smart Albums.
Select your photos and use the number keys ![]() to
to ![]() to rate them, using
to rate them, using ![]() to remove a rating you have already applied.
to remove a rating you have already applied.
Rating and Picking Your Photos Using Comparisons
Light Tables are an excellent way to sort images, but there are occasions when a traditional side-by-side approach is more appropriate. In these instances, you will switch to using Aperture’s compare view. This can’t be done on a Light Table, so switch back to your Albums and use the shortcut ![]()
![]() or use the Viewer Mode button to select Compare.
or use the Viewer Mode button to select Compare.
In Compare mode the Viewer will always show two images – one that you have chosen as the reference image and the one against which you want to rate it. The reference image will be shown on the left, surrounded by a green border, whereas the comparisons, bordered in white, sit to the right. These same color indicators are used in the Browser below the Viewer.
Pick your reference image by selecting it in the browser and pressing ![]() . Now move through the other images in the Browser, using either the mouse or keyboard until you find one better or more appropriate than the reference image. At this point, tap
. Now move through the other images in the Browser, using either the mouse or keyboard until you find one better or more appropriate than the reference image. At this point, tap ![]() again to make this the new reference image and then return to stepping through the remaining images in your collection to complete the comparison exercise (Fig. 6.10).
again to make this the new reference image and then return to stepping through the remaining images in your collection to complete the comparison exercise (Fig. 6.10).
By the time you reach the last image, the green-bordered photo should be the best of all of your assets, and can now be safely given a five-star rating before you go on to start the editing process.
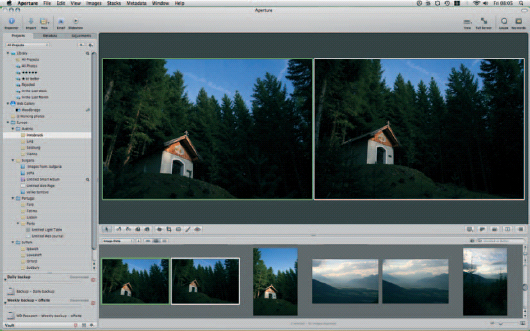
Fig. 6.10 These two images may look similar, but there are subtle differences. By comparing side by side we can pick the best. The green border denotes our reference image, whereas the white border surrounds the image with which we want to compare it. Notice how these colors are also used in the Browser frame.
Gather all of the best photos from your shoot into an Album to make them easy to find without moving their physical location and then switch to the Adjustments Inspector.
Edit Your Photos
With only a tiny number of exceptions – red-eye correction, for example – edits are conducted on a whole-photo basis. This is in stark contract to traditional photo editing tools that focus more clearly on smaller areas of an image for correcting more specific problems.
As such, edits in Aperture are more about correction than creation, and you should not expect to get a perfect result from a poorly shot image with burnt-out highlights or underexposed shadows.
Nonetheless, Aperture’s editing tools are both powerful and extensive, and explored in detail in Chapter 5 (Fig. 6.11).
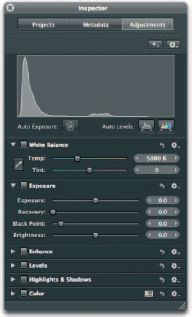
Fig. 6.11 The adjustments HUD lets you edit your photos in full-screen mode, or when you have hidden the Inspector to maximize your working space.
Output Your Photos
You should perform your editing tasks with each image’s eventual use in mind, bearing in mind that some color and exposure adjustments that may work well as a page background in a book would not work well on a Web page, or as part of a gallery. Judicious cropping, rotating and color correction should be used to maximise the impact of your results before you move on to the final stage of the workflow: output.
If you are using your images as part of a Web page or Journal, you will have to choose between publishing to your MobileMe web space – if you are a subscriber – or saving your output to your Mac’s hard drive and transferring it manually to your own Web space. If you have chosen to produce a Gallery, you have no choice but to send it to MobileMe, as it uses several server-based technologies that are not included in third-party hosting packages.
The Mac is well served by FTP applications, but one of the best is the free Cyberduck (cyberduck.ch), which uses industry standards and lets you drag items directly from the Mac’s file system to the remote server and back again.
Books must ultimately be printed by Apple’s partners by clicking the Buy Book button on the book creation interface and using your Apple ID. However, you can also print the pages of the book or save it as a PDF for proofing prior to paying any fees for a hard copy. In this way, you can seek sign-off from a client before taking the ultimate step.
If you are printing the proofs of your book, or any individual photos, it is essential that to get the most accurate representation of your photos in their final state you follow the color management guidelines in Chapter 8.
Not all photos need to be published or printed. There are many instances when you will want to save a photo to disk, either because you need to send it to a client or you want to use it in an external application, such as Adobe Photoshop.
In these instances, you would use the File > Export command to save the photo using one of your Export presets, which can be set up in advance or by picking Edit from the Preset drop-down on the Export Dialog.
Aperture ships with 18 existing presets catering for a wide range of needs, including Photoshop PSD export at both full and half-size resolutions, so there are few instances when you will need to create your own to supplement these. However, as none of these export settings includes watermarking as a default, you should seriously consider creating a logo that can be stamped onto your work when being exported for approval by a client. This would stop them from using the work without your authorization.
Aperture can use a range of image formats for watermarking, but the most versatile and highest quality are flat Photoshop files with transparency, which will give clean edges and allow you to maintain a high degree of detail. You should create your watermark in a range of sizes and create different presets for each one, as Aperture can scale overlarge watermarks down to fit but cannot scale up any that are too small to act as an effective deterrent.
Backup, Backup and Backup Again
At the end of your editing session, you will have added several new image Versions to your Library. Although they are based on the Digital Masters that you stored in a Vault at the start of the workflow, they have not themselves been safeguarded. As such, the Synchronization icon in the Vaults panel will be amber, warning you that you risk losing work if you suffer a hardware failure.
At this point, and before quitting Aperture for the day, you should re-attach your Vault and perform a backup. Only when the icon shows black will you know that your work is safe.
Light Tables
Once you have imported your images, you need to start thinning them out. A single photo shoot can stretch to several hundred frames, the vast majority of which will be unsuitable for one reason or another. You could sort them by stepping through your newly imported pictures in the Browser strip, assigning ratings and keywords to each one as you go, but this is cumbersome and unrealistic. Nobody who used to shoot with film would have taken their pictures out of their envelopes one at a time, rated and cataloged each one and then put it away again before moving on to the next.
Instead you would scatter them across a table and rearrange them by hand into collections and groups. Aperture’s Light Table feature lets you do the same in the digital realm.
Create a Light Table by selecting a range of images in a folder in your Library and picking File > New from selection > Light Table. The Light Table will appear as a new entry in the Projects pane, and open up as a grid-based space above the Browser strip. You can scale it using the slider above and to the right of it.
Start by dragging all of your images onto the Table. They’ll be arranged neatly so that each one has a full facing and none of them overlaps, giving you a good immediate overview of your pictures (Fig. 6.12).
You will already be able to see how the pictures relate to one another in terms of composition and color temperature if you’ve been shooting in a studio; subject and location if out and about. These factors should be the starting points of your sorting. At this point you’ll probably want to close the Browser and maximize the Viewer window (press ![]() ).
).
To sort your images simply do what you would in the physical world: grab hold of them and drag them around using the mouse. As you move each one you’ll see that yellow guidelines appear along its edges and center showing when it is aligned with the edge or center of other pictures on the Light Table, and as you move beyond the edge of the existing checked area in any direction, it grows to accommodate your image. You can, of course, ignore the guidelines should you choose, and you can stack images on top of one another if you need to save space on a smaller monitor.
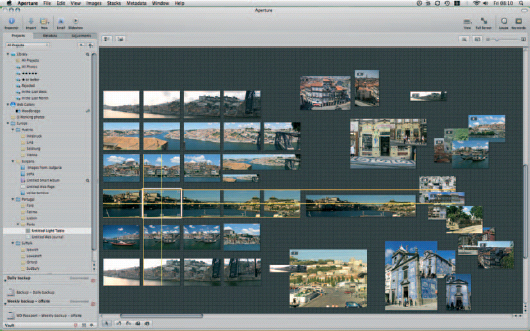
Fig. 6.12 As you move photos on the Light Table, Aperture uses dynamic guides to show when you have lined up the center or edge of each one with any other element on the Table.
As you do, it’s easy to lose track of what has become obscured by other images that overlap or cover it up. In this instance, select any of the images covering up one of the others and press ![]()
![]() to have Aperture intelligently rearrange them to give each image in the group a full facing (Fig. 6.13). The rest of the Light Table will be dimmed, and although you can’t directly manipulate any of the images you have uncovered, you can click on them. This will select the clicked image and drop them all back into their original locations, only this time with the selected image on top and ready to be worked on.
to have Aperture intelligently rearrange them to give each image in the group a full facing (Fig. 6.13). The rest of the Light Table will be dimmed, and although you can’t directly manipulate any of the images you have uncovered, you can click on them. This will select the clicked image and drop them all back into their original locations, only this time with the selected image on top and ready to be worked on.
You can select and move several images at once by holding ![]() while clicking them, and then dragging them as a group, or by dragging a selection box around adjacent images to select them as one entity. Right-clicking a selection of this type gives you the option to align any of their edges, and to space them out evenly on a horizontal or vertical plane (Fig. 6.14). This makes it very easy to stack similar images, most of which will have been taken in quick succession by dragging a selection box across them and then aligning both their top and right sides in sequence.
while clicking them, and then dragging them as a group, or by dragging a selection box around adjacent images to select them as one entity. Right-clicking a selection of this type gives you the option to align any of their edges, and to space them out evenly on a horizontal or vertical plane (Fig. 6.14). This makes it very easy to stack similar images, most of which will have been taken in quick succession by dragging a selection box across them and then aligning both their top and right sides in sequence.
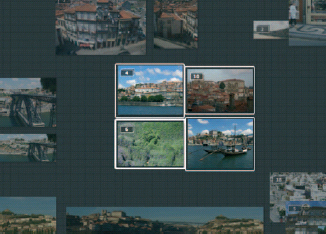
Fig. 6.13 Once you have stacked a group of images, you may want to temporarily rearrange them to expose those that have been covered up. ![]()
![]() does this, allowing you to click one of the lower images to bring it to the top of the pile.
does this, allowing you to click one of the lower images to bring it to the top of the pile.
A right-click here also gives you the option to arrange your images. This is a handy as it shuffles the selected pictures so that none of them is overlapping, and then lets you drag them as one set to a new location, complete with yellow guidelines that appear in relation to the group as a whole.
As your collection consolidates you’ll find that it quickly becomes easy to identify the duds, which can be removed by selecting them and using ![]()
![]() to delete them, in the same way that you would send a file to the Trash in the Finder. A less destructive option is to put images from the Light Table back into the Browser bar by selecting one or more and using the shortcut
to delete them, in the same way that you would send a file to the Trash in the Finder. A less destructive option is to put images from the Light Table back into the Browser bar by selecting one or more and using the shortcut ![]()
![]() . As you’ll see if you have the Browser visible (cycle through the View modes using
. As you’ll see if you have the Browser visible (cycle through the View modes using ![]() ), this removes the image from the Light Table, but keeps it close at hand should you want to use it again in the future.
), this removes the image from the Light Table, but keeps it close at hand should you want to use it again in the future.
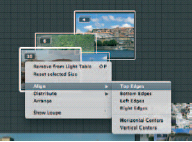
Fig. 6.14 Don’t have time to neatly arrange your photos yourself? Right-click a collection of photos, and the context-sensitive menu offers to automatically align the pictures along specified dimensions.
The more images you remove, the more space you will have, which gives you the opportunity to start enlarging the ones that remain to give you a better view and help you discern smaller differences between them. Every time you hover over an image, therefore, you’ll notice that eight grab handles appear around the edges. Pulling any of these out from the center enlarges the image, maintaining its proportions as it does, while pushing them in towards the center shrinks it down.
Because Light Tables will always be a work in progress to which you will return time and time again as you work on a particular Project, Aperture lets you keep as many as you need in your Library at any one time, and even use the same images more than once in several different Tables. Clicking away from them or closing Aperture saves their current state so you can come back to them in another session.
Performing Sorts and Edits from a Light Table
Images on a Light Table remain live at all times, meaning you can edit them here just as easily as you would an image in a Project or a folder. With the Inspector or Inspector HUD open, you can switch to the Adjustments tab and apply adjustments using the regular controls, remembering to zoom in or resize your images to give you a good view of the results. Depending on your Preference settings, any edit you make may create a new Version of the image, which will be placed on the Light Table alongside the original. Neither these Versions nor the Digital Master can be resized while unstacked, so to shrink or enlarge them click on the Version count on the Digital Master to collapse them back into a single Stack, resize the Digital Master and then click the number again to expand them back into an opened Stack with all Versions in view side by side.
As ever, tapping ![]() gives you a full-screen view of any image selected on the Light Table so you can edit at the largest possible size. However, you can also apply edits by showing the image in the Viewer window. This is hidden when you’re viewing the Light Table, but can be shown by clicking the Viewer button. Ensure you have the Browser and Light Table visible, by tapping
gives you a full-screen view of any image selected on the Light Table so you can edit at the largest possible size. However, you can also apply edits by showing the image in the Viewer window. This is hidden when you’re viewing the Light Table, but can be shown by clicking the Viewer button. Ensure you have the Browser and Light Table visible, by tapping ![]() to cycle through the different View modes until you see the Light Table displayed above the Browser strip.
to cycle through the different View modes until you see the Light Table displayed above the Browser strip.
The control strip at the top of the Browser pane sports a number of buttons, a drop-down menu and a search box. The drop-down lets you sort the images by orientation, date, keyword, rating and so on, whereas the search box lets you trim them down by typing in a search term. Clicking the magnifier at the left-most end of the box gives you quick access to the preset star ratings. There is another magnifier to the left of this that calls up the filter HUD, allowing you to perform more extensive searches. The button to activate the Viewer for more effectively performing edits sits to the right of the List View button. Clicking once opens the viewer; clicking a second time returns to the Light Table.
Stacking
Aperture is built to work like a professional photographer. As such, it can intelligently stack photos taken at a similar time, understanding that they are probably taken in a single burst, or at least in very quick succession, and thus are directly comparable.
Stacks are created automatically, either when you edit a Digital Master by creating a new Version or by examining the file creation time – something Aperture can do either at import or later, when you’re browsing the Library.
You can preview how your images will stack at the point of import, by using the Auto-Stack slider at the bottom of the Import dialog. This appears directly below the image thumbnails, and is broken into second increments, with markers at 15, 30, 45 and 60 seconds. Moving the pointer to the right increases the window within which images can fall to be stacked. So, dragging it to the furthest right extremity would stack all images taken within a minute of each other. Taking it back again half-way would release those taken with a delay of more than 30 seconds between each one.
Stacks will be shown using the Digital Master, stamped with a number indicating the number of images within the Stack. This number, and the box surrounding it, is called the Stack button. You’ll notice this number appearing every time you make an adjustment to a Digital Master within the Browser and Viewer environment (Fig. 6.15).
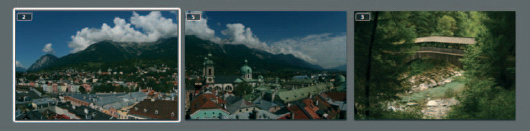
Fig. 6.15 The badge in the top left corner of a Pick image on a Stack indicates how many photos exist in each Stack.
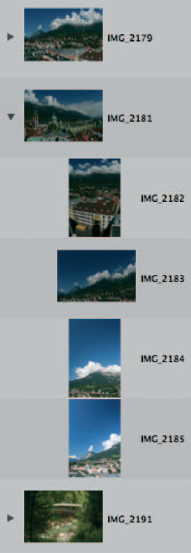
Fig. 6.16 Stacks can contain images of any orientation or subject but are always indicated by a single image in the list view unless they are expanded, as shown here.
However, you can also create Stacks manually in the Browser, and once there manipulate them, using both the mouse and the keyboard. It’s worth remembering that the button that controls Stacks, in almost every instance, is ![]() , which is combined with the
, which is combined with the ![]() ,
, ![]() and
and ![]() modifiers to perform a wide range of functions. This lets you group images by whatever criteria you choose, and so is more versatile than being restricted to stacking purely on the basis of time (you might, for example, be importing images from several cameras or several photographers, all of whom have been taking photos of the same subjects and want to amalgamate the best photos into a single Stack. Alternatively, you may have thinned out the immediately unsuitable images from your latest import and want to stack those that remain to give yourself some more space to work on the rest of the import).
modifiers to perform a wide range of functions. This lets you group images by whatever criteria you choose, and so is more versatile than being restricted to stacking purely on the basis of time (you might, for example, be importing images from several cameras or several photographers, all of whom have been taking photos of the same subjects and want to amalgamate the best photos into a single Stack. Alternatively, you may have thinned out the immediately unsuitable images from your latest import and want to stack those that remain to give yourself some more space to work on the rest of the import).
There is no reason why Stacks should be restricted to consecutive images; holding ![]() while clicking on multiple photos scattered throughout a single Project or folder and then pressing
while clicking on multiple photos scattered throughout a single Project or folder and then pressing ![]()
![]() will join them as a Stack. If your Browser is in the Filmstrip or Grid mode, they will be given a darker gray background. If you’re using the List View, the first image in the Stack will be used as a folder containing the other images you selected. A small disclosure triangle will let you expand and close the folder within the Browser to show or hide its contents (Figs 6.16 and 6.17).
will join them as a Stack. If your Browser is in the Filmstrip or Grid mode, they will be given a darker gray background. If you’re using the List View, the first image in the Stack will be used as a folder containing the other images you selected. A small disclosure triangle will let you expand and close the folder within the Browser to show or hide its contents (Figs 6.16 and 6.17).
The image used to represent the Stack in the List View, or in the Grid or Film Strip Views when the Stack is collapsed, is called the Pick image. This can be changed at any time – to reflect the best image in the Stack, for example – by dragging an image from within the Stack onto the Pick image when in List View, or in front of it in the Grid and Film Strip Views. ![]()
![]() achieves the same thing without using the mouse.
achieves the same thing without using the mouse.
Pressing ![]()
![]() toggles a Stack open or closed, while pressing
toggles a Stack open or closed, while pressing ![]()
![]()
![]() when any image in a Stack is selected will unstack every image. You can also open and close Stacks by clicking on the small indicator on the Pick image that shows how many photos the Stack contains. The most powerful Stack shortcuts are those that open and close all Stacks at once:
when any image in a Stack is selected will unstack every image. You can also open and close Stacks by clicking on the small indicator on the Pick image that shows how many photos the Stack contains. The most powerful Stack shortcuts are those that open and close all Stacks at once: ![]()
![]() and
and ![]()
![]() respectively.
respectively.
The more time you spend working with your images and thinning them down to just the very best examples from any shoot, the better you will understand their relationship with one another. At this point you may find that your Stacks are no longer relevant as they don’t represent groups of the best related photos. When this happens you’ll need to start breaking up your Stacks. However, the chances are that you’ll want to keep at least some of them stacked, perhaps because they need further sorting. As such, the shortcut to dismantle the Stack entirely (![]()
![]()
![]() ) is overkill.
) is overkill.
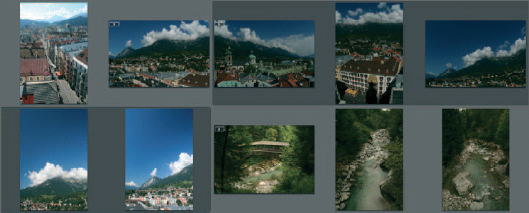
Fig. 6.17 When viewed in grid mode, Stacks are indicated by grouping all of the constituent images together with a darker gray background.
At times like this you want to manually drag images out of the Stack. The principle is the same whatever view you’re using, but the way it is represented on-screen differs slightly depending on whether you’re using List, or either Film Strip or Grid Views.
Dragging an image from your stack to any other position within it when using List View will always highlight the whole of any other image in that Stack as you hover over it. In this way you know that you are still within the Stack, and won’t drop your image in the Stack’s last position, thinking you’ve dropped it just outside of it. Once you have moved outside of the Stack, the position indicator changes to a hairline divider, which sits between images, indicating where your photo will sit once you drop it.
When using the Grid or Film Strip views, your image position is always shown using a vertical green bar, whether you’re moving inside or outside of the Stack. This means that when you drag an image to the very end of your Stack, you’ll see that the green line appears in two different positions with very small movements of the mouse: one position inside the Stack and one just outside, a few pixels away from each other (Fig. 6.18).
The same theory works in reverse, allowing you to quickly add images to a Stack by simply dragging them in from anywhere else in your Project. Alternatively, select any image in your Stack, and then any image you want to add, and tap ![]()
![]() . The new image will be added in the final position within the Stack.
. The new image will be added in the final position within the Stack. ![]()
![]()
![]() will remove any selected image from a Stack.
will remove any selected image from a Stack.
You can move images within a Stack using the keyboard, as well as the mouse, and this is almost the only instance when the shortcut strays from using ![]() .
. ![]()
![]() and
and ![]()
![]() moves an image to the left and the right respectively. If you are having trouble rating your images within a Stack, and deciding which should be used as the Pick image to represent the whole Stack, this is a good way to compare them side by side, one by one.
moves an image to the left and the right respectively. If you are having trouble rating your images within a Stack, and deciding which should be used as the Pick image to represent the whole Stack, this is a good way to compare them side by side, one by one.
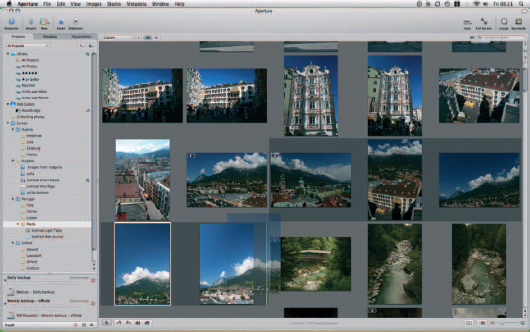
Fig. 6.18 When relocating an image inside a Stack in Grid mode, a narrow green line indicates its position. At the end of the Stack the line will appear either inside or outside of the bordered area to indicate its removal from or addition to the Stack.
This shortcut only works within a Stack; you can’t use it to rearrange images within a general Library. Neither can you move your images beyond the boundaries of the Stack, so this is not a way to move images either into or out of an existing Stack.
Why is it important to choose a good Pick image? Not only does the Pick represent the Stack as a whole (and should therefore be representative of the style and content of the Stack as a whole) but the Pick is also used in various products created using the photos in your Library.
Versions and Version Sets
With Aperture’s incremental versioning system, you can push your creativity further, always applying one more adjustment than you would usually be happy with, safe in the knowledge that you can always revert to an earlier safe state with which you were happy. The result should be more dynamic, eyecatching and – ultimately – saleable work.
Each Version, which can be created automatically or manually, acts as a safe milestone to which you can return if you take things a little too far. However, they also act as options, allowing you to give clients a range of choices, each derived from a single Digital Master.
Because a Version is just a list of metadata applied to the Master, each one takes up very little space on your hard drive, allowing you to create far more Versions using Aperture without increasing the capacity of your system than you would with an alternative, such as Photoshop.
Automatically Created Versions
Every original image in your Library is, as we have already shown, a Digital Master, which Aperture considers to be sacred and untouchable. It is the digital equivalent of a film negative, which would always exist in its original state, with only the derived products – your prints – edited by dodging, burning and changing the way in which the photosensitive paper is exposed.
As such, Aperture never lets you make any changes to your Masters, apart from editing their metadata, or changing the way they appear in products, like books, Light Tables and Web pages. When only one edition of any image is shown in your Library it is, by default, the first Version, with the original stored safely, untouched, on your drive. You can, however, set Aperture to automatically create new Versions of the first instance of any image when you apply extensive edits to it at any point through Aperture’s Preferences’ General pane.
You can make as many further edits to this Version as you like without another Version ever being created.
Manually Created Versions
There are times when you will want to make alternative edits to either an existing Version or the Digital Master from which it was derived, to give you a choice of finished products or works in progress. This lets you experiment, and is particularly useful in the early stages of working with your photos, if you have not been given a clear brief by a client, or you are unsure how best to handle your material.
To create a new Version from the Digital Master, have the Master or any Version selected, and use the shortcut ![]()
![]() (modifying this by simultaneously holding the
(modifying this by simultaneously holding the ![]() key will open both Versions side by side so that you can compare them). This gives you a fresh, untouched copy of the original from which you can start working all over again. You can achieve the same thing by selecting the Digital Master again, and making fresh edits, but this shortcut saves you some mousing, and fits better with a keyboard-based workflow, in which the keys are used to perform commands, and the mouse to make edits.
key will open both Versions side by side so that you can compare them). This gives you a fresh, untouched copy of the original from which you can start working all over again. You can achieve the same thing by selecting the Digital Master again, and making fresh edits, but this shortcut saves you some mousing, and fits better with a keyboard-based workflow, in which the keys are used to perform commands, and the mouse to make edits.
To create a new Version from an existing Version, select the Version in question and use the shortcut ![]()
![]() . In effect, this creates a new edition from the Digital Master and applies to it any adjustments you have made to the Version from which you made the duplicate. The existing Version then becomes your safe-haven milestone to which you can return, whereas the duplicated Version is the one on which you will experiment by applying further, more extreme adjustments, or by cropping and rotating the image.
. In effect, this creates a new edition from the Digital Master and applies to it any adjustments you have made to the Version from which you made the duplicate. The existing Version then becomes your safe-haven milestone to which you can return, whereas the duplicated Version is the one on which you will experiment by applying further, more extreme adjustments, or by cropping and rotating the image.