In this chapter we look at various ways to make portraits of adults using a range of different brushes and techniques. As always when making portraits in Painter it is for you to decide just how painterly they should appear. The step by step examples included here are all fairly close to the original photographs however this is just a matter of choice and you can decide whether to make any one more impressionistic by increasing the amount of painting.
These techniques are intended to give you the basics and can be taken further depending upon the result you think appropriate.
Also in this chapter are included several ideas for handling pictures of weddings and how to take standard photographs and turn them into something that bit special for the bride and groom.
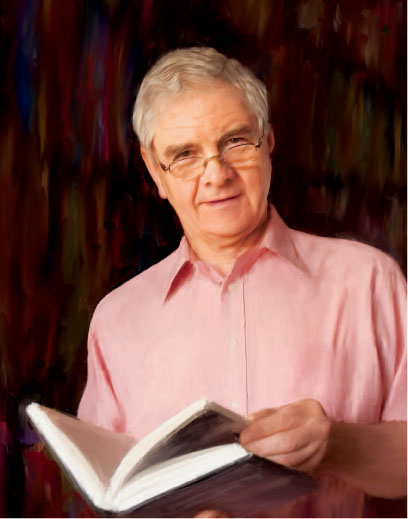
Portrait using Artists Oils

The brushes in the Artists Oils category have many interesting features that closely replicate the performance of a real brush. Two of the special features are that when sampling colors from an original to a clone copy the brushes will pick up multiple colors. Another speciality is that the brushes run out of paint fairly quickly as a real brush does. This portrait step by step takes advantage of both these features and in addition uses the Auto-Painting feature first introduced in Painter X to start off the painting.

1. Open ‘ Bob ’ from Chapter 10 folder on the DVD.
2. File>Quick Clone to clear the clone copy.
3. Select the Blender Bristle brush from the Artists Oils brush category, brush size 60.0, Opacity 100%. Click Clone Color in the Colors palette.
4. Window>show auto-painting. Tick Smart Stroke Painting and leave Smart Settings unticked as in Figure 10.3.
5. Click the arrow in the Auto-Painting palette to start the auto-clone. This will continue to paint until you either depress the Stop button or click inside the picture. This will provide a roughly painted base for the picture. Let the program run until nearly all the picture has been painted, then stop the Auto-painting and, with the same brush paint, out all the white areas that have been missed. Figure 10.4 shows the process; turn off the Tracing Paper to see the result.
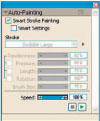
FIG 10.3 The Auto-Painting palette
6. Reduce the brush size to 35 and untick the Clone Color option so that the brush is painting rather than cloning. Hold down the Alt/Opt key and click into the picture to sample a color to paint with. Start with a darkish brown color. The way that this brush works is that it will start painting with the selected color, run out of paint fairly quickly, and then turn into a blender. We can use this feature by introducing a color onto the Canvas and then continuing to paint with the brush and blend this new color gently into the existing colors. The intention in using this on the background is to darken it right down but still to retain traces of the original colors to add interest and subtlety. Change the sampled color regularly, making the bright areas darker and introducing touches of color into the black areas. Use the Tracing Paper to check where the figure is, and paint over the edges to keep the background consistent. The figure will be cloned in again in a later step. Figure 10.5 shows the picture at this point.
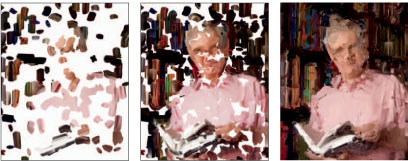
FIG 10.4 The Auto-Painting process
7. Reduce the brush size to 21 and the Opacity to 40%. Click the Clone Color option in the Colors palette and start to paint the shirt. Keep the brush strokes short to retain a chunky feel to the painting; use longer light strokes to smooth down the larger areas.
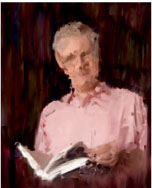
8. We now turn to the face and have a change of brush. Art Pen Brushes>Soft Flat Oils will be much softer and allow more detail to return to the face. Use Clone Color and set the brush size to 40 and the Opacity at 100%. Turn the Tracing Paper on and start painting the face. The speed with which you use this brush is critical: too fast and the face will be completely blurred, too slow and the detail will be too clear. Brush slowly, just enough to see some detail, and make short brush strokes. Paint over all the face and hair.
9. If you have made the face too clear, reduce the Opacity to 30% and make short fast brush strokes over the area – this will diffuse the area. Try making rapid dabs with the brush – this adds a texture which can be softened again by using the same brush.
10. Reduce the brush size to 10 and 24% Opacity, and work over any rough areas that need smoothing out.
11. Paint over the hair with the same brush – take it out of Cloning mode and paint directly with color to improve texture; Alt/Opt-click in the picture to sample colors. Darker parts of the hair will benefit from this application of lighter color and texture.
12. Check over the picture and make any final adjustments.
13. Make a new layer and Select All, Edit Copy, Edit Paste in Place to make a copy of the Canvas.
14. Effects Tonal Controls Apply Surface Texture. Select Image in the Using box and 25% as the Amount.
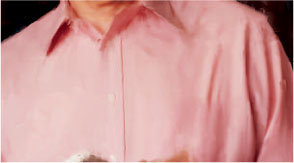
15. Adjust the layer opacity to suit the picture; I suggest around 35% to add a light texture to the brush strokes but not to be intrusive. I have cropped the picture slightly to tighten up the composition and also to remove some of the hand under the book, which did not look very satisfactory. This completes the portrait of Bob.
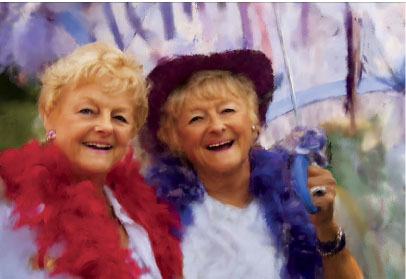
Portrait using Pastels
Pastel brushes are excellent for making a picture from this colorful and joyous photograph. These two delightful ladies were enjoying a visit to a jazz festival, a lifelong love, and I captured them in all their colorful clothing beneath a traditional jazz umbrella. In the painterly version we will retain the strong colors and vivacity of the scene.
1. Open ‘ Jazz Ladies ’ from Chapter 10 folder on the DVD.
2. File>Clone.
3. Select the Pastels>Round Soft Pastel 40, brush size 40, Opacity 100%.
4. Click the Clone Color option in the Colors palette.
5. Select the Sandy Pastel Paper in the Papers palette.
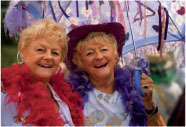
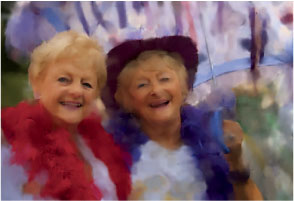
FIG 10.9 Underpainting at step 6
6. Paint over the picture ensuring that the entire photograph is covered. Follow the general direction of the colors so that the picture still retains the overall shapes. The aim is to produce an underpainting into which more detail can be cloned with a smaller brush. Paint over the faces as well.
7. Before we start adding detail it is good to deal with any problem areas such as the dark corner bottom right. Take the brush out of Cloning mode by unticking the Clone Color option. Sample the painting color by holding the Alt/Opt key and clicking in the picture – in this case one of the gray colors next to the very dark corner. Paint over the dark corner, changing the color at regular intervals so that the result is a blend of colors that matches the color and texture of the rest of the picture.
8. Reduce the brush size to 20 and the Opacity to around 50%, and paint over any other areas that look too dark.
9. Click the Clone Color option again, reduce the brush size to 7.5, Opacity to 100%, and paint down the umbrella handle. Go over this again with brush size 20 to blend it with the background.
10. Reduce the brush size to 13.0 and paint more detail into the hat and the hair of both ladies – this size brush will give a softer finish (Figure 10.10).
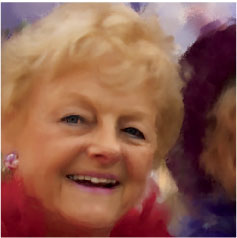
FIG 10.10 Detail of hair at step 10
11. Using brush size 10, with 100% Opacity, paint over the colorful red and purple feathers to bring out more detail and highlights. Use the Tracing Paper to check where the areas of contrast are greatest and paint over these.
12. Change the brush size to 10 to paint the faces and gently emphasize the detail. Repeated strokes in one direction will smooth out the textures.
13. Reduce the brush size to about 3.4 to paint the eyes and, using the Tracing Paper, carefully paint following the light and dark areas. This size brush may lose the texture. Paint over the same areas using brush size 8.9 which will soften the appearance.
14. To bring back more clarity in the eyes switch to the Soft Cloner brush and restore detail from the original, then lightly brush over with the Pastel brush to blend with the rest of the picture. Do the same with the teeth. Figure 10.11 shows the faces at this stage.
FIG 10.12 Hair detail added using the Square X-Soft Pastel
15. Having completed most of the picture it is time to add the important finishing touches to improve the detail and textures of the picture. The hair needs better definition so change to the Square X-Soft Pastel 30, size 3.4 Opacity 27%. Tick Clone Color and clone in the hair to add more texture.
16. If the result is too harsh, change the Resat to 0 and the Bleed to 100%. This changes the brush to a blender, which will soften the brush strokes where necessary.
17. Change to the Artist Pastel Chalk, tick Clone Color, and polish any rough areas of the face. This also works well as a blender and is excellent on skin. Use a size 10 brush with 11% Opacity.
18. Paint out the top left corner with suitable colors to avoid a change of color in that area.
19. Add a surface texture if required, as in the previous example, and make any final tonal adjustments.
20. This completes this step by step example. As you will have seen, the Pastel brushes are very versatile and particularly effective with pictures of people.
Acrylics Real Wet
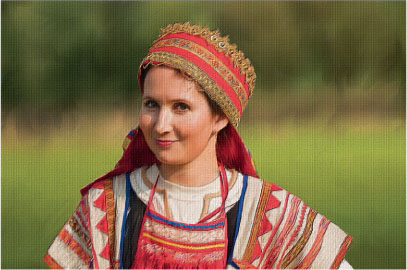
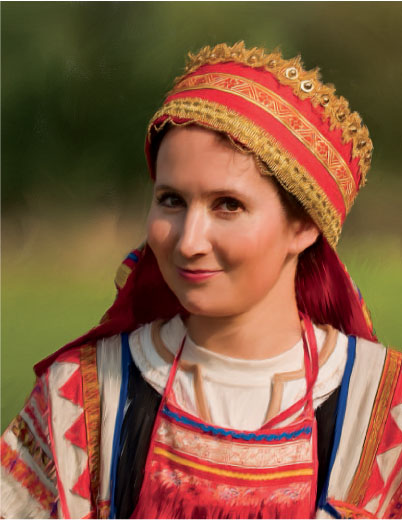
In this tutorial one of the new brushes from Painter 11 will be used to paint this lady in her beautiful traditional Russian dress.

1. Open ‘ Ksenia ’ from Chapter 10 folder on the DVD.
2. File Quick Clone.
3. Select the Acrylics Real Wet Bristle brush, size 92.2 and Opacity 75%.
4. Click the Clone Color option in the Colors palette.
5. Paint all the background and up to the edge of the figure. It does not matter if the brush goes over the edge as this can be repainted later.
6. Reduce the brush size to 25 and paint over the figure. Roughly follow the lines of the clothing but there is no need for detail at this stage. Figure 10.15 shows the picture at this point.
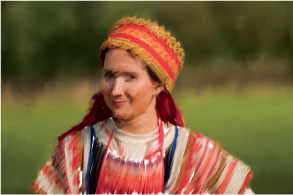
FIG 10.15 Using the Real Wet Bristle brush
7. Reduce the brush size to 13 and, beginning with the head covering, follow the lines of the material carefully and bring in the detail. Make circular brush strokes around the top edge, then long diagonal strokes on the red, and cross strokes on the next layer. Figure 10.16 shows the detail.
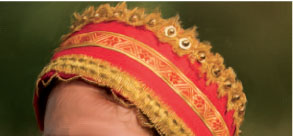
FIG 10.16 Detail in the head covering
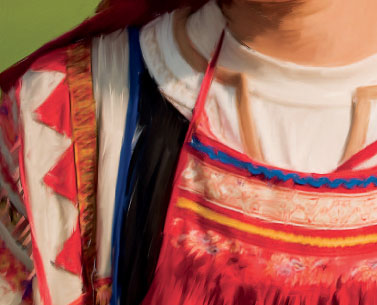
8. Continue with the dress using size 13; follow all the lines and colors. Figure 10.17 shows the detail.
9. Change the brush size to 32.2 and the Opacity to 35%. Paint over the face in a circular motion – this will smooth out the textures.
10. Reduce the brush to size 10 and gently brush over the face once again to bring in the detail, particularly in the eyes, nose and mouth.
11. Check the picture to ensure that you are happy with the finish, then apply surface texture.
12. Copy the Canvas layer (Select>All, Edit>Copy, Edit>Paste in Place).
13. Effects>Surface Control>Apply Surface Texture. Select Image Luminance and set the Amount slider at 25%. This will add a texture based on the picture, emphasizing the brushwork.
14. Copy this surface texture layer.
15. Change the paper to Artists Canvas.
16. In the Papers palette, change the Paper Scale to 165% and the Contrast to 160%.
17. Effects>Surface Control>Apply Surface Texture. Select Paper and set the Amount slider at 25%. This will add a texture based on the paper selected.
Design ideas for portraits
Painter can be valuable in creating design concepts as well as making cloned pictures. In this example the original photograph will be overlaid against a painted backdrop.
1. Open ‘ Donna ’ from Chapter 10 folder on the DVD.
2. Open the Layers palette and make a copy of the Canvas layer (Select>All, Edit>Copy, Edit>Paste in Place).
3. Activate the Rectangular Selection tool in the Toolbox and draw a selection to include the head of the model.
4. Select>Save Selection and give it a name.
5. With the new layer active make a copy; (Edit>Copy, Edit>Paste in Place) this will place a copy of the selected area on a new layer above.
6. Hide the top layer by clicking the eye icon and activate the layer below.
7. We need to lighten and desaturate this layer, so go to Effects Tonal Controls>Adjust Colors and adjust the sliders to Saturation -55 and Value + 40.
8. Blenders Grainy Blender 30, size 85 and Opacity 100%.
9. Change the paper to Sandy Pastel.
10. Blend the whole layer so that the picture is very well diffused. Turn the top layer on to see the effect and make further blending adjustments.
11. Select>Load Selection and choose the name you used for the selection.
12. Select>Modify>Border and enter 4 pixels as the size. Change the color to white in the Colors palette, then Edit Fill with the current color.
13. To make a drop shadow go to Effects>Objects>Drop Shadow. Change the Opacity to 80% and the Radius to 30 pixels, but leave the off sets at 10, angle at 114.6 and thinness at 45%. Tick the Collapse to one layer option.
14. Activate the middle layer again and use Adjust Colors again to lighten and desaturate some more. I used 24 Saturation and 46 Value.
15. Finally crop the picture.
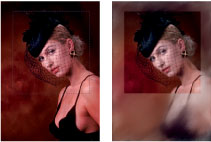
FIG 10.21 Making the selection and the picture at step 10
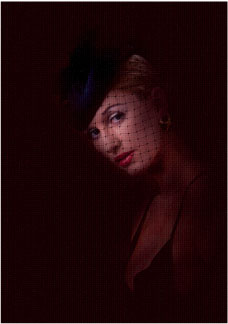
Moody portrait
This example starts with a studio portrait and transforms it to a dark and moody, low light picture. The process is simple and easy to follow.
1. Open ‘ Donna ’ from Chapter 10 folder on the DVD.
2. File>Clone. Do not clear the picture.
3. Using the Eyedropper, click on a point behind her head to sample the color which is a dark red. Edit Fill with the current color.
4. Select Cloners>Soft Cloner brush, size 72.1 and Opacity 2%. Lightly brush in the face – with this opacity the face will just be visible.
5. Reduce the Opacity to 1% and brush in the rest of the body.
6. Increase the Opacity to around 5% and go over the face again to make this brighter. To finish off the picture add a surface texture called Artists Canvas. This process is covered in detail in Chapter 5 ‘ Paper textures ’.
Weddings
Weddings are a staple for many professional photographers and one way in which to sell a premium product is to offer a painted version of selected wedding portraits. Some techniques which can achieve this using Painter are demonstrated in this chapter. In all cases the emphasis is on being able to achieve the result as quickly as possible and without any knowledge of traditional painting techniques.
This first example takes a head and shoulders color portrait and turns it into a hand colored delicate image. The techniques are all done using Painter, but some of the steps could be achieved in Photoshop, if you are more conversant with that program, and the painterly steps completed in Painter.
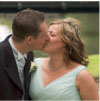
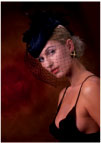
1. Open ‘ The Kiss ’ from Chapter 10 folder on the DVD.
2. Make a copy of the Canvas. Select>All, Edit>Copy, Edit>Paste in Place.
3. Effects>Tonal Controls>Adjust Colors and move the Saturation slider to the far left. This will change the layer to Monochrome.
4. File>Clone. This will make a clone of the Mono layer only.
5. Change the paper texture to Basic Paper.
6. The background is messy so we need to even it out, and before blending you should add some paint dabs. Select the Chalk Variable Width Chalk>brush at the default settings. Paint light into dark areas and dark into light.
7. Select the Blenders>Grainy Blender 30, size 84, Opacity 100%, and completely blend out the background. The dabs of paint you added in the last step have evened out the tones but left some variation in the background.
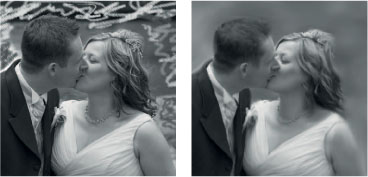
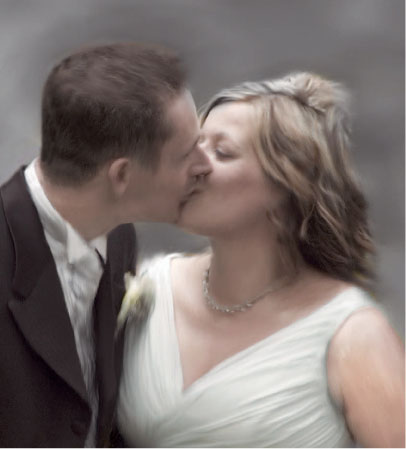
FIG 10.26 The picture at steps 5 and 6
8. Reduce the brush opacity to 10% and brush lightly over the figures following the general direction of the clothes. This will remove the last of the photographic finish.
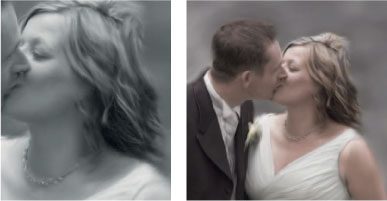
FIG 10.27 Detail at step 7 and the picture at step 8
9. Change the brush to Smart Stroke Brushes Acrylics Captured Bristle, size 11, Opacity 15%, Resat 0, Bleed 38%. Blend the faces and figures, concentrating on the edges where the finish is rough; the roughness helps this blender to work. Remember that as with all blenders the brush will drag one color into another so avoid dragging black areas into white as they will look dirty. Use this same brush at a larger size to clean up any rough areas in the background or to soften areas.
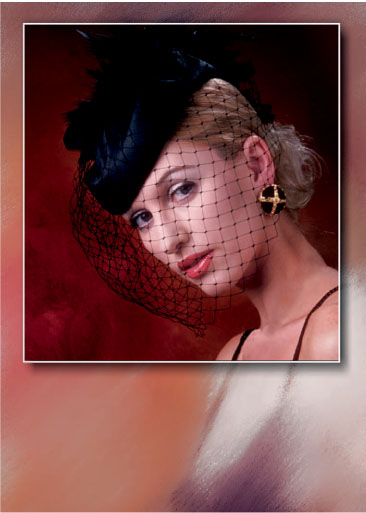
10. Make a new empty layer and Fill>Clone Source; this will put the original color picture on top of the layer stack.
11. Change the Layer Composite Method to Color.
12. Add a layer mask to this layer and click on it to make sure it is active.
13. Use the Tinting>Basic Round brush size 20, Opacity 13%, with black paint and paint out all the background leaving the figures in color. Use a smaller brush to clean up edges around the figures.
14. Reduce the layer opacity to zero then gradually bring it up until the color is visible but subtle. I made the opacity 50%.
15. Finally, make any last minute adjustments and crop the picture.
Bride in white
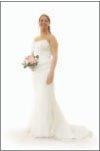
The intention with this example is to show how a simple picture of a bride can be represented in several ways to create pictures which are romantic yet different.
Prior to starting this step by step example I have painted out the background as it was not very suitable. This can be done easily by using a brush with white paint on a separate layer on top of the Canvas.
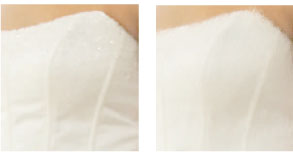
FIG 10.30 The dress before and after blending
1. Open ‘ Rebecca ’ from Chapter 10 folder on the DVD.
2. File Clone.
3. Select the Blenders Grainy Blender 30, size 30, Opacity 38%. This is used as a blender not as a cloner.
4. In the Papers palette change the paper to Sandy Pastel.
5. I will mention here once again the convenience of using custom palettes for the brushes you are going to use. This is very useful if you intend to use the same process again on another picture. There is more information on making and saving palettes in Chapter 1. For now, click on the brush variant icon on the Brush Selector bar and drag it out onto the desktop; this will instantly make a custom palette. As you use the different brushes in this step by step, you can add them to this palette by dragging the brush icons to your new custom palette.
6. Enlarge the picture on screen to 100% and begin painting the dress. Paint the top first and paint down the dress; this will smooth out the creases and remove the detail. Figure 10.30 shows the difference.
7. Continue down the dress painting downwards, but if you need to remove more detail paint across the line and then blend down again; this breaks up the picture texture. Do this on the outside edges of the dress so that it appears to blend into the background.
8. At the bottom of the dress the blender will drag out the edges beautifully, but do it gently so that the brush strokes show a delicate texture rather than a rough edge. See Figure 10.31 for the details. Paint over the floor at the same time, blending out all the detail.
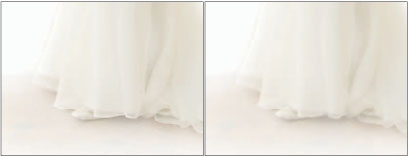
FIG 10.31 The dress before and after blending
9. Change the brush now to the Blenders>Soft Blender Stump 10, size 13, Opacity 30%. Drag this brush to your custom palette and position the icon to the right of the existing one – the icon is the same as the first.
10. Very gently run over the edges of the bottom of the dress – this will just soften the edges a little.
11. Turning now to the face, use the Soft Blender Stump, size 8, Opacity 25% and blend the face. As always take care not to drag darker colors into light areas; blend out the detail leaving a soft looking skin. Continue down the neck and arms using a larger brush, size 15.0 and 50% Opacity.
12. Blend the hand, including the ring, but then change to the Soft Cloner and bring the ring back so that is clear. Drag the Soft Cloner to your custom palette as you will need to use it later on.
13. To paint the flowers change to the Pastels Artist Pastel Chalk, size 5, Opacity 100%. Click the Clone Color option. Paint using small circular strokes to create an attractive texture to the petals and leaves. Add this brush to your custom palette.
14. We now need to add the finishing details. Use the Soft Cloner, size 2, and Opacity 24% to add the suggestion of her necklace. Turn on the Tracing Paper to help identify where the chain lies. If it is too clear you can diffuse it with the Soft Blender Stump at a low opacity. Do the same process for the earrings and a few of the crystals at the top of the dress.
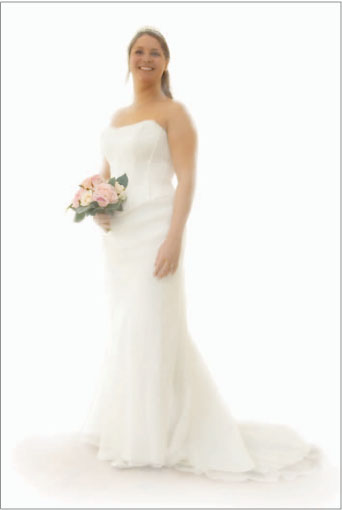
FIG 10.33 Another simple picture created from a photograph of the back of the dress
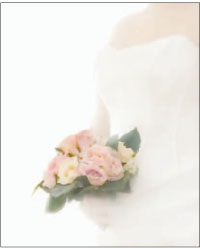
FIG 10.34 The main picture has been cropped and a white layer placed on top of the Canvas in Color Layer Composite Method
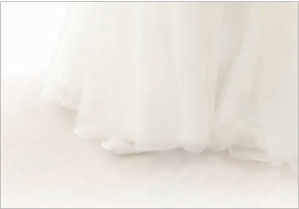
FIG 10.35 This version has been softened with the Soft Blender Stump and then cropped to isolate the single shoe peeping from the beautiful dress