
CHAPTER 7
Setting up a Home Studio
While you can take plenty of great microstock shots in the great outdoors, many of the best-selling images are, or look like they are, taken in a studio environment. No room for a studio? Not to worry. Not many have the space for a dedicated studio or the money for lots of expensive lighting equipment. “Indoor photography” is a more apt phrase, and you can achieve a lot on a shoestring budget.
Check out what you can use in your local environment (Figure 7.1). For example, you probably have a dining room table, coffee table, or the like, something at a normal tabletop height is best. You also probably have a white tablecloth that could be used as a neutral background, or you might be able to use sheets of white paper for a neutral high-key background. White is ideal for isolated images and the high-key shots that are so popular with the microstocks. And a natural wood table can make an excellent background for a range of food and object shots.
Of course, if you are shooting by natural light, you will need a firm support for your camera. But even a cheap tripod will suffice indoors.
To get you off and flying, I am going to suggest a few ideas for you to experiment with.
TABLE AND WINDOW SETUP (AVAILABLE LIGHT)
Let's start with a simple setup anyone with a flat surface, window, and cheap tripod can use. No flash or other additional kit items are needed for this.
Hold on a moment, you need a break—go and make yourself a cup of tea or coffee. When you come back, I'll be ready….
Back so soon? Well, here is Figure 7.2, an image I took as an example. I think it is pretty reasonable food macro shot for the micro-stocks,
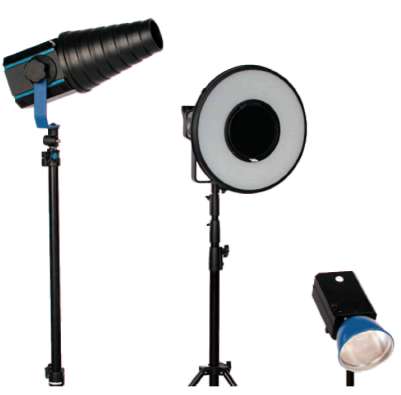
FIGURE 7.1 Studio flash. For the more serious studio, professional lighting is a must. Here we see a flash fitted with a snoot, a ring flash (great for portraits), and a simple flash unit without attachments. © Will Game/Dreamstime
and it was taken using objects lying around, using natural light from my kitchen window. My camera (for this shot I used an Olympus E-510 Four Thirds system) is fitted with a Zuiko F.2 50-mm macro lens (100-mm equivalent on a 35-mm or “full-frame” camera—a medium telephoto length that is also great for portraits), although a decent zoom with a macro function would have been nearly as good. It was taken, set up to image-ready, in the time it took you to have that well-earned cup of liquid refreshment.
Figure 7.3 shows the setup. Note that I am using the useful “live view” function on the Olympus E-510 to compose the image on the rear screen. If you have a “bridge” camera, you can do the same, but most current dSLR cameras do not offer live view. (I'm sure more will in the future.) It would be nearly as good, however, to take a sample shot and preview it on the rear screen.
For the final shot, I also used a piece of white card to the right of the camera and bowl to help fill in the shadows (you can't see the card in the shot). Exposure had to be controlled quite carefully to avoid blown-out highlights on the fruit. (Remember, expose to the right, but avoid going too far and overexposing the highlights.) Your camera may well have a warning function to show where highlights are blown out—use
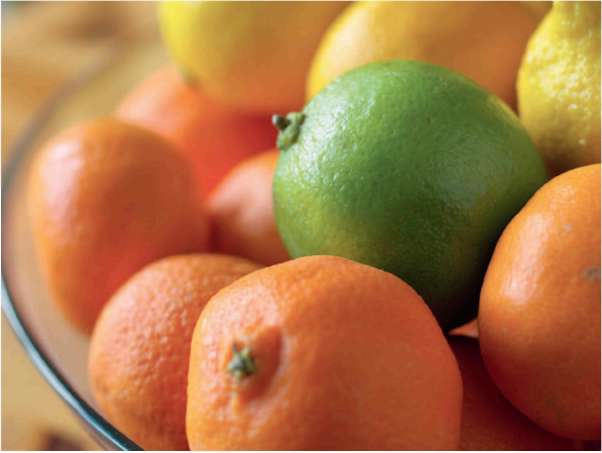
FIGURE 7.2 “Fruit.” © Douglas Freer
it. If you think they are or are not sure, reduce the exposure using your camera's exposure compensation; or, if you are shooting in full manual mode, close down the aperture or increase the shutter speed and then reshoot. In fact, it is often sound policy to shoot several different exposures to be sure you have the best shot. You can combine different exposures from tripod-mounted shots later in Photoshop to create a high dynamic range (HDR) 32-bit file that can then be converted to 16 or 8 bits, preserving both highlight and shadow detail. This technique is a little beyond the scope of this book, but it is well worth investigating.
I did not use a cable to fire the shutter in this example shot. I could have done so, or I could have used the self-timer function to remove the risk of camera shake. On this occasion, I simply took care not to jog the camera when I squeezed the shutter. Check out the final image
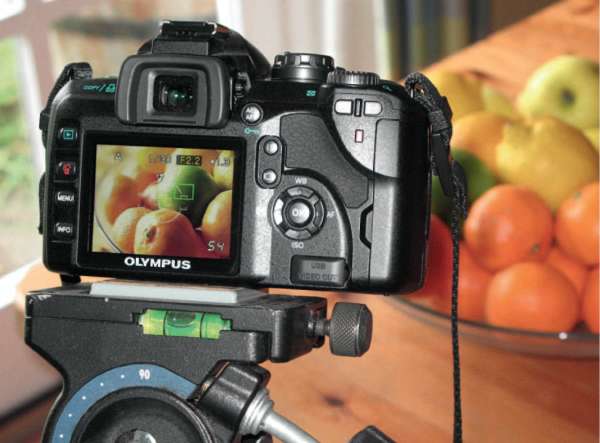
FIGURE 7.3 The setup. © Douglas Freer
on iStockphoto here: http://www.istockphoto.com/file_closeup/object/3884376_fruit_bowl.php?id=3884376. It probably won't be a runaway success, but it is too early to tell! As you can see, it is a simple shot and, as you know, simple sells.
MACRO LENSES
If you plan on doing more than the occasional natural light studio shot, I would recommend that you buy a proper macro, or close-up, lens. Macro lenses are fixed focal length lenses optimized for close-up performance, down to a full 1 : 1 (life size). They double up as great portrait lenses. I have macro lenses for all my cameras except the 8 × 10 film camera, and I find that for microstock work they are among my most used lenses because they are so versatile and useful. For studio work, a lens with a good macro capability is essential, so either buy one or make sure your zoom lens has a proper macro function. Some so-called macro settings on zooms are not true 1 : 1 macro or even close. So beware and check the specifications carefully.
I have found that the best focal length for microstock macro work is slightly telephoto, around 70–100 mm (35-mm equivalent) because it allows you a bit more distance from your subject to work with, and because these focal lengths are great for portraits.
SIMPLE STUDIO SETUP
A good, simple setup for a microstock photographer looking to take shots of objects and the occasional high-key portrait might be as follows:
- Two studio flashes, each with either an umbrella (brolly) or softbox diffuser; diffused light is important
- Stands for the lights
- A plain white background—a white matt painted wall would do
- A suitable surface—a white tablecloth or other plain white surface is good for high-key work
Hopefully, you now have that table or other surface cleared of stuff and ready to use for photography. You will also need some studio lights, at least two, with soft boxes or umbrella diffusers, preferably the former.
This first setup, backlit high key on a table, is illustrated in Figure 7.4. This setup is pretty versatile. The rear light is a large softbox on
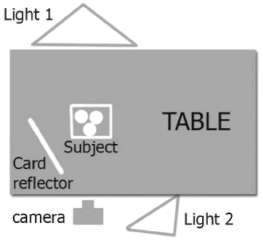
FIGURE 7.4 A basic backlit studio setup. © Douglas Freer
a flash head, providing lots of nice, soft backlighting. The camera is slightly above the object and directed down so that the rear softbox is not in view. The light to the right foreground provides some fill and is set about 1.5 stops below the rear softbox. (Most studio flash heads have variable output. Make sure those you buy do.) To the left of the subject is a white card to add some fill light to reduce harsh shadows. If shadows are still too harsh, try using the Dodge tool in Photoshop, a large soft-edged brush and low opacity around 12%, to gently lighten the shadows selectively. It's a great cheat! I have used this lighting setup in the next shot, Figure 7.5. A simple two-flash lighting setup like this works well for a variety of subjects. The white card effectively becomes a gentle third light. You can switch the card to the right and try playing with the exact light positions.

FIGURE 7.5 “Paperclips.” © Douglas Freer
Figure 7.6 illustrates another example where similar lighting has been used to make the most of a Chinese takeout dinner. (And, yes, my family and I did eat this food a few moments later!) The difference is that the main rear light was moved to the left

FIGURE 7.6 “Chinese Meal.” © Douglas Freer/Dreamstime
slightly and I did not use a fill-in card reflector in this case. I also used the natural wood table as a surface in place of a white tablecloth.
PEOPLE SHOTS
Of course, a lot of microstock photographers use studios for shots of people. Those classic business shots that are big sellers on the micro-stocks are usually taken in a studio environment. I took the main cover shot in a studio. A simple portrait setup suitable for a single subject is shown in Figure 7.7. Shots taken with the simple lighting setup in this image can be very useful for microstock photography, as my youngest son has demonstrated with the Easter-related shot shown in Figure 7.8. (The table was covered with a white tablecloth and lightened a little more in Photoshop later.) Just a single large-front softbox works well too, with the background lit by the second flash, as shown in Figure 7.9. In these cases, where the aim is a high-key isolated look, it is important to ensure you have plenty of illumination on the white background; otherwise, you'll need to do some remedial work in Photoshop to lighten it, which means more time and effort on your part.
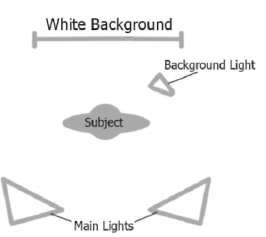
FIGURE 7.7 A simple portrait setup. © Douglas Freer
Substitute the white background for a colored one for different and more traditional portrait effects, still using the same twin front-light setup illustrated above, and greatly reduce the output from the background light—if you even need it at all. Remember that if you do use a light to illuminate a colored background, it should be fitted with a gel filter the same color as the background. Otherwise, all you will get is washed-out color. Horrible!
BUSINESS SHOTS
I mentioned earlier how well business shots sell on the microstocks. Isolated shots work well for business, like Figure 7.10 by Lise Gagne, a top iStockphoto contributor. But don't think all your business shots have to be isolations. Get out of the studio and into the workplace for big sellers, like some of the shots we saw earlier in Chapter 3 (Figures 3.26 and 3.27).
MORE ABOUT ISOLATED IMAGES
High-key images shot on a pure white background are referred to as “isolated” or “isolated on white,” and they are a mainstay of many microstock portfolios. It is a technique well worth practicing. But what if it goes wrong and your whites turn out (Horror!) to be gray?

FIGURE 7.8 “Happy Boy with Easter Egg and Candy.” © Douglas Freer/Shutterstock
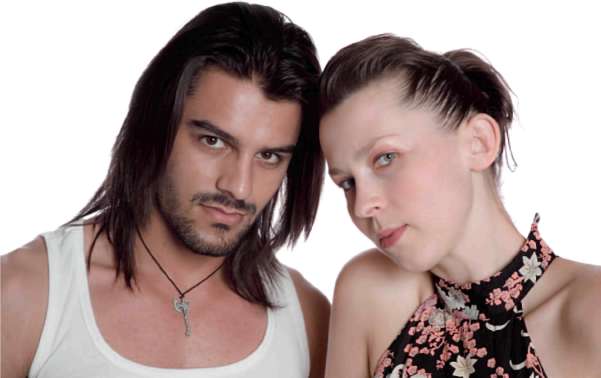
FIGURE 7.9 “Young Attractive Couple.” © Douglas Freer/iStockphoto
All is not lost. Gray can be turned to white quite easily using a number of different techniques. In fact, Figure 7.9 needed a boost in the background department. To do so, I chose what I have found to be the simplest and fastest method:
- Select quick mask.
- Using a large soft brush, paint over (mask) the subject, leaving a feathered edge between the subject and the white background. Try not to mask any of the white background. Don't worry about leaving the edge of the subject outside the mask.
- Exit quick mask leaving the unprotected area selected. Then, using curves or levels, lighten the background until it looks pure white.
- De-select the selection and, if necessary, gently bring back any edges of the subject that have been lightened too much. Check the final result at 100% on screen.
- If you still have slightly dark (not pure white) edges caused by vignetting, you can always use the paint tool to paint pure white over them. With a bit of practice, it is a doddle to get right.

FIGURE 7.10 “Teamwork.” © Lise Gagne/iStockphoto
There are more sophisticated methods, but I use what works for me. Check that the white background is really white by using the eyedropper tool to hover over the white background and check the values in the Info palette: RGB values should all read 255/255/255.
CLIPPING PATHS
Clipping paths are closed vector paths that are used to cut out part of an image to exclude unwanted parts of the image that fall outside the path. They are sought after by designers—the largest group of microstock customers—as a way of quickly and easily cutting out the useful bits of an image and dropping the image into a design. It is possible for you to include clipping paths in your JPEG images uploaded to the microstock sites, and designers will thank you if you do. Including them should increase the chances of your image being downloaded.
You don't have to have a pure white background to create a clipping path. But more often than not, you'll find clipping paths are used with isolated images, and they are a good place to start if you are unfamiliar with paths.
A word of warning: a poorly executed clipping path is worse than no clipping path at all. So, if you are going to create one, do it properly and check that it works. There are software packages that can speed up the process, such as Corel Knockout, but I am assuming you just have a no-frills copy of Photoshop at your disposal.
It might seem out of place to discuss clipping paths in a chapter on studio setups. I could have mentioned them in detail in Chapter 4, for example. But I think the discussion fits here because clipping paths are so often associated with isolated images, and those images are often shot in a studio.
THE QUICK-AND-DIRTY VERSUS THE OFFICIALLY APPROVED METHOD
I don't know about you, but I'm all for shortcuts if they work. I spend enough time in front of computers as it is, so I want to use the fastest methods available to achieve a good result. With clipping paths, the magic is in the selection process. The quick-and-dirty method is to use the magic wand tool (Figure 7.11) to select the unwanted background,
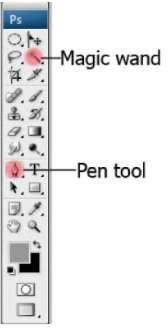
FIGURE 7.11 The Photoshop palette gives access to key tools used for creating selections. Here I have highlighted the magic wand and the pen tools.
which is what I have done with the sample whiskey image in Figure 7.12. This is not approved by some; in particular, iStockphoto regards the magic wand tool as the work of evil and demented minds! That is not my view, provided that you take care and don't use it on unsuitable subjects such as pictures with complex backgrounds.
Stage 1: use the magic wand tool to select unwanted background
Start by selecting the background using the magic wand tool. If you are not happy that you have all the background selected, add to the selected area. (I find that switching to quick mask and adding or subtracting from the mask using the paint brush to add, or eraser to remove, parts of the mask to tidy up rough edges or missed sections can help a lot.) When you are happy with your selection (check again!), invert the selection to select that part of the image you want to save (Figure 7.12).

FIGURE 7.12A and B The “marching ants” outlining the selection before inversion. Once inverted, check the quick mask tool and use the paint tool or eraser to add or remove rough selected edges. Always review your work at 100% on screen. © Douglas Freer
Stage 2: make a work path from your selection
Now, on the Paths palette, click on the little icon third from right: “make work path from a selection” (Figure 7.13).
Stage 3: edit path if necessary
This work path is editable. You can drag it around using the path selection tool, or add and delete anchor points. But, frankly, if your selection was any good, you should not have to do too much editing at this stage. Go back and try it again if you are not happy with the
Stage 4: save the path
Once you are done, you need to save the path (in the Path fly-out menu, click “save path”). The default name is Path 1. Choose another name if you prefer.
Stage 5: convert to a clipping path
The final step is to save the path as a clipping path from the Path fly-out menu.
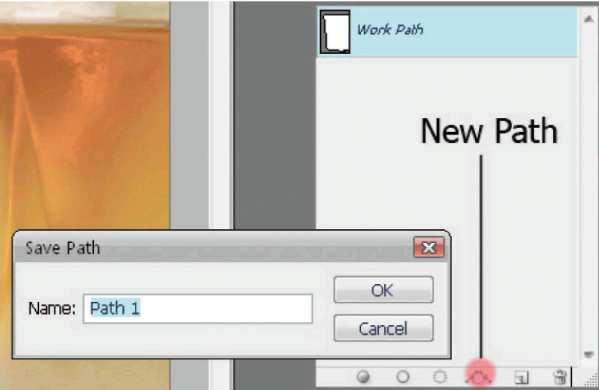
FIGURE 7.13 Making a work path.
Summary
The only difference between my quick-and-dirty method and the posh one involves the selection process. The pen tool is the preferred tool of experts to select the edges of your subject. I agree that it can be very good and often more precise. I have nothing against the pen tool, and it is the best tool for more complex work and fussy backgrounds. But, to be honest, I think it is often too much hassle with simpler subjects (Figure 7.14), and you'll get just as good results using the magic wand tool in many cases, particularly with single-color backgrounds, provided you are careful.
Another selection tool worth trying is the Quick Selection tool in Photoshop CS3. I have started using this a lot more with recent images. Use what you feel most comfortable with.
When you save your JPEG image, the path should be visible and usable by designers. Make sure you mention in your description of the image that a clipping path is included.
SOFTWARE SHORTCUTS
There are software packages to make the job of creating paths or selections easier and faster. Use these, by all means, but note that they are
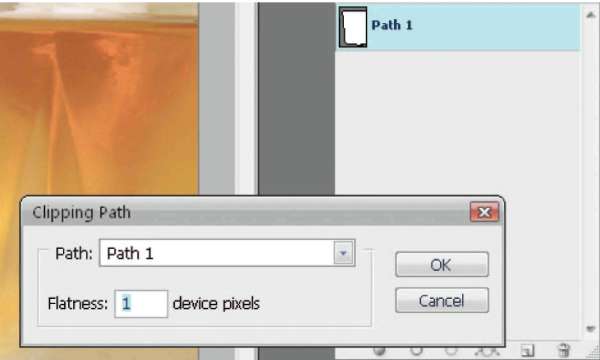
FIGURE 7.14 Saving the Clipping Path
not necessary for perfect paths if you practice a little. I have a few images with clipping paths included, but in my experience, the time and effort spent using even the quick-and-dirty shortcut are hard to justify. Your mileage may vary.
ADVANCED LIGHTING TECHNIQUES
The lighting ideas I have explained above will do for a wide range of microstock work. Try moving the lights around and changing your camera position. However, the desire to make your work stand out from the crowd might lead you to experiment with other techniques and more advanced lighting.
More lights can provide more options, but two or three light systems should cover 95% of what you will ever need to do. Below are a few ideas; try purchasing a specialized lighting book from the extensive range of photographic books published by Focal Press if you want more detail.
RIM LIGHTING
Once you start getting creative, there are lots of lighting ideas to explore. The next image, Figure 7.15, “Wine Being Poured,” has been used in a major advertising campaign in the United Kingdom for a fine art paper manufacturer. The effect is good, but the setup was surprisingly simple. I illustrate it in Figure 7.16.
A single light was used with a softbox diffuser. The middle section of the softbox was covered with black velvet, which continued to run under the subject. This meant that one light was effectively converted into two strips down either side of the velvet strip. On top of the velvet on the table is a sheet of glass taken from an old glass tabletop to provide some reflection and add depth to the image. (Although only the very base of the glass is visible, it helps to create a more three-dimensional effect in the final shot.) The last stage was to get a friend to pour some wine in to the glass, and then to take the shot from the tripod-mounted cameral. Voilà!
Dark backgrounds are more unusual than white in the world of microstocks, but that can be a selling point as there is less competition if someone comes looking for a different image. The wine image has been a top seller of mine on several microstock sites, proving the point.
For Figure 7.17, let's revert to a no-flash scenario to show that sometimes using just available light is not only possible but
essential, even in the “studio.” In order to capture the movements of the drumsticks, all I did was tripod-mount my camera. The exposure was about 2 seconds, it was that dark (and I stopped the lens down). But the drummer slowly moved the drumsticks up and down, so it looks like someone is playing the drums. I thought it was quite neat!

FIGURE 7.15 “Wine Being Poured.” © Douglas Freer/iStockphoto
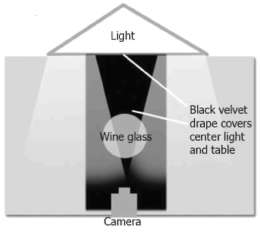
FIGURE 7.16 The setup for “Wine Being Poured.”
LIGHT TENTS AND PRODUCT TABLES
In the above examples, I have used an ordinary table and lighting. However, there are specialized products for product shots that cost a few hundred dollars and can be useful.
Product tables are made of durable acrylic or similar material and are suitable for a range of products and objects. They have a curved back that operates as a built-in background.
Product tents are like miniatures of their camping cousins, made from white fabric with a hole through which the camera lens is inserted. The fabric diffuses the light, which means that you can use relatively inexpensive lights outside the tent to provide illumination.
Personally, I find light tents and product tables too much trouble and a tad restrictive, but they may suit your style of working.
FLASH METER
Flash meters are used to measure light from studio flash units. You will definitely need a flash meter if you shoot film. With film, you don't get a preview against which to check exposure. You don't get a
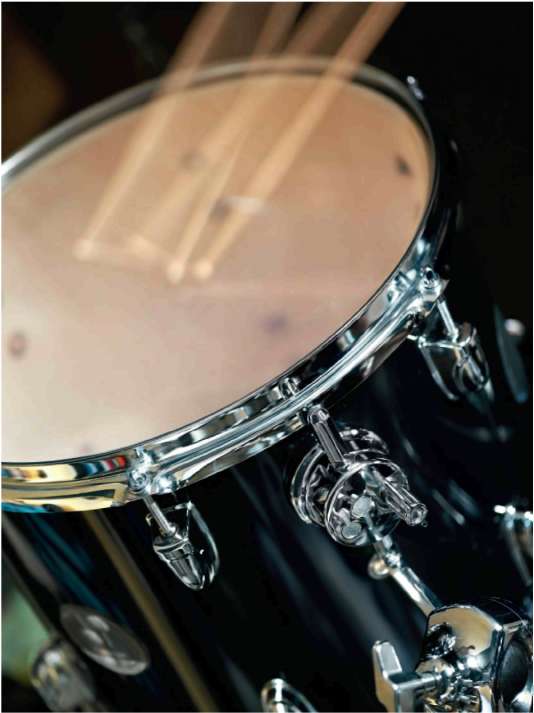
FIGURE 7.17 “Drum Kit in Action.” © Douglas Freer/iStockphoto
second chance (unless you want to pay a fortune in wasted film). Flash meters are much less important with digital cameras because you can take experimental shots and vary your exposure settings appropriately by trial and error. After all, there is no cost penalty. That is a key advantage of digital capture.
There are some great and simple meters made by the likes of Sekonic, Gossen, Minolta, and others. These can be used to measure flash, available light, or a combination of the two. I use a flash meter occasionally as a sense check; outside I use the same meter when shooting large-format film.
Figure 7.18 shows the photographer placing a meter near the subject. The flash would then be fired to measure light hitting the subject.
SLAVE RELAY
If you use studio lights, they need to be fired by a cable running from at least one of the lights to the camera. The firing of one light then sets off the other light by a photosensitive diode. It can be a pain to have more wires to trip over, so consider investing in a device that sends a radio signal to the flash head. The transmitter sits in the camera hot shoe (assuming it has one—most do, including the more expensive compacts). When the shutter is fired, a signal is sent from the transmitter to a slave unit plugged into one of the lights. This, in turn, fires the light. Slave relay is simple and now relatively cheap, with prices starting below $100 for budget units.
COLOR BALANCE
Flash color temperature is similar to that of daylight. Your camera may have a color balance setting for flash photography, but that will only get you close, not all the way there.
In the studio, you need to measure and calibrate your camera's color balance so that your images are free of unwanted color casts. This is absolutely vital if you are shooting using JPEG file format, but it is desirable even if you are shooting raw. Consult your camera manual and determine how to calibrate your camera's color temperature and, where possible, to save these settings. You will need a neutral gray card, such as the Kodak Gray Card or a Gretag Macbeth color chart, to do the job properly, but you might get by with a piece of ordinary color-free mid-tone card.
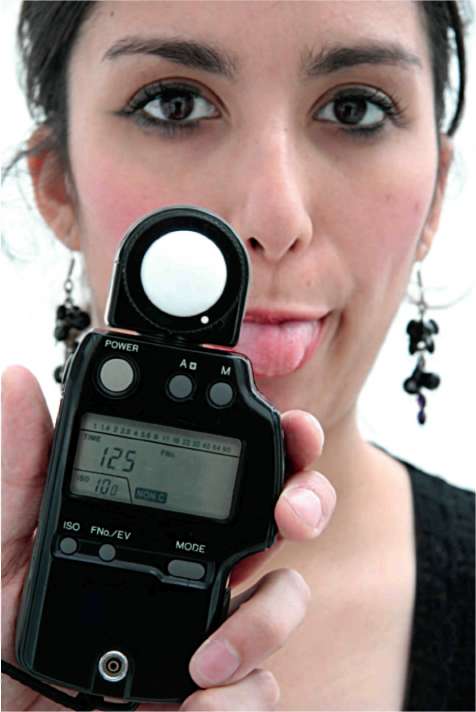
FIGURE 7.18 A flash meter is used to measure reflected or (with a flash) incident light—hopefully your model will be better behaved than this one! © Silvia Boratti/iStockphoto
FINAL NOTE
It is worth taking a little trouble to get your setup right to avoid issues later on and to ensure that you get the best possible image quality for submission to your microstock libraries. Now go experiment!