
CHAPTER 8
Twenty Tips andTricks to Winningon Microstocks
The idea when submitting to microstocks is to make money, so your goal should be to formulate a plan that maximizes your prospects of success. What is in that plan will depend upon the kind of person you are and how much time you want to spend on stock photography.
So far, we have covered quite a lot of ground. It is a good time to take stock (no pun intended), to think about what we have learned, and to add in to the mix a few tips that I think will enhance your prospects of making money from microstock photography. Some tips work better for one type of photographer than another, but let's start with a tip that I think applies generally to everyone.
TIP 1: BUY THE BEST EQUIPMENT YOU CAN AFFORD
I have already discussed equipment choices. You know it is not necessary to buy really expensive equipment to meet the needs of your new microstock career, but if you are anything like me, money burns a hole in your pocket (Figures 8.1). Don't waste your money buying expensive kit you don't need! But it can be a false economy to buy too cheap a camera. Remember Jon Oringer's comments that digital single-lens reflex cameras (dSLRs) are Shutterstock's preferred tool. That tip applies to all image libraries. The better the camera, the less time you will have to spend overcoming the limitations of a cheaper kit. Since dSLRs are available for just a few hundred dollars, they should, I hope, be accessible to most of you reading this book.
Keep in mind that a cheap point-and-shoot digital camera will not have a raw file format mode and may well output JPEG files that have imperfections—too much noise, compression artifacts, and so on. Dealing with these problems so as to generate acceptable files for
microstock libraries is time consuming and not always successful. Does it make sense to save $100 on a camera but spend hours of extra time working on poor-quality files? I don't think so!
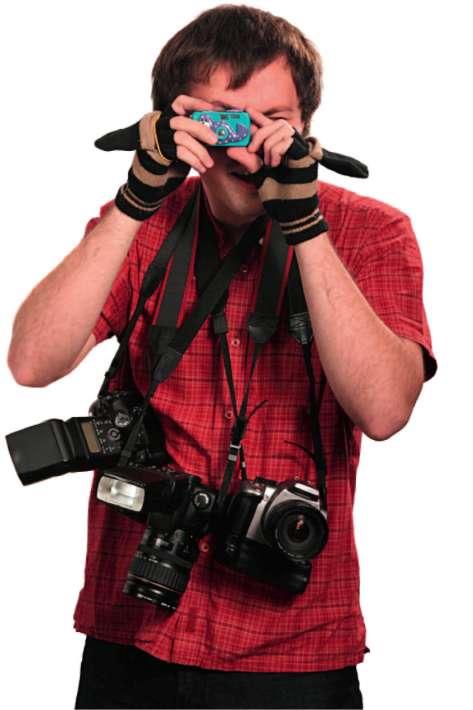
FIGURE 8.1 Do you have difficulty in choosing equipment?! © Okrest/Dreamstime
It makes sense to give yourself the best possible tools that you can afford for the job. If you can afford it, buy a dSLR from a well-known manufacturer. Remember that you don't have to buy new; there are some great used bargains to be had. Aim for a camera that has an output of at least 5–6 MP as file size is taken into account in some libraries, like Fotolia and iStockphoto. Good used bargains include the likes of the Kodak 760 Nikon-mount dSLR, with a 6-MP output, which cost around $8,000 new a few years ago and has super image quality with a free-to-download raw file converter; the Canon D60; the Olympus E-1 professional 5-MP Four Thirds camera, and many others too numerous to mention.
Make sure you budget to buy not just the camera body but lenses to suit the shots you want to take. For example, if you plan on shooting product shots, food, or other studio work, it makes sense to buy a decent macro lens and not simply make do with the standard kit lens supplied with most dSLRs.
TIP 2: DECIDE IF ARTIST EXCLUSIVITY IS FOR YOU
If you contribute to iStockphoto, you will face a choice, after 250 downloads, of whether to become an exclusive photographer with iStockphoto. Should you take the plunge?
As I mentioned in Chapter 2, iStockphoto grants photographers “canisters,” the color of which depends upon how many of the photographer's images have been downloaded. At the Bronze canister level, 250 downloads, the photographer becomes eligible to “go exclusive” and earn a higher-percentage commission. This is full artist exclusivity—the photographer who chooses exclusivity is not permitted to sell any work royalty free through other libraries. iStockphoto also offers exclusive photographers at the Gold canister level and above the right to send work to Getty, which now owns iStockphoto, for sale through one of its royalty-free programs. I have no data at the time of this writing of how successful this offer is proving to be financially, but it might be a sign of things to come in the world of microstock.
The tip here, if you like, is to get the decision on exclusivity right. Clearly, it works for some contributors. The advantage is increased commission payments, up to 40% in total, at the Diamond level, compared with 20% for nonexclusive photographers. The downside is that all your eggs are in one basket. You cannot spread your portfolio of royalty-free stock images around other sites to maximize your income. On the other hand, exclusive photographers on iStockphoto receive some benefits apart from increased commission, such as free business cards, faster image review times, and attendance at some exclusive-only events—and access to that Getty program.
I don't dispute that iStockphoto is an excellent microstock library, possibly the best of the lot for sales for many photographers, but my personal take on exclusivity is this: since exclusivity was first made an option at iStockphoto, a number of new libraries have emerged that offer genuine competition. (This must be apparent from a quick look through the appendices to this book, which list most of the major libraries.) In the fast-developing world of micro-stock photography, you must ask yourself if artist exclusivity is the best option for you and your work. iStockphoto's purchase by Getty was a major cultural shock to those who thought iStockphoto was all about the little guys taking on the big guys. iStockphoto is now part of one of the “big guys”—so much for the revolution. But in place of the revolution comes evolution and the movement away from “us and them” attitudes as microstock photography takes its proper place as a respected business model. Who really knows how such a fundamental change in ownership will affect iStockphoto in the medium to long term? Corbis has just launched SnapVillage, still currently an immature site but one that might emerge as a big hitter when you consider the parentage. Shutterstock, Fotolia, Dreamstime, Stockxpert, and others have already emerged as genuine threats to iStockphoto's top position. Big Stock, Can Stock, 123RF, and others all serve loyal constituencies, as do the other libraries listed in Appendix 1. The industry remains volatile at this time. Guessing the future is an exercise in crystal ball gazing.
For all these reasons, plus a personal dislike of unnecessary restrictions on my artistic freedom, I don't think artist exclusivity is a sensible choice for me. My tip, therefore, is to submit your work to a range of different microstock libraries and avoid artist exclusivity. The risks are simply too great. Diversify, just as a sensible investor in the stock market would usually do. You always have the option to choose to “go exclusive” at a later date.
But where? Which libraries should you choose? Simple. Choose the top four at this time, which I regard as iStockphoto, Shutter-stock, Dreamstime, and Fotolia. With those in the bag, and assuming your work passes their acceptance criteria, add a few more if you wish from the other microstock libraries. There are up-and-coming players like Corbis's SnapVillage, more established smaller libraries like Stockxpert (a rising star), 123RF, Big Stock, Can Stock, and others.
TIP 3: BUY DECENT FTP UPLOAD SOFTWARE
I personally think it is a good idea to keep the uploading process as simple as possible. So, while we are stuck with iStockphoto's flaky upload interface, I insist that other libraries I submit to must use FTP bulk upload if I am going to send my work to them. The advantage for you as a photographer is that you can use FTP software to upload new images to several libraries at once.
There are many available software packages that make uploading via FTP painless. I use a program called Ipswitch WS_FTP Professional, which costs about $60 to buy, but there are good and cheaper alternatives available. I have listed some of them in Appendix 3.
TIP 4: BUY AND USE ADOBE PHOTOSHOP
Yes, yes, yes, I hear you—Photoshop is expensive. But it's not as expensive as your time. Photoshop is an industry standard, and that means that there is a lot of free help out there from other users. I have used Photoshop since Version 4, and its current iteration, CS3, is a complete and powerful package. The cheaper Elements or Corel Paint Shop Pro offer viable alternatives.
TIP 5: BUY A MACRO LENS IF YOU OWN A dSLR
It's a bit off the wall, but I do recommend getting a proper, dedicated macro lens for the options it opens up in portraiture (and, hence, fashion and business-type shots), food and object shots, and concept shots, and for the simple pleasure of using a quality fixed focal length lens. Zooms with a macro function are not quite as good, particularly if used near their maximum aperture.
Because macro lenses are optimized for close-up photography, the results are sharper, and because true macro lenses are “prime” lenses with just one focal length, they tend to have faster maximum apertures of around F/2.8. It is tempting to go for a zoom lens with a macro button or function on it, but it is unlikely, in my experience, to offer the same level of performance as a true fixed focal length macro lens, and it will probably be bigger and heavier.
TIP 6: BUY A TRIPOD TO GO WITH THAT NEW MACRO LENS
No one's hand is steady enough for available light macro or studio work. Decent shots deserve decent support. A tripod is so useful that I cannot believe anyone would consider not having even a cheap one.
There are any number of different tripod designs and they vary wildly in price. For indoor use, you don't need to spend a lot of money. Almost any cheap tripod will do. For outdoor use, you need to consider how sturdy the tripod will be in windy conditions and how heavy it is to transport.
I use a carbon fiber tripod because it is lightweight but it is more expensive to buy than an aluminum one. Major makes like Manfrotto, Gitzo, and Velbon have wide ranges to choose from. I recommend a ball head to go with the tripod for ease and speed, together with a quick release plate.
TIP 7: JOIN THE FORUMS
Join the forums—that means the libraries' forums to start with. Don't expect liberal and free debate. Go in with a healthy dose of skepticism to immunize yourself against the cheerleader mentality. All in all, they are a useful source of feedback on rejected images, standards, and technical information as well as site-specific announcements, such as amendments to terms, new commission rates, and pricing. Also, some buyers frequent the library forums, and some photographers have said the more active participants on the forums see a boost in sales, possibly due to their extra exposure.
TIP 8: GET AN INDEPENDENT VIEW BY JOINING INDEPENDENT FORUMS
Great though the libraries' own forums are for those all-important technical inquiries, they are pretty hopeless if you want to engage in critical discussion, particularly if you complain too loudly. They ruthlessly expunge seriously critical content. Perhaps we should not be too surprised—the microstocks are businesses that want to maximize profit, after all (yes, they are, although you'd hardly believe it from the over-the-top love-in comments you sometimes read—yuk, get real, people!), and bad vibes on their own forums are not going to help.
The leading independent forum is the one I started on Yahoo! in 2005, the Micropayment Forum, so why not join up at http://tech.groups.yahoo.com/group/micropayment Unlike the libraries' own forums, there are no thought police deleting critical threads on the Micropayment Forum. It's good to be free. Go enjoy!
TIP 9: SET UP REFERRAL LINKS
The major libraries pay bonuses for referring new buyers or contributors.You can add to your income by including referral links on your personal Web site or blog or in e-mail links. How this works and what you get differ from one library to another. Below is a description of how the “top four” operate.
SHUTTERSTOCK
Shutterstock offers $0.03 cents for every image downloaded from a photographer referred by you. If you refer buyers, you get 20% of the price paid by referred buyers for their subscription, up to a maximum of $50.
To participate, you need to set up referral links so that Shutterstock can determine that you are responsible for the introduction of a new photographer or buyer. As an example, my Shutterstock number is 11718. My photographer and video footage referral link thus reads http://submit.shutterstock.com/?ref=11718 and the buyer link is http://www.shutterstock.com/?rid=11718.
Those are my referrer links. Full disclosure: if you use those links to join Shutterstock as a photographer or buyer, then I will receive the referral commission. Well, I did say this book was about making money from microstocks, and what kind of an author would I be if I didn't take advantage of every available opportunity!
iSTOCKPHOTO
iStockphoto pays $10 for each member you refer the first time that member buys credits. Unlike Shutterstock, you don't get a slice of royalties, just a one-off fee.
iStockphoto provides the HTML source code to add a link button to iStockphoto from your own Web site to your portfolio or to any iStockphoto page. Just embed the code and away you go.
FOTOLIA
Fotolia runs something called an “affiliation program.” This rewards both sales and purchases. As Fotolia explains: “An affiliate is anyone who is referred to Fotolia meaning someone who opens an account on Fotolia after the recommendation of a member. Someone is referred to Fotolia by a member if [he or she creates] an account after clicking on the affiliation link. An Affiliation link is an Internet hyperlink or web link pointing to the Fotolia website with a member's reference id. The reference id is a unique code assigned to every member of Fotolia.”
If you click on the “Affi liation” tab in your member area on Fotolia, it will detail the various ways to set up an affiliation link. For example, you could add a link in an e-mail signature line (here is mine as an example: http://en.fotolia.com/p/6195/partner/6195) or a hyperlink for your Web site. Additionally, Fotolia has gone a step further by developing an Application Programming Interface (API) that allows business and Web designers to integrate access to the Fotolia search engine and display images on their own Web sites and to earn money through sales (Figure 8.2). There are presently three levels of sophistication: Partner, Business, and Developer APIs. It is an interesting way for the more savvy of you to make money partnering with Fotolia.
DREAMSTIME
Dreamstime also offers an affiliate/referral program through the use of Web site links approved by Dreamstime. Once up and running, you get certain benefits:
- A $5 bonus for the first visit Dreamstime receives from a site badge on an approved site (basically a mini “golden handshake”)
- 10% from all credit packages purchased for 3 years after referred people sign up
- 10% from all sales made by referred photographers for 3 years after their registration
Referral income is added to your earnings account and can therefore be cashed in the same way, that is, as soon as your total earnings reach $100.
I know of several microstock photographers who make a significant portion of their income from referrals. However, referrals can prove to be unproductive. Only a few of my referred photographers at Shutterstock have portfolios of more than a handful of images. Nonetheless, it is worth considering as an additional, if often small, source of revenue, particularly if you have a Web site where you can place referral links.

FIGURE 8.2 Fotolia's midrange Business Application Programming Interface for online shopping sites. Different versions exist for different users. Earn money by allowing visitors to your Web site to search for and buy images from Fotolia. © Fotolia 2007
TIP 10: CHECK WHAT IS SELLING—AND WHAT IS NOT
It is no use just pumping out any old images if you want to make money, as you will realize by now from the earlier chapters of this book. But to stay ahead of the curve, it is a good idea to keep an eye on what is selling well. For example, iStockphoto lists the top-selling images of all time and for the past 3 months. Shutterstock lists its top 50 best sellers ever and the top 50 images for the current week. Shut-terstock allows you to apply filters to show only the top photos, vectors, or illustrations or the whole lot together. Fotolia has a “Best Sellers” page with an all-time Hall of Fame (Figure 8.3), and monthly, weekly, and even daily best sellers listed.
This is valuable information! However, avoid trying too hard to copy what others have already shot. Examine trends and form your own interpretation of them. Images that are just a little bit different may have that crucial commercial edge buyers are looking for. Learn but do not slavishly copy.
TIP 11: ENLIST FRIENDS AND COLLEAGUES
Given that people shots are big sellers but professional models cost money, try enlisting the help and support of friends and colleagues to act as models, making sure that they understand what this means and asking them to sign a model release. Wives, boyfriends, uncles, and so on can all help out. The possibilities are endless (unlike the bad jokes you may have to crack to keep them happy)!
FIGURE 8.3 From the Fotolia Hall of Fame comes this classic stock image. © bellestock/Fotolia
If you follow Tip 10, then it will already be obvious that people shots feature heavily among the most popular images, so if you can enlist the help of those you know as models, then you are off to a flying start in your microstock career. Make sure you submit a site model release for every recognizable face in your shots. See Chapter 11 andAppendix 2 for further information.
TIP 12: UPLOAD NEW WORK REGULARLY BUT IN SMALL BATCHES
It may be better to upload small numbers of images at regular intervals than to upload a large batch all at once. This seems to be particularly true of subscription-based sites like Shutterstock, where buyers want to download new material up to their daily download limit. Certainly there is plenty of anecdotal evidence that this is the case—I have seen the effect myself. So it is not just about quality and quantity, but frequency too.
Another factor that works in favor of a “few-but-often” approach is the risk that you may see more rejections if you upload a large batch of images. Again, the hard evidence is thin on this, but there may be something in it. In one sense it must be true: if a batch of your images has a common fault—too much noise, for example—it might be better to find that out from the rejection of a small batch, when you can catch the problem and correct it, than from a mass rejection of all your images.
My grandfather would say that “a little of what you fancy does you good”; maybe we should adapt that for the microstock library age to read “a little of what they fancy will do you good”!
TIP 13: SET KEY WORDS ACCURATELY
It truly is pointless to take fabulous stock shots if no one can find them. Good key words are essential to making sure your work can be found. To ensure your photograph can be found among the myriad of similar photos from other photographers, you need to make sure you include accurate, relevant key words. These can be literal, conceptual, general, and specific.
Take, for example, a photograph of a beach. Relevant literal key words might be “beach, sand, ocean, rocks, seascape, shore, shoreline,” etc. More conceptual keywords might include “peaceful, paradise, vacation.” A photo of a businessperson might include literal words such as “businesswoman, worker, manager” and also conceptual keywords such as “happy, winner, successful, dominant.” You need to include both, within reason.
The problem is that different libraries use different search engines, so you may need to vary your key words to suit each site. Bad key words will not just mean your images cannot be found, they may also lead to your images being rejected; therefore, set your key words accurately. Don't “spam” (i.e., include irrelevant but popular) key words to pick up hits; instead, use accurate key words relevant to your image.
Shutterstock has a cool feature that allows you to check the most popular 100 key words used in searches. Last time I checked, the top three were “Christmas,” “fl ower,” and “background.”
If you submit to iStockphoto, then learn about their new key word system, which relies upon key phrases. This is totally different from the standard key word system and is an adaptation of a system developed by new owners Getty. It is quite confusing at first. iStock-photo converts your standard key words or phrases into words or phrases recognized by the system. You enter between five and 50 comma-separated tags (words or phrases) and click to add them, and the system interprets the words or phrases. A “drumstick” could mean a musical instrument part or a chicken drumstick, for example (Figure 8.4). You choose the right meaning by ticking the right box. Some phrases such as “isolated on white” refer to specific photographic techniques where the image is set on a pure white background.
HOW TO ENTER KEYWORDS
The sites let you enter key words online, but it is better to add them before you upload. In Photoshop, go to the File menu and select File Info to open up a dialogue box where data can be entered. Enter key words separated by commas in the keyword field. Also enter a name (Document Title) for your image, preferably the same as the name you saved the file with, and a short description. You can also make these entries using Adobe Bridge, which comes with Photoshop CS3. You may need to amend your key words later (particularly for iStockphoto and its key phrases system), but you will save a lot of time this way, particularly if you use FTP software to bulk upload to several sites at once. Treat good keywording as being just as important as taking good photos. It really is that important to microstock success!
TIP 14: USE SELECTIVE FOCUS
Instead of trying to get everything in your picture to look sharp, try going to the other extreme and use shallow focus for effect. It's a great technique used properly and with the right subjects—but it is absolutely vital that you focus accurately on the main subject if you use it. For portraits, this means focusing on the eyes, not the end of
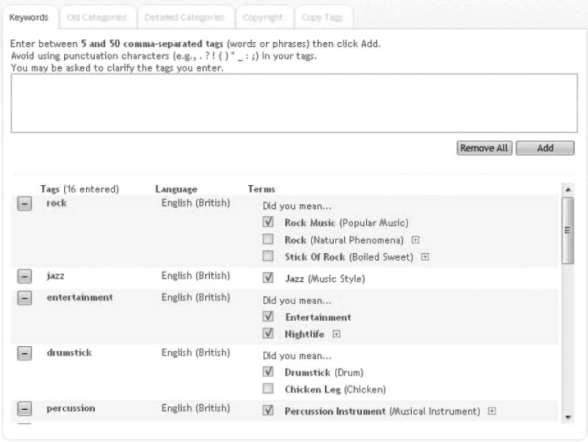
FIGURE 8.4 iStockphoto recognizes the difference between a musical drumstick and a chicken drumstick and between a stick of rock and rock music in this screen capture for one of my images of a drum being played. © Douglas Freer/iStockphoto
the nose. With other subjects, you need to choose the point of sharp focus with great care. You may need to turn off your camera's autofocus and focus manually. As with most things in life, practice will help make perfect. Good prime lenses come into their own when using selective focus because they have a wider maximum aperture, essential for the shallow depth-of-fi eld effects seen in “Allium Flowers” (Figure 8.5).
TIP 15: CHALLENGE YOUR CREATIVITY
Creative images do well on the microstock libraries. Designers are always on the lookout for something different among the plethora of standard images, so why not try something really whacky!
In Chapter 3, we looked at concept shots, but I'll bet you thought, “I can't shoot concept; I'll play it safe.” Phooey! Somewhere in you
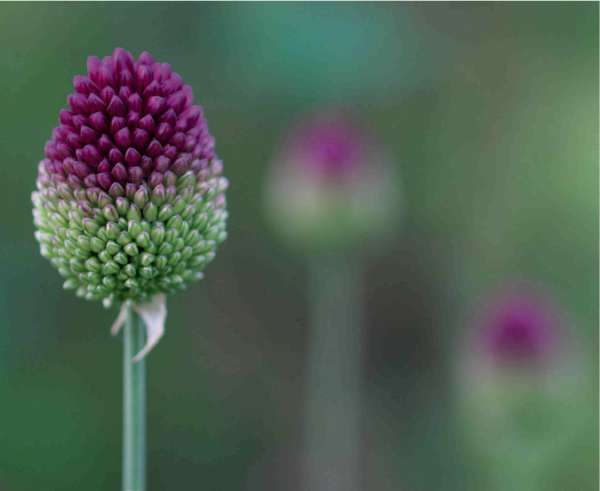
FIGURE 8.5 “Allium Flowers.” Only the front flower is in sharp focus. The background is an attractive blur. © Douglas Freer
there is a creative streak waiting to burst out—give it some space (Figure 8.6). Try different angles, lighting, and subjects. Try combining two images in one. It might not work, but it is sure fun to try.
A word of warning. It is probably now impossible to do a concept or other shot of a sunflower without sending the microstock reviewers into a demented rejection frenzy. Just say “no” to sunflowers.
TIP 16: USE sRGB COLOR SPACE FOR SUBMISSION
Color spaces are a little like bit depth. You will remember my earlier advice to manipulate and make corrections to your images in 16 bits instead of 8 bits. When you are done, you convert your 16-bit TIFF file

FIGURE 8.6 Concept shots—your key to riches? © Dušanzidar/Dreamstime. Also check out the main cover shot.
to an 8-bit file and save as a JPEG. Think of Adobe RGB as the color equivalent of a 16-bit TIFF, and sRGB as the equivalent of an 8-bit TIFF. Adobe RGB (and other color spaces) contains a lot of color data. However, some of those data are beyond the capability of most computer monitors or four-color offset printing presses to reproduce. In particular, Adobe RGB images look a little washed out and undersatu-rated if they are displayed on the Web or at some Web browsers. The last thing you want is for your great, punchy, colorful images to look bad when seen by buyers; so, to prevent this, make sure your JPEG microstock shots are converted to sRGB before you submit them.
It may be that your camera has a setting that allows you to change from sRGB to Adobe RGB and back again. My preferred workflow is as follows:
- If your camera supports raw file format, use it; convert from raw, save as 16-bit TIFFs, Adobe RGB color space, and then open and manipulate as necessary in Photoshop. When you are done and ready to send the file to the microstocks, convert to sRGB color space and then save as an 8-bit JPEG file.
- If your camera does not support raw file format but does allow you to choose between Adobe RGB and sRGB, choose Adobe RGB; then convert the JPEG to a 16-bit TIFF file in Photoshop. When you are finished with any corrections, noise removal, and so on, convert to sRGB; then convert to 8 bits and save as a JPEG ready for submission.
- If your camera only allows you to save in sRGB, then stay in sRGB. However, still follow the conversion to 16-bit routine for manipulation before saving as a JPEG for submission.
Although sRGB color space is smaller than Adobe RGB, it is big enough for most purposes.
TIP 17: READ THE MANUAL!
Modern digital cameras are really complex computing devices. Buried in the small print of your camera manual and the sub-menus of the camera itself will be a range of different options that may affect in fundamental ways the quality of your photographs.
Unlock the power of your equipment by reading the manual. Good digital cameras will allow you to change default sharpening (turn it down or off—sharpening should be the last step in your workflow), color space (see Tip 16), noise reduction (experiment with settings, but generally, if outputting JPEGs, turn to low or off), exposure, focusing defaults, and many other functions.
TIP 18: DON'T CROP TOO TIGHTLY
Many microstock images are used by designers who value some spare image real estate to allow for cropping in order to fit your picture to their design.
In some ways this seems counterintuitive. Simple sells and that means a reasonably tight crop. You want your subject to fill most of the frame, but if you overdo it, then you may limit the usefulness of your images. My tip is to leave a little space around the main subject to allow for cropping and resizing.
TIP 19: SHOOT THE LIGHT
Photography is all about shooting the light. Learning about light—not just how much for correct exposure, but its quality—is a key to successful photography of all kinds, not just microstock photography. An uninteresting subject can look spectacular in the right light. Shadows can be your friend, not something to be avoided.
Try taking photographs of the same subject in different lighting conditions—say, at dawn, midday, and at sunset. Notice how the light changes in temperature (color) and how shadows change. There is a reason why most great landscapes are shot at early morning or dusk. Similarly, the light you use to illuminate your subject plays a critical role in the success of the image.
Make the extra effort to shoot your subject when the light is interesting. If you are using studio lights to illuminate your subject, play around with the position of your lights, the balance between them, and their output.
Here is a simple example; if you take a photograph of a prominent local building, does it look better at midday in full sun, or the evening with more gentle side lighting? Go look and see and try a few shots. If you are using a shallow focus effect (Tip 14), reducing the power of your studio lights will enable you to use a wider lens aperture, thus reducing the depth of field for a nice shallow focus image—great for fashionable food and product photography!
Remember that your images are in competition with many others and the microstocks' clients will choose the best for their use. Interesting lighting is one way to ensure that your images stand out from the crowd.
TIP 20: GET NETWORKING!
Sometimes it is not what you know but who you know. This is a close relative of Tips 7 and 8. Essentially, the idea is to get your name “out there” to potential customers. Ruthlessly promote yourself and your microstock portfolios. There are endless possibilities. As an iStockphoto exclusive photographer, you'll receive free business cards, should you go down that route. If not, get some made. Use free Web space often offered with Internet packages to set up a Web presence from which you can link to your microstock portfolios, display samples of your work, and maybe write a blog about your experiences.
Mention your work to friends, neighbors, and business associates. If you work on the basis that most business folk know at least 250 other contacts, then leveraging friends and colleagues to spread your message could be highly beneficial and profitable. Plus, you of course have the added benefit of referral income for successful buyer and photographer introductions.
There are also network groups you might join. One I highly recommend for serious photographers is Business Network International, or BNI for short. BNI, the world's largest business referral organization, is the brainchild of Dr. Ivan Misner. The organization has spread from its US roots to establish a presence in many countries. Check http://www.bni.com/ for more information and the location of your nearest branch.
I'm not going to suggest you write a book, of course!