
CHAPTER 4
How to Make Sure Your Pictures Win
I hope by now that you have gained a better understanding about what the Microstock libraries are and the types of images that sell well through them. In the last chapter, we looked at what sells and what does not. In this chapter, I share some ideas that should help ensure that your pictures win.
Win, in this context, means sell, and sell well. Success with micro-stocks is all about achieving high-volume sales, so your images have to appeal to a wide audience. Some images, such as “Modern Office Reception” in Chapter 2, just seem to hit a sweet spot and generate a lot of sales. Others languish with hardly any or no sales. It seems so unfair!
While there is no guarantee of success with any image, following some simple compositional and technical rules will dramatically improve your chances of making money from the microstocks.
COMPOSITION
A winning, saleable image needs to be well composed, so take some time to consider your shot against this checklist:
- Look carefully before you take the picture. Don't just snap away. The microstocks will reject snapshots.
- What are you trying to say with the image? What market are you targeting? Think like a buyer, and build your shot accordingly.
- Remember that simple sells. Ask yourself: Is the image too cluttered? Is the main point of interest too small in the shot?
- How about colors? Do they work? Are they saturated enough or even too saturated?
- Are you using the right lens or focal length? Should you get down lower, or maybe up higher, to make your photograph more interesting?
- If you are shooting architecture, have you included all the needed parts of the image in the shot?
- If you are shooting people, are your subjects looking at the camera? Are they frowning when they should be smiling?
- How about the “rule of thirds”? Have you placed your main object at the optimum point in the shot?
- Is it in focus?
Let's start with a compositionally challenged image I have taken (Figure 4.1). Before you turn the page, see if you can detect the main issues with this image and how it could be improved.
Everything is wrong with this image, it meets very few of the items on the list I just mentioned, yet it is not untypical of snapshots taken every day and rejected in vast numbers by microstock library owners. The aim was to photograph these pretty poppies, but the execution was unsuccessful:
- The composition is a disaster! The subject, the poppies, is lost against a cluttered background.
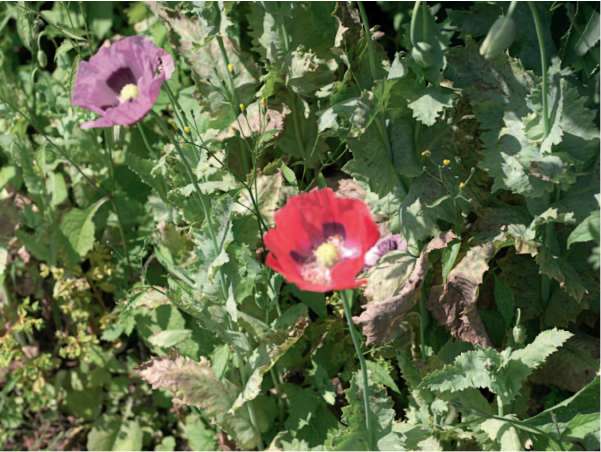
FIGURE 4.1 “Poppies.” © Douglas Freer
- The point of sharpest focus is the background, not the foreground flower. The camera's focus system has been fooled, something that can easily happen if the main focal point of your shot is off center.
- The lighting is harsh and creates too much contrast.
- The image is all over the place, with dead and dying leaves detracting from the flowers.
I have spent some time reading messages posted on the microstock libraries' forums. Often, shots like this, or pictures of pets, are rejected and the photographers post samples asking why. It may be better to adopt an entirely different frame of mind before you go any further: Why should anyone buy this image? If you do not have a ready answer, then the answer is probably that no one would buy the image, and that is why it has been or will be rejected.
Make no mistake; the microstocks are all about business. They want your images but only if they can sell them. If there were the faintest chance my dodgy poppy image would sell, it would be accepted, assuming it met the relevant technical criteria we will discuss in Chapter 5. An image like Figure 4.1 might have sentimental value, but as a stock photograph, it is of little or no use. Yet, with just a bit more care, I can take a much better shot.
Now take a look at this second image I took a few seconds later (Figure 4.2). This second image is a lot better than the first one:
- The subject fills the frame—simple sells.
- The photo is accurately focused on one of the front petals. In this case, I focused manually, but from this angle, the camera's autofocus might have worked.
- Selective focus (i.e., a wide-lens aperture) has been used to direct attention to the subject, with the rear purple poppy acting as an interesting background component, without detracting from the main image. This is done by manually focusing the camera, or using the “focus lock” button to focus on an object off center frame and then recomposing
- The photo is taken at the level of the subject, drawing the viewer into the shot.
- The green background also acts as a foil to the main subject.
- I have waited until the sun has gone behind a cloud to reduce harsh contrasts, a useful trick with botanical photography.
It is easier to achieve the “soft” selective focus effect with a digital single-lens reflex (SLR) than with a compact camera for a variety of technical reasons, but a compact camera can be used if it allows manual control of the lens aperture.
THE “RULE OF THIRDS”
I'm not a great believer in rules when applied to photography, and it might therefore be better to think of this rule as a useful

FIGURE 4.2 “Summer Poppies.” © Douglas Freer
guide when composing your image. Imagine a grid laid over the image you are taking. The idea behind the rule of thirds is to place your main subject at the intersection of the lines of the grid, thus placing the image roughly one third of the way in and one third of the way up or down from the edge (Figure 4.3). The red dots in the grid shown in Figure 4.3 represent where the focal point of your image should be. This could be a person's face or a boat on the horizon, for example. The placement does not have to be exact, but the intention is to achieve harmony through balance.
The grid works for images in landscape and portrait orientation. Take the example of the field and tree we looked at in Chapter 3 and add a grid overlay (Figure 4.4). The tree is approximately at the bottom right intersection, and the horizon is close to the bottom line. The rule works also for portraits (Figure 4.5).

FIGURE 4.3 “Rule of thirds” grid. © Douglas Freer
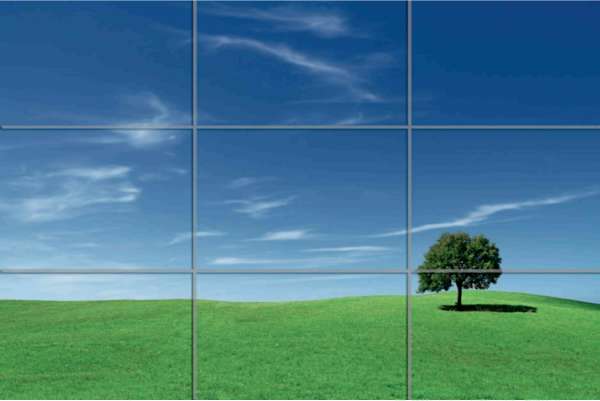
FIGURE 4.4 “Green Field and Tree.” © Slawomir Jastrzebski/iStockphoto
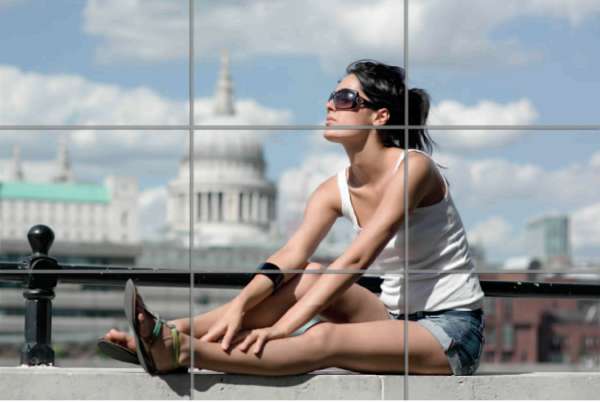
FIGURE 4.5 “Young Woman Relaxing.” © Douglas Freer/iStockphoto
Do not blindly follow the rule of thirds, but use it as a guide to composition. There are plenty of examples where photographers have ignored the rule, or where it is simply not relevant, but always have it in mind when composing.
CROP TIGHTLY
I have mentioned that simple sells. The essence of the poppy shot in Figure 4.2 was in the cropping. I mentioned getting in close for flower shots, but the same idea also works with many other subjects, including portraits. Get in close to your subject and allow it to fill the frame.
With portraits and group shots, such as those great business shots that sell so well, you have to be careful to accomplish the following:
- Focus on the eyes, not the end of the nose. (Focusing manually helps.)
- Use a lens with a suitable focal length. On a “full-frame” digital SLR like a Canon 1Ds III or Nikon D3, an ideal focal length is between 80 and 100 mm for portraits.With “crop factor” digital SLRs, where the sensor is smaller, something around 60 mm is ideal. If you are using a zoom, set the focal length appropriately and then use your feet to move in and out, not the zoom itself. With group shots, use a wider-angle lens, say around 35 mm, and step back.
- Use a wide aperture. A wider aperture (f-stop) throws the background out of focus so that the viewer's attention is concentrated on the person. If you look again at “Young Woman Relaxing” (see Figure 4.5) and ignore for a moment the overlaid grid lines, you will notice that the woman is sharply focused, but the background—while recognizable as the London skyline including St. Paul's cathedral—is not intrusive. The picture would be less effective if the background were also sharp. It might also be less effective in this case if the background were totally out of focus. Hopefully, the balance is right.
Figure 4.6 presents another great example of the creative use of selective focus.
USE BOLD AND COMPLEMENTARY COLORS
The simple use of bold colors draws microstock buyers' attention to your shot. You can also use contrasting or complementary colors to great effect, as in Figures 4.7 and 4.8. Also, make sure your camera color balance is right—auto works fine for most shots—and that you're using the right lens for the job. I will cover lens choice in more detail later in the book. As a general rule, wide-angle lenses are most useful for landscapes and panoramic photos, whereas moderate telephoto lenses are useful for portraits.
We have covered portrait lenses in the section on portraits. You want to use a slightly “long” or telephoto lens for portraits to prevent the unsightly distortion of facial features that can occur with wide-angle lenses or standard lenses (“big nose” syndrome). The use of wide-angle lenses without thinking often results in those disappointing holiday shots your relatives show you. If you use a wide-angle lens (e.g., 35 mm or more on a full-frame digital) for landscape, then, as mentioned above, you need to try to include some foreground interest in the image; otherwise, all you will get is a dull blank open space—and an image rejection from the microstocks.
USE THE BEST APERTURE AND SHUTTER SPEED COMBINATION
All digital SLRs and most quality compact cameras allow you to change the camera f-stop, or aperture. If the camera is left on fully automatic program mode, the camera will choose what it thinks is the optimum combination of aperture and shutter speed for the

FIGURE 4.6 “Golf.” © Mikael Damkier/Fotolia
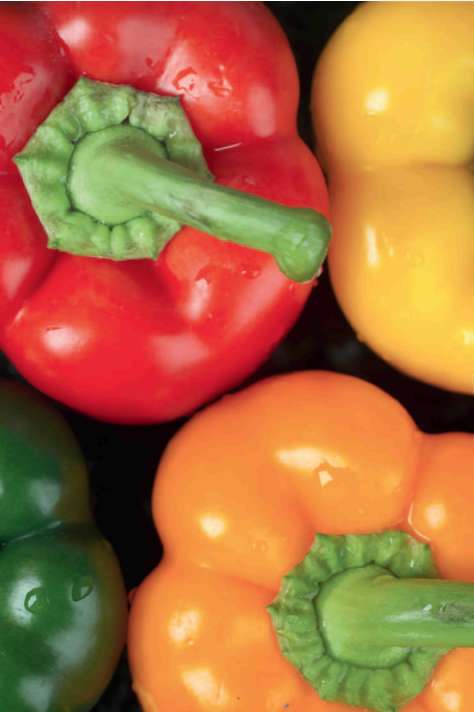
FIGURE 4.7 “Peppers Red Yellow Green and Orange.” © Douglas Freer

FIGURE 4.8 Spices and dyes on an Arabian market stall—another image where color is the object of the shot. © Douglas Freer
available light. Simple cameras have “scene” settings. These prioritize either the shutter speed or the aperture, depending on the subject. If your camera allows it, try taking full control by switching to manual mode and setting the camera aperture and shutter speed yourself. The camera should have a built-in meter that allows you to check whether you have the correct exposure (often adjusted using “+” or “-” symbols in the viewfinder). Each increase in aperture or shutter speed represents a doubling of the light hitting the sensor, and vice versa.
For example, if the correct exposure for your shot is an aperture of f/11 at a shutter speed of 1/125 second, you will get exactly the same exposure if you “open up” the lens aperture by one stop, to f/8, and increase the shutter speed to 1/250 second. You will also get the same exposure if you “close down” the aperture to f/16 and reduce the shutter speed to 1/60 second, and so on.
I often use full manual control because I like to be in charge of what the camera is doing and because I want to deliberately adjust the area of the image that will appear to be in focus, therefore using a wider aperture in combination with a faster shutter speed for portraits while using a smaller aperture and slower shutter speed for landscapes, and probably a tripod too. We have already seen in this chapter some examples of the effects you can obtain by choosing a wider aperture. If full manual control is too much, try aperture priority, usually marked with an “A” symbol on camera menus. This means the camera matches an appropriate shutter speed to your aperture choice. For most static subjects, all you want is a fast enough aperture to avoid camera shake. It is the aperture that is most critical.
To see the effect that changing the aperture has in a real-world situation, compare Figures 4.9 and 4.10. Figure 4.9 was shot at an aperture of f/2 and 1/1250 second, ISO 400. The second shot, Figure 4.10, was taken at f/11 at 1/40 second.
Now, go and apply this to some test shots of your own. Using a wide-angle lens or wide setting on your compact, try tilting the camera down and including some foreground interest, say, a flower or stones. Check the composition to make sure you have not tilted down too far and excluded part of your view! Stop your lens down as far as you can (i.e., set a small aperture or f-stop) without risking camera shake and focus about one third of the way in to the shot. Wide-angle lenses have an excellent “depth of field,” meaning more of the shot appears in focus and about one third of the way into the shot is known as the hyperfocal distance. I recommend that you focus on the hyperfocal distance to get a maximum depth of field. Use a tripod if you can to avoid camera shake; this will allow you to use a smaller aperture.
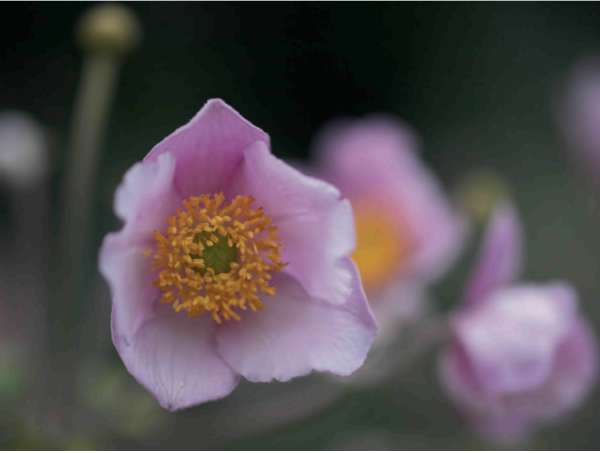
FIGURE 4.9 A shallow depth of field. © Douglas Freer.jpg
Next, with a longer focal length lens or using the telephoto setting on your compact, try taking a portrait, or something like the poppy image I showed you earlier, opening up your lens to the maximum and choosing a nice fast shutter speed to get the correct exposure. Experiment with different shutter speed and aperture combinations—learn your tools and take control. You cannot be a full-fledged photographer if you leave the important decisions to Canon or Nikon!
GET DOWN LOW—OR UP HIGH
Don't be lazy. Your shots have to compete with many other microstock photographers' work, and when a buyer does a search for an image, you want yours to offer something just a bit different. Instead of just
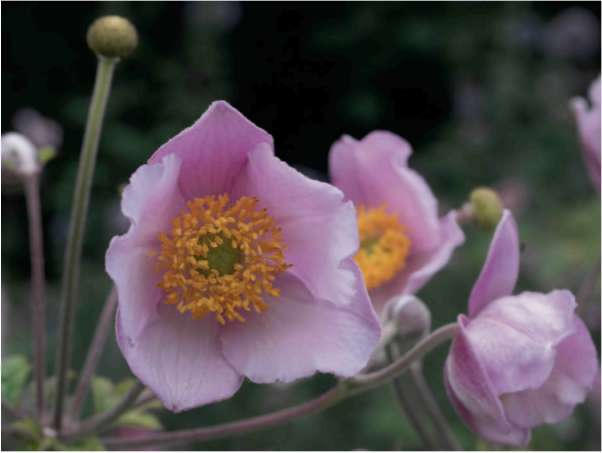
FIGURE 4.10 A high depth of field. © Douglas Freer.jpg
photographing the subject from a normal standing or sitting position, get below or above it if you can for added drama and effect. You don't need expensive equipment for this, just a sense of adventure! The poppy shot in Figure 4.2 was taken down low, as was “Backlit Narcissus” in Chapter 3 (see Figure 3.24) and “Golf” (see Figure 4.6). The peppers image in Figure 4.7 was taken from above to emphasize the symmetry.
USE UNUSUAL FOCAL LENGTHS
“Scientists Working” in Chapter 3 (see Figure 3.3) was taken with a fisheye lens, which I think adds a sense of drama. Using unusual focal lengths can be fun and effective, provided you don't overdo it. Also,specialized lenses can be expensive to buy. They're worth considering but not essential. Above all, experiment.
THE WINNING FORMULA
Nothing I have written so far in this book is difficult to follow. You are now ready to shoot a far wider range of subjects with a different viewpoint than before. Through practice, you will gain confidence and develop new ideas and themes.
You are well on the way to becoming a successful microstock photographer. But, as in those wretched computer games, there is always another monster lurking around the next corner. The next monster in your quest for microstock success is particularly nasty, but it can be slain. And in Chapter 5, I'll show you how.