FOCUS: APERTURES, LENSES, AND DEPTH OF FIELD
“MY PRIMARY PROJECT HAS ALWAYS BEEN IN FINDING WAYS TO MAKE THE VIEWER AWARE OF THEIR OWN ACTIVITY OF LOOKING AT SOMETHING.”—UTA BARTH
PHOTOGRAPH © SEAN WILKINSON Untitled, 1999, Paris,from Traces
FOCUS: THE SECOND PHOTOGRAPHIC ELEMENT
Have you ever seen a painting you identified as “Photorealistic?” What was the primary quality of that painting that made it most like a photograph? The answer: the quality of focus it depicts. What sets Photorealistic paintings apart is that they depict a scene the way a camera would see it, and photographs, no matter how closely they seem to approximate human sight, never depict the world as we see it. Photorealism looks photographic primarily because it reproduces a sense of the camera’s monocular vision, which, as discussed in Chapter 1, differs from our binocular vision in the way it flattens depth perspective onto a two-dimensional plane. The physical characteristics of the camera’s aperture and lens, that camera vision allows variable depth of focus, along with the ways in which framing operates, create an image that is altogether different than the one our eyes and brain create. It is those physical characteristics that impose themselves upon the focus (or sharpness) of the images they apprehend, and it is those characteristics that Photorealism explicitly acknowledges in its creations. Our visual memory enables us as viewers to recognize the differences in quality of focus as uniquely photographic, and in so doing requires us to relate to the subject and content of Photorealistic paintings in a specific way. I use the example of Photorealism to begin this discussion because through painting, quality of focus is called to our attention in a way that is so implicit, so transparent, that it is often lost when we view photographs.
Since the invention of photography, the disparity between the appearance of images captured by the camera and those apprehended by human vision has been of primary importance to its practitioners and viewers. The relevance of this disparity deals with the quality and depth of focus. Images captured by the action of light (through an aperture or lens) exist on a sort of continuum with a familiar center: the quality and depth of focus produced by human, binocular vision. On one end of the focus continuum are images that are somehow “clearer and more descriptive” than our own eyes can see, and on the opposite end are images that are somehow “hazy and less specific” than human vision generally affords. Precisely where the focus in an image is fixed on the continuum greatly impacts how it communicates about a subject, as well as the way it is interpreted by viewers.
The ways in which photographers and artists have represented quality of focus has had an extreme range since the conception and use of the earliest camera, the camera obscura. Scientists were inspired by the ability of the device to render the visible universe more objectively and more accurately than the mind’s eye tethered to the hand could render. By 1850, only a few short years after photography could record the ephemeral image, daguerreotypes began a precedent of photographic processes replacing traditional forms of manual reproduction for any purpose that relied on fidelity and descriptive quality. Conversely and almost immediately, the Pictorialists became photography’s first practitioners to successfully embrace the value of the specific lack of sharpness that the camera-made image could deliver. This began several waves of practitioners using it as a form of art for rendering expressive rather than descriptive images. Around the same time, the still point of the focus continuum was located with P.H. Emerson and the Naturalists, many of whom consciously manipulated the monocular vision of the camera in such ways as to attempt to approximate human vision’s quality of focus. Throughout its history, the camera’s unique quality of focus has offered photographers control over the appearance and meaning of images; today, visually literate photographers have even more tools at their disposal that allow the controlled manipulation of focus if they understand how to use it. At the one side, sharply focused photographs carry connotations of specificity, and by extension, truth and reality. Viewers more readily equate sharp focus with what was present in front of the camera, and the more descriptive it is, the greater our degree of trust in the accuracy and factualness of image. Documentary, photojournalistic, and evidentiary images rely on sharp focus for this very reason. Photographs on the opposite end, those that use soft or distorted focus, remove this relationship between the contents of the image and the seen world. They connote a vague essence of things, and an atmospheric or more overtly filtered image of reality. In addition, the softly focused image guides the viewer’s attention more consciously to the act of seeing.
APERTURES: A BRIEF TECHNICAL BACKGROUND
It is usually assumed that this element of photography is comprised of two parts: the aperture and the lens that houses it. However, a lens is not needed in order to create images from light. Apertures and lenses have distinct technical attributes that contribute to the visual outcome, and therefore the meaning of photographic images; so, discrete but interrelated study of each provides more thorough understanding of how they combine to affect the quality of focus in photographic images.
An aperture of any kind is simply an opening. As it relates to the camera, the aperture (also called the f-stop) literally refers to the opening through which light enters the camera to produce an exposure. This mechanism, normally located within the camera lens, controls the amount or quantity of light that will strike the photographic media upon releasing the shutter mechanism. Aperture numbers correspond to a range of fixed diameters in full-stop increments. These full stops allow in exactly ½ or 2 times the amount of light allowed by the number directly before or after it, and it is important to understand their interrelationship. Some lenses allow you to adjust the aperture in fluid, step-less increments, or in ½ or ⅓ stop increments, which offers
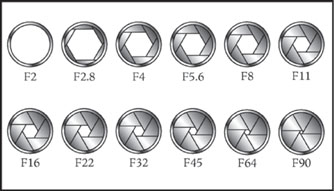
ILLUSTRATION © TOBY COCHRAN, 2007.
These are the common, whole-stop aperture number. They are referred to as being. “1 stop” apart; that is, each whole aperture number doubles or cuts in half the exposure to light that the adjacent number provides.
finer control over exposure but makes the mathematics of it much more complicated.
DEPTH OF FIELD: A BRIEF TECHNICAL BACKGROUND
An image projected through a camera aperture is “in focus” at a specific distance from the aperture, and it gradually becomes less focused the further you get from that specific distance. The fall-off of focus occurs both in front of and behind the focus distance, and has a relatively predictable pattern. This is an important technical and visual attribute of the aperture and lens, and it is referred to as depth of field. Depth of field describes the ratio from foreground to background that an image will be in focus from its focus point. The ratio of depth of field is always on the order of ⅓ in front of the focus point and ⅔ behind it.
Since the chapter discussion will include depth of field at several points, it is important to first understand what it is and how it is influenced.
The three controllers of depth of field are as follows:
1. Aperture: The size of the aperture controls the depth of field in that the smaller the aperture is, the greater the depth of field (the other two factors remaining the same).
2. Lens focal length: The focal length of the lens controls the depth of field in that the shorter (or wider angle) the focal length, the greater the depth of field (the other two factors remaining the same).
3. Camera to subject distance: The distance between the camera and the subject controls the depth of field in that the further from the focus distance the camera is, the greater the depth of field (the other two factors remaining the same).
Technically speaking if you want a wide range of depth of field from foreground to background, select an adequately small aperture, focus #x2153; of the way into the scene, and shoot. In this way you can better maximize depth of field when you need it. Conversely, if you want to maintain narrow depth of field, use a larger aperture and focus on the precise distance of the subject or primary content. This range and control over depth of field offers a way of seeing that human vision cannot afford, since our plane of focus is fixed at the distance at which we are focused and falls off rapidly on either end, and we can do little to alter it. Using the camera’s focus and depth of field controls, we can focus on aspects of the visible world that are imperceptibly small and bring them into clear view, or we can image a scene whereby the entire picture plane, from its nearest point to infinity, is rendered in sharp focus.
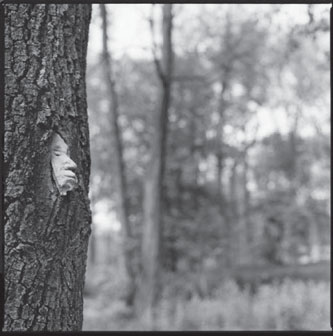
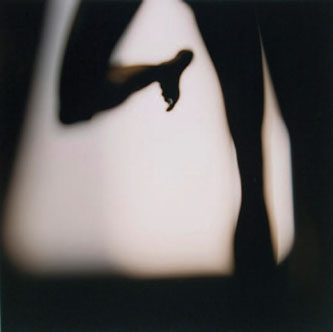
PHOTOGRAPH © ANGELA FARIS BELT, UNTITLED FROM THE SERIES SPACES, 1999.
Using shallow depth of field directs the viewer’s attention to the primary content in the image; the lack of sharp focus on other areas in the frame indicate to the viewer that these are areas of secondary or supporting content. The fine black borders (created by using a filed-out negative carrier) are an explicit barrier underscoring what is in the frame versus what is not.
CAMERAS WITHOUT LENSES
As stated in the chapter introduction, the aperture’s size, composition, and orientation determine important aspects about the visual outcome of the image. No lens is required to capture an image. The aperture size determines the intensity of light entering the camera and also the optimal sharpness at the plane of focus. Light entering an aperture is focused at a specific point in space; if you place light-sensitive media at that precise distance a more clearly focused image is rendered; any other distance will render a less clearly focused image.
Photographers choose to make images with lensless cameras for a variety of reasons. First, many photographers prefer to make their cameras rather than buy them; that is, they prefer images that are captured through a device created by their own hands, or designed in a non-traditional format according to their own specifications. Second, the image projected through an aperture and without a lens has its own characteristics (which we will discuss more in depth in a moment). In many ways those characteristics communicate more specific messages to a viewer about the photographer’s impressions of a subject than a lens-made image could. Still other photographers like the experimental nature of alternative cameras or are interested only in the ephemeral image inside the camera obscura rather than in capturing it.
Camera Obscuras
The first apparatus to use an aperture to transfer an image made from light was the Camera Obscura (Latin for Dark Room). Essentially, a camera obscura is a dark room, which can be large enough for a person to be inside, with a very small hole in one side which, if sized properly, allows light to project the outside scene onto the interior opposite wall of the camera. Although the technology to record images onto light-sensitive media did not exist until the 19th century, the camera obscura’s optics were recognized by Arabian scientist Abu Ali al-Hassan Ibn al Haitham in the 10th century B.C., who described it as his tool for studying a solar eclipse. The camera obscura was also referenced in China as early as the 5th century B.C. and by the Greek philosopher Aristotle in the 4th century B.C. It was not until the 15th century that artists throughout Europe used camera obscuras and then camera lucidas to assist them in drawing from nature, though many would not admit to doing so. Recently, the camera obscura has made a comeback, notably by photographer-artist Abelardo Morell, who has created iconic documentary images of the camera obscuras he creates in hotels, museums, and other interiors throughout the world. Although the camera obscura does not have a lens, the hole through which the image is transported must be of a particular diameter, and the distance from the hole to the far side of the “dark room” must be of a particular distance, in order for the image to be rendered as sharply focused as possible. Here is a simplified way of calculating both:
• Focal length = Distance from the aperture to the far wall of the camera obscura. This distance will dictate the precise aperture diameter that will render the image sharpest at the plane of focus.
• Aperture size (f-stop) = Focal length/Diameter of aperture.
• Aperture diameter determines the sharpness and brightness of the projected image. The formula for determining the best aperture diameter for a given focal length is complex, involving physics of light wavelengths and some more advanced mathematical calculations. Several reliable charts are available on the topic, so through research you should find the aperture diameter that works best for your needs.
Pinhole Cameras
The pinhole camera is based on the same premise as the camera obscura, but inside the dark room is added a piece of light-sensitive media placed at the image plane so that the image projected through the pinhole may be recorded and preserved. As stated in the camera obscura section, for every focal length there is an “optimal” aperture diameter, that is, a diameter which produces the sharpest possible image. Given that pinhole photographers and artists may not desire the greatest possible sharpness, the aperture size is a general guide.
There are many excellent resources for information about making pinhole cameras, beginning with www.pinholeresource.com. There are many places that sell custom pinholes in body caps to fit nearly any camera, but if you enjoy experimentation and making things from scratch, one very simple method follows. Begin with an extra body cap for your SLR camera, and drill about a 1-inch diameter hole in the center of it. Then determine the proper size pinhole for the focal length of the camera’s inside dimension by measuring the distance from the pinhole to the media plane. Buy or create the pinhole using needles with known diameters; insert the appropriate needle into the center of the body cap, and use its corresponding f-stop to determine proper exposure. This method of pinhole camera experimentation combines the quality of focus of a pinhole camera with the convenience of accurate, adjustable shutter speeds, a ready-made tripod mount, and the comfort of familiarity with the equipment.
Beyond the basic calculations and information provided above, there are a few technical considerations that pinhole or lensless photographic image makers need to understand:
1. Because of their minute apertures (for example, f 295); pinhole cameras capture infinite depth of field. A given camera structure has a corresponding, optimum aperture (pinhole) size that will produce the sharpest image quality. The same formulas for focal length (the measurement from the pinhole to the media plane),
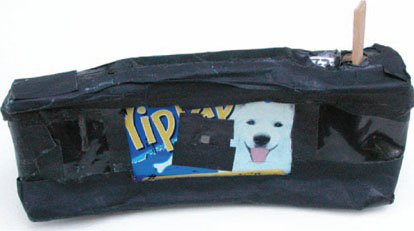
A PINHOLE CAMERA MADE FROM A YIP YAP DOG BREATH FRESHENER TIN BY DENNIE EAGLESON.
aperture size (f-stop), and aperture diameter used for camera obscura apply to the pinhole camera.
2. Pinhole apertures can vary considerably in diameter depending on the camera’s focal length; generally, a smaller pinhole will result in better image resolution (a sharper picture) because the projected circle of confusion is smaller. Depending on the distance from the aperture to the film plane, the infinite depth of field means that the fall-off in focus in front of and beyond the focus point has little visible effect on overall focus. Any softness produced by the aperture is far less a factor of “lenslessness” than it is of light diffraction due to the minute aperture size (or rough-edged pinholes).
3. The rounder and smoother the pinhole, the sharper the image; distorting (deviating from a round pinhole) the shape of the pinhole distorts the image, and can be used as a creative or communicative tool. Industrially produced pinholes are generally laser-etched and are more “perfect” than handmade pinholes.
4. The thinner the material from which the pinhole is made, the sharper the image. This is because as the diameter of the aperture approaches the thickness of the material in which it is made, a greater degree of edge vignetting occurs due to light entering at other than a 90° angle. Materials too thin to remain rigid are not useful. Materials such as brass shim stock or metallic shim stock (painted black) work quite well.
5. The smaller the pinhole, the longer exposure time is required.
6. A shorter focal length (distance from the pinhole to the media plane) decreases the exposure time required and results in a more wide-angle image; a longer focal length increases the exposure time required and results in a more telephoto image.
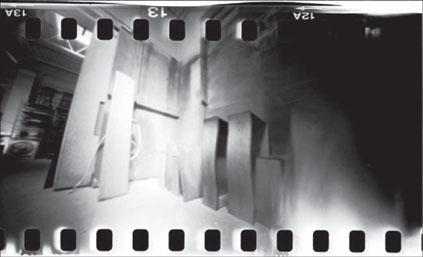
IMAGE © DENNIE EAGLESON, SPRAY BOOTH.
This image was made on 35-mm film in a Yip Yap Dog Breath Freshener tin that is 2′ × 3′ × ¾′ in dimension, converted to a pinhole camera. The camera has an attached 35-mm film feeder cassette, a light-tight take-up cassette, and an aperture of f/62. See more of Dennie Eagleson’s work in the Portfolio Pages of this chapter.
AFFECTING VISUAL QUALITY AND PHOTOGRAPHIC MEANING WITH APERTURES AND LENSES
The element of photography that allows light to enter the camera and form the image is the aperture. The addition of a lens dramatically affects the light entering the aperture and its transportation onto the media, and the effects are significant as they relate to the resulting image. There are also technical and communicative advantages to using a lens. The first advantage to using a lens is that the photographer can vary and make precise the point of focus. Second, most lenses allow the photographer to vary the aperture size, which is a benefit in terms of exposure and depth of field. Third, some lenses (called zoom lenses) provide a range of focal lengths in a single lens, so that photographers do not have to frame images within a fixed focal length. Fourth, the vast majority of lenses offer optical advantages: they provide a more even field of sharpness, reduce distortion and vignetting, and have coatings that reduce chromatic aberrations to transmit more accurate color hue and saturation while reducing flare and reflections.
It is not necessary for the purpose of this discussion to understand the inner workings of camera lenses. It is important to recognize the three combined attributes of lens-made images that significantly affect the visual character of the image: they are the lens focal length, plane of focus, and lens quality.
Lens Focal Length
There are three basic categories of lenses: normal, wide angle, and telephoto lenses. These have different effects on the angle of view and visual quality of the image, as outlined below.
NORMAL FOCAL LENGTH LENSES
The normal focal length for any given media format is the same as the diagonal measurement of the media plane. For instance, if you measure the image size of a 35-mm SLR camera, you arrive at a normal focal length of approximately 50 mm.

ILLUSTRATION © SHAWN MARIE CURTIS, 2007.
The normal focal length lens provides photographers with particular visual advantages. The normal focal length for a given format most closely approximates human sight, and projects an image with the least distortion and compression of space from foreground to background.
The approximate normal focal length size for the common film formats are as follows:
35-mm format = 50-mm normal lens
645 format = 75-mm normal lens
6 × 6 format = 80-mm normal lens
6 × 7 format = 90-mm normal lens
6 × 9 format = 105-mm normal lens
4 × 5 format = 150-mm normal lens
Note: As of this printing, common digital SLR sensor sizes, although many of them use the same lenses, are generally a bit smaller than the 35-mm film camera image area; therefore, the normal focal length is a bit shorter than 50 mm. Consult your DSLR manual for specific sensor measurements.
For darkroom practitioners, these are also the minimum focal length lenses required for making enlargements that provide an even spread of light across the picture plane, as well as the largest projection possible. Using a shorter focal length than that required for the negative size vignettes the image to white; using a Songer focal length than that required for the negative projects a smaller image.
Normal focal length lenses are the standard when you wish to represent a subject in a relatively non-inflected way, by maintaining normal perspective within the visual field

PHOTO © DAVID BECKERMAN, HEAD IN HANDS, SUBWAY, NEW YORK, 2005.
Using a normal focal length lens brings to this documentary-style photograph a balance of intimacy and distance it creates an image that feels more like natural human vision, and in doing so places the viewer easily into the scene, allowing them to empathize with the subject more intimately.
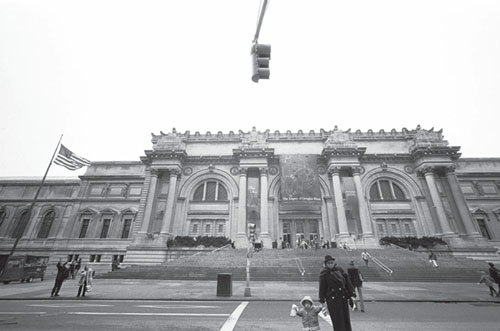
PHOTO © DAVID BECKERMAN, METROPOLITAN MUSEUM, NEW YORK, 1999.
Using a 16-mm wide angle lens on a 35-mm SLR camera allows a wider than normal angle of view for this scene. The distortion and inclusion of the traffic light dangling from the top of the frame act as compositional elements that occur as a direct result of the wide angle of view. www.davebeckerman.com
and keeping the distance and size relationships from foreground to background relatively unchanged. Although their visual advantages are often underrated, normal lenses are excellent general purpose lenses.
WIDE ANGLE LENSES
Also called short lenses, the wide angle lens for a given format is described as any lens that is literally shorter than the normal focal length. For a 35-mm film SLR camera, this would be any lens shorter than 50-mm. Wide angle lenses provide a wider than normal angle of view than the format’s normal focal length lens does, which means that wide angle lenses include more of the scene than their longer counterparts. In addition to providing a wider angle of view, wide angle lenses exaggerate size relationships by making foreground elements larger than they would appear naturally in relation to background elements. At the extreme, such as fish-eye lenses, wide angle lenses distort the angle of view into a circular form, and make elements in the background minute in size.
TELEPHOTO LENSES
Also called long lenses, the telephoto lens for a given format is described as any lens that is literally longer than the

PHOTO © DAVID BECKERMAN, WALL STREET SHAPES, NEW YORK, 2000.
A long telephoto lens (200 mm on a 35-mm SLR) was used to create the drastic compression of space and merge the buildings and the light posi into a single almost abstract composition.
normal focal length. Long lenses provide a narrower than normal angle of view than the format’s normal focal length lens does, which means that telephoto lenses include less of the scene than their shorter counterparts. In addition to providing a narrower angle of view, telephoto lenses compress perceived space between foreground and background in the scene, bringing objects in the background more fully into juxtaposition with objects in the foreground.
Plane of Focus
As light enters the aperture or lens, it projects an image of the outside world linearly through the camera body. The image is focused at only one precise distance, one place in space—the plane of focus. The optimized plane of focus is determined by the confluence of aperture size, distance from camera to subject, and focal length, and it is generally positioned precisely at the media plane, so the projected image is in focus. Because most cameras are designed such that the lens plane bears a fixed, parallel relationship to the media plane, plane of focus of the projected image always bears a direct relationship to the focus point, rendering everything at the focus distance in the same degree of sharp focus. But this is not always the case; some cameras and accessories allow the photographer to have creative control over the plane of focus (read on).
BELLOWS OPTIONS
One exception occurs in direct view cameras where a flexible bellows is placed between the lens and the media plane, allowing each plane to be manipulated independently. View cameras locate the lens on what is called the “front standard” and the media plane is located in the “rear standard.” View cameras allow two movements that alter the lens plane to media plane relationship; they are tilt (in which the front or rear standard is tilted downward or upward) and swing (in which the front or rear standard is pivoted horizontally). Tilt allows you to confine the plane of focus to a horizontal strip across the media plane, and swing allows you to confine the plane of focus to a strip vertically through the film plane. In addition to view cameras, certain medium format camera systems, such as the Hasselblad ArcBody, offer a lens mount that will allow similar, yet more limited, plane of focus adjustment. These cameras are smaller and less bulky than view cameras, and offer the added benefit of being able to look through the viewfinder while making the photograph.
In the following images, fine art photographer Lincoln Phillips uses a 4 × 5 view camera to direct the plane of focus. He states, “In these images I am concerned with the simultaneous specificity and generality of ‘place’ as
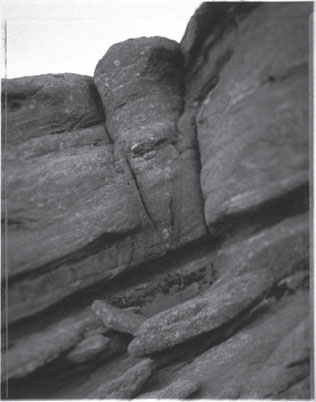
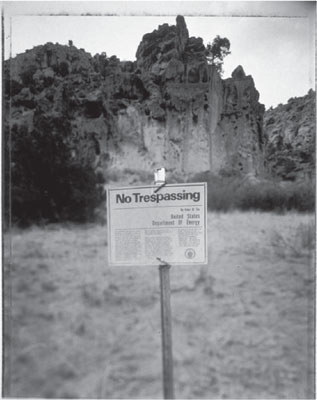
PHOTOGRAPH © LINCOLN PHILLIPS, DOD SIGN, FROM BELOW LOS ALAMOS, 2004.
experienced both by me as I photograph, and by the viewer as she or he sees. To manifest this concern visually, optical manipulation becomes my experimental tool kit. When selecting sites to photograph, decisions are often based more on sensation than mechanics. In each image juxtapositions arise from the process of manipulating the focal plane and defocus field to create visual interest and the potential for conceptual relationships. Focus initially directs sight to forms and objects rendered crisply, lending identifiable context for the viewer.” Additionally, Philips uses Polaroid Type 55 positive/negative film and includes the masking marks around the edge, “both as a direct reference to process and for the visual symbol of frame as context and concept.”
Both adjustable bellows options, the view camera and the adjustable prime lenses for medium format cameras, are cost-prohibitive for many photographers who wish to experiment with controlling plane of focus. Fortunately, a solution came in the form of an inexpensive attachment designed for most common SLR and DSLR camera bodies: the Lensbaby™.
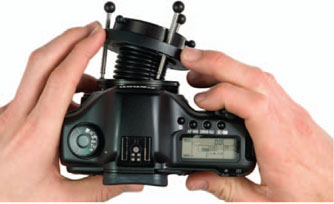
Top view of Lensbaby.
Lensbabies are selective focus SLR camera lenses made with flexible tubing. The lenses are made from multi-coated optical glass, so the optical quality is maintained. Using the Lensbaby, the photographer can capture photographs with one area or plane in sharp focus. Photographers can adjust the area of sharp focus anywhere in the image area by bending the flexible lens tubing. There are several versions of the Lensbaby, each with different advantages, and there are Lensbabies made for Medium Format cameras. With the Original Lensbaby™ and the Lensbaby 2.0™ the photographer manually holds the lens in a bent position while pressing the shutter release; the Lensbaby 3G™ adds
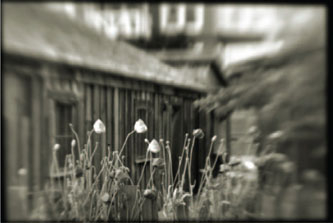
IMAGE © DARKO JUVAN. COURTESY: LENSBABIES, LLC.
three focusing rails that allow the photographer to lock the plane of focus in a desired bent position.
Bellows cameras, adjustable plane prime lenses, and attachments like the Lensbaby all off er plane of focus manipulation allowing photographers the ability to direct the viewer’s attention in a non-traditional way. Altering the plane of focus outside of the parallel position removes the viewer’s sense of “the way we see,” that is, with the single plane of focus afforded by human vision, and replaces it with a conscious feeling of seeing the way that only the camera can. The value in offering this opportunity to viewers is that their innate familiarity forces them to literally see the contents of the image in a new and different way, opening their mind’s eye to clues about the meaning of the image.
Using a flexible bellows is the most common way to break free of the rigid relationship between lens plane and media plane, but ingenuity and experimentation also afford ideas. Think about the relationship of the lens plane to the media plane, and how and when you might adjust it. You cannot very well “bend” a digital sensor, but you can bend, bow, or otherwise alter the flat plane of traditional media, both film and paper, in the camera and in the darkroom. You can alter the flat plane of the negative in the enlarger housing, or you can print onto paper that is not parallel to the negative carrier. The communicative and visual potential for manipulation of plane of focus are not limited to those practices that have been widely experimented with and publicized. The idea is to understand the characteristics of the medium and begin to utilize them to your specific advantage.
OUT-OF-FOCUS OR SOFT-FOCUS SLR
While the bellows option allows the lens plane and media plane to be manipulated independently, SLR cameras with a fixed lens to media plane relationship also offer their own unique opportunities for focus control. While the plane of focus is parallel to the media plane with most cameras, in most instances the photographer determines where to place the plane of focus. If you are using a manual-focus camera, you may simply choose to capture the image out of focus by placing the plane of focus in front of or behind the media plane. The idea to capture images in sharp focus happens nearly by default, but choosing not to can lend a great deal of feeling and meaning to your images.
In order to control the results of out-of-focus shooting, here are a couple of tips: first, use the widest aperture on the lens. When you view through the lens, as you do with SLR cameras, you are viewing the image at its widest aperture, since the aperture only closes down to record the image. This gives you a more accurate feel for what the final image will look like when shot at that aperture. Second, use your depth of field preview. Most SLR cameras have this option; it closes the aperture to the corresponding number you choose; the image in the viewfinder becomes darker
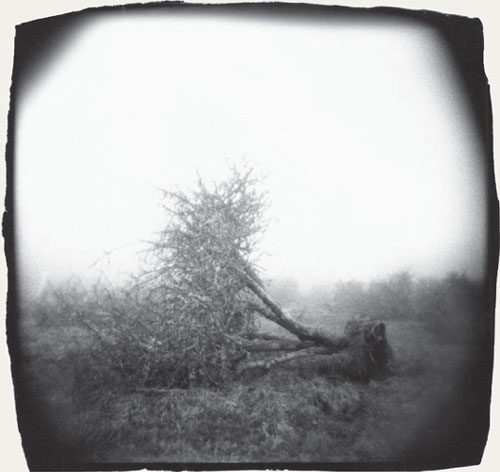
PHOTOGRAPH © SEAN WILKINSON, UNTITLED, FROM HIS SERIES TRACES, 1999, LONDON.
Sean Wilkinson uses a medium format SLR camera, carefully regarding the degree of focus through the lens.
but the depth of field becomes visible. If you don’t want the aperture wide open, experiment with the aperture range by activating your camera’s depth of field preview and looking at the image appearance through the viewfinder.
Out-of-focus imagery made by photographers such as Uta Barth, Robert Stivers, and Sean Wilkinson (see his work in the Portfolio Pages of this chapter) demonstrate a range of conceptual and visual potential that can be mined through this kind of image making. Research and look at a lot of out-of-focus imagery, and consider what “lack of focus” might indicate about your particular subject.
Lens Quality
The quality of the lens used—its optics, the quality of its glass and coatings, etc.—is the third significant factor in the clarity or perceived sharpness of the image. Image clarity includes things such as the sharpness of focus, resolution, and acutance. Resolution is defined as the ability of the lens to render fi ne detail, the lack thereof creates an image that feels soft. Acutance is the ability of the lens to render fi ne edge sharpness and sharp transitions between contrasty tonal differences. Sharpness, resolution, and acutance are also defined by media and materials, but lens quality significantly impacts image clarity. In short, the better the lens construction, higher quality the glass and coatings, the clearer and sharper your images will be.
But not all photographers wish to produce images that are perfectly, or even reasonably clear. Many photographers recognize the value in lack of clarity for its unique relationship pertaining to the contents and information in the frame. In effect, decreasing lens quality can increase expressive potential.
One way of producing images that lack clarity is to use a plastic lens camera, and another is to alter your crisp-lens SLR camera.
PLASTIC LENS CAMERAS
There are many types of plastic lens cameras, but the two most common are the Diana, originally introduced in the 1960s and no longer in production, and the Holga, introduced in the 1980s and still in production. Both cameras capture images that are highly regarded by some for their low-fidelity aesthetic; they maximize the serendipity of light, producing images with light leaks, vignetted at the edges, and a reduced degree of clarity. These are all positive aesthetic advantages for practitioners who wish to use the camera’s ability to record a less accurate reproduction of the subject. See Plastic Cameras: Toying with Creativity
PHOTOGRAPHS © ANGELA FARIS BELT, RAIN LEAVES, 2007.
This plastic camera image was made with a Holga camera with the insert in place. The camera was held horizontally to make a horizontal frame.
by Michelle Bates for more detailed history and technical information about plastic cameras. (See Michelle Bates’ images in the Portfolio Pages of this chapter.)
DIFFUSION
Diffusion is another aspect of lens quality that should be discussed independently because of its specific, unique attributes. Diffusion should not be confused with either lack of focus or lack of sharpness. Diffusion filters soften specular light without reducing sharpness or contrast.
Essentially, diffusion filters affect bright light the most by flaring it out, creating a “halo” around the bright area. When using diffusion filters in shooting, the highlight areas are affected most. When using diffusion filtration in the darkroom, however, the effect is just the opposite because the shadow areas in the negative are the brightest part of the image (the thinnest part of the film). Therefore, diffusion used in the darkroom creates halos around shadow areas of the image.
There are spot diffusion filters as well, which have strongest diffusion at the edges and less toward the filter’s center. You can also make your own diffusion filters out of materials such as acetate (that you can scratch), petroleum jelly on an inexpensive UV haze or skylight filter (a bit messy), cellophane, waxed paper, or thin nylon stockings.
MAKING YOUR SLR CAMERA BEHAVE LIKE A PLASTIC-LENS CAMERA AND ALTERNATIVES TO USING DIFFUSION FILTERS
If you like the low-fidelity appearance of plastic camera images and of diffusion filters, but want exposure control and the comfort of using your familiar camera body, as well as the ability to be more creative with diffusion, you could alter your SLR camera. To reproduce both of the primary attributes of most plastic-lens cameras (lack of clarity and vignetting), you’ll need to alter two aspects of the lens: its optics and its edges. To alter its optics, experiment with a number of materials that will soften the view slightly. You can use materials such as nylons stretched tightly over the lens, plastic wrap, or other clear(ish) translucent material. In order to both create the vignetting and hold the materials in place, use a lens shade intended for a focal length longer than the one you’re using (for instance, if you’re using a 28-mm lens, place a lens shade intended for an 80-mm lens).
You can do this for both traditional and digital image capture, in color or black and white. The idea is to capture the look of the image you want in camera using the tools necessary to make that happen.
DIGITAL DARKROOM FOCUS EFFECTS
In the digital darkroom, focus is not a real factor, and so in the digital realm any notion of focus which is to be affected after capture must be artificially created. There are several ways of altering the sense of focus in the digital darkroom, including fuzzy filters and plug-ins that mimic plastic cameras, but those are not “organic”; that is, they do not use the image content as a springboard for creating a specific sense of focus, depth of field, or clarity that relates sensitively to the image subject. What interests us here is how to use the digital darkroom and the tools of Adobe Photoshop to regain a sense of focus control which would usually be captured in-camera or could be affected in the traditional darkroom.
Digital Plastic Camera Effect
The Plastic Camera Effect Tutorial found in the Technical Tutorials Section for Chapter 2 can be easily modified for producing a range of plastic camera effects in Adobe Photoshop; I developed it through research and some simple trial and error. You can begin with step-by-step, and develop more individualized techniques based on your needs.
The effect of plastic cameras varies, but two of the more telltale signs are a slight softness and intensified color and contrast, in particular near the vignetted edges of the image.
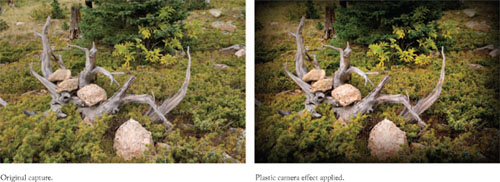
IMAGE © ANGELA FARIS BELT, 2006.
Digital Diffusion Effects
The Digital Diffusion Effects found in the Technical Tutorials Section for Chapter 2 were originally created in camera and in the traditional darkroom (and still are); they often have subtle and beautiful visual consequences for images. This tutorial provides information commonly known to many digital darkroom practitioners and is a terrific starting point for anyone interested in adding diffusion to their digital images. Remember that these techniques can be combined with others to make the outcome more

IMAGE © LINDSAY GENRY, 2007.
unique and relevant to your subject. The diffusion effect images illustrate the technique and were created by one of my students, Lindsay Genry, from images she made during a trip to Italy.
Once you understand the nature of diffusion, its effects can be beneficial whether created in camera or in darkroom (traditional or digital). You can add visual weight to the image by diffusing the shadow areas of an image into the highlight areas, or conversely, you can create a more ephemeral feeling by diffusing the highlights into the shadows.
As an element of photographic grammar, the range of focus from the clarity of hyper-sharp, deep focus to the haziness of soft focus or diffusion influences and is influenced by other forms of reproduction (particularly painting) and by the needs of a marketplace of end users. Radical manipulation of lens attributes such as diffusion and plane of focus are prevalent in contemporary fine art and advertising photography, pointing to the significance of this element as a sophisticated tool for communicating diverse meanings to a wide range of viewers. Conscious use of this element of photography allows practitioners to utilize focus on a continuum ranging from concrete imagery that feels indisputable in its authority and specificity, to seductive imagery that only hints at its content, as it capitalizes on form and color. Focus leads the viewer’s eye purposefully throughout the frame in a controlled and meaningful path, and places visual emphasis on the aspects of the frame that are central to communicating the meaning of the image.
CHAPTER EXERCISES
These exercises will help you to learn about camera’s focusing abilities and how to manipulate them. It will also help you to question the notion of clarity, focus, depth of field, etc., that are part and parcel of photographic image making. Does an out-of-focus image have anything to tell us about a subject? Can a pinhole camera image, with its lack of sharpness but infinite depth of field shed understanding about a specific topic? Remember to stick with your chosen subject or concept that you’ve been concentrating on for the previous exercises, but for these, consider what the notion of “focus” has to say about your subject or what your subject has to say about focus.
Exercise No. 1: Limited Depth of Field Image Series
Make a series of photographs with your camera set at its closest focusing distance. Look through the lens and compose your images based only on the sharply focused aspects of the frame in relation to light and shadow rendered in the rapidly diminishing depth of field that you see. Use close to the widest aperture (f/2, 2.8, 4) available on your lens in order to limit your depth of field to what you see through the lens. You will be printing a series (4–6) of them, so be sure to consider how the subject matter and content of these images will relate as a group.
For added complexity, you could create limited depth of field images to be printed as diptychs, triptychs, or multipanel panoramas. As in the exercises in Chapter 1, plan the images in advance so that the results are more predictable. Still, work in a series, and edit 4–6 successful multi-panel images to print.
Exercise No. 2: Series of Out-of-focus Images
For this exercise make a series of photographs with your camera set to a focusing distance that renders the scene out of focus. Do not simply change your distance from your subject until it is in focus. Look through the lens and compose based only on the light and shadow that you see. Use close to the widest aperture (f/2, 2.8) available on your lens in order to limit your depth of field to what you see through the lens. You will be printing a series (2–5) of them, so be sure to consider how the subject matter and content of these images will relate as a group.
Exercise No. 3: Plane of Focus Manipulation
In this exercise you’ll need access to a Hasselblad Arc Body or Flex Body, a Lensbaby, a large-format view camera, or even a vintage camera with an adjustable bellows.
View the scene through the lens, and begin to adjust your bellows or lens plane until the plane of focus looks interesting to you. Don’t over-analyze it … make intuitive decisions based on the appearance of the image in the viewfinder or ground glass.
Approach this exercise as a series, and try to produce 4–6 images where the plane of focus manipulation adds to the meaning of the image.
Exercise No. 4: Convert Your SLR Camera into a Pinhole Camera
For this exercise, you’ll want to do some independent research beginning with Pinhole Resource (www.pinhole-resource.com). Purchase an extra camera body cap, and drill a smooth hole about 1″ in diameter into the center of it. Secure a handmade or purchased pinhole of the proper aperture size for the camera body’s depth to the inside of the body cap using black tape, and use it to make photographs of your chosen subject, topic, or genre. Think conceptually about how the extremely wide depth of field against the softness of the image can affect your viewer’s perception of your subject.
PORTFOLIO PAGES
The artists represented in this chapter’s portfolio pages engage in a wide range of photographic practices. To create their work they use traditional, digital, and hybrid media, and they consciously (visually as well as conceptually) address how the depth and clarity of focus affect the appearance and meaning of their photographic images. The work in these pages is not about apertures or lenses perse; rather, it uses the guiding principles of these technical devices as visual strategies to support or address the subject of their images. These photographer—artists use pinhole and plastic lens cameras, non-traditional and inventive focusing techniques, as well as specific attention to depth of field and framing to create images that communicate uniquely and beautifully.
These images are intended to inspire creative thinking and critical debate about the content and subject of the work, as well as the use of apertures and lenses in relation to that content. Additionally, think of other instances where still images use the depth and clarity of focus consciously, or reference them in the work in order to comment on their subject. How might a more conscious use of the attributes of apertures and lenses add dimension and meaning to your images?
TRACES
ARTIST STATEMENT
In making these pictures, I was interested in the suggestion of a thing rather than its description. Objects merge with their backgrounds, and light dissolves edges. I have deliberately sacrificed precision and detail in order to emphasize allusion and evocation. At the same time, I want the viewer to identify the subject matter sufficiently to discern, simultaneously, both its substance and its essence.
Process Statement
Clear focus is one of the most compelling virtues of photography. People once used a magnifying glass and a pin to count the bricks in buildings recorded in daguerreotypes. The seemingly infinite detail of a large format contact print can astonish us still today. To throw a picture deliberately out of focus seems almost perverse, a violation of what is “right.” On the other hand, because of the relative novelty, almost anything looks temporarily interesting when seen this way. But although everything looked promising in the camera, the pictures were never the same as what I saw there. They never are.
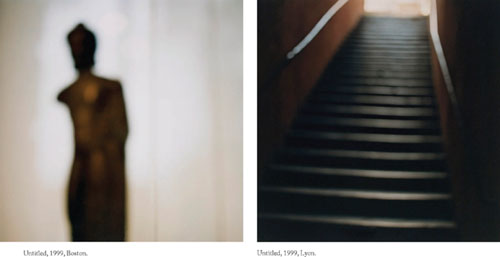
Untitled 1999, Florence.
ARCHEOLOGY OF A LIFE
ARTIST STATEMENT
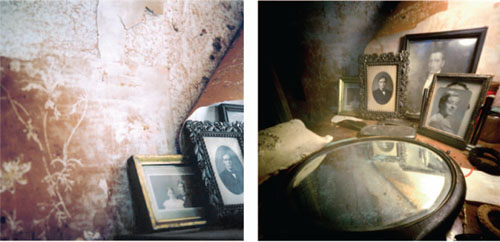
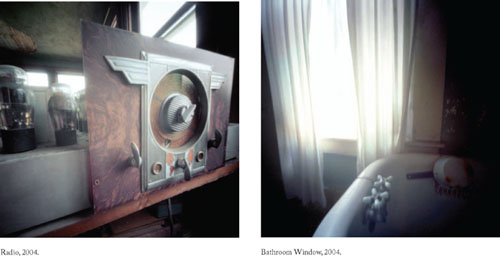
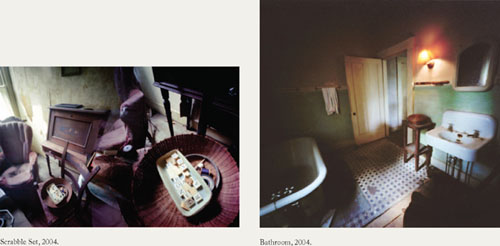
Interior spaces speak to me. I am curious about the way human presence imprints and leaves residues of its history. The house pictured in this exhibition was left empty in 2000 after the death of a 92-year-old woman, the last member of a family that had lived in the house for over a century. These images, taken with permission of the surviving relatives, are documents of the artifacts of a life that had few contemporary elements. The framed family portraits, drawers with Harriet Hubbard Ayer’s Beautifying Face Powder and a button jar, an old edition of The Tales of Peter Rabbit tied with twine, saved ribbons and receipts, parts of a scrabble game exist in a space in which time is suspended. The house itself is a time capsule, with strange and anachronistic pairings of objects: a 1962 New Yorker magazine occupies a drawer with a more contemporary article from a local paper. I wondered about the personal value attached to what was saved and whether there was some mysterious order or meaning to the collections. The experience caused me to reflect on my own collection of treasures, and on who might sort through them after my passing, getting to know me, and my history through my artifacts.
Process Statement
I used pinhole cameras to make these pictures. The required exposure of the objects and spaces took long minutes to accomplish. I chose to work with pinhole cameras because the distortion and shifting colors inherent in the process resemble the evocation of dream or memory. The camera’s extreme depth of field challenges normal perception of scale, and objects appear iconic and monumental, as with the image of the 1950s style radio, with its now obsolete radio tubes. The images were photographed with Fuji 400ASA color film and printed digitally on Legion Matt paper on an Epson 2200 printer. I appreciate the subtlety of control made possible with digital printing, and the ability to print on fine-art papers, creating an image that looks like an artifact in its own right.
Pictures (diptych: left and right panels), 2004.
PLASTIC CAMERA IMAGES
ARTIST STATEMENT
The Holga is my camera of choice. It’s a super-simple plastic box with a spring shutter and almost no way to adjust your exposure. It doesn’t roll the fi lm on tightly, sometimes the back falls off, and the negatives are usually way over- or under-exposed. On the plus side, they’re cheap and light, and the images they make have a look and feel wonderfully different from what you get with a “normal” camera.
With my first successful Holga image made in 1999, I discovered that the square-ish negative was a bit bigger than the standard size for its format (6 cm × 6 cm on a medium format 120 film). In response, I cut a negative carrier out of cardboard that follows the Holga negative’s natural edges, and I’ve been using that carrier ever since.
I’ve always loved the inherent characteristics of Holga images. They bulge outward like an old TV screen, leaving straight lines out of the picture completely. They vignette, drawing the eye into the center of the frame. The focus likewise falls off toward the edges, mimicking how we see the world through our eyes.
The themes I’ve made the subjects of my Holga images have changed over the years, but my Holgas always seem to like photographing quirky subjects. I have many images of carnivals rides, animals, fake animals, sculptures, parades, and other funky subjects that make people smile. Over time, though, I’ve pulled the Holga away from its traditional milieu to try to tease great photographs out of other subjects. These series include many city and nature photos, both scenic and abstract, and photos that focus on graphic qualities in structures.
The hit-or-miss aspect of this type of shooting keeps the intrigue in the act of photographing, breaking the expectation of predictability, and leaving room for unanticipated surprises.

Garbage Pail and Twin Towers, New York
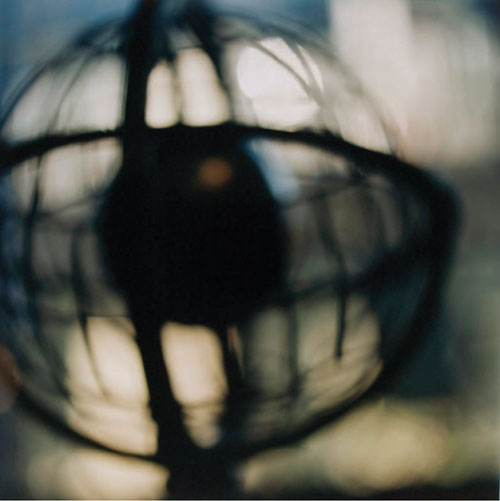
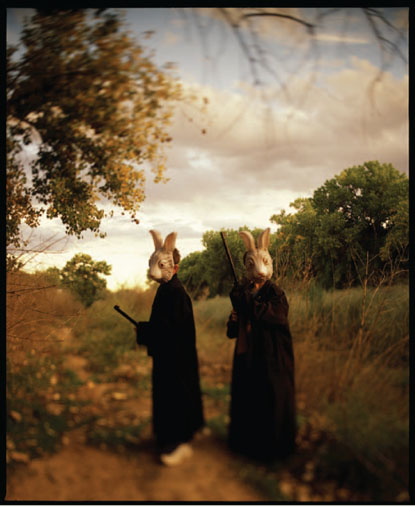
ARTIST AND PROCESS STATEMENT
I love to run around with a shift/tilt lens adapter on my Mamiya RZ 67, especially with a 75-mm lens and 85b filter, and the auto prism. Though it is the world’s heaviest point and shoot camera, it frees me to be spontaneous with both exposure and focus. This led to a “shoot before I think” way of shooting; I let my body and my stomach feel what to do … then I snap the shutter before I let my brain compose or focus. This is how the bunny series came about. It is a bit macabre and melancholy, but it is also playful, innocent, and fantastical. The soft focus, the vignette, and tonality add to their nostalgic and timeless impressionism. I think that selective focus is a bit like selective attention spans; sometimes my mind and I just like to wander and not focus on details … but rather take in the whole image and feel. Through these images, the viewer can do the same.

Clock Bunny.
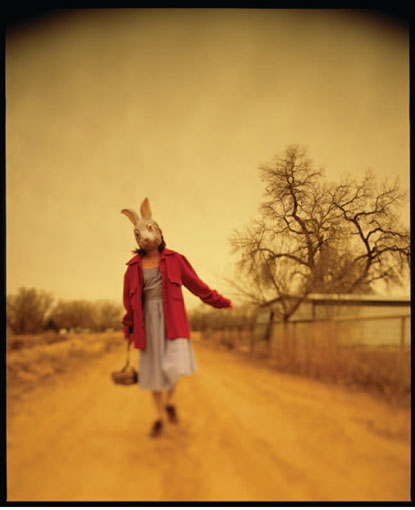
Penelope.
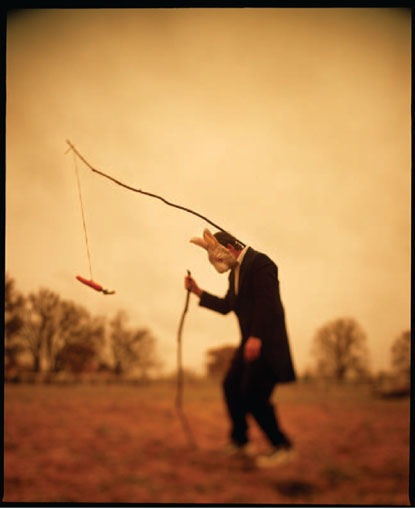
Follow the Carrot.
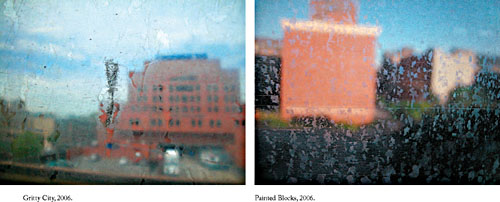
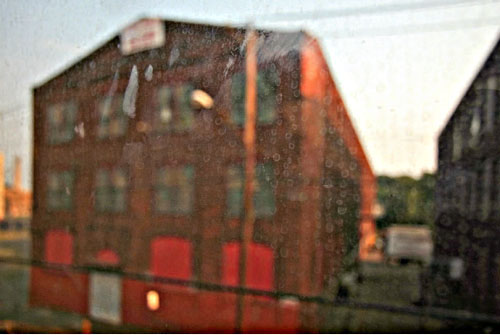
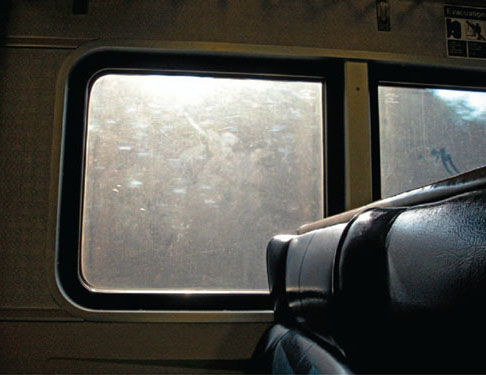
OFF-PEAK
ARTIST STATEMENT
There is a certain excitement about a train ride. It’s a journey to somewhere else. That somewhere can be new or it can be familiar, but if you are, like me, a person who is drawn by an invisible force toward the nearest window, the experience of riding the train and window watching is always fresh. From the moving train, fleeting images of the landscape are perceived and held for a fraction of a second and then dissolve into memory. Familiar objects are transformed by the camera lens which produces blurs, movement lines, and records the marks and stains on the windows as impartially as what lies beyond. With speed, clear outlines dissolve, and sides of buildings become washes of color; grass and trees turn into green brushstrokes. Chance plays a role. Nothing can be planned; decisions have to be made in an instant. Every picture represents Yes! I like that! Click. After many such clicks, patterns emerge that help the photographer anticipate certain effects.
Process Statement
In this series, the lens and shutter were manipulated to evoke the experience of riding the train. Putting distant objects out of focus recalls landscapes glimpsed fleetingly, and remembered imperfectly. Memories have soft edges. When the focus is on the window, rather than a distant object, all the rain, dirt, or other marks record clearly, and the landscape appears to have the dirt and smears directly imprinted upon it. This awareness of the window is important to the meaning of the work. Obtaining the optimum range of apertures for sufficient depth of field was a consideration, as the shutter speed had to be at least 160 and often higher to eliminate camera shake and unintended blurs on a moving train. This limited the depth of field. The camera used is a Canon EOS Digital Rebel with a Canon EF-S 17–85-mm 5.6 IS USM lens.
Jewel Box, 2007.
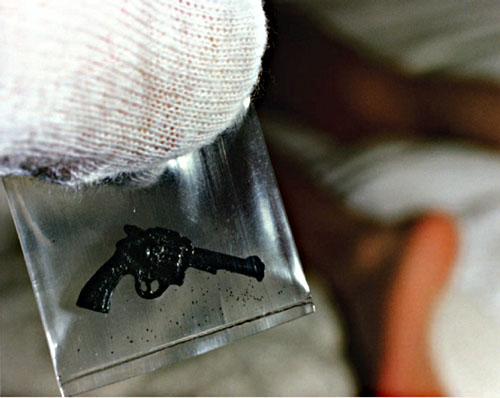
LIFE-SIZE
ARTIST STATEMENT
I’m fascinated by the fact that almost anything—whether sunglasses, a hypodermic needle, or condom—can be found in miniature. I’m equally intrigued by the desire to collect such tiny replicas of normal-size objects. As a smaller scale surrogate of the original, the miniature implies the existence of some kind of alternative universe where we—as larger bodies—are like gods, omnipotent, and in control. For my series, Life-Size, I use a 35-mm SLR camera with a macro lens to photograph my friends and family interacting with miniature dollhouse objects in their own homes and backyards. By exploiting extremely shallow depth of field, I make the surrounding environment fall out of focus, drawing attention to the surface details of the tiny objects as well as the wrinkles, scars, and pores of my larger human subjects. In the darkroom I enlarge the negative so that the previously small appears to approximate the “life-size” in the final photograph. This dramatic shift in scale and narrow range of focus emphasize the resemblance of the miniature to its larger-size referent, and at the same time upset our usual sense of order and proportion.
The resulting photographs show gigantic adult figures invading a claustrophobic world of Lilliputian proportions, awkwardly attempting to make these under-sized objects function as if they were actual working possessions or tools. This intersection of scales disturbs the imagined perfection of a mini-sized fantasy world, eliciting humorous and absurd narratives that explore our desire to control and contain the unpredictable and sometimes overwhelming circumstances of life. By inviting the viewer to look beyond the surface and confront the betrayal of appearances, the photographs explore the relationship between how we see, interpret, and experience the world we live in. By making images that challenge our expectations, I’m exploring how perceptual experience shapes our understanding of the world around us, and our concepts of what is real and/or an illusion.
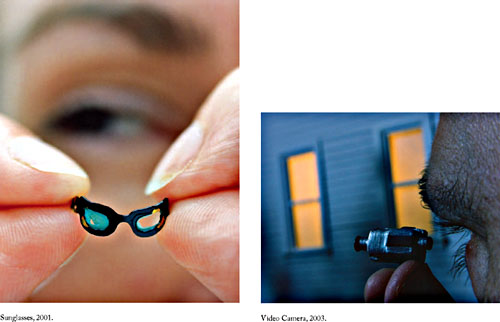

Life Preserver, 2003.