
SHUTTER SPEEDS:
TIME AND
MOTION
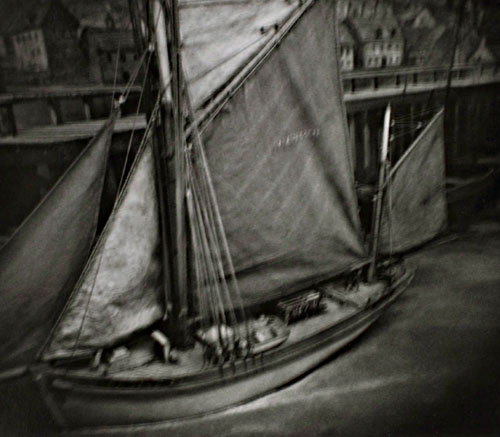
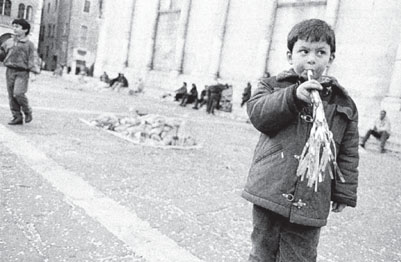
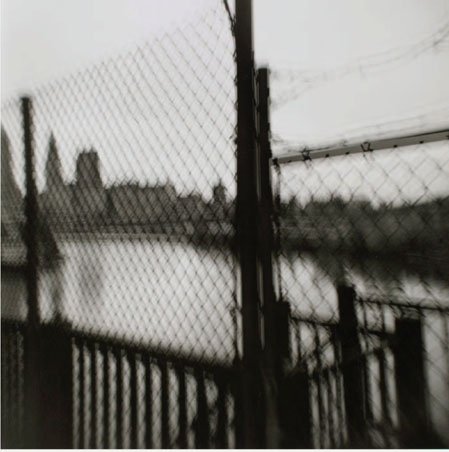
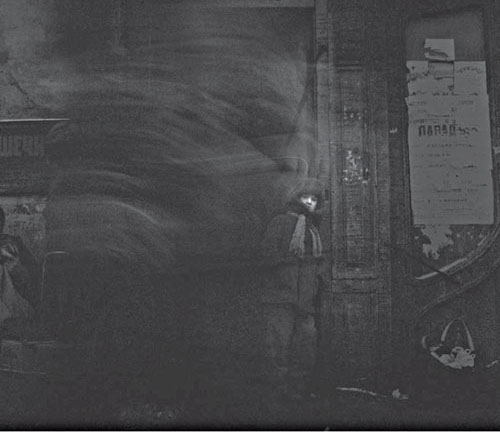
PHOTOGRAPH © SEAN WILKINSON, Untitled, 1999, London, from Something More and Less.
“BECAUSE PHOTOGRAPHY IS TECHNICALLY … SUCH A PRECISE MEDIUM, ABERRANT EFFECTS, WHICH ONCE OCCURRED QUITE UNPREDICTABLY, CAN BE CONTROLLED AND SKILLFULLY EXPLOITED IN SERVICE OF GREATER EXPRESSION.”—MARTIN FREEMAN
SHUTTER SPEEDS: THE THIRD PHOTOGRAPHIC ELEMENT
Since the first photographs, images recording motion-blur have both vexed and fascinated photographers and viewers alike. Blurring motion was not a creative discovery— throughout the medium’s early years, photographers (and their subjects) had to go to great lengths to avoid it because of the extremely slow light sensitivity of available media— but it was to many an interesting occurrence, ripe with visual potential. Once media sensitivity increased to allow blur to be avoided, the degree of freezing or blurring motion could also be controlled, and photographers began to consciously utilize shutter speeds as an aesthetic and communicative tool. As they did, they and visually literate viewers began to realize the myriad levels on which the degree of freezing or blurring time could affect the visual character of their subject matter and infuse potential meaning into images. Indeed, like focus, motion in a photograph, can
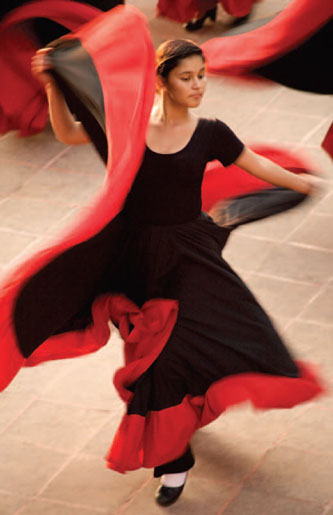
PHOTO © NICOLE KULINSKI, 2006.
In this photograph of a traditional Mexican dancer, Denver-based editorial photographer Nicole Kulinski used a shutter speed of ¼ second at f/4 with a 170-mm lens. These factors, combined with her distance from the subject and the speed at which the dancer was moving, provided the perfect combination of factors to capture simultaneously the grace of the frozen moment with the fluidity of slightly blurred movement.
be recorded on a continuum of nearly innumerable points ranging from completely frozen to unrecognizable blur; for photographers it is important to understand that where you place your image content on that continuum creates specific, unique photographic meaning (Shore, 1998, p. 35).
SHUTTER SPEEDS: A BRIEF TECHNICAL BACKGROUND
The shutter speed controls the length of time that the media receives exposure to light, or how long the passage through the aperture is open. When you activate the shutter release mechanism, a curtain within the camera opens, leaving nothing between the open lens aperture and the media (the sensor or film) so that light may enter to create the exposure. There are two basic types of shutter mechanisms: leaf and focal-plane (also called curtain) shutters. Leaf shutter mechanisms are located within the camera’s lens (usually in medium and large format cameras) and focal-plane (curtain) shutters are located inside the camera body just behind the lens in front of the film or sensor plane. Focal-plane shutters are most commonly found in SLR cameras. The two kinds of shutters have several different attributes that are most significant when using flash or strobe. Focal-plane shutters are limited to the flash synch speed or slower in order to record information to the entire picture plane, because this is the fastest speed at which the entire image area (media plane) is open to light simultaneously. Leaf shutters, on the other hand, can be used with a flash or strobe at any speed, since the aperture opens from the center outward; however, because of this, leaf shutters also have a slower minimum shutter speed than do focal-plane shutters. While focal-plane shutters commonly offer a shutter speed as fast as 1/4000th of a second, leaf shutter mechanisms offer about 1/500th of a second at their fastest.
The common whole-stop shutter speeds are: 8 seconds 4′ 2′ 1′ ½ ¼ 8 15 30 60 125 250 500 1000 2000 4000 8000
Understanding shutter speeds and their relationship to several other factors enables photographers to control the representation of time and motion in their images. Only practice and experimentation provide enough guidance to control this element of photography to make it effective as a communicative tool.
Students often question why they should learn these techniques when it’s easy enough to create blur effects in Photoshop. My response is as usual—as photographers we are responsible for understanding and utilizing the
relationship between the world of motion and the static nature of our medium. You might decide to alter the freezing or blurring effects in the digital darkroom, but in order to do so with credence you must first understand how movement, suspended or drawn out against static media, actually appears. This enables you to create images in which movement is wholly believable, or incredible or fantastic by drawing upon the viewer’s suspension of disbelief.
AFFECTING VISUAL QUALITY AND PHOTOGRAPHIC MEANING USING SHUTTER SPEEDS
Technically, the movement recorded in a photograph is dictated by the interrelationship of three factors: the shutter speed (duration of the exposure); the static nature of the media (the flat, stationary, light-sensitive material in the camera); and the movement in front of the camera or of the camera itself (including its speed and direction, camera to content distance, and magnification/focal length). Photographers use shutter speeds for communicative effect by controlling the interrelationship between these three factors.
Explained another way, while photographic media is static, the world flows in time (Shore, 1998, p, 35), Movement captured onto static media for a particular duration of time—30 seconds, or 3 hours, or 1/250th of a second, or 1/8000th of a second (what John Szarkowski calls “a discreet parcel of time”)—creates a range of meanings completely different from those derived by watching the event unfold. These meanings are controlled in part by framing (our first photographic element) in which the photographer determines the specific aspects of the motion in front of them to be recorded onto the photographic image (knowing that viewers see only the motion occurring within the confines of the frame and have no visual reference to anything beyond it), but the meaning of motion in an image is primarily controlled by the three factors mentioned above.
Just as shutter speeds create a broad range of visual effects from freezing to blurring motion, the range of meanings created by those shutter speeds is so great that at polar ends they might have the effect of contradicting one another (depending on the subject matter and the movement as recorded onto the static media). While freezing motion in the creation of a sharp, crisp image carries with it connotations of truth, accuracy, and clarity (rightly or not), blurring motion necessarily calls into question the relationship between clarity and truth, and forces the viewer to confront the indistinct nature of the thing blurred as well as its place in time and space.
A photograph containing an adequately frozen moment creates concrete juxtapositions among clearly seen subject matter, allowing viewers to contemplate the moment in time as they imagine it took place. The clarity of the frozen-moment image often offers viewers the borrowed confidence of one who sees a thing first-hand, a great service to credence for photojournalists and documentary photographers. Conversely, a photograph containing blurred motion allows a viewer to contemplate a less usual reality, one which is difficult to place in an imagined context because our eyes do not transfer such images to the brain; in so doing blurred images offer the possibility of understanding truth of a different order than a frozen moment can reveal. For instance, the use of slow shutter speeds in relation to particular subject matter can infer the transience of a state of being—youth, aspects of the natural world, time, or life itself—it can literally record the passing of time in relation to a subject’s processes, “discreet parcel of time” on earth, and the very traces left by its movement through time and space. Imagine you are making photographs whose subject is “time” and you decide to use a metronome as your primary content. The object itself is used as an indicator of time or rhythm, which is what the image is about. You could simply make a photograph of the metronome, with everything in the frame crisply frozen. Or you could place the camera on a tripod, set the metronome into motion, and using a slow shutter speed you could capture the device and its surroundings in a static state while blurring the rhythm of the clicking pendulum such that the viewer actually sees the motion itself extruded into the image. This type of comparison can be applied to a vast range of subjects, and makes a significant difference in both the appearance of the image and in the meaning it conveys to viewers.
One of the most significant attributes of the intersection of shutter speed, motion, and static media relates to how this intersection is framed. The intersection of photography’s temporal element as captured in the frame was referred to by photographer Henri Cartier-Bresson as “the decisive moment.” Cartier-Bresson described that there is a certain way of making photographs in which there is “an interrelationship of eye, body, and mind that intuitively recognizes the moment in time when the formal and psychological elements within the visual field take on enriched meanings” (Rosenblum, 1984, p. 483). Cartier-Bresson believed photography’s strength to be “The simultaneous recognition, in a fraction of a second, of the significance of an event as well as of a precise organization of forms which give the event its proper expression” (Newhall, 1955, p. 485).
To this day, this “decisive moment” is the very thing that draws countless individuals to the practice of photography. It epitomizes the significance of photographic image making for countless photographers; among them is Alexis Abrams. Abrams’ training is in photojournalism and documentary photography, apparent even in her personal work. Of it she says, “Capturing the decisive moment is
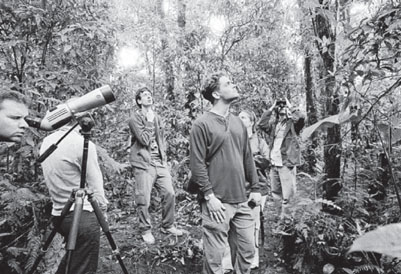
PHOTOGRAPH © ALEXIS ABRAMS, LOOKING FOR THE QUETZAL, SANTA ELENA, COSTA RICA, 2005.
the ultimate ambition for a documentary photographer, the conjunction of content (“the significance of an event”), composition (“the precise organization of forms”), and concept (“its proper expression”).” She goes on to say that, “With an attitude of humility and a spirit of openness,” she tries to “extract transcendent instants that reveal the beauty and humanity of her subjects out of the onslaught of ordinary moments.”
Another photographer whose street photography relies on the principles of the decisive moment is photographer Torn Finke. Trained in fine art photography, Finke has spent many years developing two ongoing series of photographs entitled Celebrations and Competitions in both the United States and Japan. His images embrace the street photography tradition, and as such they employ the theory behind Cartier-Bresson’s decisive moment. Of his work he says, “Like expressions of the face, the attitudes of the body are full of meaning. Some of our gestures and poses are contrived for an audience; some are unconscious and involuntary, or nearly so. All of them send messages about who we think we are, or how we feel, or what we mean—messages we might prefer to disguise, as well as, those we intend to project. The present sample readily suggests the unsurprising conclusion that, we have become less inhibited about expressing ourselves.”
PHOTOGRAPH © ALEXIS ABRAMS, CARNEVALE, LUCCA, ITALIA, 2000.
Abrams states that she uses, “minimal equipment and available light, so I can respond, unencumbered, to the moments unfolding before me. I have no desire to direct the action in front of my camera. My greatest pleasure, in photographing, is to coordinate my breath, eye, and movement with the chaotic rhythms and unpredictable intersections that occur naturally in the world, without mediation.”
PHOTOGRAPH © TOM FINKE, UNTITLED, FROM HIS SERIES CELEBRATIONS AND COMPETITIONS.
THE DELINEATION OF TIME IN A PHOTOGRAPH
Based on the three factors that control motion-capture (shutter speed, static media, and movement), there are four ways in which the world of time can be translated onto a photograph. There are innumerable degrees to which time may be arrested or extruded, and some images can contain both simultaneously; however, all photographic images delineate time in the following ways. They are: frozen, blurred, static, or overlapping. What follows is a discussion of these four manifestations of time and motion in photographs.
1. Frozen Time
Time can be frozen in a photographic image; photographers from Jacques Henri Lartigue (1894–1986) to Lois Greenfield (contemporary) have done so to their advantage. When time is frozen in a photograph, two criteria are present: movement is occurring (in front of the camera, the camera itself, or both) and that movement is arrested. Here, a “discreet parcel” of fluid time is stopped because the exposure was of a brief enough duration to do so. Frozen time often brings to mind the mid-air fast action captured by sports photographers, but this is not usually the case. In fact, to some degree or another, the majority of photographs capture frozen time, since cameras are most often handheld and their own motion during exposure must be arrested. Frozen time allows us to view aspects of the world of motion that would not be visible to our eye, and allows us to pause and consider the moment arrested in time.
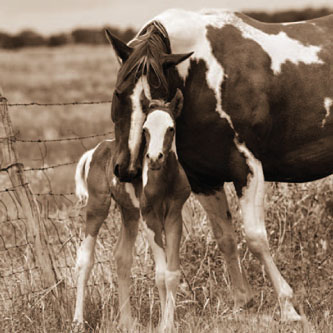
PHOTO © NICOLE KULINSKI, 2006.
This photograph of a mother and foal was made in the San Luis Valley. It was made with a 300-mm lens; f/8 @ 1/500-second shutter speed. This image illustrates a perfectly represented moment of tenderness that existed only for the fraction of a second that the image was made. The shutter speed that Kulinski used was fast enough to freeze both the movement of the subject and the camera shake that exists with a telephoto lens.
Frozen time is used in scientific photography as well as any photographs in which the significance of the image relies on a moving subject suspended in time.
There are technical factors to consider when attempting to freeze time successfully, and only practice will enable you to accurately determine how to proceed in order to achieve your desired result.
FIVE FACTORS THAT DETERMINE THE DEGREE OF FROZEN TIME IN A PHOTOGRAPH
1. Shutter speed: The other four factors being equal, the faster the shutter speed, the more frozen the motion will be rendered.
Technical Note: In order to freeze the motion of the camera itself if you are hand-holding it, the shutter speed must be equal to or faster than the numerical equivalent to 1/focal length of the lens you are using. Example: While using a 200-mm lens, you would need to use a shutter speed of 1/250 of a second.
2. Speed of motion: The other four factors being equal, the faster the subject or camera itself is moving, the faster the shutter speed must be in order to freeze the movement.
3. Direction of motion: The other four factors being equal, the more parallel to the lens axis the motion, the more frozen it will be. In other words, a subject moving toward or away from the camera will be rendered frozen
at a slower shutter speed than a subject moving across (perpendicular to) the camera’s field of vision.
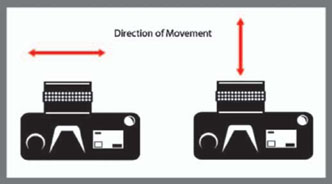
ILLUSTRATION © SHAWN MARIE CURTIS, 2007.
If movement is perpendicular to the lens axis (across your field of view) a faster shutter speed is required to freeze it.
If movement is parallel to the lens axis (directly toward or away from the camera) a slower shutter speed can be used to freeze it.
4. Distance from subject: The other four factors being equal, the further the camera to subject distance, the more frozen the motion will be.
5. Focal length/magnification: The other four factors being equal, the shorter the focal length of the lens, the more frozen the motion will be. This is because shorter focal lengths (wider angle lenses) provide less magnification. Conversely, when a macro or close-up lens is used the movement of the subject and camera are magnified, so a faster shutter speed is needed to freeze motion.
2. Blurred Time
Time can be blurred in a photographic image. Photographers such as Ralph Eugene Meatyard (1925–1972) and Francesca Woodman (1958–1981) have blurred time. With blurred time, the movement in front of the camera or the movement of the camera itself is extruded, drawn out across the picture plane. In these instances, the content of the image is moving, the camera is moving, or both are moving and blur is created because the exposure time is long enough to record the movement across the picture plane. There are nearly unlimited ways in which blurred time
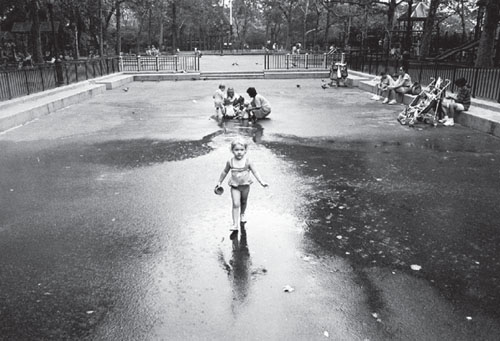
PHOTO © DAVID BECKERMAN, GIRL WITH PAIL, NEW YORK, 2003.
This photograph captures a young child in mid-stride, freezing her motion (and the motion of others around her) in such a way as to draw connotative meaning between her outstretched arms and the light which seems to emanate from her amid a large field of darkness. His use of a 21-mm wide angle lens adds to the feeling of space engulfing the girl in part due to exaggeration of size—space relationships and in part due to edge distortion www.davebeckerman.com
can be delineated in a photograph; only practice and experimentation allow you to understand and predict the effects of slow shutter speeds in relation to time and motion.
Two particularly useful tools for blurring motion are tripods and neutral density filters. When you want to use a long shutter speed, but want to record only the motion in front of the camera as blurred (eliminating camera movement and thereby making the viewer’s point-of-view stationary), the best way is to place the camera on a tripod. Remember that it is only possible to confidently handhold a camera at a shutter speed close to 1/focal length of the lens, so depending on the focal length and the degree of subject movement you want to record as blur, you will need to use a tripod.
Often, you want to blur motion beyond the capabilities of your camera’s exposure settings. For instance, you are trying to blur the motion of a waterfall. You set your digital camera to the slowest ISO or buy slow ISO film to assist you, and you set your aperture to the smallest setting your camera lens offers so that you naturally get the slowest shutter speed you can for proper exposure. If the lighting conditions are very bright, you still might not have a shutter speed sufficiently slow enough to blur motion to the extent that you’d like. This is where a neutral density filter comes in handy. A neutral density filter is designed to absorb light while not affecting the color balance of the scene (at least not much). They are sold in increments that absorb varying amounts of light according to the stop-factor chart (for information on the stop-factor chart, see page 178). An ND 2 filter absorbs 1 stop of light; an ND 4 filter absorbs 2 stops of light; an ND 8 filter absorbs 3 stops of light.
Here is how an ND 8 filter would be used to blur the waterfall in the above example:
Your camera is on a tripod, so everything in the frame except the moving water will be frozen. You are focused on a waterfall, and are using the following exposure setting:
100 ISO f/32 1 second … you are achieving proper exposure, but you want to blur the water more. You add an ND 8 filter to your lens, which absorbs 3 stops of light, so your new exposure is: 100 ISO f/32 8 seconds. Now the water is blurred to a silky texture!
Neutral density filters are an indispensable tool for photographers who want control over the degree of motion in their images, and a high-quality glass screw-mount filter will provide that control.
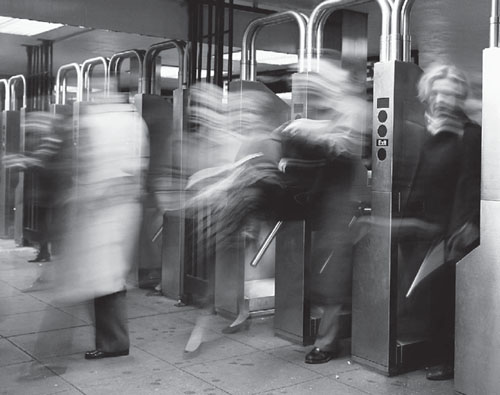
PHOTO © DAVID RECKERMAN, TURNSTILE, NEW YORK, 1994.
Here, New York photographer David Beckerman placed his camera on a tripod and used a slow shutter speed (1 second) in order to capture with clarity the environment of the subway turnstiles and simultaneously blur the motion of the fast-moving commuters moving through them.
Finally, in order to insure that a scene will be sharp during a long exposure, you should do one of two things: use a cable release or use the camera’s self-timer. Either option removes the possibility that your own hand’s pressure on the shutter-release mechanism will cause the image to be blurred overall.
IN-CAMERA AND DIGITAL DARKROOM BLURRED TIME TECHNIQUES
Painting with light: A particular instance of using blurred times in creating unique visual effects is in a technique commonly known to studio photographers as “painting with light.” Painting with light is accomplished by using a long exposure in a darkened environment, which allows the photographer to literally “paint in” areas of the scene using a flashlight or any small, controllable light source. The effect seems to be one of softening the overall focus of the image, but what is really happening is that a soft, diffuse, and often color-cast glow appears around painted aspects of the photograph because the light which reveals the image content is emerging from a fluid rather than a single, fixed source.
Photographers who paint with light often use colored filters or gels over the light source to control the color of light in particular areas of the scene as well as diffusion filters over the lens during the painted aspects of the exposure. In the following images, travel and editorial photographer Anna Zoromski photographed an automobile graveyard using the technique in-camera. She arrives on location before dusk in order to survey the site, and with her camera on a sturdy tripod she makes her long exposures using two flashlights. Her camera is generally set to an aperture of F22 and a shutter speed of 30 seconds, using ISO 100 on her digital camera to reduce noise in the images.
Although the effects of this technique cannot be reproduced in the traditional darkroom, in the Digital Darkroom a sense of painting with light can be created beautifully.
A tutorial developed by Denver food photographer Joe Lavine demonstrates how. See the Technical Tutorials Section for Chapter 3.
Panning: Another means of registering blurred time in a photograph is commonly known to photographers as panning. The technique is often used by sports photographers; it’s relatively difficult to master, but lends itself to a unique combination of motion against frozen elements within the frame. In order to pan, you use a long shutter speed (say, 1/4th of a second to 1 second), handhold the camera, and literally move the camera in the direction of the motion of the subject moving across your field of vision. If the moving
subject stays in the same place in the frame throughout the long exposure, and everything else is moving (due to the motion of the camera) a successful pan is created, which renders the moving subject as frozen and all of the stationary content as blurred. The key is to move the camera at the same rate of speed as the subject’s motion, to keep the moving subject at exactly the same point in the frame so that its motion is not extruded across the picture plane.
IMAGE © JOE LAVINE, CHERIMOVA, 2007.
3. Static Time
In order for time in a photograph to be rendered as static (as stationary, or “still time” as Stephen Shore refers to it) there must be no movement in front of the camera, and the camera itself must not be moving, so that no freezing or blurring is possible. In these instances, time literally seems to be standing still. Photographers from Karl Blossfeldt (1865–1932) to Edward Weston (1886–1958) have created iconographic images from objects in a seemingly perpetual static state. Static time is really a case of frozen time taken to the extreme, as eventually everything in the universe moves or changes. But in a photograph, static time appears quite different from frozen time in that the contents of the image seem at rest, as opposed to seeming arrested in time as they move; as such, these images connote very different meanings in relation to their specific subject and content.
An indispensable tool for creating images of static time is the simple tripod. With it, an image can be made to have maximum depth of field and still be static, since the smaller the aperture gets, the longer the shutter speed needs to be and the more often blur becomes apparent. If the subject is still (a still life, an interior space, or anything else which is not moving or changing rapidly) and the camera is on a tripod then the length of time the exposure takes is inconsequential, so with respect to motion a slow shutter speed can be used to the same visual effect as a fast shutter speed. The primary difference in this case is the change in depth of field which is created when you change the aperture to maintain proper exposure.
As stated before, a subject can be captured in static time while using a long shutter speed, since nothing in the image

PHOTO © KATHY LIPPERT, 2007.
This image was made at the 2007 National Western Stock Show and Rodeo in Denver, Colorado. Panning captured not only the power and speed of barrel racing, but also the beauty of the fluidity of motion created by horse and rider Kathy Lippert is a photojournalist and freelance editorial photographer specializing in sports, recreation, outdoor lifestyle, and, in particular, western lifestyle.
is moving. However, one major factor in relation to static time when using a long shutter speed is that the build-up of ambient light which occurs in the scene can make a dramatic difference in the visual outcome of the image. For example, in architectural photography it is desirable most of
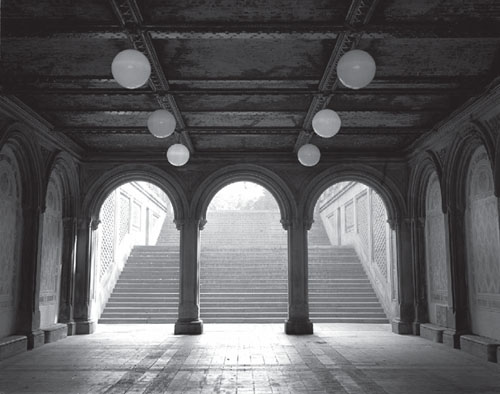
PHOTO © DAVID BECKERMAN, BETHESDA PASSAGE, CENTRAL PARK, 1994.
This image captures the nature of static time; there is nothing moving in the scene, and the camera itself is still, so the scene carries with it a feeling of solitude, calm, and quiet The image was made with a 4 × 5 view camera with a normal focal length lens (150mm.).
the time to produce sharp, dear images of the place photographed using a small aperture to achieve maximum depth of field. When doing so, it is essential to use a sturdy tripod to be able to meter the difference between various ambient light sources in the scene and to be able to “light balance” that is, to adjust your flash or strobe output in relation to the ambient light readings in the scene in order to produce your desired results.
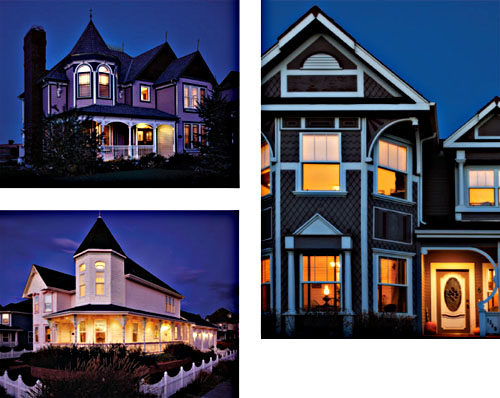
In the following examples, architectural photographer Paul Weinrauch produces images which reveal static time in juxtaposition with interior ambient light for his personal portfolio. He finds that the technique of using a slow shutter speed to build upon the ambient light exposure at dusk and dawn, in relation to interior lighting, produces a beautiful visual effect in conjunction with the Victorian architecture that he loves. He uses the mix of different Kelvin temperatures from the various light sources in the scene to add color and character to the images in relation to the color and style of the houses themselves.
4. Overlapped Time
Time can be overlapped onto static media by making several exposures in order to record multiple discreet instances in time layered on top of one another onto the same media

plane. Photographers as far back as Eadweard Muybridge (1830–1904) and Harold Edgerton (1903–1990) have overlapped time. Overlapping time necessarily includes one or more types of time capture; for instance, you might make multiple exposures recording frozen time, or you might combine exposures of frozen and blurred time. In any sense, if you take multiple “discreet parcels of time” and overlap them onto a single plane, you are creating an image which constitutes overlapping time; this could potentially have significant implications with respect to particular subject matter, and so should be considered as an important tool in the service of visual communication.
In this chapter’s Artist Portfolio Pages, David Stephenson uses multiple (overlapped) exposures of blurred time in order to create kaleidoscopic images tracing the stars. This recording of time can also be achieved in the traditional darkroom using multiple printing techniques, as is famously done by artist-photographer Jerry Uelsmann, and similarly can be achieved in the digital darkroom as well using layers and layer blending modes. What makes this a distinct form of time capture in a photograph is the fact that it allows the production of images which could not exist without overlapping time within the frame.
TECHNICAL CONSIDERATIONS FOR OVERLAPPING TIME
One of the difficulties of achieving images which overlap time in the camera is determining the correct exposure for each of the individual frames. Well … help is on the way! There is a simple chart that outlines the amount to reduce the exposure depending on the total number of exposures you will make to a single frame, and it works in the darkroom as well as in capture. It is the stop-factor chart, and it’s handy for more than just multiple exposures. It is the standard way that filter factor (how much light a filter absorbs) is described, and it is used when determining the number of multiple flash or strobe “pops” needed to build up exposure when using an insufficiently large aperture—a technique used primarily in studio photography in order to achieve greater depth of field. The chart is also used in describing ratios (the difference between the amounts of light in the highlight versus the shadow areas of a scene).
| Stops | 0 | 1 | 2 | 3 | 4 | 5 | 6 |
| Factor | 1 | 2 | 4 | 8 | 16 | 32 | 64 |
Here’s how the chart works: the difference between amounts of light allowed to strike the photographic media is determined in what is referred to as “stops.” For each 1 stop change, the media receives 2 times or ½ the amount of exposure to light—that is, an exposure factor of 2. Each subsequent change entails applying a simple multiplication factor, and the chart provides it for you. Therefore, as a starting point, if you want to overlap two images onto a single frame, you will need to underexpose each image by 1 stop; if you want to overlap four images onto a single frame, you will have to underexpose each image by 2 stops and so on so that the final image has the correct overall density. Many cameras do the math for you simply by programming in the number of exposures you wish to overlap, but knowing the mathematics behind it allows you to control your results when your camera doesn’t offer this capability.
In the following example, Michael Davidson of Florida State University’s Institute of Molecular Biophysics creates wholly original images using overlapping time through exacting microscopy exposures.
Above is a multiple exposure image of ascorbic acid (the wheat field in the foreground), liquid crystalline xanthin gum (the mountains), the field diaphragm defocused with an orange filter (the moon), and polybenzyl-L-glutamate
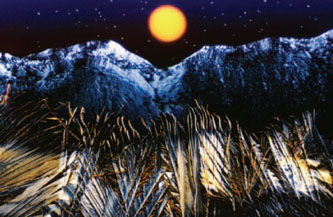
IMAGE © MICHAEL W. DAVIDSON, ASCORBIC ACID, IDAHO; COURTESY THE NATIONAL HIGH MAGNETIC FIELD LABORATORY, FLORIDA STATE UNIVERSITY.
spherulites with a blue filter (the stars). Michael Davidson says, “My interest in microscopy has led me to explore the possibilities of multiple exposure color photomicrography using crystals grown from a wide variety of chemicals, biochemicals, polymers, thin films, and biological macromolecules. The basic construction of these photomicrographs involves the classical microscopy techniques of brightfield and darkfield illumination, in addition to … cross polarization, differential interference contrast, and Rheinberg illumination assisted by basic visible light color-filtering processes. This effort has resulted in the generation of a portfolio of images which I have termed microscapes. Microscapes consist of multiple exposures fashioned on a single frame of a 35-mm transparency film. They are intended to resemble unusual and/or alien-like landscapes and are designed to have the highest contrast and color saturation available with current commercial processing techniques.”
TRADITIONAL DARKROOM TECHNIQUES FOR USING OR CREATING OVERLAPPED AND BLURRED TIME
While in-camera techniques are used to control the translation of the world in front of the camera onto the capture media, darkroom techniques using the element of time are used to translate the captured image onto the output media (the print). The printing aspect of this element of photography only comes into play in a real sense in the traditional (wet) darkroom, because in the digital darkroom the passing of time during printing does not directly affect the visual outcome of the print.
In the traditional darkroom, the enlarger’s timer operates as the equivalent to the camera’s shutter speed; this aspect of photographic image making happens in “real time” and is the aspect of print exposure that allows the opportunity to dodge and burn, and to manipulate the print through movement of the printing paper, the negative, or additional elements during the exposure. It also allows the creation of combination prints, the addition of motion onto the print by moving the paper or objects positioned between the paper and the enlarger light during exposure, and enables photographers to make multiple exposures onto the printing paper.
Technically, exposure works the same way in the darkroom as it does in the camera, though the longer exposure times allow a greater degree of creative control. The stop-factor chart works the same way in the darkroom, so that if you have a 20-second exposure to place proper density onto the print, then you can split that time into any number of increments in order to manipulate the element of time to your advantage. You might make two 10-second long exposures, and place text printed onto acetate in the light path for one of the exposures. You might make one 10-second exposure, and two 5-second exposures, and move the negative slightly in-between. There are countless ways to use the element of time to your advantage during the printing process; the key is to do so in such a way as makes sense for the content and subject of your images. Photographers also use these practices when making photograms or when combining exposure to both objects and negatives. Perhaps the most significant (and at times frustrating) aspect of manipulating this element during the print exposure is that each print will be unique, since it is difficult to impossible to reproduce the exact degree of movement throughout an edition of prints.
In the following image example, Carol Golemboski uses the element of time to create finished images during her printing process; she states, “All manipulations occur in the printing process … I incorporate photograms into the pictures by laying objects on the paper during exposure to achieve a reverse (white) silhouette of the object, or a dark (black or gray) silhouette if I am using an Ortho-Litho template.” The resulting images are complex and would be unattainable if the artist limited her creative process to in-camera capture and direct printing of the negative. Not only is the concept of time central to her work (in that the objects depicted in her images had previous lives in the world complete with meanings of their own and are now resurrected in second lives in a completely different context) but it is also central to the physical means through which she creates her work in the darkroom—the process of darkroom manipulations which depend on the exposure time and additional objects that she uses to make her final prints. View more of Carol Golemboski’s work in the Artist Portfolio Pages of this chapter.
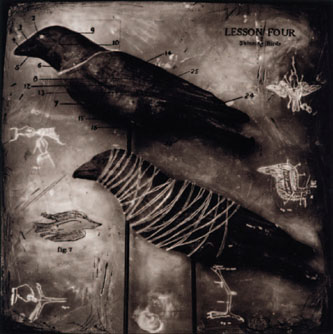
© CAROL GOLEMBOSKI, SKINNING BIRDS, TONED GELATIN SILVER PRINT, 2003.
Because the speed of light is constant, time and motion, arrested or extruded, are to some degree predictably written on to light-sensitive pages of photographs. Through the confluence of time, motion, and the duration of the exposure, image content is traced into a position on a continuum from frozen to blurred. In translating time and motion onto a two-dimensional plane in this way, a new meaning to the photograph’s subject is created; conceptual ties bind the content to the way it is recorded in time, thereby utilizing one of the medium’s most valuable gifts.
As photographic processes continue to evolve, the ways in which frozen, blurred, static, and overlapping time are delineated in their images will also evolve. The potential for heightened understanding of any subject that can be rendered through the action of light in a photograph is endless. By uniting photographic processes with other time-related processes the potential is exponentially increased. From cinema’s evolving time to image projection, film stills, scanner-as-camera, and animation through photographic sequencing, the medium is rich with possibility. But in order to capitalize on that possibility, practitioners must understand how the media’s grammar operates with respect to the physical laws of time and light, and how static media relates to a moving world.
CHAPTER EXERCISES
In these exercises you are urged to consider in what ways time and motion relate to your chosen subject or concept. How can freezing, blurring, overlapping, panning, or a combination of these help a viewer to understand your subject or your point of view about it? These exercises are designed to help you explore your subject and practice your effective use of shutter speeds relative to the world of motion.
Exercise No. 1: Blurring Time and Motion from the Camera’s Perspective
This exercise is intended to familiarize you with how your own movement or the movement of the camera itself can be used for communicative effect. In other words, you are placing the location of the movement at your own perspective, and therefore at the perspective of the viewer. Approach your subject using a range of slow shutter speeds, and, while moving around your subject or through the content of your images, make photographs. Don’t worry about the results yet; just make photographs.
In this exercise, the editing process—really looking at the resulting images on your contact sheets—is where you will really discover the potential for unique possibilities that your own movement in relation to the subject can create. How do your own movement and the movement of the camera during the exposure create images and meanings that differ from those images in which the camera is stationary and the subject is moving? The differences can be dramatic in terms of their visual and conceptual implications.
Exercise No. 2: Freezing Time
The use of frozen time can lend a great deal of insight into a given subject, in that it gives the viewer the opportunity to pause over an event which has been sliced from and held in time. In this exercise, you should consider your subject in relation to Henri Cartier-Bresson’s “Decisive Moment.”
Use a sufficiently fast shutter speed to freeze the motion of your camera if it is handheld and to freeze any activity in the frame’s content, or you might choose to freeze motion using a flash or strobe in a darkened interior, since the duration of many strobe units is faster than the shortest shutter speed in most cameras.
How does a frozen moment relate to your subject, or how could some secondary contents frozen in mid-movement relate to your stationary subject? Consider the natural moving aspects of the content surrounding your subject, or the meanings that might be conveyed about the movement of your subject itself.
Exercise No. 3: Personal Direction
Experiment with your own ideas on how to communicate about your chosen subject, genre, or concept as it relates to time and motion. You might choose to use a flash (to freeze motion) coupled with long exposure (to add faint blur) or rear-curtain flash coupled with long exposure. You might decide to create multiple exposures or to use the traditional or digital darkroom to explore the nature of motion as it relates to your subject. The idea is to use your knowledge about the nature of time and motion as it relates to your particular subject. Be inventive, creative, and think conceptually about your subject, topic, or genre!
PORTFOLIO PAGES
The artist-photographers represented in this chapter’s portfolio pages focus on a wide range of techniques in which the shutter speed and the world of motion are intertwined to produce images with specific meaning and unique visual character. The photographers manipulate shutter speeds, time and motion in the camera, and in the traditional or digital darkroom; they overlap time upon several frames or overlap several frames over time; they freeze or blur motion in order to clarify meaning; and they document the world of motion in ways that our eyes cannot apprehend. As with all of the portfolio pages in this text, they are intended not as exhaustive examples of this element’s possibilities, but as a source of inspiration from artist-photographers who have successfully employed the element in the service of making images that more accurately communicate their meanings.
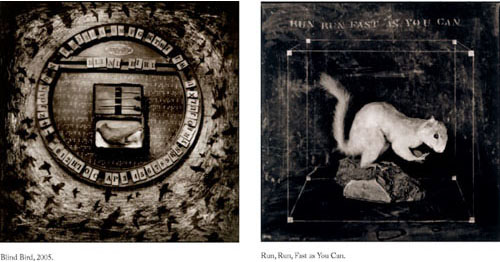
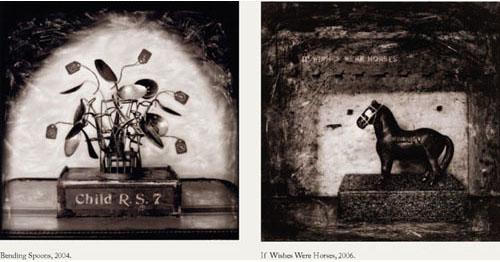
PSYCHOMETRY
ARTIST STATEMENT
Psychometry is a series of black and white photographs exploring issues relating to anxiety, loss, and existential doubt. The term refers to the pseudoscience of “object reading,” the purported psychic ability to divine the history of objects through physical contact. Like amateur psychometrists, viewers are invited to interpret arrangements of tarnished and weathered objects, relying on the talismanic powers inherent in the vestiges of human presence. These images suggest a world in which ordinary belongings transcend their material nature to evoke the elusive presence of the past.
Through an examination of fortune-telling and clairvoyance, many of the images confront the desperate human desire to know the unknowable, historically referencing the Victorian interest in spiritualism as well as the look of the 19th century photographic image. Illegible text and arcane symbols in pictures with themes like palm reading, spoon bending, and phrenology force the viewer to consider man’s insatiable need to anticipate his own fate.
The success of these images relies on the viewer’s expectation of truth in the photograph, expanding upon age-old darkroom “trickery” to suspend belief between fact and fiction. The romantic ideas suggested by these photographs are enhanced by the nostalgia that accompanies historic photographic imagery, the process of traditional printmaking, and the magic of the darkroom.
Process Notes
The photographs in the series begin as straight negatives. I hunt for objects to photograph at flea markets and antique shops, arrange them in a space, and shoot them with a medium format camera under natural light. The negative size is 2¼″ square.
All manipulations occur in the printing process. The marks that appear in the image are the result of a combination of scratching the negative and printing through drawings I’ve created on frosted mylar, drafting vellum or tracing paper with charcoal, graphite, and ink. I also use Ortho-Litho film to create templates for black marks, drawings, and text.
To further the sense of illusion, I incorporate photograms into the pictures by laying objects on the paper during exposure to achieve a reverse (white) silhouette of the object, or a dark (black or gray) silhouette if I am using an Ortho-Litho template.
After a traditional archival printing process, I tone the photographs with sepia toner. Despite the various manipulations that take place in the darkroom, I have always refrained from altering the surface of the print once it is finished.
The concept behind each picture ultimately dictates its darkroom manipulation, sometimes requiring research and revisions that last for weeks or months. Combining photography with drawing, seamlessly incorporating photograms, integrating appropriated text, and scratching the emulsion of the negative create images where horror, history, and psychology occupy the same imaginative locale.
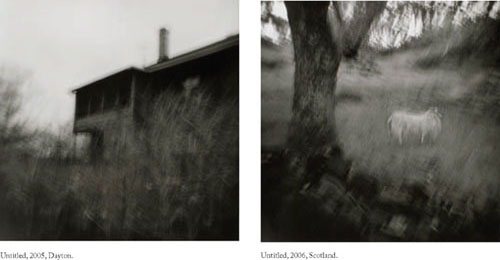
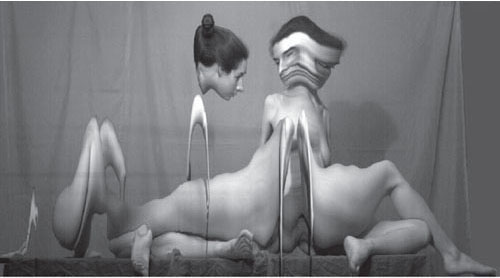
SOMETHING MORE AND LESS
ARTIST STATEMENT
Relationships between what is in front of a camera and what ends up as a picture are never as direct or simple as they seem. A picture always shows both more and less than what was there. These pictures make a point of emphasizing such discrepancies. The method of making the picture comes overtly into play. The thing seen is plainly affected by the instrument of seeing. These pictures are not unmediated, evidentiary, or dispassionate documents. They are quirky, rough, sketchy, and somewhat elusive.
Process Statement
I click the shutter of my plastic camera several times for each picture, the number roughly gauged depending on the light available. The camera moves slightly between exposures, and eaxh successive click adds to the accumulation of time. The visual effect is impossible to predict. I can only guess how what I see before me will be transformed. The main event of picture making is therefore an act of imagination, and the result is always a surprise.
Untitled, 2006, Pittsburgh.
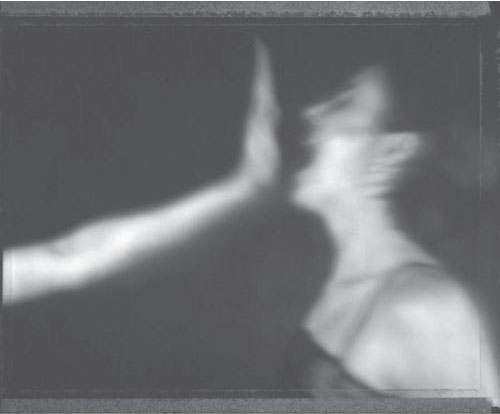
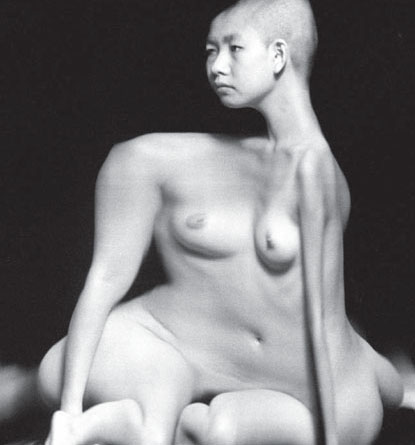
SELF PORTRAITS
ARTIST STATEMENT
My work combines pinhole photography with improvisational performance and stems from the idea that everything we experience is stored somewhere in our bodies. Movement is one way to access and give visual form to what lies beneath the surface of the skin. The making of these photographs is an exploration of the nature of each movement and where it originates internally.
Because of the unpredictable nature of pinhole photography, there is no way to really know how an image will turn out. I don’t always begin with a clearly defined idea. The images often reveal stories that may or may not have been known to me previously. That doesn’t mean that they aren’t my stories. Often the body remembers what the mind has forgotten.
The pinhole camera is low tech; it is the most basic tool for making a photographic image. There is no lens to interfere with the light as it travels from the subject to the film. Because there is no viewfinder through which to preview the image, it’s a relatively blind process.
Process Statement
The photographs in this series are self-portraits made with a pinhole camera. I use a hand-made 4 × 5 pinhole camera with a pinhole of unknown size. I work in a studio that is filled with natural light, and my exposures range anywhere from 30 seconds to 2 minutes, depending on the weather. All of the figures in my photographs are me; I move around in front of the camera during the exposure, and when I remain still for more than a few seconds my image is recorded. The importance of this process to my work is the way it reveals the relationship between my inner experience and my physical body. Over time, the boundaries between inner and outer, physical and non-physical begin to blur as I experiment with varying degrees of movement and stillness.
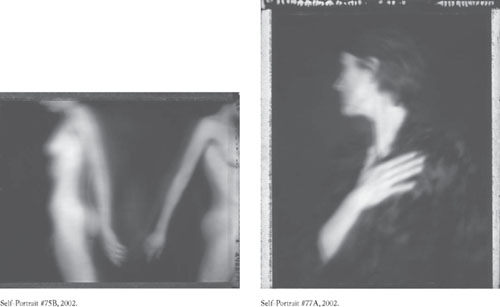

Self-Portrait #85B, 2002.
STARS
COMBINED ARTIST AND PROCESS STATEMENT
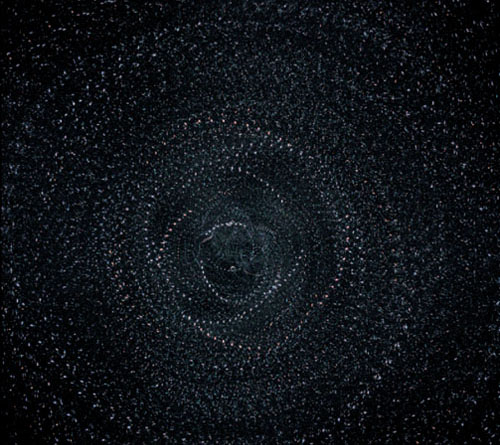
My photographs of star-filled night skies in 1995 and 1996 looked to the celestial realm for a sublime space in nature. Any photograph records a specific moment when light strikes film or paper—and in this sense is always a document of time itself. In my photographs of the night sky, the light of distant stars may take tens of thousands of years to reach us, and so my camera was recording the present moment but also looking back into time, using light originating from distant prehistory, and the movement of the earth, to “draw” on the film. The Stars evolved from an initial exploration of black and white silver prints in 1995 to the color images of 1996. By rotating the camera while overlaying as many as 72 multiple exposures, I was able to build up complex patterns which have affinities with the geometric structures of cupolas and mandalas, as well as system-based minimalist art. Extending Talbot’s metaphor of photography as the pencil of nature, the Stars are drawings whose marks result from the movement of the earth, and a stationary camera that is periodically moved through a sequence of pre-determined positions.
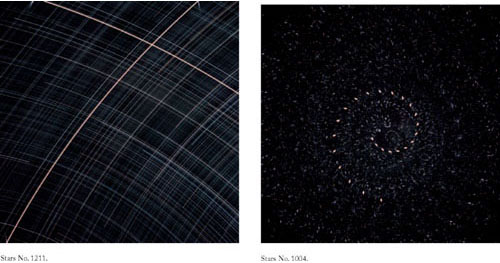
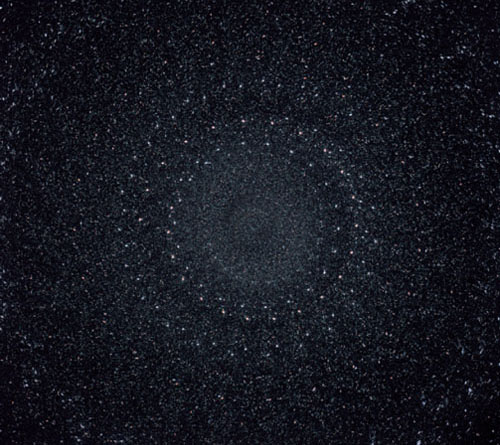
Stars No. 1103.
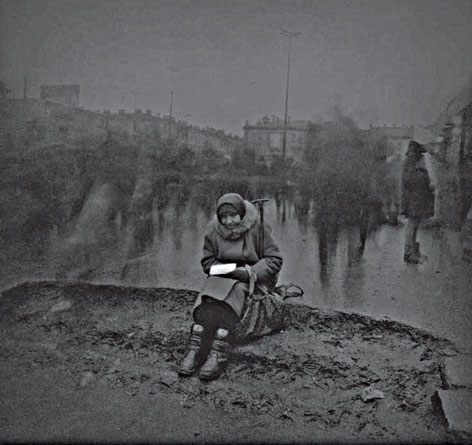
ARTIST STATEMENT
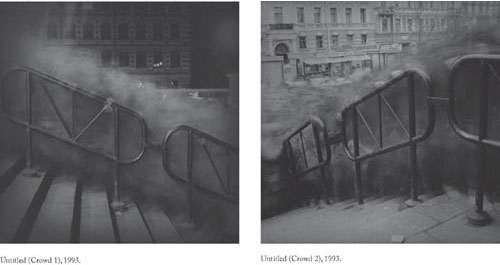
When the Soviet Union collapsed in the winter of 1991–1992, chaos reigned. I was one of the participants in this drama and shared the general mood of sadness, fear, and hopelessness. Crowds of people were wandering blindly in tired desperation through the city streets in a vain attempt to find food, medicines, and urgent supplies. St. Petersburg—a northerly city that during the autumn and winter is in the grip of an eternal twilight—was poorly illuminated, and the human figures, dressed in the dark clothes typical of the Soviet order, resembled phantasmagorical shadows from another, unreal world. They suggested living analogs for favorite works of mine by Dmitry Shostakovich (e.g., his Second Violin Concerto) or Fyodor Dostoevsky. It was as though time had stopped. This sensation was so powerful and precise that I felt a compelling desire to capture it on film. Capture, that is, not the reality that was unfolding before our eyes, but the idea of it: the reflection of that reality, colored by personal emotions. Thus I conceived the idea of employing prolonged exposure in the series of photographs that later came to be called City of Shadows.
I believe one of the most important objectives of an artist is to make inner emotions and feelings visible to others, to promote understanding and empathy, and thus to get people to feel compassion and love for their neighbors.
Process Statement
In the creative use of prolonged exposure the most difficult question the photographer faces is how long the exposure should be. The following fundamental principle needs to be kept in mind: the faster objects in the frame are moving, the shorter the exposure should be (and vice versa). If this principle is not followed, the only objects to be rendered successfully in the photograph will be those that are stationary (houses, trees, etc.); moving objects (people, cars) will disappear (although this approach is acceptable if what you need is a feeling of empty space). I was faced with this problem when photographing crowds trying to get into a metro station. A mad avalanche of desperate people squeezed up against each other and holding on to a handrail for dear life was moving very slowly and jerkily, in spasms. At the entrance to the station a policeman stood, admitting only small groups at a time. So I needed as long an exposure as possible. The maximum length possible was 3 minutes—this is the exposure I set for all photographs of the crowds. Because people’s hands remained motionless on the rail for longer than their bodies, the hands stayed in sharp focus, while the figures themselves were blurred.
When photographing street scenes, I had, on the contrary, to reduce the exposure. Because people were moving quickly, the exposure I set was around 2 seconds. If the weather was clear and sunny, I employed a neutral density filter and the smallest aperture (f/22, f/32).
In order to create the impression of sunrays, the camera had to be held still during the initial stage of exposure and then moved smoothly. Of course, this is a difficult operation to perform in a mere 2 seconds. So I had to use an appropriate aperture setting and density of filter to allow an exposure of at least 4–5 seconds—and for at least half this time the camera had to be held still.
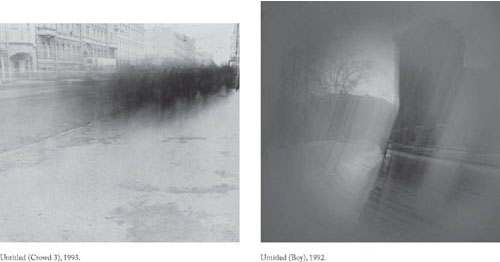
Untitled (Woman on the Corner #2), 1995, from series Black and White Magic of St. Petersburg.
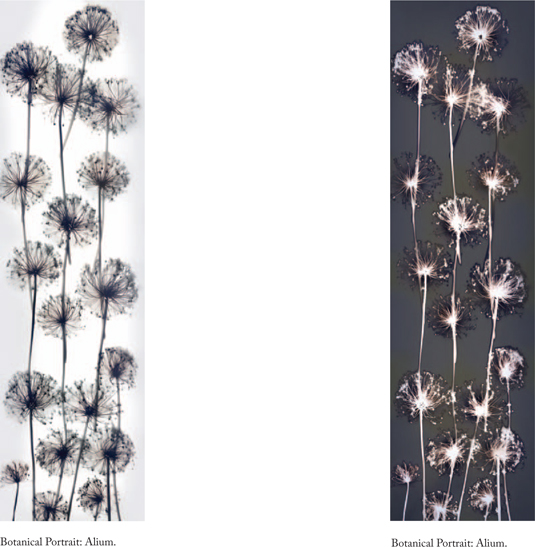
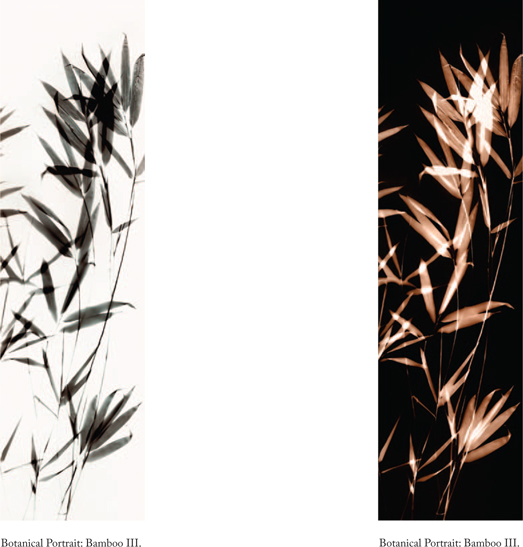
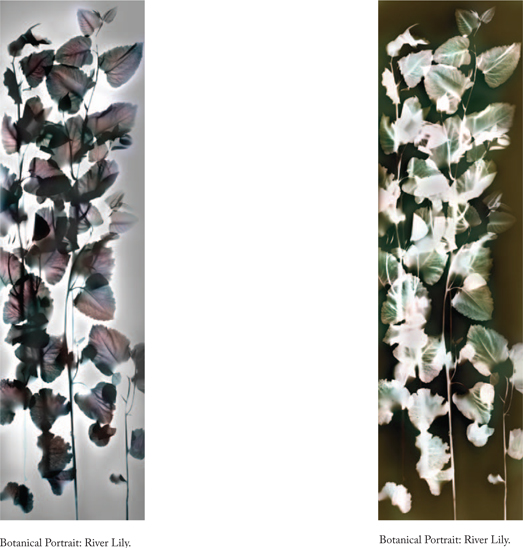
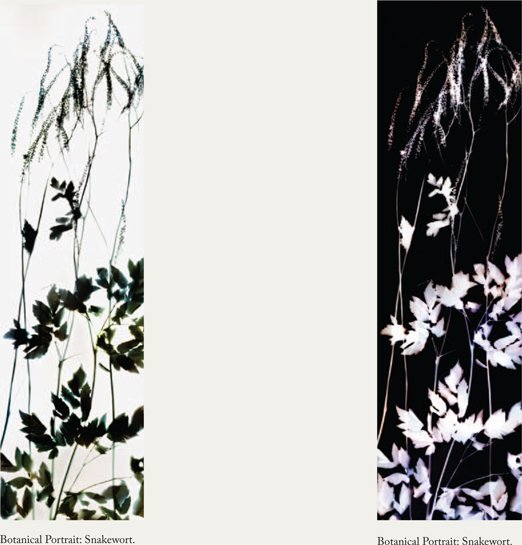
BOTANICAL PORTRAITS
ARTIST STATEMENT
The cycles of the seasons and the rhythms of the sun dancing through days, months, and years fill me with awe and inspiration. The gentle whisper of dawn envelops me within its subtlest suggestion of the infinite realm of possibility that is contained within human experience. The space of deepest silence when day changes into night draws me into an experience of oneness that transcends words. These timeless experiences of consciousness continue to powerfully beckon to me as an artist. The process of my work reflects the passages of life, seeking not an understanding of time, but rather an experience of the sacred presence within it.
The radiance of the sun as the essence of creation becomes a direct experience within the work. The sun reveals the truth of human nature—that what we seek dwells quietly within the core of our beings. The exquisite form of a newborn baby embodies this teaching with the sweetness of absolute trust. The sublime perfection of a young woman’s body with all its sensuality and mystery suggests hope. The character and unique form of an elder human being speaks of wisdom. May my work be a boat that carries me safely down the relentless river of time across the ocean of worldliness.
Botanical Portraits
Botanical Portraits is an extension of my solar photogram work since the mid-1980s, titled Human Nature. The direct solar photograms use human scale plant forms as subject matter, which express a powerful and vital energy. The plants in this body of work are chosen for both their scale relationships and healing properties for the human condition. We all know clearly that our current relationship to the natural world is a fragile one. The simple, direct truth of the subject matter is revealed, alternating between dark and light, suggesting both the benevolent and terrible beauty of the natural world. These prints measure 6 ft high by 2 ft wide.
Process
The human scale 6-ft tall plant is placed on a slow-speed printing-out-paper and exposed in the direct sunlight for 5–30 minutes, relative to the foliage density. The resulting print is then gold toned and fixed for archival permanence. This print is then contact printed to an unexposed sheet of printing-out-paper to make the positive print. High-resolution direct scans are made of the unique prints. Finally, digital editions are created of both the original photogram and the positive print. The resulting full-scale digital prints are made using pigment dyes on archival paper.
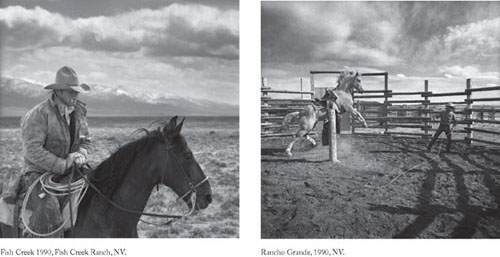
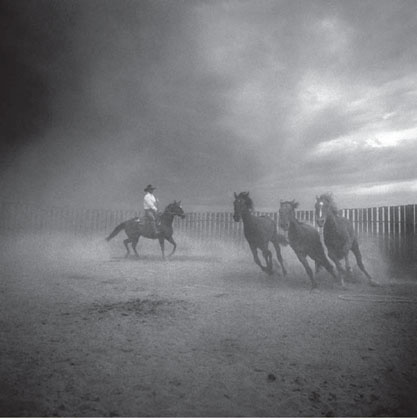
THE LAST COWBOY
ARTIST STATEMENT
I like to look and I like to share what I see. But I like to do that sharing wordlessly. Over the years, some of my peers have accused me of being mostly interested in the “fringe” people. Maybe so. But I like to think I am drawn to those who seem to exist outside of time in forgotten corners and cultures. Somehow, they seem more in touch with, or part of, the human condition.
The FSA photographers of the depression have always been my role models. They documented people and life in a difficult period of our history, in an honest, straightforward, respectful, and intimate way, and they did so beautifully. And they preserved it forever.
I work in black and white because it allows me to boil elements down to their very essence—shape, lines, and light. Light can be indescribably beautiful and fascinating. I love to watch it completely transform something. The same scene can go from being unremarkable, to extraordinary, and back to unremarkable in a heartbeat. Even after all these years of working, the ability to freeze a moment in time, and preserve it forever, although mostly science, to me is really more like magic.
Process Statement
“Photography takes an instant out of time, altering life by holding it still.”—Dorothea Lange
“To take photographs means to recognize—simultaneously and within a fraction of a second—both the fact itself and the rigorous organization of visually perceived forms that give it meaning. It is putting one’s head, one’s eye, and one’s heart on the same axis.”—Henri Cartier-Bresson
The concepts of “holding time still,” “fractions of a second,” “the decisive moment,” “seconds snatched from eternity,” and “the fleeting moment” are all phrases used by great photographers, to describe their most important goal in their work.
Subject matter often dictates my approach, and in this body of work, I am interested in capturing as much detail of texture, light, and atmosphere that I can. To this end, I work with a medium format rangefinder camera. This type of camera gives me the ability to use the largest negative that is practical for me to create images in a constantly changing situation. Technically, I have two main challenges. The first challenge is that much of what I shoot is in very low light conditions. The use of a rangefinder camera lets me shoot at slow shutter speeds, avoiding the inherent problem of camera vibration that would pose a problem by using any kind of single-lens reflex camera. My second challenge is to be able to freeze rapidly changing action, at the absolute peak moment. I observe, anticipate what is going to take place, press the shutter, stopping time at just the right instant. A split second before or after, and the moment is gone, forever.
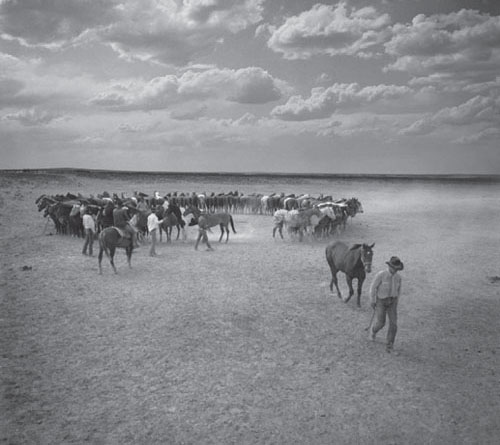
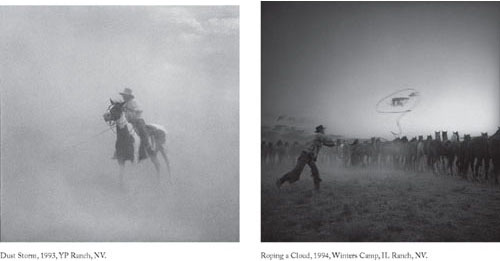
Part of his String, 1993, YP Ranch, NV.
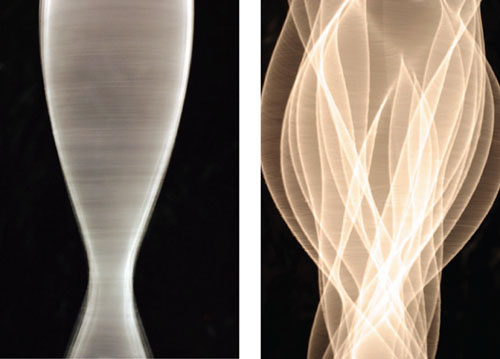
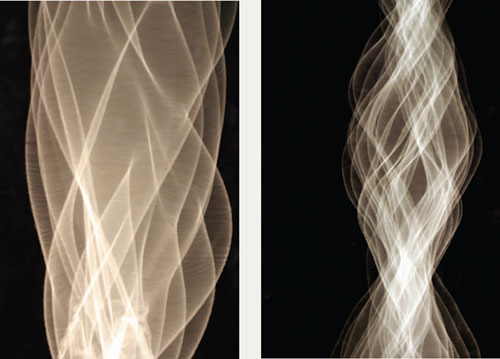
STRING THEORY IMAGES
STATEMENT OF CONCEPT AND PROCESS
Some time ago I received an e-mail message from an editor who had been exploring my website and who thought I might have some photographs that could be applicable to an article about a theory that has the world of science abuzz. It is the “String theory.” The truth was I had no photographs of strings in any shape or form but the inquiry started me thinking and I thought I pre-visualized what these images might look like and how they would be made. The fact I had a digital camera at my disposal made it possible to check out my ideas in short order.
Since the request was for an image that would show strings moving in odd ways and vibrating this reminded me of strings in musical instruments where a taut string is held on both ends and plucked in the middle to produce sound waves. I also remembered from somewhere, maybe a physics class, that one could also simply hold one end and make the other end move up and down. If done properly this would induce a wave-like motion on the string that under some conditions would be a “standing wave.” This started me thinking about other ways to induce vibrations in a string and I built a set-up where the string was attached on one end to a fastener located on the edge of a rotating disk driven by a small electric motor whose speed could be varied by changing, with a rheostat, the voltage driving the motor. I then attached a small weight to the other, free, end and let gravity pull the string down.
I decided to go contrary to convention, and instead of making a sharp record of the string I purposefully chose an exposure time long enough to allow the string to make several rotations during the exposure cycle. This, now, revealed the rotating string notas a single line in space with a wave in it but rather as a “volume,” something that seemed to have a three-dimensional quality to it. This was a bit more interesting than the plain string picture but then something unexpected happened. While adjusting the voltage to the motor, the voltage went so high as to cause the rotating string to assume a changing wave pattern as the weighted-down string could not keep up with the speed of the disk powering it. The string wrapped up onto itself pulling the weight upwards and causing the string to perform rather erratic motions in the process.
I continued photographing and when these images were displayed on the camera’s LCD screen it became clear that as far as an interpretation of a vibrating string that might accompany an article about the string theory, these photographs seemed to hold much more promise than a simple image of a plain string with a wave pattern on it.
PERIPHERAL PORTRAITS
Andrew Davidhazy’s Visual Transformations, by A. Becquer Casaballe “From the time of its invention, photography has been characterized by its capacity for capturing in a fraction of time, each time a smaller fraction as advances were made not only in the technology of emulsions and papers, a given scene, following the laws of optics.
Instantaneity and photography, governed by rules of perspective, in this sense have become almost synonymous, where light, in a single action, discharges its energy over the photosensitive material. The history of photography was constructed in this manner: light, instantaneous recording, and a space recorded over the angle of view of the camera’s lens. Behind these physical and chemical underpinnings we find the creative will of the photographer who brings to the final product personal vision and sensibility.
On the other hand, the work, the research, and the photographs of Andrew Davidhazy are endowed with a new dimension from the moment that the factor of time, inescapable in every photographic image, reconstructs space by a disengagement from the traditional and conventional methods.
Technologically, his photographs are based on the basic operating parameters of focal-plane shutters that move from side to side of the focal frame and thus control the exposure time. Davidhazy inverted this positive process: he holds the shutter slot still in the center of the frame and makes the film move behind it at a uniform speed.
Thus a new dimension of space manifests itself since the resulting image—the photograph—is created over a period of time and following the movement of the subject. This transformation is somewhat unnerving but at the same time it is a revelation of this new spatial dimension that can only be obtained through photography.
The work of Davidhazy makes us consider a new reality which our conventional perception of the nude is incapable of perceiving, but which is there—his photographs are a direct and indisputable evidence that this reality exists—and which only reveals itself through the most realistic of abstractions.”
—This text was provided by Becquer Casaballe from a May 1998 Exhibition at Club Fotografico de Mexico, in Mexico City. Becquer Casaballe is the Owner and Editor of Fotomundo Magazine published in Buenos Aires, Argentina.
Peripheral Portrait, Koola.
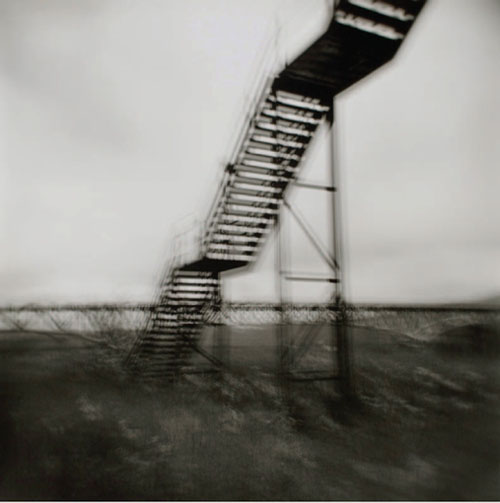
FRANCE IN PASSING
ARTIST STATEMENT
We spend so much time in transit from “here to there.” This series is about the journey in-between. Our perception of the world is of things always being in motion, as if passing us by. My use of incarnera motion-induced blur reflects the experience of viewing the landscape in transit.
Buddhists say the world is illusion. Modern physics tells us that material objects are mostly space. I’m interested in the way motion in a photograph can dematerialize objects we normally regard as solid. Here space and the object begin to merge. It suggests the idea of impermanence and moves the images closer to memory or dreams.
It’s a visual expression of ourselves as visitors here, not as tourists, but as ephemeral beings just passing through. The best of these fleeting glimpses begin to resonate on a more symbolic level: the solidity of a tree vaporizing in air as it bridges earth and heaven.
Is a momentary glance necessarily less revealing than a stare? The photograph remains for us to contemplate after the moment seems to have passed. As the old song goes, “such a long, long time to be gone, and a short time to be here.”
Process Statement
This project began some years ago with film. Last year I switched to a Canon G6 digital camera for the series and found, as expected, that the immediate feedback allowed me to adjust technique more efficiently in response to results. Shutter speeds vary from ½ second to 1/30th of a second depending on light and speed of travel. I count on random chance, look for pleasant surprises, and a combination of motion/blur and sharp definition. Once in the computer, a 17″ Mac Powerbook G4, I’ve used the new Adobe Lightroom program to edit and adjust the large number of images in the series. An Epson 2200 printer was used to print for the first exhibition.
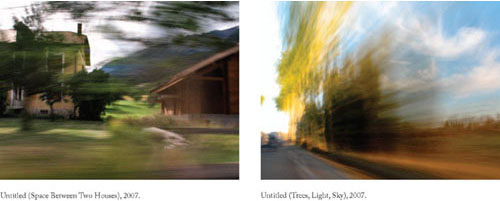

Untitled (Castle in the Air), 2007.
