
One of the most exciting moments in recording comes when the finished mix is played over the studio monitor speakers. The sound is so clear you can hear every detail, and so powerful you can feel the deep bass throbbing in your chest.
You use the monitor system to listen to the output signals of the console, audio interface, or recorders. It consists of the console monitor mixer, the power amplifiers, loud-speakers, and the listening room. The power amplifier boosts the electrical power of the console signal to a sufficient level to drive a loudspeaker. The speaker converts the electrical signal into sound, and the listening-room acoustics affect the sound from the speaker.
A quality monitor system is a must if you want your mixes to sound good. The power amp and speakers tell you what you’re doing to the recorded sound. According to what you hear, you adjust the mix and judge your mic techniques. Clearly, the monitor system affects the settings of many controls on your mixer, as well as your mic selection and placement. And all those settings affect the sound you’re recording. So, using inadequate monitors can result in a poor-sounding product coming out of your studio.
It’s important to use accurate speakers that have a flat frequency response. If your monitors are weak in the bass, you will tend to boost the bass in the mix until it sounds right over those monitors. But when that mix is played over speakers with a flatter response, it will sound too bassy because you boosted the bass on your mixer. So, using monitors with weak bass results in bassy recordings; using monitors with exaggerated treble results in dull recordings, and so on. In general, colorations in the monitors will be inverted in your mixdown recording.
That’s why it’s so important to use an accurate monitor system—one with a wide, smooth frequency response. Such a system lets you hear exactly what you recorded.
SPEAKER REQUIREMENTS
The requirements for an accurate studio monitor are these:
• Wide, smooth frequency response. To ensure accurate tonal reproduction, the on-axis response of the direct sound should be ±4 dB or less from at least 40 Hz to 15 kHz. The low-frequency response of a small monitor speaker should extend to at least 70Hz.
• Uniform off-axis response. The high-frequency output of a speaker tends to diminish off-axis. Ideally the response at 30 degrees off-axis should be only a few decibels down from the response on-axis. That way, a producer and engineer sitting side-by-side will hear the same amount of treble. Also, the treble will not change as the engineer moves around at the console.
• Good transient response. This is the ability of the speaker to accurately follow the attack and decay of musical sounds. If a speaker has good transient response, the bass guitar sounds tight, not boomy, and drum hits have sharp impact. Some speakers are designed so that the woofer and tweeter signals are aligned in time. This aids transient response.
• Clarity and detail. You should be able to hear small differences in the sonic character of instruments, and to sort them out in a complex musical passage.
• Low distortion. Low distortion is necessary because it lets you listen to the speaker for a long time without your ears hurting. A good spec might be total harmonic distortion under 3% from 40 Hz to 20 kHz at 90 dBSPL (sound pressure level).
• Sensitivity. Sensitivity is the sound pressure level a speaker produces at 1 meter (m) when driven with 1 watt (W) of pink noise. Pink noise is random noise with equal energy per octave. This noise is either band-limited to the range of the speaker or is a one-third-octave band centered at 1 kHz. Sensitivity is measured in dB/W/m (dB sound pressure level per 1 W at 1 m). A spec of 93 dB/W/m is considered high; 85 dB/W/m is low. The higher the sensitivity, the less amplifier power you need to get adequate loudness.
• High output capability. This is the ability of a speaker to play loudly without burning out. You often need to monitor at high levels to hear quiet details in the music. Plus, when you record musicians who play loudly in the studio, it can be a letdown for them to hear a quiet playback. So you may need a maximum output of 110 dBSPL.
This formula calculates the maximum output of a speaker (how loud it can play):
where dBSPL is the sound pressure level at 1 m, P is the continuous power rating of the speaker in watts, and S is the sensitivity rating in dB/W/m.
For example, if a speaker is rated at 100 W maximum continuous power, and its sensitivity is 94 dBSPL/W/m, its maximum output SPL is 10 log(100) + 94 = 114 dBSPL (at 1 m from the speaker). The level at 2 m will be about 4 to 6 dB less.
NEARFIELD™ MONITORS
Many professional recording studios use large monitor speakers that have deep bass. However, they are expensive, heavy, and difficult to install, and they are affected by the acoustics of the control room. All studios, large or small, need a pair of Nearfield monitor speakers (Figure 5.1). A Nearfield monitor is a small, wide-range speaker typically using a cone woofer and dome-shaped tweeter. You place a pair of them about 3 or 4 feet apart, on stands just behind the console, about 3 or 4 feet from you. Nearfields are far more popular than large wall-mounted speakers.
FIGURE 5.1 A Nearfield monitor speaker.
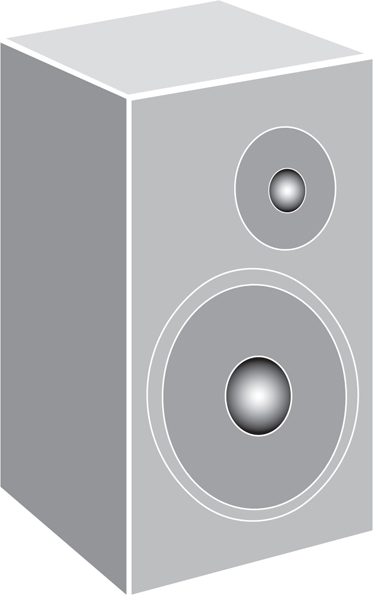
This technique, developed by audio consultant Ed Long, is called Nearfield monitoring. Because the speakers are close to your ears, you hear mainly the direct sound of the speakers and tend to ignore the room acoustics. Plus, Nearfield monitors sound very clear and provide sharp stereo imaging. Some units have bass or treble tone controls built in to compensate for the effects of speaker placement and room surfaces.
Nearfield monitors have enough bass to sound full when placed far from walls. Although most Nearfields lack deep bass, they can be supplemented with a subwoofer to reproduce the complete audio spectrum. Or you can check the mix occasionally with headphones that have deep bass.
Some Nearfields are in a satellite-subwoofer format. The two satellite speakers are small units, typically including a 4-inch woofer and 3/4-inch dome tweeter. The satellites are too small to produce deep bass, but that is handled by the subwoofer—a single cabinet with one or two large woofer cones. Typically, the subwoofer (sub) produces frequencies from 100 Hz down to 40 Hz or below. Because we do not localize sounds below about 100 Hz, all the sound seems to come from the satellite speakers. The sub-satellite system is more complicated to set up than two larger speakers, but offers deeper bass.
POWERED (ACTIVE) MONITORS
Most monitors have a power amplifier built in. You feed them a line-level signal (labeled MONITOR OUT or STEREO L/R) from your mixing console or audio interface. Most powered monitors are bi-amplified: they have one amplifier for the woofer and another for the tweeter. The advantages of bi-amplification include:
• Distortion frequencies caused by clipping the woofer power amplifier will not reach the tweeter, so there is less likelihood of tweeter burnout if the amplifier clips. In addition, clipping distortion in the woofer amplifier is made less audible.
• Intermodulation distortion is reduced.
• Peak power output is greater than that of a single amplifier of equivalent power.
• Direct coupling of amplifiers to speakers improves transient response—especially at low frequencies.
• Bi-amping reduces the inductive and capacitive loading of the power amplifier.
• The full power of the tweeter amp is available regardless of the power required by the woofer amp.
THE POWER AMPLIFIER
If your monitor speakers are not powered, you need a power amplifier (Figure 5.2). It boosts your mixer’s line-level signal to a higher power in order to drive the speakers.
FIGURE 5.2 Crown D-75A, an example of a power amplifier.

How many watts of power do you need? The monitor speaker’s data sheet gives this information. Look for the specification called “Recommended amplifier power.” A power amp of 50 W per channel continuous is about the minimum for Nearfield monitors; 150 W is better. Too much power is better than too little, because an underpowered system is likely to clip or distort. This creates high frequencies that can damage tweeters.
A good monitor power amp has distortion under 0.05% at full power. It should have a high damping factor—at least 100—to keep the bass tight. The amp should be reliable. Look for separate level controls for left and right channels. The amplifier should have a clip or peak light that flashes when the amp is distorting.
SPEAKER CABLES AND POLARITY
When you connect the power amp to the speakers, use good wiring practice. Long or thin cables waste amplifier power by heating. So put the power amp(s) close to the speakers and use short cables with thick conductors—at least 16 gauge. The low resistance of these cables helps the power amplifier to damp the speaker motion and tighten the bass.
If you wire the two speakers in opposite polarity, one speaker’s cone moves out while the other speaker’s cone moves in. This causes vague stereo imaging, weak bass, and a strange sense of pressure on your ears. Be sure to wire the speakers in the same polarity as follows: in both channels, connect the amplifier positive (+ or red) terminal to the speaker positive (+ or red) terminal. Setting the correct polarity is also called “speaker phasing.”
CONTROL-ROOM ACOUSTICS
The acoustics of the control room affect the sound of the speakers. At your ears, the sound waves reflected from the room surfaces combine with the direct sound from the speakers. Reflections that arrive within 20 to 65 milliseconds (msec) after the direct sound blend with the direct sound and affect the tonal balance you hear.
Chapter 3, under the heading “Controlling Room Problems with Acoustic Treatment,” described how to treat the acoustics of studios and control rooms to reduce excessive reverb, echo, standing waves, and noise.
Using Nearfield monitors makes the room acoustics less important, but it still helps to put absorbent material on the wall behind the monitors. This treatment improves the monitors’ sound. Stereo imaging and depth are greatly improved, the sound is clearer, and the frequency response is flatter. The treatment will reduce boominess and ringing, and make transients sharper. Also, your recordings will translate better to other speakers.
While sitting in front of your mixer, have someone slide a mirror along the walls at eye height. Note the spots where you can see the monitor speakers in the mirror, and put some absorbent material there to absorb sound reflections. Repeat this procedure with the mirror on the ceiling between the monitors and your mix position.
If your control room is separate from the studio, the control room should be built to keep out sound from the studio. You want to hear only the sound from the monitors, not the live sound from the musicians. In a home studio, you might be able to achieve isolation simply by putting the control-room equipment in a room far removed from the studio, with the doors closed.
A control room built next to the studio needs good isolation. Use staggered-stud construction, seal holes between rooms, and install a double-pane window (mounted in rubber) between the control room and studio.
In some home or project studios, the control room is the same room as the studio. Because no isolation is used, the cost of building the studio is much less. You record while listening with headphones, and do the critical monitoring with speakers during playback and mixdown.
SPEAKER PLACEMENT
Once you have acquired the speakers and worked on the room acoustics, you can install the speakers.
• Mount them at ear height so the mixer doesn’t block their sound.
• To prevent sound reflections off the mixing console, place the speakers on stands behind the console’s meter bridge, rather than putting them on top.
• For best stereo imaging, align the speaker drivers vertically and mount the speakers symmetrically with respect to the side walls.
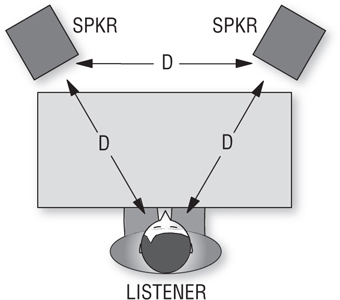
• Place the two speakers as far apart as you’re sitting from them; aim them toward you, and sit exactly between them (Figure 5.3). Some engineers recommend aiming the speakers 12–18 inches behind the listener.
• To get the smoothest low-frequency response, put the speakers near the shorter wall, and sit about ⅓ of the way back from the front wall.
• Use a foam isolation device under each speaker to ensure deep, tight bass. Auralex MoPads and Primacoustics Recoil Stabilizers work well.
FIGURE 5.3 The recommended speaker/listener relationship for best stereo imaging.
Try to position the monitors several feet from the nearest wall. Wall reflections can degrade the frequency response and stereo imaging. The closer to the wall the monitors are, the more bass you hear. In small rooms you might have to place the monitors against the wall, which will exaggerate the bass. But some monitors have a lowfrequency attenuation switch to compensate.
KRK Systems ERGO is a monitor controller that corrects a room’s phase and frequency-response errors, resulting in accurate monitoring—so mixes translate better to other systems.
USING THE MONITORS
You’ve treated the room acoustics, and you’ve connected and placed the speakers as described earlier. Now it’s time to adjust the stereo balance.
1. Play a mono musical signal into an input channel on your mixer, and assign it to the stereo output channels 1 and 2.
2. Adjust the input channel’s pan pot so that the signal reads the same on the stereo output channel 1 and 2 meters.
3. Place the two speakers the same distance from you.
4. Sit at the mixer exactly midway between the speakers. If you sit off-center, you will hear the image shifted toward one side. Listen to the image of the sound between the speaker pair. You should localize it midway between the monitors; that is, straight ahead.
5. If necessary, center the image by adjusting the left or right volume control on your power amp or powered monitors.
When you do a mixdown, try to keep the listening level around 85 dBSPL—a fairly loud home listening level. As discovered by Fletcher and Munson, we hear less bass in a program that is played quietly than in the same program played loudly. If you mix a program while monitoring at, say, 100 dBSPL, the same program will sound weak in the bass when heard at a lower listening level—which is likely in the home. So, programs meant to be heard at 85 dBSPL should be mixed and monitored at that level.
Loud monitoring also exaggerates the frequencies around 4 kHz. A recording mixed loud may sound punchy, but the same recording heard at a low volume will sound dull and lifeless.
Here’s another reason to avoid extreme monitor levels: loud sustained sound can damage your hearing or cause temporary hearing loss at certain frequencies. If you must do a loud playback for the musicians (who are used to high SPLs in the studio), protect your ears by wearing earplugs or leaving the room.
You can get a low-cost sound level meter from Radio Shack. Play a musical program at 0 VU or 0 dB on the mixer meters and adjust the monitor level to obtain an average reading of 85 dBSPL on the sound level meter. Mark the monitor-level setting.
Before doing a mix, you may want to play some familiar commercial CDs over your monitors to remind yourself what a good tonal balance sounds like. Listen to the amount of bass, midrange, and treble, and try to match those in your mixes. But listen to several CDs because they vary.
While mixing, monitor the program alternately in stereo and mono to make sure there are no out-of-phase signals that cancel certain frequencies in mono. Also beware of center-channel buildup. Instruments or vocals that are panned to center in the stereo mix sound 3 dB louder when monitored in mono than they do in stereo. That is, the balance changes in mono—the center instruments are a little too loud. To prevent this, don’t pan tracks hard left and hard right. Bring in the side images a little so they will be louder in mono.
You’ll mix the tracks to sound good on your accurate monitors. But also check the mix on small inexpensive speakers to see whether anything is missing or whether the mix changes drastically. Make sure that bass instruments are recorded with enough edge or harmonics to be audible on the smaller speakers. It’s a good idea to make a CD copy of the mix for listening in a car, boom box, or compact stereo.
HEADPHONES
Compared to speakers, headphones have several advantages:
• They cost much less.
• There is no coloration from room acoustics.
• The tone quality is the same in different environments.
• They are convenient for on-location monitoring.
• It’s easy to hear small changes in the mix.
• Transients are sharper due to the absence of room reflections.
Headphones have several disadvantages:
• They become uncomfortable after long listening sessions.
• Cheap headphones have inaccurate tone quality.
• Headphones don’t project bass notes through your body.
• The bass response varies due to changing headphone pressure.
• The sound is in your head rather than out front.
• You hear no room reverberation, so you may add too much or too little artificial reverb.
• It’s difficult to judge the stereo spread. Over headphones, panned signals tend to sound closer to center than the same signals heard over speakers. The same is true of stereo recordings made with a coincident pair of mics.
Because speakers sound different from headphones, it’s best to do mixes over speakers. But check your mixes on headphones too because so many listeners use them with MP3 players.
Focusrite’s Saffire PRO 24 DSP Audio Interface with VRM technology simulates the sound of studio monitor loudspeakers over headphones. You can choose three room models and 15 different speaker emulations.
If your monitor speakers are in the same room as your microphones, the mics pick up the sound of the speakers. This causes feedback or a muddy sound. In this case you must monitor only with headphones while recording or overdubbing, then monitor with speakers during playback or mixdown.
If you monitor with headphones as the musicians are playing, external sounds leak through the headphones and mask the sounds you are trying to monitor. That makes it hard to judge the sound quality you are picking up. Check it during playback. Closedcup (closed back) headphones or in-the-ear earphones provide the best isolation from outside sounds.
THE CUE SYSTEM
The cue system is a monitor system for musicians to use as they’re recording. It includes some of the aux knobs in your mixer, a small power amplifier or headphone amp, a headphone connector box, and headphones. Musicians often can’t hear each other well in the studio, but they can listen over headphones to hear each other in a good balance. Also, they can listen to previously recorded tracks while overdubbing.
Headphones for a cue system should be durable and comfortable. They should be closed-cup to avoid leakage into microphones—especially for a click track. Also, the cue “phones” should have a smooth response to reduce listening fatigue, and should play loud without burning out. Make sure they are all the same model so each musician hears the same thing. A built-in volume control is convenient.
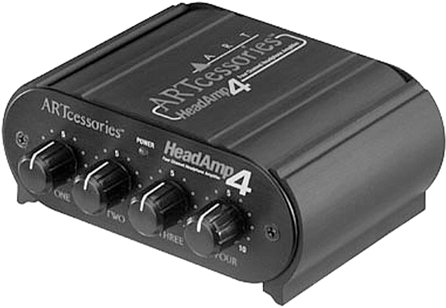
A headphone amplifier is shown in Figure 5.4. Connect it to a headphone monitor jack on your mixer or audio interface. It drives up to eight headphones and lets you adjust the volume of each one. Examples include the PreSonus HP60 and HP4, ART HeadAmp 4 and HeadAmp 6 PRo, Samson S-Phone, and C-Que 8.
FIGURE 5.4 ART HeadAmp 4, an example of a headphone amplifier
Does your mixer or audio interface have a strong signal at its headphone jack? You could install four 1/4-inch stereo jacks in a small metal box wired in parallel (tip to tip, ring to ring, and sleeve to sleeve). Connect them by a single cable to the headphone jack of your mixer or audio interface.
Although some consoles can provide several independent cue mixes, the ideal situation is to set up a personal monitor mixer near each musician. Then they can set their own cue mix and listening level. The inputs of these mixers are fed from the console output buses. Other names for this device are headphone monitor mixer or cue mixer. Some examples are the Behringer PowerPlay System, Furman HR-6, Mackie HMX-56, Aviom A16II, Hear Technologies Hear-Back-Four-Pack, and Roland M-48.
Suppose a vocalist sings into a microphone and hears that mic’s signal over the cue headphones. If the singer’s voice and the headphone’s sound are opposite in polarity, the voice partially cancels or sounds funny in the headphones. Make sure that the voice and headphones are the same polarity.
Here’s how. While talking into a mic and listening to it on headphones, reverse the ground and signal leads to the headphones connector. The position that gives the fullest, most solid sound in the headphones is correct.
All the headphones in your studio should be the same model, so that everyone will hear with correct polarity.
CONCLUSION
Ultimately, what you hear from the monitors influences your recording techniques and affects the quality of your recordings. So take the time to plan and adjust the controlroom acoustics. Choose and place the speakers carefully. Monitor at proper levels and listen on several systems. You’ll be rewarded with a monitor system you can trust.