
Welcome to the computerized world of MIDI equipment—samplers, synthesizers, sampling keyboards, drum machines, and sequencers. Because other texts explain this equipment in detail, we’ll offer brief descriptions here.
Musical Instrument Digital Interface (MIDI) is a standard connection between electronic musical instruments and computers that allows them to communicate with each other.
Here are some things that MIDI lets you do:
• Play a piano-style keyboard, drum pads, MIDI guitar, or breath controller to produce a sound like any instrument.
• Record and play back a musical performance that is independent of the sound of that performance. You can hear your performance played by any musical instrument or synthesized sound, or change the instrument sound after your performance is recorded.
• Record a difficult part slowly, or one note at a time, and play it back at any tempo you wish.
• Enter the notes on a musical scale or on a piano-roll grid, one at a time, and play them back at any tempo.
• Edit any note of the performance—change its timing, length, or pitch.
• Create the effect of a band playing. Record a performance that is played by drum samples, overdub another performance that is played by a synthesized bass, overdub another performance played by piano samples, and so on.
• Combine or layer the sounds of two electronic musical instruments by playing them both with the same performance.
• Quantize the notes to make them rhythmically precise.
The MIDI signal is a stream of digital data—not an audio signal—running at 31,250 bits per second. It sends information about the notes you play on a MIDI controller, such as a piano-style keyboard or drum pads. Up to 16 channels of information can be sent on a single MIDI cable.
There are three types of MIDI ports on MIDI devices:
1. MIDI IN receives data going into the device.
2. MIDI OUT sends out data generated by the device.
3. MIDI THRU is like MIDI OUT, but duplicates the data that is at the MIDI IN port.
Connect MIDI OUT from the sending device to MIDI IN of the receiving device. For example, connect a keyboard controller’s MIDI OUT to the MIDI IN connector of a MIDI/audio interface, a sequencer, or a sound module. Use MIDI THRU to connect two or more receiving devices in a row. For example, connect a keyboard controller’s MIDI OUT to sequencer MIDI IN, and connect sequencer MIDI THRU to sound module MIDI IN.
You can compose and record music using MIDI without knowing the codes or data that MIDI equipment uses. Those codes are described in the MIDI 1.0 Specification. If you want to explore those codes, see these resources:
• www.ibiblio.org/emusic-l/info-docs-FAQs/MIDI-doc/index.html
• www.midi.org/techspecs/midispec.php
Also see MIDI Clock and MIDI Time Code in the Glossary. See Appendix E for books on MIDI.
MIDI COMPONENTS
In addition to the usual studio gear—monitors, computer DAW, cables, etc.—you can use the following equipment to record with MIDI:
• MIDI controller
• Sequencer
• Synthesizer
• Sampler and sample CDs
• Drum machine or soft synth playing drum-set samples
• MIDI computer interface, audio interface with MIDI I/O, or computer USB port
• MIDI cables
• Equipment stand
You learned about most of these in previous chapters, but a review might help at this point.
A MIDI controller is an instrument that generates MIDI data when you play on it. Examples are a piano-style keyboard (Figure 16.1), drum pads, MIDI guitar, or a MIDI breath controller. A synthesizer or drum machine can act as a controller.
FIGURE 16.1 M-Audio Oxygen 49, an example of a MIDI keyboard controller. It communicates with a computer by USB as well as MIDI.
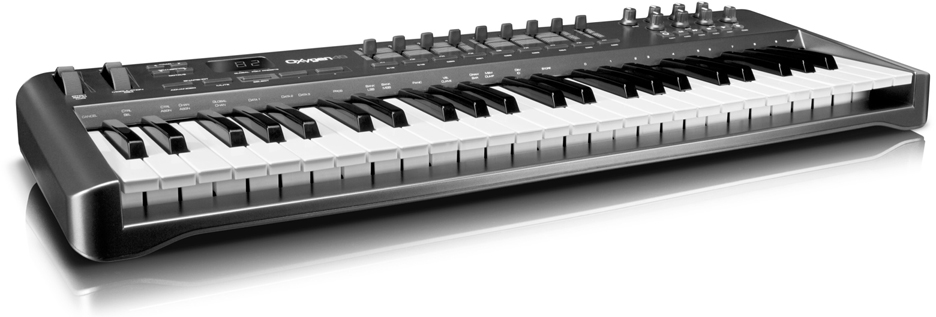
Some keyboard controllers are compact and lightweight, and connect to your computer via a USB cable. Examples are the Novation 49 SL MkII series, M-Audio’s Axiom and Oxygen series, CME M-Key v2, Akai MPK Mini Controller, and Roland A300Pro. Because they have fewer keys than a standard keyboard, they use octave up/down buttons.
Some MIDI controllers have an audio interface so you can connect microphones to your computer.
A sequencer is a device or program that lets you record, edit, and play back MIDI data. A recording done on a sequencer is called a sequence, which is a MIDI song. Unlike an audio recorder, a sequencer does not record audio. Instead, it records the key number of each note you play, note-on signals, note-off signals, and other parameters such as velocity, pitch-bend, and so on. A sequencer captures a performance, not the sound. Then any sound you want can be played by that performance. You can edit the recorded performance (sequence) to fix wrong notes, etc.
A sequencer records and plays MIDI files (.mid files). They are sequencer recordings of your own performances, or are MIDI files that can be downloaded from the Web.
The sequencer can be a standalone unit, a circuit built into a keyboard instrument, or a computer running a sequencer program (Figure 16.2). Like a multitrack audio recorder, a sequencer can record 8 or more tracks, with each track containing a performance of a different instrument.
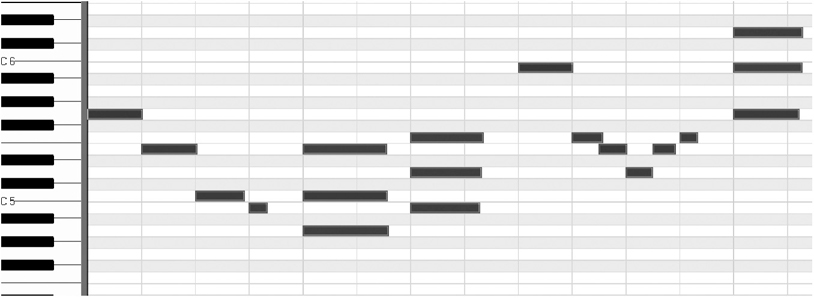
FIGURE 16.2 A screenshot of a piano-roll view, part of a MIDI sequencer program.
A step up from a sequencer program is a MIDI/audio recording program (also called DAW software). It records both MIDI sequences and digital audio tracks on your hard drive, and keeps them in sync. In other words, this program lets you add microphone signals such as a vocal, sax, etc., to MIDI sequences. This software and your computer form a digital audio workstation (DAW). Details are given in Chapter 14 on computer recording.
A synthesizer is a musical instrument that creates sounds electronically. It can play MIDI data, either from a built-in keyboard, a separate MIDI controller, a MIDI sequence, or a MIDI file downloaded from the Web. Synthesizers come in four forms: piano-style, sound module, software, or a synth chip on a sound card.
• A piano-style synth has a piano keyboard and built-in sound generators. You might want to use more than one synth to expand your palette of sounds.
• A sound module or tone module is a synthesizer without a keyboard. This standalone device is triggered by a sequencer or a MIDI controller.
• A soft synth or virtual instrument is a synthesizer that is simulated in software. It runs in your CPU. The GUI of the software looks like a hardware synthesizer. A wavetable soft synth plays samples of real instruments, which sound more realistic than an FM soft synth.
• Another option is a synth chip, which is built into many sound cards.
Some soft-synth companies are E-MU, Arturia, Quantum Leap, Waldorf, Spectrasonics, Rob Papen, FXpansion, MOTU, IK Multimedia, Native Instruments, Cakewalk, Vir2 Instruments, Vienna Instruments, Garritan, Toontrack, Wavemachine Labs, Inaudio, Submersible Music, Gen, Slate Digital, Avid, McDSP, and many more. Spectrasonics Stylus RMX sounds great for drums, and Trilian is popular for bass.
The musical sounds that synthesizers make—such as a fretless bass, grand piano, sax, or drum set—are called patches, programs, or presets. A multitimbral synthesizer can play two or more patches at once. A polyphonic synthesizer can play several notes at once (chords) with a single patch.
A sampler is a device that records sound events, or samples, into computer memory and plays them back when activated by a sequencer MIDI file or MIDI controller.
A sample is a digital recording of one note of a real sound source: a flute note, a bass pluck, a drum hit, etc. A sample also can be a digital recording of a short musical phrase. The sampling process is described in Chapter 13 under “Digital Recording.”
A soft sampler is software that plays samples and lets you map them along your keyboard. In other words, you can tell the sampler which notes on the keyboard play which samples. A sampler lets you import any sound, such as a WAV file of a single note that you recorded, or a file from a sample CD. In contrast, a soft synth generates its own sounds—either the ones supplied with it, or your own customized versions.
Some software sample players are Korg Legacy Collection, IK Sampletank, IK Multimedia Miroslav Philharmonik, Native Instruments Kontakt 5 and Komplete 8, Quantum Leap, MOTU MachFive 3, EXS-24, Garritan Personal Orchestra, and Steinberg HALion. Synthogy Ivory is a great-sounding piano sample player. Also check out these websites: www.synthzone.com/softsyn.htm, www.sonicspot.com/softwaresynth.html, www.hitsquad.com/smm/, www.soundsonline.com, and www.kvraudio.com.
A soundfont is an audio sample (an instrument patch) in a special SF2 format. It’s like a WAV file, but also includes a key range so that when you play a MIDI note number (keyboard key), it plays the sample pitch assigned to that note number. Soundfonts also include velocity switching, note envelope, looping, release sample, filter, and low-frequency oscillator (LFO) settings. A single soundfont can contain many WAV files of different pitches. You can import a soundfont into a sample player. To use soundfonts, you need a SoundFont player, a MIDI controller, MIDI interface, and MIDI sequencing software.
Often a sampler is built into a sample-playing keyboard, which resembles an electronic piano. It contains samples of several different musical instruments. When you play on the keyboard, you hear the sample notes. The higher the key you press, the higher the pitch of the reproduced sample.
Be sure to check out sample libraries. You can buy CDs with samples for use in your own projects. You copy the samples to your hard drive, then load them into a software sample player and trigger them with a sequencer or MIDI controller.
Several DAW recording programs have samples and loops included. You can also download samples from the Web. Do a Google search for piano sample freeware, Hammond B3 sample freeware, and so on.
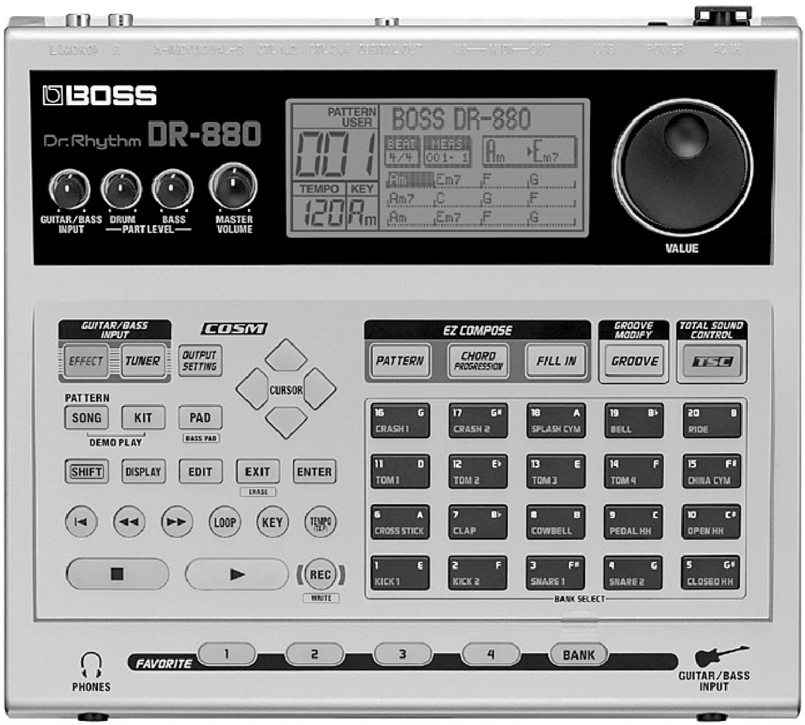
A drum machine or beat box is a device that plays built-in samples of all the sounds of a drum set and percussion (Figure 16.3). It also is a sequencer that records and plays back drum patterns played or programmed with built-in keys or drum pads. Some units can sample sounds. Most recorder-mixers have a drum machine built in. In a DAW, you might use a soft sampler that plays drum samples—a virtual drummer.
FIGURE 16.3 BOSS DR-880, an example of a beat box.
Some drum plug-ins and drum machines for MIDI/audio recording programs include EastWest (Quantum Leap) Storm Drum 2; Native Instruments Battery 3; Toontrack EZdrummer, Beatstation, and Superior Drummer 2; Monkey Machine freeware (http://rinki.net/pekka/monkey/); Gen 16 Digital Vault Z-Pack; Steven Slate Digital EX and Signature Drumkits; FXpansion BFD ECO; Sonic Reality Ocean Way Drums; Submersible DrumCore; and Cakewalk Session Drummer 2.
A librarian program organizes your collection of samples and synth patches.
A voice editor program lets you create your own synthesizer patches.
A notation program converts your performance to standard musical notation. You can edit the notes, add lyrics and chords, and print out a copy.
A MIDI interface plugs into a user port in your computer and converts MIDI signals into computer data so that it can be recorded, edited, and played back with sequencer software. Many sound cards and audio interfaces include a MIDI interface. Some keyboard controllers connect to a computer via USB, so no MIDI interface is needed.
The iConnectivity iConnectMIDI is a MIDI interface with two USB mini ports that can connect to an iOS device (iPad, iPod Touch) or to a Mac/PC.
If you have two or more hardware synthesizers, or a synth and a drum machine, you might need a line mixer to blend their audio outputs into a single stereo signal.
MIDI cables carry MIDI signals and are used to connect synths, drum machines, and computers together so that they can communicate with each other. A MIDI cable is a 2-conductor shielded cable with a 5-pin DIN plug on each end. Pins 4 and 5 are the MIDI signal, pin 2 is shield, and pins 1 and 3 are not connected.
An equipment stand is a system of tubes, rods, and platforms that supports all your equipment in a convenient arrangement. It lets you use short cables and has a small footprint.
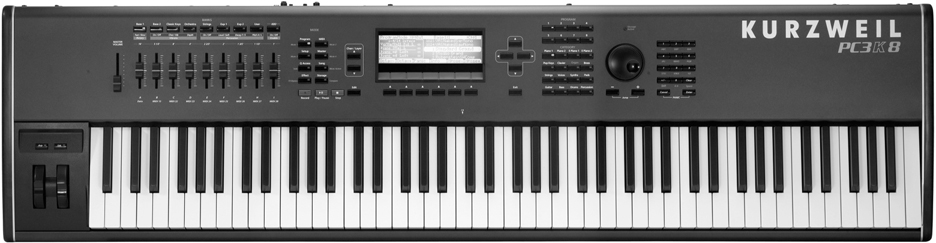
A keyboard workstation (Figure 16.4) includes several MIDI components in one chassis: a keyboard, a sample player, a sequencer, and perhaps a synthesizer and disk drive. That’s everything you need to compose, perform, and record instrumental music. Many workstations include drum sounds so that you can get by without a separate drum machine. A few include a mic input so you can record vocals or acoustic instruments.
FIGURE 16.4 The Kurzweil PC3K8, an example of a keyboard workstation.
The rest of this chapter describes recording procedures for some MIDI studio setups. You’ll also need to read your instruction manuals thoroughly and simplify them into step-by-step procedures for various operations. Note that each piece of MIDI gear has its own idiosyncrasies, and the instructions may have errors or omissions. If you have questions, call or e-mail tech support for your equipment. Also looks for books and videos devoted to your specific musical instrument.
RECORDING MUSIC MADE BY SOFT SYNTHS
In this method, you will play a MIDI controller and record the performance on a MIDI track in a MIDI/audio recording program on your computer. Software synths, samples, and drums in your computer will play the sounds during recording and playback (Figure 16.5). They are included with most recording software, or you can buy them separately.
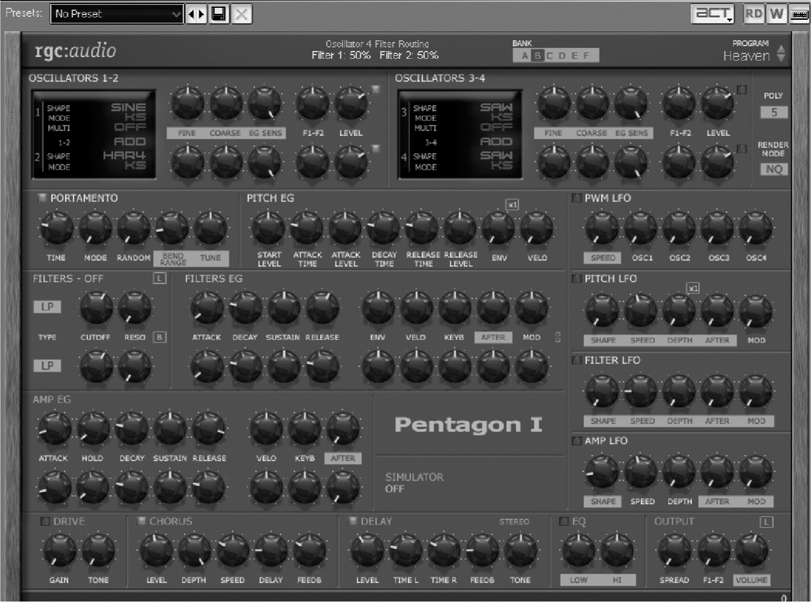
FIGURE 16.5 rgc:audio Pentagon, an example of a soft synth.
The MIDI Signal Chain
Figure 16.6 shows a MIDI signal chain that uses a soft synth. From start to finish (left to right), these are the components and their functions:
1. MIDI controller. A piano-style keyboard, drum pads, or breath controller that outputs MIDI code (note on, note off, key number, etc.) when you play it. The code is tagged with a channel number from 1 to 16, which you set in the controller.
2. A MIDI cable from your controller’s MIDI OUT to your interface’s MIDI IN.
3. A MIDI interface or MIDI/audio interface. It converts the MIDI signal into a data format that your computer can understand.
4. A PCI, USB, or FireWire connection from the interface to the computer. The MIDI data you generate with a controller travels on this cable to your computer.
5. A MIDI driver (not shown). This is a small program in your computer that allows your recording software to transfer data to and from an audio/MIDI interface.
6. Sequencer (MIDI/audio) software running in your computer. It records the MIDI signal to the computer’s hard drive and plays it back.
7. Soft synth/soft sampler. A virtual instrument plug-in in your DAW program. As you record your performance, you are listening to the software synthesizer (or sample player) play music according to your keyboard presses. So in addition to being recorded, the MIDI signal goes to a soft synth or sample player of your choice.
8. A PCI, USB, or FireWire connection (same as number 4 above) carries the synth’s digital audio to your audio interface. A single USB or FireWire cable is used to send MIDI data to your computer, and to send audio from your computer to your interface and monitor speakers.
9. The MIDI/audio interface converts the synth’s digital audio to analog, and sends that musical signal to its stereo output channels. This is same interface as in number 3 above.
10. Monitors. The stereo output of your interface feeds amplified speakers or headphones so you can hear the sound of your performance.
FIGURE 16.6 A MIDI signal chain that uses a soft synth.
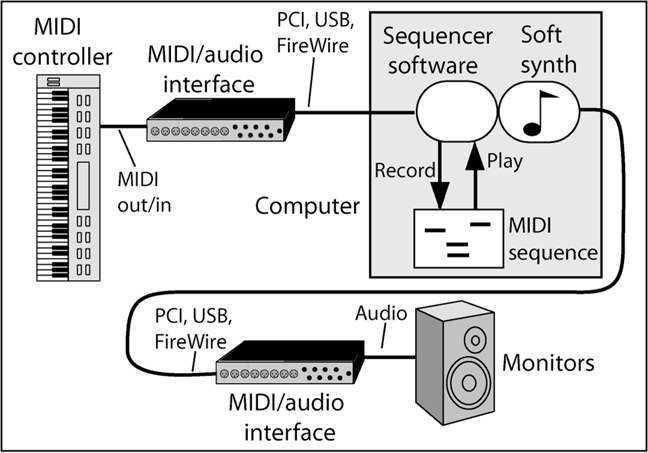
During playback, the recorded MIDI sequence “plays” or triggers the soft-synth patch, and its audio is routed through your interface and monitors.
MIDI Recording Procedure
Now that you understand the MIDI signal chain, the steps below will make more sense. Here’s how to create the audio and MIDI tracks in your sequencer (MIDI/audio) program.
• 1. Set Up the Audio and MIDI Tracks
• Insert a MIDI track to record your MIDI sequence, and insert an audio track that contains the soft synth as a plug-in. (Your sequencer might combine the MIDI and audio tracks into one track.)
• Synth and sample patches are stored in groups called banks, and each bank contains several different patches. In the MIDI track, choose a synth bank and patch (bass, drums, piano, etc).
• In the MIDI track input, specify the MIDI channel that the synth will respond to: either Omni mode (any channel) or the same channel number that your MIDI controller is set to.
In the MIDI track output, specify the synth or sample player that you want the MIDI track to play.
Set the audio track output to the stereo output of your interface.
• 2. Start Recording
• In your interface control program, or in your recording program, set the latency or buffer size low (under 4 msec if possible) while tracking so that the synth responds without a noticeable delay. See Appendix B under the heading “Minimizing Latency.”
• Choose a tempo in your sequencer. Set the metronome to count off two measures.
• Enable Record mode on the MIDI track. Using your mouse, click on the RECORD button on-screen or on your computer keyboard. You’ll hear the sequencer’s metronome ticking at the tempo you set.
• 3. Play Music on Your Keyboard
• Listen to the metronome and play along with its beat. The sequencer keeps track of the measures, beats, and pulses. As you play, MIDI data from your keyboard goes from keyboard MIDI OUT to interface MIDI IN, and is recorded as a MIDI file or sequence. When the song is done, click on STOP.
• Another way to record your performance is in step time, one note at a time. You also can set the sequencer tempo very slow, record while playing the synth at that tempo, and then play back the sequence at a faster tempo.
• Suppose you are trying to simulate a real musical instrument. Stay within the limits of that instrument: its note range, the number of notes in a chord that it can play, and so on. Work on the sound of the synth in its GUI. Often, audio effects such as reverb and EQ can increase the realism of a synthesized instrument. Add volume automation to pads so they don’t sound like a steady tone. Record a complete performance rather than using cut and paste.
• 4. Play Back the Sequencer Recording
• Click PLAY. You’ll hear the sequence playing your soft synth. If you change the patch and click PLAY, you’ll hear the same performance played by a different instrument.
• 5. Layer the Drum Track
• Using the recording software’s sound-on-sound setting, you can record several passes of a MIDI drum track, adding another instrument each time. On the first pass tap-in the kick and snare, on the next pass add hi-hat, and so on.
• Quantizing automatically corrects the timing of each note to the nearest note value (quarter note, eighth note, and so on). If you wish, quantize the performance by the desired amount. Caution: Quantizing can dehumanize the performance, making it too rhythmically perfect. It’s better to adjust the timing of certain notes only, and to the smallest note value that works. Quantizing is essential if you want to use a notation program.
• 7. Punch In/Out to Correct Mistakes
• To correct a musical error, you can punch in to Record mode before the mistake, record a new performance, and then punch out of Record mode. Another way to correct errors is to edit the MIDI notes in the piano roll view, described later in this chapter. Here’s one way to punch in:
a. Go to a point in the song a few bars before the mistake.
b. Just before you get to the mistake, punch in to Record mode and play a new, correct performance.
c. As soon as you finish the correction, punch out of Record mode.
• Alternatively, you can use autopunch. With this feature, the computer punches in and out automatically at preset measures; all you have to do is play the corrected musical part. Perform an autopunch as follows:
a. Using the computer keyboard or mouse, set the punch-out point (the measure, beat, and pulse where you want to go out of Record mode).
b. Set the punch-in point (just before the part you want to correct).
c. Set the cue or preroll point (where you want the track to start playing before the punch).
d. Click on PLAY.
e. When the screen indicates punch-in mode, or when the appropriate measure comes up, play the corrected part.
f. The sequencer punches out automatically at the specified point in the song.
These punch-in routines were done in real time. You can also punch in/out in step time:
a. Go to a point in the song just before the mistake.
b. Set the sequencer to step-time mode.
c. Step through the sequence note by note, and punch in to Record mode at the proper point.
d. Record the proper note in step time.
e. Punch out of Record mode.
• 8. Edit the Sequence Recording
• You might find it easier to edit the MIDI performance. Go to the MIDI edit screen or piano-roll view (Figure 16.2). It’s a grid showing pitch verses time. The pitch of each note is represented by its height on the grid, and the duration of each note is represented by it length. You can grab incorrectly played notes and put them at the correct pitch and timing, delete unwanted notes, copy and paste phrases of notes, stretch or shorten note durations, and so on.When you’re finished editing one MIDI performance, overdub other MIDI tracks, edit them, and set up a mix.
• 9. Arrange the Song by Combining Sequences
• At this point you can put together your composition. Many songs have repeated sections: the verse and chorus are each repeated several times. If you wish, you can record the verse and chorus once. Then copy the verse section and paste it every place it occurs in the song. Do the same for the chorus.
• 10. Add Audio TracksSuppose you want to add vocals or live instruments to the mix. Here’s a suggested procedure.
a. If you are using a sound card, plug a mic into a mic preamp or mic input of a mixer. Connect the preamp or mixer line output to your sound-card line input. If you are using an audio interface, plug a mic into one of its mic connectors. Connect the interface’s PCI, USB, or FireWire port to your computer.
b. In your recording software, insert an audio track, and set its input source to the audio interface or sound-card channel that the mic signal is plugged into. For example if you plugged a mic into interface input 3, set the track’s input to interface input 3. Enable Record mode on that track.
c. Set the recording level by adjusting the microphone input trim or gain on your preamp, mixer, or interface.
d. Go to the beginning of the tune and hit PLAY in your DAW. The MIDI sequences that you recorded earlier should start playing. (You may need to press the PLAY key on a drum machine first if it is an outboard device, rather than a part of software.)
e. While listening to the MIDI tracks playing through headphones, record the vocal on an audio track. Then overdub more vocals and non-MIDI instruments on other open tracks.
You might record a few takes and then cut and paste selected portions to create a perfect take. For example, record one good chorus and copy it in each chorus section in your song. You also can edit audio notes to correct their pitch or timing.
When you play back what you recorded, the recorded MIDI tracks play the soft synths, and the digital audio tracks play their audio signals. A mix of the soft synths and audio tracks plays from the audio interface line output, which is connected to your monitors.
• 11. Mix, Export the Mix, and Burn a CD
a. After all your tracks are recorded, use the on-screen mixer to set up a mix of the audio tracks and MIDI instruments. Adjust levels, panning, and effects (plug-ins).
b. Play the song several times to perfect the mix and to set up automation. See Chapter 11 under the sections on mixing procedures and automation.
c. Export the mix to a stereo WAV file on your hard drive. Then you can burn a CD of the song or convert it to an MP3 file.
RECORDING A HARDWARE SYNTH
Suppose you like the sound of a hardware synth. You want to record its sound and also record a MIDI sequence of your performance so you can edit it. Figure 16.7 shows the connections.
1. Monitor a mix of the synth audio and sequencer playback. In other words, monitor a mix of the interface input signal and output signal.
2. Insert a MIDI track in your sequencer program. Set its input to your MIDI/audio interface in Omni channel mode. Set the output of the MIDI track to your MIDI/audio interface. That way, during playback the recorded sequence will pass through the MIDI/audio interface to your hardware synth and will trigger it to play music.
3. Enable Record mode in the MIDI track. Record your performance on the MIDI track. (The sequencer will also record whatever MIDI channel number is set in the synth.)
4. If necessary, set your synthesizer to External Clock (MIDI clock) so it will follow the timing of the recorded sequence.
5. Play the sequence and edit it in the piano-roll view.
6. Insert an audio track. Set its input to the interface line input that is connected to the synth audio output. Disable Record mode on the MIDI track, and enable Record mode on the audio track.
7. Make sure that the synth MIDI channel is unchanged. Set levels and start recording. In other words, play the MIDI track while recording the synth audio on the audio track. The MIDI sequence will “play” or trigger the synthesizer as you record its output on an audio track.
8. When the song is done, you have an audio track produced by the hardware synth. If you wish, you can disable the MIDI track that drove the synth.
FIGURE 16.7 Setup for recording a hardware synth on a computer.

“NO SOUND” MIDI TROUBLESHOOTING
Suppose you load a MIDI file and hit PLAY on your sequencer, but you hear nothing. Or you play notes on your MIDI controller, but there’s no sound. Not a peep.
That’s not too surprising, considering that the MIDI signal chain is a long one. Every link in the chain has to work, whether it’s hardware, software, or their settings. I’ll give some MIDI troubleshooting advice that should coax your system to speak when you ask it to.
If any part of the chain is not turned on, or has the wrong settings, you won’t hear a sound when you monitor the synth—no matter how hard you pound the keys! Listed below are some possible reasons why your synth can’t sing, and what to do about it.
• MIDI OUT or MIDI THRU is not connected to MIDI IN somewhere in your system. Trace the cable connections from beginning to end, and see whether a MIDI cable is not plugged in where it should be. The cable itself might be broken.
• Your MIDI interface is not communicating with your computer. A missing or flaky PCI, USB, or FireWire connection can disrupt the data flow between interface and computer. Replug or replace the cable. You might need to restart your sequencer program too. Some recording software has an on-screen indicator that flashes when the software is receiving MIDI data, so check it out.
• When you are tracking, the MIDI sequencer track is not selected. Some sequencer software does not monitor the soft synth unless you select its MIDI track. In some sequencers, you can live-monitor only one synth at a time, but you can play back multiple synth tracks at once.
• The MIDI sequencer track has no MIDI channel assigned, or is set to a different channel than the MIDI controller. Just as you need to set your TV to a certain channel to see a station’s programming, you need to set your MIDI sequencer’s track to the same channel your controller is sending data on. It might be easiest just to set the MIDI track input to your interface in Omni mode, so the track will hear any channel that the controller is sending. You can set multiple MIDI tracks to Omni; just record one track at a time.
• The MIDI sequencer track output is not pointing at your soft synth. You have to tell the MIDI track which synth to play.
• The wrong sound bank was selected in a synth. You might have specified a bank that contains no sounds. Or the MIDI mapping on your controller is set so the notes aren’t playing the patches you want them to play. Check the bank setting, patch settings, and MIDI mapping.
• In the sequencer’s options menu, under MIDI devices, your MIDI interface is not selected. The sequencer does not know where to find the driver that communicates with your interface, so you don’t hear anything. If your sequencer has a MIDI data indicator that is NOT flashing in response to your playing, maybe you forgot to select the MIDI driver.
• The synth’s audio-track volume, or the MIDI track’s key velocity, is turned down. Disable any mute buttons and turn up the faders for those tracks. Check that no other tracks are soloed.
• You started playing the MIDI track in the middle of a long note, rather than at its beginning. A synth needs to receive a note-on command in order to play a note. If you start playing the sequence from a point after the beginning of a note, the synth does not receive the note-on code, so it remains silent.
• Your hardware synthesizer lost the program-change command. Although you told the synth which patch to play, sometimes this information is lost. Change the patch on the synth and then set it back as it was. Or record the program change at the beginning of the song.
• The input to your sequencer track lost the setting for its MIDI input device. Sometimes when you close a sequencer program and reopen it, the MIDI track inputs might forget their settings. Temporarily set the MIDI track input to another device, then set it back as it was.
• The MIDI driver is buggy. Download the latest update from the interface manufacturer.
• The synth audio output is not assigned to your interface’s stereo output channels. In other words, the synth is making music but not sending it anywhere.
• Can you hear any audio playing through your monitors? If not, the monitor power amp, or your mixer’s monitor controls, might be off or turned down. Maybe the cables between your interface and monitors are not plugged in. Seems obvious, but it’s happened to me.
I hope these suggestions make your speakers play notes when you press keys. The better you understand the MIDI/audio signal path, the better you can find errors and fix them.
RECORDING WITH A KEYBOARD WORKSTATION
This is another way to record in a MIDI studio. Basically you follow the steps for multitrack sequencer recording above, but do them in the keyboard workstation rather than in a computer. The workstation’s manual explains how to do it.
You can access the keyboard’s effects menus to set up the effects that are heard with a patch: hall reverb, chorus, flanging, echo, distortion, and so on. Press the correct number on the numeric keypad to get to the effects menus. (Note that these are built-in keyboard effects, not outboard studio effects.)
Save the completed song (MIDI sequence) in multitrack form to the keyboard’s internal memory or to a plug-in RAM card. If you’re satisfied with the final results, use a DAW to record the stereo output signals of the workstation. Then you can burn a CD or create an MP3 file from the WAV file you just recorded on your hard drive.
In addition to these basic operations, you can:
• Bounce tracks: copy one track’s performance to another track so it will play another patch.
• Edit each note event.
• Create and copy patterns (for a drum or bass part, for example).
• Modify track and song parameters.
• Insert/delete/erase measures.
• Modify sounds and effects.
• Change the instrument (patch) that each track plays.
RECORDING WITH A DRUM MACHINE AND SYNTH
Suppose you want to record a drum pattern on a hardware drum machine, and then you want to add a synth part using your computer.
First record the drum pattern. Here’s one suggested method:
1. On the drum machine, set the tempo, time signature, and pattern length in measures. In this example, the pattern will be 2 bars long.
2. Add a count-off (a few measures of clicks) at the beginning so that overdubs made later can start at the correct time.
3. Start recording, and play the hi-hat key in time with the metronome beat.
4. At the end of 2 bars, the hi-hat pattern you tapped repeats over and over (loops).
5. While this is happening, you can add a kick drum beat.
6. While the hi-hat and kick drum are looping, add a snare drum beat, and so on.
7. Mix the recording by adjusting the faders or keys on the drum machine for each instrument.
Next, you repeat the process for a different rhythmic pattern—say, a drum fill—and store this as Pattern 2. Then develop other patterns. Finally, you make a song by repeating patterns and chaining them together as described in the drum machine’s instruction manual. A song is a list of patterns in order.
Some musicians like to compose by programming a simple repeating drum groove first. While listening to this, they improvise a synth part. After recording the synth part, they redo the drum part in detail, adding hand claps, tom-tom fills, accents, and so on.
Finally, copy the audio signal of the drum pattern to a stereo track in your computer recording program. Play back that track while overdubbing other parts.
USING EFFECTS
No matter how you record with MIDI, effects are an important part of the mix. To keep the sound lively, try to vary the effects throughout the song, or use several types of effects in the mix.
For example, suppose you have a multitimbral synth, and you want to add a different effect to each patch. Whether or not you can do this depends on your synth. If it has a separate output for each patch, you can use a different effect on each patch. But if your synth has only a single output (mono or stereo) and you run it through an effects device, the same effect is on all the patches.
If your song includes program changes (patch changes), you can have the effects change when the patch changes. Set up a MIDI-driven multieffects processor so that each synth program change corresponds to the desired effect. When the synth program changes, the effect also changes.
What if you want the effect, but not the synth patch, to change during a mix? Reserve a track and channel just for effects program changes. You don’t hear these program changes in your synth, but you do hear the effects change. During a mixdown, it’s usually easier to change effects automatically with your sequencer, rather than manually.
In a sample player, some samples might have reverberation or some other effect already on them: the effect is part of the sampled sound. Note that the sampled reverberation cuts off every time you play a new note. Although this sounds unnatural, you can use it for special effect.
Because effects are audio signals, audio recorders can record effects but MIDI sequencers can’t. MIDI sequencers, however, can play synths or patches that have effects built in.
Some recording software lets you convert a MIDI track to an audio track, then apply audio effects to that track. Other software uses a separate MIDI track and audio track for the same instrument patch. You apply effects to the audio track.
MIDI effects (MFX) are nonaudio processes applied to MIDI signals, such as an arpeggiator, echo/delay, chord analyzer, quantize, transpose MIDI event filter, or velocity change. They are plug-ins in MIDI tracks.
LOOP-BASED RECORDING
Let’s turn to a different aspect of computer MIDI recording. It’s possible to compose, record, and perform music entirely in software. You might start by creating a variety of loops or grooves, which are constantly repeated rhythmic or musical patterns.
You can buy loops or make your own. You might create a loop by recording a 4-measure sample of a drum beat or bass riff that you play to a metronome or click track. Or use a handheld recorder to sample some interesting sounds in the field. The sounds might create a rhythm when repeated. If not, you can edit the timing of individual sounds until you get a rhythm you like. Soft synths are another source for loops, and some are bundled with ready-to-use patterns. Many recording programs include loop patterns. You can also create loops from parts of tracks that you recorded.
Making Your Own Loops
Let’s make a 4-bar loop in 4/4 time using the editing function in a DAW. Start with a musical pattern longer than 4 measures that was made to a metronome or click track. Ideally the pattern has little or no reverb so that the reverb won’t be cut off when you trim the loop.
Trim the start of the loop waveform just before beat 1, and trim the end of the loop after measure 4-beat 4, and just before the next beat 1. To avoid a click in the audio when the loop repeats, both trim points should be at zero crossings where the waveform crosses the 0-volt line (Figure 16.8)
FIGURE 16.8 Trim loops at zero crossings in the waveform.

Copy the trimmed 4-measure clip and paste it on the beat several times to repeat it. Or right-click the clip and select “Loop clip.” If you hear no clicks and the rhythm is steady, export the 4-measure loop to your loop library. Store your loop collection by tempo, style and type (for example, 120 bpm, jazz, drum set with brushes).
Once you have created several loops, you can drag and drop them (or import them) into your DAW software. There, you can copy and paste loops on the beat to repeat them. A SONAR groove clip (explained next) can be repeated by click-dragging the end of the clip to the right.
Types of Loops
There are five types of loop audio files based on their ability to have their tempo changed:
• A loop made from a standard digital audio file. It has a fixed tempo, so you must build your song around that tempo.
• A processed audio file. The tempo or pitch of the loop can be changed by a time-stretch or pitch-shift algorithm in your audio editing program. But if you need to change the tempo of a song, you need to adjust all the loops you stretched.
• A file with REX-based time stretching. The transients in the audio file are cut into slices, whose spacing depends on the tempo. REX files follow tempo changes in your composition.
• An acidized (RIFF) WAV file. Pitch and tempo information are in the file header, and the audio is sliced at transients as with REX files. Acidized files follow tempo and key changes. Slowing down the loop by more than 15 or 20 beats per minute can add artifacts, so it helps to start with a slow tempo of less than 120 bpm.
• Cakewalk SONAR recording software includes Groove Clips that have embedded tempo and root-note pitch. SONAR can stretch the clips to match changes in tempo, or transpose clips to match the project’s key. You repeat a Groove Clip by dragging its end to the right in the track. Almost any audio clip can be converted to a SONAR Groove Clip; just select the clip and press Ctrl-L.
Working with Loops
Once you’ve made several repetitions of the groove, you can add effects, distortion, or pitch/tempo changes. You might put some echo or reverb on a drum loop and vary the dry/wet mix with automation as the loop plays. When the loops are complete, overdub audio and MIDI tracks such as soft-synth parts, percussion, vocals, and acoustic instruments. Import other loops and place them where you want them in the song.
You can also create loops externally, then import them into a DAW recording program. For example, compose a repetitive beat of drums, synth, and samples in a beat box. Launch your DAW software, set up a stereo track, and record the box output to that track as it plays the beat. On other DAW tracks you can overdub vocals, doubled vocals, rap sections, and harmony.
Repetitive loops can get boring, so edit or remove various notes in the piano-roll view to add some variety. You might insert some spaces here and there in the song to create breaks for solos or record scratches.
Some loop programs offer groove quantizing, which transfers the timing and dynamics from one groove to another. It allows human-like variations in timing and key velocity.
Loop Libraries
A loop library or sound library is a collection on CD or DVD of loops and sampled musical phrases that you can use to create a composition. The loops come as MIDI files and WAV files, and usually are organized by tempo and key. You drag them into DAW tracks and construct several song sections, each made of repetitive loops.
The major distributors of loop libraries are Big Fish Audio, Sony, and EastWest. Other libraries are available from Nine Volt Audio, PureMagnetik, www.producerloops.com, www.kellysmusicandcomputers.com/loop_sample_libraries.htm, www.loopmasters.com, www.ilio.com, and www.sonomic.com.
Some library examples are M-Audio ProSessions, Sample Logic, Audiobro LA Scoring Strings, EastWest Hollywood Strings, Hark Loops, Cakewalk loop libraries, Sony Creative Software Artist Integrated loop libraries, Sonic Foundry Acid loop libraries, Vienna Symphonic Library, GarageBand, Smart Loops, FL Studio, Beatboy, Keyfax Twiddly Bits, Groove Monkee, APO Multimedia Mix It, and Pocket Fuel RADS series. Some drum sample libraries include Wizoo VST Drum Sessions, FXpansion’s BFD, Discrete Drums, DrumCore, Multiloops Naked Drums, and Toontrack EZdrummer.
Do a Google search for “Loop Libraries” or “ACID loops.” Complete looped rhythm tracks are available online for purchase. Just add vocals.
Loop Creation Software (Construction Kits)
Many DAW recording programs include loop-creation software, which is also available separately as a loop construction kit. For example, Propellerheads Software (www.propellerheads.se) has a variety of programs to create and modify loops. They also offer soft synths, drum machines, and sequencers. Here are some of their products:
• ReCycle is a standalone tool that starts with a loop and lets you change its tempo and pitch, and replace and process sounds within the loop. By detecting peaks in the waveform, ReCycle automatically breaks a loop into parts or slices. A slice might be a snare-drum hit, a kick-drum hit, or a kick-and-snare hit. When a loop’s tempo is changed, the start point of each slice moves in time so that the beats occur at the right time. (You might need to touch this up manually.)
• If the tempo is slowed down, ReCycle creates a decay after each drum hit to fill in the gaps. You can delete slices, change their length, attack, decay, and pitch; and add compression or EQ. Then you can import the improved loop as a REX2 file into an audio track in your sampler or sequencer program. There you can control all aspects of the loop.
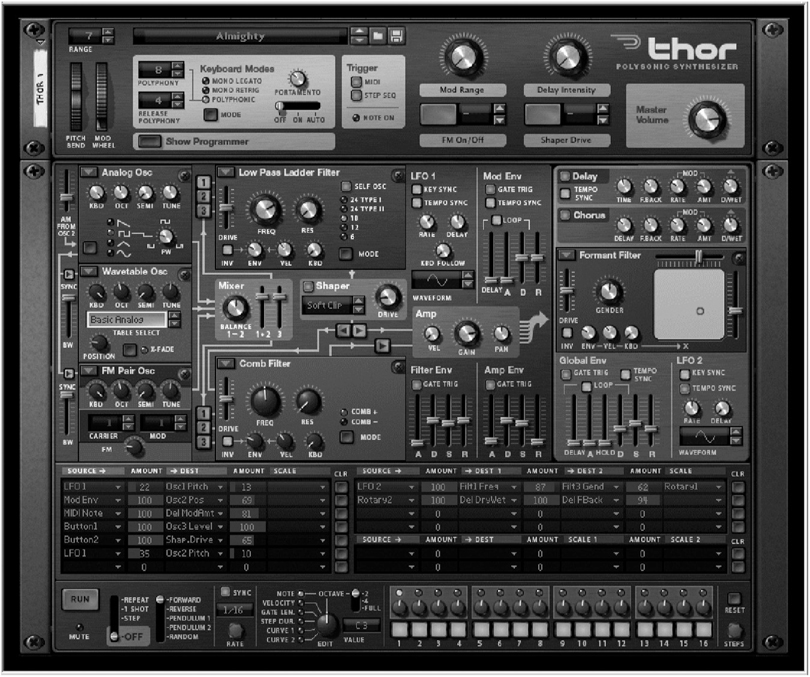
• Reason includes a group of synthesizers and samplers, a drum machine, a mixer, effects, a pattern sequencer, and more (Figure 16.9). It’s all-in-one and easy to learn. Reason can import and play ReCycle’s REX files.
• ReWire is a useful feature found in some loop programs. It transfers or streams audio data between two computer applications in real time, almost like a cable. This allows programs to communicate with each other and synchronize together.
• Balance is a 2-in/2-out USB audio interface designed to integrate into Reason with no setup or driver install.
FIGURE 16.9 The Thor synthesizer screen in Reason software.
Some other loop-based tools to compose and record music are listed below.
Ableton Live lets you compose with soft synths, record high-resolution multitrack audio, and play loops in a live performance. With Live you can make stuttering drums, create arrangements, do MIDI loops, and modify grooves, timing, pitch, volume, and effects.
Sony Creative Software’s ACID products let you select audio loops from Windows Explorer, drag them into a recording program’s track view, and arrange them into multitrack projects. The tempo and key of each loop are automatically matched to your project’s music in real time, using the slicing technique described before. ACID uses time-stretching algorithms to lengthen sounds when the tempo is slowed down.
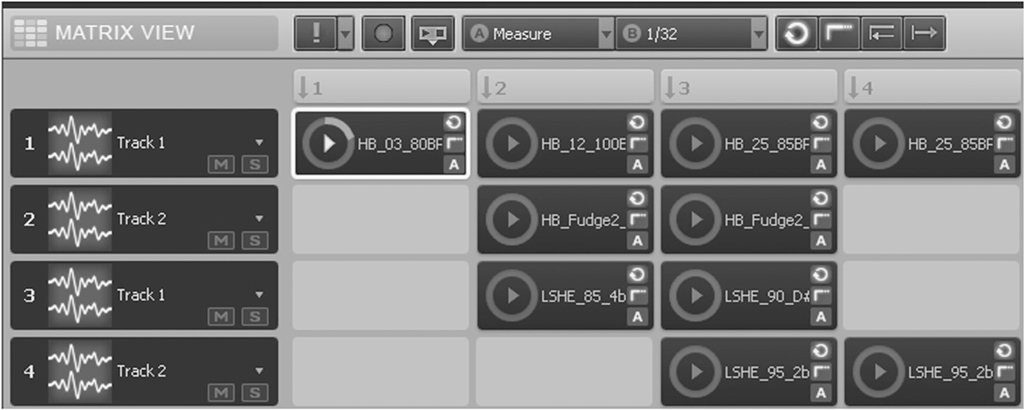
Other loop-intensive DAWs include FL Studio (PC) and Apple GarageBand (with Apple Loops included). Figure 16.10 shows Sonar’s Matrix loop construction app, which comes with Cakewalk Sonar Producer X1. It’s like a multitrack recording project for loops. You drag 2-bar and 4-bar instrument loops into the Matrix wherever you want them, stack several instruments, and play them. You can even trigger different loops in real time and record your performance.
FIGURE 16.10 Sonar’s Matrix loop construction app.
A few loop construction kits are Native Instruments Discovery Series, Ueberschall Funk & Soul, Sony Charm, Freshtone Samples Lost Tapes Vol. 1, Best Service K-Size Electro Edition, and Big Fish Audio Pure Rock Hits.
Some excellent articles on loops were in the July 2004 and August 2002 issues of EQ Magazine, the January 2007 issue of Recording Magazine, and the October 2011 issue of Electronic Musician (“Refined Repetition” by Craig Anderton). Also be sure to see the article “Under Construction” by Len Sasso: go to http://www.emusician.com/techniques/0768/loops–under-construction/139936.