The Wii is packaged in a relatively small box, but it comes with everything you need to enjoy it as a single-user appliance. For those folks who want to take full advantage of the Wii’s gaming prowess, some accessories have to be on the “to acquire” list. Otherwise, not much two-player action will happen; the Wii will be a solitary endeavor.
To help you decide whether you need to purchase anything to go with your first Wii, this chapter looks at what’s inside each Wii box, examining the features and the guts of the Wii so that you can see what this machine can do. Then I’ll show you how to set it up and how to connect to the Internet in the quickest, most efficient manner.
Note
I use the word appliance because the Wii is much more than just a gaming machine. It is in fact an Internet appliance that lets users send and receive email, surf the Internet, shop, manage photos, receive key information such as weather and news, and generally connect to the world as a whole.
The Wii comes with everything you need to get started for a single-user situation (Figure 2.1). But like all consoles on the market, the basic kit lacks a second controller (in this case, a second Wii Remote), which makes dual-user capability possible only when the users can hand one remote back and forth.
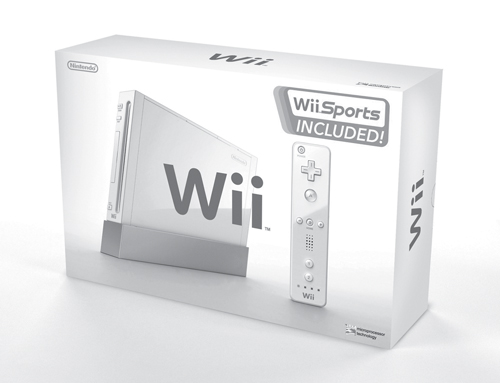
Here’s exactly what comes with the Wii right out of the box:
Wii console
Wii Remote
Nunchuk controller
Vertical stand and plate
Sensor bar and stand
AC adapter
AV cable
Wii Sports disc
Wii Operations Manual and other documentation
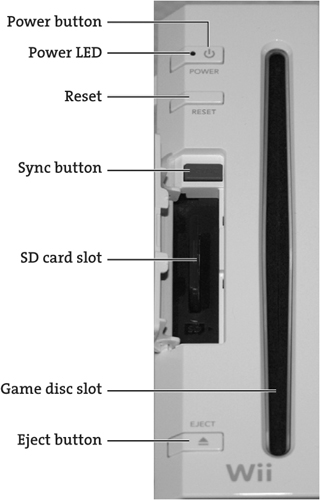
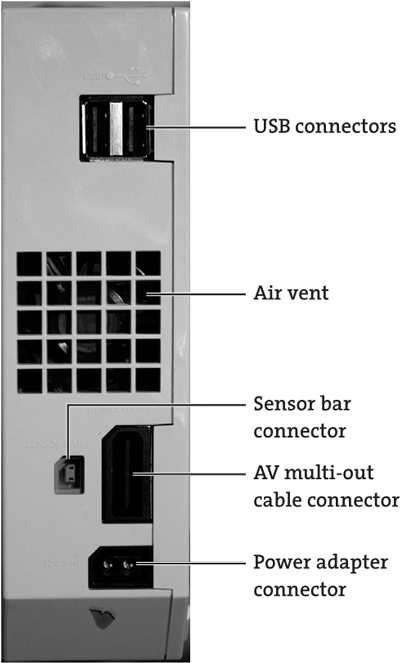
The Wii console contains a series of buttons as well as two doors that give you access to the GameCube portion of the Wii and the SD Memory Card access slot for the Wii. Figure 2.2, Figure 2.3, and Figure 2.4 also show where the power adapter, the AV adapter, the sensor bar, and the USB connectors are located.
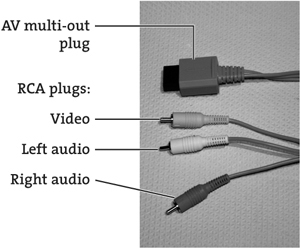
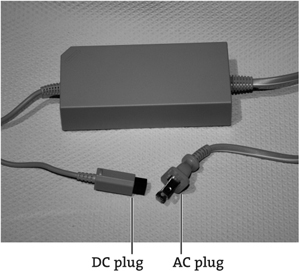
The basic AV cable (Figure 2.5) and the AC power cable for the Wii (Figure 2.6) are self-explanatory in terms of where you attach them on the Wii and how you plug them into a power outlet or the inputs on a television.
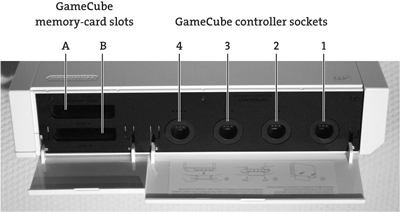
What’s perhaps most impressive about the Wii is that it’s essentially a GameCube and a Wii all in one. Flip up the cover on the top of the Wii, and you see the GameCube area, which contains four GameCube controller sockets and two GameCube memory-card slots.
The small door on the front of the Wii gives you access to the Sync button (which you use to synchronize Wii Remotes with this particular Wii) and the SD card slot, which allows you to add storage space to your Wii via an SD (secure digital) Memory Card.
The Wii Remote and the Nunchuk are the two input devices that come with the Wii.
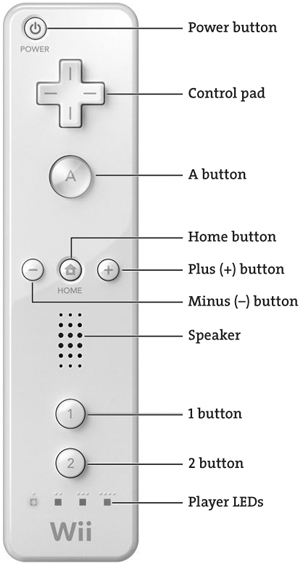
The Wii Remote (Figure 2.7) is the backbone input device, working entirely wirelessly—indeed, seemingly magically. It contains accelerometers, infrared sensors, a speaker, and a vibrating feedback mechanism that causes the remote to actually jolt in your hand in concert with what’s happening onscreen.
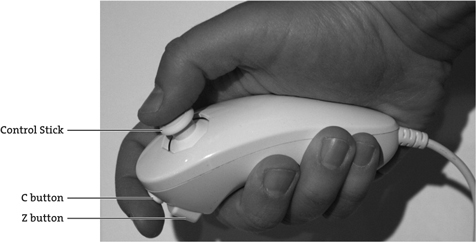
The Nunchuk (Figure 2.8) is reserved for gaming applications, but because it’s required for Wii Boxing (included in Wii Sports), the folks at Nintendo made sure that it’s part of the basic Wii kit. Although it too contains such things as accelerometers, the Nunchuk works only when hooked to a Wii Remote via the connector at the base of the device.
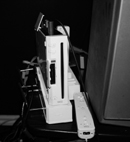
You can set up the Wii in a horizontal configuration or in a vertical fashion to save space and (arguably) to look more hip. The vertical stand that comes with the Wii allows you to set the console on its end with more confidence. The stand plate adds stability to the vertical configuration so that you’re less likely (or at least relatively less likely) to pull the Wii off its perch during a game that involves a GameCube controller connected to the Wii by a wire.
Besides the operating system that is built into the device, the Wii comes with Wii Sports, an ingenious collection of sports games that takes advantage of the wireless Wii Remote and provides instant enjoyment. The Wii Sports disc includes these games:
Tennis. For new Wii users, Tennis seems to be the most difficult game to get the hang of.
Golf. The Wii’s three-hole Golf game is lots of fun. It demonstrates the power of the Wii Remote to act like anything, including a golf club.
Bowling. Fun for the whole family, Bowling requires little skill and can be played by anyone between the ages of 4 and 100.
Baseball. Baseball is three innings of fun in which pitching and batting are the entire object; fielding is automatic. The players switch from batting to pitching at the top and bottom of each inning.
Boxing. The most dramatic of the Wii Sports games, Boxing pits two boxers against each other in a three-round bout.
Of the Wii Sports games, Boxing (Figure 2.9) is the one that most kids want to play immediately. After you play even one round, you quickly realize that the Wii has the capability to do something besides just entertain and serve as an Internet appliance; it can also be used very effectively as exercise equipment. You heard me correctly: The Wii is actually a tool for helping people stay active and lose weight. (More on that later.)
Note
In Boxing, you need the Nunchuk so that both of the boxer’s hands can register punches or evasive maneuvers.
Pretty much all the games are more enjoyable when played by two people, but the lack of a second controller can be an obstacle. Fortunately, two people can play Bowling and Golf merely by swapping the Wii Remote. Still, the real joy of Baseball, Boxing, and Tennis comes when two Wii Remotes are available so that two players can truly go head to head.
Boxing with the Amazing Wii Remote
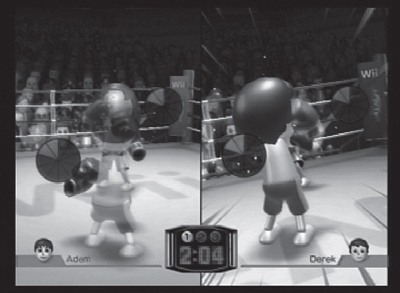
When you take a stab at Wii Sports Boxing, you really begin to see the power of the Wii and its wireless remote system. The Wii Remote and Nunchuk enable you to throw specific punches with both hands, your onscreen persona throwing the same punches that your offscreen body is throwing in midair (Figure 2.10). But the remote and Nunchuk also sense when your body moves from side to side, and the onscreen boxer you are controlling moves from side to side with you. Add to this the fact that the remote gives you physical feedback in the form of a jolt—as well as auditory feedback—every time you get hit by your opponent or land a particularly solid punch, and you’ve got a control system that changes the way games are played.
The result is a round of boxing that’s remarkably like a real-world match, with the opponents dodging left and right; throwing jabs, roundabouts, and uppercuts; and generally looking like real boxers. Even though the players aren’t facing each other—they’re standing side by side facing a TV set—they are nonetheless engaged in what they perceive to be a battle of pugilistic honor. The effect is a lot of fun and surprisingly healthy. Indeed, the first time I played Wii Sports Boxing against my 8-year-old son Adam, I managed to record a victory, but at the end of three rounds I was also pouring sweat, and my heart rate was up considerably.
The Wii is a powerful gaming console, but perhaps the most surprising aspect of this new gaming system is that it really can’t compete with Microsoft’s Xbox 360 or Sony’s PlayStation 3 in terms of raw computing power or graphical capabilities. Nintendo obviously made a conscious choice to create a unit that, although impressive, is not intended to set the gaming world on fire with its power. Indeed, the company went after the gaming market with a plan to create an adequate, inexpensive, yet paradigm-creating console that incorporated existing technology in ways that would make it irresistible to gamers and families alike.
This strategy paid off in spades, because the Wii continues to be a hot item. Even as I write this paragraph, months after the holiday season of 2006–07, the Wii is still sold out at every store in my area, and a scan of the major online retailers, such as Best Buy, tells much the same story.
The following sections examine the technical aspects of the Wii.
The processors are the real guts of a console’s (or any computer’s) performance. Generally speaking, a gaming console such as the Wii has a central processing unit (CPU) and a visual processing unit (also known as a graphics processing unit, or GPU), and from these two units, the console derives its power.
The CPU is a PowerPC “Broadway” processor that runs at 729 MHz.
The GPU is an ATI “Hollywood” processor that runs near 250 MHz.
Note
Computers and videogame consoles with separate video processors are relatively recent developments. For many years, the graphics on a computer were managed by a built-in graphics chip or—heaven forbid—by the computer’s own CPU. As consumer demand for more detailed, impressive animations and graphics increased, so did the need for more powerful graphics chips. Today, it’s not uncommon for a person buying and assembling a new computer for gaming purposes to spend more money on the video processor than on the computer’s main CPU.
The Wii comes with built-in flash memory for storing downloads and other important information (such as saved games), but it also includes an expansion slot for an SD Memory Card. The GameCube area of the Wii contains slots for GameCube memory cards, and the disc drive can handle both the 12-cm Wii optical discs and the 8-cm GameCube discs.
The Wii Remote also has an important storage feature. Each remote has a small amount of memory (only 6 KB) that you can use to store as many as 10 Mii characters. This feature allows you to back up special Mii characters or transfer Mii characters to a friend’s system with ease.
The Wii’s storage features are as follows:
512 MB built-in flash memory
Single SD Memory Card slot
Two GameCube memory-card slots
Slot-loading optical disc drive for GameCube and Wii discs (read-only)
6 KB EPROM (Erasable Programmable Read-Only Memory) in the Wii Remote
Note
SD Memory Cards come in several flavors, from 256 MB up to 4 GB. For this book, I bought two 1 GB SD cards to store saved games and downloaded Virtual Console titles. A 1 GB SD card currently runs about $29. When I consider that I once spent $499 on a 16 KB memory upgrade for my Commodore Vic 20 computer, it boggles my mind to imagine that I can now spend 1/17th as much for a memory chip that’s roughly 64,000 times larger (in terms of storage) and about 1/100th the size of the 16 KB memory upgrade.
Outlets include the actual ports, peripheral connections, and adapter-connection locations on the Wii. Following are all the ports on the Wii:
Four GameCube controller ports
One SD Memory Card slot
Two GameCube memory-card slots
Sensor bar port
AC adapter port
AV cable port
Two USB 2.0 ports
Internal 802.11 b/g wireless module for Wi-Fi Internet connection
This section looks at the capabilities of the Wii’s basic output in terms of video and audio output:
For video, the Wii is capable of standard NTSC output or 480p progressive-scan output.
Video can be connected via RGB, S-Video, or Component connectors.
Audio output is stereo, with Dolby Pro Logic II capability.
Audio output in the controller is via a single built-in speaker.
You fought off the crowds at the stores, bribed the clerk, acquired a Wii, and got it to your house without anyone ripping it out of your hands along the way. Now what do you do? The answer is simple: You set up the Wii and get the ball rolling with your brand-new and exciting gaming console.
To set up your Wii, follow these steps:
Remove the Wii from its box.
Remove the AC adapter and the AV cable from their packaging.
Remove the vertical stand, stand plate, sensor bar, and sensor-bar stand from their packaging.
Remove the Wii Remote and Nunchuk from their packaging.
Find a place near your TV for the Wii, and set up the Wii horizontally or vertically (Figure 2.11).
Plug the AC adapter into a power outlet, and connect the AV cable to the input on your TV, with the yellow cable going to the video input and the red and white cables going to the audio inputs.
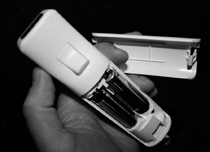
Put the batteries in the remote control (Figure 2.12).
Turn on the Wii.
Follow the onscreen instructions to set a language, your location, time of day, and so on.
As gut-wrenchingly simple as the Wii is, it has a slight wrinkle when it comes to Wii Remotes. Wii Remotes don’t bond to your Wii console automatically; they actually have to be told to do that.
The remote control that comes with your console is prebonded to it, but any extra Wii Remotes you may have purchased have to be synchronized with your Wii to work with the console smoothly. You can do this in two ways: One Time Mode and Standard Mode.
One Time Mode allows your Wii Remote to work with a Wii other than the one it is synchronized with. If you go to a friend’s house to play some Wii Golf, for example, and he has only one Wii Remote, you can take your remote along and synchronize it with your friend’s Wii, using One Time Mode. Follow these steps:
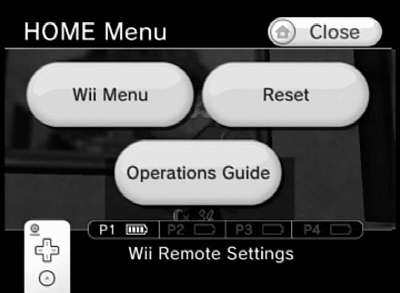
Press the Home button on the Wii Remote that is already synchronized with the Wii console you want to use.
Select the Wii Remote Settings option; then select the Reconnect option (Figure 2.13).
After you click the Reconnect button onscreen with the Wii Remote’s cursor, simultaneously (and physically) press the 1 and 2 buttons on the remote that you want to sync with the console.
When the lights stop blinking and your remote vibrates slightly (you can feel it in your hand), your remote has synchronized temporarily with that Wii console. The attachment of the remote is reflected onscreen as well.
Use Standard Mode to connect additional Wii Remotes to your Wii system permanently—when you’ve purchased (or otherwise acquired) new remotes for your system, for example, and you want to have them available for game play at all times.
To synchronize a new remote with your Wii, follow these steps:
Press the Power button on the Wii console to turn it on.
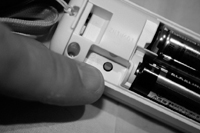
Remove the battery cover on the back of the Wii Remote, and press the Sync button inside the cover (Figure 2.14).
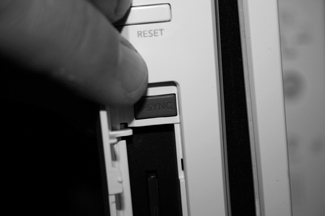
Open the door over the SD card slot on the Wii console, and press the Sync button inside that compartment (Figure 2.15).
When the LEDs on the remote stop blinking, synchronization is complete.
Part of what makes the Wii special is its ability to connect to the Internet with ease, giving you access to the information and shopping channels that are available only with an Internet connection. You can connect the Wii to the Internet through wireless connections or wired connections.
To connect to the Internet via an existing wireless connection in your house, office, or wherever you are, you need only your Wii, a power source, and a functional Wii Remote. Assuming that your wireless network is not encrypted, you can connect with the following method:
In the main Wii menu, move to the bottom-left corner and click the Wii Options button (Figure 2.16).
Click the Wii Settings button.
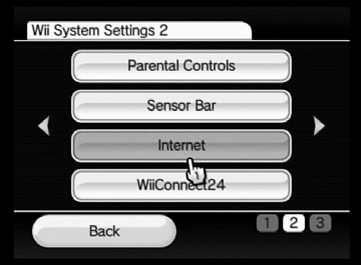
Move to the Wii System Settings 2 screen by clicking the arrow button; then click the Internet button (Figure 2.17).
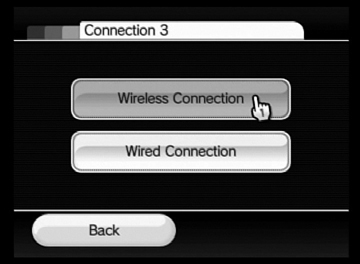
Click the Connection Settings button; then click the Wireless Connection button (Figure 2.18).
Click Search for an Access Point.
After you do this, the system searches for available wireless networks and lists them onscreen.
Select the network you want to use.
Click the Test Connection button to see whether your connection is working.
That’s it!

If your wireless network is encrypted, use this procedure:
Complete steps 1 through 5 of the preceding list.
After you click Search for an Access Point and select a network, the Wii displays a screen that asks for a key or password (Figure 2.19).
In the input screen, enter the WEP key or password for your wireless network, and click OK (Figure 2.20).
When the correct password or key is in place, the Wii is connected.


Note
If you have access to an encrypted wireless network, no doubt you know the key or password for it, because your computer connects in the same way. Beyond telling you that you need to have this information, I can’t help you further because of the nature of WEP (short for Wired Equivalent Privacy) encryption passwords, keys, and wireless systems; it’s impossible to walk you through them all.
If you don’t have an existing wireless connection nearby, but you do have a computer nearby that’s connected to the Internet, you can use Nintendo’s Wi-Fi USB Connector to turn your PC into a wireless broadcaster/receiver that your Wii can connect to.
To do this, first you need to complete steps 1 through 4 in “Connecting via an existing wireless network” earlier in this chapter. Then you need to move to your PC and install the software from the disc that comes with the USB connector, as follows:
Insert the USB connector into a USB slot in your PC.
Insert the USB-connector software disc into your PC.
Follow the installation instructions.
Run the Nintendo Wi-Fi USB Connector Registration Tool.
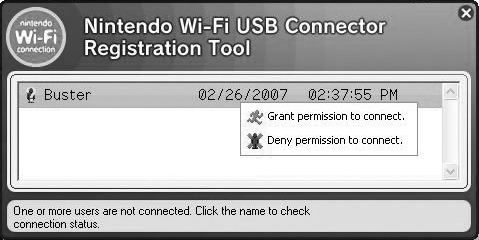
Your Wii will appear in the tool window (Figure 2.21).
Right-click the Wii, and choose Grant Permission to Connect from the shortcut menu (Figure 2.22).
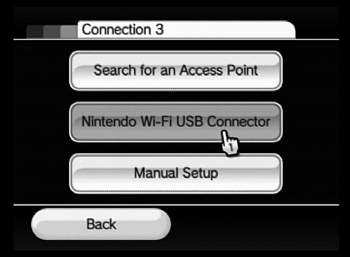
Click the Nintendo Wi-Fi USB Connector option (Figure 2.23).
When the PC is set up, click OK in the Wii screen.
The Wii tests the connection, and voilà—you’re connected.

When this book was being written (early 2007), the Wii LAN adapter, which will connect to the Wii via one of the two USB ports, was not available from Nintendo. To connect to the Internet with this cable, however, you should be able simply to connect the LAN adapter, plug in the Internet connection, and select Wired Connection in the Internet screen of Wii Settings.