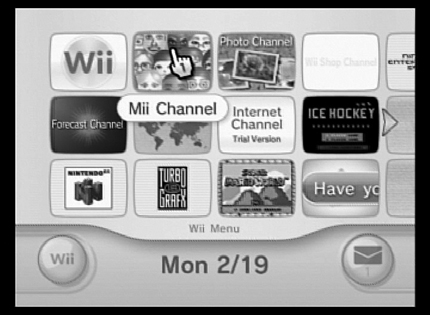
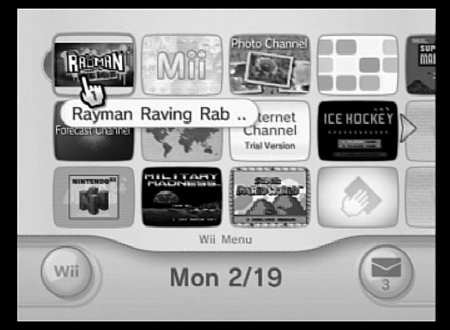
The Wii Channels are available in the form of miniature television-style screens tiled on the main Wii menu (Figure 3.1). These channels are your Wii’s windows to the world, so to speak, allowing you to access the Internet, all things Mii, photographs, weather forecasts, shopping, and the various Virtual Console games that you’ve bought and downloaded to your Wii.
The Wii has eight main channels, each of which gives you access to a different aspect of the Wii experience. The Disc Channel, the Mii Channel, and the Photo Channel don’t require Internet access, but the Wii Shop Channel, the Forecast Channel, the News Channel, the Everybody Votes Channel, and the Internet Channel are completely dependent on Internet access for their functioning.
This chapter examines the important aspects of the eight main Wii Channels, showing you their functionality and use as they pertain to both experienced and novice Wii users.
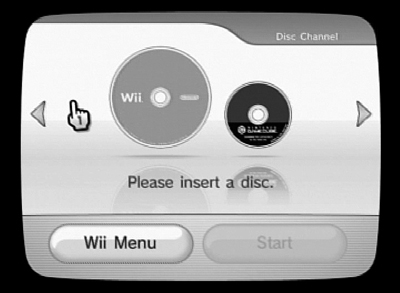
The Disc Channel always appears in the top-left corner of the Wii’s main menu; the image it displays correlates to whatever disc is currently inserted into the Wii. When no disc is in the drive, this channel displays a picture of a Wii disc and a GameCube disc, as shown in Figure 3.2; it’s in ready state, waiting for you to insert a disc.
Channel Arrows
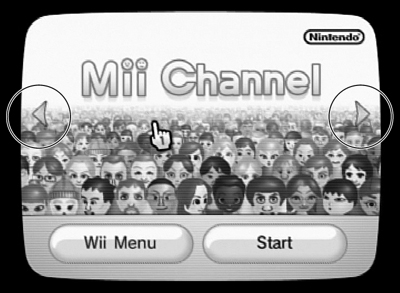
When you look at the close-up view of any particular channel, you’ll notice arrows on either side of the screen (Figure 3.3). These arrows, when you select them, cause the channel to slide to the left or right of the current channel. In other words, clicking those arrows is just another way of moving between channels; this way is sequential, taking you through all the available channels one at a time.
When you insert a disc into the Wii, the Disc Channel screen shows either a graphic pertaining to the software/game (in the case of a Wii game) or a Nintendo GameCube graphic (in the case of GameCube games). In Figure 3.4, the Wii game Rayman Raving Rabbids is in the disc drive; therefore, its graphic is displayed, making it easy for you to see what game is in the drive and ready to go.
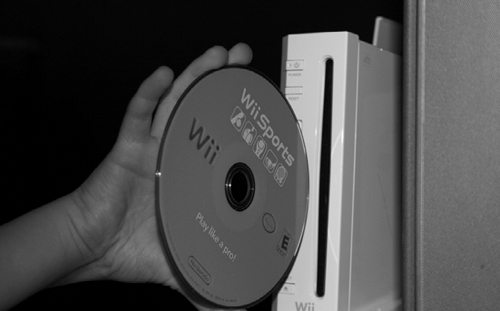
To swap a disc in the drive and thereby change what’s on the Disc Channel, simply press the Eject button on the front of the Wii console. The present disc slides out so you can grab it and put it away. To insert a different disc, simply place it in the mouth of the slot, as shown in Figure 3.5; the disc gets sucked into the Wii. Before you know it, the software on the disc you just inserted is displayed in the Wii Channel screen as a valid option.
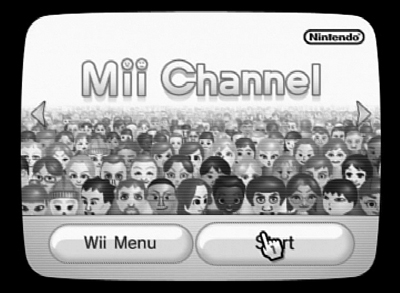
The Mii Channel (Figure 3.6) is the place where all things Mii take place. Incidentally, the word Mii is pronounced “me,” making it great for all you folks who grew up in the 1980s, largely accepted as being the “Me” decade. As comedian Dennis Miller said, the ’90s were the “Me me me me me” decade, so maybe the first decade of the new millennium can be the “Mii” decade and avert the nasty subtext.
Miis are simply miniature versions of you. In the online world, characters such as Miis are called avatars, which are graphic representations of how you want people to see you. With Miis, you can create exactly what you want, whether it’s an accurate portrait of you or a representation of what you’d like to be. Miis are there for you to mold as you see fit. The Miis that you create or invite to your Mii Plaza (covered later in this chapter) end up as characters in many of the games you play, so having Miis adds a fascinating, endearing, and entertaining wrinkle to the Wii’s lovability.
When you create a Mii, you have the option of allowing it to travel. If a Mii travels, it can show up on a stranger’s Wii on the other side of the world. Likewise, other people’s Miis show up on your Wii from time to time as well. The whole concept is a lot of fun. You can also send Miis directly to a fellow Wii user by mailing them from Mii Plaza.
Note
When a Mii travels, it doesn’t disappear from your Wii, so don’t worry that allowing a Mii to travel means that you’ll lose it for a while. You won’t.
For a much more in-depth look at Miis, the Mii Channel, and everything else Mii related, check out Chapter 4, which is dedicated to the subject of me . . . I mean, Mii.
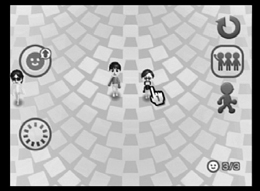
Miis tend to congregate in a couple of places, the first of which is Mii Plaza (Figure 3.7). This spot is where all the Miis you create on your Wii mingle. They tend to walk around; have conversations; and generally stand ready for those times when you need to use them in a game, in an activity, or in some other software.

In Mii Plaza, you can create a Mii; edit an existing Mii; save a Mii to your Wii Remote; email a Mii to another Wii user; or organize your Miis in several ways. In short, Mii Plaza is the hub of Mii activity—the place where you can engage in most Mii activities. Pressing the plus (+) and minus (–) buttons on the Wii Remote allows you to zoom in and out on the Miis in the Plaza, and clicking the whistle icon in the bottom-right corner causes the Miis to come to attention and line up for your inspection.
The Mii Parade, shown in Figure 3.8 (on the next page), is where traveling Miis come into your Wii system to hang out. Occasionally, it’s a good idea to go to the Mii Parade area to check out whether any Miis are tooling around there. If so, you can leave them alone; get rid of them; or invite them to your Mii Plaza, where they become part of your Mii community.
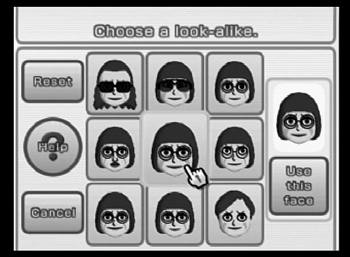
Two buttons in Mii Plaza let you create and edit Miis. When creating a Mii, you can build it completely from scratch or choose a look-alike to help you get the process started. Figure 3.9 shows an intermediate step in the selection of a look-alike to create a Mii.
Editing Miis is highly individual. If you get a new pair of glasses or a new haircut, you may want to edit your Mii to reflect the new you, or you may want to give your Mii the Mohawk you’ve always wanted. Again, check out Chapter 4 for a detailed breakdown on Mii creation and management.
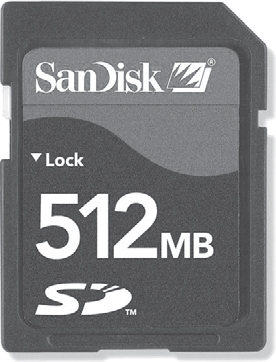
The Photo Channel is a place of great fun and creativity, but you need an SD Memory Card to get your photos into the Wii in the first place. The SD card (Figure 3.10) is a small memory device that’s nonvolatile but can be written over and erased ad infinitum. SD cards are often the storage medium of choice for owners of digital cameras, so it’s easy to get photos into a Wii.
For now, I’ll assume that you can get your photos onto an SD card, but if you don’t understand what I’m talking about, check out Chapter 9 for an explanation of SD cards and a method for getting your digital photographs into your Wii.
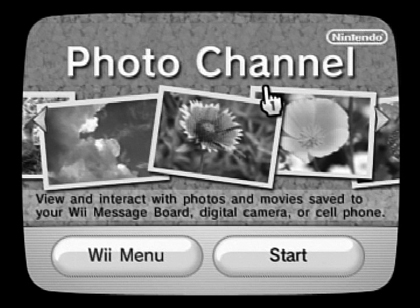
At first blush, the Photo Channel (Figure 3.11) doesn’t seem to have a heck of a lot going for it, but dig just below the surface, and you find that you can have quite a bit of family fun with this channel. Offering everything from slideshows to miniquizzes to the chance to goof with someone’s looks in a photo, the Photo Channel is a surprising addition to the Wii universe.
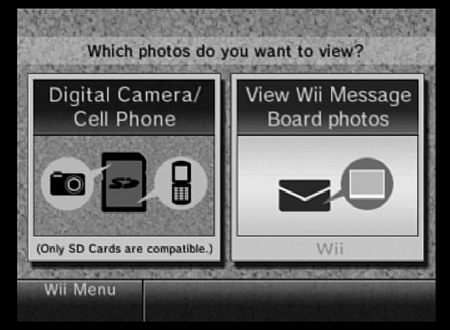
To add photos to the Wii, you need to insert a photo-laden SD card into the SD card slot on the front of the Wii console (see the diagram in Chapter 2). Many digital cameras and camera cell phones use SD cards as their main form of memory; if this is the case with your photo device, you’re all set.
When the SD card is in place in the Wii, click the Start button in the Photo Channel screen to get to the photo-selection screen, shown in Figure 3.12.
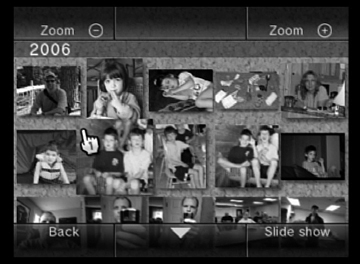
When the photos are found, the Wii displays first a screen that says Found X photos (where X is the number) and then a View button. Click the View button to see the photos in question. The photos come up in a nicely displayed grid, as shown in Figure 3.13. You have four options at your immediate disposal: Zoom – and Zoom +, which shrink and magnify the current view; Back, which takes you to the preceding screen; and Slide Show, which starts an automatic slideshow of all the pictures available. You can select any photo by clicking it, or you can choose the Slide Show option to start a slideshow.
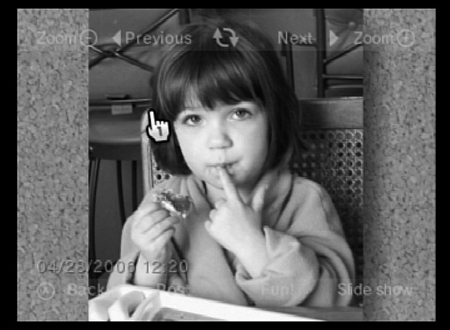
To view an individual photo, click it, and it zooms up to fill the screen (Figure 3.14). From this screen, you can rotate the photo; post it to the Wii Message Board; start a slideshow; zoom in or out on the picture; or have some fun with it. To post a photo to the Wii Message Board, you need only click the Post button; to rotate, click the arrow icons in the top-center portion of the screen. (I discuss the Fun! area a little later in the chapter.)
To watch a slideshow, click the Slide Show button any time you see it, either in the main photo screen (where your pictures appear as thumbnails) or in the individual-picture screen. When you click the button, the Wii displays a 3-2-1 countdown that looks like the start of an old movie; then it shows your photos one at a time, with music playing in the background.
The other cool thing about slideshows on the Wii is that the photos are subjected to what’s commonly called the Ken Burns Effect. (Ken Burns makes great documentaries about subjects including the American Civil War, baseball, and jazz. He pioneered the technique of panning and zooming still photos to create the effect of motion where none existed, because only still images were taken of the Civil War, of course.) The Wii uses this effect beautifully to display your slideshows.
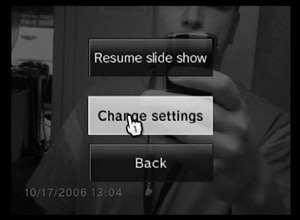
If you press the A button during a slideshow, you get three option buttons (Figure 3.15): Resume Slide Show, Change Settings, and Back. If you choose Change Settings, you go to the Slide-Show Settings screen (Figure 3.16), where you can alter several aspects of your slideshow. The first thing you can change is the order of pictures; the Wii can display them in file-date order or move through them randomly.
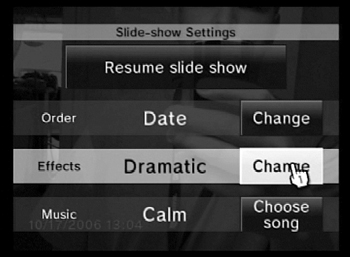
The second button in the settings screen lets you change the slideshow effects, rotating through three options: Simple, Nostalgic, and Dramatic. The default setting is Dramatic, which provides the motion-laden Ken Burns Effect. The Simple setting displays each picture in a plain, standard slideshow manner, with no fancy motion. The Nostalgic setting, however, gives each photograph a sepia-tone coloration (effectively making all photos look old) while maintaining the dramatic Ken Burns Effect. Ultimately, how the Wii presents your slideshow is up to you.
Another cool option that you can add to your slideshows is music. Click the Choose Song button, and select one of the six instrumental songs that the Wii offers. But fortunately for those of us who like to listen to our own type of music, you can enjoy whatever music you want. In the Choose Song screen is a button that says Other Music. When you click this button, you get instructions for putting your own music into a slideshow (Figure 3.17).
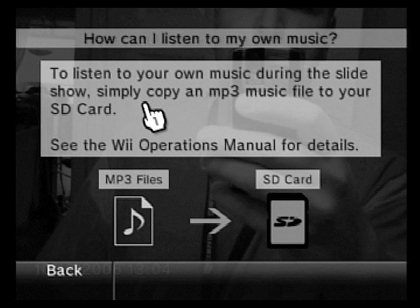
Getting your own songs onto the Wii is simple enough: Just copy MP3 files to your SD card, and they show up in your music list when you set up your slideshows. Check out Chapter 9 for details on how to get MP3 files onto your SD card.
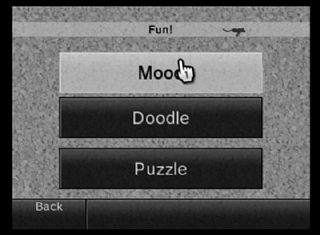
You can have lots of fun with pictures by clicking the Fun! button (Figure 3.18) when you view an individual photo. After you click this button, the Fun! screen appears, featuring three buttons: Mood, Doodle, and Puzzle. All three of these buttons can create plenty of laughs for friends and family.
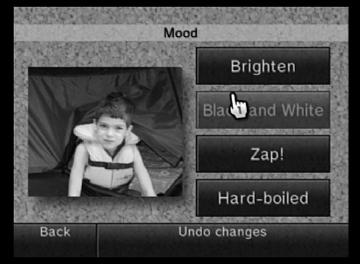
The first option in the Fun! screen is Mood. The Mood area (Figure 3.19) gives you the option to alter your photos in four distinct ways:
Brighten. This option makes the photo brighter, which can be handy for pictures that are a little too dark to begin with.
Black and White. Not surprisingly, this option strips away all the color information, making your picture pure black and white.
Zap! This option turns your photo into a photographic negative, which can produce some rather interesting results.
Hard-Boiled. This option turns the photo into an image that resembles a picture photocopied from a newspaper article.
The second area is Doodle (Figure 3.20), where you can write all over your photos in pretty much any color you want. The Wii provides electronic crayons in seven colors, an eraser, and an eyedropper tool that lets you match the color of the writing utensil to any color already in the photo. Doodle also allows you to zoom in and out of the photo for detail work, and it lets you add kisses, hearts, stars, and even sunglasses to provide pizzazz.

Tip
When you add an object such as sunglasses or a kiss in the Doodle editor, notice that the proximity of the Wii Remote to the sensor bar affects the size of these items. If you want to resize the sunglasses, for example, simply move the remote back a little, and the glasses shrink. Also, you can rotate the items by rotating the Wii Remote.
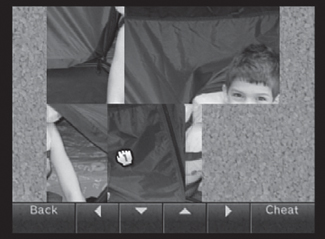
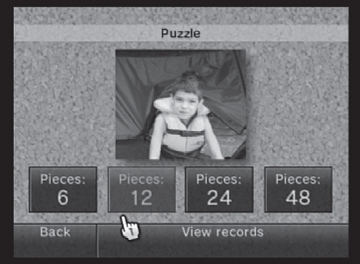
The last button in the Fun! screen is Puzzle. When you click this button, the current picture becomes a six-piece puzzle that you must solve (Figure 3.21). When you finish, the Wii displays the time it took you to complete the puzzle. Even better, however, is that completing the puzzle gives you the option of moving on to a more complex puzzle with 6, 12, 24, or even 48 pieces (Figure 3.22). The Puzzle area is surprisingly entertaining, as players race against the clock to put together the puzzle faster than their predecessors did.
A shopping channel on the Wii? Yes, it’s true, but it’s probably not the kind of shopping channel you have in mind. The Wii Shop Channel (as it’s officially called) is a place where you can purchase and download games and other software for the Virtual Console, as well as a place to get nongaming software such as the Everybody Votes Channel and the Opera Web browser for the Internet Channel.
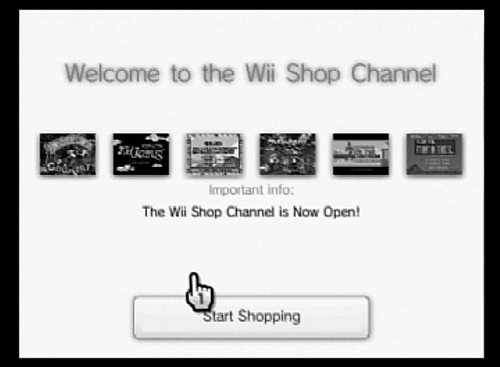
The Wii Shop Channel (Figure 3.23) runs on Wii Points, which you can purchase in retail stores as Wii Points Cards; you can also buy them online with a credit card. For a detailed view of the Shop Channel, check out Chapter 7.
The Wii Ware area is the part of the Shop Channel that offers nongaming applications for the Wii. These applications are often free and are sometimes in incomplete beta form, but that doesn’t mean that they aren’t functional and useful.
At this writing, the Everybody Votes Channel is available for download through the Wii Ware area, as is the Opera Web browser (which is currently free but eventually will cost 500 to 1,000 Wii Points). This channel is free to all users and is supposed to remain that way. In fact, by the time you purchase your Wii (if you haven’t already), the Everybody Votes Channel may very well be included, eliminating the need to download or update it.
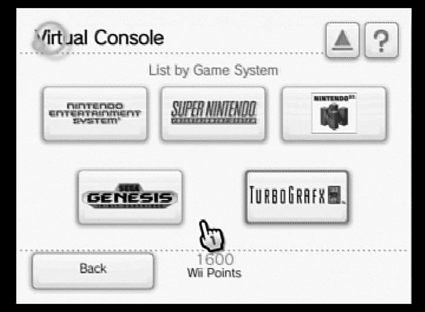
The Virtual Console area is where you can purchase games for the Wii’s Virtual Console—a feature that takes advantage of the Wii’s power and flexibility by enabling it to play games made for long-since-dead gaming systems. The Virtual Console includes games for the Nintendo Entertainment System, Super Nintendo, Nintendo 64, Sega Genesis, and TurboGrafx 16 (Figure 3.24). Many of the games offered here are absolute classics that even youngsters jaded by today’s technology can still find enjoyable.
Check out Chapter 7 for more details on the Virtual Console area in the Shop Channel, and see Chapter 8 to learn about the Virtual Console in general.
The Forecast Channel is a great spot that lets you download weather reports and long-term forecasts into your Wii (via the WiiConnect24 service). When you start the Forecast Channel, the Wii helps you select the city or town nearest your location, the temperature display (degrees Fahrenheit or Celsius), and the way wind speed is represented. Then the forecast for your location comes up on the screen, as shown in Figure 3.25.
Note
The WiiConnect24 service is Nintendo’s way of ensuring that the Wii is connected to the Internet all the time, so that traveling Miis, mail, weather reports, and news can come to the device around the clock, putting current information at your fingertips whenever you sit in front of the Wii. Check out Chapter 6 for more detail on the WiiConnect24 service.
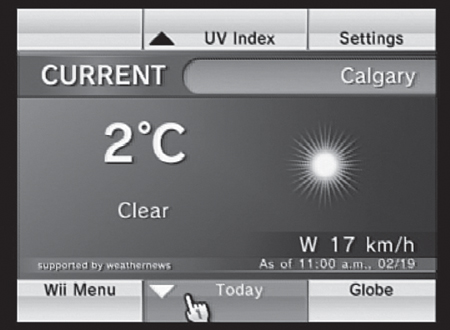
In the main Forecast Channel screen, you see the current temperature and conditions; at the click of a button, you can also see the UV index, change the settings, or look at the forecasted temperatures for today or this week.
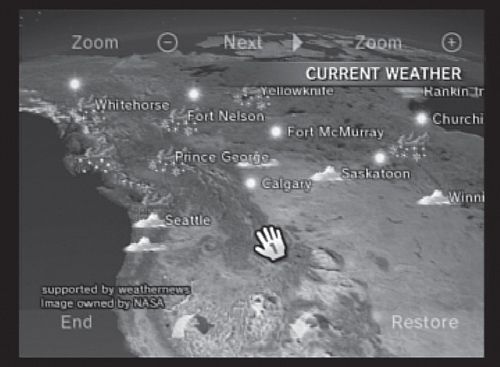
Perhaps the best feature of the Forecast Channel is the Globe (Figure 3.26), which allows you to check out temperatures around the world simply by putting a Wii Remote “hand” on the globe and spinning the globe to the locations you want to see.
The News Channel is very much like the Forecast Channel except that it contains information about news rather than weather. What news the Wii displays is skewed toward the location where you live, but you still have access to news from the world over.
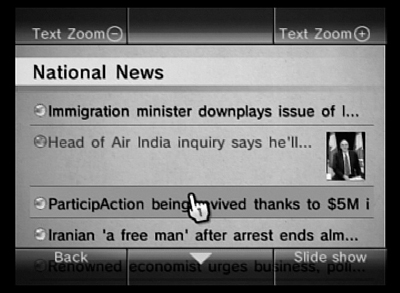
When you access the News Channel, expect a short delay while the news items are downloaded. Then you get a main page that displays several news headings: National News, International News, Sports, Arts/Entertainment, Business, Science/Health, and Technology.
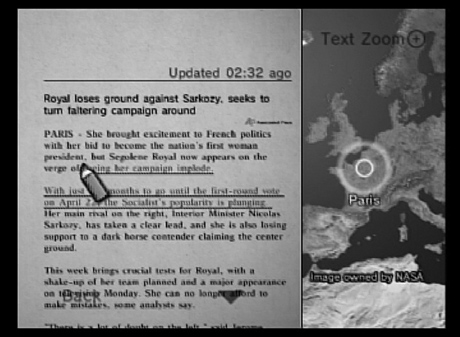
As you move through and select the main headings in the News Channel, individual news stories appear, with the first few words of each story displayed. Sometimes, the Wii displays a small picture as well (Figure 3.27). Clicking a news item brings up the article in readable form, along with any available pictures. To modify the scale of the picture and the size of the text, press the + (plus) and – (minus) buttons on the Wii Remote.
If you are reading a particular story and want to point out some text to someone else in the room, you can highlight that text. Press the 1 button while moving over the text to bring up a red pencil, which highlights the text you’re moving over (Figure 3.28).
The News Globe
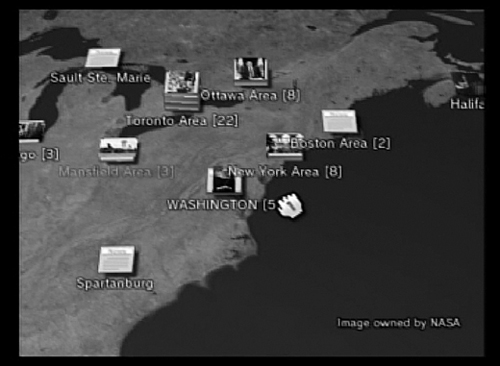
When you’re viewing an International News item, the specific area where the story is set appears on the right side of the screen. If you click this map, you get a large globe view that’s not unlike the Forecast Channel’s Globe feature. In this view, you can see news items from all over the world, and if you tilt the viewpoint by clicking the arrow keys on the screen, you can determine the number of news items about specific locations by the height of their stacks (Figure 3.29).
This channel launched in February 2007 and is available from the Wii Ware area of the Wii Shop Channel. The Everybody Votes Channel (Figure 3.30) is a unique idea, in that it allows up to six users of a single Wii to vote on a series of questions that are tallied both locally and worldwide.
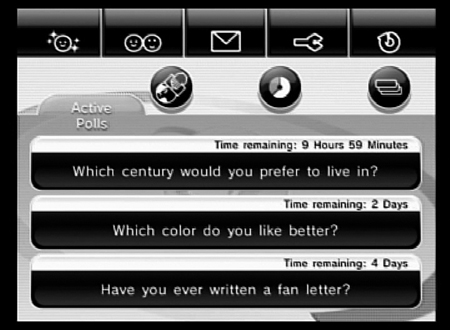
The first thing you have to do is register some Miis to vote—as many as six per household. To register a Mii, select it in the Mii list. Then select the question you want to vote on. Questions are listed on the main page. You can also click the Worldwide Polls button to find other questions to vote on.
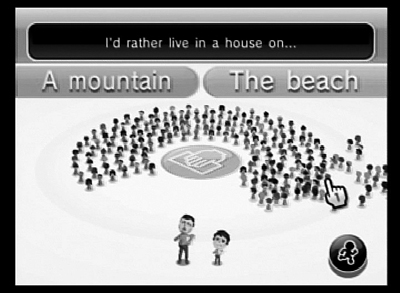
After you select the question you want to vote on, you go to a large circular area where you pick up your Mii and move it to one answer or the other. (Answers are color coded.) This action casts your vote.
Next, you are asked whether you want to predict the vote’s outcome. Predicting the vote’s outcome is different from voting, in that you are trying to guess how most people will vote rather than giving your opinion. When you’re done, that’s it; you need to wait until the vote’s time limit is up (usually, several days). To view the results of a vote, select the results that you want to see; hordes of miniature Miis stream in to show you graphically what the results are. Figure 3.31 shows an example of voting results.
The Everybody Votes Channel is engaging, but the questions tend to be on the inane side and are generally more for children than for adults. Still, it’s interesting to watch the technology in action, and it’s fun to sit down with your kids and see how each vote transpired.
The software for the Internet Channel (Figure 3.32) is available by download from the Wii Shop Channel. At this writing, the software is free, but Nintendo plans to charge for it eventually. The software in question is the Opera browser, which works pretty much like any other Web browser. Indeed, you can use the Internet Channel to visit an unlimited number of Web sites, so be aware when your kids are using it.

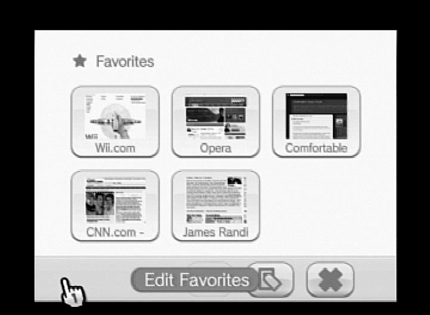
The browser offers three areas: Favorites, Enter a Web Address, and Help. The Favorites area (Figure 3.33) is like a bookmarks area in Microsoft’s Internet Explorer or Apple’s Safari browser, which is to say that when you go to a site you want the program to remember, you can mark it as a favorite.
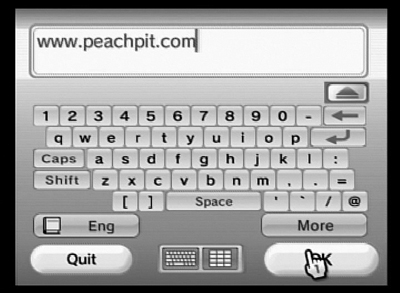
To enter a Web address, click the WWW button in the main Internet Channel screen; then use your cursor to enter the address just as you would in a normal Web browser (Figure 3.34), and click the OK button to go to that Web site.
Currently, the Internet Channel is just for Web browsing, but the browser is as powerful as most similar browsers, and you can do almost everything with it that you could on a PC. Check out Chapter 6 to learn a little more about the Internet Channel.