Part of what makes the world of the Wii so special is the existence of Miis (Mii is pronounced “me”), which are little cartoon characters that represent you in the Wii universe. Miis can be anything you want them to be, so you can design them to look as much—or as little—like you as your heart desires. If you want, you can make a different Mii for every day of the week, or if you’re feeling really avant-garde, you can create a Mii that represents both the male and female aspects of your personality.
In other words, when it comes to creating Miis, the sky is the limit. This chapter is here to show you how to squeeze every last drop of creativity out of Miis in the Wii universe.
Note
Everything that happens directly with Miis, with the exception of attaching Miis to emails that you send out of the main Wii screen, happens in the Mii Channel. Therefore, whatever I discuss in this chapter relates to the Mii Channel unless I note otherwise.
If you haven’t spent a fair bit of time with a Wii, no doubt you wonder why Miis populate the Wii in the first place. That’s a good question. But when you start playing some games on the Wii, toying with software, and communicating with your friends and acquaintances via Wii Mail, you soon realize why Miis play a special role in making the Wii such an engaging machine.
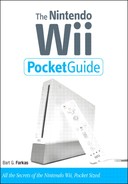
Miis are recordkeepers for many games and activities that you play and enjoy on the Wii. When you play Wii Sports games, for example, the onscreen characters are pulled directly from Mii Plaza (Figure 4.1). In Wii Sports Baseball, for example, characters from Mii Plaza are used as fielders and batters. This feature adds an air of familiarity to many of the games you play on the Wii, making extra fun for individual players when their Miis are the focus of attention.
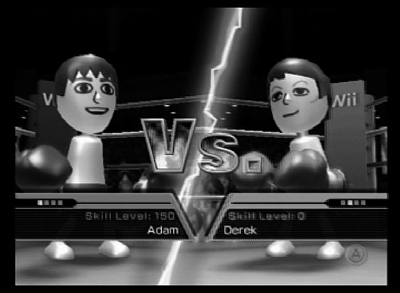
Miis are an important part of allowing you to identify with the onscreen actions of the Wii; they give you a sense of ownership that other consoles just don’t provide. When you vote in the Everybody Votes Channel, you vote with your personally created Mii (Figure 4.2). This sort of connection with the games and activities makes Miis an integral part of the Wii’s success.
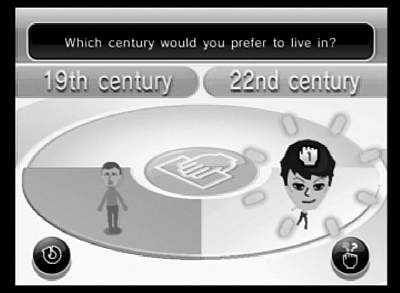
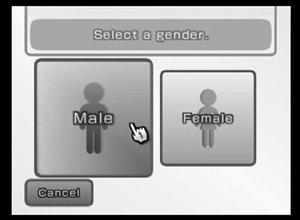
So now that you know what a Mii is, you need to dive straight in and make yourself a Mii so that you can be represented in the Wii universe. To make a Mii, go into the Mii Channel; then click the Start button, which takes you to Mii Plaza. Click the New Mii button on the left side of the screen. You go to a screen that allows you to choose between a male and a female Mii.
The following sections discuss the various aspects of creating a Mii.
When it comes to creating a Mii, you can take two basic paths. One path involves choosing a prefabricated face for your Mii, and the other involves building the Mii’s face from scratch. As soon as you select the gender of your Mii, you can start from scratch or choose your Mii’s face from a page of look-alikes.
If you start from scratch, you’ll literally build your Mii from the ground up. If you don’t want to spend the time tinkering with minutia, go the look-alike route, which gives you multitudes of faces to choose among (Figure 4.3).

No matter which choice you make, you end up in the Mii Editor, and you have access to all the tools available for altering the Mii. The following section looks at the nine distinct tools available for altering your Mii.
Whether you start building your Mii from a prefabricated model or create it from scratch, the process of altering or creating a Mii is similar.
If you choose to go the look-alike route, you start with a face that’s already in place, and you can alter it or choose not to. But if you choose to build your own Mii, you need to move through each tool to build your Mii.
To modify or build a Mii from scratch, follow these steps:
Go to the Mii Channel, and click the Start button.
You arrive in Mii Plaza.
Click the New Mii button on the left side of the screen (Figure 4.4).
Choose your Mii’s gender (Figure 4.5); then click Start from Scratch.
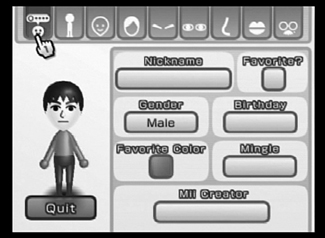
Click the first button in the row of buttons at the top of the screen; then enter a name for your Mii, give it a birthday (which could be your own), choose the Mii’s favorite color, and identify the Mii’s creator (Figure 4.6).
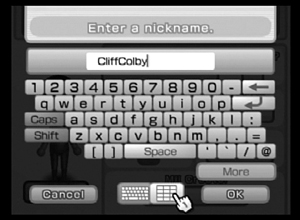
If you also want to give your Mii a nickname, click the Nickname box; the Wii displays a virtual keyboard (Figure 4.7) that you can use to enter the nickname.
If you choose here to make your Mii one of your Favorites, you can organize it that way in Mii Plaza later.
Deciding whether your new Mii mingles (Figure 4.8) is important, because a Mii that mingles will travel to other consoles and join other people’s Mii Parades. (I guess you could look at this option as being a nonbiological way of reproducing.) See the “Traveling Miis” sidebar in this section for more details. To set your Mii to mingle, click the Mingle box (refer to Figure 4.6).
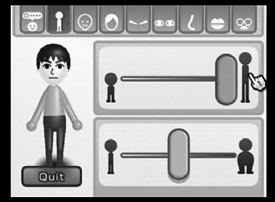
Click the second button over at the top of the screen to set the height and weight of your Mii (Figure 4.9).
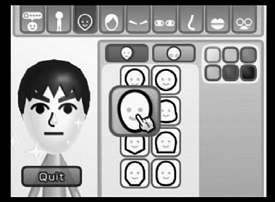
Click the third button over at the top of the screen to go to the head area, where you can use the top row of buttons to choose the basic shape of your Mii’s head and its skin color (Figure 4.10).
You have six choices of skin color—enough to allow you to express a reasonable amount of racial diversity.
The 12-button grid below the basic head-shape buttons (Figure 4.11) lets you add facial features—age lines, bags under or around the eyes, rosy cheeks, and even eye shadow—to tweak the Mii’s looks even further.
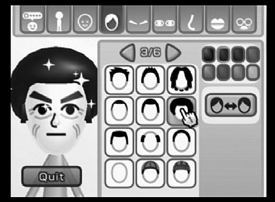
Click the fourth button over at the top of the screen to do your Mii’s hair (Figure 4.12).
You have 72 distinct hairstyles to choose among, roughly divided into male and female areas, as well as 8 hair colors.
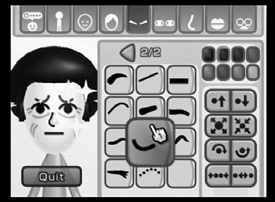
Click the fifth button to set the eyebrows (Figure 4.13), which come in 24 flavors, including no eyebrows at all.
Choose any of eight colors for these amusing strips of hair. You can also move the eyebrows up or down and left or right, tilt them, and move them closer together or farther apart. You can even change their size dramatically. (Mr. Spock, here I come!)
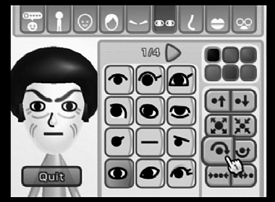
Click the sixth button to adjust the eye shape (Figure 4.14).
You can alter each of the 48 eye styles the same way that you adjust the eyebrows: closer together or farther apart, up or down on the face, tilted up or down, and smaller or larger. You also have a choice of six eye colors, from evil black to groovy green.
Tip
I highly recommend that when you choose the particulars for your Mii’s eyes, you take your time and try out a multitude of options. The eyes, as some say, are the windows to the soul, and the eye options give you so much flexibility that it’s worth taking the time to get your Mii’s eyes just right.
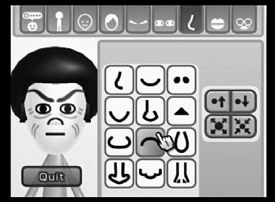
Click the seventh button to fix your Mii’s nose (Figure 4.15).
You have 12 basic options to choose among. The important modifiers are the size and placement controls, which allow you to move the nose up and down on the face and change its size dramatically.
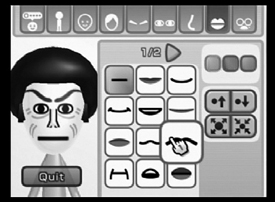
Click the eighth button to set the mouth (Figure 4.16).
The mouth screen has 24 options, some of which are a little more on the feminine or masculine side than others, but all of them are acceptable for any Mii. If you’re using full lips, you can choose among three lip tones, ranging from flesh color to pink. As with the eyebrows, nose, and eyes, you can alter the position (up or down on the face) and size of the lips.
Click the ninth button to add accessories (Figure 4.17).
Your options include facial hair, eyeglasses, and beauty marks. When you choose a particular accessory (such as eyeglasses), you get options for tweaking that accessory.
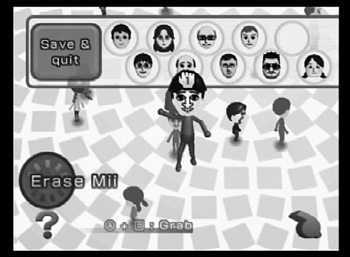
When you’re satisfied with your Mii, click the Quit button; then click the Save and Quit button to save your Mii and end the process.
You return to Mii Plaza, where your new Mii drops into place (Figure 4.18).


Note
If you are working on your Wii and want to edit a Mii that you didn’t create, unfortunately, you’re out of luck. Still, if you are just dying to do it, you can edit that Mii on your PC or on the Web by using one of the third-party Mii editing tools. (See “Editing Miis Outside the Wii” later in this chapter.) This ability is one of the key reasons for a person to use a third-party Mii editor.
Mii Plaza is the place where Miis hang around, ready for you to inspect or alter them. The Plaza has nine basic command buttons on the left and right sides of the screen (Figure 4.19).
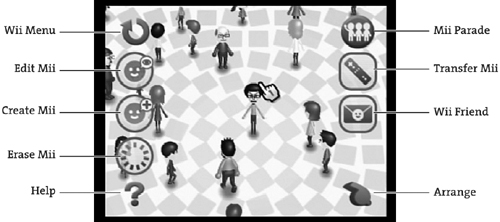
In counterclockwise order from the top-left corner of the screen, the buttons are:
Wii Menu. This button returns you to the main Wii screen.
Edit Mii. This button allows you to edit any aspect of a Mii.
Note
You can edit only Miis that were created on your Wii, so Miis that came from other users over the Internet are off limits for modification. (Bummer.)
Create Mii. This button takes you to the area where you can create a Mii from a facial template or create it from scratch (refer to “Making a Mii” earlier in this chapter).
Erase Mii. As the name implies, dropping a Mii onto this button erases the Mii. Not to worry if you drop the Mii on this button accidentally; you must click a button in a dialog box to confirm your intention to delete the Mii.
Help. Clicking the Help button gives you what it says: help.
Arrange. This button enables you to arrange the Miis in Mii Plaza by various criteria, including gender, name, and size (see “Arranging Miis” later in this chapter).
Wii Friend. This button allows you to email your Miis to another Wii user. The only caveat is that you need to know the other Wii owner’s Wii Number (see the sidebar “The Wii Address Book” later in this chapter).
Transfer Mii. Click this button to place as many as ten Miis on your Wii Remote and ultimately transport them to another Wii system.
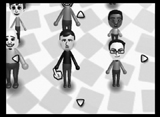
Mii Parade. This button takes you to the Mii Parade area, where Miis that have come to your Wii via the Internet parade up and down the screen endlessly.
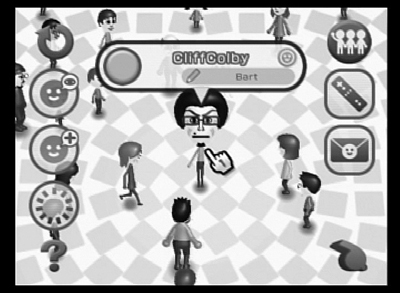
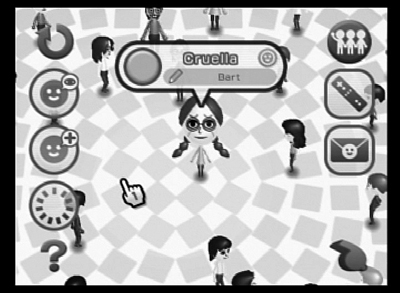
When your Miis are populating your Mii Plaza, you have a few ways to manage them, keep track of them, and generally manipulate them. The basic way to identify an individual Mii is to move your cursor over the Mii and then press the A button on your Wii Remote; a bubble pops up that shows the Mii’s name, and the Mii turns toward you so that you can see its face (Figure 4.20).
The following sections discuss the various commands and techniques for managing Miis in Mii Plaza.
Mii Plaza tends to be set at a particular magnification, allowing you to see just enough detail of the Miis to pick them out. If you click a Mii with the A button on your remote, the Mii’s name appears above it, but to get a closer look at a Mii or a group of Miis, you need to press the plus (+) key on the Wii Remote to zoom in on the action, as shown in Figure 4.21. Not surprisingly, if you zoom in with the + key, you can zoom back out with the minus (–) key just as easily. These controls are duplicated onscreen, but it’s easier to use the remote.
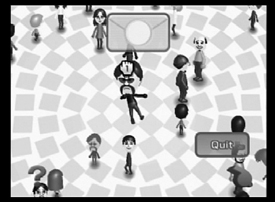
If you want to pick up a Mii in Mii Plaza, put your cursor over the Mii and simultaneously press the A and B buttons on the Wii Remote. The Mii gets picked up by its head, and its arms and legs flail dramatically (Figure 4.22). Even the Wii Remote gives you physical feedback that you are holding a squirming entity! When you have the Mii in your grasp, you can move it to the Wii Friend, Edit Mii, or Erase Mii button.

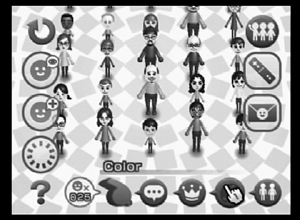
If you click the Arrange button—the whistle icon—all the Miis immediately move into a grid, standing at attention so that you can inspect them (Figure 4.23). When the Miis are in this grid, you can arrange them alphabetically, by their status as favorites, by the color of their clothing, and by gender.
If you want to send a Mii to a friend, you need only click the Wii Friend button (the envelope icon). Then pick up the Mii you want to send (refer to “Grabbing Miis” earlier in this chapter), and drag it to the envelope icon at the top-center of the screen, as shown in Figure 4.24.
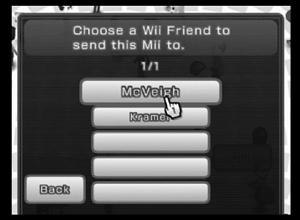
After you’ve moved the Mii to the envelope icon, you get a list of Wii owners to whom you can send the Mii (Figure 4.25). Click the appropriate name, and you’re done. You return to Mii Plaza, where the Mii you just sent lands unceremoniously in the middle of the Plaza, and you get a message saying that the Mii was sent to the person you chose. The process is easy, requiring only that you already have your Wii Friends listed in your address book (see the sidebar “The Wii Address Book”).
The Wii Address Book
Although emailing is covered in detail in Chapter 6, it’s worth mentioning the Wii Address Book here to show you how to figure out your Wii’s number and how to get names into the address book.
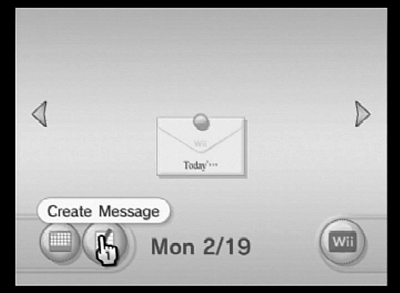
I suspect that Wii newbies may have trouble finding their Wii’s 16-digit Wii Number. Most people start looking in the Settings area, but you actually find the Wii Number by clicking the Wii Message Board icon in the bottom-right corner of the Wii’s main screen and then clicking the Create Message button, as shown in Figure 4.26.
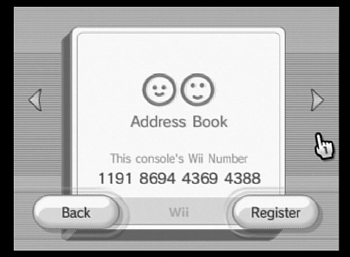
When you’re in the Create Message area, simply click the Address Book icon, shown in Figure 4.27, and you see the Wii Number for your device. The Wii Number always appears on the front page of your address book so that you can get to it quickly and easily. I recommend, however, that you write this number down, because it’s common for people to ask you for this number via email (on your computer) or through other non-Wii means.
To enter a new name into your address book, you need that person’s Wii Number. After you’ve done that, you can send messages and Miis to fellow Wii users with ease.
One of the great features of the Wii Remote is that it can hold as many as ten Miis in storage. These Miis can be transferred to other Wii units or held on the Wii Remote indefinitely.
Note
When a Mii is transferred to a Wii Remote, it isn’t removed from the Wii unit. A Mii that resides on the Wii Remote is just a copy of the Mii that resides on the Wii console.
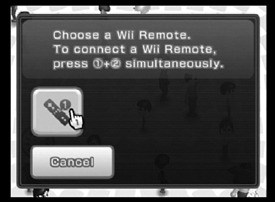
To transfer one or more Miis to your Wii Remote, click the Transfer Mii button; when the screen showing the connected Wii Remotes appears, click the Wii Remote that you want to transfer the Miis to. Figure 4.28 shows this process for a Wii that has only one Wii Remote connected.
The Wii Remote’s Save panel opens, showing ten circles, each of which can hold and save one Mii. To save any particular Mii, place your cursor over the Mii; then pick the Mii up (by pressing the A and B buttons on the remote together) and drag it to the save spot, as shown in Figure 4.29. When Miis are saved on the Wii Remote, they stay there until you delete them.
To put saved Miis on someone else’s Wii, you simply reverse the process. After the Wii Remote is connected to the machine, click the Transfer Mii button to get the Wii Remote’s Save panel to appear; then drag the Miis from the Save panel to the foreign Wii’s Mii Plaza.
Although the Wii’s tools for managing Miis are handy, it’s not surprising that several Mii editors have cropped up, both for the PC and for the Web. Why would you want to edit your Mii on the Web or on a home computer? The answer lies in the fact that these editors usually offer features that are not available on the Wii itself, but more important, these editors allow you to edit Miis that you didn’t create yourself. This capability is a powerful one, because the Wii prevents you from touching any Mii that you didn’t personally create.
Because getting your Miis off the Wii and onto your PC can be a difficult, cumbersome process that may require extra equipment, that method of editing Miis is discussed in Chapter 10. That said, the actual Mii-editing software is easy to use and readily available for both Web-based players and Windows software. In this section, I discuss both types of software.
Several Web-based editors are available as I write this book; it’s probably safe to assume that many more are in the works. By the time you read this chapter, a dozen new programs may be available, but most of them will probably work in similar ways.
The two most popular editors are Mii Editor and Wii-volution. Both of these editors are functional and fun to play around with.
Mii Editor (www.miieditor.com), shown in Figure 4.30, is a full online editor. Still in beta form, it looks and functions exactly like the Mii Editor on the Wii. The only difference is that the online editor lets you import and export Mii files.

Note
Mii Editor requires Adobe’s Flash Player 9.0.28.0 or later. The download for the Flash player is entirely free and available from Adobe’s Web site (www.adobe.com).
To save or load Mii files, click the File button to go to the Files screen (Figure 4.31). Here, you can save and load your creations for later transfer to a Wii Remote and ultimately to a foreign Wii.
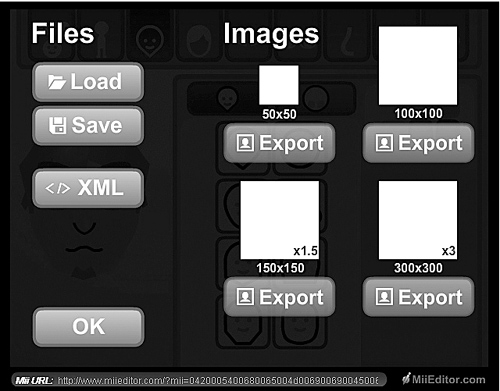
Mii Editor gives you control of all Mii properties, and you can load and save all Mii binary files for modification. As a bonus, you can export your Mii to a JPEG file for use as an avatar somewhere else.
One key difference between the Wii’s built-in editor and the Web-based Mii Editor is the Randomize feature, which you access via a small die in the top-right corner of the Mii display window. If you click that die, a random set of facial features appears for the Mii under construction. Figure 4.32 shows just how bizarre a random Mii generation can be. That said, however, random generation can create interesting Miis.

The Wii-volution editor (Figure 4.33) is available at www.wii-volution.com/create-a-mii.html. It differs from the Web-based Mii Editor in that it’s a close copy of what’s available on the Wii. In other words, you can’t create Miis in this editor and then move them to your Wii, and you can’t do anything in this editor that you can’t do in the Wii Editor. Wii-volution is simply a copycat editor that lets people experiment with the editing tools on the Wii.

The only real exception is that the graphics in this editor are unique and more 3D than the Wii’s built-in graphics. Still, Wii-volution is a fun little editor you can use to experiment when you’re bored at work and don’t have your Wii handy.
Two popular PC-based editors are available at this writing. (Sorry, Macintosh fans; nothing’s available for the Mac yet.) Wii - M!! Editor and AJ’s Mii Editor are nongraphical, dialog-box-based programs, which means that you don’t get to see your Mii being built—just the numerical parameters of the various shapes and colors. Still, these editors have some real power; if you’re serious about editing Miis, you probably should gravitate to these programs.
Note
The actual process for transferring Miis to and from a PC is discussed in detail in Chapter 10.
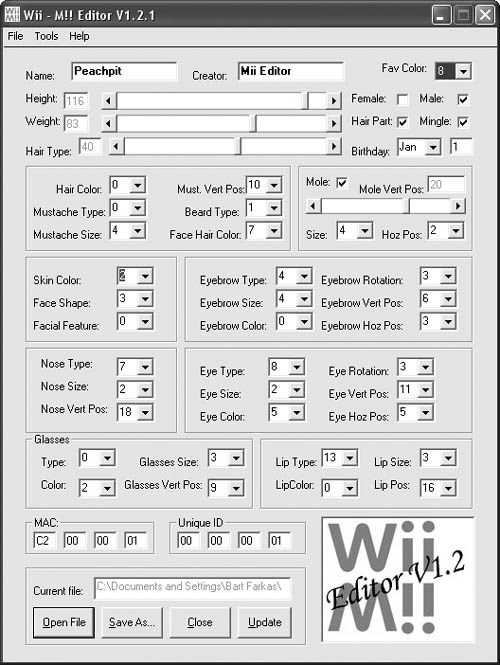
Currently up to version 1.2.1, Wii - M!! Editor (Figure 4.34) is the most powerful Mii editor available. The software (created by Jamie Magers in Visual Basic) breaks every aspect of a Mii’s appearance into exact numeric values, enabling you to adjust the details of a Mii as finely as possible. You can adjust everything about the eyebrows, for example, from type, size, and color to rotation to vertical and horizontal positions. Wii - M!! Editor is a great piece of software for those who love minute detail.
AJ’s Mii Editor (Figure 4.35) is another dialog-box-based editor that displays no graphics but allows you to alter a Mii in extreme ways. The software takes the physical features of your Mii to the far extremes of what’s possible, letting you create some very interesting Miis. The one caveat is that you must have Microsoft .NET 2.0 Framework installed on your computer before you can run the software.

AJ’s Mii Editor was created by someone who prefers to be known only as AJ187. Despite his or her anonymity, the creator updates the software regularly with bug fixes and minor new features.