1. Introducing the iPhone SDK
The iPhone and iPod touch offer innovative mobile platforms that are a joy to program. They are the first members of Apple’s new family of pocket-based computing devices. Despite their diminutive proportions, they run a first-class version of OS X with a rich and varied SDK that enables you to design, implement, and realize a wide range of applications. For your projects, you can take advantage of the iPhone’s multitouch interface and powerful onboard features using Xcode, Apple’s integrated design environment. In this chapter, you discover the components of the SDK and explore the product it creates: the iPhone application. You learn about Apple’s various iPhone developer programs and how you can join. You explore the iPhone application design philosophy and see how applications are put together. Finally, you read about setting up your program credentials so you can put that philosophy to use and start programming.
iPhone Developer Programs
Are you ready to start programming for the iPhone? Ready to see what all the fuss is about? Apple’s iPhone Software Development Kit (SDK) is readily available to members of Apple’s iPhone developer programs. There are four. These programs include the free online program, the paid enterprise program for in-house development, the paid standard program that allows developers to submit their products to the App Store, and a special University program (see Table 1-1).
Table 1-1 iPhone Developer Programs

Each program offers access to the iPhone SDK, which provides ways to build and deploy your applications. The audience for each program is specific.
Online Developer Program
The free program is meant for anyone who wants to explore the iPhone SDK programming environment but who isn’t ready to pay for further privileges. The free program limits you to Mac-only programming. While you can run your applications in the simulator, you cannot deploy those applications to the device or sell them in App Store.
Although each version of the simulator moves closer to representing actual device performance, you should not rely on it for evaluating your application. An app that runs rock solid on the simulator may be unresponsive or even cause crashes on the actual device. The simulator does not, for example, support vibration or accelerometer readings. These and other features present on the device are not always available in the simulator. A discussion about simulator limits follows later in this chapter in the section “Simulator Limitations.”
Standard Developer Program
To receive device and distribution privileges, you must pay the $99/year program fee for the standard iPhone developer program. Once paid, you gain access to App Store distribution and can test your software on actual iPhone hardware. This program adds ad hoc distribution as well, allowing you to distribute prerelease versions of your application to up to 100 registered devices. The standard program provides the most general solution for the majority of iPhone programmers who want to be in App Store. If you intend to conduct business through selling applications, this is the program to sign up for.
Enterprise Developer Program
The $299/year Enterprise program is meant for in-house application distribution. It’s targeted at companies with 500 employees or more. Enterprise memberships do not offer access to the iPhone App Store. Instead, you can build your own proprietary applications and distribute them to your employees’ hardware through a private storefront. The Enterprise program is aimed at large companies that want to deploy custom applications to their employees such as ordering systems.
University Developer Program
Available only to higher education institutions, the University Developer Program is a free program aimed at encouraging universities and colleges to develop an iPhone development curriculum. The program allows professors and instructors to create teams with up to 200 students, offering them access to the full iPhone SDK. Students can share their applications with each other and their teachers, and the institution itself can submit applications to App Store.
Registering
Register for the free program at the main iPhone developer site at http://developer.apple.com/iphone. You can sign up for the paid programs, Standard or Enterprise, at http://developer.apple.com/iphone/program.
Getting Started
Regardless of which program you sign up for, you must have access to an Intel-based Mac running a current version of Mac OS X. It also helps to have at least one, and preferably several, iPhone and iPod touch units to test on to ensure that your applications work properly on each platform, including legacy units like the first generation iPhone and iPod touch.
There are often delays associated with signing up for paid programs. After registering, it can take weeks for account approval and invoicing. Once you actually hand over your money, it may take another 24 to 72 hours for your access to advanced portal features to go live.
Registering for iTunes Connect, so you can sell your application through App Store, offers a separate hurdle. Fortunately, this is a process you can delay until after you’ve finished signing up for a paid program. With iTunes Connect, you must collect banking information and incorporation paperwork prior to setting up your App Store account. You must also review and agree to Apple’s distribution contracts. Apple offers full details at itunesconnect.apple.com.
Downloading the SDK
Download your copy of the iPhone SDK from the main iPhone developer site at http://developer.apple.com/iphone. Use your program credentials to access the download page. So be sure you’ve signed up for one of the three programs before attempting to download. The free program offers access only to fully released SDKs. The paid program adds early looks at SDK betas letting you develop to prerelease firmware.
The kit, which typically runs a few gigabytes in size, installs a complete suite of interactive design tools onto your Macintosh. This suite consists of components that form the basis of the iPhone development environment. iPhone-specific components include the following software:
• Xcode—Xcode is the most important tool in the iPhone development arsenal. It provides a comprehensive project development and management environment, complete with source editing, comprehensive documentation, and a graphical debugger. Xcode is built around several open source GNU tools, namely gcc (compiler) and gdb (debugger).
• Interface Builder—Interface Builder (IB) provides a rapid prototyping tool for laying out user interfaces graphically and linking to those prebuilt interfaces from your Xcode source code. With IB, you place out your interface using visual design tools and then connect those onscreen elements to objects and method calls in your application.
• Simulator—The iPhone Simulator runs on the Macintosh and enables you to create and test applications on your desktop. You can test programs without connecting to an actual iPhone or iPod touch. The simulator offers the same API used on the iPhone and provides a preview of how your concept designs will look. When working with the simulator, Xcode compiles Intel x86 code that runs natively on the Macintosh rather than ARM-based code used on the iPhone.
• Instruments—Instruments profiles how iPhone applications work under the hood. It samples memory usage and monitors performance. This lets you identify and target problem areas in your applications and work on their efficiency. Instruments offers graphical time-based performance plots that show where your applications are using the most resources. Instruments is built around the open source DTrace package developed by Sun Microsystems. Instruments plays a critical role in tracking down memory leaks and making sure your applications run efficiently on the iPhone platform.
• Shark—Shark provides performance optimization by analyzing where an application spends most of it its time. It locates and identifies bottlenecks, enabling you to speed your application performance.
Together, the components of this iPhone SDK suite enable you to develop your applications. From a native application developer’s point of view, the most important components are Xcode, Interface Builder, and the simulator, with Instruments providing an essential tuning tool. In addition to these tools, there’s an important piece not on this list. This piece ships with the SDK but is easy to overlook. I refer to Cocoa Touch.
Cocoa Touch is the library of classes provided by Apple for rapid iPhone application development. Cocoa Touch, which takes the form of a number of API frameworks, enables you to build graphical event-driven applications using user interface elements such as windows, text, and tables. Cocoa Touch on the iPhone is analogous to Cocoa and AppKit on Mac OS X and supports creating rich, reusable interfaces on the iPhone.
Many developers are surprised by the size of iPhone applications; they’re tiny. Cocoa Touch’s library support is the big reason for this. By letting Cocoa Touch handle all the heavy UI lifting, your applications can focus on getting their individual tasks done. The result is compact, focused code that does a single job at a time.
Using Cocoa Touch lets you build applications with a polished look and feel, consistent with those developed by Apple. Remember that Apple must approve your software. Apple judges applications on the basis of appearance, operation, and even content. Using Cocoa Touch helps you better approximate the high design standards set by Apple’s native applications.
Development Devices
A physical iPhone or iPod touch provides a key component of the software development kit. Testing on the iPhone is vital. As simple and convenient as the SDK Simulator is, it falls far short of the mark when it comes to a complete iPhone testing experience. Given that the iPhone is the target platform, it’s important that your software runs its best on its native system rather than on the simulator. The iPhone itself offers the fully leaded, unwatered-down testing platform you need.
Apple regularly suggests that the development unit needs to be devoted exclusively to development. Reality has proven more hit and miss on that point. When you first tether your iPhone to your computer using a standard USB cable, Xcode detects your unit. If you want to use your device for development, confirm that; otherwise, click Ignore.
Using a device as a development unit means that it is subject to onboard data changes and might no longer work reliably as a field unit, but experience shows that once you’re past early betas of new SDKs that the devices seem to hold up fine for regular day-to-day use. It’s still best to have extra units on hand devoted solely to development, but if you’re short on available units, you can probably use your main iPhone for development; just be aware of the risks.
When developing, it’s important to test on as many iPhone platforms as possible. Be aware that there are real platform differences between each model of iPhone and iPod touch. For example, the second generation iPod has a built-in speaker; the first generation does not. It also uses a faster processor than the first-generation iPod touch. iPhones have cameras, which none of the current iPod touches offer. A discussion of model-specific differences follows later in this chapter.
Simulator Limitations
Each release of the Macintosh-based iPhone Simulator continues to improve on previous technology. That having been said, there are real limitations that you must take into account. From software compatibility to hardware, the simulator approximates but does not equal actual device performance.
The simulator uses many Macintosh frameworks and libraries, offering features that are not actually present on the iPhone. Applications that appear to be completely operational and fully debugged on the simulator may flake out or crash on the device itself. You simply cannot fully debug any program solely by using the simulator and be assured that the software will run bug-free on the iPhone.
The simulator is also missing many hardware features. You cannot use the simulator to test the onboard camera or accelerometer feedback. Although the simulator can read acceleration data from your Macintosh using its sudden motion sensor if there’s one onboard (usually for laptops), the readings will differ from iPhone readings and are not practical for development or testing. The simulator does not vibrate or offer multitouch input (at least not beyond a standard “pinch” gesture). Core location is fixed to the coordinates of 1 Infinite Loop in California, that is, the Apple Headquarters building.
From a software point of view, the basic keychain security system is not available on the simulator. You cannot register an application to receive push notification either. These missing elements mean that there are certain kinds of programs that can only be properly used when deployed to an iPhone.
Another difference between the simulator and the device is the audio system. The audio session structure is not implemented on the simulator, hiding the complexity of making things work properly on the device. Even in areas where the simulator does emulate the iPhone APIs, you may find behavioral differences as the simulator is based on the Mac OS X Cocoa frameworks.
That’s not to say that the simulator does not play an important testing role. It’s quick and easy to try out a program on the simulator, typically much faster than transferring a compiled application to an iPhone unit. The simulator lets you rotate your virtual device to test reorientation, produce simulated memory warnings, and try out your UI as if your user were receiving a phone call. It’s much easier to test out text processing on the simulator because you can use your keyboard; this simplifies repeated text entry tasks such as entering account names and passwords for applications that connect to the net.
In the end, the simulator offers compromise. You gain a lot of testing convenience but not so much that you can bypass actual device testing.
Tethering
All interactive testing must be done using a USB cable. At this time, Apple provides no way to transfer, debug, or monitor applications wirelessly. That means you do nearly all your work tethered over a standard iPhone USB cable. The physical reality of tethered debugging can be problematic. Reasons for this include the following points:
• When you unplug the cable, you unplug all the interactive debugging, console, and screenshot features. So you need to keep that cable plugged in all the time.
• You cannot reasonably use the iPhone with a dock. Sure, the dock is stable, but touching the screen while testing interfaces is extremely awkward when the iPhone is seated at a 75-degree angle.
• The tether comes to the bottom, not the top of the unit, meaning it’s easy to catch that cable and knock your iPhone to the floor.
Obviously, untethered testing would vastly improve many of these issues. Unfortunately, Apple has not yet introduced that option. If you like, you can Rube Goldberg-ize your iPhone to get around these problems. One solution is to attach Velcro to the back of an iPhone case—a case that leaves the bottom port connector open—and use that to stabilize your iPhone on your desk. It’s ugly, but it keeps your iPhone from getting knocked to the floor all the time. You can also now purchase third-party cradles for the iPhone that help with development work. These stands hold the iPhone a few inches off the desk and keep the cable directed toward the back.
Always try to tether your unit to a port directly on your Mac for best results. If you must use a hub, connect to a powered system that supports USB 2.0. Most older keyboards and displays only provide unpowered USB 1.1 connections. When testing, it helps to choose a reliable, powered 2.0 port you can count on.
Understanding Model Differences
When it comes to application development, many iPhone apps never have to consider the platform on which they’re being run. Most programs rely only on the display and touch input. They can be safely deployed to all the current iPhone-family devices; they require no special programming or concern about which platform they are running on.
There are, however, real platform differences. These differences are both significant and notable. They play a role in deciding how you tell App Store to sell your software and how you design the software in the first place. Should you deploy your software only to the iPhone? To the iPhone and the second generation and later iPod touch? Or should your application be targeted to every platform? Here are some issues to consider:
Camera
Each iPhone ships with a camera; iPod touches do not. These cameras are useful. You can task the camera to take shots and then send them to Flickr or Twitter. You can use the camera to grab images for direct manipulation, and so forth. The iPhone SDK provides a built-in image picker controller that offers camera access to your users, but only on camera-ready platforms. Video services are limited to the 3G S model and later.
When building camera-ready applications, know that you cannot deploy them to iPods. Camera services are limited to the iPhone family. The first and second generation iPhone’s built-in 2 megapixel camera will never win awards. The third generation camera is much improved, offering autofocus, macro photography, video recording, and better low-light sensitivity.
Speakers and Microphones
First generation iPod touches lack the built-in speaker found on the iPhone and the second generation iPod touch. Although the 1G touch is perfectly capable of powering third-party speakers through its bottom connector port, Apple considers those to be unauthorized accessories and their use is rare.
Don’t assume that end users will wear headphones when using applications. When designing for the first generation iPod, carefully consider the role of audio cues. If they are critical to the program, you may want to either recommend headphone use or consider skipping the 1G iPod as a distribution platform.
The second generation iPod touch supports external headset microphones. The first generation does not. If you do plan to deploy a recording application, make sure you specify clearly that the iPod will require extra equipment to use those features.
The third generation iPhone 3G S provides a number of accessibility features including voice control. It’s unclear at the time of writing whether voice control APIs will be opened to iPhone developers.
Telephony
It may seem an overly obvious point to make, but the iPhone’s telephony system, which handles both phone calls and SMS messaging, can and will interrupt applications when the unit receives an incoming telephone call. Sure, users can quit out of apps whenever they want on both iPhone and iPod platforms, but only the iPhone has to deal with the kind of exit that’s forced by the system and not a choice by the user.
Consider how the different kinds of interruptions might affect your application. It’s important to keep all kinds of possible exits in mind when designing software. Be aware that the choice to leave your app may not always come from the user, especially on the iPhone.
Another fall-out of telephony operations is that more stuff ends up running in the background on iPhones than on iPod touches. This means that as a rule, the amount of free memory is likely to be reduced on the iPhone compared to the touch. This is one reason that making the iPhone your primary development device over the iPod touch may be a smart move. Working within the iPhone’s greater limitations may produce software that operates robustly on both the iPhone and touch platforms.
Core Location Differences
Core location depends on three different approaches, each of which may or not be available on a given platform. These approaches are limited by each device’s onboard capabilities. Wi-Fi location, which scans for local routers and uses their MAC addresses to search a central position database, is freely available on all iPhone and iPod touch platforms.
Cell location, however, depends on an antenna that is available only on the iPhone. This technology triangulates from local cell towers, whose positions are well defined from their installations by telephone companies. The final and most accurate strategy, GPS location, is available only to second generation iPhones and newer. GPS was not built into the first generation iPhone and is not currently available to any iPod touch units.
The third generation iPhone 3G S introduces a built-in compass (via a magnetometer) along with the Core Location APIs to support it.
Vibration Support and Proximity
Vibration, which adds tactile feedback to many games, is limited to iPhones. iPod touches do not offer vibration support. Nor do they include the proximity sensor that blanks the screen when holding the iPhone against your ear during calls. Until SDK 3.0, using the proximity sensor in your applications has been theoretically off limits although it was used in a number of App Store products, most notably in the mobile Google application (http://itunes.com/apps/googlemobileapp). Starting with version 3.0, the UIDevice class offers direct access to the current state of the proximity sensor.
Processor Speeds
The second generation iPod touch features a 532MHz processor. The touch offered the highest power processing in the iPhone line until supplanted by the iPhone 3G S, running at a reported 600MHz. Make sure to test your software on older, slower units as well as on the newer ones. Application response time can and will be affected by the device on which it’s being run.
If your application isn’t responsive enough on the older platforms, consider working up your efficiency. There is no option in App Store at this time that lets you omit the first generation iPhone from your distribution base.
OpenGL ES
OpenGL ES offers a royalty-free cross-platform API for 2D and 3D graphics development. It is provided as part of the iPhone SDK. Not all iPhone models provide the same OpenGL ES support. The iPhone 3G S and newer models support both OpenGL ES 2.0 and 1.1. Earlier models including the 2G and 3G iPhone, and the first and second generation iPod touch, run only OpenGL ES 1.1. The 2.0 API provides better shading and text support, providing higher quality graphics.
To target all iPhones, develop your graphics using only 1.1. Applications leveraging the 2.0 API are limited to the iPhone 3G S and other future models.
Platform Limitations
When talking about mobile platforms like the iPhone, several concerns always arise, such as storage, interaction limits, and battery life. Mobile platforms can’t offer the same disk space their desktop counterparts do. Along with storage limits, constrained interfaces and energy consumption place very real restrictions on what you as a developer can accomplish.
With the iPhone, you can’t design for a big screen, for a mouse, for a physical keyboard (yet), or even for a physical always-on A/C power supply. Instead, platform realities must shape and guide your development. Fortunately, Apple has done an incredible job designing a new platform that somehow leverages flexibility from its set of limited storage, limited interaction controls, and limited battery life.
Storage Limits
The iPhone hosts a powerful yet compact OS X installation. Although the entire iPhone OS fills no more than a few hundred megabytes of space—almost nothing in today’s culture of large operating system installations—it provides an extensive framework library. These frameworks of precompiled routines enable iPhone users to run a diverse range of compact applications, from telephony to audio playback, from e-mail to Web browsing. The iPhone provides just enough programming support to create flexible interfaces while keeping system files trimmed down to fit neatly within tight storage limits.
Note
Each application is limited to a maximum size of 2GB. To the best of my knowledge, no application has ever come close to this size, and many users complain when applications exceed about 10MB.
Data Access Limits
Every iPhone application is sandboxed. That is, it lives in a strictly regulated portion of the file system. Your program cannot directly access other applications, certain data, and certain folders. Among other things, these limitations minimize or prevent your interaction with the iTunes library and the calendar. Your program can, however, access any data that is freely available over the Internet when the iPhone is connected to a network, and, new to 3.0, you can access a shared systemwide pasteboard.
Memory Limits
On the iPhone, memory management is critical. The iPhone does not support disk-swap-based virtual memory. When you run out of memory, the iPhone shuts down your application—as Apple puts it, random crashes are probably not the user experience you were hoping for. With no swap file, you must carefully manage your memory demands and be prepared for the iPhone OS to terminate your application if it starts swallowing too much memory at once. You must also take care concerning what resources your applications use. Too many high-resolution images or audio files can bring your application into the autoterminate zone.
Apple system engineers suggest that applications need to stay within 20MB of RAM. Here is the rough rule of thumb that circulates in developer circles. At about 20MB of use, the iPhone begins to issue memory warnings. At around 30MB, the iPhone OS shuts the application down.
Note
Xcode automatically optimizes your PNG images using the pngcrush utility shipped with the SDK. (You find the program in the iPhoneOS platform folders in /Developer.) Run it from the command line with the –iphone switch to convert standard PNG files to iPhone-formatted ones. For this reason, use PNG images in your iPhone apps where possible as your preferred image format. The open source fixpng utility, which is hosted at http://www.cyberhq.nl, goes the opposite way. It restores compressed images back to Mac-friendly formats and is a valuable tool to have on hand for iPhone development. The venerable Graphics Convert application (http://lemkesoft.com, $35) also offers iPhone PNG support.
Interaction Limits
Losing physical input devices and working with a tiny screen doesn’t mean you lose interaction flexibility. With multitouch, you can build user interfaces that defy the rules. The iPhone’s touch technology means you can design applications complete with text input and pointer control using a virtual screen that’s much larger than the actual physical reality held in your palm.
A smart autocorrecting onscreen keyboard, built-in microphone (for all units except on the iPod touch), and an accelerometer that detects orientation provide just a few of the key technologies that separate the iPhone from the rest of the mobile computing pack. What this means, however, is that you need to cut back on things such as text input and scrolling windows.
Focus your design efforts on easy-to-tap interfaces rather than on desktop-like mimicry. Remember, you can use just one window at a time—unlike desktop applications that are free to use multiwindow displays.
Note
The iPhone screen supports up to five touches at a time, although it’s rare to find any application that uses more than two at once.
Energy Limits
For mobile platforms, you cannot ignore energy limitations. That being said, Apple’s SDK features help to design your applications to limit CPU use and avoid running down the battery. A smart use of technology (for example, properly suspending themselves between uses) lets your applications play nicely on the iPhone and keeps your software from burning holes in users’ pockets (sometimes almost literally). Some programs, when left running, produce such high levels of waste heat that the phone becomes hot to the touch and the battery quickly runs down. The Camera application is one notable example.
Application Limits
Apple has instituted a strong “one-application-at-a-time” policy. That means as a third-party developer you cannot develop applications that run in the background like Apple’s Mail and Phone utilities. Each time your program runs, it must clean up and metaphorically get out of Dodge before passing control on to the next application selected by the user. You can’t leave a daemon running that checks for new messages or that sends out periodic updates.
On the other hand, Apple does support push data from Web services as of firmware 3.0. Registered services can push badge numbers and messages to users, letting them know that data is waiting on those servers. Chapter 16, “Push Notifications,” introduces push notifications and shows you how to transmit these messages to users.
Note
According to the iPhone Terms of Service, you may not use Cocoa Touch’s plug-in architecture for applications submitted to the App Store. You can build static libraries that are included at compile time, but you may not use any programming solution that links to arbitrary code at runtime.
User Behavior Limits
Although it’s not a physical device-based limitation, get used to the fact that iPhone users approach phone-based applications sporadically. They enter a program, use it quickly, and then leave just as quickly. The handheld nature of the device means you must design your applications around short interaction periods and prepare for your application to be cut off as a user receives a phone call or sticks the phone back into a pocket. Save your application state between sessions and relaunch quickly to approximate the same task your user was performing the last time the program was run. This can demand diligence on the part of the programmer but is worth the time investment due to the payoff in user satisfaction.
SDK Limitations
As you might expect, building applications for the iPhone is similar to building applications for the Macintosh. Both platforms run a version of OS X. You use Objective-C 2.0 to develop your code. You compile by linking to an assortment of frameworks. In other ways, the iPhone SDK is limited. Here are some key points to keep in mind:
• Garbage Collection is MIA and probably always will be. On the iPhone, you are responsible for retaining and releasing objects in memory. The missing Garbage Collection can be explained in two ways. First, a constrained mobile platform like the iPhone demands precise performance characteristics, especially for processor-intense applications like games. Garbage Collection adds an unpredictable element to performance; it must freeze threads when it cleans up memory. Second, limited memory does not allow garbage collection to be implemented in any sane and useful manner. Garbage collected applications use a higher watermark for memory usage. This subjects applications to more OS shutdowns.
• Many libraries are still only partly implemented. Core Animation is partially available through the Quartz Core framework, but some classes and methods remain missing in action. The lesson here is that you’re working in early-release software even though it has been quite some time since the first SDK debuted. Work around the missing pieces and make sure to submit your bug reports to Apple so that it (we hope) fixes the parts that need to be used. Be aware that Apple has deliberately cut access to some proprietary classes and methods. For example, you read EXIF orientation from images, but you cannot add that data; the method to do so is unpublished.
Note
Xcode’s compiler lets you mix C++ and Objective-C code in the same project. The resulting Objective-C++ hybrid projects let you reuse existing C++ libraries in Objective-C applications. Consult Apple’s documentation for details.
Using the Developer Portal
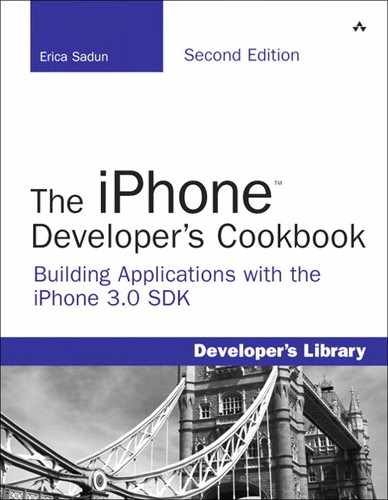
The iPhone developer program portal hosts all the tools needed to set up your system for iPhone development. It is found at http://developer.apple.com/iphone/manage/overview/index.action, and you will not have access to it unless you have signed up for one of the two paid iPhone developer programs. Here is where you can set up your development team, obtain your certificates, register development devices and application identifiers, and build your provisioning profiles so you can properly sign your applications.
Because the details are subject to change, this overview focuses on the big picture. Should Apple alter any of the particulars, you’ll still know what the major milestones are, so you can adjust accordingly. Figure 1-1 shows the key points of the process.
Figure 1-1 Basic functions of the iPhone developer portal.
Setting Up Your Team
An iPhone development team consists of one or more members. The primary member of the team, called the “agent,” is the original person who enrolled into the iPhone developer program. The agent has basic administrative powers over the account: He or she can add other members to the team if this is not an individual account, approve certificate requests, and so forth. In addition, the agent can grant administrative privileges to other members, who are called, unsurprisingly, “admins.” Members without administrative privileges can request new provisions and download them, but that’s pretty much the limit.
Admins can invite new members at the portal using the Team screen. This is also where you can update e-mail, check on certificates, and add and remove members. Additional tabs in this screen let you check your technical support incidents and review your developer agreements with Apple.
Requesting Certificates
Certificates play a major role in iPhone development. You cannot deploy applications to iPhones, even for testing, without a valid development certificate. You also need a distribution certificate for selling applications through the App Store. You can request and download these certificates from the portal.
Start by generating a certificate request from your Macintosh’s Keychain Access utility.
1. Launch the program from the /Applications/Utilities folder.
2. Choose Keychain Access > Certificate Assistant > Request a Certificate from a Certificate Authority. Check your e-mail address, choose Saved to Disk, and click Continue.
3. Select where to save the certificate (the Desktop is a good choice) and click Save. Wait for the certificate to generate and click Done.
You then upload the request at the portal to create either your development or distribution certificate. The portal walks you through the process. Each certificate must be approved by the team agent before it is issued. Once approved, you can download it from the Certificates window on the portal site.
Install the new certificate into your keychain by double-clicking it. Certificates are currently good for one year. Make sure you remove any expired certificates from your keychain as Xcode cannot readily distinguish between them. You will encounter problems compiling until you do so. Select the expired certificate in the Macintosh Keychain Access application (/Applications/Utilities/Keychain Access.app) and delete it.
In addition to these two certificates, you must also install the WWDR intermediate certificate issued by Apple’s worldwide developer relations. It can be downloaded from the portal or directly at http://developer.apple.com/certificationauthority/AppleWWDRCA.cer. Make sure you add this to your keychain as well.
Should you need to develop on more than one machine at a time, you can export your developer and distribution certificates from the Keychain Access Utility. Right-click a certificate and choose the Export option. Choose the .p12 Personal Information Exchange option and click Save. Enter a password that you will remember and verify that password. Click OK to continue. OS X prompts you to enter your admin password for your Macintosh. Enter it and click Allow. Keychain Access generates the encrypted p12 file. You can transfer this to another Macintosh system and double-click to install. The local keychain will prompt you for the password.
Registering Devices
You must register all development iPhones at the program portal. You do so by providing a device name and its unique device identifier (UDID). You can register up to 100 devices at any time. Once registered, you may use that device for your development and ad hoc provisions. To begin, start by viewing the Devices screen at the portal and clicking Add Device. Enter a name, enter a UDID, and click Submit.
Finding UDIDs is not complicated: You can easily recover a device UDID from iTunes. When docked, select the device name from the sources list (the left iTunes column) and view the Summary tab. Click the words Serial Number. This changes the display from Serial Number to Identifier (UDID). Choose Edit > Copy (Command-C) and the UDID transfers to your system clipboard. You can then paste that number into a file.
Alternatively, have your users download a copy of Ad Hoc Helper (http://itunes.com/apps/adhochelper) to their iPhone. It is a free utility that I created to help people e-mail their device IDs directly to a developer. When launched, it automatically starts a new e-mail that is populated with the user’s UDID. Users add your address as the recipient and tap Send.
Apple offers several ways to register several devices at once. The most reliable option is to enter several items into the Add Devices screen before clicking the Add Device button. You can also use Apple’s iPhone Configuration Utility to manage UDIDs. It is available for download at the portal site but has had its ups and downs in terms of stability.
Please note that Unregister does not immediately free up slots on your 100-slot devices list. Due to some developers abusing the system there is a one-year time-out before a slot can be reused. You can contact Apple and ask them to override this setting if there is a valid reason that your slots need to be reused within the year.
Registering Application Identifiers
Each application you build should use an exclusive identifier. This string enables your application to uniquely present itself to SpringBoard and guarantees that it will not conflict with another application. Most typically, you build your identifiers using Apple’s reverse domain notation, for example, com.sadun.myApplicationName, uk.co.sadun.myApplicationName, org.sadun.myApplicationName, and so on. Avoid using any special characters in your application identifiers.
You need not register each application at the portal, but you should register at least one “wild-card” identifier. By this, I mean an identifier that uses an asterisk as a wild-card matching character, for example, com.sadun.*. You can use this single identifier to create provisions that work with all your applications, regardless of whether they are used only during development or are destined for the App Store. A wild-card provision properly signs all applications whose identifiers match its pattern.
The sole exception to this wild-card rule are application identifiers meant to be used with push notifications. Chapter 16 details the difference, explaining why you must register applications individually and how you can do so. Push-based applications aside, most developers can get by with registering a single wild-card application ID at the program portal.
For the most part, the samples for this book use a single application identifier, com.sadun.helloworld. You need to replace this identifier with one that matches your provision profile. I mostly use just one identifier to avoid clogging up your iPhone with dozens of samples at once. Each sample replaces the previous one, ensuring that SpringBoard remains relatively uncluttered.
Note
If you’re wondering what those random characters that precede your registered IDs are, they are Bundle Seed IDs and are meant to be used with applications that share keychain data. Consult Chapter 13, “Networking,” and the Apple portal for more details about using seed IDs.
Provisioning
Provisioning profiles provide a way to associate registered developers and registered devices with a specific iPhone development team. They are used in Xcode to sign your code, authorizing the software to run on the device or to be allowed in the App Store. Most developers use two key provisions: a wild-card development provision and a wild-card distribution provision. In addition, most developers eventually build one or more ad hoc provisions, which allow you to distribute your application outside the App Store to devices you have registered at the portal.
Create your profiles at the Provisioning screen of the program portal. Choose the Development or Distribution tab, click Add Profile, check the certificate name box, and choose your wild-card application ID. For development and ad hoc provisions, you must select the devices that are included. Click Submit and then refresh the screen a few times. It usually takes less than minute for the provision to be generated and made available for download.
Should you need to add devices at a later time, you can easily do so. Expand the device user base by editing your already-issued provisions. Choose Edit > Modify, check the new devices, and click Submit. Re-download the updated provisioning profile by clicking Download.
To install provisions, drag them onto the Xcode icon or (for development and ad hoc provisions only) drop them into the Xcode Organizer window for the device. Xcode automatically reads them in and installs them into your home folder in ~/Library/MobileDevice/Provisioning Profiles. To remove a provision, use the Xcode organizer’s Provisioning Profiles pane.
Note
If you’d rather manage your profiles from the command line, quit Xcode and delete them from the profiles folder. The provisions do not retain their original names so be sure to delete the correct file by using the command line grep utility (e.g. grep -i firstpush *) or by peeking at the files in a text editor to find the right one.
Xcode automatically installs provisions onto devices to ensure that applications compiled with those provisions can run properly. To remove a provision from a device, open Settings > General > Profiles on the iPhone or iPod touch in question. Select a profile, and click the red Remove button. When you remove a device provision, you won’t be able to run any applications signed with that provision.
Assembling iPhone Projects
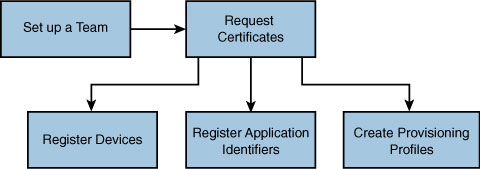
iPhone Xcode projects contain varied standard and custom components. Figure 1-2 shows a minimal project. Project elements include source code, linked frameworks, and media such as image and audio files. Xcode compiles your source, links it to the frameworks, and builds an application bundle suitable for iPhone installation. It adds your media to this application bundle, enabling your program to access that media as the application runs on the iPhone.
Figure 1-2 Xcode projects bring source code, frameworks, and media together to form the basis for iPhone applications.
iPhone code is normally written in Objective-C 2.0. This is an object-oriented superset of ANSI C, which was developed from a mix of C and Smalltalk. Chapter 3, “Objective-C Boot Camp,” introduces the language on a practical level. If you’re looking for more information about the language, Apple provides several excellent online tutorials at its iPhone developer site. Among these are an introduction to object-oriented programming with Objective-C and an Objective-C 2.0 reference (http://developer.apple.com/iphone/library/documentation/Cocoa/Conceptual/ObjectiveC/).
Frameworks are software libraries provided by Apple that supply the reusable class definitions for Cocoa Touch. Add frameworks to Xcode by dragging them onto your project’s Frameworks folder. After including the appropriate header files (such as UIKit/UIKit.h or QuartzCore/QuartzCore.h), you call their routines from your program.
Associated media might include audio, image, and video files to be bundled with the package as well as text-based files that help define your application to the iPhone operating system. Drop media files into your project and reference them from your code.
The project shown in Figure 1-2 is both simple and typical despite its fairly cluttered appearance. It consists of five source files (main.m, MyAppDelegate.h, MyAppDelegate.m, MyViewController.h, MyViewController.m) and two interface files (MyViewController.xib, MainWindow.xib) along with the default iPhone project frameworks (UIKit, Foundation, and Core Graphics) and a few supporting files (Default.png, icon.png, My-Info.plist). Together these items form all the materials needed to create an extremely basic application. As you discover in Chapter 2, “Building Your First Project,” Xcode can generate most of these elements automatically for you. You can then edit them as needed to add functionality.
Note
The My_Prefix.pch file is created automatically by Xcode. It contains precompiled header files.
The iPhone Application Skeleton
Nearly every iPhone application you build will contain a few key source files. Figure 1-3 shows the most common source code pattern: a main.m file, an application delegate, and a view controller. These five files (more if you use Interface Builder .xibs) provide all the components necessary to create a simple Hello World style application that displays a view onscreen.
Figure 1-3 These files comprise the most common source code configuration for a minimal iPhone application. You may or may not choose to use a .xib file to define interfaces.

Some of these components may be familiar. Others may not. Here’s a rundown of the file types:
• The implementation files use a .m extension and not a .c extension. These .m files contain Objective-C method implementations in addition to any C-style functions. The project in Figure 1-3 uses three .m files.
• iPhone source files use the standard C-style .h extension for the header files. Header files offer public declarations of class interfaces, constants, and protocols. You usually pair each class implementation file (in this case the application delegate and view controller .m files) with a header file, as you can see in Figure 1-3.
• XIB files (.xib) are created in Interface Builder. These XML-based user interface definition files are linked to your application and called by your app at runtime in their compiled .nib format. The project in Figure 1-3 uses a single .xib, which defines the contents of the primary view. A standard Xcode project may add a MainWindow.nib, which does little more than create a new, empty window.
Here is a quick rundown of those files, what they are and what role they play in the actual application.
main.m
The main.m file has two jobs. First, it creates a primary autorelease pool for your application. Second, it invokes the application event loop. These two elements provide critical elements to get your application started and running. Here is what those two items are and how they work.

Note
The argc and argv variables passed to main() refer to command-line arguments. Since the iPhone does not use a command-line to launch its programs (all applications are run from a common graphical user interface), these elements are not used. They are included for consistency with standard ANSI C practices.
Autorelease Pools
Autorelease pools are objects that support the iPhone’s memory management system. This memory system is normally based on keeping track of reference counts, that is, counting how many objects refer to an allocated part of memory. Normally, you’re responsible for releasing those objects. That’s where the autorelease pool steps in. The pool automatically sends a release message to all the objects it owns at the end of every event loop cycle so you don’t have to.
Autorelease objects are typically created with a pattern that looks like this:
[[[Someclass alloc] init] autorelease]
Once added to the autorelease pool, these objects pass their release responsibilities along to the pool. At the end of the event loop, the pool drains and sends the releases.
The iPhone expects that there will always be an autorelease pool available so memory can be recovered from these objects at the end of their lifetime. If you ever create a secondary thread in your application, you need to provide it with its own autorelease pool. Autorelease pools and the objects they contain are discussed further in Chapter 3.
The UIApplicationMain Function
The UIApplicationMain function provides the primary entry point for creating a new application object. It creates the new application instance and its delegate. The delegate is responsible for handling application status changes and providing program-specific responses to those changes.
The third and fourth arguments of the UIApplicationMain function specify the name of the principal application class and its delegate. If the third argument is omitted (set as nil), the iPhone defaults to using the standard UIApplication class.
UIApplicationMain also establishes the application’s event loop. An event loop repeatedly looks for low-level user interactions such as touches on the screen or sensor triggers. Those events are captured by the iPhone’s kernel and dispatch an event queue, which is forwarded to the application for handling.
Event loops let you design your program around callbacks. Callbacks are where you specify how the application should respond to these events. In Objective-C, this corresponds to method invocations. For example, you can build methods to determine how the application should reorient itself when the user moves the screen from portrait to landscape or how views should update when a finger is dragged onscreen. This style of programming is based on the underlying event loop, which is set up in main.m.
Application Delegate
An application delegate implements how your program should react at critical points in the application life cycle. The delegate is responsible for initializing a windowing system at launch and wrapping up business at termination. It also acts as the key player for handling memory warnings. Here are the more important delegate methods that your applications will implement:
• The applicationDidFinishLaunching: method—This method is the first thing triggered in your program after the application object has been instantiated. Upon launch, this is where you create a basic window, set its contents, and tell it to become the key responder for your application.
• The applicationWillTerminate: method—This method enables you to handle any status finalization before handing control back to SpringBoard. Use this to save defaults, update data, and close files.
• The applicationDidReceiveMemoryWarning method—When called, your application must free up memory to whatever extent possible. This method works hand in hand with the UIViewController’s didReceiveMemoryWarning: method. If your application is unable to release enough memory, the iPhone terminates it, causing your user to crash back to the SpringBoard. SpringBoard is the main iPhone GUI that presents the application icons, allowing users to launch programs.
The application delegate also handles responsibility for when your application suspends or resumes, such as when the user locks the screen.
After launching and loading the window, the application delegate takes a back seat. Nearly all application semantics move over to some child of a UIViewController class. The application delegate typically does not take a role again until the application is about to finish or if memory issues arise.
View Controller
In the iPhone programming paradigm, view controllers provide the heart of how an application runs. Here is where you normally implement how the application responds to selections, button presses, as well as sensor triggers. If you haven’t used Interface Builder to create a precooked presentation, the view controller is where you load and lay out your views. While the main.m and application delegate files are typically small, view controller source code is normally extensive, defining all the ways your application accesses resources and responds to users. Some of key methods include the following:
• The loadView and viewDidLoad methods—Assuming you aren’t using XIB files to lay out your views, the loadView method must set up the screen and lay out any subviews. Make sure to either call [super loadView] or, alternatively, implement viewDidLoad, whenever you inherit from a specialized subclass such as UITableViewController or UITabBarController. This allows the parent class to properly set up the screen before you add your customizations to that setup. Apple’s documentation and sample code encourage the viewDidLoad approach when basing your code off specialized subclasses.
• The shouldAutorotateToInterfaceOrientation: method—Unless you have pressing reasons to force your user to remain in portrait orientation, add the should-autorotate method to allow the UIViewController method to automatically match your screen to the iPhone’s orientation. You must define how the screen elements should update.
• The viewWillAppear: and viewDidAppear: methods—These methods get called whenever a view is ready to appear onscreen or a view has fully appeared onscreen. The viewWillAppear: method should update information for views that are about to display. When called, your view may not have been loaded yet. If you rely on accessing IBOutlets connected to subviews, poke self.view to ensure the view hierarchy gets loaded. Use viewDidAppear: to trigger behavior for once the view is fully transitioned onscreen, such as any animations.
The number and kind of XIB files varies with how you design your project. Figure 1-3 assumes you’ve created a single XIB for the view controller. You can use Interface Builder to design additional components or skip IB entirely and create your interfaces programmatically.
Note
Only UIView instances can directly receive touch calls; UIViewController objects cannot. See Chapter 8, “Gestures and Touches,” to learn more about directly managing and interpreting touches and gestures in your application.
A Note About the Sample Code in This Book
For the sake of pedagogy, this book’s sample code usually presents itself in a single main.m file. It’s hard to tell a story when readers must look through five or seven or nine individual files at once. Offering a single file concentrates that story.
These samples are not intended as stand-alone applications. They are there to demonstrate a single recipe and a single idea. One main.m file with a central presentation reveals the implementation story in one place. Readers can study these concentrated ideas and transfer them into normal application structures, using the standard file system and layout.
There are two exceptions to this one-file rule. First, application-creation walk-throughs use the full file structure created by Xcode to mirror the reality of what you’d expect to build on your own. The walk-through folders may therefore contain a dozen or more files at once.
Second, standard implementation and header files are provided when the class itself is the recipe or provides a precooked utility class. Instead of highlighting a technique, some recipes offer these precooked class implementations and categories (that is, extensions to a preexisting class rather than a new class). For those recipes, look for separate .m and .h files in addition to the skeletal main.m that encapsulates the rest of the story.
iPhone Application Components
Compiled iPhone applications live in application bundles. Like their Macintosh cousins, these application bundles are just folders named with a .app extension. Your program’s contents and resources reside in this folder, including the compiled executable, supporting media (such as images and audio), and a few special files that describe the application to the OS. The folder is treated by the operating system as a single bundle.
Application Folder Hierarchy
iPhone bundles are simple. Unlike the Mac, iPhone bundles do not use Contents and Resources folders to store data or a MacOS folder for the executable. All materials appear at the top level of the folder. For example, instead of putting a language support (.lproj) folder into Contents/Resources/, Xcode places it directly into the top .app folder. You can still use subfolders to organize your project, but these developer-defined folders do not follow any standard.
The iPhone SDK’s core OS support includes the NSBundle class. This class offers access to the files stored in the application bundle. NSBundle makes it easy to locate your application’s root folder and to navigate down to your custom subfolders to point to and load built-in resources like sounds, images, and data files.
Note
As on a Macintosh, user domains mirror system ones. Official Apple-distributed applications reside in the primary /Applications folder. Third-party applications live in /var/mobile/Applications. The underlying UNIX file system is obscured by the iPhone’s sandbox, which is discussed later in this section.
The Executable
The executable application file of your application resides at the top-level folder of the application bundle. It carries executable permissions so it can run and is signed as part of the application bundle during the compilation process. You may only load and run applications that have been signed with an official developer certificate. Those certificates are issued by Apple via the iPhone developer program portal at the official developer Web site.
Apple offers several kinds of signing profiles called mobile provisions that vary by how the application will be deployed. You need separate provisions for applications that will be tested during development on a local device, for applications that will be sent out to registered devices for testing, and for those that will be distributed through App Store. You’ve already read about creating your provisions earlier in this chapter. The actual application signing process is discussed in further detail in Chapter 2.
The Info.plist File
As on a Macintosh, the iPhone application folder contains that all-important Info.plist file. Info.plist files are XML property lists that describe an application to the operating system. Property lists store key-value pairs for many different purposes and can be saved in readable text-based or compressed binary formats. In an Info.plist file, you specify where the application’s executable (CFBundleExecutable, “Executable file”) can be found, the text that appears under the application icon (CFBundleDisplayName, “Bundle display name”), and the application’s unique identifier (CFBundleIdentifier, “Bundle identifier).
Be careful when setting the display name. Titles that are too long to display properly are truncated; the iPhone adds ellipses as needed. So your application named “My Very First iPhone App” may display as “My Very F....” This provides less information to your end user than a simpler title like “First App” would offer.
The application identifier typically uses Apple’s reverse domain naming format (for example, com.sadun.appname). The identifier plays a critical role for proper behavior and execution; it must not duplicate any other identifier on App Store. In use, the product identifier registers your application with SpringBoard, the “Finder” of the iPhone. SpringBoard runs the home screen from which you launch your applications. The product identifier also forms the basis for the built-in preferences system called the user defaults.
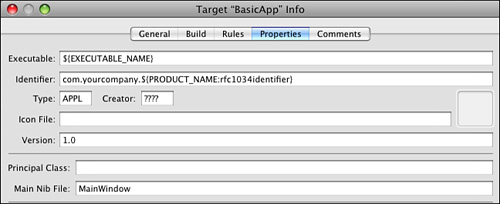
The identifier is case sensitive and must be consistent with the provisions you generate at the developer portal. Problems with misnamed bundle identifiers have cost developers many hours of wasted time. Specify the identifier by editing your project’s settings in Xcode (see Figure 1-4).
Figure 1-4 Customize your application’s bundle identifier by editing target properties. Edits here are reflected in your application’s Info.plist file. The PRODUCT_NAME identifier is specified in your project’s settings.
Note
To change identifiers, open the Targets list in the Xcode project’s left-hand column. Double-click Targets > Your Application Name. This opens the Target Info window. Click on the Properties tab and edit the Identifier from com.yourcompany to a reverse domain name that represents your actual company. Enter your personal domain and let Xcode append the application product name.
Application preferences are automatically stored in the application sandbox. The sandbox mimics the domains and folders normally found on the core OS. On the iPhone, preferences appear in a local Library folder and use the application identifier for naming. This identifier is appended with the .plist extension (for example, com.sadun.appname.plist), and the preferences are stored using a binary .plist format. You can read a binary .plist by transferring it to a Macintosh via Xcode’s organizer.
Note
To copy application data from the iPhone to your Macintosh, open the Organizer window (Windows > Organizer). Select your device and then an item from the applications list. Click the arrow next to the name to reveal the Application Data bundle and then drag that bundle to the desktop. It expands to a standard folder named with the application identifier and the date and time the data was retrieved.
You can edit property list files directly in Xcode or use the Property List Editor that ships as part of Xcode’s utilities. It’s located in /Developer/Applications/Utilities and offers a user-friendly GUI. Use Apple’s plutil utility to convert property lists from binary to a text-based XML format: plutil –convert xml1 plistfile. Apple uses binary plists to lower storage requirements and increase system performance.
As with the Macintosh, Info.plist files offer further flexibility and are highly customizable. With them, you can set application-specific variables (UIRequiresPersistentWiFi) or specify how your icon should display (UIPrerenderedIcon). These variables are powerful. They can define multiple roles for a single application although this functionality is not available to third-party development. For example, the Photos and Camera utilities are actually the same application, MobileSlideShow, playing separate “roles.” Appendix A, “Info.plist Keys,” lists these keys in detail.
Other standard Info.plist keys include UIStatusBarStyle for setting the look and color of the status bar and UIStatusBarHidden for hiding it altogether. UIInterfaceOrientation lets you override the accelerometer to create a landscape-only (UIInterfaceOrientationLandscapeRight) presentation. Register your custom application URL schemes (for example, myCustomApp://) by setting CFBundleURLTypes. See Chapter 21, “Accessibility and Other iPhone OS Services,” for more information about URL schemes.
The Icon and Default Images
The icon.png image and Default.png are two key image files. Icon.png acts as your application’s icon, the image used to represent the application on the SpringBoard home screen. Default.png (also known as your “launch image”) provides the splash screen displayed during application launch.
Unlike Default.png, the icon filename is arbitrary. If you’d rather not use “icon.png,” set the CFBundleIconFile key in your Info.plist file to whatever filename you want to use but be aware that this might cause trouble when submitting your application to App Store; iTunes Connects requires the application to use icon.png (or Icon.png) even if the Info.plist specifies another name. This key is not set by default, so be sure to add a value regardless of the art you use.
Apple recommends matching Default.png to your application’s background. Many developers use Default.png to launch images for a logo splash or for a “Please wait” message. These go against Apple’s human interface guidelines (launch images should provide visual continuity, not advertising or excuses for delays) but are perfectly understandable uses. Xcode lets you take screenshots of your application in action using its Organizer window (Window > Organizer). It also offers the option to set one of those shots as your Default.png image.
The official application icon size is 57-by-57 pixels. SpringBoard automatically scales larger art. Provide flat (not glossy) art with squared corners. SpringBoard smoothes and rounds those corners and adds an automatic gloss and shine effect. If for some compelling reason you need to use prerendered art, set UIPrerenderedIcon to <true/> in your Info.plist file.
As with all on/off Info.plist items, make sure to set the value for UIPrerenderedIcon to the Boolean value true (<true/>, the checked box in the Xcode GUI). Using a string for “true” (<string>true</string>) may work on the simulator while producing no effect on the iPhone. Also remember that the 3.0 Xcode property list editor hides the actual key name. Add a field for the “Icon already includes gloss and bevel effects” key and check the box that appears in the value column.
When submitting your application to App Store, you need to create a high-resolution (512-by-512 pixel) version of your icon. Although you can up sample your 57-by-57 icon.png art, it won’t look good. Going the other way allows you to maintain high-quality art that you can compress to your icon as needed. Keep your art simple and compressible. An icon that looks stunning at 512×512 looks muddled and sloppy at 57×57 when overly detailed.
Note
You may include a 29-by-29 pixel image called Icon-settings.png in your project. This image represents your application in the Settings application. Most developers skip this option. If not included, Settings simply scales your icon.png image.
NIB Files
Interface Builder creates .xib files that store precooked addressable user interface layouts in XML format. (If you’re curious, you can open these files in your favorite text editor and peek at the XML.) Most IB-based applications contain several .xib files that define various view components. Typical .xib contents might include window layouts, custom table cells, pop-up dialogs, and more.
When creating your application bundles, Xcode compiles the XML data into a NIB package, which is placed alongside the executable and any other application components. (NIB, somewhat archaically, stands for NeXT Interface Builder, which is the ancestor of the OS X Interface Builder used to build iPhone applications.) The .nib files appear at the top level of your application bundle and are used directly from your program when loading screens.
Note
When you develop programs that do not use XIB Interface-Builder bundles, remove the NSMainNibFile key from Info.plist and discard the automatically generated MainWindow.xib file from your project. This reduces clutter in your program and keeps your application from trying to load an interface file that you never fully defined. Set the fourth argument of UIApplicationMain() in main() to the class name of your application delegate.
Files Not Found in the Application Bundle
As with the Macintosh, things you do not find inside the application bundle include preferences files (generally stored in the application sandbox in Library/Preferences), application plug-ins (stored in /System/Library at this time and not available for general development), and documents (stored in the sandbox in Documents).
At this time, the iPhone SDK does not let you prepopulate these folders. Since your program cannot edit or overwrite any files in the application bundle, copy any files that need to be changed, such as database files, to another folder (Documents or Library) on the first run of your program.
Another thing that seems to be missing (at least from the Macintosh programmer point of view) is Application Support folders. You should copy your support data, which more rightfully would be placed into an Application Support structure, to your Documents or Library folders from the application bundle when your application is first launched. Thereafter, check to make sure that data is there and recopy the data if needed.
IPA Archives
When users purchase your application they download a .ipa file from iTunes. This file is actually a zipped archive. It contains a compressed payload, namely the app bundle you built from the components just described. iTunes stores .ipa archives in the Mobile Applications folder in the iTunes Library. If you rename a copy of any .ipa file to use the .zip extension, you can easily open it using standard compression software.
Each application is customized on download to ensure that it can only be installed and run on the iPhone devices authorized by your iTunes account. This prevents the application from being shared freely over the Internet. Although software pirates have created cracking tools, these are not widely used in the wild. Apple’s basic protections ensure that for the most part only those who have purchased and downloaded the application from iTunes can run your software.
Sandboxes
The iPhone OS restricts all SDK development to application “sandboxes” for the sake of security. The iPhone sandbox limits your application’s access to the file system to a minimal set of folders, network resources, and hardware. In some ways, it’s like attending a restrictive school with a paranoid principal:
• Your application can play in its own sandbox, but it can’t visit anyone else’s sandbox.
• You cannot share toys. You cannot share data (except via the user-controlled system pasteboard). You cannot mess in the administrative offices. Your files must stay in the folders provided to you by the sandbox, and you cannot copy files to or from other application folders.
• You cannot peek over the fence. Reading from or attempting to write to files outside your sandbox is grounds for App Store rejection. Your application is prevented from writing to most folders outside the sandbox by the iPhone OS.
• Your application owns its own Library, Documents, and /tmp folders. These mimic the standard folders you’d use on a less-restrictive platform but specifically limit your capability to write and access this data.
In addition to these limitations, your application must be signed digitally and must authenticate itself to the operating system with a coded application identifier, which you must create at Apple’s developer program site. Details on how to do this follow in Chapter 2.
On the bright side, sandboxing ensures that all program data gets synced whenever your device is plugged into its home computer. On the downside, at this time Apple has not clarified how that synced data can be accessed from a Windows- or Macintosh-based desktop application.
Note
Sandbox specification files (using the .sb extension) are stored in /var/mobile/Applications along with each actual sandbox folder. These files control privileges such as read-and-write access to various bits of the file system. As a developer, you will not be able to see or manipulate these files, but they are there, controlling the ways your app may or may not interact with the operating system.
Programming Paradigms
iPhone programming centers on two important paradigms: objected-oriented programming and the Model-View-Controller (MVC) design pattern. The iPhone SDK is designed around supporting these concepts in the programs you build. To do this, it has introduced delegation (controller) and data source methods (model) and customized view classes (view). Here is a quick rundown of some important iPhone/Cocoa Touch design vocabulary used through this book.
Object-Oriented Programming
Objective-C is heavily based on Smalltalk, one of the most historically important object-oriented languages. Object-oriented programming uses the concepts of encapsulation and inheritance to build reusable classes with published external interfaces and private internal implementation. You build your applications out of concrete classes that can be stacked together like LEGO toys, because it’s always made clear which pieces fit together through class declarations.
Pseudo-multiple inheritance (via invocation forwarding and protocols) provides an important feature of Objective-C’s approach to object-oriented programming. iPhone classes can inherit behaviors and data types from more than one parent. Take the class UITextView, for example. It’s both text and a view. Like other view classes, it can appear onscreen. It has set boundaries and a given opacity. At the same time, it inherits text-specific behavior. You can easily change its display font, color, or text size. Objective-C and Cocoa Touch combine these behaviors into a single easy-to-use class.
Model-View-Controller
MVC separates the way an onscreen object looks from the way it behaves. An onscreen button (the view) has no intrinsic meaning. It’s just a button that users can push. That view’s controller acts as an intermediary. It connects user interactions such as button taps to targeted methods in your application, which is the model. The application supplies and stores meaningful data and responds to interactions such as these button taps by producing some sort of useful result. MVC is best described in the seminal 1988 paper by Glenn Krasner and Stephen Pope, which is readily available online.
Each MVC element works separately. You might swap out a pushbutton with, for example, a toggle switch without changing your model or controller. The program continues to work as before, but the GUI now has a different look. Alternatively, you might leave the interface as is and change your application where a button triggers a different kind of response in your model. Separating these elements enables you to build maintainable program components that can be updated independently.
The MVC paradigm on the iPhone breaks down into the following categories:
• Model—Model methods supply data through protocols such as data sourcing and meaning by implementing callback methods triggered by the controller.
• View—View components are provided by children of the UIView class and assisted by its associated (and somewhat misnamed) UIViewController class.
• Controller—The controller behavior is implemented through three key technologies: delegation, target action, and notification.
Together, these three elements form the backbone of the MVC programming paradigm. Let’s look at each of these elements of the iPhone MVC design pattern in a bit more detail. The following sections introduce each element and its supporting classes.
View Classes
The iPhone builds its views based on two important classes: UIView and UIViewController. These two classes and their descendants are responsible for defining and placing all onscreen elements.
As views draw things on your screen, UIView represents the most abstract view class. Nearly all user interface classes descend from UIView and its parent UIResponder. Views provide all the visual application elements that make up your application. Important UIView classes include UITextView, UIImageViews, UIAlertView, and so forth. The UIWindow class, a kind of UIView, provides a viewport into your application and provides the root for your display.
Because of their onscreen nature, all views establish a frame of some sort. This frame is an onscreen rectangle that defines the space each view occupies. The rectangle is established by the view’s origin and extent.
Views are arranged hierarchically and are built with trees of subviews. You can display a view by adding it to your main window or to another view by using the addSubview method to assign a child to a parent. You can think about views as attaching bits of transparent film to a screen, each piece of which has some kind of drawing on it. Views added last are the ones you see right away. Views added earlier may be obscured by other views sitting on top of them.
Despite the name, the UIViewController class does not act as controllers in the MVC sense. They more often act as view handlers and models than as controllers. Although some will disagree, Apple terminology does not always match the MVC paradigm taught in computer science classes.
View controllers are there to make your life easier. They take responsibility for rotating the display when a user reorients his or her iPhone. They resize views to fit within the boundaries when using a navigation bar or a toolbar. They handle all the interface’s fussy bits and hide the complexity involved in directly managing interaction elements. You can design and build iPhone applications without ever using a UIViewController or one of its subclasses, but why bother? The class offers so much convenience it’s hardly worth writing an application without them.
In addition to the base controller’s orientation and view resizing support, two special controllers, the UINavigationController and UITabBarController, magically handle view shifting for you. The navigation version enables you to drill down between views, smoothly sliding your display between one view and the next. Navigation controllers remember which views came first and provide a full breadcrumb trail of “back” buttons to return to previous views without any additional programming.
The tabbed view controller lets you easily switch between view controller instances using a tabbed display. So if your application has a top ten list, a game play window, and a help sheet, you can add a three-buttoned tab bar that instantly switches between these views without any additional programming to speak of.
Every UIViewController subclass implements a method to load a view, whether through implementing a procedural loadView method or by pulling in an already-built interface from a .xib file and calling viewDidLoad. This is the method that lays out the controller’s main view. It may also set up triggers, callbacks, and delegates if these have not already been set up in Interface Builder.
So in that sense alone, the UIViewController does act as a controller by providing these links between the way things look and how interactions are interpreted. And, because you almost always send the callbacks to the UIViewController itself, it often acts as your model in addition to its primary role as a controller for whatever views you create and want to display. It’s not especially MVC, but it is convenient and easy to program.
Controller
When Apple designs interactive elements such as sliders and tables, they have no idea how you’ll use them. The classes are deliberately general. With MVC, there’s no programmatic meaning associated with row selection or button presses. It’s up to you as a developer to provide the model that adds meaning. The iPhone provides several ways in which prebuilt Cocoa Touch classes can talk to your custom ones. Here are the three most important: delegation, target-action, and notifications.
Delegation
Many UIKit classes use delegation to hand off responsibility for responding to user interactions. When you set an object’s delegate, you tell it to pass along any interaction messages and let that delegate take responsibility for them.
A UITableView is a good example of this. When a user taps on a table row, the UITableView has no built-in way of responding to that tap. The class is general purpose and it has no semantics associated with a tap. Instead, it consults its delegate—usually a view controller class or your main application delegate—and passes along the selection change through a delegate method. This enables you to add meaning to the tap at a point of time completely separate from when the table class was first implemented. Delegation lets classes be created without that meaning while ensuring that application-specific handlers can be added at a later time.
The UITableView delegate method tableView: didSelectRowAtIndexPath: is a typical example. Your model takes control of this method and implements how it should react to the row change. You might display a menu or navigate to a subview or place a check mark next to the current selection. The response depends entirely on how you implement the delegated selection change method.
To set an object’s delegate, assign its delegate property (this is preferred) or use some variation on the setDelegate: method. This instructs your application to redirect interaction callbacks to the delegate. You let Xcode know that your object implements delegate calls by adding a mention of the delegate protocol it implements in the class declaration. This appears in angle brackets, to the right of the class inheritance. Listing 1-1 shows a kind of UIViewController that implements delegate methods for UITableView views. The MergedTableController class is, therefore, responsible for implementing all required table delegate methods.
Listing 1-1 Defining and Adding Delegate Protocol Declarations to a Class Definition
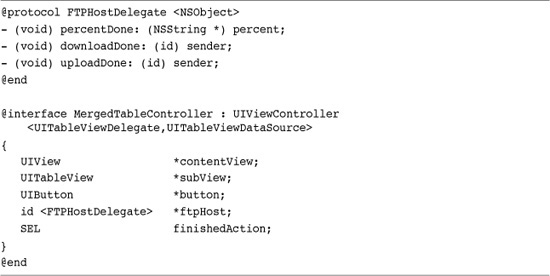
Xcode’s documentation exhaustively lists all standard delegate methods, both required and optional. Open Help > Documentation (Command-Option-Shift-?) and search for the delegate name, such as UITableViewControllerDelegate. The documentation provides a list of instance methods that your delegate method can or must implement.
Delegation isn’t limited to Apple’s classes. It’s simple to add your own protocol declarations to your classes and use them to define callback vocabularies. Listing 1-1 creates the FTPHostDelegate protocol, which declares the ftpHost instance variable. When used, that object must implement all three (required) methods declared in the protocol. Protocols are an exciting and powerful part of Objective-C programming, letting you create client classes that are guaranteed to support all the functionality required by the primary class.
Note
If your application is built around a central table view, use UITableViewController instances to simplify table creation and use.
Target-Action
Target-actions are a lower-level way of redirecting user interactions. You encounter these almost exclusively for children of the UIControl class. With target-action, you tell the control to contact a given object when a specific user event takes place. For example, you’d specify which object to contact when users press a button.
Here is a typical example. This snippet defines a UIBarButtonItem instance, a typical buttonlike control used in iPhone toolbars. It sets the item’s target to self and the action to @selector(trackNotifications:). When tapped, it triggers a call to the defining object sending the setHelvetica: message:

As you can see, the name of the method (setHelvetica:) is completely arbitrary. Target-actions do not rely on an established method vocabulary the way delegates do. In use, however, they work exactly the same way. The user does something, in this case presses a button, and the target implements the selector to provide a meaningful response.
Whichever object defines this UIBarButtonItem instance must implement a setHelvetica: method. If it does not, the program crashes at runtime with an undefined method call error. Unlike delegates and their required protocols, there’s no guarantee that setHelvetica: has been implemented at compile time. It’s up to the programmer to make sure that the callback refers to an existing method.
Standard target-action pairs always pass either zero, one, or two arguments. These arguments are the interaction object and a UIEvent object that represents the user’s input. Your selector can choose to pass any or all of these. In this case, the selector uses one argument, the UIBarButtonItem instance that was pressed. This self-reference, where the triggered object is included with the call, enables you to build more general action code. Instead of building separate methods for setHelvetica:, setGeneva:, and setCourier:, you could create a single setFontFace: method to update a font based on which button the user pressed.
Note
To build target-action into your own UIControl-style classes, add a target variable of type id (any object class) and an action variable of type SEL (method selector). At runtime, use performSelector: withObject: to send the method selector to the object. To use selectors without parameters, for example, @selector(action), pass nil as the object.
Notifications
In addition to delegates and target-actions, the iPhone uses yet another way to communicate about user interactions between your model and your view—and about other events, for that matter. Notifications enable objects in your application to talk among themselves, as well as to talk to other applications on your system. By broadcasting information, notifications enable objects to send state messages: “I’ve changed,” “I’ve started doing something,” or “I’ve finished.”
Other objects might be listening to these broadcasts, or they might not. For your objects to “hear” a notification, they must register with a notification center and start listening for messages. The iPhone implements many kinds of notification centers. For App Store development, only NSNotificationCenter is of general use.
The NSNotificationCenter class is the gold standard for in-application notification. You can subscribe to any or all notifications with this kind of notification center and listen as your objects talk to each other. The notifications are fully implemented and can carry data as well as the notification name. This name + data implementation offers great flexibility, and you can use this center to perform complex messaging.
It’s easy to subscribe to a notification center. Register your application delegate or, more typically, your UIViewController as an observer. You supply an arbitrary selector to be called when a notification arrives, in this case trackNotifications:. The method takes one argument, an NSNotification. Ensure that your callback method hears all application notifications by setting the name and object arguments to nil.
[[NSNotificationCenter defaultCenter] addObserver:self
selector:@selector(trackNotifications:) name:nil object:nil];
All notifications contain three data elements: the notification name, an associated object, and a user information dictionary. If you’re unsure what notifications UIKit objects in your application produce, have your callback print out the name from all the notifications it receives—for example, NSLog(@"% @", [notification name]).
The kinds of notification vary by the task you are performing. For example, notifications when rotating an application include UIApplicationWillChangeStatusBarOrientation Notification and UIDeviceOrientationDidChangeNotification.
Make sure you implement the trackNotifications: method (or another callback method whose selector you supplied), which gets called in this case for all program notifications, regardless of name or object. Setting these to nil when listening acts as a wild card.

Note
The recipes in this book use printf and CFShow as well as NSLog. Each debug feedback method has its advantages and disadvantages. The former have the advantage of not printing out the date and time, which results in cleaner output. How you choose to log information is strictly a matter of taste. There are no wrong or right ways to put print statements into your program. See Chapter 3 for more details about logging information.
Model
You’re responsible for building all application semantics—the model portion of any MVC app. You create the callback methods triggered by your application’s controller and provide the required implementation of any delegate protocol. For relatively simple programs, model details often are added to a UIViewController subclass. With more complex code, avoid shoehorning that implementation into a UIViewController. Custom-built classes can better help implement semantic details needed to support an application’s model.
There’s one place that the iPhone SDK gives you a hand with meaning, and that’s with data sources. Data sources enable you to fill UIKit objects with custom content.
Data Sources
A data source refers to any object that supplies another object with on-demand data. Some UI objects are containers without any native content. When you set another object as its data source, by assigning its dataSource property (preferred) or via a call like [uiobject setDataSource:applicationobject], you enable the UI object (the view) to query the data source (the model) for data such as table cells for a given UITableView. Usually the data source pulls its data in from a file such as a local database, from a Web service such as an XML feed, or from other scanned sources. UITableView and UIPickerView are two of the few Cocoa Touch classes that support or require data sources.
Data sources are like delegates in that you must implement their methods in another object, typically the UITableViewController that owns the table. They differ in that they create/supply objects rather than react to user interactions.
Listing 1-2 shows a typical data source method that returns a table cell for a given row. Like other data source methods, it enables you to separate implementation semantics that fill a given view from the Apple-supplied functionality that builds the view container.
Listing 1-2 Data Source Methods Fill Views with Meaningful Content

Objects that implement data source protocols must declare themselves just as they would with delegate protocols. Listing 1-1 showed a class declaration that supports both delegate and data source protocols for UITableViews. Apple thoroughly documents data source protocols. You find this documentation in Xcode’s Documentation window (Help > Documentation).
The UIApplication Object
In theory, you’d imagine that the iPhone “model” component would center on the UIApplication class. In practice, it does not, at least not in any MVC sense of the word model. In the world of the Apple SDK, each program contains precisely one UIApplication instance, which you can refer to via [UIApplication sharedInstance].
For the most part, unless you need to open a URL in Safari, recover the key window, or adjust the look of the status bar, you can completely ignore UIApplication. Build your program around a custom application delegate class that is responsible for setting things up when the application launches and closing things down when the application terminates. Otherwise, hand off the remaining model duties to methods in your custom UIViewController classes or to custom model classes.
Note
Use [[UIApplication sharedInstance] keyWindow] to locate your application’s main window object.
Uncovering Data Source and Delegate Methods
In addition to monitoring notifications, message tracking can prove to be an invaluable tool. Add the following snippet to your class definitions to track all the optional methods that your class can respond to:
Summary
This chapter introduced you to the iPhone SDK, the developer portal, and the iPhone application. You saw how to choose a developer program and how to create provisions. You explored typical iPhone applications, from projects and source files to the application end product and learned about design limitations that should influence your development. Here are a few thoughts you may want to take away with you before leaving this chapter:
• Most developers end up choosing the $99/year standard iPhone developer program. This is the best, most general program to sign up for as it allows you to test on real devices and gives you access to the App Store.
• There are significant differences between each iPhone and iPod touch platform. Make sure your applications understand those differences to provide the best end-user experience.
• Developing for mobile platforms is not the same as developing for desktop systems. Keep this cardinal rule in mind: Fingers big, screen small, attention span short.
• The iPhone application bundle is much simpler and less structured than its Macintosh brother although it shares many common features such as Info.plist files and .lproj folders.
• If you come from a Cocoa background, you’ll be prepared, if not overprepared, to create iPhone applications. Familiarity with Objective-C and Cocoa best practices will put you on a firm development footing.
• If you’re more comfortable using C++ than Objective C, Apple has made it possible to create hybrid projects that leverage your C++ expertise with a minimum of Objective-C overhead.