
Chapter 1. Optimizing Your System and Final Cut Pro
The best way to prevent problems and to achieve maximum efficiency in Final Cut Pro is to set up your system properly. In this chapter, you’ll learn how to organize your projects like a pro. Next, we’ll walk through key preference settings. I’ll also provide media management guidelines for maximizing your storage space.
Then, before we jump into the program itself, you’ll learn how to monitor your hardware, explore playback options within the Timeline, and learn key troubleshooting tips to keep everything running smoothly.
These Power Skills will make a world of difference at keeping you and your system editing quickly and smoothly.
Organizing Your Files
You can store files anywhere, but here’s a system that’s both easy and sensible.
Final Cut Pro is designed so that you can store project files anywhere, but the media that goes into the project needs to be stored and not moved once you’ve put it in your project. Here’s a system that has worked well for thousands of editors. I’ve modified this slightly to account for the proliferation of servers and external RAIDs.
Final Cut Pro uses two basic types of files: media files that play back natively and files that need to be rendered in order to play back. Media files include video and audio. Files that require rendering include Motion and LiveType projects, Photoshop documents, still images, and so on.
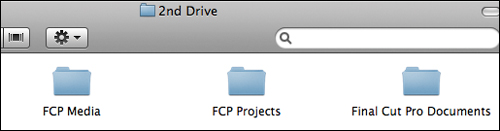
Consequently, I create three folders on my system, with very specific names:
• FCP Projects
• Final Cut Pro Documents
• Final Cut Media
The FCP Projects folder can be created and stored anywhere. (I used to suggest keeping this on the boot drive, but it makes more sense to move this over to a second, media drive. The precise location of this folder—boot drive, server, or media drive—is not particularly important.) In this folder, store all the files related to your project that don’t contain timecode. (This includes Final Cut Pro, Motion, Soundtrack, and LiveType project files, other audio clips, still images, Photoshop documents, and so on.)
The Final Cut Pro Documents folder you create and store is only on separate media drives, never the boot drive. This is the folder you point scratch disks to within Final Cut because this is the folder it uses to store all media and render files.
The Final Cut Media folder is new. As we increasingly move to tapeless media or creating files in After Effects for Final Cut, we need a place to store those files. That’s what I use this folder for.
In the Project and Media folders, you can create whatever subfolders are needed to help you organize projects. I leave the contents of the Documents folder alone.
Back Up, Back Up, Back Up
The worst words you will ever hear are “You’ve lost all your data.”
No one ever believes me when I tell them to work out a backup strategy before they start capturing their first piece of media—that is, until they erase that one critical shot they need for their project. Then, they turn into believers.
Extra Credit
RAIDs (Redundant Array of Inexpensive Drives) are becoming increasingly affordable for video editing. Keep in mind that low-cost RAID 0 devices are very fast and inexpensive; however, they do not provide any protection in the event of a hard disk failure. RAID 5 devices, though they cost more, provide high-speed data access with the ability to restore your data in the event you lose one drive. RAID 6 devices do everything a RAID 5 device does, plus they can restore your data in the event you lose two drives at the same time. Keep this in mind as you plan your own backup strategy.
Especially today, as we move out of tape into tapeless media, backups become even more critical because you no longer have your source tapes to return to.
Here are three suggestions to consider as you create your own backup system:
1. Use the Autosave Vault built into Final Cut and be sure it stores its files to a different drive from the one you use for your project files.
2. Make backups of your project files daily. I tend to make daily backups to a separate hard drive and weekly backups to CD.
3. Make sure your media files are stored in at least two different physical places. Hard disks are the best choice for media backups during a project, but should not be used for long-term archival storage.
Note
A quick definition: backups are not archives. A backup is something you do during the production process to guard against accidentally erasing a file. An archive is something you do when the entire project is complete so that you can modify that project at some point in the future. Hard disks are fine for backups. Digital tape (such as Linear Tape Open, or LTO) is a much better choice for long-term archives.
Creating a File-Naming Convention That Works
The key to successful editing is getting, and staying, organized.
There are as many different organizational systems as there are editors—or, at least, it seems like it. As Mark Raudonis of Bunim/Murray Productions said, “If you can’t find a file, you can’t work. Period.”
Extra Credit
When working with tapeless media, create a subfolder in your Final Cut Media folder that starts with the job code, followed by a unique number. That way, all tapeless media can be quickly found and sorted by job code—for instance, JM01_Card01.
Or, as John Gallagher, a reader of my newsletter, wrote: “When it comes to my physical possessions, clothes, etc., I’m really quite messy, but on my computer I tend to be a bit more anal and I just can’t stand badly made filenames.”
When I get a new project, I create a job code consisting of four characters. First are two letters for the client code (i.e., Just-a-Moment Productions becomes JM) followed by two numbers (i.e., their first job becomes 01). Thus, JM01 is the code for the first job for Just-a-Moment Productions.
I put the job code at the beginning of every Final Cut, Motion, or Soundtrack project file. I also use it as the start of every graphic or Photoshop document filename. That way, if I ever wonder where a file has gone, I only need to search for the job code.
Tapes or cards get labeled similarly—starting with the job code followed by _01. The underscore separates the tape number from the job code. Tapes are labeled sequentially in the order they’re shot. If I’m doing multiple camera work, I add A, B, C... at the end to indicate the camera position: Left = A, Center = B, or Right = C.
Finally, when capturing clips for scripted shows, I identify the clip based on scene and take. However, since most of my work is for documentaries, I always label each clip where someone is talking starting with their last name. That way, I always know who’s speaking—even when I leave a project for a while, because the speaker’s name is part of the clip name.
Setting Your Scratch Disk
Scratch disks are critical to Final Cut Pro working reliably.
The Scratch Disk is where Final Cut Pro stores your media. To get the performance and reliability you need from Final Cut, it’s important to properly set up a scratch disk to store your media.
Note
Never use a USB drive for a scratch disk. It isn’t fast enough. PCIe connections are the fastest, followed by eSATA, FireWire 800, then, finally, FireWire 400.
First, and most importantly, this disk needs to be a separate drive from your boot disk. It can be an internal, or external, drive but it must be a separate drive.
Create a folder named Final Cut Pro Documents on each drive you want to use to store media.
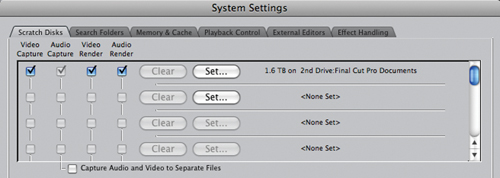
Select Final Cut Pro > System Settings, then select the Scratch Disk tab and “point” the scratch disk to the Final Cut Pro Documents folder you just created using the Set command at the top of the screen.
Note
Don’t partition the boot drive to create a scratch disk. A partition is slower than a dedicated drive and, even if you do partition the drive, the boot drive is the worst place to put it.
If you’re using multiple drives to store media, Final Cut automatically records media to the drive that’s the emptiest. This keeps your media stored evenly across all your drives and decreases playback demands on any one drive.

Scratch Disks Are Not Project Based
Final Cut Pro’s media is system based, not project based. Here’s what you need to know.
Probably the most requested feature that Final Cut Pro doesn’t support is allowing us to change scratch disks when we change projects. However, in Final Cut Pro 7, this is still not an option.
Note
Many editors, in an effort to get around this limitation of Final Cut Pro, try to switch scratch disks between projects. The problem with this approach is that Final Cut Pro changes the folders to which it writes media based on whatever project is active in the Browser. As you switch projects, it invisibly switches folders. This often means you are storing media and render files where you don’t expect, causing problems with media going offline later.
Final Cut expects you to set your scratch disks once, then leave them alone. It stores all your media inside those scratch disks in folders named after each project. As soon as you start changing scratch disk locations, there’s a really good chance some of your files will start going offline because Final Cut Pro can’t find them.
So, the workflow is simple:
• Set your scratch disks once and never change them.
• When you create a new project, immediately save it and give it a name.
• Final Cut Pro stores all your media, video render files, audio render files, and related media in folders inside your scratch disks. Specifically, captured or ingested media is stored in a subfolder that is named after your project and stored inside the Capture Scratch folder.

Why Store Media to a Second Drive?
It’s all about speed and reliability.
The boot disk has many masters to serve.
The first priority, above all others, is the operating system. When the OS has a question, or needs data, everything else waits while the heads of the hard disk go off to find it.
Note
In a crunch, you can store media to your boot drive. Just remember that this is not the best place for it and will often lead to dropped frames during capture or editing.
The second priority, after the operating system, is the foreground application.
After that come background applications.
After that comes data.
But what do we need to play, megabyte after megabyte, minute after minute? Right. Data. However, it has a priority level down near dirt.
Note
You tell Final Cut the location of your Scratch Disk by selecting Final Cut Pro > System Settings > Scratch Disk tab.
So, to solve this problem, we move all our speed-critical media to a second drive—either internal or external.
Now, while the boot drive is going nuts meeting the needs of the OS and applications, our second drive can focus on meeting the playback needs of our media.
Extra Credit
In a server-based editing environment, it’s often a good idea to minimize network traffic to set render files to a local hard drive, while allowing media files to be captured to a network drive. This provides really good editing performance while minimizing network bandwidth. The only problem with this approach is that render files are stored locally and aren’t accessible to other computers on the network.
Configuring System Settings
Of all the preference settings in Final Cut Pro, these are the most important.
There are three preference settings windows in Final Cut Pro:
• Final Cut Pro > System Settings configures Final Cut to work with your computer.
• Final Cut Pro > Audio/Video Settings configures Final Cut to work with your AV gear.
• Final Cut Pro > User Preferences configures Final Cut to work with you.
Of these three, the most important is System Settings.
Final Cut supports up to 12 scratch disks. However, if you need that much storage, you are much better off purchasing a RAID. FireWire is a very chatty protocol. If you connect more than about five FireWire drives, they spend more time talking to each other than transferring data.
In the Final Cut Pro > System Settings window, select the Scratch Disk tab. Here, you set scratch disks in the top of the window.
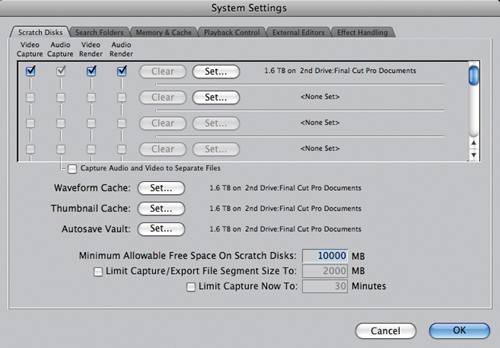
Then, in the middle of the System Settings window you set the location of some technical files. While these can be stored anywhere, I recommend storing them to your first scratch disk. This tends to be both the biggest and the fastest hard drive on your system.
Finally, at the bottom, change the first number, Minimum Allowable Free Space, to 10000. Hard disks slow down as they fill up. This means that you are always keeping 10 GB (10,000 MB) of free space on each scratch disk.
Note
This 10 GB limit has a variety of subtle effects. If you don’t have a minimum of 10 GB of free space, Final Cut Pro won’t capture, won’t ingest, won’t render, won’t export, and won’t print to video. If, during one of these processes, your hard disk exceeds this limit, Final Cut Pro will stop and warn you. In that case, delete some files to make more room so you can continue.
Configuring User Preferences
These preferences tell Final Cut Pro how you want to work.
The A/V settings configure Final Cut Pro to work with your cameras, decks, and tapeless media. Most of the time, the presets are fine. However, these change so quickly it’s impossible to cover them in a book. A much better source is Apple’s support Web site (www.apple.com/support).
Extra Credit
If you’re using a FireWire 400 drive as your scratch disk, select the Limit Real-Time Video option and set it to 22 MB/s. If you’re using a FireWire 800 drive as a scratch disk, set this to 45 MB/s. For any other type of drive, leave this setting off.
There’s one other preference window you need to configure: User Preferences.
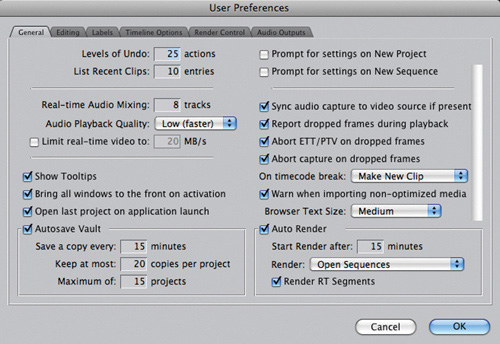
The screenshot below shows how I set my system up. While I like the settings for all the check boxes, I dislike the numbers. So here’s how I change them.
Final Cut supports up to 99 levels of Undo, but this takes too much memory. A setting of 25 levels of Undo provides a good balance between security and memory.
Autosave Vault is the backup system for your projects. These settings mean it saves every 15 minutes, and keeps the 20 most recent backups from each of the 15 most recent projects.
Auto-Render means that Final Cut Pro will automatically render all open sequences starting 15 minutes after you stop moving the mouse or typing on the keyboard. The best way to enable Auto-Render is to move Final Cut to the background while you work on something else.
FireWire Tips
FireWire drives slow down your system if you don’t pay attention. Here’s what to watch for.
Here are some tips for maximizing performance when using FireWire drives:
• A FireWire drive should have at least an 8 MB cache, spin at 7,200 RPM or faster, and use an Oxford chip for data.
• FireWire is very “chatty.” The more drives you attach, the more they talk to each other and the less data they transmit. My general rule is to attach no more than five FireWire drives to a system.
• For optimal performance, try not to let hard drives get more than 80 percent full. The emptier they are, the faster they go.
• Keep the total length of all FireWire 400 cables to less than 15 feet (5 meters). Longer cable runs have been known to corrupt data.
• Unless you add a separate FireWire card to your system, all FireWire devices are bussed. This means that the speed of all your FireWire devices is determined by the slowest device plugged in—typically, a camera.
• Connecting a FireWire 400 drive and a FireWire 800 drive into the same computer, either directly or looped through each other, cuts the speed of the FireWire 800 drive almost in half.
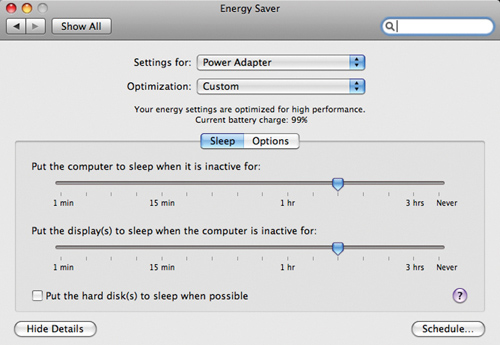
• Turn off sleep mode by clicking the Apple icon, choosing System Preferences, and clicking Energy Saver. Hard disks love to spin and last longer that way, too. For fastest system performance, don’t force them to go to sleep.
• When formatting a hard drive, turn journaling on for your boot disk and off for any hard drive you plan to use for capturing media. Journaling slows media drives down.
Connecting a FireWire Deck After Starting Final Cut Pro
Here’s how to tell Final Cut that you’ve connected a deck or camera.
Normally, you should turn your FireWire camera, or deck, on before starting Final Cut. That way, Final Cut Pro connects to it automatically during launch. However, if you forget, here’s what you need to do to get Final Cut Pro to recognize it:
1. Select View > External Video > Refresh A/V Devices.
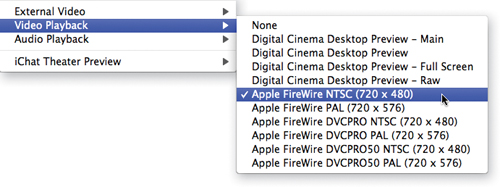
2. Select View > Video Playback and set the device you just turned on.
Note
When Final Cut Pro starts, it checks to see if a FireWire deck is attached. If it doesn’t find one, Final Cut Pro turns off all FireWire input or output for media, which is why we need to go through this procedure.
3. Select View > Audio Playback > Audio Follows Video, and remember to always monitor audio and video at the same point to avoid sequences sounding out of sync when they aren’t.
4. Select View > External Frames > All Frames. This sends video and audio to your external device. This includes monitoring, capturing, and output to tape.
Extra Credit
If you don’t have an external video monitor, you can select View > Video Playback > Digital Cinema Desktop Preview to turn your main computer monitor into a video monitor. This technique simply makes the picture bigger; you cannot use your unmodified computer monitor for making color or contrast decisions.
5. To test whether you have a good connection, open the Log and Capture window to make sure the “VTR OK” message appears below the Preview window.
Now your deck is good to go.
Trashing Final Cut Pro Preferences
5 Rules to Trashing Preferences
Final Cut Pro is a very stable program. But, sometimes, it gets confused. Really confused. In that case, the best way to fix it is to trash its preference files.
Note
There are some great Final Cut Pro preference management programs, which you’ll learn about in a few pages.
There are five rules to trashing your Final Cut Pro preferences:
1. Never trash preferences if Final Cut Pro is working properly. Trashing preferences is never needed for maintenance. Never trash preferences “just in case”—only trash them when Final Cut is broken.
2. Only trash preferences after quitting Final Cut.
3. Always trash all preference files as a group. There are four of them and they are linked; don’t just trash one or two.
4. Only trash files; never trash folders.
5. Always empty the trash when you are done.
Trashing Your Preferences
Trashing preferences is a repair procedure. Here’s what you need to do.
If you’re experiencing Final Cut Pro weirdness or performance issues, try trashing your preferences. Sometimes these files become corrupted and Final Cut Pro loses stability or starts displaying strangely.
To trash your preferences:
1. Close Final Cut Pro by choosing Final Cut Pro > Quit.
2. Open your Home directory (press Command+Shift+H).
3. Go to [home directory]/Library/Preferences.
Note
Be forewarned: when you trash preferences, you’ll lose all Favorite motions, transitions, and effects; the list of recently opened projects; and any custom window/button arrangements that weren’t saved to disk.
4. Trash the file com.apple.FinalCutPro.plist.
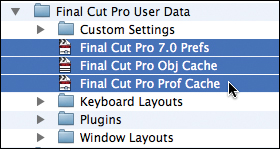
5. Scroll down to the Final Cut Pro User Data folder.
If you’re using Final Cut Pro 7.x:
6. Trash the file Final Cut Pro 7.0 Prefs.
7. Trash the file Final Cut Pro Obj Cache.
8. Trash the file Final Cut Pro Prof Cache.
9. Empty the trash.
If you’re using Final Cut Pro 6.x:
6. Trash the file Final Cut Pro 6.0 Prefs.
7. Trash the file Final Cut Pro Obj Cache.
8. Trash the file Final Cut Pro Prof Cache.
9. Empty the trash.
Preserving Final Cut Pro Preference Files
You can preserve or manage preference settings using this software.
The Achilles heel of Final Cut Pro is its preference files. While Final Cut is getting more and more stable with each version, these files still tend to become corrupted on a regular basis. And the only fix is to delete them and start over.
Note
Don’t back up preferences until you’ve created clean files. Otherwise, you’ll never know if you are backing up good, or bad, preference files.
A variety of third-party preference managers are available to help you manage the process. I’ve used all of these at one time or another and happily suggest them to you:
• Digital Rebellion’s Preference Manager (www.digitalrebellion.com/pref_man.htm)
• Reinphase’s Final Cut Pro Manager (www.reinphase.com/en)
• Chesapeake Systems’ FCP Attic (www.versiontracker.com/dyn/moreinfo/macosx/32852)
• EditGroove Software’s UserMatic (www.editgroove.com)
Here’s a secret: Final Cut Pro saves revised preference settings to disk only when you quit the program. So, if you’re planning to create backups of your preferences, trash them first. Then, go through and create all new settings for everything. Then, quit Final Cut Pro (which updates all your preferences with your revised settings). Since the preferences are brand new, they won’t be corrupted. And since you customized them, they’re exactly the settings you want to restore in the event of a disaster.
Get Started Faster
Final Cut Pro has two secret ways to start up faster.
Normally when you start Final Cut, the application launches, loads the last saved project you were working on, and displays the sequences you were working on when you last saved the file. This can be very helpful. However, you can override this behavior by holding down the Shift key while clicking the Final Cut Pro icon in the Dock. (Clicking the icon in the Dock is the only way this works.) Final Cut starts but doesn’t load any projects. This is a great trick to keep in mind if the last project you were working on takes a long time to load, if you’re having problems with corrupted projects, or if you edit a project only once.
Now, with Final Cut Pro 7 there’s a second secret key: Option.
Normally, when you save your work and quit with a lot of sequences open in the Timeline, they all reopen in the Timeline when you restart Final Cut Pro.
However, if Final Cut Pro hasn’t yet started, click to open a project file, then immediately hold the Option key. This opens Final Cut without opening any sequences into the Timeline.
This can often save you time by allowing you to select the specific sequence you want to work on.
Automatically Launch Final Cut Pro During Startup
You can use this to launch any application when you start your computer.
Here’s a fast, automatic way to start Final Cut—or any application—at the same time you start your computer (or when you log in):
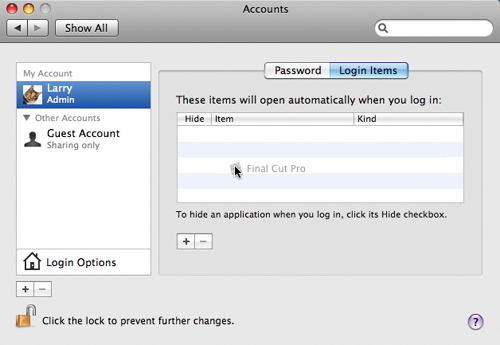
1. Select Apple > System Preferences and click the Accounts tab in the Preferences window.
Note
Another way to do this is to Control-click the Final Cut icon in the Dock and select Open at Login.
2. Click the Lock icon (in the lower-left corner) to unlock this panel; if necessary, enter your password.
3. Select the Login Items tab and drag the icon for Final Cut Pro (or any other application or file you want to open when your computer starts up) into the window on the right. From this point on, Final Cut Pro will launch whenever you start up your computer.
Extra Credit
To stop a file from launching during startup, simply remove it from the list in this window.
The Benefits of Save As
Save As does more than let you change the filename.
Did you know that Save As not only allows you to create a file with a new name, it also fixes internal errors that may be creeping into your Final Cut Pro project? The command also compacts the file, thus removing unneeded internal pointers.
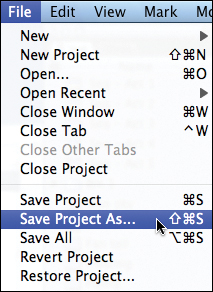
From time to time, make sure you select File > Save Project As, give your project a new name, and save it. It’s a good idea to use Save As on all your longer-term projects, say every 2 to 3 days.
Keep Project Size Down
Final Cut Pro does not like really large projects. Here are tips to reduce file size.
Most of the time, Final Cut Pro works fine. However, if navigating around the Timeline starts getting sluggish, you may need to take some preventive measures.
Extra Credit
Project files are generally small. If your project file starts to balloon over 100 MB in size, it runs the risk of corruption. To prevent this, immediately do a File > Save As to make a protection copy of your sequence. Then, open the copy and remove as many clips from the Browser as you can to help reduce file size. Once a project file corrupts, it is extremely hard to fix.
As your Final Cut project grows in size, certain editing functions can slow down. This is normally the result of having too many clips (generally too many clips in the Timeline), using clips with extremely long durations, or using subclips created from clips with very long durations.
To avoid potential performance issues, try dividing long, complex sequences into shorter sequences, and load only the clips for that act into that project.
Also, try capturing in smaller blocks. Long clips can sometimes be a problem, so break a 1-hour tape into shorter blocks, if possible.
Keeping down the clip count and clip duration should help keep Final Cut running smoothly.
Understanding the RT Menu
There’s RT (real-time) and there’s Unlimited RT. Here’s how to choose.
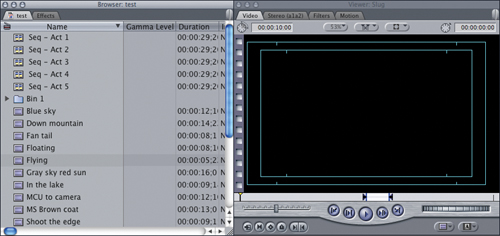
Tucked into the top-left corner of the Timeline is the RT menu. What the heck does this menu do?
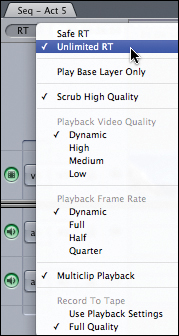
By default, Final Cut Pro plays your images at the highest possible quality during editing; this is the “Safe RT” setting.
Note
Final Cut Pro always outputs your images at the highest quality; whether to a tape or a file. Here, we are just talking about playback quality during editing.
The benefit of Safe RT is that you always see your images at the highest possible image quality and frame rate, but the trade-off is that more effects need to render.
When you change this setting to Unlimited RT, you are giving Final Cut permission to lower the image quality during editing playback so that it can play more effects in real time.
This is similar to a concept in After Effects, where you can watch your comp instantly in low quality or, after rendering, see it in high quality.
Note
To work its magic, Unlimited RT does not display everything you have applied to a clip. For instance, it does not display drop shadows, soft or color borders to wipes, or other elements that require heavy processing.
Once you set this menu to Unlimited RT, you can then specify what you want Final Cut to alter: image quality or frame rate.
The Dynamic setting means that Final Cut Pro will alter the image quality or frame rate “dynamically,” that is, on the fly, during playback. If all you’re doing is viewing a clip with no effects, it will play back in high quality. If you’re viewing a multilayer extravaganza with 8 billion effects, Final Cut Pro will lower image quality or frame rate, or both, until it is able to play that portion of the sequence in real time.
Extra Credit
For successful multiclip editing and playback, setting this menu to Unlimited RT is essential.
Most of the time, setting both image quality and frame rate to Dynamic works fine.
File > Revert vs. File > Restore
Final Cut Pro has a built-in autosave function, but you have to turn it on.
There are two ways you can move back to a previously saved version of your project: File > Revert Project and File > Restore Project.
How do you decide which to use?
Revert Project takes you back to the last time you saved your project. You control when and where your project is saved. You also determine what it’s called. Using Revert Project means you will lose all changes since the last time you saved your file. Revert Project is a good option when you want to return to the last version of your project.
Extra Credit
If you have a corrupted project, you can also use Restore Project to find an earlier copy of your project that works.
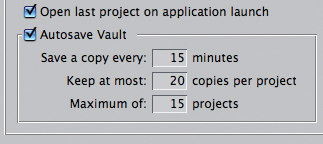
Restore Project takes you back to the last time Final Cut saved your file. Final Cut Pro has a built-in backup system called the Autosave Vault. However, you need to turn it on before you can use it. To do so, choose Final Cut Pro > User Preferences, select the General tab, and make sure the Autosave Vault option is checked.
Generally, I store the Autosave files on a hard disk separate from where I store my project files. That way, if something happens to my project hard disk, I don’t lose both. Also, I suggest you change the default settings to:
• Save a copy every 15 minutes
• Keep at most 20 copies per project
• Maximum of 15 projects
Then, if you forget to save your project and your computer crashes, you can get your project back by choosing File > Restore Project. Up pops a dialog box allowing you to select which version you want to open.
Using Render Manager
Here’s a great tool for recovering lots of hard disk space.
As long as you don’t change the location of your scratch disks, the Render Manager does a great job of tracking your render files.
Note
There is no Undo with this tool. So be careful to select the correct project and render files.
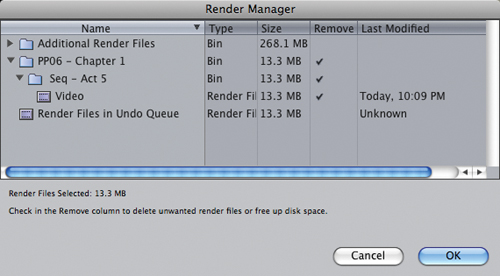
To use this tool, select Tools > Render Manager. The Render Manager window usually has three folders in it: one for the current project, one for all other projects, and Constant Frames, which Final Cut needs. (You may also see render files stored in the Undo Queue.)
Click the disclosure triangle next to the Additional Render Files folder (earlier versions of Final Cut Pro called this folder Additional Projects) to see all projects that have render files. Even if a project is no longer active, its render files probably still exist, taking up valuable hard drive space.
Click the disclosure triangle next to the current project file to see that render files are separated first into sequences, then into audio and video render files.
Don’t mess with the Constant Frames folder. It is quite happy being left alone.
To delete render files, click in the Remove column. Final Cut lets you delete render files by type (audio or video), sequence, or project. When you select a file to delete, the total amount of recovered space is shown in the lower-left corner.
Click OK to delete the files.
Monitoring Your System
Activity Monitor helps you keep an eye on your system.
Curious to see how hard your processors are working, how much memory your applications are using, or how fast your hard disks are transferring data? Well, you can find all these answers in one place.
Choose Applications > Utilities > Activity Monitor. (A fast way to get to the Utilities folder is to press Command+Shift+U).
If the Activity Monitor window does not appear, press Command+1.
While there are five tabs along the bottom, these three are the most useful:
1. CPU indicates how hard your processors are working. Green dots indicate the amount the CPU is working on your processes, red dots indicate the amount the CPU is working on operating system processes, and black is where the CPUs are kicking back by the side of the pool and waiting for something to happen.
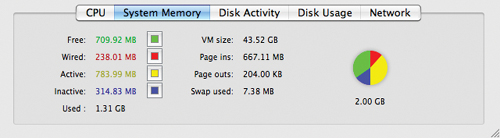
2. System Memory displays four memory states:
• Wired is memory reserved for, and in use by, the operating system.
• Active is memory reserved for, and in use by, applications you have started.
• Inactive is memory reserved for, but not in use by, applications you have started.
• Free is memory that is not being used.
If this graph is principally green and blue, you have plenty of available RAM. If it’s principally red and yellow, adding more memory may help. (Keep in mind that Final Cut [even Final Cut Pro 7] can only access 4 GB of RAM.)
3. Disk Activity shows how much data is being read (green) and written (red) to your hard disks. This is a fast way to measure hard disk speed, especially if you’re getting dropped frame errors.
Isn’t it nice knowing these things?
Getting F-key Shortcuts to Work
Final Cut has wonderful F-key shortcuts for editing—none of which work.
Probably the most helpful keyboard shortcuts that Final Cut has are F9 and F10, which quickly perform an Insert, or Overwrite, edit. The only problem is, they don’t work. That’s because the operating system uses F9 and F10 for things like adjusting audio levels or monitor brightness. Useful, I’m sure, but not to me.
You have two options: change Final Cut Pro or change the OS. Since we know which is the most important application here, we are going to change the operating system shortcuts.
To do so, select Apple > System Preferences > Exposé & Spaces. (OS X 10.4 users should choose the Dashboard & Exposé preference.)

Click the Exposé tab. Then, while pressing the Control key, reset the pop-up menus for
• All Windows to Control+F9
• Application Windows to Control+F10
• Desktop to Control+F11
• Dashboard to Control+F12
What you’ve done is remap (change) the keyboard shortcuts so they no longer conflict with Final Cut Pro. To call up Dashboard, you now press Control+F12 rather than just F12 by itself.
Note
Using Control instead of another modifier key avoids conflicts with other Final Cut keyboard shortcuts.
Getting Function Keys to Function
By default, the F-keys on your keyboard don’t do what you expect.
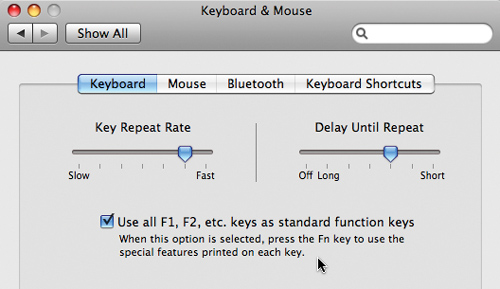
Eric Mittan recently e-mailed me about a problem he was experiencing and the solution he came up with. Eric pointed out that on the newest models of Apple’s Aluminum and wireless Aluminum keyboards, F9 is assigned to Forward as a media player control button and F10 is assigned to Mute.
Note
The Keyboard and Trackpad window changes depending on your computer and keyboard. Yours may look different.
Eric wrote, “Now while you can certainly make the argument that a ‘real’ editor should go out and get themselves a ‘real’ keyboard, I also think that the budget-minded editor should be able to use the best features of Apple’s hardware right out of the box.”
So, Eric explained, you choose System Preferences > Keyboard and Mouse and click the Keyboard tab. Make sure the “Use all F1, F2, etc. keys as standard function keys” check box is selected—this makes F9 and F10 work in Final Cut Pro again.
Extra Credit
So, how do you use volume controls? Turning on this function disables the functionality of all your volume control buttons, not just F10. Note that there is a function modifier key labeled fn on the new keyboards. On the wireless aluminum keyboard it’s in the lower-left corner of the keyboard next to Control. On the wired aluminum keyboards, it’s just under F13, next to Home and above Forward Delete. Press this key in addition to F10, F11, and F12, and your volume keys will function as they did before.