
Chapter 7. Transitions and Effects
Let’s face it. The fun of editing is in creating transitions and effects. That’s not to say the rest of the process is dull and boring, but nothing adds spice and interest to a project like the perfect effect at the perfect time.
The problem is, creating those effects can take forever!
In this chapter, you’ll learn dozens of techniques you can use to simplify, speed up, or simply supply special sizzle to your sequences. (And I’ll try to do it without applying any more awful alliteration.)
It... Just... Won’t... Fade...!
Make a clip completely fade to black at the end of a sequence.
Final Cut Pro is a very helpful program. Whenever it sees a gap between two clips, it assumes that you want to fill that gap with black. So, it cheerfully—and invisibly—fills any gap with TV-safe video black, audio black, and timecode.
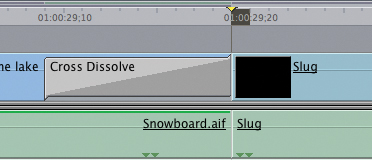
However, the rules that Final Cut follows tell it to fill gaps only when there is a clip on either side of the gap. This is not the case when you reach the end of a sequence. Since this is the last clip, Final Cut doesn’t know what to do—so it does nothing; it just parks on the last frame. This means that if you are fading to black, the fade almost reaches black... but not quite. There’s still a trace of the last image lingering in the Canvas. And it lingers. And it lingers... all because the playhead stops one frame too early.
Note
If you want, you can dissolve between the last clip and the slug. But it isn’t necessary. You’ll achieve the same effect by simply editing the slug so it’s the next clip after the transition. And editing the clip is faster.
Here’s how to fix this never-ending fade:
1. Put your playhead at the end of the last clip.
2. In the Viewer, open the Generator menu (the icon has the letter A on it) in the lower-right corner of the Video tab and select Slug.
Note
Slugs are also a great way to add black leader to the end of your program when you lay it back to tape. I recommend using 60 seconds of black slug.
3. Change the slug length to anything that seems appropriate. For example, if this is video you’re laying off to tape, you might set the duration to 60 seconds. If this is a video for the Web, you might use one second.
4. Edit the slug to the Timeline immediately after the transition.
Ta-da! A perfect fade to black.
Apply the Default Audio and Video Transition Simultaneously
Why click twice when you can click once?
Normally, to apply the default video transition, you select the video edit point and press Command+T. Then, you select the audio edit point and press Option+Command+T.

Great... twice the work to add one transition. However, here’s a simple trick for applying both the default video and audio transitions to all selected edit points at the same time:
1. Select the edit point either by Command-clicking each or by drawing the Edit Selection tool (press G) around the edit points you want to select.
Note
This trick applies to any selected edit points, including clips that aren’t linked or that are on multiple tracks.
2. Control-click the edit point and select Apply Transition “Cross Dissolve” from the contextual menu.
Two for the price of one!
Setting the Default Transition
Here’s an easy way to modify the default transition.
By default, the standard video transition is a 1-second cross-dissolve and the standard audio transition is a 1-second cross-fade +3 dB. Personally, I like both these transitions, but I don’t like either of these durations. For my taste, the video transition is too long and the audio transition is way too long. Here’s how to change them—quickly!
1. Click the Effects tab in the Browser to open it.
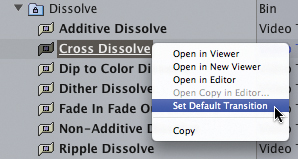
2. Open the disclosure triangle next to Video Transitions and click a triangle to open a bin; for example, the Dissolve bin. The current default transition is underlined.
Note
My favorite video transition is 20 frames. My favorite audio transition is 5 frames. By the way, audio transitions often sound better if their duration is an odd number of frames.
3. Select the transition you want to make your new default.
4. Change the length, if needed, by scrolling right a few columns in the Browser and double-clicking in the Length column for that transition and entering the duration you prefer.
Extra Credit
The same procedure works for changing the default audio transition, except you set the selected audio transition using Effects > Audio Transitions > Set Default instead.
5. Control-click the name of the transition and select Set Default Transition, or choose Effects > Video Transitions > Set Default.
See how this underlines the name of the transition you chose? This indicates your new default!
Creating an Alpha Transition
This new effect uses a third video to transition from one shot to the next.
Normally, when you dissolve or wipe from one shot to the next, a total of two video elements are used: the old shot and the new shot.
In Final Cut Pro 7, however, Apple has added a new transition called an Alpha Transition, which can create some cool new effects. (By the way, the term alpha simply refers to transparency. Just as the Red channel describes how much red each pixel contains, the Alpha channel describes how transparent each pixel is. Apple could have called it the transparency channel—but they didn’t.)
Here’s how it works:
1. Select the video edit point.
2. Choose Effects > Video Transitions > Wipe > Alpha Transition. The transition is applied to the selected edit point.
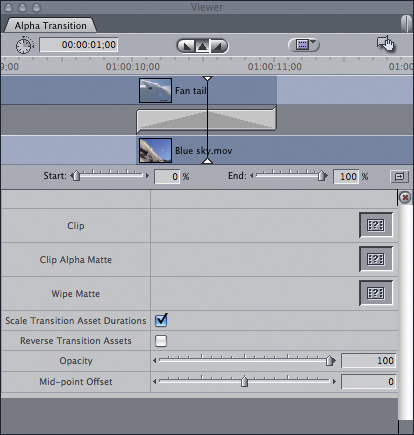
3. Double-click the transition icon in the Timeline to load it into the Viewer.
Extra Credit
The transition between shot 1 and 2 happens in the middle of the transition. If you want it to occur earlier or later, adjust the Mid-point Offset slider
4. The Alpha Transition dialog box appears in the Viewer. The top portion is similar to other transitions. The bottom portion, however, has some new goodies:
Clip is where you put the video clip that appears as the foreground of the transition. For instance, let’s say we have a plane flying through the frame. If the clip only contains the image of the plane, it goes in the top box and you need to add a matte to the second box. If the plane clip contains both the image of the plane and an alpha channel, put the video in the top box and leave the other two boxes empty.
Clip Alpha Matte is where you put the matte clip containing the alpha channel; that is, the transparency data about the image in the top box. In our example, this contains an alpha channel with the silhouette of the plane matching the movement of the clip in the top box. The silhouette is opaque; the rest of the frame is transparent. Only clips with alpha channels go here.
The Wipe Matte clip is used when you have a matte with a silhouette, but not an alpha channel. These were used a lot when effects were recorded to video tape. Most of the time, this box will be left empty.
Creating Custom Transitions You Can Reuse
You can create a custom transition once, then use it over and over again.
In projects where you want to use the same customized transition over and over, here’s a fast way to do it. (This tip was first suggested to me by Adam Lloyd Connell.)
Create the transition between two clips in the Timeline and modify it until you are happy. Then, drag the transition icon from the Timeline into the Browser. (You can create an Effects bin to store them in.) Not to worry—the original transition stays put in the Timeline.
Then, whenever you need to use that transition again, just drag it from the Browser to the Timeline.
You could also make the transition a Favorite. However, the problem with Favorites is that everything in the Favorites folder is lost when you trash your Final Cut Pro preferences. By storing the transition in the Browser, you ensure that it’s saved with the project and never gets trashed with Preferences.
Extra Credit
Because you can copy bins from one project to the next, you can easily create a “Favorite transitions” bin in one project, then drag it from the old project to the new project if you need to access the effects.
Applying Multiple Transitions at the Same Time on the Same Track
Introducing a huge new feature in Final Cut Pro 7—with a hidden option.
One of the most requested features from users over the years is the ability to apply multiple transitions at the same time on the same track. With the release of Final Cut Pro 7, that dream has finally become possible.
Note
As with any transition, you need to have handles, extra video, at the ends of all clips to which you want to apply transitions.
Here’s how it works.
Extra Credit
Put your playhead in the middle of the selected clips and select a new transition from the Effects menu; the new transition replaces the old ones!
Select the clips to which you want to add a transition. At this point, you can:
• Press Command+T to apply the default transition to all selected clips.
• Place your playhead in the middle of the selected clips and apply any audio or video transition from the Effects menu.
Extra Credit
If you drag a transition and place it on top of just a single transition, it only changes that one transition. However, you can’t replace all transitions by dragging a new transition to the selected group of clips.
• Drag the transition you want to apply from the Effects tab in the Browser.
You’ll apply the transition to the beginning and end of every selected clip. Very cool—but only the beginning!
If you don’t want the transition at the beginning or end of all the selected clips, set In and Out points. Then transitions are only applied between the In and Out.
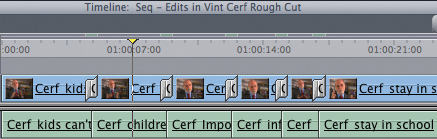
Selecting Multiple Edit Points on Multiple Tracks
Here’s a fast way to select multiple edit points on multiple tracks at the same time.
While you can use the new feature introduced in the previous Power Skill to add multiple transitions, sometimes you just need to select specific edit points, say for some fast trimming. A fast way to select one edit point per track is to use the Edit Selection tool.
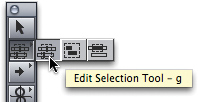
Press G, then drag a rectangular marquee around the edit points you want to select. When you let go, the Trim Edit window opens. You can either adjust your edits in that window, or close the window and adjust them on the Timeline.
Extra Credit
You can also select widely divergent edit points by Command-clicking the edit points you want to select.
I use this technique a lot when I want all the selected edit points to start or end at the same time:
1. Select the edit points you want to move.
2. Put the playhead where you want the edit points to jump.
3. Press E.
Find and Replace Multiple Transitions at Once
This technique can save you a lot of work.
Let’s say you’ve edited a sequence and filled it with transitions. (Christine Steele showed me this tip.)
Let’s say that some of these transitions are the same—in this case, I used a combination of Cross-Dissolves and Cube Spins. The transitions are all different lengths and scattered throughout my project.
Then I woke up one morning and realized that all those Cube Spins looked really dated and I needed to change them to something different—say a Fade in Fade Out Dissolve.
This is easy:
1. Open the sequence you want to change in the Timeline.
2. Select Edit > Find (or press Command+F).
3. Enter Cube (or the first portion of the name of the transition you want to replace).
4. Click Find All.
Final Cut Pro selects all the transitions in the Timeline containing that name—something that can’t be done any other way.
5. From the Effects menu, select the transition you want to use in place of the selected transition.
All selected transitions are replaced by the new transition, which also inherit all the old transitions durations and locations.

Another Trick for Applying Multiple Transitions at Once
Impress people at parties with this!
This trick is a fast way to apply the default video, or audio, transition to multiple clips at the same time on the same track:
1. Build a sequence in the Timeline (make sure all your clips have handles).
Note
Unlike the new multiple transition feature of Final Cut Pro 7, this technique can be used by many older versions of Final Cut Pro.
2. Move your playhead to the start of the first clip where you want the transitions to begin.
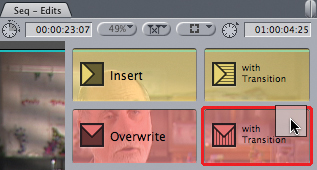
3. Select all the clips to which you want to add the default transition.
4. Drag all the clips up to the Canvas, and drop them on the red Overwrite with Transition overlay.
5. All your clips are immediately edited back to the Timeline with the default video transition (normally a 30-frame cross-dissolve) applied between each clip.
Take a QuickView of Your Effect
The QuickView window is a great way to preview an effect.
While Final Cut continues to get faster with each new version and hardware upgrade, there are times when you are confronted by the dreaded red render bar.
At this point, you have two choices: start rendering, then, while that’s processing, return to that 800-page novel you should now have time to finish, or... use the QuickView window.
I opt for QuickView.
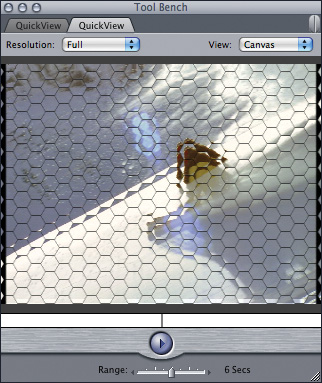
Put your playhead in the middle of the clip that has the effect you want to preview. Select Tools > QuickView. A window opens on top of the Viewer. (By the way, if you want the QuickView window to be bigger, a fast way to do that is to make the Viewer bigger before you open QuickView.)
QuickView plays a range of video from the Timeline, ranging from a default of 2 seconds to a maximum of 10. The first time through, it builds a RAM preview. The second, and succeeding, times through, it plays your effect in real time.
Extra Credit
QuickView centers the current position of the playhead in the window. If the range is set to 5 seconds, it plays 2.5 seconds past the current position of the playhead, then goes back 2.5 seconds before the current position and plays for 5 seconds. Consequently, make sure your playhead is in the middle of what you want to see before opening this window.
Play Unrendered Clips
Of all the keyboard shortcuts in Final Cut Pro, this one is my favorite.
Those dratted red render bars! When your computer is not fast enough to play an effect or transition in real time, Final Cut lets you know by displaying a render bar at the top of the Timeline. Whether the bar is orange or yellow or red, it means that if you want to see your effect perfectly and in real time you need to render.
Extra Credit
Want to see your video play in Frame Viewer? Press Option+P.
Of course, you could simply render the effect by choosing Sequence > Render All or selecting what you need to render and choosing Sequence > Render Selection.
Extra Credit
Want to see if your white levels are OK? Choose View > Range Check > Excess Luma and press Option+P.
Or...
You could use my absolutely #1 keyboard shortcut: put the playhead at the start of what you want to watch and press Option+P. This plays the clip as fast as the computer can calculate the effect, without first rendering the clip. This means that this plays slower than real time.
Extra Credit
Want to see almost anything that doesn’t play in real time? Press Option+P.
If you need to see your effect in real time, you need to render. Most of the time, however, you just want to see your effect. In which case, Option+P can save you hours on every project!
Replace a Clip Without Losing Its Effects
You can add effects to a clip; why not add a clip to an effect?
Generally, when you copy and paste a clip, you want to copy everything associated with that clip—the video image, audio, timecode, as well as any filters and motion effects.
However, sometimes you might want to keep the effects but replace the content of the clip. I ran into this a while ago when I was using freeze frames as transitions between segments. The producer loved the effect—sort of a morphing posterization combined with a text type-on—but naturally he wanted to change the images I was using as the freeze frame.
Here’s how to do it:
1. Select the clip containing the new video.
2. Select Edit > Copy (or press Command+C) to copy it to the clipboard.
3. Select the clip that has the content you want to replace.
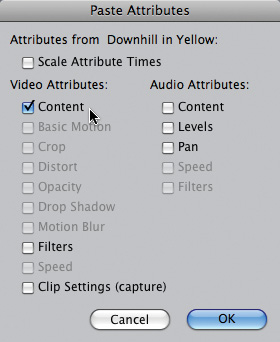
4. Select Edit > Paste Attributes (or press Option+V).
5. Deselect all options except Content.
6. Click OK.
Note
Paste Attributes is an excellent tool when you want to replace some effects attached to a clip, but not everything.
Note
Paste Attributes does not work with any settings that you create or adjust using the Controls tab of the Viewer.
Invisibility Doesn’t Take a Cloak
Green visibility lights are not the best way to make a single clip invisible.
The green visibility lights for each track in Final Cut Pro are useful when you want to toggle a track off or on. However, whenever you change the visibility light for a track, all render files associated with that track are deleted. This could be a problem.

While you can use Undo after changing the status of a track, that assumes you made no changes since you changed the track status. Here’s an often better option:
For video, if you want to make a clip invisible so that you can see what’s below it, Control-click the clip and turn off Clip Enable. You still lose render files, but only those files associated with that clip, and not the entire track. (The shortcut is Control+B.)
To make a clip visible, repeat the same process—Clip Enable is a toggle.
Note
Whenever you change the visibility of a track, you always lose your render files. (Yes, Final Cut will warn you.) This is because render files are associated with the sequence, not the clip, and since you are changing what’s visible in the sequence, the render files need to change.
Note
The green visibility lights control more than just track visibility. When a green light is off, clips on that track do not display on the Timeline, nor do they render, output to tape, or export.
ProRes Enlarges Its Family
Apple increases the ProRes count to five.
All video is encoded using a codec. DV, HDV, XDCAM, and HDCAM are all examples of video codecs. A codec is neither good nor bad—it’s a necessary part of the digital video process.
In the past, codecs have been specific to particular cameras, or formats. With the release of Final Cut Studio 2, Apple introduced a new family of codecs that were not tied to a particular format. Instead, they allowed different—and often incompatible—video formats to be converted into a high-quality common format.
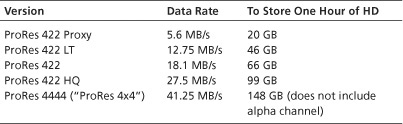
With the release of the latest version of Final Cut Studio, Apple increased the number of ProRes codecs to five, as shown in the following table.
PRORES CODECS IN FINAL CUT PRO 7
All five of these flavors share the same characteristics. They all:
• Compress their images using I-frames, which is better than GOP compression
• Use 10 bits to define their pixels, which is better than 8-bit video found in DV or HDV
• Use variable bit-rate compression, to keep file size down
• Offer a very high image quality
Only the ProRes 4444 version provides alpha channels, which means it can retain the transparency information in a clip. The rest do not.
If you are working with a single video format, ProRes may not be that helpful. But as you start to mix and match between formats, ProRes should definitely be part of your workflow.
Change Codecs to Improve Render Quality and Speed
Changing codecs is important if you are working in HDV, XDCAM HD, or XDCAM EX.
Normally, it’s easier to render your effects and transitions using the same video format you’re editing. In other words, your render format should match your sequence settings. However, for some video formats—for example, those that use a GOP compression scheme—changing render settings can improve quality and allow renders to be completed faster.
Note
Video formats this works for include all varieties of HDV, XDCAM HD, and XDCAM EX. Formats like AVCHD, though GOP-compressed, are converted to ProRes automatically during ingest, so they won’t benefit from this technique.
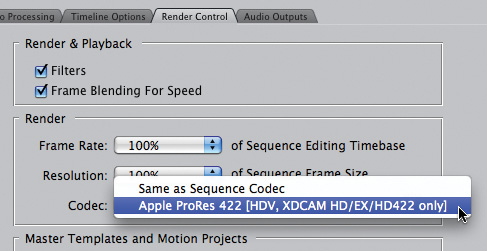
To change your render settings, choose Sequence > Settings and select the Render Control tab. Then, change the Codec pop-up menu to Apple ProRes 422. Render times should speed up over 40 percent!
Note
In my testing, changing the codec has no impact on output or export speed, but will increase render speeds up to 40 percent. Also, ProRes should provide higher-quality effects and transitions.
The one disadvantage to this technique is that your file sizes will be about four times larger than the native format. However, you may decide that the performance gains outweigh this.
Extra Credit
You can make this a permanent setting for all future projects by choosing Final Cut Pro > User Preferences > Render Control. This changes the render settings for all future sequences that you create.
Render Your Sequences Automatically
Auto-Render saves you more time than you might expect.
Wouldn’t it be nice if Final Cut Pro could do its rendering “in the background,” while you’re working in Photoshop, checking your e-mail, or updating your accounting? It can and here’s how.
Auto-Render is essentially a timer that tells Final Cut Pro to do something when it isn’t busy. And that’s the key word: busy. Final Cut Pro considers itself not busy when there are no mouse clicks or key presses. That means whenever Final Cut Pro is running in the background, it is suddenly “not busy.”
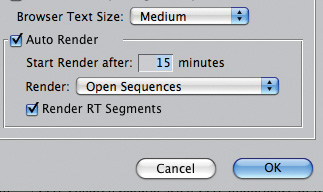
To set this feature, choose Final Cut Pro > User Preferences and click the General tab. In the lower-right corner is Auto-Render. I consider the default setting of 45 to be too long and change it to 15. This means that Auto-Render kicks in after 15 minutes of inactivity.
Note
Auto-Render has no effect when you are running Final Cut Pro—only when you are using other programs and Final Cut Pro is running in the background.
Here’s the secret: when you switch to another application, keep Final Cut Pro open. Since Final Cut Pro doesn’t see any mouse or keyboard activity, it figures it isn’t busy, so after 15 minutes it renders all open sequences, even though you’re busy working in another application.
Render All Doesn’t
The default settings of Render All actually miss things.
According to Apple, in the default setting, when you render using Sequence > Render All, the Full option (shown here) is not enabled. This category refers to sequence items with real-time effects that are capable of playback and output to video at full quality with no rendering required. There may be differences in the Canvas display between real-time playback and fully rendered material.
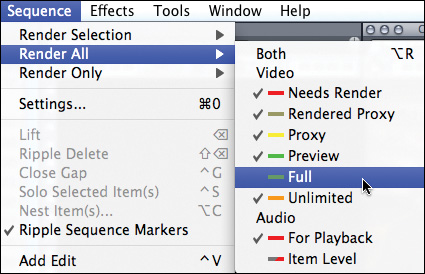
To ensure a consistent playback quality in the Canvas, enable (check) the Full Render category before rendering.
Extra Credit
Also, make a point to check every line item when you choose Sequence > Render Selection; otherwise, that option skips stuff as well. These options remain checked until you trash your Final Cut Pro preferences.
Make the FrameViewer Move
The FrameViewer just shows stills—unless you know this secret.
The FrameViewer (Tools > FrameViewer, or press Option+7) allows you to compare two different shots in the same window—such as the current frame with and without filters, or the current and previous shot. The problem is that when you play your sequence, the FrameViewer does not update. Unless, as Duke Bishop suggested recently, you fool it into playing.
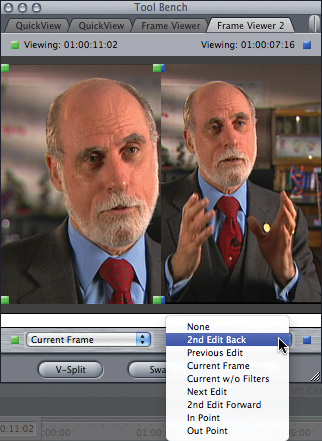
When FrameViewer is open, the current frame will update when you use the Left/Right Arrow keys, drag with the playhead, or press Option+P.
I love tricks like this!
Note
In case you were wondering, the previous or next edit frame doesn’t update because the FrameViewer is showing the Out or In point of that clip, which doesn’t change as you move the playhead.
Viewing Clips on Different Tracks
Here’s a great way to compare clips stacked vertically but widely separated by tracks.
Most of the time, our projects have only a few tracks and we can easily see and compare clips within the Timeline. But, sometimes our video effects or audio tracks start stacking clips like floors in a skyscraper and it becomes impossible to see all the clips at once. Worse, if we need to align a clip on a high track with a clip on a lower track, things get tricky—unless you know this next technique.
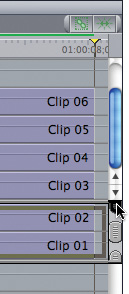
Running horizontally through the center of the Timeline is a double gray bar. While we generally consider this the separator between audio and video, it actually has a deeper function.
Go to the right side of the Timeline and drag one of the rounded thumbs up, to surround the lower video tracks, or down, surrounding the lower audio tracks. This draws a heavy gray rectangle around the lower tracks—in this example, I’m capturing V1 and V2.
Extra Credit
Once you have captured a track, you can change the size of the captured area by dragging either the top or bottom gray edge with the mouse.
To gain more room to view audio or video clips, when the double gray bar is collapsed, forming a thick gray bar, simply drag the bar up or down in the Timeline.
Now, grab the thumb in the middle and drag it up (for video) or down (for audio) and notice how you can compare the timing of the clips in the boxed area with those on higher tracks. Since Final Cut Pro allows up to 99 tracks of video or audio, this can be a useful technique when your tracks are widely separated vertically.
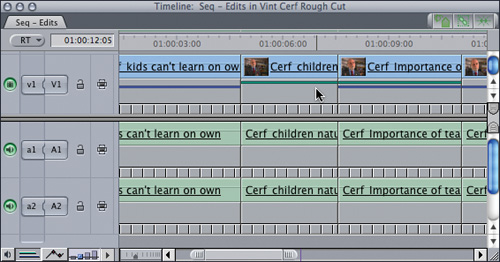
A Fast Way to Find Effects
You can tell in a snap whether a clip has any effects on it.
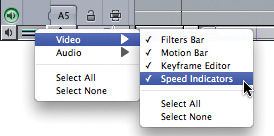
Ever want to know if a clip in the Timeline has any effects applied to it? Press Option+T to toggle Clip Keyframes on. (It’s the button with green and blue stripes in the lower-left corner of the Timeline.)
Note
This button also allows you to edit motion and filter effects, and their associated keyframes, in the Timeline, which is worth its own Power Skill a bit later.
Any clip with a green line under it has a filter applied. Any clip with a blue line under it has a motion effect applied. For example, in this illustration, the first clip has a motion effect, the second has a filter effect, and the third has both a filter and motion effect.
Extra Credit
This button displays a lot of information hidden in the Timeline. To restrict what is displayed, Control-click the clip and only check the settings you want to see.
Finding an Effect in the Browser
Find effects as fast as you find a clip!
If you only have a few effects, this technique isn’t that useful. But as you start to accumulate more and more third-party filters, transitions, generators, and other toys, this Power Skill can help you avoid hours spent searching for an effect.
Extra Credit
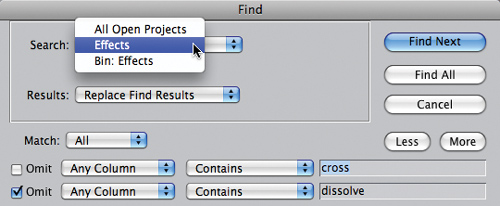
Click the More button to reveal additional search criteria. In this example, I am searching for all effects that start with the word “Cross” but exclude “Dissolve.”
Because the Browser is a database, you can use Edit > Find to locate clips. You can also do the same with Effects. Click the Effects tab in the Browser to make it active, choose Edit > Find (or press Command+F), and enter the name, or a portion of the name, of the effect you want to find in the lower-right text box.
Then, click Find to find the first effect that meets your criteria, or Find All to display all the effects that match your search.
Creating a Favorite
Playing favorites is easy...
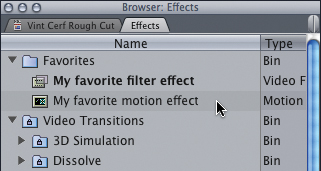
Final Cut creates favorite effects and favorite motions and stores them in the Favorites folder in the Effects tab in the Browser. Favorite effects are created from the Filters tab, while favorite motions are created from the Motion tab.
Here’s how to create a favorite Filter effect:
1. Apply and modify a filter, or group of filters, to a clip.
2. Make sure the clip is loaded into the Viewer and that the Viewer window is active.
3. Select the Filter tab, and then choose Effects > Make Favorite Effect (or press Option+F).
Note
You can’t create a single favorite that includes both filters and motions in one favorite.
And here’s how to create a favorite Motion effect:
1. Load a clip into the Viewer and modify the settings on the Motion tab.
Note
You can’t create favorites from settings in the Controls tab.
2. Make sure the Viewer is selected.
2. Select the Motion tab, and then choose Effects > Make Favorite Motion (or press Control+F).
You can create an unlimited number of favorites and rename them in the Effects tab. The first five effects in each category are automatically assigned keyboard shortcuts.
Note
A group of filters is called a filter stack. Be careful not to open that filter folder in the Effects tab, as this changes the order of the clips.
Save Your Favorites
Favorites can be trashed accidentally—here’s how to save them.
The good thing about favorites is that you can create them easily and reuse them between projects. The bad thing is that they are stored in your preference files, so when you trash preferences, your favorites get trashed as well.

It’s time for a workaround.
To keep your favorites permanently, assuming that you have already created a variety of favorite effects, follow these steps:
1. Create a new project.
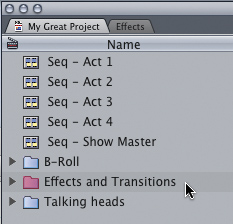
2. Tear the Effects tab away from the Browser tab so you can see the contents of both the project and effects tabs.
Note
While effects in the Browser won’t appear in your Favorites menu, you can apply any effect in the Browser by simply dragging it from the Browser onto a clip.
3. Drag your entire Favorites folder from the Effects tab into the Browser tab.
4. Save the file. Effects stored in the Browser of a project file are not affected when you trash preferences.
Note
You can’t assign keyboard shortcuts to effects stored in the Browser.
To restore filters from this project folder, drag the contents of the Favorites folder in your Browser into your Favorites folder in your Effects tab. Dragging the contents means you won’t accidentally replace any new favorites you may have created.
Extra Credit
Instead of creating a favorite, drag your filter, motion effect, or transition directly from the Timeline into the Browser (you can put them in bins so you’ll know what you’ve stored where).
Using Motion Templates
Harness the graphics power of Motion without knowing anything about Motion.
Motion is a great program. However, for a variety of reasons editors are often afraid to use it. For that reason, Apple invented Motion templates. Motion templates allow you to add high-quality motion graphics to your Final Cut Pro projects without understanding anything about motion graphics.
Note
Superimpose decides where to locate the template based on the location of the playhead. Superimpose places the template on the track above the track containing the v1 patch (on the left of the Timeline), trimmed to the same length and location as the clip your playhead is in.
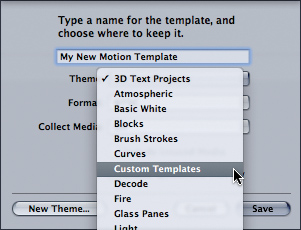
You can see what I’m talking about by choosing Sequence > Add Master Template. These templates can be accessed from a variety of menus in Final Cut, but you need to be careful what you select before you open the template menu.
If the Timeline is selected when you access this menu, the buttons in the bottom right say Superimpose, Overwrite, and Insert, which allow you to edit the template directly into the Timeline.
Extra Credit
You can open Motion templates by opening the Browser and clicking the Effects tab, by choosing from the Effects menu, or by Control-clicking a clip in the Timeline. But my choice is Sequence > Add Master Template, because that’s the only option that allows me to see the template before applying it.
If, on the other hand, you select the Browser, Viewer, or Canvas before opening the template window, the lower-right corner only contains one button, Open, which opens the template into the Viewer.

Replace Templates with Blinding Speed
Oops—added the wrong Motion template to your sequence? Replace it fast!
One of the very cool, but hidden, tricks of Motion templates is that replacing any of the following is easy:
• A single occurrence of a template in a sequence
• Every occurrence of that template in a single sequence
• Every occurrence of that template in every sequence in that project
The reason this is so cool is that when you replace the template, all the text, images, timings, and locations remain the same. Only the template changes. However, to use this, you need to be patient:
1. Open into the Timeline the sequence containing the template(s) you want to replace.
Note
This is a good way to use a Motion template as a placeholder. Pick a template to use while the graphics artist is creating the template you want. Then, virtually instantly, you can replace all the temporary graphics with the final graphics while retaining all the text, images, and timing of the original templates.
2. Select the Viewer and choose Sequence > Add Master Template.
3. Open the new Motion template you want to use in the Viewer. This is important—the template needs to be in the Viewer.
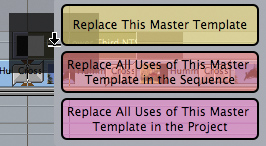
4. Grab the template in the Viewer and drag it on top of the template you want to replace in the Timeline. Then, wait...
After a few seconds a menu pops up allowing you to replace just the template you’re dragging the new version on, or every instance of this template in your sequence, or every instance of this template in the entire project.
Where Motion Templates Are Stored
To use Motion templates across a network, you need to change where they’re stored.
By default, custom Motion templates are stored in the Home directory of the computer that installed the Motion application. (The specific route is: Home Directory > Library > Application Support > Final Cut Studio > Motion > Templates.)
For single-user systems, while this location is OK, I make a point to store all my Final Cut Studio data to a second drive, so that I don’t take up space on my boot drive.
However, in a network situation, these templates could not be stored in a worse place. There is no way for another user to get access to your home directory. To solve this problem, reinstall your Motion data files to a folder on a shared network drive. This resets the pointers in both Motion and Final Cut Pro showing where your Motion templates are stored.
However, this next step is critical. Create folders (Apple calls them Themes) in this network template folder before you save any templates. If a custom folder is created before saving the file, Motion stores the new template to the network location. If a folder is not created, Motion creates a new Theme folder and stores the new template in the home directory of the computer that saved the Motion file.
Matching Fonts Between Motion and Final Cut Pro
Text created in Motion doesn’t match the same text in Final Cut Pro—here’s why.
If you’ve used a font and point size in Motion, then moved that file into Final Cut Pro and tried to match the font, you’ve found they don’t match. While Motion and Final Cut Pro calculate the font size the same, they don’t calculate font tracking the same. The following screenshot illustrates the problem.
To match fonts between the two applications, make sure to use the same font and point size in both applications. Then, to get them to match, open the Final Cut text clip in the Controls tab in the Viewer and adjust the Center, Tracking, and Leading settings.
Note
While specific numbers will vary by font and size, setting Center to 2, −50, Tracking from 1.6 to 1.8, and Leading from 0 to −4 should get your text to match.
Sharing Motion Projects
Motion doesn’t make moving project files easy.
Matt Davis sent me this tip.
When moving a Motion project between computers, you can’t simply move the Motion project as it won’t contain any movies, images, or sounds that you’ve added to the project. Motion just points to your assets—it doesn’t contain them.
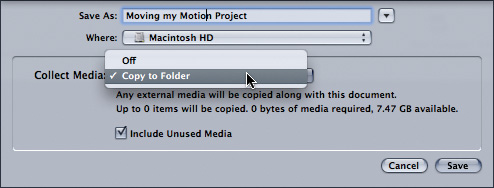
So, to move a Motion project to another machine, choose File > Save As, enter your desired name, and select Copy to Folder from the Collect Media pop-up menu. This trick stores all the assets used in your Motion project in one convenient place.
Note
Motion sometimes has problems sending custom font information using this process. In that case, send your client a QuickTime movie of your project using File > Export > QuickTime Movie from Final Cut Pro.
In the process, Motion tells you how much space the assets will take, and places them in a subfolder called Media in the same location as your Motion project. Depending upon the assets you are using, this may become quite a large folder!
Once this folder is on the client’s system, all you need to do is to email the Motion project to the client and tell them to put it in the same folder. That way, by using the same folder on both systems, Motion’s links to the media will be maintained.
If you add any new elements to your project, be sure to send them to the client with instructions to place it in the Media folder for this project.
What Is a Wireframe?
And why would you use it?
A wireframe displays the outline of your clip. Although you can’t see the image it contains, you can see where the image is located, its shape, and where it moves through the frame.
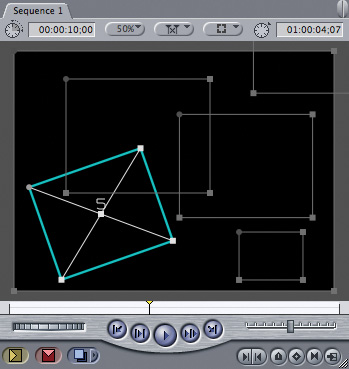
The benefit of a wireframe is that no matter how complex your motion effect, wireframes never need rendering; you can always watch them in real time. If you have a ton of clips all moving around the frame, this is a great way to check their movements without needing to render every time you make a change.
To switch to Wireframe mode, select either the Canvas or Viewer, and then select View > Wireframe; select Wireframe from the rightmost pop-up menu at the top of the Viewer or Canvas; or select the window you want to switch to Wireframe mode and press W twice.
Note
Wireframe mode is not the same as pressing the Caps Lock key. When the Caps Lock key is on, all rendering is stopped. This is a holdover from when computers were much slower and it could take 30 seconds just to display a frame after you applied a Blur. By pressing the Caps Lock key, you’d see your frame immediately, but not the effect applied to it.
Title Safe, Action Safe, and the New SD Boundaries
New boundaries allow you to shoot 16:9 and protect 4:3.
Title Safe and Action Safe are guides that allow camera operators and effects compositors to make sure that all essential elements of their images can be seen by most viewers.
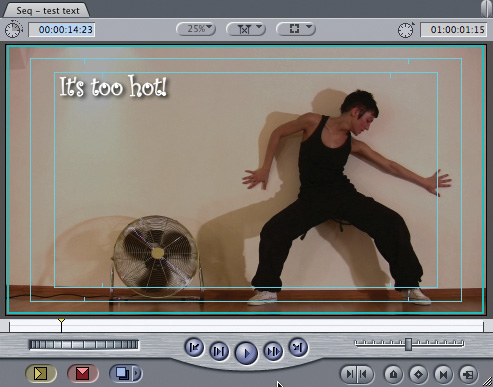
These grew out of the vagaries of analog television sets, but continue into the digital age as much of our material is still down-converted to older analog TV sets. Also, we still have issues with image cropping on HD rear-projection screens and digital theater projection.
To compensate for this, we draw a rectangle around our image 5 percent in from all edges—this is called Action Safe. All essential action should be contained inside this outer rectangle; for instance, notice that the dancer’s hands and feet extend right to the line.
Note
To display these boundary lines, choose View > Show Title Safe. If they don’t appear, be sure View > Show Overlays is also selected.
Then, 10 percent in from all edges, we draw a second rectangle—this is called Title Safe. All essential text must be contained inside this inner rectangle.
New with the latest version of Final Cut Pro are four short vertical lines. These indicate the boundaries of Action and Title Safe for 4:3 images when shooting 16:9. My camera friends call this “shooting 16:9 but protecting 4:3.” This allows you to be sure that all essential elements are inside the 4:3 boundary.
Quickly Create Text Clips
One keystroke—one text clip. Easy!
Here’s a keyboard shortcut that lets you avoid scrolling through several drop-down menus just to create a text clip:
Press Control+X.
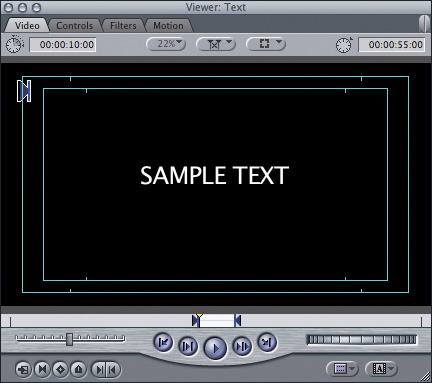
In an instant a new text clip is loaded into the Viewer. Click the Controls tab and start making changes!
Note
There is no way to change the default font. It is always Lucida Grande, 36 point, aligned Center.
Extra Credit
By default, this shortcut creates a 10-second full-screen text clip in the Viewer, matching the video format settings in Easy Setup. Simply alter the duration time in the top-left timecode box of the Video tab to change the length.
Three Steps to Better Text
Here’s a fast, three-step process to creating text clips in Final Cut Pro.
Just because you can create a text clip quickly doesn’t mean you are done. In fact, many editors create a text clip and start making changes, only to discover that their changes don’t show up in the Timeline.
To solve this problem, here’s a three-step way to create text in Final Cut that never gets lost. I call it the “Three-Step Text Process.” Start by putting your playhead in the middle of the clip you want to superimpose the new text over. Then follow these steps:
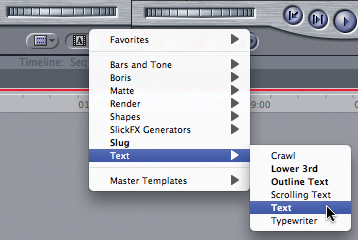
1. Press Control+X (or open the Generator menu in the lower-right corner of the Video tab in the Viewer and select Text > Text).
Extra Credit
If you aren’t superimposing the text over a clip, drop the text clip on Overwrite in the Canvas Overlay menu. All text has a default duration of 10 seconds.
2. Drag the clip from the Viewer to the Canvas. An Overlay menu appears; drop the clip on Superimpose. This edits the clip to the Timeline, matching the duration of the clip your playhead is in and putting it one track higher than the current position of the v1 patch tab.
3. Double-click the text clip in the Timeline to load it into the Viewer so you can make changes.
Generate—Superimpose—Double-click. Done.
Scaling Text in Controls vs. Motion Tab
If you have the choice, always scale your text in the Controls tab.
The difference between scaling a Final Cut text clip in the Controls tab versus the Motion tab is all about quality and flexibility. (Scaling in the Motion tab is the same as scaling directly in the Canvas by dragging wireframes.)
Extra Credit
When positioning text, use the Controls tab, because that moves the text itself. Positioning text using the Motion tab moves the frame that contains the text. If the edge of a letter is outside the frame, the Controls tab will reveal it; the Motion tab won’t.
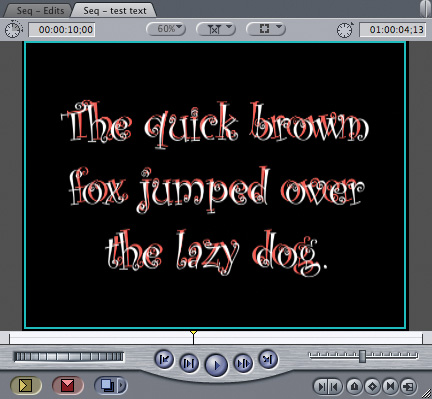
As the left side of the screenshot illustrates, when you scale text in the Controls tab, you are changing the text itself. All text in Final Cut Pro is a mathematical equation, called a vector, that allows text to scale to any size perfectly. The Controls tab takes advantage of this fact.
Note
The accompanying image was created using 600-point Curlz positioned and scaled first in the Controls tab, and then repositioned and scaled in the Motion tab.
When you scale text in the Motion tab, you are scaling the frame that contains the text. As the right side of the screenshot illustrates, you aren’t improving the resolution but are simply blowing up the original image. This causes fuzzy edges, color fringing where different colors meet, and a general softness and lack of quality.

Drop Shadow Settings
Text needs a drop shadow to make it readable. Here are my favorite drop shadow settings.
We all get excited about the high image quality inherent in high-definition video. However, even 1080p video is barely two megapixels in resolution. For video, this is great. For a still image, it’s not worth mentioning in polite company. Standard def (SD), of course, is far, far worse.
All this means that we need to add drop shadows whenever we want people to read the text we display onscreen, especially if the color of the text comes close to matching the color of the background.
Extra Credit
To copy the drop shadow settings from one clip to others, select the clip with the settings you like. Choose Edit > Copy. Select the clip, or clips, to which you want to transfer the settings. Select Edit > Paste Attributes, check only Drop Shadow, and then click OK.
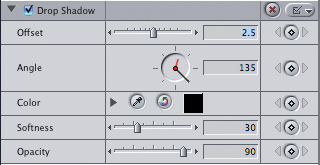
To apply a drop shadow:
1. Double-click your text clip to load it into the Viewer and open the Motion tab.
2. Check the Drop Shadow check box to turn it on.
3. Click the Disclosure triangle to open the dialog box.
4. For HD text, set the Offset to 2.5 (for SD text, use 1.5).
5. Set Softness to 30.
6. Set Opacity to 90.
Constant-Speed Changes in Final Cut Pro 7
We could always change clip speed. Final Cut Pro 7 makes it easier.
Final Cut has two ways to change the speed of a clip: constant and variable. A constant-speed change alters the speed of the entire clip by the same amount. A variable-speed change varies the speed of a clip during playback.
Until recently, making a constant-speed change to a clip always altered the duration of the clip. With the latest release, that’s no longer true.
1. Select the clip for which you want to change the speed.
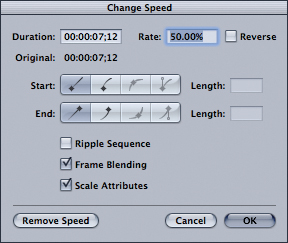
2. Choose Modify > Change Speed (or press Command+J).
3. You can either enter the actual Duration for the clip in the top-left text box, or enter the percentage change in the Rate text box (top-right corner). The Rate box is faster; the Duration box is more precise.
Extra Credit
If you want a clip to run full speed in reverse, click the Reverse check box and leave Rate at 100%.
4. If Ripple Sequence is checked, the entire clip will play at the new speed, its duration will change accordingly, and all downstream clips will be adjusted for the new duration of the clip. If Ripple Sequence is not checked, the clip will start at the current In point until the current duration of the clip is reached. This means that if the clip is slowed down, not all of the original frames will play. Or, if the clip is sped up, more than the original frames will play back.
Note
Constant-speed changes apply to both audio and video.
Note
The Start and End curves are for variable-speed changes. You can turn them on for constant-speed changes, but they may create unexpected speed change effects.
Variable-Speed Changes in Final Cut Pro 7
Making variable-speed changes is a lot easier.
In the latest version of Final Cut Pro, Apple changed how variable-speed changes are created. A variable-speed change is where the speed of the clip changes during playback.
There are several ways to create a variable-speed change. Here’s one I like:
1. In the Tool palette, select the Speed tool (press SSS). It looks like a stopwatch in a box. It’s in the fifth row from the top of the Tool palette, and is the third one from the left.
Note
Control-clicking a speed keyframe offers a variety of new settings Final Cut Pro hasn’t offered before, including the ability to set Ease in and Ease out speeds using the menu.
2. Display the time keyframe section of the Timeline by pressing Option+T, or by clicking the Toggle Clip Keyframes button in the lower left of the Timeline (the button has blue and green bars on it).
3. With the Speed tool, click the hash marks at the bottom of a clip to set a keyframe in your timeline clip at the point that you want the speed change to begin.
4. Again, with the Speed tool, set a second keyframe where you want the speed change to either end or change again.
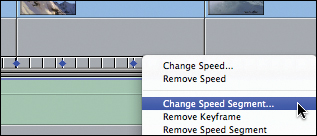
5. Control-click the small blue keyframe at the bottom of the clip in the Timeline graph and select Change Speed Segment. This allows you to change the speed just from the previous keyframe to the current one.
6. In the Speed dialog box, set Rate to the new speed of that segment. Experiment with the Ease In and Ease Out buttons to change the transition speed into and out of the new segment.
This is a powerful new tool in Final Cut Pro, with more settings than can be covered in one Power Skill. However, the key new changes are to use the Speed tool to set keyframes in the clip in the Timeline, then Control-click the keyframe to select Change Speed Segment.
Apply Multiple Keyframes to Multiple Clips Fast
Without even opening the Viewer, you can add Motion tab keyframes all at once.
Let’s say you have a stack of clips in the Timeline that you want to start scaling and rotating all at the same time. Here’s a fast way to set motion keyframes in multiple clips at the same time.
1. In the Timeline, put your playhead where you want the keyframes to be placed and select the clips to which you want to apply the keyframes. All the clips you want to add keyframes to must be positioned under the playhead.
2. In the lower-right corner of the Canvas, click the Add Motion Keyframe button; it’s the one that looks like a diamond.
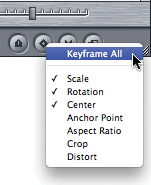
When you load a clip into the Viewer, notice that keyframes have been added to Scale, Rotation, Center, Anchor Point, Crop, Distort, and Aspect Ratio. The good news is that this sets every Motion tab parameter keyframe at once at the position of the playhead. The bad news is that this sets every Motion tab parameter keyframe at once at the position of the playhead.
Note
This technique does not set keyframes in the Controls or Filter tabs or other Motion tab parameters such as Opacity, Drop Shadow, Motion Blur, or Speed.
So, here’s the part that makes this technique worthwhile:
Control-click the Add Keyframes button and uncheck all the keyframes that you don’t want to set when you click this button. Now, you set just the keyframes you want, with a single click of the mouse.
Note
Once you set a keyframe for a parameter when you reposition the playhead and change the parameter setting, Final Cut Pro sets a new keyframe. This means, generally, you only need to set an opening keyframe, and then just make adjustments thereafter. Final Cut Pro sets the keyframes for you automatically.
Displaying Motion and Filter Keyframes in the Timeline
You can reveal hidden effect keyframes in the Timeline, if you know where to look.
In the lower-left corner of the Timeline is a button with two bars, one green and one blue. Click the Toggle Clip Keyframes button to turn on the Timeline keyframe display.
All the tracks are separated by a gray area, and some clips have blue or green bars underneath them.
A green bar under a clip indicates that a filter is applied to the clip.
Extra Credit
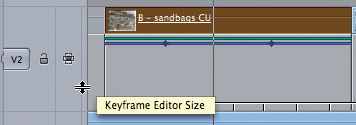
If you need more room to see, right next to the left edge of the track—between the track and the Auto-Select button—is a very thin vertical column. Drag inside this column and you’ll expand, or contract, the height of this gray area.
A blue bar under a clip indicates that a motion effect is applied to the clip.
Small diamonds in a blue or green bar indicate keyframes are applied to the effect.
The small boxes at the bottom of this new gray area indicate the speed of a clip. The width of the boxes changes as the speed of the clip changes.
Extra Credit
To reset all tracks back to their normal height, click one of the four “bar charts” at the bottom left of the Timeline.
Adjusting Effect Keyframes in the Timeline
Not only can you display keyframes in the Timeline, but you can change them there, too!
Say you’ve applied a Gaussian Blur filter and two motion effects to a clip. Display Timeline keyframes by pressing Option+T. The green bar indicates a filter is applied; the diamonds indicate there are keyframes attached to the filter.
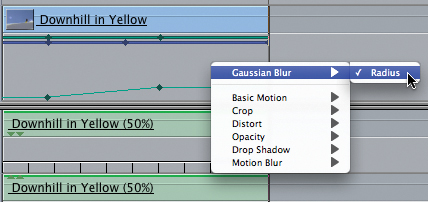
Control-click in the gray area under a clip and the pop-up menu displays all the filters applied to the clip (above the thin gray line), and all the available Motion settings.
Select the keyframes you want to change—for this example, choose the Blur keyframes—and a second line shows up at the bottom. This new line contains the Scale keyframes applied to this clip. Filters are displayed as a green line, motion effects use blue lines.
Note
I’m of two minds about this feature. It is much faster, but when you load a clip into the Viewer, you can change more than one parameter at a time, whereas here you need to change each parameter individually.
You can now change keyframes in the Timeline, without first loading the clip into the Viewer.
Tossing Keyframes
Keyframes aren’t permanent—you can just toss them away. Here’s how.
Did you know that you can delete a keyframe in the Timeline by dragging it vertically out of the clip with the mouse?
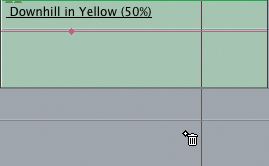
Grab the keyframe, drag it outside the border of the clip, and watch as the mouse icon changes to a tiny trash can. This works best if you drag quickly.
Release the mouse and your keyframe is no more.
Note
This trick also works in the Viewer, but not for Rotation in the Motion tab.
Slipping Keyframes in the Timeline
Here’s a fast way to change the timing of keyframes in the Timeline.
Moving all the filter keyframes—or all the motion keyframes attached to a clip—all at once is something we can’t do in the Viewer.
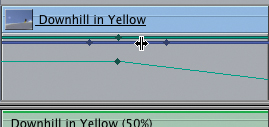
Instead, we do it in the Timeline:
1. In the lower-left corner, click the Toggle Clip Keyframes button (or press Option+T). As mentioned earlier, clips with blue lines have motion effects applied, and clips with green lines have filter effects applied.
Extra Credit
If you have lots of keyframed parameters, Control-click the Toggle Clip Keyframes button, and check only the parameter whose keyframes you want to move.
2. Keyframes, if they exist, are indicated by small diamonds in either the green or blue line.
3. Using the Arrow tool, grab the blue line between the diamonds (or the green line—it works the same) and drag it back and forth to slide your keyframe(s) earlier or later in the Timeline, all without going up to the Viewer!
Sliding Keyframes in the Viewer
Here’s yet another cool way to move effect keyframes, this time in the Viewer.
Have you ever wanted to move keyframes for an effect? Well, you can, if you have the right tool.
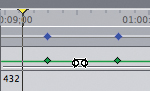
In this example, I’ve created some keyframes for a motion effect. (This happens to be for scaling, but it works for any keyframed parameter in either the Viewer or the Canvas.)
Note
This technique shifts all the keyframes associated with that parameter. You can’t select just a group of keyframes and move them.
In the Tool palette, select the Slip tool (or press S).
Click and drag on the parameter line between the two keyframes and they all change position.
Note
This technique won’t work if any of the keyframes are positioned on the first or last frame of a clip.
Creating Moves on Still Images
Getting movement within still images is tricky—but less so after you read this.
Looking for a quick way to create movement on still images (known as the “Ken Burns effect”), but don’t want the hassle of creating keyframes in Motion?
Extra Credit
When creating this effect in iPhoto, you may notice that the motion is randomly applied, in both direction and location on picture. Although you cannot control the type of motion, you can drag the picture to set where the motioning will end. You’re essentially setting the key focal point. This is a handy tip when iPhoto decides to pan down to a crotch rather than up to a face.
Here’s one solution, suggested by Eric Cosh and John Kaplan:
1. Open your stills in iPhoto and make a separate album (folder) in iPhoto called image montage (or whatever name suits your fancy) containing only the shots you want to move in it.
2. Click the Slideshow icon at the bottom of the iPhoto window. Choose Ken Burns Effect with a dissolve duration of one second or faster.
3. Choose File > Export > As a File and export it as a QuickTime movie.
4. Import the new QuickTime file into Final Cut Pro, edit it to your sequence, and render.
Note
Another program that makes moves on stills very easy is PhotoMotion from GeeThree (www.geethree.com). It works as a Final Cut Pro plug-in.
Fun with the Anchor Point
The anchor point controls more than rotation. Check this out and see.
Have you ever wondered what the anchor point does in the Motion tab? Well, let’s find out:
1. Load an image you want to manipulate from the Timeline into the Viewer.
2. Select the Canvas, and choose Image + Wireframe either from the View menu or the small pop-up menu at the top right of the Canvas. The white dot that appears connected to the center of your image is the anchor point.
3. Select the Distort tool (press D), and then drag the point to move it. You could also enter the coordinates for the anchor point directly in the Viewer, if you want to be precise about it.
Now for some fun. Select the Motion tab in the Viewer and watch what happens in the Canvas when you do the following:
• Rotate your image—it rotates around the anchor point.
• Drag the Scale slider—it scales from its original position and gradually recedes into the anchor point.
Note
Moving the anchor point to a corner of the image is an interesting way to have an image scale and reposition automatically.
Create a Filter Range
You can apply filters to only a portion of a clip—without cutting the clip.
You can limit the range of a filter in two ways: before or after you apply a filter. This can save you having to create keyframes for something simple like blurring a logo.
To create a range within a clip before you apply a filter, from the Tool palette select the Range Selection tool (or press G three times). Then, drag across the portion of the clip to which you want to apply the filter. When you apply a filter, it will only apply to the selected portion of the clip, or clips.
Note
When you use the Range Selection tool, these black bars are moved automatically by the tool to create the range.
To create a range within a clip after the filter has been applied, double-click a clip to load it into the Viewer and click the Filter tab.
If you look closely at the top of the filter bar, you’ll see a dark black vertical bar at the beginning and end of the clip; the bar at the beginning is often hard to see. Grab and drag each of these two heavy black vertical lines at the top of the filter to alter the range of the clip to which the filter applies.
Note
A clip range can extend across multiple clips.
Extra Credit
Put the Arrow tool between these two black bars and you can slip the range within the clip. This won’t work if the bars are at the beginning and end of the clip; filter ranges need to have handles, like clips, in order for slipping to work.
A Fast Way to Remove Filters
This tip makes removing filters from a range of clips a snap.
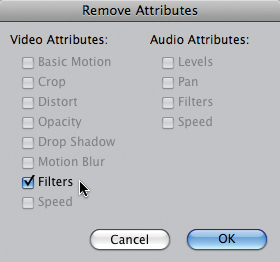
Select all the clips from which you want to remove the filters. Choose Edit > Remove Attributes, check Filters (leave all the other settings unchecked), and click OK. This removes all the filters from the selected clip(s). Using this technique, you can’t remove just some of the filters assigned to a clip, you either remove all of them or none.
But if all the selected clips have the same set of filters, you can remove selected filters and keep the others. To do this, we’ll create a model clip, and then copy the settings from that model to the other clips.
1. Open a clip to the Viewer and select the Filters tab.
2. Remove the filter(s) you want to get rid of by highlighting the name of the filter and pressing Delete.
Note
This only works if the filters are the same throughout the selected clips. Also, if you customized filter settings between clips, they will all reset to match the settings of the first clip.
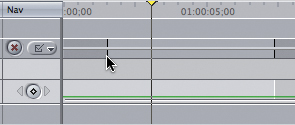
3. Highlight the clip with the new set of filters in the Timeline and select Edit > Copy (or press Command+C).
4. Highlight all the clips in the Timeline that you want to change and select Edit > Remove Attributes, check only the Filters check box, and click OK.
5. Keep those same clips selected. Go to Edit > Paste Attributes (or press Option+V), check only the Filters check box, and click OK.
Creating a Luma Key
A Luma key allows you to key one shape into another without using an alpha channel.
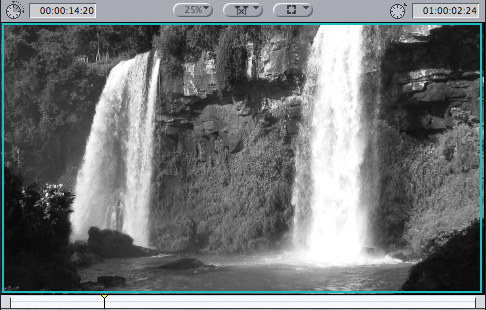
In our earlier discussion of the new alpha transitions, we discovered the power of alpha channels, which contain transparency information for the image. However, black-and-white images downloaded from the Web almost never contain alpha channels.
For instance, I’ve found this great jigsaw puzzle piece—perfect for one of my projects as a fascinating metaphor illustrating digital complexity—but the image doesn’t have an alpha channel. It’s just a single-layer JPEG. How can we create a key? The answer is a Luma key.
In this example, we will key video inside the puzzle piece which is set against a black background.
1. Put the video clip to appear inside the puzzle piece on V1.
2. Put the shape directly above it on V2. In this example, I’m using a white jigsaw puzzle piece against a black background. The entire image is a single layer and saved as a JPEG. Because the puzzle image is full-screen, it totally blocks the V1 clip below it.
3. Select the V2 clip.
4. Choose Effects > Video Filters > Key > Luma key. A Luma key makes portions of a clip transparent based on luminance, or grayscale, levels. Images that make great Luma keys are generally black and white, with limited shades of gray.
5. Double-click the V2 clip to load it into the Viewer, and click the Filters tab. Because we want to make transparent everything that’s now white, select Key Out Brighter from the Key mode pop-up menu. (If you wanted to make the black portions transparent, use Key Out Darker instead)
6. Switch the View pop-up to Matte and adjust both the Threshold and Tolerance until you get clean edges on your key.
7. Choose Final from the View pop-up menu and you’re done!

Add Burned-In Timecode to Your Sequence
Burn timecode into your sequence clips in no time flat!
Need to output a sequence with burned-in timecode matching your sequence for clients or producers to review? Piece of cake. You’ll find two timecode filters when you choose Effects > Video Filters > Video.
Timecode Reader displays the timecode of your source material as it was shot by the camera. This filter can be dropped directly on a clip or clips in the Timeline. Timecode Reader only shows the original timecode from your source video, so the numbers change between clips.
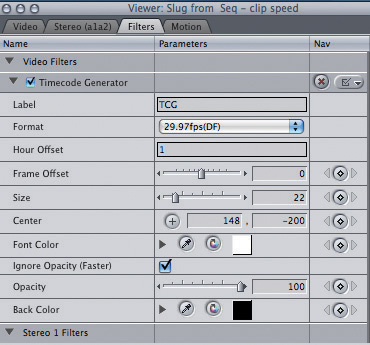
Timecode Generator creates timecode from zero, or a preset start time such as 01:00:00:00, that starts from the beginning of the clip to which you apply it. The most useful way to use this filter is to display sequence timecode on the Timeline. However, if you drop Timecode Generator on a clip or range of clips, it automatically restarts timecode at the start of each clip.
Note
Whether you nest or use the slug, you’ll still need to render—which is why I prefer to use Compressor when possible because it burns timecode into the video of a clip in the background during compression.
Some people prefer to nest the clips—which does work—however, I discovered a faster way that doesn’t involve nesting.
Open the Video tab of the Viewer, and select Generator > Slug from the pop-up menu in the lower right. This is a clip of black audio and video. However, before editing the slug into the Timeline, change its duration to the length of your sequence.
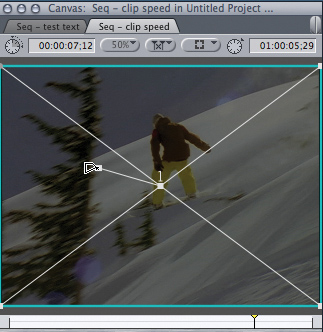
Edit the slug to the top track of your Timeline across your full sequence and select it. Apply Effects > Video Filters > Timecode Generator. Double-click the slug to load it into the Viewer, and change the settings to match your sequence timecode. Here I changed the hours to start at 01.
Now choose Modify > Composite Modes > Screen. Voilà! Just render and output.
Sharpening Your Stills
Add more focus to stills.
Looking to add a bit of “snap” to a still image? Try using the Unsharp filter.
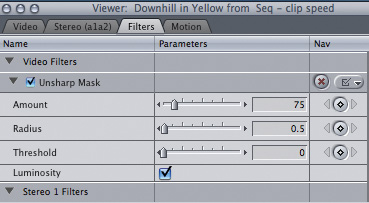
Be cautious adding sharpening your video—most inexpensive cameras already apply sharpening during recording to improve the apparent focus of an image by making the edges more visible.
To change the less-than-optimal default settings for this filter, choose Effects > Video Filters > Sharpen > Unsharp Mask. Then, set Amount to 75, Radius to 0.5, and Threshold to 0.
Note
Unsharp Mask, even though it has a weird name, is the best filter in the bunch to use. Don’t use Sharpen, since it doesn’t work as well.
Note
In the low resolution of video, sharpening can help. But don’t use too much, or your edges will look harsh and could cause flicker.
Fixing Fluorescent Flicker
Ceiling fixtures driving you nuts? Try this!
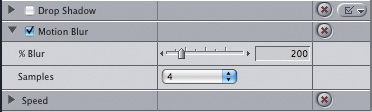
You can fix fluorescent flicker showing up in your videos by opening your clip in the Viewer and selecting the Motion Blur option. Then, set the pop-up menu to 4 samples at 200%.
As your shots get more complex—for example, in footage where the people featured move a lot—duplicate the track, with motion blur on the lower track, no effect on the top track, and a garbage matte to isolate the portion of the frame with a lot of movement.
Note
To learn how to do garbage mattes, check out the Apple manual or my Web site.
Since the flicker is isolated to the small section where there is a lot of motion, it isn’t as noticeable as when the entire frame flickers.
Note
Motion Blur takes forever to render. Apply this effect only to clips that really need it.
This technique generally avoids smeary video.
When to Deinterlace
Deinterlacing should never be your first choice.
NTSC, PAL, and some HD formats (those that end with the letter i) are interlaced. This is not a bad thing—in fact, it’s how the formats were designed. So, if you are creating footage for an NTSC or PAL project, it should be interlaced.
The problem is that the computer screen always displays images as progressive. This causes problems when you are editing video destined for the TV screen but watching it on the computer screen.
The problem with deinterlacing is that it cuts the vertical resolution of your image in half, making the image appear soft, with lots of fine detail getting lost. Because video doesn’t have a lot of detail to start with, deinterlacing only makes matters worse.
Here are some things to keep in mind for great-looking images:
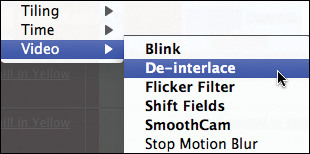
• All still images are progressive. You don’t need to deinterlace a still image. If you are getting edge flickering, Effects > Video Filters > Video > Flicker Filter will be a better choice.
• If you are creating freeze frames for export to Photoshop, deinterlace in Photoshop, not Final Cut.
• If you are creating freeze frames in Final Cut Pro for Final Cut Pro, try to find a still that doesn’t have motion and don’t deinterlace it. If it flickers, then deinterlace.
• 24 fps material is always progressive and doesn’t need deinterlacing.
• If you are creating video in After Effects or other software, export the video to match your sequence settings. This means exporting interlaced DV for your DV sequence.
• If you are creating material for the Web, if possible shoot a progressive format. If not, deinterlace during compression, not during editing.
• Check your delivery specs. If you are expected to deliver an interlaced program, avoid deinterlacing as much as possible.
• The default settings for the deinterlace filters in both Final Cut Pro and Photoshop are generally correct.
As long as you remember that deinterlacing reduces image quality, and that many TV sets are designed to handle interlacing with no problems, you know enough to make the right decision most of the time.
Making Clips Black and White
Nothing says old and stylish like black and white. Go back in time with one mouse click.
Looking to create a retro black-and-white effect on your color images?
To make a clip black and white:
1. Select the clip in the Timeline.
2. Choose Effects > Video Filters > Image Control > Desaturate.
Ta-da! Instant Fred Astaire and Ginger Rogers!
Note
Desaturate provides a slider that you can adjust to remove some, but not all, of the color. This is used a lot in fashion photography to give a cool, refined look to a clip.
Creating Sepia-Toned Clips
Sepia is even better than black and white for aging a clip. Here’s how.
Want to create a clip with a warm, brown tone? If you’re looking for the nostalgia of a sepia-toned clip, start where the last Power Skill ended. Apply the Desaturate filter. This removes all the color from a clip, which gives the Sepia filter a solid base to work from.
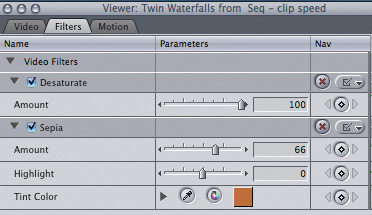
Then, select the clip and choose Effects > Video Filters > Image Control > Sepia. Change the amount to around 66%
Tweak the settings by decreasing the amount and darkening the sepia color, and you’ll achieve just the effect you’re looking for.
Note
This may work best if you color-correct the clip to adjust black levels. The sepia color is applied more to the darker shades of the image.
Using the RT Menu for Scopes
The controls for your video scopes are hidden, unless you know where to look.
The video scopes in Final Cut are hidden, but you can display them in two ways: Tools > Video Scopes, or Window > Arrange > Color Correction. Of the two, I recommend the second approach.
The reason is that using the Window command realigns your screen so that you can see all five windows.
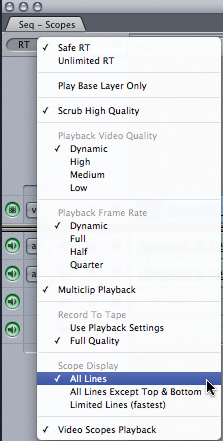
What you may not know is that when the scopes are displayed, hidden menu choices appear in the RT menu, located in the top-left corner of the Timeline.
Scope Display is a new category:
All Lines means that every pixel in every line of your clip is displayed in the scope. This is a change from earlier versions where not all pixels were displayed in the scope.
All Lines Except Top & Bottom means that every pixel in every line except the top nine and bottom nine lines is displayed. This is useful if you have closed captioning or other technical data embedded in the video signal that you want to exclude from the scopes.
Limited Lines: This displays every pixel on 32 lines of video distributed evenly within the Action Safe area.
Note
The lower-right corner of the video scope display indicates your video format and format choice.
When playing back, the real-time display always shows Limited Lines. The scope updates to full display when the playhead is paused.
Rules for Color Correction
Color correction is a huge topic; keep some basic rules in mind.
Books have been written about color correction, and we hardly scratch the surface here. Here are some useful rules.
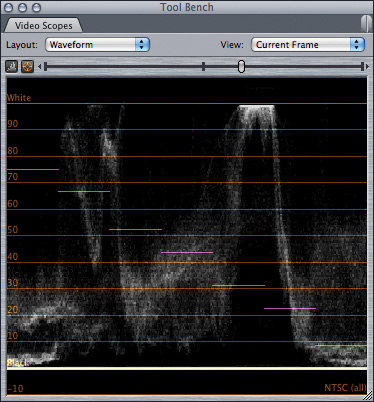
The Waveform monitor tells us everything we need to know about the black, gray, and white in an image, but nothing about color.
The Vectorscope tells us everything we need to know about the color in an image, but nothing about black and white. We need to use these two scopes together to make sense of our image.
When color-correcting an image:
1. Never color-correct without using video scopes and a calibrated video monitor. Your computer monitor does not display color information accurately.
2. Changing color has no impact on contrast. Contrast—that is, the black, white, and grayscale levels—must be set first.
Extra Credit
The best color correction filter to use is the Color Corrector 3-Way filter. You can do amazing things with it in Final Cut Pro, so consider using it before moving projects to Color.
3. The order in which you set contrast makes a difference. Set black levels to 0%. Set white levels so that they don’t exceed 100%.
4. Black, white, or gray always contains equal amounts of red, green, and blue. However, saying this same thing another way is the essence of color correction: If something is supposed to be black, white, or gray, it must contain equal amounts of red, green, and blue.
5. To remove a color, add the opposite color.
Color-Correcting with One Mouse Click
This won’t make you a colorist, but it will solve color problems in a big hurry!
Have you ever been in a hurry to meet a deadline only to discover that the camera operator forgot to color-balance the camera and everything is gold or blue? While it would be great to carefully color-balance each shot, you have exactly three nanoseconds to get this project done.
Here’s a single mouse click solution that can easily fix a badly off-color image:
1. Put your playhead in the middle of the clip you want to color-correct.
2. Select the clip.
3. Choose Effects > Video Filters > Color Correction > Color Corrector 3-Way.
4. Double-click the clip to load it into the Viewer.
Note
Be careful not to click something that is overexposed (blown out) or that has lots of reflections.
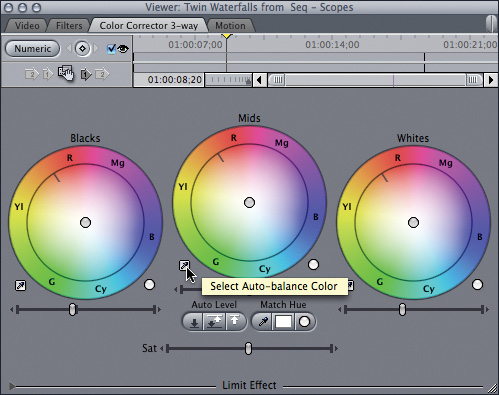
5. Click the Color Corrector 3-Way tab at the top of the Viewer.
6. Click the small eyedropper to the lower left of the Mids color wheel.
Note
Mid-tone grays carry the most color and are the best choice for color correction. But if there are no mid-tone grays in your shot, a good second choice is white. Just click the eyedropper to the left of the Whites color wheel and click something near white in the image.
7. Click something in the image that is supposed to be pure gray.
Fixed.
Skin Tone Settings for Scopes
Everyone is different, but....
Each of us is an individual. However, when it comes to video, our eyes have been conditioned to expect certain colors. Our brains are programmed to recognize three colors: blue sky, green grass, and skin tone. If there is more than about a two-to three-degree difference between what we see versus what we expect, our brains tell us there’s something wrong.
Note
These numbers assume the subject is well lit using standard studio lighting.
Use the following suggestions when you are trying to make people look “normal,” or correct for a color cast in the camera.
• Caucasian skin
• 45–70% grayscale on the Waveform monitor
• Saturation around the second circle (40%) of the Vectorscope
• Asian/Hispanic skin
• 35–50% gray scale on the Waveform monitor
• Saturation between the first and second circle (30%) of the Vectorscope
• Black skin
• 20–45% grayscale on the Waveform monitor
• Saturation around the first circle (20%) of the Vectorscope
Keyframing the Color Corrector 3-Way Filter
This works just like it does in any other filter—once you get to the right place.
You can easily use keyframes in the Color Corrector 3-Way filter in Final Cut Pro, provided you set an initial keyframe first.

To do this:
1. Select the clip in your sequence and choose Effects > Video Filters > Color Correction > Color Corrector 3-Way.
Extra Credit
If you want to see your keyframes, adjust them individually, or delete them, click the Numeric button in the top-left corner of the filter. To return to the visual display, click the Visual button.
2. Double-click the clip in your sequence to load it into the Viewer.
3. Put your playhead in the clip in the Timeline where you want to set your first keyframe.
4. Select the Color Corrector 3-Way tab at the top of the Viewer and click the keyframe diamond at the top of the filter.
5. Move the playhead to the next position and adjust a setting. Since you have already applied a keyframe to every parameter in the effect, making any adjustments later automatically sets a new keyframe for that parameter.
Fix It Before You Start
Normally, you color-correct at the end. With multiclips, color-correct at the start.
You’re about to edit a music video using multiclips, but one camera was not properly color balanced. Normally, you’d fix this at the end of the production—which would mean color-correcting the same clip dozens of times. You could copy and paste the filter into multiple clips, but there’s a better way.
Edit the source clip—before you build the master clip—into the Timeline and color-correct it as you would normally. When you are happy with the look of the clip, double-click the clip to be sure it is loaded into the Viewer. Drag the Color Corrector 3-Way filter from the Filters tab into the Browser. This adds the filter to the list of clips in the Browser.
Load the source clip from the Browser into the Viewer, and then drop the filter setting you stored in the Browser onto the clip in the Viewer. This applies the color correction setting to the source clip.
Now when you create your multiclip, the color correction filter will travel with the clip into the multiclip. Although you won’t see it as you edit the multiclip in the Viewer, when you play the Timeline the filter will be applied automatically.
Note
This technique works with any filter or motion effect. If you don’t need to see the results of the filter settings prior to building the multiclip, simply load your Browser clip into the Viewer and apply the effect. Because color correction requires adjusting the filter in the Viewer while viewing it in the Canvas and checking the scopes, we needed to add the step of dragging the filter settings to the Browser. You can’t apply a filter by dragging it on top of a clip in the Browser.
Color-Correcting a Sudden Color Change
Here’s a faster way to quickly compensate for an unintended color shift during a scene.
While keyframing the Color Corrector filter gives us lots of control, it also takes a long time. In looking for a faster way to fix a problem, such as when the talent walks outside—out of tungsten light into daylight—Lee Berger suggests this tip.
Instead of keyframing, split the clip at the change in lighting using the Razor tool (press B). Apply the Color Corrector 3-Way filter to each clip, and then color-correct each clip as necessary. Apply a dissolve to the split point.
This trick makes it easy to shift or extend the transition point without having to deal with keyframes.
Monitoring Video Levels
Final Cut Pro provides a fast way to check your video levels.
In the Audio chapter, we learned that there are three technical requirements in every project: audio levels that don’t distort, video white levels below 100 percent, and video chroma levels that are not excessive.

Keeping white levels below 100 percent and chroma levels from oversaturating is a key part of the finishing process of your video. The video scopes help, but there is an additional tool you can use that makes monitoring video levels very easy.
Note
While this check box is not as accurate as a $15,000 Tektronix video scope, you’ll find that you can trust it in most situations.
Final Cut Pro includes an indicator you can use to check video white levels. It’s called Range Check, and you access it by choosing View > Range Check > Excess Luma.
Extra Credit
This display does not update in real time, which is a real shame, because if it did, you could watch your show and your video levels at the same time. However, a great workaround is Option+P. This will play your sequence in close to real time, while still displaying the Range Check.
To use it, put your playhead in the clip you want to check and press Control+Z. This checks that frame for white levels. If your white levels are between 90 and 100 percent, a green check box with an up-pointing arrow is displayed (left). If your white levels exceed 100 percent, a yellow warning is displayed (center). If your white levels are 90 percent or below, a green check box alone appears (right.)
You can use a similar tool to test chroma levels. Choose View > Range Check > Excess Chroma. There are only two indicators here: a green check box indicates your chroma levels are OK; yellow indicates you have problems.
You can also choose View > Range Check > Both, except that the indicator doesn’t specify whether the problem is white levels or chroma levels. For this reason, I use the Luma Check first, followed by Chroma Check.
Finally, you adjust video level settings using the Color Corrector 3-Way filter.
Keep Your White Levels Broadcast Safe
White levels over 100 percent are a sure way to disaster. Read this.
When editing in Final Cut Pro, take precautions to keep your white levels “broadcast safe.”
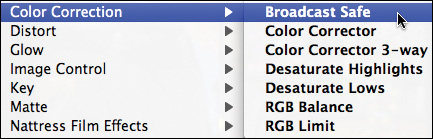
Digital white can be recorded with levels as high as 109 percent, but any level above 100 percent is too high for the analog world of video. Excess white levels can cause visual breakup, transmitter overmodulation, audio buzz, and angry finger-pointing. Even in today’s digital world, this is still an issue for any images distributed via DVDs or displayed via down-conversion on older analog TVs.
Note
The default settings for the Broadcast Safe filter are fine. You don’t need to make any adjustments. In fact, Apple recommends against changing them.
Most of the time, you’ll control your white levels using the Color Corrector 3-Way filter. However, sometimes there’s a lack of time, or a specular needs some fast clamping. Final Cut prevents excess white levels on imported graphics and images automatically, but it does not do so for video.
When you need to be absolutely sure your white levels are safe, apply the Broadcast Safe filter by choosing Effects > Video Filters > Color Correction > Broadcast Safe.
The Twirling Thingy of Color
It’s a curved arrow that seems to do absolutely nothing, except...
...help you when you need to pick a color.
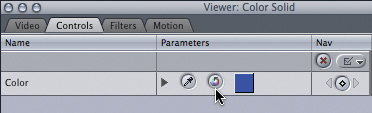
The eyedropper on the left allows you to select a color from anywhere on your screen, not just from within a clip. The color chip on the right allows you to select a color using a variety of color pickers. However, when you click this middle color whatsit, the only thing that seems to happen is that the arrow changes direction. What the heck is it?
This color twirly button determines the direction of color rotation as you use keyframes to change colors. For instance, if it points clockwise, the colors rotate from green to red to blue and back to green. If it points counterclockwise, the colors rotate in the opposite direction, from green to blue to red and back to green.
Now you know.