
Chapter 5. Implementing Services
This chapter explores a few of the options in Ruby for implementing services. Specifically, in this chapter, you will implement a service from the social feed reader application with Rails, Sinatra, and as a basic Rack application. Implementing the same functionality in all these frameworks will help reveal the differences in these choices and the possible strengths and weaknesses of each.
The Rails framework provides an option that most readers are familiar with for complete web applications. Rails supplies a lot of innate functionality, but at the cost of speed and extra code and complexity that isn’t necessary in smaller services. Rails is a good place to start, but you should examine other frameworks to see other ways of organizing logic for handling requests. Sinatra is part of the newest generation of Ruby frameworks that diverge from Rails in design. Rack is the basic web server interface that both Rails and Sinatra are built on.
The Vote Service
The service this chapter focuses on is the vote system from the social feed reader application. Basically, the vote service should provide a way to let users give a “thumbs up” or “thumbs down” to a feed entry. It should also provide different ways to retrieve previous vote data. In addition, the service should provide the following specific features:
• Vote an entry “up” or “down”—The service should provide an API call to rate an entry. This call should require a user ID, an entry ID, and whether the vote is up or down. Further, a user should be able to have only a single vote per entry. The user should be able to change a vote from up to down, but the service should make sure the user can’t continually vote the same way on an entry.
• Get the entry IDs voted on by a user—Given a user ID, the service should return the list of entry IDs that a user has voted up or down. This list should be in date descending order (by when votes were created), and the API should provide a method to retrieve the list with pagination options.
• Get the vote totals for an entry—Given an entry ID, the service should return the total up and total down votes for an entry.
• Get the vote totals for a list of entries—Given a list of entry IDs, the service should return the total up and down votes for each entry in the list.
• Get the vote for an entry and user—Given an entry ID and a user ID, the service should return the vote information for that user and entry.
• Get the vote information for a list of entries for a user—Given a list of entry IDs and a single user ID, the service should return the vote information for the entries in the list the user has voted on.
• Get the vote totals for a user—Given a user ID, the service should return the total number of entries voted up and down.
When you look at this list of requirements, you should notice that there is only a single call that writes data to the service: when a user votes on an entry. The rest of the API calls are for returning data based on those votes. With so many different read-based calls, this service could be optimized for those reads. The single write could be routed through a messaging system instead of through a RESTful interface. Chapter 11, “Messaging,” covers how to write highly scalable write interfaces using messaging. For now, the full API will be exposed through REST.
You need to make a few design choices with respect to the API. The JSON data format has already been selected. Now you must make decisions for the URI design and how the API should behave. For instance, how are the user’s vote totals exposed? One way would be to return totals when getting the votes themselves. The URI and response might look something like the following:
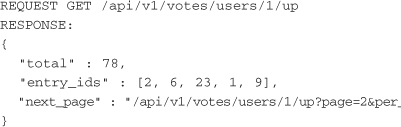
Two additional calls would be available in connection with the preceding method of returning up votes: Return all votes for a user and return the down votes. Having the total in the votes API calls fulfills the final requirement of retrieving totals for a user. However, it probably makes sense to include an extra call to retrieve just the numbers.
A Multi-Get Interface
One of the important design choices to be made is how to expose a multi-get interface. Multi-get refers to the ability to retrieve information for multiple IDs at once. Specifically, the API must be able to retrieve the votes for a list of entry IDs. Multi-gets are often exposed as either a GET or a POST call. The requests for each might look as follows:
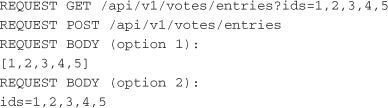
The GET request includes everything the service needs in the URI. The POST request shows two options for the request body. The first is to make the request body a simple JSON array of entry IDs. The second is a standard “form variables”—style POST request. This is what the request body for a POST from an HTML form would look like. With the second option, the logic for pulling out the IDs in Rails or Sinatra would look exactly as it looks when the IDs are pulled from the GET request. That is, ids is accessible through the params hash, like this: params[:ids].
Exposing the multiple get as a GET request is appealing because it aligns closely with the idea of REST. It is a read request on a resource. The specific list of IDs represents the resource. Further, always sorting the IDs in the same order before the request is made ensures that repeated requests for the same set of IDs will be a cache hit. This is important if lists of the same IDs are regularly requested.
The disadvantage of using GET is the limitation on URI length. If the entry IDs are UUIDs or something similar, each ID will use 36 characters. While these types of IDs are not common in normal Rails applications, UUIDs are used very often in distributed systems. In fact, the vote system should probably not enforce that an entry ID be an integer. It should be up to the entry system to decide whether it will use integer or string IDs.
URI length limits vary, depending on clients, servers, and proxies that exist between them. Browsers often have the strictest limitations on URI length. Internet Explorer has a limit of around 2 KB, while Firefox has a limit of 65 KB. However, these service APIs will be used by other libraries and not in a browser address bar, so the GET request can be used with larger limits.
For the purposes of Ruby services, it makes sense to look at the settings for the two most popular web servers: Nginx and Apache. Nginx has a default URI length limit that depends on the platform it is built on. It is either 4 KB for 32-bit systems or 8 KB for 64-bit systems. The default setting can be increased through the large_client_header_buffers setting (see http://wiki.nginx.org/NginxHttpCoreModule#large_client_header_buffers). Apache has a default URI length of 8190 bytes. This default can be increased through the LimitRequestLine directive (see http://httpd.apache.org/docs/2.2/mod/core.html#limitrequestline). The potential limitations are worth keeping in mind if the API is expected to handle many IDs in a single request.
The API should be able to return the vote values for a single entry and for a single entry and user (in addition to the multi-get versions). Instead of implementing separate calls for the single gets, the multi-get interface can be reused. The request will simply have a list containing only one ID, and the response will have a list of results with only one element. Limiting the total number of endpoints in an API will make it easier to program against, test, and modify.
Responses for an API should follow a predictable convention. There are many different ways to return responses to multi-get requests. One response format could return a JSON array of objects where the order is the same as the IDs requested. The other option is to return a JSON hash with the ID as a key and the response as a value. The latter option is a little more verbose, but it’s more explicit and easier to handle in the client code.
The Vote Interface
The final API decision to be made is what the interface for creating a vote should look like. There are many valid ways to expose this functionality. The only requirement is that the back-end server logic enforce the “one vote per entry per user” rule. The data that must be conveyed is the entry ID, the user ID, and the vote value (up or down).
There aren’t any hard rules for the interface. The decision really boils down to aesthetics. Let’s explore some of the possible interfaces to see which might be the most sensible:
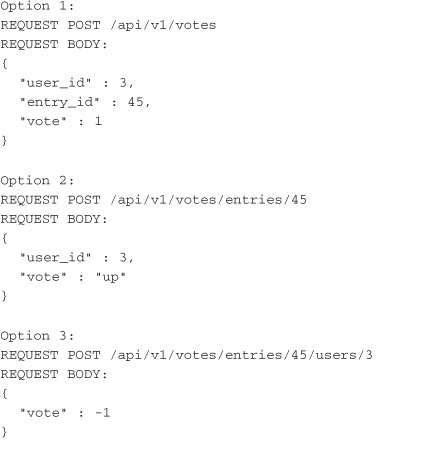
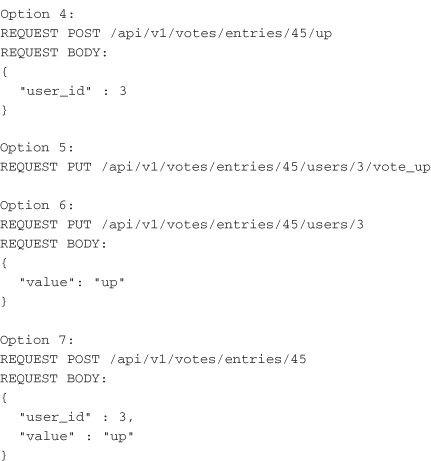
Each of these options uses a different combination of specifying the data in the URI and in the request body. The options also use different HTTP methods and values for the vote. The options highlight the three decisions that must be made when designing the vote interface:
• How should the vote value be represented?
• What data should be specified in the URI or the request body?
• Which HTTP method should be used?
The vote value could be represented as a string of “up” or “down,” or it could be represented as an integer value of 1 or –1. From a math perspective, the 1 and –1 values are appealing. They can be added together, and they use fewer characters for transmitting the actual vote value. The “up” and “down” values provide a little more readability. The words also have symmetry. It’s intuitive that if you see “up” as a vote value, you can assume that “down” is the other one. With a value of 1 you might wonder if 0, –1, or any other integer values are valid. Finally, using “up” or “down” keeps you from attempting to add the values passed in from the API call, which could introduce bugs. What if someone posts a vote value of 100? The server will have to make sure to bounds check the values. When you use “up” and “down,” it’s already known that the server will have to check which of those the value is. It keeps you from attempting something clever like using integer values for votes and adding them to totals, which is where you might introduce bugs. However, it is important to note that the server has to ignore case on the value.
The choice of which URI to use is another place where API design has a large amount of flexibility. The seven options take various approaches in how to divide the data. The vote information can be transmitted in the URI or in the request body. One option shows all the data conveyed in the request body, while another has a completely empty request body with a fully descriptive URI.
The best choice for URI can be narrowed down by considering how RESTful the interface is and what the requirements are. Specifically, one requirement is that a user can have one vote per entry. This makes options that don’t expose the vote as a specific resource less appealing (for example, the calls to vote_up as a remote procedure call).
Considering REST design goals helps determine whether to use PUT or POST for the interface. Notice that the options that expose the vote as a specific resource both use PUT, while all the others use POST. This makes sense because specific resources should be put while the others represent an append to a list or an RPC-style API call.
API Design Guidelines
The following guidelines help determine which API makes the most sense:
• URIs should be descriptive—For submitting a vote, the URI should at least contain the word vote or votes.
• When possible, API endpoints should be exposed as resources—Preference is given to the resource and RESTful style. Avoid constructing APIs that look like remote procedure calls (for example, XML-RPC). Examples such as those with vote_up in the URI can be ruled out based on this guideline.
• Data should be descriptive—Ideally, the data being transmitted should be human readable. It should be clear what the intention is by reading the URI and the request body. Vote values of integers leave a bit of guesswork. While they may be more efficient, they aren’t as descriptive.
These criteria can help you narrow down your choice to option 6 or option 7. Either one of these seems like a decent choice. However, option 6 is a little more appealing because it is more specific. Option 7 has the vote appended to the list of votes on an entry. Meanwhile, option 6 is a PUT to specify the value of the vote for a given entry and user. This gives the most descriptive URI and fits quite nicely with REST principles. The call is setting the value of the vote resource.
Models
Before you get to the HTTP service interface, you need to create the data models. The same ActiveRecord models can be used across all services. This will help highlight how the HTTP service interface portion differs among frameworks. When it comes to the service design, the underlying model shouldn’t be very important. It can have performance implications for later, but the underlying model can be changed later with ease because of the service-layer abstraction.
The implementation example uses the simplest data structure to store everything. In fact, the data for this entire service can be encapsulated in the following model (which is based on ActiveRecord 2.3):
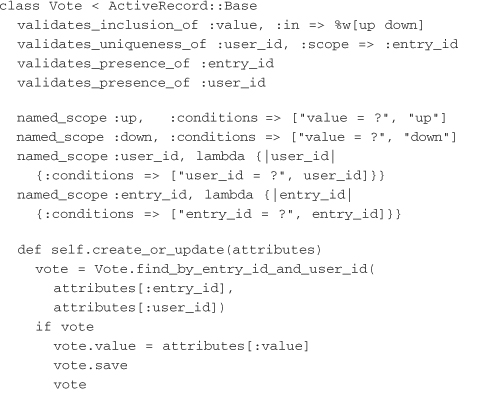
The first four lines of this model provide the necessary validations. The vote value may only be an “up” or a “down,” each user may have only one vote per entry ID, and an entry ID and user ID are required. If a validation error occurs, the service responds with a 400 error and the JSON representation of the ActiveRecord errors.
The named scopes provide the finders that will be used in the various service API calls. They provide calls to to find up votes, down votes, votes by user ID, and votes by entry ID. The remaining methods wrap up the logic that the service will provide. The API needs to create a vote or update its vote value through the create_or_update method. The remaining methods return only the data needed for service responses. Note that the entry_ids_for_user method uses the Will Paginate gem (http://wiki.github.com/mislav/will_paginate) to provide pagination.
This model is a very simple representation for the functionality needed by the vote service. For example, it’s not storing any aggregate stats. Instead, everything is calculated on the fly. In order to get the service up quickly, this is fine, but over time it will most likely migrate to a more denormalized design. This could include additional tables or indexes for looking up votes by either user or entry or counter caches to store totals.
Remember that one of the big advantages of using services is encapsulation. These kinds of changes can be made to the underlying models over time, with the service consumers remaining blissfully ignorant. In a standard Rails application, this is much more difficult because there may be many more points of entry directly to the vote model. With the vote service, the only thing that touches the model is the service layer itself.
Rails
A full Rails application can be created to serve up the vote service. To start it off, you have to go through the regular steps to create the Rails application, the vote model, and the vote controller:

The three commands shown here create the basic structures for the Rails service.
The following sections show examples for both Rails 2.3 and Rails 3. Many readers may still be running Rails 2.3, but feel free to skip to the next section if you’ve already upgraded to Rails 3.
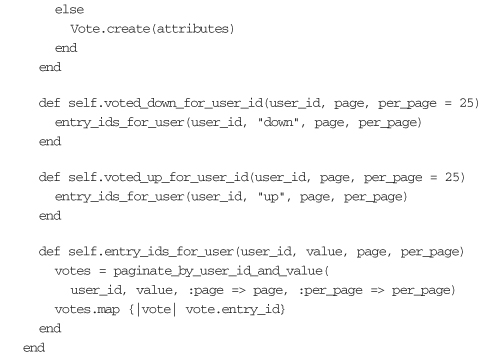
Rails 2.3 Routes
You need to define the service entry points in the routes. The following section covers how to use routes in Rails 2.3 to specify the HTTP entry points. You edit the routes to create the public entry points for the service. These declarations in routes.rb represent the entire public interface for the vote service:
As you can see, this interface doesn’t use routes in the standard RESTful resources style. The first route specifies the controller and action for creating a vote. The following named routes show how votes and the aggregate totals can be retrieved. Now the actions must be created in the vote controller to handle each public API call.
Rails 3 Routes
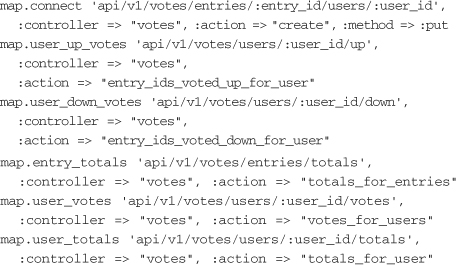
Rails 3 features a new router that gives it some additional functionality and introduces a new domain-specific language for defining routes. The syntax for defining the routes for the service make it a bit cleaner and even makes it possible to specify the API version in the HTTP header:
The Rails 3 example removes the version from the URI. The scope block at the beginning tells the Rails router to look only for incoming requests that start with /api/ratings. The constraints block shows the version check. It states that the request header must contain Accept: application/vnd.pauldix.voteservice-v1+json. For some APIs, it may be preferable to default to the latest version of the API if no Accept header is present to request a specific version. Thus, only requests for older versions of the API would require the header. The section after the constraints shows the matching of the URI entry points to the vote controller.
The Rails Controller
The Rails controller code can be used in either the Rails 2.3 or Rails 3 API. It maps the incoming requests to the appropriate model logic for storing and retrieving votes:
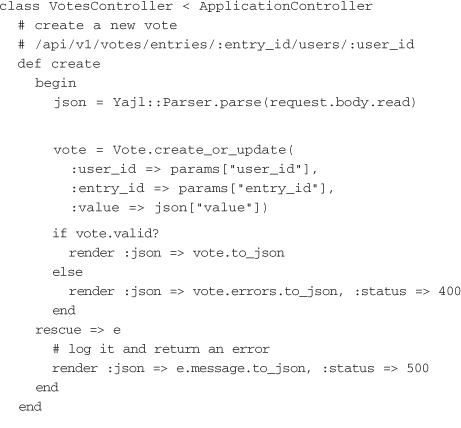

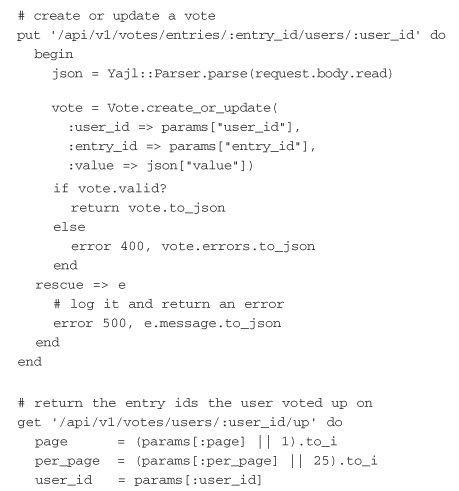
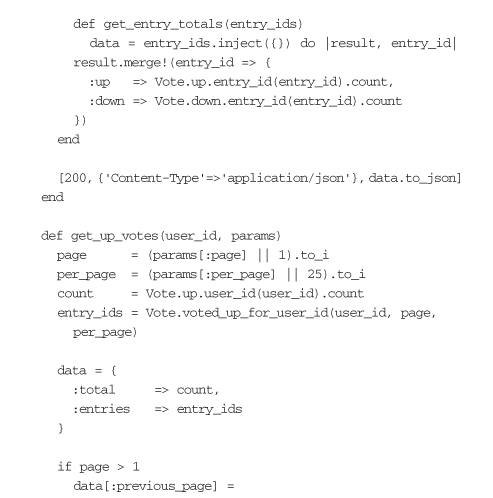
The create method is the action that creates the vote. If there are validation errors, they are converted to JSON and returned with an HTTP response code of 400. There is also a general catchall for unexpected errors that returns with the exception message and an HTTP response code of 500. If all goes well, the API returns a response code of 200 with the vote JSON in the body. To parse the JSON in the request body, the example uses the yajl-ruby library, but you can also use the JSON gem.
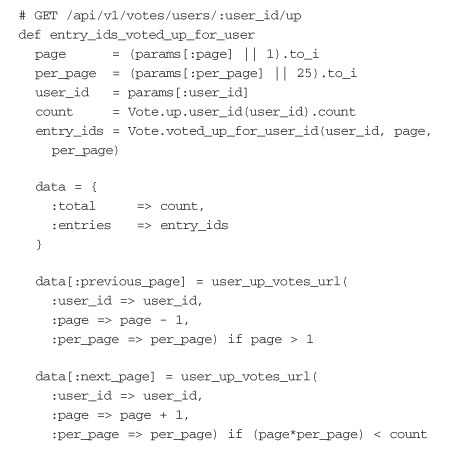
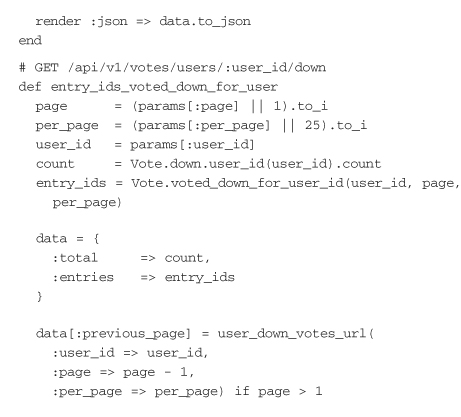
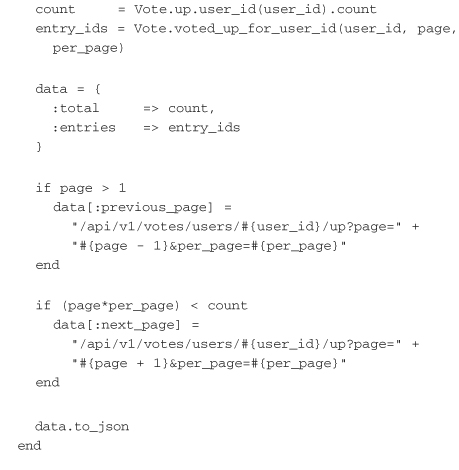
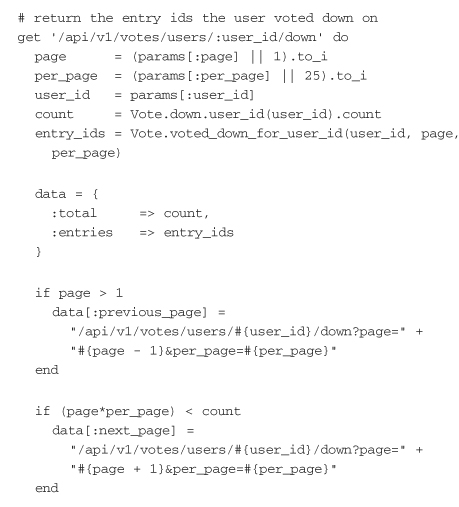
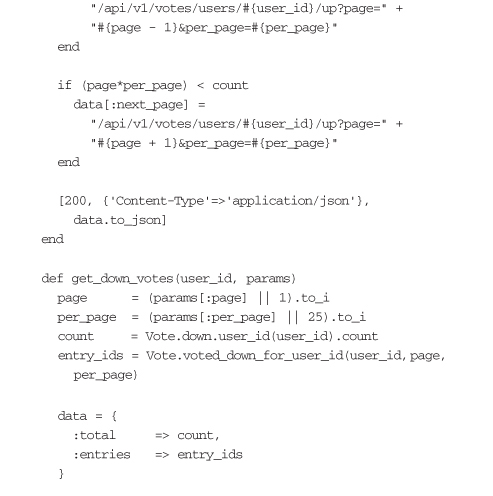
Next are the methods for returning user up and down votes. The example keeps all the response assembly code in the controller to keep things visible. As a result, the controller actions have quite a bit of code in them for handling pagination. Another option for organizing this kind of logic is to use a presenter pattern. The important part of these methods is that links are included for previous and next pages, if needed. It’s a good idea to include some kind of pagination like this in any API call that can return a list. The API would also want to add limits on the page size later.
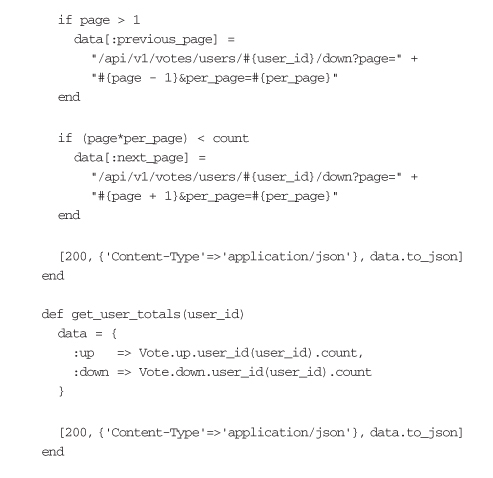
Finally, APIs return the vote information for a specific list of entry IDs. This example uses the GET method with the single parameter ids. For the response, it builds up a hash of entry ID to the corresponding vote information. Once the hash is built, it is returned as JSON in the response.
The overall structure of this controller jumps out because it doesn’t map to the standard Rails RESTful CRUD style of development. These calls are fairly specific, and there are far more GETs than CREATEs. For the most part, the API is simply an HTTP-facing interface for the model object. The only things that lie outside the model have to do with parsing requests and managing URIs.
For the simple needs of the vote service, the entire Rails framework is overkill. It doesn’t need any of the view or helper constructs. Further, the way it uses controllers seems a bit off. It doesn’t fit with the regular Rails paradigm. Let’s take a look at some offerings that are a bit more service focused or modular.
Sinatra
Sinatra is a lightweight web services framework built on top of Rack. It is designed for small, simple web applications and services, so it is a perfect fit for your vote service. You can use the same model as you did with your Rails implementation.
Sinatra doesn’t come with any built-in generators, so you have to generate your own application structure. However, the number of directories and the amount of support code needed is minimal. The example has to be able to run ActiveRecord migrations, load an environment, and support the Rack application loading style. The directory structure should like this:

The setup and required files are very simple. Included are config, db, and models directories. The vote model and its migration have been copied over from the Rails example. The HTTP services interface is defined in service.rb. Finally, the rackup command and other web servers use the config.ru file to load the application.
With the basic structure created, it’s time to look at the implementation of the service in service.rb:
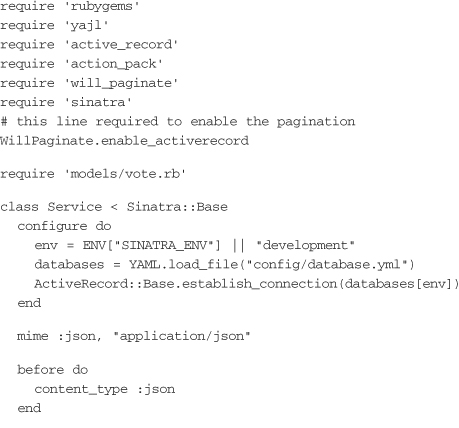
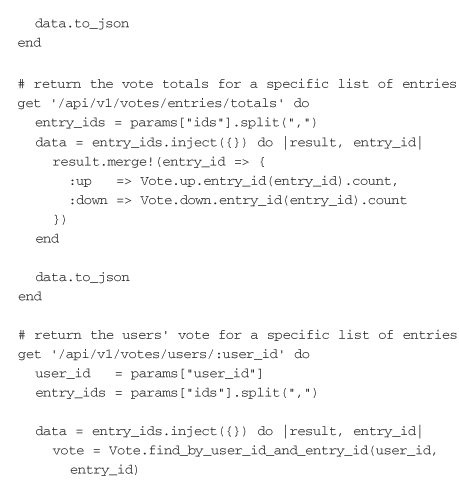
First, the required libraries for Service are loaded. Inside the Service class itself is a configure block that gets called when the service is initially loaded. It is here that the ActiveRecord connection is set up. The MIME type JSON is then defined so it can be set on every response coming from this service in the before block.
The rest of service.rb is the full API interface. Unlike with Rails, with Sinatra, routes are defined with the implementations of their handlers. For example, line 20 in this example defines the URI for creating a vote. It should be a PUT call that matches the pattern /api/v1/votes/entries/:entry_id/users/:user_id.
There are two major differences between this code and the Rails code. First, the Sinatra service has dropped all the extra baggage around the service. Everything is contained in a single file. Second, the routes reside with the implementation of what those routes do. For a small service like the vote service, this single file can be referenced to get an idea of what the public interface looks like. It’s a single point of reference for the service interface.
Rack
This section looks at using the raw Rack interface for implementing the vote service. Rack was designed to wrap HTTP requests and responses in a very simple interface that is modular and versatile. It is on top of this simple unified API that Rails, Sinatra, and many other frameworks are built. In fact, you could build your own simple service framework on top of Rack. The following example works with Rack directly.
As with Sinatra, with Rack there is a simple directory structure to the service. The entire service can be contained within a single file. For pure Rack applications, everything can be contained in a service.ru file. The rackup file becomes the actual service:

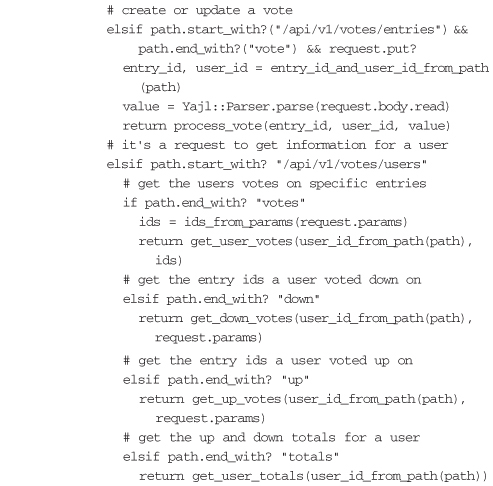
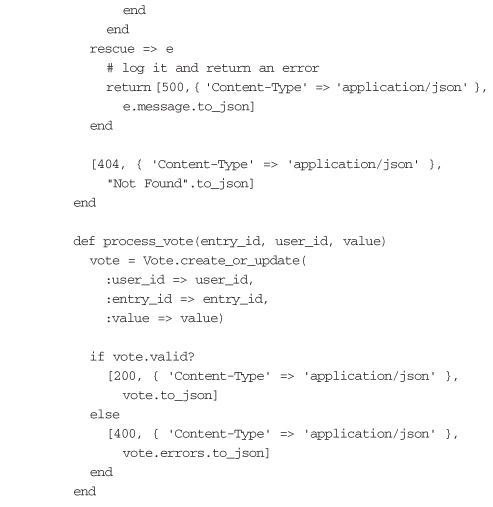
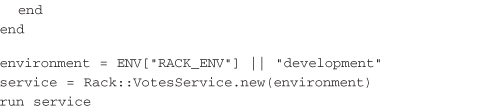
The beginning of the rackup file looks very similar to the Sinatra service, with the same required libraries. The VotesService class is inside the Rack module, but this is only out of convention and not a requirement. The important part of the VotesService class is the call method. Every request that comes into Rack will invoke a call and pass in the env variable.
The env variable consists of the regular CGI environment variables that hold information about the request. Those variables can be accessed through the env hash, but it’s easier to work with the Rack Request wrapper than the environment variables directly. Request takes the env variables and wraps them in a friendlier interface. The rest of the call method is a series of statements that determine which request is being made to the API.
To make things a little more readable, the implementation of each API entry point is its own method. This means that the entire body of call methods is devoted to resolving a request to a Ruby method. The implementations of these methods are almost identical to the implementations in the Sinatra example.
In normal circumstances, you probably wouldn’t want to write Rack code like this. The code inside the call method highlights some of the common things you want out of a service framework: mapping a request URI and HTTP method to a Ruby method (like routes in Rails) and pulling out values from the request path and query string. A more advanced service interface might route based not only on URI and HTTP method but on headers as well. For example, if you were using headers to specify the API version, it would be helpful to route based on that information. The raw Rack implementation shows what common elements Sinatra and Rails provide.
Conclusion
This chapter takes a quick tour of a few of the options for implementing services in Ruby. However, it only scratches the surface. There are many frameworks out there, including Wave, Mack, and several others. However, the three options reviewed in this chapter give a good idea of different ways for structuring the code for a service.
While Rails is probably the most familiar option, it includes extra code and scaffolding that are unnecessary. Sinatra provides a simple, clean interface for mapping requests to blocks of code for their implementation. The common element among most frameworks is Rack. However, while you can write a raw Rack-based service, its implementation is quite messy.
Ultimately, the choice of which framework to use comes down to aesthetics. Most frameworks can accomplish the job. While requests may run a little more slowly through the Rails framework, the service application layer is horizontally scalable. However, services should strive for simplicity. This means keeping the amount of code to a minimum and striving for readability and maintainability throughout.