3. Creating and Managing Images
So far, I’ve introduced Photoshop Elements and worked mostly in Bridge, importing and arranging photos for manipulation later. But Elements is based on the code from Photoshop, the industrial-strength image editor used by the pros. As such, it’s important to build a foundation of knowledge about digital images in preparation for editing them later.
This chapter offers some basic guidelines on adjusting image size and resolution. If you want to e-mail a photo to a friend, you’ll need a small file size for easy delivery—so you’ll want to create a low-resolution image, which means it contains a smaller number of pixels. If you’re planning to print high-quality images on your ink-jet printer, you’ll want to maintain as high a resolution as your printer can handle (meaning a greater density of pixels) to ensure a crisp, clear print.
I also cover creating images from scratch. You’ll also learn the different methods for viewing additional information about your images and working with the new window behavior in Photoshop Elements 8.
Understanding Resolution and Image Size
Resolution and image size are frequently used and often misunderstood terms.
Resolution simply refers to the number of pixels, or picture elements—tiny, square, building blocks—that are packed into a digital image. Today’s computer monitors and LCD displays pack millions of pixels into the screen you’re viewing; the more pixels, the higher the resolution, and in general the more detail you’re able to see.
Image size refers to both the print size and resolution of an image. Depending on whether you want to print a photograph, post it on a Web page, or e-mail it to a friend, you’ll need to adjust its image size and resolution accordingly.
Pixel basics
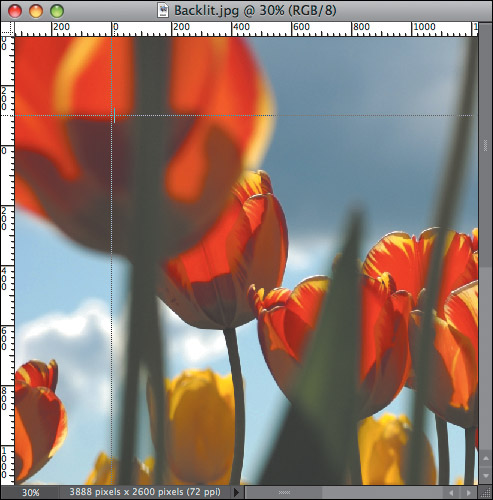
Everything you do in Photoshop Elements involves controlling and changing pixels. Pixels make up your entire image and are typically not visible as individual elements until you zoom in on your picture (Figure 3.1).
Images are often described using pixels as the unit of measure. For example, a digital camera may shoot images at 1600 × 1200 pixels (the x is pronounced “by,” just as in “3 × 5 photo”). Multiplying 1600 times 1200 gives you the total number of pixels in the image, which in this case is 1.92 million pixels.
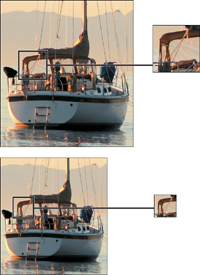
Digital cameras often include preset resolution modes. These settings determine both the physical dimensions and file size of the image (Figure 3.2).
Figure 3.1 Pixels become more visible as you increase the magnification of your image.
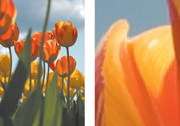
Figure 3.2 Examples of common digital camera resolutions and associated file sizes, all viewed at 100% (also referred to as actual pixels). Higher-resolution images, like the photo on top, provide a sharp, clear picture that’s excellent for printing. Lower-resolution images, like the bottom photo, lack sufficient pixel information for printing purposes, but work fine for e-mailing or posting on the Web.
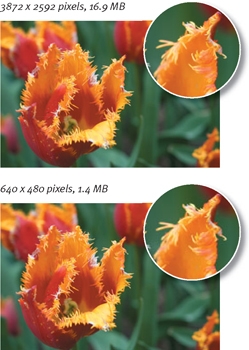
Figure 3.3 The display of an onscreen image is based on the resolution of the image, the size of the monitor, and the monitor resolution.
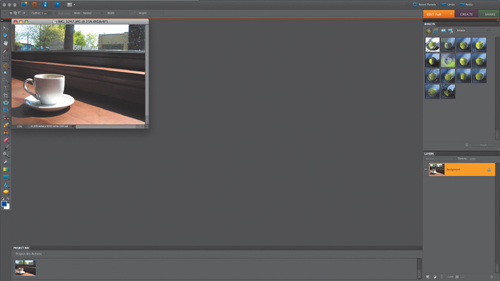
Figure 3.4 A monitor set to 1024 × 768 is a common setting, and allows program menus to be seen more easily.
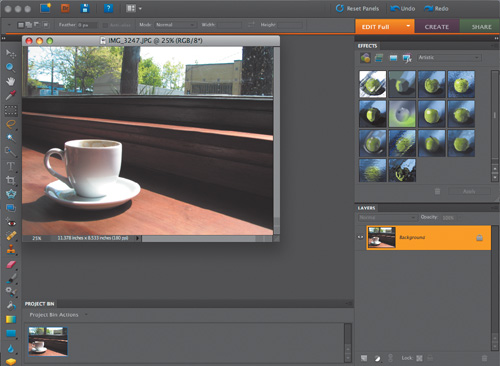
Figure 3.5 The same monitor set to 800 × 600 displays fewer pixels per inch, so less of the image is visible.
Displaying and printing images
Any discussion of resolution and output can be confusing, so you need to keep a few basic details in mind. Image resolution is described in pixels per inch, or ppi.
The ideal amount of detail and level of resolution depends on how you intend to use an image. If you’re going to display your photos on the Web, keep in mind that large files take forever to download and view, so you’ll want to choose a lower resolution like 72 ppi (72 ppi is the most common image resolution for monitor displays).
Three factors affect the way an image is displayed on a computer monitor: the number of pixels in the image, the screen resolution, and the screen size (Figure 3.3). The size of each pixel is determined by the resolution and size of the monitor. For example, a 17-inch monitor set to a resolution of 1024 × 768 pixels would have 82 pixels per inch (Figure 3.4). The same monitor set to a resolution of 800 × 600 would have fewer pixels per inch, so each pixel takes up more screen space (Figure 3.5). If you change your monitor resolution to a lower resolution setting, the images and icons appear larger on your screen. It takes fewer pixels to fill the monitor, so the size of each pixel appears larger.
Print resolution is usually described by the number of dots per inch, or dpi, a printer is capable of printing. If you want to print a high-quality flyer or photo, you may want to use an image resolution as high as 300 pixels per inch, so that a maximum amount of image information is sent to the printer. Fortunately, a wide range of available image resolutions work well for different situations, and Photoshop Elements includes some automatic functions (such as the Save for Web command) that take the guesswork out of the process.
Creating a New Image
If you want to start with a blank canvas, use the New dialog to set up the basic dimensions, image resolution, and color mode. You can create your own work of art using Photoshop Elements’ many painting and drawing tools, or you can assemble a collage of multiple images. But for now, I’ll stick with the basics.
To create a new image:
1. To create a new image go to the File menu and choose New > Blank File, or press Command-N.
2. In the New dialog, enter a filename; then enter dimensions for the width and height (Figure 3.6). The default size is 6 × 4 inches, which works fine as a starting point. You can always change it later.
3. Set the resolution and color mode. For more information, see Chapter 7, “Changing and Adjusting Colors.”
4. From the Background Contents dropdown menu, choose an option for the background layer of the image.
![]() White is the default background option and creates a pure white background layer for the image. This option is just fine for most purposes.
White is the default background option and creates a pure white background layer for the image. This option is just fine for most purposes.
![]() Background Color fills the background with the current background color—useful if you want a Web graphic that matches the background color of your Web page.
Background Color fills the background with the current background color—useful if you want a Web graphic that matches the background color of your Web page.
![]() Transparent makes the first layer transparent and results in an image with no background at all—a good choice if you’re creating an image for the Web and want it to appear transparent on the page.
Transparent makes the first layer transparent and results in an image with no background at all—a good choice if you’re creating an image for the Web and want it to appear transparent on the page.
Figure 3.6 The New dialog lets you name your new image and set its dimensions, resolution, and color mode.
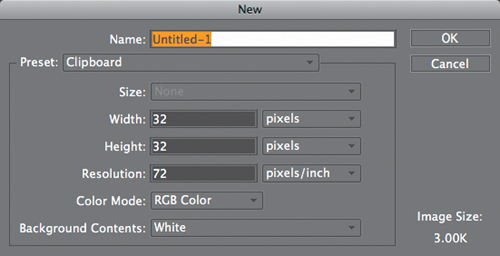
Figure 3.7 This image was duplicated (top) then reduced 50% (bottom). Notice in the zoom views that the reduced image isn’t as detailed as the original. That’s because, even though both have the same number of pixels per inch, the reduced image contains fewer pixels overall.
Changing Image Size and Resolution
Pixel dimensions, image dimensions, and resolution are all adjusted using the Image Size dialog. You will often capture one image and then use it for different purposes, so it’s important to understand how these adjustments affect your image file.
For the Web and other onscreen viewing, it’s common to adjust the pixel dimensions, or number of pixels, to control the resolution and/or file size of the image. This is known as resampling. The Resample Image check box is probably the most important feature to understand. When this box is checked, the pixel dimensions change—that is, the pixels will increase or decrease in number as the image is resampled (Figure 3.7). When the box is not checked, the pixel dimensions are locked in, and no resampling can occur. You can change the document size (the size the image will print), but the number of pixels in the image and the size that the image displays onscreen will stay the same.
There are no absolute rules for the best resolution to use when working with images for the Web or for printing. The best approach is to try a couple of settings, using the following guidelines, and see what works well for your specific situation. Here are some typical situations and recommended resolution ranges:
![]() For onscreen viewing of Web images, 72 ppi is a standard and safe resolution.
For onscreen viewing of Web images, 72 ppi is a standard and safe resolution.
![]() For color images printed on color ink-jet printers, a range of up to 150 ppi is often ideal. The exact resolution will depend on your printer and the type of paper on which you are printing.
For color images printed on color ink-jet printers, a range of up to 150 ppi is often ideal. The exact resolution will depend on your printer and the type of paper on which you are printing.
![]() For color or high-resolution black and white images printed on photo printers, you’ll want a resolution between 150 and 300 ppi.
For color or high-resolution black and white images printed on photo printers, you’ll want a resolution between 150 and 300 ppi.
If you want to create higher-quality professional projects, such as magazine or print design work, be aware that Photoshop Elements is not capable of producing CMYK files (the color-separated files used for high-end printing). If you need an image-editing program that can handle these kinds of jobs, you should consider buying the full version of Adobe Photoshop.
To resize an image for screen viewing:
1. From the Image menu, choose Resize > Image Size to open the Image Size dialog.
2. Make sure the Resample Image box is checked, and click the Resample Image drop-down menu (Figure 3.8).
When you resample an image, its pixels are transformed using a process known as an interpolation. Interpolation is a computer calculation used to estimate unknown values based on existing known values—in this case, pixel color values. So, when you resample an image in Elements, its existing pixels are changed using one of five primary interpolation methods (Figure 3.9):
![]() Bicubic is the default option and generally produces the best results and smoothest gradations.
Bicubic is the default option and generally produces the best results and smoothest gradations.
![]() Bilinear produces medium-quality results.
Bilinear produces medium-quality results.
![]() Nearest Neighbor is the fastest method, but may produce jagged effects.
Nearest Neighbor is the fastest method, but may produce jagged effects.
![]() Bicubic Smoother can be used when you’re increasing the size of an image, or upsampling. Typically, I strongly advise against upsampling, because there is usually a noticeable loss of image quality and sharpness. But I’ve seen acceptable results with Bicubic Smoother, as long as I don’t resize much above 120 percent.
Bicubic Smoother can be used when you’re increasing the size of an image, or upsampling. Typically, I strongly advise against upsampling, because there is usually a noticeable loss of image quality and sharpness. But I’ve seen acceptable results with Bicubic Smoother, as long as I don’t resize much above 120 percent.
![]() Bicubic Sharper can be used when you’re reducing the size of an image, or downsampling. Its purpose is to help retain sharpness and detail. My success with this option has been mixed.
Bicubic Sharper can be used when you’re reducing the size of an image, or downsampling. Its purpose is to help retain sharpness and detail. My success with this option has been mixed.
3. To maintain the current width-to-height ratio, make sure Constrain Proportions is checked.
Figure 3.8 The Resample Image drop-down menu includes five options for specifying how the resampling occurs.
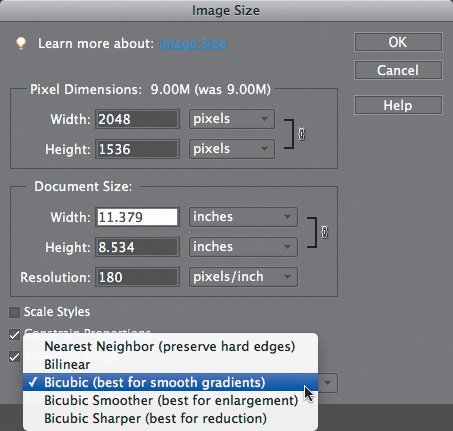
Figure 3.9 You can resample an image using one of three calculation methods: Bicubic (left), Bilinear (center), or Nearest Neighbor (right). Bicubic does the best job at retaining detail and anti-aliasing, whereas Nearest Neighbor creates images with a rougher quality.
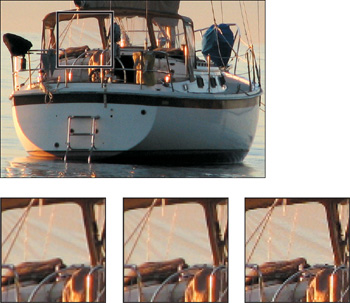
Figure 3.10 Pixel dimensions can be entered as pixels or as a percentage.
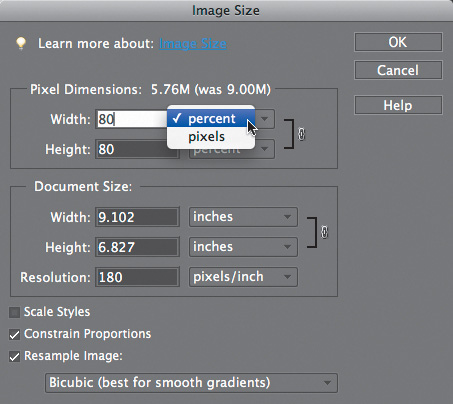
4. Enter new values in the Pixel Dimensions fields. You can enter values in pixels or as percentages (Figure 3.10).
If you choose percent, you can enter a percentage amount in either the Height or Width box to automatically scale the image to that percentage. The new file size for the image is displayed at the top of the dialog (along with the old file size in parentheses).
5. Click OK to complete the change. The image is resized larger or smaller, depending on the pixel dimensions or percentage you entered.
![]() Tip
Tip
![]() When you change an image’s size by changing its pixel dimensions, you also change its print size (you’ll see the change in the width and height dimensions in the Document Size fields of the Image Size dialog). Although these images are acceptable for onscreen viewing or as quick test prints, you may be disappointed with their printed quality. That’s because you discard image information by resampling, and so lose some sharpness and detail.
When you change an image’s size by changing its pixel dimensions, you also change its print size (you’ll see the change in the width and height dimensions in the Document Size fields of the Image Size dialog). Although these images are acceptable for onscreen viewing or as quick test prints, you may be disappointed with their printed quality. That’s because you discard image information by resampling, and so lose some sharpness and detail.
To resize an image for printing:
1. From the Image menu, choose Resize > Image Size.
2. To maintain the current width-to-height ratio, check that the Constrain Proportions option is selected.
3. Uncheck the Resample Image box.
4. Choose a unit of measure (or a percentage) and then enter new values for the width or height in the Document Size portion of the dialog (Figure 3.11).
In the Document Size portion of the dialog, the resolution value changes accordingly. For instance, if you enter width and height values of half the original image size, the resolution value will double, and the image will print clearer and sharper. That’s because you’re compressing the same number of pixels into a smaller space. So, when scaled at 50 percent, an image 4 inches wide with a resolution of 150 pixels per inch (ppi) will print at 2 inches wide and at a resolution of 300 ppi.
5. Click OK to complete the change.
The image’s print size will be changed, but since it still contains the same number of pixels, it will appear to be unchanged on your screen. You can, however, view a preview of the final print size onscreen:
![]() From the View menu, choose Print Size. The image is resized on your screen to approximate its final, printed size (Figure 3.12).
From the View menu, choose Print Size. The image is resized on your screen to approximate its final, printed size (Figure 3.12).
![]() From the View menu, choose Actual Pixels, or press Command-Option-0 to return the display size on your screen to 100 percent.
From the View menu, choose Actual Pixels, or press Command-Option-0 to return the display size on your screen to 100 percent.
![]() Tip
Tip
![]() To return the dialog to its original settings, press Option to change the Cancel button to Reset, then click Reset.
To return the dialog to its original settings, press Option to change the Cancel button to Reset, then click Reset.
Figure 3.11 Enter new width and height values to change an image’s print size.
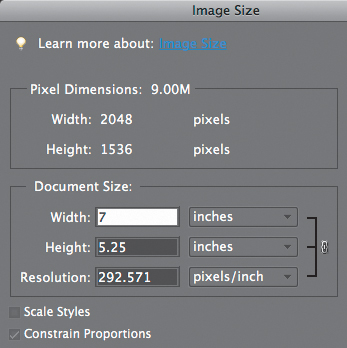
Figure 3.12 An image can be viewed at an approximation of its final print size, even when its resolution differs from the computer’s display.

Figure 3.13 Any two sets of color information (RGB, HSB, Web Color, or Grayscale) can be viewed at once.
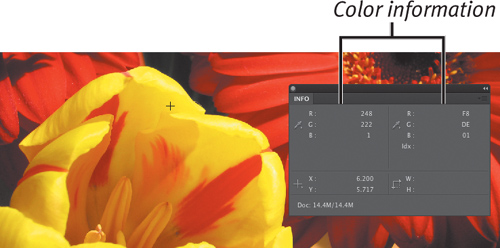
Figure 3.14 Color modes (and other settings) can be changed from pop-up lists in the panel.
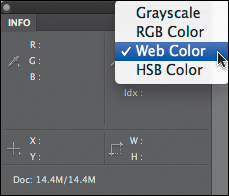
Figure 3.15 The x and y coordinates of the pointer are shown in the Info panel.
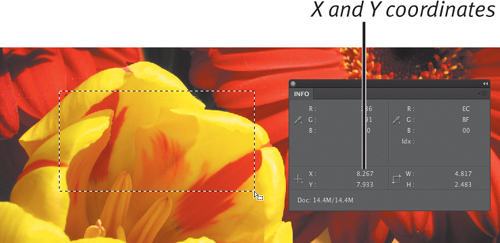
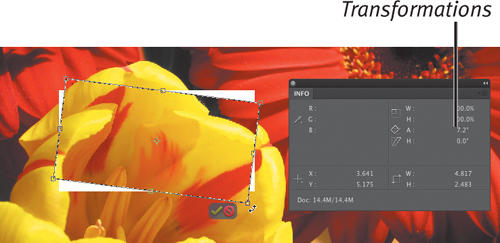
Figure 3.16 Any change in the scale or transformation of a selection or layer is visible in the Info panel.
Getting Information about Your Image
The Info panel displays measurement and color information as you move a tool over an image. In addition, you can customize the status bar at the bottom of the Info panel to display different file and image information.
To use the Info panel:
1. From the Window menu, choose Info to open the Info panel.
If you like, you can drag the Info panel into the Panel Bin.
2. Select the desired tool and then move the pointer over the image. Depending on the tool you are using, the following information appears:
![]() The numeric values for the color beneath the pointer. You can view any two sets of color modes at the same time (Figure 3.13). Information for different color modes can be displayed at any time by clicking either of the eyedropper cursor buttons in the Info panel (Figure 3.14).
The numeric values for the color beneath the pointer. You can view any two sets of color modes at the same time (Figure 3.13). Information for different color modes can be displayed at any time by clicking either of the eyedropper cursor buttons in the Info panel (Figure 3.14).
![]() The x and y coordinates of the pointer, and the starting x and y coordinates of a selection or layer, along with the change in distance as you move the pointer over your image (Figure 3.15).
The x and y coordinates of the pointer, and the starting x and y coordinates of a selection or layer, along with the change in distance as you move the pointer over your image (Figure 3.15).
![]() The width and height of a selection or shape and the values relating to transformations, such as the percentage of scale, angle of rotation, and skew (which distorts a selection along the horizontal or vertical axis) (Figure 3.16).
The width and height of a selection or shape and the values relating to transformations, such as the percentage of scale, angle of rotation, and skew (which distorts a selection along the horizontal or vertical axis) (Figure 3.16).
![]() Tip
Tip
![]() It’s usually quicker to change units of measure using the Info panel rather than by using the Preferences menu.
It’s usually quicker to change units of measure using the Info panel rather than by using the Preferences menu.
To display different Info panel options:
1. Click the More button on the Info panel to open the panel menu, and then choose Panel Options (Figure 3.17).
2. Use the drop-down menus in the top three areas of the dialog to change the color and unit options you would like the panel to display (Figure 3.18).
3. In the Status Information area of the dialog, click the check box next to the options you would like the panel to display (Figure 3.19).
Here are descriptions of some of the most useful options:
![]() Document Sizes displays information relating to the file’s size. The first number represents the approximate size of the file if flattened (all layers combined into one) and saved. The second number represents the current file size, with layers.
Document Sizes displays information relating to the file’s size. The first number represents the approximate size of the file if flattened (all layers combined into one) and saved. The second number represents the current file size, with layers.
![]() Document Profile displays the color mode of the image.
Document Profile displays the color mode of the image.
![]() Document Dimensions displays the width and height of the image.
Document Dimensions displays the width and height of the image.
![]() Scratch Sizes displays the amount of memory needed to process the image. The first number represents the memory currently used to display all open images. The second number represents the total available RAM. If you think you’re running into memory problems and need to add more RAM to your computer, viewing this information will help you evaluate the problem.
Scratch Sizes displays the amount of memory needed to process the image. The first number represents the memory currently used to display all open images. The second number represents the total available RAM. If you think you’re running into memory problems and need to add more RAM to your computer, viewing this information will help you evaluate the problem.
Figure 3.17 Access Panel Options from the Info panel’s More menu.
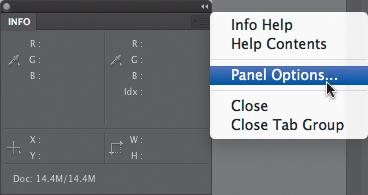
Figure 3.18 You can control what type of information will be displayed for color modes and for units of measurement.
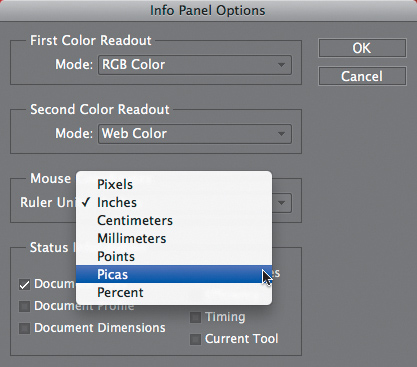
Figure 3.19 The Info panel can display the status for up to seven different types of information, all at the same time.

Figure 3.20 Open documents occupy the main workspace and are only visible one at a time. Click a tab to bring a document to the front.
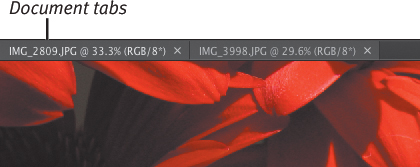
Figure 3.21 You can open multiple windows of the same image from the View menu.
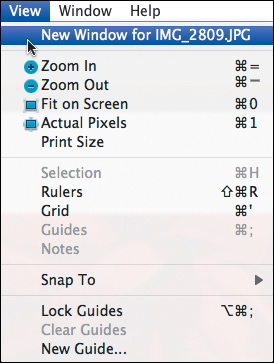
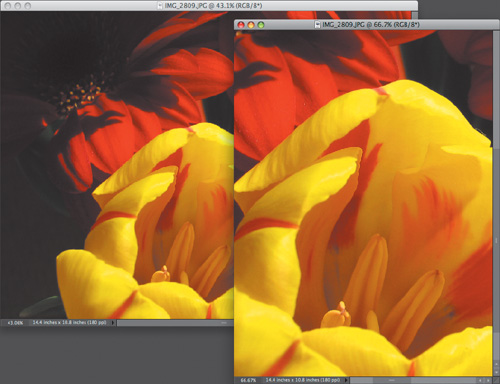
Figure 3.22 Multiple image views let you work on a detailed area while at the same time allowing you to see how the changes affect the overall image.
Arranging Windows
Photoshop Elements 8 adopts Adobe’s new approach to managing document windows in its applications. Instead of windows floating on top of each other, they all occupy the entire work area, with tabs that indicate open files (Figure 3.20).
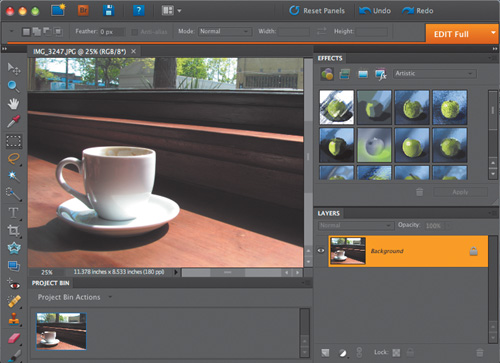
If you want to return to the behavior of previous versions, go to Photoshop Elements > Preferences > General and enable the option titled Allow Floating Documents in Full Edit Mode. With that active, you can drag a window’s title bar away from the workspace edge to make it appear as a free-floating window.
The options in the next section assume you’ve enabled that option; otherwise, many are not available.
Opening and Arranging Multiple Views
You can open multiple windows with different images, or, if you prefer, you can open multiple views of the same image. This is a handy way to work on a detailed area of your image while viewing the full-sized version of the image at the same time. It’s especially useful when you’re doing touch-up work, such as correcting red eye or erasing a blemish in a photo.
To open multiple views of an image:
1. From the View menu, choose New Window for the name of current file (Figure 3.21).
2. Drag the title bar to move the additional window(s) as necessary to view them simultaneously.
You can set different levels of magnification for each window to see both details and the big picture at the same time (Figure 3.22).
Do one of the following:
![]() To create cascading, overlapping windows, choose Window > Images > Cascade (Figure 3.23).
To create cascading, overlapping windows, choose Window > Images > Cascade (Figure 3.23).
![]() To display windows without overlap, choose Window > Images > Tile (Figure 3.24).
To display windows without overlap, choose Window > Images > Tile (Figure 3.24).
To close multiple view windows:
Do one of the following:
![]() To close a single window, click the close button on that window’s title bar.
To close a single window, click the close button on that window’s title bar.
![]() To close all document windows, from the File menu, choose Close All or press Command-Option-W.
To close all document windows, from the File menu, choose Close All or press Command-Option-W.
![]() Tips
Tips
![]() To quickly switch from one open window to another, press Command-~ (tilde).
To quickly switch from one open window to another, press Command-~ (tilde).
![]() When you’re working on a zoomed-in image, it’s easy to get lost. From the Window menu, choose Images > Match Zoom to set all open windows to the same zoom level. Or, choose Images > Match Location to make the same visible pixels appear in all windows. That’s a quicker option than scrolling around looking for a match, or using the Navigator panel.
When you’re working on a zoomed-in image, it’s easy to get lost. From the Window menu, choose Images > Match Zoom to set all open windows to the same zoom level. Or, choose Images > Match Location to make the same visible pixels appear in all windows. That’s a quicker option than scrolling around looking for a match, or using the Navigator panel.
![]() To quickly switch all floating windows to tabbed, choose Window > Images > Consolidate All to Tabs.
To quickly switch all floating windows to tabbed, choose Window > Images > Consolidate All to Tabs.
Figure 3.23 Cascading windows overlap with some portions of each image visible. They allow you to keep multiple windows open at once, without cluttering the work space.
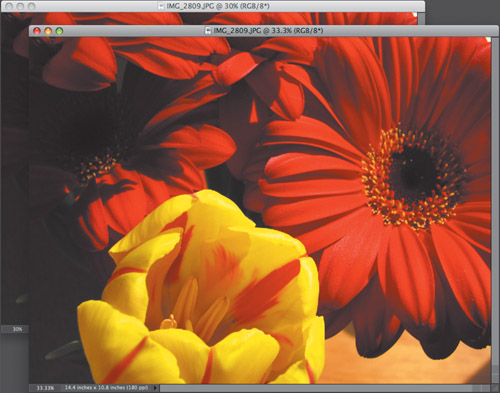
Figure 3.24 Tiled windows are arranged so they don’t overlap.
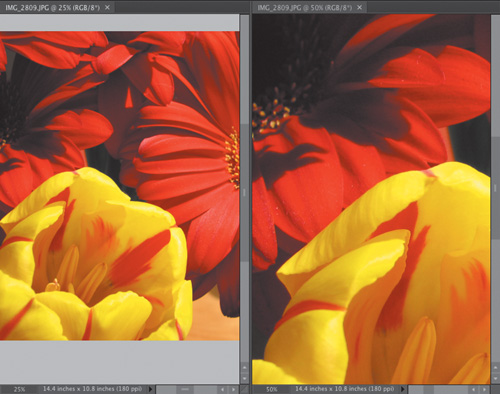
Figure 3.25 The rulers’ zero point establishes the origin of the rulers.

Figure 3.26 Drag the zero point to a new location anywhere in the document window.
Using Rulers
Customizable rulers, along the top and left sides of the document window, can help you scale and position graphics and selections. The rulers are helpful if you are combining photos with text (in a greeting card, for example) and want to be precise in placing and aligning the various elements. Interactive tick marks in both rulers provide constant feedback, displaying the position of any tool or pointer as you move it through the window. You can also change the ruler origin, also known as the zero point, to measure different parts of your image.
To show or hide the rulers:
![]() From the View menu, choose Rulers to turn the rulers on and off, or press Command-Shift-R.
From the View menu, choose Rulers to turn the rulers on and off, or press Command-Shift-R.
To change the zero point:
1. Place the pointer over the zero point crosshairs in the upper-left corner of the document window (Figure 3.25).
2. Drag the zero point to a new position in the document window.
As you drag, a set of crosshairs appears, indicating the new position of the zero point (Figure 3.26).
3. Release the mouse button to set the new zero point.
To change the units of measure:
![]() Right-click on either ruler. A contextual menu appears, from which you can choose a new measurement unit.
Right-click on either ruler. A contextual menu appears, from which you can choose a new measurement unit.
![]() Tip
Tip
![]() To reset the zero point to its original location, double-click the zero point crosshairs in the upper-left corner of the document window.
To reset the zero point to its original location, double-click the zero point crosshairs in the upper-left corner of the document window.
Setting Up the Grid
The nonprinting, customizable grid appears as an overlay across the entire document window. As with the rulers, it can be used for scaling and positioning, but it can be especially helpful for maintaining symmetry in your layout and design, or for occasions when you’d like objects to snap to specific points in the window.
To show or hide the grid:
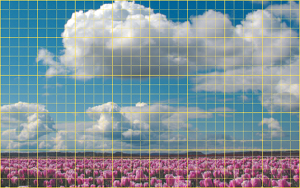
![]() From the View menu, choose Grid to turn the grid on and off(Figure 3.27).
From the View menu, choose Grid to turn the grid on and off(Figure 3.27).
To change the grid settings:
1. From the Photoshop Elements menu, choose Preferences > Guides & Grid to open the Guides & Grid Preferences.
2. From the Color drop-down menu, choose a preset grid color, or choose Custom (Figure 3.28).
Choosing Custom displays the Color Picker, where you can select a custom grid color.
3. From the Style drop-down menu, choose a line style for the major grid lines (Figure 3.29).
4. In the Gridline every drop-down menu, choose a unit of measure; then enter a number in the accompanying field to define the spacing of the major grid lines.
5. In the Subdivisions field, enter a number to define the frequency of minor grid lines (Figure 3.30).
6. Click OK.
Figure 3.27 Activate the document grid from the View menu.
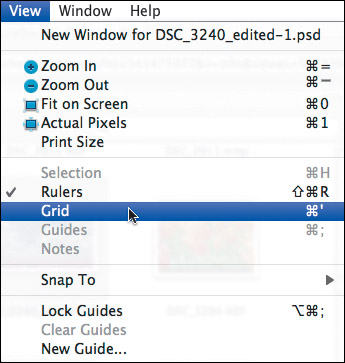
Figure 3.28 Choose a grid color from the list of preset colors or create a custom color.
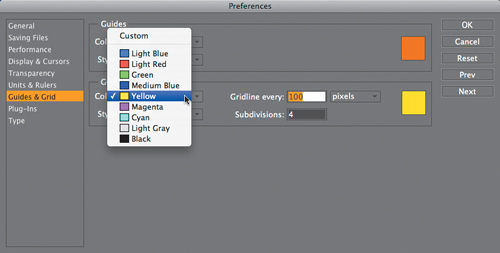
Figure 3.29 Examples of grid line styles.
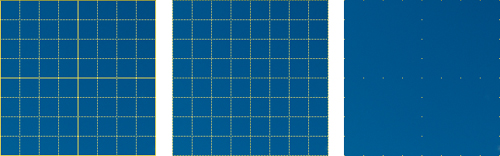
Figure 3.30 This figure shows a document grid with major grid lines set every inch, subdivided by four minor grid lines.