9. Filters and Effects
For decades, photographers have used lens filters to improve and alter the look of their photographs. Filters are frequently used to change the intensity of color values and to lighten certain tones and darken others. In addition to using filters, photographers also rely on darkroom and printing techniques to create wonderfully creative effects.
But thanks to the advancements of digital technology, you don’t have to fiddle with chemicals or additional camera equipment to enhance your photographs. The filters and effects included in Photoshop Elements go far beyond what’s been possible in traditional photography. Many of these filters (such as the Blur filters) allow you to make subtle corrections and improvements to your photos, whereas other filters (such as Artistic, Stylize, and Sketch) can transform an image into a completely new piece of artwork. Photoshop Elements also provides effects you can add to your photos, including striking image effects (lizard skin, anyone?) as well as type effects and unique textures.
In this chapter, I’ll explore the many ways you can use filters and effects to take your work to a whole new level.
Using the Effects Panel
Photoshop Elements offers you almost unlimited possibilities for tweaking and enhancing your images. Most filters include a dialog where you can preview any changes and adjust the settings for either a subtle or dramatic effect. And some of the filters (such as the Liquify filter) are so comprehensive, they seem like separate little applications within Photoshop Elements.
Effects work a bit differently than filters. When you apply an effect, Elements actually runs through a series of automatic actions in which a number of filters and layer styles are applied to your image. Effects are a bit more complex than filters. If you want to add a drop shadow, picture frame, or brushed-metal type to a photo, browse through the Effects panel to see what’s available.
To view the Effects panel:
1. In the Editor, choose Window > Effects (if the panel isn’t already visible).
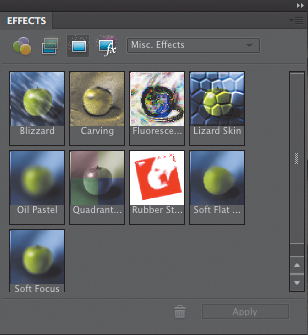
2. Click either the Filters or Photo Effects icon at the top of the Effects panel (Figure 9.1).
Figure 9.1 Access filters and photo effects from the Effects panel.
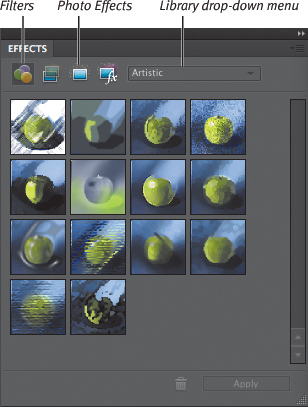
Figure 9.2 When you select Show All from the Library drop-down menu, all filters or effects in their respective libraries are displayed at once.
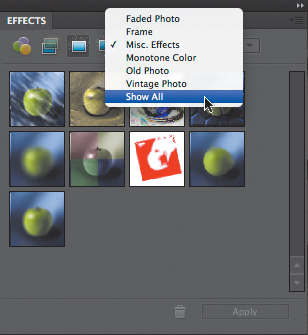
Figure 9.3 Select Show Names from the panel menu to display filters or effects with their names.
To change the number of filters or effects displayed in the panel:
Do one of the following:
![]() Click the Show All button to the right of the Photo Effects button.
Click the Show All button to the right of the Photo Effects button.
![]() If it’s not already selected, choose Show All from the Library drop-down menu at the top of the panel to see all filters or effects (Figure 9.2).
If it’s not already selected, choose Show All from the Library drop-down menu at the top of the panel to see all filters or effects (Figure 9.2).
![]() Select a set of filters or effects from the Library drop-down menu to see just the ones in that set.
Select a set of filters or effects from the Library drop-down menu to see just the ones in that set.
To change the panel view:
Do one of the following:
![]() From the More menu, choose Small, Medium, or Large Thumbnail View to change the size of the filters or effect previews. Medium is the default.
From the More menu, choose Small, Medium, or Large Thumbnail View to change the size of the filters or effect previews. Medium is the default.
![]() From the More menu, choose Show Names to view the filters or effects with their identifying names (Figure 9.3).
From the More menu, choose Show Names to view the filters or effects with their identifying names (Figure 9.3).
![]() Tip
Tip
![]() Filter plug-ins created by third-party developers usually appear at the bottom of the Filters panel menu.
Filter plug-ins created by third-party developers usually appear at the bottom of the Filters panel menu.
Applying Filters and Effects
Depending on the filter or effect you choose and the size of your image, your computer can take a while to apply and display these changes. Of course, computing power increases dramatically every year, along with the typical amount of RAM installed in most new machines. Both the speed of your processor and amount of RAM contribute to faster processing of these transformations. Fortunately, almost all of the filters include a preview window, which allows you to see the result before you decide to apply it.
Effects don’t include a preview window, but you’ll find useful examples of each effect on the Effects panel. For many filters and effects, a good approach is to select a small area of your image and apply the change to see the results—that way, you don’t waste a lot of time waiting for your computer to process changes to the entire image. The exceptions are effects like Frames, where the effect is designed to be applied to your entire image. A few effects (such as the Cutout and Recessed frame effects) require you to make a selection before you can apply the effect.
To apply a filter:
1. To apply a filter to an entire layer, select the layer on the Layers panel to make the layer active. To apply a filter to just a portion of your image, select an area with one of the selection tools (Figure 9.4).
2. Do one of the following:
![]() Double-click a filter on the Effects panel. The Filter Options dialog appears (Figure 9.5).
Double-click a filter on the Effects panel. The Filter Options dialog appears (Figure 9.5).
![]() From the Filter menu, choose a filter from one of the filter submenus.
From the Filter menu, choose a filter from one of the filter submenus.
![]() Drag any filter from the Effects panel onto your image in the image window.
Drag any filter from the Effects panel onto your image in the image window.
Figure 9.4 Filters and effects can be applied to an entire layer or to a selection.
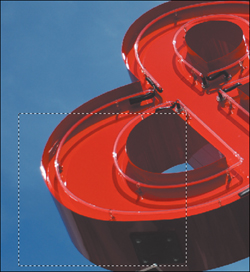
Figure 9.5 The Filter Options dialog includes a large preview window and sliders you can use to adjust a filter’s settings.
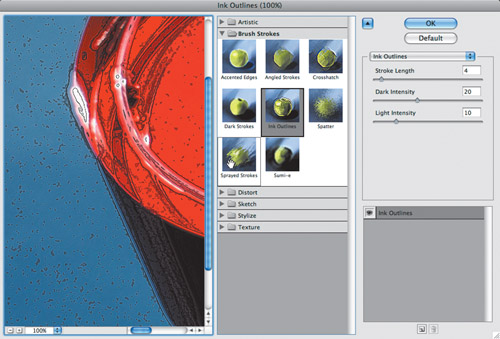
Figure 9.6 To move around (or pan) the preview image, just click and drag to move the image.
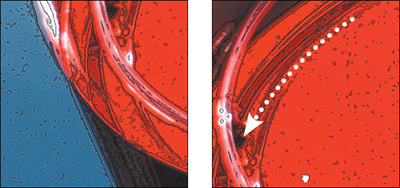
Figure 9.7 After you click OK, the filter is applied to your image.
3. When the Filter Options dialog opens, experiment with the available values and options until you get the look you want.
4. In the dialog preview window, you can change the view by doing one of the following:
![]() To zoom in or out, click either the Zoom In (plus sign) or Zoom Out (minus sign) button.
To zoom in or out, click either the Zoom In (plus sign) or Zoom Out (minus sign) button.
![]() To see a specific area of your image, click and drag within the preview window (Figure 9.6).
To see a specific area of your image, click and drag within the preview window (Figure 9.6).
5. Click OK. The filter is applied to your image (Figure 9.7). If you’re not happy with the result, choose Edit > Undo or select the previous state from the Undo History panel.
![]() Tips
Tips
![]() Filters with additional options include ellipses (…) after their names.
Filters with additional options include ellipses (…) after their names.
![]() The list in the lower-right corner of the Filter Options dialog lets you add multiple filters before applying them to your image. Click the New Filter Layer button (the document icon) and choose another filter to see how it affects the image.
The list in the lower-right corner of the Filter Options dialog lets you add multiple filters before applying them to your image. Click the New Filter Layer button (the document icon) and choose another filter to see how it affects the image.
![]() As you add filters, you’ll notice that you’re presented with two different types of Option dialogs. The Add Noise filter, for instance, opens to a dialog specific to just that filter. But filters contained in the Artistic, Brush Strokes, Distort, Sketch, Stylize, and Texture groups open to an Option dialog where you can not only adjust the settings for the filter you’ve selected, but also choose a completely different filter from a filter sets menu in the center of the dialog. Just click any of the filter set names to open them, and then choose a new filter by clicking its thumbnail. A preview window changes to reflect the new filter you’ve selected.
As you add filters, you’ll notice that you’re presented with two different types of Option dialogs. The Add Noise filter, for instance, opens to a dialog specific to just that filter. But filters contained in the Artistic, Brush Strokes, Distort, Sketch, Stylize, and Texture groups open to an Option dialog where you can not only adjust the settings for the filter you’ve selected, but also choose a completely different filter from a filter sets menu in the center of the dialog. Just click any of the filter set names to open them, and then choose a new filter by clicking its thumbnail. A preview window changes to reflect the new filter you’ve selected.
1. To apply an effect to an entire layer, select the layer to make it active. To apply an effect to just a portion of the image, select an area using one of the selection tools.
2. In the Effects panel, double-click the chosen effect (Figure 9.8).
If you prefer, you can also drag any effect from the Effects panel directly onto your image.
When you apply an effect, it creates one or more new layers immediately above the selected layer (Figure 9.9).
![]() Tips
Tips
![]() To reduce the visible impact of an effect, change the opacity of the effect layer using the Opacity slider on the Layers panel.
To reduce the visible impact of an effect, change the opacity of the effect layer using the Opacity slider on the Layers panel.
![]() Sometimes the filter and effect names, and their thumbnails, don’t represent the variety of results you might get by applying them to an image. Experiment by pushing the filter and effect options to extreme limits. You’ll often be surprised by the results. Print a copy of your image for future reference and to use on other photos. It’s also a good idea to rename the layer with a descriptive name related to the effect you used: for instance, Blizzard 30%.
Sometimes the filter and effect names, and their thumbnails, don’t represent the variety of results you might get by applying them to an image. Experiment by pushing the filter and effect options to extreme limits. You’ll often be surprised by the results. Print a copy of your image for future reference and to use on other photos. It’s also a good idea to rename the layer with a descriptive name related to the effect you used: for instance, Blizzard 30%.
![]() To change the look of an effect, experiment with the various blend modes on the Layers panel.
To change the look of an effect, experiment with the various blend modes on the Layers panel.
Figure 9.8 Double-click any effect in the Effects panel to apply it to an image or selection. You can also drag an effect or filter from the panel into the image window.

Figure 9.9 When you apply an effect, it generates one or more layers above the selected layers. The number of new layers depends on the series of actions required to create the specific effect.
Figure 9.10 You can apply the Motion Blur filter to an entire layer or to a selection, as I’ll do in this photo.
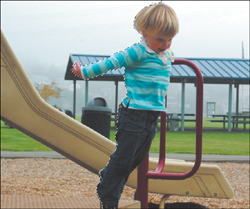
Figure 9.11 Once you’ve chosen a layer or selection, double-click the Motion Blur thumbnail.
Simulating Action with the Blur Filters
Photoshop Elements includes a few blur filters that can create a sense of motion where none exists. In many cases, you’ll want to select a specific area in your photo when using these filters, so that the motion or movement is applied to one object, such as a person, your dog, or a pair of shoes.
The Motion Blur filter blurs a layer or selection in a specific direction and intensity. The result simulates the look of taking a picture of a moving object with a fixed exposure or of panning a camera across a still scene.
The Radial Blur filter creates the impression of a camera zoom or of an object moving toward or away from you. You can also create the impression of an object spinning at variable rates of speed. In either case, the Radial Blur filter lets you control the center of the effect and the amount of blurring or motion.
To add a motion blur to an image:
1. Select the desired layer to make it active. To create a feeling of motion in just a portion of your image, select an area with one of the selection tools (Figure 9.10).
2. Do one of the following:
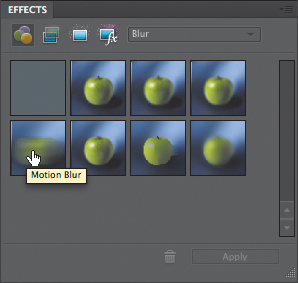
![]() Choose Blur from the Library dropdown menu on the Effects panel, and double-click the Motion Blur filter (Figure 9.11).
Choose Blur from the Library dropdown menu on the Effects panel, and double-click the Motion Blur filter (Figure 9.11).
![]() From the Filter menu, choose Blur > Motion Blur.
From the Filter menu, choose Blur > Motion Blur.
The Motion Blur dialog appears with options for the motion angle and distance.
3. Set the Angle and Distance options to get the look you want (Figure 9.12). You can refer to the preview window in the dialog, and if the Preview option is checked, you can also see the results in the main image window.
By default, the Angle option is set to 0°, meaning that the pixels will be blurred along the horizontal axis as shown next to the Angle text box. So, the impression of motion will be right to left (or left to right) across your screen. You can change the angle by dragging the line on the Angle icon or by entering a number of degrees in the Angle text box.
The Distance option determines the number of pixels included in the linear blur, with the default set to 10 pixels (a moderate amount of blurring). When you reach the upper limits of this option (999 pixels), the objects in your photo may become barely recognizable.
4. When you are satisfied with the effect, click OK to apply it to your image (Figure 9.13).
![]() Tip
Tip
![]() It may look more realistic if you feather your selection before applying the blur (Select > Feather). See Chapter 5 for more on feathering selections.
It may look more realistic if you feather your selection before applying the blur (Select > Feather). See Chapter 5 for more on feathering selections.
Figure 9.12 The Motion Blur dialog includes options for the angle and distance of the effect.
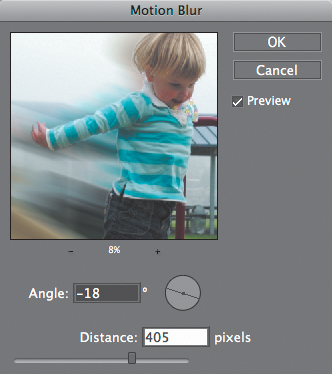
Figure 9.13 Click OK to see the Motion Blur filter applied to your image. If you want to back up and try again, just choose Edit > Undo and experiment with different settings.
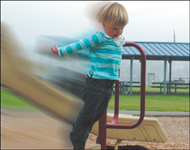
Figure 9.14 The Radial Blur dialog does not include a preview, but the Quality options include Draft, which you can use to quickly apply and view the effects of the filter on your image.
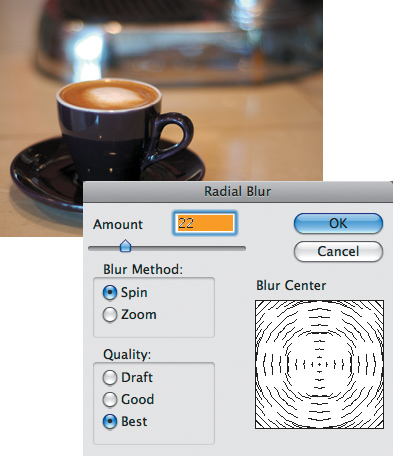
Figure 9.15 To change the center point, drag the preview in the Blur Center window.
To add a circular blur to an image:
1. Select the desired layer to make it active. To create a feeling of radial motion in just a portion of your image, select an area with one of the selection tools.
A circular (elliptical) selection works especially well when you want to create a circular effect.
2. Select the Radial Blur by doing one of the following:
![]() Double-click the Radial Blur filter on the Effects panel.
Double-click the Radial Blur filter on the Effects panel.
![]() Choose Filter > Blur > Radial Blur from the main menu.
Choose Filter > Blur > Radial Blur from the main menu.
The Radial Blur dialog appears, with options for amount of blur, blur center, blur method, and quality (Figure 9.14).
3. Set the Amount and Blur Center values.
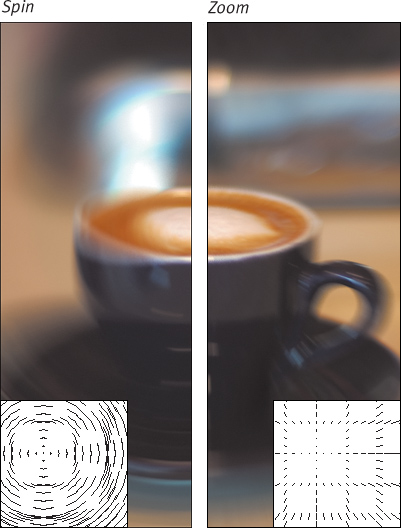
The two Blur Method options are Spin and Zoom (Figure 9.15). Choose Spin to blur along circular lines or Zoom to blur along lines radiating from the center, as if you were zooming in or out of an image.
4. Select a Quality option for the filter.
Draft quality produces a quicker rendering of the filter, but with slightly coarse results. The Good and Best options both take a bit longer to render, but provide a smoother look; there’s not a big difference between the latter two options.
5. When you are satisfied with the effect, click OK to apply it to your image.
![]() Tip
Tip
![]() The Radial Blur filter doesn’t include a preview window, so if you aren’t happy with your results and want to try different settings, just click the Edit Undo button (or press Command-Z) to try again.
The Radial Blur filter doesn’t include a preview window, so if you aren’t happy with your results and want to try different settings, just click the Edit Undo button (or press Command-Z) to try again.
Distorting Images
The Distort filters include an amazing array of options that let you ripple, pinch, shear, and twist your images. Experiment with all of the Distort filters to get a feel for the different effects you can apply to your images. One filter in particular stands above the others in its power and flexibility: the Liquify filter.
The Liquify filter creates amazing effects by letting you warp, twirl, stretch, and twist pixels beyond the normal laws of physics. You’ve probably seen plenty of examples of this filter, where someone’s face is wildly distorted with bulging eyes and a puckered mouth. However, you can also use the Liquify filter to create more subtle changes and achieve effects that would be impossible with any other tool.
The Liquify filter is unique in that it includes a dialog with its own complete set of image manipulation tools. And because the Liquify filter works within its own dialog box, you can’t undo specific changes with the Edit > Undo command or Undo History panel. Fortunately, the Liquify filter offers its own Reconstruct tool to restore any area to its original (or less contorted) state. The Reconstruct tool allows you to “paint” over your image and gradually return to the original version, or stop at any state along the way. If you just want to go back and start over, clicking the Revert button is the quickest method.
To distort an image with the Liquify filter:
1. Select an entire layer, or make a selection of the area you want to change.
2. From the Filter menu, choose Distort > Liquify; or, on the Effects panel, choose Distort from the Library drop-down menu and double-click the Liquify filter.
If your image includes a type layer, you will be prompted to simplify the type to continue. This means the type layer will be flattened into the rest of your image’s layers. Be aware that if you click OK, the type will no longer be editable.
The Liquify dialog appears, including a preview of the layer or selection area. The Warp tool is selected by default, with a brush size of 64 and a pressure of 50 (Figure 9.16).
You’ll probably want to change the brush size and pressure during the course of your work.
3. To change the brush settings, do one of the following:
![]() To change the brush size, drag the slider or enter a value in the option box. The brush size ranges from 1 to 600 pixels.
To change the brush size, drag the slider or enter a value in the option box. The brush size ranges from 1 to 600 pixels.
![]() To change the brush pressure, drag the slider or enter a value in the option box. The brush pressure ranges from 1 to 100 percent.
To change the brush pressure, drag the slider or enter a value in the option box. The brush pressure ranges from 1 to 100 percent.
4. Distort your image with any of the Liquify tools located on the left side of the dialog (Figure 9.17) until you achieve the look you want. To use any tool, simply select it (just as you do tools on the main toolbar) and then move your pointer into the image (Figure 9.18).
Figure 9.16 The Liquify dialog includes its own set of distortion tools as well as options for changing the brush size and pressure.
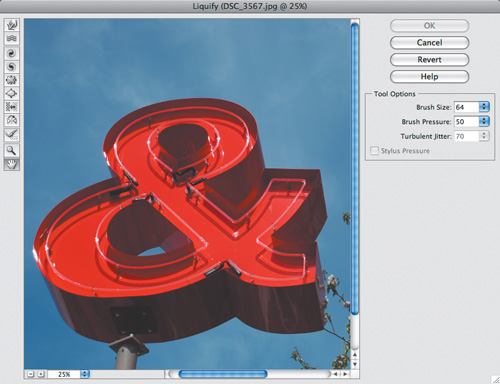
Figure 9.17 The Liquify tool set.
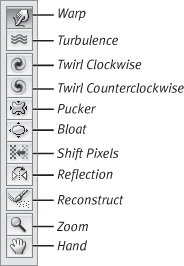
Figure 9.18 The best way to become familiar with the Liquify distortion tools is to experiment with them on a variety of images, as in this series of photos.
To undo changes:
![]() In the Liquify dialog, click the Reconstruct tool. Then, while holding down your mouse button, “brush” over your image to gradually undo each change you’ve made.
In the Liquify dialog, click the Reconstruct tool. Then, while holding down your mouse button, “brush” over your image to gradually undo each change you’ve made.
To undo all Liquify changes:
![]() In the Liquify dialog, click the Revert button to return the image to its original state.
In the Liquify dialog, click the Revert button to return the image to its original state.
![]() Tips
Tips
![]() Here’s another way to undo Liquify changes: In the Liquify dialog, hold down the Option key. The Cancel button changes to Reset. Click the Reset button to undo any changes you’ve made with the Liquify tools. The Revert and Reset buttons work the same way, but the Reset button, true to its name, also resets the Liquify tools to their original settings.
Here’s another way to undo Liquify changes: In the Liquify dialog, hold down the Option key. The Cancel button changes to Reset. Click the Reset button to undo any changes you’ve made with the Liquify tools. The Revert and Reset buttons work the same way, but the Reset button, true to its name, also resets the Liquify tools to their original settings.
![]() The Reflection tool can be a little hard to get used to. You may find it works better if you use a large brush size and 100 percent pressure. Also, the direction of your stroke determines which way the image is reflected.
The Reflection tool can be a little hard to get used to. You may find it works better if you use a large brush size and 100 percent pressure. Also, the direction of your stroke determines which way the image is reflected.
Correcting Camera Distortion
Most cameras may be digital these days, but it’s still an optical medium, and every camera has tradeoffs; for example, some lenses offer incredible zoom, but at the expense of introducing barrel distortion around the edges. The Correct Camera Distortion filter provides tools to compensate.
To correct camera distortion:
1. Select a layer or make a selection to edit.
2. From the Filter menu, choose Correct Camera Distortion. The dialog of the same name appears (Figure 9.19).
3. Apply the following controls based on the distortion found in your image:
![]() Remove Distortion. Drag the slider to the left to bloat the image or to the right to pinch it (Figure 9.20).
Remove Distortion. Drag the slider to the left to bloat the image or to the right to pinch it (Figure 9.20).
![]() Vignette. To add or remove a vignette (such as found in old photographs), drag the Amount slider to match the vignette area. Use the Midpoint slider to adjust the vignette’s size.
Vignette. To add or remove a vignette (such as found in old photographs), drag the Amount slider to match the vignette area. Use the Midpoint slider to adjust the vignette’s size.
![]() Perspective Control. Drag the Vertical and Horizontal Perspective sliders to tilt the image. The Angle control rotates the image.
Perspective Control. Drag the Vertical and Horizontal Perspective sliders to tilt the image. The Angle control rotates the image.
![]() Edge Extension. After using the controls above, you may want to scale the image with Edge Extension to crop unwanted blank areas caused by the adjustments.
Edge Extension. After using the controls above, you may want to scale the image with Edge Extension to crop unwanted blank areas caused by the adjustments.
4. Click OK to apply the changes.
![]() Tip
Tip
![]() As with most adjustment dialogs, hold Option and click the Cancel button if you want to reset the dialog’s settings.
As with most adjustment dialogs, hold Option and click the Cancel button if you want to reset the dialog’s settings.
Figure 9.19 Correct Camera Distortion fixes many common photographic gaffes.
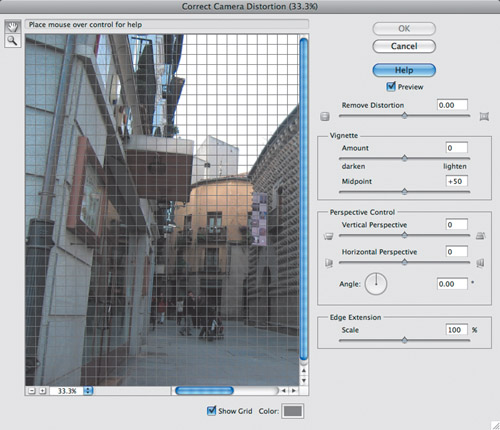
Figure 9.20 The corner of the building on the left curves due to lens distortion (top), so I’ve applied a small amount of Remove Distortion to pinch the image slightly and straighten the curve (bottom).
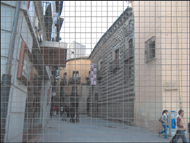
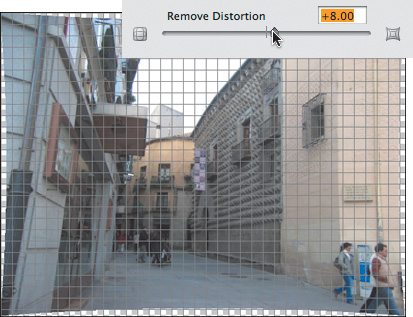
Figure 9.21 When you first open the Lighting Effects dialog, it may seem a bit intimidating. But it only takes a little experimentation with the settings to see the range of effects possible with this filter.
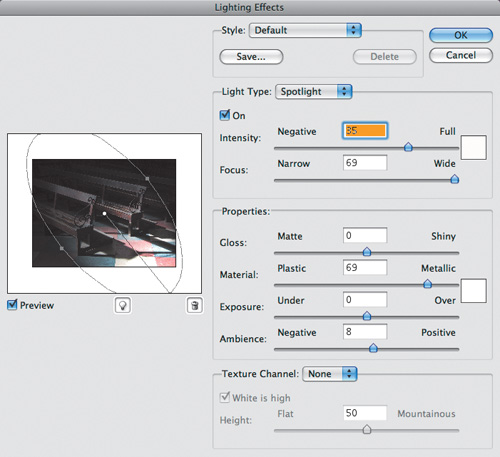
Figure 9.22 The Properties area offers an almost infinite combination of settings you can use to change the appearance and intensity of the lighting.
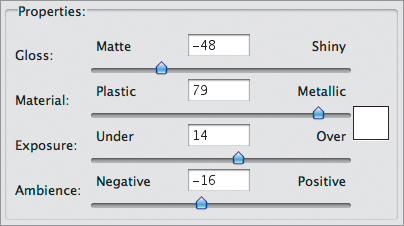
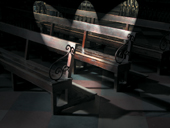
Figure 9.23 The Triple Spotlight filter has been applied to this image.
Creating Lights and Shadows
Lights and shadows add drama to almost any photograph. It’s always best to plan your lighting before you take your picture, but there are times when you just can’t control these factors. Elements includes some nifty filters to help you enhance the lighting after the fact. The Lighting Effects filter lets you create a seemingly infinite number of effects through a combination of light styles, properties, and even a texture channel. It’s almost like having your own lighting studio.
To add lighting effects to an image:
1. Select the desired layer to make it active. To confine the lighting effect to just a portion of your image, select an area using one of the selection tools.
2. Select the Lighting Effects filter by doing one of the following:
![]() On the Effects panel, choose Render from the Library drop-down menu and double-click the Lighting Effects filter.
On the Effects panel, choose Render from the Library drop-down menu and double-click the Lighting Effects filter.
![]() From the Filter menu, choose Render > Lighting Effects.
From the Filter menu, choose Render > Lighting Effects.
The Lighting Effects dialog appears (Figure 9.21).
3. Choose a predefined Style, or create your own using the following controls:
![]() Choose a Light Type from the drop-down menu, which includes Directional, Omni, and Spotlight options. Each lighting style is based on one of these three light types.
Choose a Light Type from the drop-down menu, which includes Directional, Omni, and Spotlight options. Each lighting style is based on one of these three light types.
![]() Set light properties (Figure 9.22).
Set light properties (Figure 9.22).
4. When you are satisfied with the effect, click OK to apply it to your image (Figure 9.23).
Light styles and types
The Lighting Effects dialog offers a mind-boggling number of properties, light types, and styles, making it more than a little difficult to figure out where to start. Here’s a list of some of the most useful lighting styles and types, along with some pointers on how styles work with light types and properties.
Lighting styles
Flashlight focuses a direct spotlight on the center of the image, with the rest of the image darkened. It’s set at a medium intensity with a slightly yellow cast.
Floodlight has a wider focus and casts a white light on your image.
Soft Omni and Soft Spotlight provide gentle lightbulb and spotlight effects respectively, and work well for many different kinds of images.
Blue Omni adds a blue overhead light to your image and offers insight into how lighting styles and types work together. If you select this light type, you’ll see a blue color box in the Light Type area of the dialog. If you click on this box, the Color Picker appears (Figure 9.24), letting you change the color to anything you want. Once you’ve chosen a new color, click OK to apply your custom lighting style to your photo.
Most of the remaining lighting styles create more dramatic and specialized effects (for example, RGB Lights consists of red, green, and blue spotlights), but are worth exploring.
Light types
Directional creates an angled light that shines from one direction across your photo (Figure 9.25).
Omni produces a light that shines down on your image from above (Figure 9.26).
Figure 9.24 Some lighting styles, such as Blue Omni, include colored lights. Change the color by clicking the lighting color box, which opens the Color Picker.

Figure 9.25 The Directional light produces a light source that shines in one direction across your photo, as indicated by the line in the image preview window.
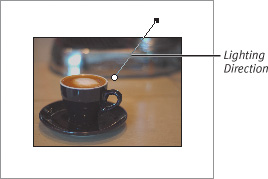
Figure 9.26 The Omni light creates the impression of a light shining directly onto your photo. To change the size of the lit area, drag one of the boundary handles.
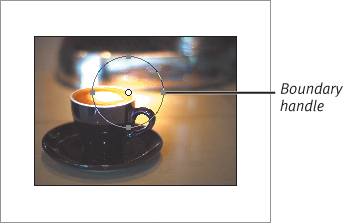
Figure 9.27 The Spotlight is represented by an elliptical boundary in the preview. Drag a handle to change the area being lit, and drag the lighting direction line to change the direction of the light source.
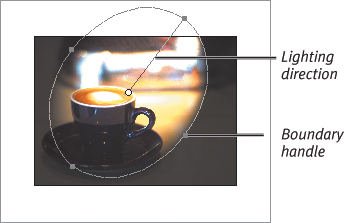
Spotlight creates a round spotlight in the center of your image. In preview mode, you’ll see that the boundaries of the light look like an ellipse. You can change the size of the ellipse by dragging any of the handles. To change the direction of the light, just drag to move the line (Figure 9.27).
When you select a light style, it automatically defaults to whichever light type best supports that look—so, for example, the Floodlight style uses the Spotlight type.
Light properties
Once you’ve chosen a light style and type, you have complete control over four different lighting properties. To change these, just move the sliders to the left or right.
Gloss establishes how much light reflects off your image and can be set from Matte (less reflection) to Shiny (more reflection).
Material determines the surface properties of your image. It can be set from Plastic to Metallic. As you move the setting toward Plastic, the highlights scatter across the surface more; if you choose Metallic, the highlights are more contained.
Exposure increases or decreases the light. If you click through the light types, you’ll notice that most of them leave this setting at, or very close to, 0. This is one setting you may just want to leave as is or make only subtle changes to since it has such a pronounced impact on the light.
Ambience refers to ambient lighting, or how much you combine the particular lighting effect with the existing light in your photo. Positive values allow in more ambient light, and negative values allowless.
1. Select the desired layer to make it active. To confine the lighting effect to just a portion of your image, select an area using one of the selection tools.
2. Select the Lens Flare filter by doing one of the following:
![]() On the Effects panel, choose Render from the Library drop-down menu and double-click the Lens Flare filter.
On the Effects panel, choose Render from the Library drop-down menu and double-click the Lens Flare filter.
![]() From the Filter menu, choose Render > Lens Flare.
From the Filter menu, choose Render > Lens Flare.
The Lens Flare dialog appears, with options for the brightness, flare center, and lens type (Figure 9.28).
3. Set the brightness option by dragging the slider to the right to increase or to the left to decrease the brightness.
4. To move the flare center, just click the image preview to move the crosshairs to another location.
5. Set the Lens Type options as desired, and when you’re happy with what you see, click OK to apply the filter to your image (Figure 9.29).
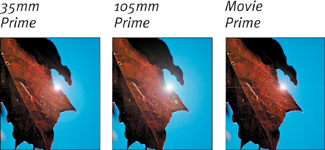
The options include settings for three common camera lenses (50–300mm Zoom, 35mm, and 105mm), plus Movie Prime, and the filter creates a look similar to the refraction or lens flare you’d get with each one (Figure 9.30).
Figure 9.28 The Lens Flare dialog adjusts the brightness, flare center, and lens type.
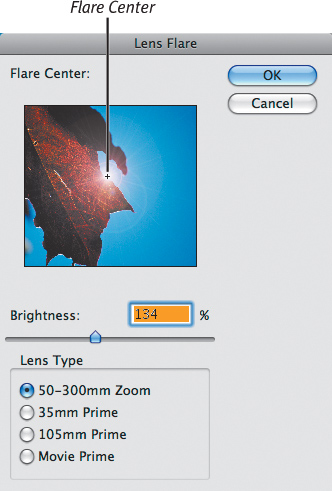
Figure 9.29 I applied the Lens Flare filter with the default brightness and lens type options.
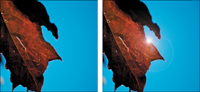
Figure 9.30 The lens options can be subtle.