
CHAPTER 14
Dealing with Noise
Tweak, cut, blend, and steal whatever you have to so that the audience can understand every word. They should be convinced it was all recorded in one take.
Ric Viers, sound designer
Author of The Sound Effects Bible
This chapter is about noise: how to remove it (at best); how to manage it (as a middle ground); and how to find a way to cohabitate with it (a dissatisfying but grown-up possibility). Since “noise” is an unmanageably broad topic, I've divided this chapter into two types of noise, and therefore two means of attack:
- Transient noises These range from the tiniest clicks and crackles to beeps and buzzers, to longer interruptions like dolly squeaks and background car-bys. Such impulsive noises vary in duration and annoyance, but each is in one way or another time-limited. They start and they stop, perhaps repeatedly. But they are events rather than space-definers. These we will refer to as “noises.”
- Ambient noise If transient noises describe the temporal details of what was happening on and around the set when the movie was shot, then ambient noise tells us about the problems of the space itself. “What unwanted noises are born of the set?” Buzzes, hisses, whines, and more. “What ambient noise is coming from the area around the set?” Rumbles, roars, drones, and worse yet. These noises tend to run the entire length of a scene. They may be constant in nature or change over time. We'll generally refer to these scene-long nuisances as “noise.”
A Word of Caution
When if comes to noise reduction, the roles, rules, and relationship between dialogue editor and mixer are tricky. Communication is vital. There may be turf wars over who does what (only a foolish dialogue editor would take on this fight). There should be discussions concerning what to do, which tools to use, and how to use them. And there must be understandings about how you build and organize tracks that will yield the best results with the least pain.
All mixers are different. Each has his own noise reduction plans, habits, and peeves. Respect all of these; otherwise you're doing nothing to help your tracks or your vision. Come up with a noise reduction strategy before you get started. Know what's yours to do and what isn't. This is the most important advice you will get in this chapter.
What is Noise?
The world is a noisy place, and even the most resolute location mixer can't do much about airplanes, traffic, and other exterior sounds other than to beg for additional takes. Once these infiltrators show up on your lap, it's your job to find them, assess their worth, and then determine their fate.
Logically, you'd choose to remove all unwanted noise in order to make room for the dialogue and to present a smoother scene, with no artifacts of the filmmaking process. Give the actors the space they need—free of pesky noises—and the film opens up. But noise control requires more than just a vigilant ear. There are borderline cases, scenes where noise is a nuisance but doesn't interfere with the dialogue. A scene shot next to a busy street, for example, can be justifiably noisy. The fact that you have to labor to hear a few words might help the viewer to sympathize with the character, who also must strain to understand and be understood. If you like this tension, sell it to the sound designer. Remember, though, that a noisy dialogue track saddles you with a noisy scene. The scene will never be quieter than the dialogue premix, and you won't be able to isolate the dialogue.
Even the slightest amount of inappropriate background noise can kill a quiet, intimate scene. A scene of a couple sitting in their living room in the middle of the night, discussing their troubled relationship, loses its fragility and edge if we hear traffic, airplanes, the neighbor's TV, or a crewmember walking around the set. This scene must have dead quiet dialogue. The supervising sound editor may choose to color the scene with quiet spot effects, an interesting and mood-evoking background, or music. But the dialogue editor must be able to deliver a track with no disturbances to create a world of two people in a very quiet room—alone with all their problems.
Finding Noises
Before you can fix the noises in your dialogue, you have to find them. In most cases, eliminating noises isn't difficult, but noticing them is daunting. It sounds easy, but it's a skill that separates experienced dialogue editors from novices. Even if you pride yourself on your superhuman listening skills and canine hearing, you have to learn how to listen for the annoying ticks, pops, and screeches that besiege every dialogue track. They're in there, coyly taunting you to find them.
First, you must discover as many noises as you have time, patience, and budget for. Then, before blindly eliminating every one, you have to ask yourself, “What is this noise? Does it help or hurt the story?” Period. It's actually as simple as that; you just have to stay awake and aware.
I hate when the dialogue editor keeps only the ugly HF, thinking sound is only “words;” when he processes “hard” corrections and tries to clean everything, making for dead tracks.
(“Noise is not dirty. Silences are beautiful.” – John Cage)
Cécile Chagnaud, film editor/sound editor/sound designer
Or, Mon trésor; Nizwa, sur les traces d'H. de Monfreid
Every step in the process of filmmaking is sorcery. It's all about getting the viewer to believe that this story really happened as shown in the final print. As a film professional, you like to think that you're immune to this seduction. You know it's not real. Yet when you screen the offline picture cut or watch a scene over and over, the most obnoxious noises might slip right past you. Just like the average movie fan, you're sucked in.
It's pretty embarrassing to screen your seemingly perfect tracks that you lovingly massaged for weeks, only to have the director comment “What about those dolly sounds?” Sure enough, a shot with flagrant dolly noises. You fell for the story, you heard the scene too many times, you overlooked the dolly. Ouch! It's your job to hear and correct these sounds, so you must find ways not to fall victim to the story's siren song.
Evaluating Noises
Question every noise you hear. Don't fall into the trap of “Well, it was part of the location recording, so it must be legitimate.” Obviously, if the gaffer dropped a wrench during a take, or the producer sneezed, you'd replace the damaged word. However, when an actor's footstep falls on a delicate phrase, you might be reluctant to make the repair, thinking it's a “natural” sound.
Remember, there's nothing natural in the movies. To see whether it's a good decision to lose the errant footstep, fix it. Either you'll miss it, finding the rhythm of the scene suddenly damaged and unnatural, or you'll see a new clarity and focus. If removing the footstep results in a rhythmic hole but greatly improves articulation, tell the supervising sound editor before the Foley is recorded, so that the necessary footstep will be in place but controllable. Better yet, find another, quieter production footstep to replace the offender.
The most rewarding part of careful listening is that once you've heard a noise or had it pointed out to you, you'll never again not hear it. The 1915 illustration “My Wife and My Mother-in-law” is a classic example of not seeing the obvious until it's pointed out1 (see Figure 14.1). At first glance, you see either a maiden or a hag, but not both. Even if someone tells you what to look for, you're stuck. Finally, you have your breakthrough moment, and what was hidden from you becomes clear. Henceforth, you'll always be able to find each of these women, like it or not.
Similarly, you can listen to a track many times and never hear the truth. But once your brain wakes up to it, you'll hear that click in the middle of a word and wonder how you missed it the first few times around. Ignoring the meaning of the dialogue and focusing on the sounds is a useful tool when searching for unwanted noises. Listening at a reduced monitor level can help you hear beyond the words.
The following sections describe the origins of the most common noises you'll encounter in your tracks. Use this list to help you learn to locate these unexpected interlopers.
Transient Noises
Transient noises, the not-so-silent warriors in the conspiracy to screw up your tracks, have several sources, some from the set, some from beyond.
Noises on the Set
A shooting set—especially a location set—is composed of lots of people and lots of equipment, usually surrounded by lots of other things that make noise. Even under the best of circumstances, these things aren't quiet. For example:
Actors
- Unusual or inappropriate vocal sounds: unsavory, off-camera, or loud lip smacks
- Dentures, bridges, and other dental work (always a delicate subject)
- Stomach gurgling (you can tell when a take was recorded just before lunch!)
- Footsteps that interfere with the dialogue or introduce an unwanted cadence
- Body mic clothing noise or other rustle
- Clothing
- Unusual diction that results in clicks or pops
Electronics
- Brief but loud clicks caused by electrical disturbances or static discharge
- Clicks or interruptions
- Radio mic breakup (usually a long-duration problem that most often requires replacement of the shot)
Crew
- Dolly pings
- Camera mount hydraulics/pneumatics
- Crew footsteps
- Crew talking(!)
- Continuity stopwatch beep(!)
Most of the noises you encounter don't come from the set itself, but from further away. We'll deal with them later.
Dollies
Dolly noise is easy to spot since they don't make noise when they're not moving. It's simple: When the camera moves, listen for weird sounds—for example:
- Gentle rolling, often accompanied by light creaking and groaning
- One or more pairs of feet pushing the dolly (not very common)
- Quiet metallic popping or ringing, indicating flexing dolly track rails as the heavy dolly/camera/camera operator combination crosses over them. The tracks are made of metal, so this flexing resembles the sound of an aluminum baseball bat striking a ball. Occasionally you'll hear this bat sound even when the dolly isn't moving. It might come from the track settling after the dolly passes over it or from a crewmember lightly bumping the track.
Too Many Feet
Unnecessary footsteps are easy to hear but hard to notice. When you first listen to a scene involving two characters walking on a gravel driveway, all seems normal. You hear dialogue and some footsteps. But something inside tells you to study this shot more closely and check for problems. Ask yourself how many pairs of feet you hear. If it's more than two (which is likely), you have a problem. Picture how the shot was made and you'll understand where all the noise comes from. How many people were involved? Let's see: two actors, one camera operator, one assistant camera operator, one boom operator, one location mixer (maybe), one cable runner (probably), one continuity person, one director. That's a lot of feet. But because you expect to hear some feet in the moving shot, you initially overlook the problem.
As with dolly noise, be on the lookout for a moving camera—in this case handheld; that's where so many noise problems breed. Find out how the footsteps interfere with the scene by replacing a section of dialogue from alternate takes or wild sound (discussed in later sections), noting any improvement. It's likely that the scene will be more intimate and have a greater impact after you remove the rest of the crew's feet from the track.
Fortunately, a good location mixer will spot the trouble in the field and provide you with workable wild lines, and perhaps even wild footsteps, to fill in the gaps. Otherwise, you'll have to loop the shot.
Crew (Continued)
Remember, there are a lot of people on a set all of whom move, breathe, and make noise, so be on the lookout for these noises:
- Footsteps that have nothing to do with the actors
- The director “quietly” whispering to the camera operator
- Pings from tools inadvertently touching light stands, the dolly, the track, and so on
- The continuity person's stopwatch when she times the take. It's got to be done, but unfortunately most modern stopwatches beep. Dumb. You'll rarely hear beeps during the action part of a take (although they can sneak in), but they'll make you crazy while searching for room tone.
Sound Recording Issues
Sadly, many unwelcome noises can and will get into the tracks as by-products of the recording process itself. The boom operator, location mixer, and cable puller are all very busy capturing manageable dialogue, and sometimes bad things happen.
- Small, short clicks. These may be from small static discharges or radio microphone transmission issues. Once you learn to listen, they're very easy to spot, and far more common than you'd think.
- Longer electrical clicks, possibly associated with brief signal interruptions.
- Clothing rustle caused by a body mic rubbing against clothing or against the protective “tent” built to protect it. These scratches usually last longer than static discharge clicks and are therefore much harder to fix.
- Shock mount noises. If the mic isn't well seated in the shock mount, you may hear low-frequency “thuds” in the track. This is the mic absorbing energy from the boom that should have been absorbed by the shock mount.
- Dropouts. Rare, but they do occur
- Wind distortion. A nasty problem that can be long-lasting and cover a wide frequency range. A director or picture editor might become so used to a scene with wind distortion that he'll fight you when you insist on removing it. “But the sound is so authentic, so exciting,” he'll argue. Rubbish. Fight him. Wind distortion is as ugly as any other distortion, and if it's on your dialogue track you can do nothing to remove, enhance, or shape it. Replace it, one way or another; the effects editor will find something just as exciting, but pretty. Result: good, clean dialogue with controllable, pristine stereo wind.
Actors
With so much attention paid to getting the best sound from actors' voices, it's no surprise that you're occasionally faced with all sorts of sounds coming from an actor—sounds that you'd just as soon not hear. We all make noises that aren't directly part of speech. Someone you're talking to may be producing an array of snorts, clicks, pops, and gurgles, yet you'll rarely notice.
Comparatively normal human noises often sneak under the radar when we're in the heat of a conversation because our brains simply dismiss them as noninformation, of no consequence. Yet when you record this conversation, unseemly body sounds stand shoulder-to-shoulder with the dialogue.
What sorts of vocal and body noises should you be on the lookout for?
Dental Work
Dentures, plates, bridges, and the like can make surprisingly loud noises. They're easy to spot because they almost always coincide with speech. Unfortunately, denture clicks usually get louder in the dialogue premix, where dialogue tends to pick up some brightness. At that point, they become impossible to ignore.
Most people with fake teeth aren't thrilled about advertising the fact, so a serious round of click removal is usually welcome. Also, relentless dental noise is almost certain to get in the way of story and character development. There's a chance that the character's persona calls for such unenviable dental problems. If that's the case, the supervising sound editor may elect to remove most dental details from the dialogue and have the effects or Foley department provide something more stylized, personalized, and controllable.
Mouth Smacks and Clicks
People make lots of nonverbal sounds with their mouths. Sometimes these sounds have meaning that would be difficult to express in words: a sigh or a long, dramatic breath can say worlds; a contemplative wetting of the lips can imply a moment of reflection before words of wisdom; a clicking of the teeth or tongue may suggest thought or nervousness. An actor's clicking, chomping, snorting, and sighing may be just what the scene calls for, or it may be just more commotion that comes between the scene and the audience.
Your job is to spot each nonverbal sound and decide if it conveys the mood and information you want for the scene or if you need to thin out or replace or eliminate it altogether. Things to think about when listening for smacks:
- Is it off-screen? If so, probably lose it. Here taste and style are more important than rules of thumb, but in general if you don't see the lip smack there's probably no real reason to keep it. All those unseen noises are just that: more noise to get in the way of the story and mood.
- Is it appropriate? If not, replace it. Just because the actor made a vulgar, slippery onscreen smack immediately before tenderly saying “I love you” doesn't mean you have to use it. Yes, it's on-camera, so you likely need something there, but must it be so ugly? Did that phlegm-soaked snort really make the scene more romantic? What does it do for your emotional reaction to the lines? Wouldn't a nice, moist lip opening set the mood better than the original slurp?
- Is it missing? Sometimes the problem is a missing mouth noise. When you see a character open her lips, you may need to reinforce the action with some sort of smack, small though it may be. Otherwise the viewer senses lip flap, the annoying movie sensation when you see mouth action but don't hear any corresponding vocalization to make it real. If mood or just common sense calls for a bit of lip noise, find it and cut it in.
The sounds a character makes between sentences or words can be as important as the information contained in the text. Get it right and you'll greatly increase the drama and emotion of the scene.
Interestingly, I take out mouth clicks in the production track, but I find putting mouth clicks in when I'm cutting ADR sometimes helps “sell” the ADR as real.
Jenny Ward, ADR editor
King Kong
Clothing
We've seen how clothes rustling against a body mic can be a nuisance. Many other common clothing noises are just as bad and require a sharp mind and a keen ear.
- Inappropriate or annoying shoe sounds, whether footsteps or squeaks
- Corduroy pants or jackets, which often make a rustle when moving
- Anything made of plastic, such as ski jackets or nylon gym wear
- Coins and keys
- Large earrings and bangles
Actors and Microphones
You'll inevitably encounter places in the track where the actor sounds a plosive consonant, such as a P or B and the rush of air distorts the microphone capsule. There's no point getting into why this happens; your job is to fix it. Usually, you'll have to replace that section of the contaminated word, but there are some filtering tricks that may work.
Distortion and Clipping
An actor unexpectedly yells, the recorder input level is set too high, a limiter is used too aggressively. You're left with distortion, an ugly flaw that's very hard to fix. We'll get to this later.
Fixing Transient Noises
Once you've trained yourself to be alert for the countless rattles, pops, clicks, and snorts squatting in your tracks, the next step is to decide what to do with them. There are two basic editorial tools for removing unwanted noises: room tone fill and replacement. Noises falling between words or action can almost always be removed by filling with appropriate room tone, whereas noises falling on top of words or actions, or even just before or after dialogue, require searching through alternate material to find appropriate replacements.
Let's look at these two techniques, remembering that there are many ways of fixing noises and as many opinions as there are editors. With time you'll settle into your own way of working, synthesizing all of the techniques and creating your own private stockpile. Generally, exhaust your editorial options before moving on to electronic solutions. The are some great plugins that will help sort out transient noises, but you're usually best off trying an editorial fix before opening up your plugin arsenal.
Room Tone Fill
Small electrical clicks, individual clothing-mic collisions, lip smacks, and the like, are easily removed with room tone, but only between words, rarely within them (see Figure 14.2).
Here's what you do to remove these tiny noises:
- When you hear the unwanted noise, stop and note its whereabouts on the timeline.
- Use a scrub tool to localize the noise. Set your workstation preferences so that the insertion point will “drop” wherever you stop scrubbing, so that you can easily zoom in to the click. On Pro Tools this is called “Edit
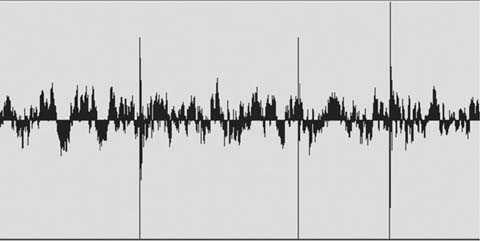
Figure 14.2 Small clicks typical of radio microphone trouble.
|

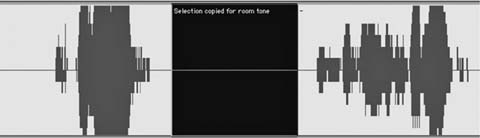
Figure 14.4 Good room tone can usually be found nearby. Always leave a bit of usable room tone outside the selection.
- If you can't copy a short piece of room tone adjacent to the offending noise, find a piece from another portion of the take. (See the section on room tone in Chapter 11.)
- Usually, you'll make a small crossfade at the head and tail of the insert to avoid a click and to help smooth the transition. This is especially true when the underlying room tone is very quiet or if it contains substantial low-frequency information.
A couple of additional tips and tricks will come in handy:
- If you smooth your edit with a crossfade, don't allow your fades to enter the area of the noise you're covering. If you do, you'll hear vestiges of the noise and you won't be any better off than when you started. As a rule, listen separately to all fades you create—fade-ins, fade-outs, and crossfades—to ensure that you haven't left behind a little gift.
- Pay attention to the waveform cycle when inserting room tone. Most workstations can perform a decent, click-free edit despite wave cycle interruptions, but if there are a lot of low-frequency components in the room tone it's hard to avoid a click. Help your workstation do its job by lining up the waveforms as best you can, then make crossfades to smooth the leftover bump. Also, you'll better your chances of a glitch-free splice if you cut at the zero crossing of the waveform, rather than at a peak or trough (see Figure 14.5). Some workstations take care of this for you; others don't.
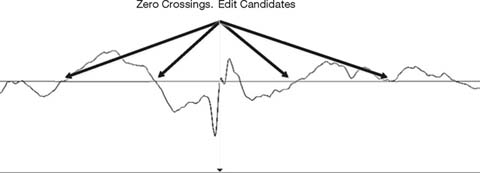
Figure 14.5 Splicing at the zero crossing increases the likelihood of a successful edit.
Removing Short Clicks with the Pencil Tool
Extremely short nonacoustic clicks can often be removed with your work-station's pencil tool. (Most workstations have a tool that enables you to redraw a soundfile's waveform—these tools are usually shaped like a pencil, so “Pencil Tool” is a pretty good generic name.) When used on an appropriate noise, the pencil tool can be miraculous. However, there are a couple of very important things to remember when using them. First, unlike almost every other process, the pencil tool modifies the parent soundfile. Second, it's inappropriate for all but the shortest problems and if there's a significant acoustic element—even the tiniest ringout—it just won't work and you'll be stuck with a low-frequency “thud” where once you had only a tiny click.
Using the Pencil
Using the scrub tool and waveform display, find the click in question (see Figure 14.6). The waveform usually isn't very helpful until you've zoomed in quite close. More often than not, the click will appear as an unimpressive jagged edge along an otherwise smooth curve. It could also appear as a very small sawtooth pattern along the line of the curve. Although small to the eye, a glitch like this can cause a lot of trouble.
Always remember that using the pencil is destructive, which is rare in non-linear editing. Any change you make will affect the original soundfile—and thus every occurrence of this part of it. This is definitely a mixed blessing. If the click occurs in the middle of a line repeated many times in the film, the modification will present itself in every recurrence of that line, for better or worse.
Say a film begins on the deathbed of a family patriarch, who at the moment of his demise manages to murmur, “The butler did it!” Throughout the film we hear Dad's ghost say, “The butler did it!” If there's a short electrical click in the middle of the word “butler,” you fix it once with the pencil and you've fixed every occurrence. Since the same part of the original sound was reused several times, a change in one occurrence affects all other appearances of Dad's disembodied ghost.
This, however, is unusual behavior for an audio workstation. You want to protect the original soundfile from your lapses of judgment, so remember this rule of thumb: before using the pencil tool, make a copy of the section you intend to repair. Here's the safest way to proceed:
- Highlight a section of the clip, a bit wider than the damaged area.
- Make a copy of this highlighted area. It's not enough to copy the clip itself, as this doesn't create a new soundfile, just another reference to it. Instead, use any function that creates a new soundfile, such as “consolidate” or “bounce” or even a quick rerecording of the segment—whatever is fastest and easiest—to create a new soundfile, thus leaving the original audio safe from the destructive pencil (see Figure 14.7).
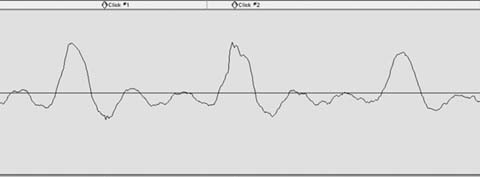

Figure 14.7 Top: The segment from Figure 14.6 with two clicks (labeled with markers). Bottom: The area to be repaired was consolidated (highlighted in black) to create a new, tiny soundfile. The pencil was used to redraw the waveform. Compare the smooth curves below with the jagged originals.
- Zoom in very close to the click. Filling the screen with two sound cycles is a good place to start. Select the pencil tool and draw over the damaged area. Take care to create a curved line that mimics the trajectory of the underlying (damaged) curve, or what that curve “should have been.”
- Redraw the smallest possible portion of the waveform. Otherwise, you run the risk of creating a low-frequency artifact.
- Move the boundaries of the now fixed consolidation until there's no click on the edit. Fade if necessary to avoid clicks (it's generally better to move the edit location than to use a long fade).
If you're not happy with the results, then delete the new consolidated clip, re-join the two sides of the resulting hole, and start over. This is why you repaired a copy soundfile rather than blazing ahead on the original.
Reducing Clothing Rustle and Body Mic Crackle
When clothing rubs against a lavaliere microphone you hear a nasty grinding. This can often be avoided with careful mic placement, but by the time the problem gets to you, it's a bit late to care what caused it. You can't filter out the noise, as it covers a very broad frequency range and it poisons everything else in the track. You can try a de-esser, but the odds of this working are pretty small. Normally, the only way to rid yourself of this sound is to collect the alternate takes of the shot and piece together an alternate assembly (see the upcoming section on alternate takes). You should also add this line to your ADR spotting list.
However, if you've exhausted the alternate lines and the actor is no longer on speaking terms with the director and refuses to be looped, you can try a trick that occasionally works. There are many plugins—usually bundled as “restoration suites”—that are the grandchildren of software originally designed to reduce surface noise when re-mastering old 78 rpm recordings. Waves, Sonic Studio, IZotope, Cedar, and Sonnox are some of the big players in the noise reduction universe.2 Later in this chapter we'll use these tools to reduce broadband and harmonic noise. But for now, we're interested in the components that focus on clicks and crackle. Collectively referred to as impulsive noises, these distortions come from physically abrading a surface or microphone, or by overloading or otherwise abusing an electronic device. When closely compared, the waveform of a transcription from an old vinyl

record and that of a dialogue recording contaminated with mild clothing rustle have many similarities. In each case, what should be a smooth curve is instead serrated stubble.
De-cracklers and de-clickers use very clever math to smooth out local irregularities (see Figure 14.8). De-click and de-crackle processors don't work by filtering, but rather by interpolating (in other words, if you know what precedes and follows a moment, then you stand a good chance of figuring out what ought to be there). Once you define just what constitute clicks and crackles (usually defined by amplitude and duration or “shape”), the processor will identify the appropriate events and remove them. Then, by “looking” both before and after the excised click it will fill in the hole. Of course, it's more complex than this, and each product has its own way of going about the process, but they think in more-or-less the same manner.
Maybe, just maybe, you can use them to smooth out your curve, reducing the clothing rustle to a manageable distortion. Before you start, make a copy of the region so that you have a listening reference and can return easily to the original should this noise-removal plan prove ill-conceived. (You don't need to create a new soundfile, since these processes aren't destructive.) As with all interpolation processes, you're usually better off making several small, low-power passes than one powerful pass. Work in small chunks of time so that you neither over-process words that aren't particularly damaged, nor undercook those sections in need of extra attention. Don't develop great expectations for this method of cleaning up clothing rustle. Its results range from mediocre to surprisingly good. Still, when you have no other choice, a bit of de-crackle may be an acceptable fix.
Repairing Distortion
Distortion can originate in the analogue chain (an overloaded mic, a poorly set limiter, etc.), or because of digital clipping (perhaps the nastiest noise on the planet). It can't be removed. Really, it can't, and your only real recourse is to replace the distorted words with alternate material. However, when your back's against the wall and there's no choice, there are plugins that can help lessen the ugliness and restore some of the original fidelity.
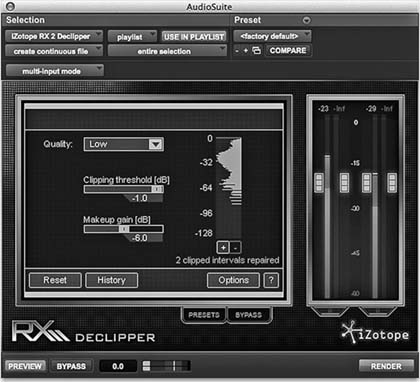
Declipping Software
These programs are designed to reconstruct signal peaks damaged by clipping—analogue or digital. They identify clipped areas, after which the user determines a threshold for processing (see Figure 14.9). The actual repair involves resynthesis of the affected area by comparing it to surrounding material, which is presumably less damaged. Depending on the type and severity of the distortion, declipping can reduce distortion's nasty “fingernails on the blackboard” fingerprint. Typically you'll run several passes; with each iteration the lopped off waveform will round out, get taller, and sound better. The result certainly doesn't outperform a good recording, but it likely beats what you started work with. However, declippers are potent tools, and if used imprudently can cause more troubles than they solve. Experiment with threshold levels and take care to process only what's needed. And it wouldn't hurt to read the manual.
Mitigating Distortion with De-click and De-Crackle
If you don't have declipping software and but you're nonetheless confronted with distortion, there are two common noise reduction tools—de-click and de-crackle—that may lessen the pain. Look closely at the waveform of a distorted track and you'll see two ugly problems (see Figure 14.10). First, the waveform is truncated, like sawed-off pyramids. That gives you the ugly compression of a distorted sound. Second, the plateaus are jagged and rough, not unlike the surface of a wear-worn 78 rpm record. As with removing clothing rustle, repeated passes of a de-click utility followed by de-crackling may, just may, smooth the rough edges and even rebuild some of the waveform's natural contours.
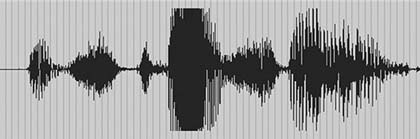

Figure 14.11 If you must reduce gain prior to processing, create a new soundfile at a lowered level. Session automation is not sufficient.
As with most audio signal processes, de-click and de-crackle can raise the level of a soundfile, so make sure that there's at least 3 dB of headroom in the original soundfile when you start this operation. If the audio level of your original recording is unusually high, you may need to lower its gain—especially if you're working with 16-bit soundfiles.3 In truth, you'll almost never encounter location recordings that are extremely hot. But if you must reduce the level of a clip, you can use the “Gain” AudioSuite processor (or equivalent), which will yield a new, quieter, soundfile (see Figure 14.11).
- One of the few good things to say for distortion is that most of the damage is confined to the loudest material. That's why you start with a very high threshold, leaving the undamaged majority of the signal unaffected. In essence, what you're doing is aggressive processing on the topmost part of the waveform.
- After one very powerful pass, apply several additional passes, each one less aggressive than its predecessor. Remember to keep the threshold high to avoid harming the undamaged, lower-level material. Repeat the same process with the de-crackler. Begin aggressively and then progressively back off.
Most restoration tools allow you to monitor the removed noises, switching between the dregs you're removing and the cleansed results. This is handy for determining if you're overprocessing. If you can hear components of the program material (that is, the dialogue) while monitoring the removed noises, you're damaging the original track and should back off. If you don't have this monitoring option, you can listen to what you've removed by placing the de-clicked/de-crackled soundfile on a track adjacent to the original region, syncing the two, and listening with one of the regions out of phase. If your sync and level are precisely aligned, you'll hear only the removed sounds or distortion harmonics.
De-crackling shouldn't be your first line of defense against distortion or removing clothing rustle. You stand a much better chance of making a proper fix if you go back to the original recordings and find an alternate take, or just give up and loop the line. Even so, it's good to have a bag of tricks to help you out of impossible situations. The result may not be glorious, but at times mediocre is better than nothing.
Solving Dolly Noise Problems
Dollies are a particularly ugly source of noise, and the damage they cause tends to go on much longer than run-of-the-mill ticks, clicks, and pops. A moving dolly can spread its evil across several lines of dialogue, so doing something to fix such noises is much more complicated. Before giving up and calling the scene for ADR, try to reconstruct the damaged part of the scene from alternate takes, hoping that the noises don't always fall on the same lines.
Fixing a line ruined by dolly noise is no different from other fixes that call on alternate takes. First find valid alternates, then line them up under the damaged shot and finally piece together the outtakes to create a viable line. You have to know how to quickly and painlessly locate the other takes from that shot in order to find alternate lines, more room tone options, and the comfort of knowing you've checked all possibilities. Read on.
Alternate Takes
Life isn't always fair, and sooner or later you'll run into noises within words—noises you can't remove with room tone or de-clickers. Then you'll have to look through the dailies for alternate takes that convey the same energy and character as the original but without the unfortunate noise. At first, going back for alternate takes seems a monumental task, so you invent all sorts of excuses not to do it. Once you realize that it's a not lot of work, though, you'll discover a huge new world of possibilities that make your editing not only more professional and effective but much more fun and rewarding.
Before you begin the quest for alternate takes, check your list of wild dialogue cues to see whether you have wild coverage for the scene (see Chapter 10 for more on wild sound). You never know, and it could save you some grief. And if you're looking for a very small sound, say a new attack or a word said repeatedly in a sentence, you may not need to search beyond the existing clip. Copy it to a work track, pull out the handles and see if you can find the sound you're seeking, and cut it in. You're done.
Usually, though, it takes a bit more work.
As a matter of course, dialogue occupies a significant amount of the director's and editor's attention during the picture edit. They've combed through all the takes and made decisions about the best performances, so the majority of the dialogue editing decisions have already been made. So when you try to introduce, suggest, or use alternate takes, you may meet some resistance.
Use an alt that is the best possible match, especially in terms of performance. Use as little of it as possible. Can you just use part of a word? Can you get rid of that bump by using just the beginning or middle or end of the same word from another take?
Where there is a larger problem and you have to swap out a half or whole sentence, then you will need to show this to the director/editor before it goes to the dialogue premix. And if possible, have more than one alt ready to show. This way, it will not be a shock to anyone when you get to the final mix.
Jenny Ward, supervising dialogue editor
Happy Feet Two
Finding Alternate Takes
The process of finding alternate takes starts at the beginning of the project. Success hangs on getting from the production the items you absolutely must have to safely start any dialogue editing project (see Chapter 7). Let's review:
- All original recordings. Assuming that sound was captured with a hard disk recorder, original recordings will most likely be organized by shooting day. If the sound was recorded on tape (less and less likely), you'll get a big box of video or audiotapes.
- Sound reports. It's pretty hard to hold a USB drive to the light, squint, and divine what sounds reside there. You need help to find the scene and take you're looking for, and to know a few details about how it was recorded. When the location mixer records sound, she makes logs of the scenes, shots, and takes on each tape, as well as room tone, wild lines, and wild SFX. Her logs are essential for you to determine the options you have for solving problems on your tracks.
- Lined script. If possible, get the lined script; it contains notes on each scene's coverage. You can never have too much information.
- EDLs. You need one video EDL for each reel of film, as well as one audio EDL for each set of four audio tracks in the Avid or FCP edit for each reel. (See Chapter 7 for an explanation of EDLs.) The EDL is one of your most important tools. You can't get by without it, especially if your original sound is on tape.
- List of scenes and their shooting dates, if the location sounds originated on hard disk. It's much easier to find alternate takes on disk-originated recordings because you don't have to wade through tapes. However, you need to know in which folder the scene is hiding.
It's useful to have the continuity and camera reports and whatever relevant notes you can get your hands on. Some dialogue editors think this is too much information, a waste of space, and an indulgence. Let them. When it's three in the morning and you must find an alternate take and all of your normal paper trails have failed you, the script continuity or camera reports may be just what it takes to fix the line and get home to bed.
A film is a living, breathing thing, and each has its own idiosyncratic way of organizing itself. Naming conventions, use of non-alphanumeric characters, inconsistency between the camera, sound, and picture departments, and even choice of field recorder influence how you go about finding the takes you need. As with any relationship, you and the movie will get to know each other over time and you'll learn how best to go about the search. Until then, start with the simplest, straightest path between you and the alternate takes. If the simple route works, great; you saved some time and headache. If this path takes you nowhere, then try other routes. None of these methods are difficult. Here are some options for searching, from simple to not so simple:
- Search by soundfile name within your DAW.
- Search by soundfile name within your operating system.
- Search by name within the sound reports or other paperwork, in order to find the folder where the sound file lives.
- Use the EDLs to find the folder.
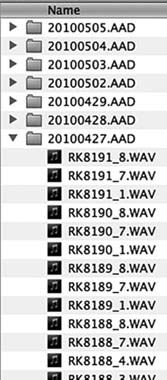
Figure 14.12
Original recording soundfiles are found in folders by shoot date.
Once you locate the file, the rest is comparatively easy. It's just editing. As you search for the alternate take that will save the day, you will quickly learn the secrets of this film's filing system.
Searching by filename
This is by far the simplest approach. Any DAW has some means of finding and importing files, some systems easier than others. Type the name, choose from the list, and you'll likely see the scene/shot you're looking for. This usually works. However, a number of things can go wrong with a name search, usually caused by problems with the filenames.
More often than you'd like to think, the information you see in the clip does not match the filename. You see Sc4c-tk1 in the clip, but a search yields nothing. Try 04c-t1, or sc4-3-1, or another reasonable sequence. If you tire of guessing, open any folder containing original recordings. Original recordings are almost always organized by shooting day, each of which has its own folder (see Figure 14.12). Note how files are named and you've cracked the code. If more than one location sound team worked on the film, you may have to learn two different systems.
Search using EDLs
If you can't manage to find the original files by a search, try another method. You can almost always find the shot you're looking for by using the EDLs. Follow these steps and it won't seem scary.
Highlight the Clip You Want to Fix
If you're using Pro Tools, the start and end time codes of the highlighted region are displayed at the top of the screen as Start, End, and Length (see Figure 14.13). Other workstations have similar displays. Use the Start and End timecode values to find this take in the EDL.
Figure 14.13 Select the region and note the start and end times. Find these times in the appropriate EDL to determine the source of the soundfile. If you are working with sounds that exist only on tape, you must use this method.
Find the Correct EDL
Each CMX 3600 EDL represents four tracks of audio, so you may have several of them for each reel. Normally, the events you care about will fall in the first or second EDL, representing tracks 1–8. (EDLs are discussed in great detail in Chapter 7.)
Find the Event in the EDL
Always follow the same sequence of EDL columns to track down your alternates:
- Record In and Record Out, the two rightmost columns. Look through the Record In times until you find timecode that matches or is near that of the region you're looking for, as highlighted in Figure 14.14. Next, look at the Record Out time (Figure 14.15) for the same event and make sure that your highlighted region falls between Record In and Record Out. Be careful—it's not unusual to find two events with the same Record In time, so make sure that the event you've marked in the EDL is the most likely candidate.

Figure 14.14 Record In time. This is where the event begins in your timeline. Refer to Figure 14.13 “Start” time.

Figure 14.15 Record Out time. Refer to Figure 14.13 “End” time.
- Confirm scene and take. To make certain you've found the EDL event describing the region you're trying to replace, look at the Comment field immediately under the event line (see Figure 14.16). A decent picture department will insert Comment fields that contain scene and take information. Confirm that the event listed in the Comment field is indeed the same as the name in your session clip.

Figure 14.16 Comment field, used in this case to show scene/slate/take information.


Figure 14.18 Source field. This is the name of the soundfile you're looking for.
- Determine the folder that contains the file. This is the second comment line, if it exists (see Figure 4.17). If you're working on tape, this cell likely reflects the name of the tape. On a file-based project, this folder is most certainly the shoot date. The name of the file is in the source name cell (see Figure 14.18).
Remember, be flexible. No two films have precisely the same organizational quirks. Some projects will use the fields as shown in this example; others will have their own systems. Examine the raw material, come up with a plan for finding alternate takes, and then be quick in abandoning plans that don't work in favor of those that do.
Check the Sound Reports
Once you find the right folder, you can use the sound reports to find out if anything else of interest was recorded for that shot (e.g., room tone, wild lines, PFX, etc.). Location mixers commonly use abbreviations to describe takes (see Table 14.1). This will also tell you if takes are complete or cover only the start or end of a shot.
What if the Filenames Don't Make Any Sense?
Some field recorders name their files with a unique codename rather than the expected Sc/Sh/Tk format. There are all sorts of good reasons why a manufacturer chooses to do this, but it can make for problematic searches. One solution is to use a search engine that's smarter than the one in your workstation. Search engines that specialize in sound, such as Soundminer,
Audiofinder, and BaseHead allow you to find soundfiles regardless of naming mistakes, glitches in metadata, and other screw-ups.4 Plus, they enable intelligent auditions, and they allow you to import only a portion of the soundfile. So if you need only a breath from the middle of a four-minute take, no need to import the entire file.
If you don't have a clever file searching application, this problem may seem insurmountable. Remember, though, that sound reports will inevitably come to you as PDF or Excel documents, so you can easily search them in order to gain your bearings. To bridge the gap between clip names and filenames, use the EDLs as in the example above. In order to search across all of the shooting days, you'll need to merge all of the PDF sound report files into one. If you have a decent command of Excel or another spreadsheet application, you can find out what's what. You just can't audition or load the sounds.
Once you find the right shot, listen to the takes in order to figure out your options.
- Is the offending noise also on this take? If so, it means that the noise is rhythmically tied to the action. It could be an annoyingly accurate dolly grip or an actor who always plants her feet on the same line. Discovering these consistencies is a setback but by no means a fatal one. You just have to listen to every take and hope for a slip in the machinelike regularity of the noise source.
- Does the actor use exactly the same language? Remember, you're not replacing an entire take, just a word or two, so a replacement take, as a whole, can vary from the take the director chose. The relevant section must be exactly the same, however, unless the noise-damaged line is off-camera. Even then, be careful not to undermine the choices of the director.
- Does the actor speak with approximately the same speed and pitch as in the original? Once you choose a replacement take and import it into your session, you'll have some control over the length, speed, and pitch of the line, although less than hoped for. Try to get it right as you select.
- Are the tone and attitude of the actor the same as in the original? You're replacing a line for technical reasons, but what's most important is maintaining the spirit of the line chosen by the director. Ask yourself why the director chose this one over another. Find that special quality that sets this read apart. Honestly ask yourself if the replacement serves the film as well as the original line did.
Plan B: Check Other Angles
Obviously you want to find an alternate take from the same shot (i.e., camera position) as the original to increase your chances of a decent sound match. However, sometimes you can't find useable alternate takes from the same angle. When that happens, first make a note in your ADR spotting calls but don't give up on the sound rolls just yet. Perhaps you can find the replacement lines within a compatible shot. This is where the sound reports really pay off.
An Example of Locating an Alternate Take from Another Angle
Say you're working on scene 88, an interior scene with two characters, Alfred and Elizabeth. The scene is made up of these shots:
- 88A—master shot (wide) with both characters
- 88B—single shot of Alfred
- 88C—single shot of Elizabeth
- 88D—medium two-shot of both characters
- 88E—dolly shot starting in the middle of the scene
You need to fix a problem in Alfred's close-up lines, but you've already exhausted all takes for shot 88B, the angle used in the film. Where else should you look for material that will save Alfred from looping?
- Shot 88C isn't likely to help, as Alfred will either be off-mic or nonexistent, with the continuity person or director reading his lines. Still, it's worth checking the sound reports to see if your actor is present and was given a mic. Unlikely, but possible.
- You probably won't find joy in the master shot (shot 88A) either. Because it's a wide shot, the sound will be either very wide or on radio mics, both of which can make for a difficult match. However, desperate dialogue editors do desperate things, so if all else fails give it a try.
- The dolly shot (shot 88E), depending on what it is, could be of help, but don't make it your first choice as it may introduce new problems. Since this is a pickup (a take including only a part of the scene), you can use the shooting script to find out if it includes the parts of the shot you want. Do this before you start looking to save yourself some unnecessary wading through takes.
- Head straight for 88D, the medium two-shot. It's the most likely place to find Alfred with a microphone in the right place.
Choose the Right Parts
Sometimes it's not even about replacing the whole line. It could be just one word or even one letter of a word. Some dialog editors do a great job in blending alternate takes into the selected take so that it cleans up the noise and at the same time does not change the performance of the actors.
Kunal Rajan, supervising sound editor
The Mourning Hour; The Root of the Problem
You've imported the likely alternates into your session. Now you have to find out which one will make the best fix and then cut it into your track. I find it easiest to move my work tracks directly beneath the track with the damaged region.
To select the best alternate take, try the following procedure. You'll develop your own technique with time, but this isn't a bad way to start.
- Place a marker at the location of the noise you want to eliminate so you can navigate back to your target location after scrolling through long
- soundfiles. Some workstations allow you to open several timelines at the same time. This makes auditioning sounds much easier, as do sound search engines.
- Import the alternate take soundfiles into your session.
- Drag alternate take clips onto work tracks, more or less lined up with the original (see Figure 14.19).
- On each alternate take clip, remove all but the desired material.
- Line up the beginning of each alternate take clip with the beginning of the original damaged clip.
- Listen to the original take and then each of the alternates. Pay attention to cadence, tone, and attitude and how they match up with the originals.
- Put aside the takes that patently differ from the original, but don't remove them from the session as they might hold hidden secrets. Just get them out of the way. Now you'll have only the best takes, lined up roughly in sync under the original line.
On rare occasions, an alternate take will have all the right attributes—the speed, mood, and linguistic “music” (cadence, timbre, energy, spirit) of the original. You need only sync it to the original and edit it into the track. However, you usually have to work a bit harder. Often, one part of the line will work well but another will be wrong. There are a number of things you can do to create the perfect replacement.
Combine Parts of Several Takes
Listen to the original line—beginning, middle, and end. Describe to yourself its spirit. I often invent a nonsense rhyme to describe the music and energy of each part of a line. Then I play back the nonsense tune in my head as I listen to parts of each potential replacement. By taking the language out of the dialogue, I can better focus on its music. It's not uncommon to combine pieces of two or three or more takes to make a good alternate line.
Get the Sync Right
Tricks and tips for syncing are akin to fishing advice—everyone has the perfect secret, certain to give you great results in the shortest time. In truth, it's a matter of time, experience, and a knack for pattern recognition. Try a few of these pointers and develop them into a technique of your own.
- Break the line into short, easily managed sections. If you start off with too much material, your attempts at sync will be compromised from the outset. Try rhythmic blocks of no more than three or four words.
- Find a landmark consonant in the phrase. Consonants are easy to spot. The plosives (P, B, etc.) or the stops (T, D, etc.) usually rise above the plain of the rest of the word's waveform. They're also important because their short durations serve as clapper boards, revealing to the audience if a shot is in sync or not. Start syncing by lining up a landmark consonant with the same sound in the original. Do this to all your alternates because you don't yet know which takes you'll be using.
- Check the length. Compare the length of the original take with the semi-synced alternates. Unless the actor is a machine (in which case your job will be very easy), each take will have its own internal rhythm even if the overall lengths don't vary too much. Look for a shot whose internal rhythm most closely replicates that of the original.
After you've completed these steps, it's time to listen again. It's easy to get caught up in the graphics and begin slipping here, nipping and tucking there, with little regard for content. Remember, you're performing a very delicate operation here, replacing words while respecting the character, mood, focus, and drama of the original line and at the same time worrying about sync. Listen to the original. Close your eyes so that you can visualize the flow of the phrase. Sometimes I see a phrase as colors with varying intensities, modulating with the line. This lava lamp of transposed information helps me categorize the line's technical as well as emotional attributes.
If you're allergic to touchy-feely notions like “visualize the phrase,” please indulge me. First, I find closing my eyes very valuable. It removes the stimulus of the computer monitor so I'm not influenced by visual cues. Second, I find it useful to assign shapes and/or colors to the elements of a phrase or word, as this rich shorthand is often easier to code and remember than the raw sound. As I said, sometimes I reduce the phrase to nonsense sayings to provide a sort of mental MIDI map for interpreting it. Finally, imagining the phrase as colors or shapes is very visceral and helps me quantify its real workings. Of course, you're free to think of all of this as hogwash and use your own tricks.
Save the Original Line
Once you find the replacements for each section of the line, you're ready to construct the fake. First, however, you need to copy the original line to a safe place, whether muted on the main timeline or on a junk track. There are two kinds of lines you never want to throw away: those you replace with alternates and those you replace with ADR. The reasons are pretty obvious.
- The director hates your replacement line and would rather put up with the problem noise than give up the special characteristic of the original.
- You misunderstood the point of the line when you made the replacement, so its emotional key is now missing or incorrect.
- The replacement line doesn't match well either in sound quality or acting energy, and you know the director will drop it.
- The editor is very territorial and can't stand it that you replaced any line.
- A few days after you replaced a line, you realize that your month without sleep really did cloud your judgment.
All of the preceding is true for ADR as well as alternate take replacements.
Changing the Speed
Most workstations have plugins for “fitting” replacement lines, whether ADR or alternates, to match your original, but you need to know how they operate before you can make them work for you. It's not uncommon to hear the telltale artifacts that these voice fitters create when used irresponsibly. The trick is to prepare the track before you use the fitter, never to ask the processor to do more than is reasonable, and to honestly listen after its every use. If it sounds weird, it will never get better.
Time Expansion/Compression Tools
Time-stretch tools (“word-fitting” tools like VocAlign fall into this category) change the duration of an event without changing its pitch. Unlike pitch-shift tools, which behave like variable-speed analogue tape machines by changing the sample rates and then resampling, time stretchers add or subtract samples as needed. If a phrase is too long, they'll remove enough samples to get to the right length. If the phrase is too short, they'll duplicate samples to lengthen the selection.
These tools have to know where to make the splices. If you tell it that you can't tolerate any glitches, the time-stretch tool will put most of its splices in the pauses between words or in other very safe places. After all, who's going to hear the splice where nothing is said? Or sung? Or played? What you end up with are essentially unchanged words with dramatically shortened pauses as well as truncated vowels and sibilants. Thus, if you order a 10 percent length reduction, the line will indeed be ten percent shorter but the speed change won't be consistent. This is especially noticeable with music, where time compression/expansion can result in a “rambling” rhythm section.
Choose a more “accurate” time change and you're telling the tool that local sync is very important, even at the risk of glitching. In extreme cases, you'll have perfect rhythm because the tool is splicing at mathematically ideal locations, ignoring content. But the glitches resulting from this “damn the torpedoes” approach are often unacceptable.
Here you have to make informed compromises (see Figure 14.20). All-time expansion/compression tools provide a way to control the delicate balance between “perfect audio” and “perfect rhythmic consistency.” You just have to figure out what it's called. Usually there's a slider called something like “Quality” that indicates how glitch-tolerant the tool should be. The less glitch tolerance (that is, higher “quality”), the worse the rhythmic consistency. The more you force the rhythm to be right (lower “quality”), the greater your chances of running into a glitch. As expected, the default average setting will generally serve you well.
Before you process a region with a time expansion/compression algorithm, make an in-sync copy of it. Here's how this will help you:
- If you need different time expansion/compression ratios for separate parts of the line, you'll find it helpful to have the original version handy. Given that time expansion/compression routines are far from transparent, the last thing you want is to process an already altered file.

- As you construct the phrase, you'll find sections that need time flex and others that don't. With a copy of the unprocessed region standing by, it's easy to access the original for editing.
- If you process the original without making a copy first, and then decide your entire syncing logic was wrong, you'll have to re-edit the line.
Word-Fitting Tools
As you'll see in Chapter 15, there are processing tools for locally time-stretching a line; that is, comparing the waveform of the original with that of the alternate and manipulating the speed of the alternate to match the reference. Word fitters use, more or less, the technology of time expansion/compression, but they're largely automatic—able to look at small units of time and make very tight adjustments. Still, they have the same real-world limitations that time expansion/compression has: quality versus sync. All of these tools offer some sort of control to enable you to make that choice. Play with them and get used to how they work.
Time expansion/compression and word-fitting tools create new files. You'll have to name these. Do it, and be smart about it. I'll name a section of a shot that I stretched something like “79/04/03 part 1, +6.7%.” A word-fit cue I might name “79/04/03 part1, VOC” (for VocAlign). If you don't sensibly name your new files, you may eventually regret it. However, these complex clip-naming schemes are meant to make life easier, not to burden you with extra chores. It's up to you to find a reasonable balance between utility and neurosis when figuring out how to manage the many files that result from offline processing.
Syncing the Alternate Line
You'll find a full treatment of syncing and editing alternate lines and ADR in Chapter 15. Here I'll just briefly outline the steps.
- Place one empty work track directly beneath the original line. Your alternate lines will be just below it. It's on this blank track that you'll build your new line.
- Copy the original clip to a junk track.
- Find the most suitable replacement from the alternates you lined up below it for each section of the original line.
- Cut and paste the appropriate sections from the alternate takes onto the blank track, more or less in sync with the original.
- Start syncing each section of this assembly with the original line.
− Get the length right. The best way is to try editorial nips and tucks to adjust the pauses. Do this before you begin any word fit or time-stretch processing. You can shorten and lengthen during pauses, but if you lengthen a bit of “silence,” make sure you don't introduce a loop by repeating a tick, click, smack, or other recognizable noise.
− Don't be afraid of cutting in the middle of a word. Contrary to common sense, you can actually trim in the middle of certain word sounds. Refer to “Where to Splice” in Chapter 11 to remind you how to use consonants and sibilants to splice within words.
− Do as much manual editing as you can before resorting to the length-changing tools. The easier you make life for the processor, the better results you'll achieve.
- Listen to what you've constructed. Watch the alternate line in sync with the picture, then compare it with the original. Although it's great to be able to match waveforms, you can easily forget what this is all about: convincing dialogue, solid sound, and language that a normal person (as opposed to a computer) would believe.
- Do your time-stretching work. Use a word-fitting tool or a time expansion/compression plug-in, whichever you have and whatever makes sense to you. Be sure to logically label the resulting regions.
- Move the original line to another track and mute it. Slide the replacement to where the original had been. Fix the fades and move on to the next fix.
Overlaps
People interrupt each other all the time. Sometimes out of excitement, sometimes out of anger or arrogance, actors are always stepping on each other's lines, and such “overlaps” cause ceaseless headaches. In Chapter 11 we looked at problems caused when the sounds of two people, on two microphones, in the same shot overlap. Let's return to our friends Alfred and Elizabeth and see what can happen when people in different shots step on each other. Here, again, is the list of shots for scene 88:
- 88—master shot (wide) with both characters
- 88A—single shot of Alfred
- 88B—single shot of Elizabeth
- 88C—medium two-shot of both characters
- 88D—dolly shot starting in the middle of the scene
In an otherwise outstanding take of 88A, Elizabeth interrupts the end of Alfred's sentence. Back in the picture editing room, the editor and director piece together a back-slapping spat between our two characters. The picture editor includes Elizabeth's interruption on Alfred's track, cutting to Elizabeth at the first rhythmic pause. No one but you notices that Elizabeth's first four words are off-mic, having come from Alfred's track. What do you do? You announce that it must be fixed, either with ADR or alternate material.
Overlaps put you in a bad position. Often the director and the editor won't notice them while editing because they're so used to hearing the cut. You're the only one who notices, so you'll be stuck trying to justify the extra ADR lines or the time spent rooting around in the originals to find the replacement material. Still, if you ever want to show your face at the sound editors' sports bar, you can't let it go. Overlaps with off-mic dialogue aren't acceptable.
When Elizabeth (off-mic) interrupted Alfred (on-mic), she ruined the last few words of both of their lines. The end of Alfred's otherwise pristine line is now corrupted by an ill-defined mess, so it must be replaced from alternates. (Refer to Figures 11.35 and 11.36.) Let's hope that Elizabeth won't jump the gun in other 88A takes. We also have to replace the head of Elizabeth's line (88B) so that she'll have a clean, steady attack. Again, we have to rub our lucky rabbit's foot in hope that there'll be a well-acted alternate 88C from which we can steal Lizzy's first few words. If alternates don't help, you'll have to call both characters for ADR on the lines in question. But since you'll face the problem of matching the ADR into the production lines, it's in everyone's interest to use alternates to fix the problem.
When shooting a fast-paced comedy in which the characters regularly step on each other's lines, a location mixer may use a single boom plus a radio mic on each actor. If this is recorded on a multichannel hard disk recorder, you stand a far better chance of sorting out the overlap transitions. However, even if you have nice, tight radio mic tracks of each character, you'll have to be careful of the off-mic contamination from one of them. There's no free lunch.
Fixing the Acting
It's not unusual for actors to slip in their diction, slur a word, or swallow a syllable. Often you can fix these problems the same way you remove noises—go back to the alternate takes and find a better word or phrase. Of course, you'll copy and put aside the original line since that little “slip” may turn out to be the reason the director chose the shot. Also, when replacing a line because of an actor's problems, you'll keep it to the bare minimum so that the spirit of the line is unaltered. Plus, when it comes to “improving” acting, you're on thin ice. The director carefully chose this actor, whom she then directed. Together with the editor, she selected her favorite reading of the line. Be gentle when suggesting that a line is not up to par.
Removing Wind Distortion
Location mixers go to great lengths to avoid wind buffeting distortion. They protect the mic from the wind using shock mounts and screens with all sorts of lovely names (including “zeppelin,” “wind jammer,” “woolly,” and “dead cat”). Regardless, it's certain that sooner or later you'll curse the location mixer for “not noticing” the wind buffeting the mic on the Siberian blizzard wide shot (while you were in your comfy cutting room).
Often you can tame this very low-frequency distortion in the mix with a high-pass filter set to something like 60 Hz. As with all filtering issues, you should talk with the rerecording mixer or the supervising sound editor about how to proceed. If you're really lucky, the mix room will be available and you can listen to the scene in the proper environment. You can also do a poor man's test by running the track through a high-pass filter in your editing room and playing with cut-off frequencies between 60 and 100 Hz. Keep in mind that wind distortion will always sound less severe in your cutting room than on the dubbing stage, so don't get too excited by the results.
If, God forbid, you decide to filter the tracks yourself in the cutting room, you must make a copy of the fully edited track before filtering and put the original on an adjacent track. Many a time I thought I was doing my mixer a favor by “helping” the track a bit with a high-pass filter, only to have the mixer stop, turn to me, and ask, “What were you thinking?” What sounded like a vast improvement in my little room was now thin and cheap. Plus, the energy from the wind noise was still evident. The mixer gently reminded me of the division of labor. “You cut,” he said, “I make it sound good.” Thankfully, I had stashed the original (completely edited) onto a nearby track, so with little effort the Empire was saved. Still, who needs the humiliation?
So what should you do about wind distortion? I suggest you build two parallel tracks: the original—fully edited and faded and cleaned of nonwind noises, but still containing the wind buffeting; and an alternate version assembled from other takes, reasonably free of the wind noises. Mute your least favorite version. This way you're prepared for anything that might happen in the mix. If the mixer can remove the wind noise from the original take without causing undue damage to the natural low frequency, great. If not, you're prepared with a wind-free alternate. Either way you don't get yelled at.
Removing Shock Mount Noises
Like wind distortion, shock mount noises appear as unwanted low-frequency sounds. But unlike wind, which usually lasts a long time, they're almost always very brief. Like dolly noise, which occurs with camera motion, shock mount noise is usually tied to a moving fishpole (boom). This makes it easier to spot.
You can often succeed in removing shock mount noise with very localized high-pass filtering, usually up to 80 Hz or so. As with any filtering you perform in the cutting room, save a copy of the original. Don't filter the entire clip but just the small sections corrupted by the low-frequency noise. If possible, listen to the tests of your filtering in the mix room, so you get an idea of how your fixes translate in the big room. Here you'll learn if you under- or overfiltered, and you'll hear any artifacts you couldn't hear in the edit room.
Of course, the right way to fix shock mount noise is, yes, to find replacements for the damaged word in the outtakes. This way you don't risk any surprises in the mix.
Back to Dolly Noises
It was dolly noise over dialogue that started the discussion on using alternate takes to repair damaged lines. By now it should be clear how to piece together a new sentence from fragments of other takes. What makes dolly-related damage interesting is the fact that the noise source is always changing, so you usually must line up all reasonable alternates and hope that the annoying cry of the dolly occurs at slightly different places on each one. You end up constructing an entirely new line from the best moments of all the takes. If this doesn't work, you'll have to rerecord the line.
Fixing the impossible
You have a respectable arsenal for your battle against transient noises: room tone, impulsive noise reducers, pencils that can redraw a waveform, and knowledge of how to wrangle alternate material to your advantage. Still, there are sound problems that seem impossible to fix, especially if there was only one “perfect” performance, or only one take. A cell phone ringing, a truck backing up, a cough, or a car horn; even unfortunate noises coming from an actor's mouth—any one of these can wreck a unique recording.
Spectrogram editing allows you to locate an unwanted sound embedded within a signal and remove it with amazing precision. The Cedar Retouch spectrogram in Figure 14.21 illustrates the sound of a car horn sounding during a church concert. The horn's fundamental and harmonics can be seen as short horizontal lines, very evenly spaced—a telltale sign of a harmonic sound. One-by-one, components of the offender are highlighted and removed using the Patch tool. In Figure 14.22 the horn has been removed by selectively reconstructing its sound components.
Just as quickly as you learn how to “hear” the sounds displayed in DAW waveforms, so too can you catch on to the language of histograms, enabling
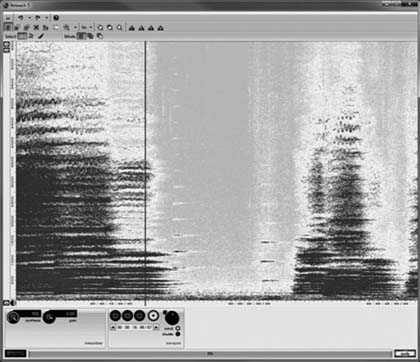

Figure 14.22 The car horn has been removed. The editor used the Patch tool in Cedar Retouch to remove and replace the noise by using sound from a different sound from part of the audio spectrum.
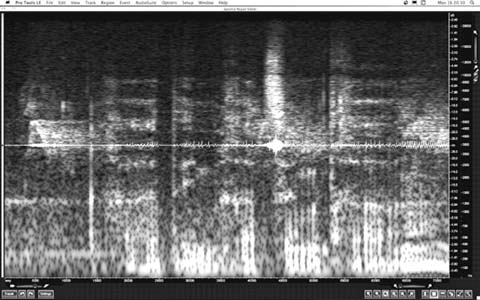
Figure 14.23 A bird call covers some dialogue, seen in IZotope RX2 Spectral Repair. Thanks to spectrogram editing, transient noises as shown in this image and in Figure 14.21 can often safely be removed, reducing the need for ADR.
you to differentiate friend from foe. Figure 14.23 shows a histogram in IZotope RX2's Spectral Repair module. The example consists of a few words that are corrupted with birdcalls. The horizontal waveform display reveals two sibilants—easy to spot due to their almond shape and relatively high amplitude. These sibilants, one on the far left and the other in the middle of the image, are also easily seen in the histogram. They contain a great deal of relatively broad energy, so their frequency (vertical) footprint is quite impressive. You can't easily miss them. Between these sibilants in Figure 14.23 are towers of horizontal lines, each beginning (left side of the noise) with a strong vertical element. These are the birdcalls, with their harsh attacks and notable harmonic regularities. Fortunately for us, in this example these cries come with amazing regularity, so it's easy to distinguish (desirable) dialogue from (undesirable) birdcalls.
Once you identify the fundamental and harmonics of the invasive sound, highlight each of them using a drawing tool and then perform the repair. Each software manufacturer has its own tools and choices for repairing sound in the selected area. Some selectively attenuate, others resynthesize. Some do both. What's right for any specific problem depends on the nature of the burst of noise and of the underlying signal—yet another good reason to read the manual. As with all noise reduction tools, you can easily overdo it. No point removing the birds at the expense of the voice.
Reducing Ambient Noises
As long as films have had sound they've had noise. Buzzing lights, grinding cameras, growling environmental noise, and any number of other hums, hisses, and roars. Sound engineers have continuously sought to vanquish these background sounds—with mixed results. In the years between vacuum tube gates and software plugins were two classic noise reduction tools that played dominant roles in quieting film sound—and in setting the stage for today's processors: the Urei 565 filter set, affectionately known as “Little dipper”; and the Dolby Cat. No. 43 noise reduction unit.
The Little Dipper was introduced at the 1970 AES show in New York, and addressed a problem desperately in need of a fix: the removal of very specific steady-state noises. (see Figure 14.24) With its very tight band filters and 18dB-per octave high- and low-pass filters, the Little Dipper became famous for attenuating camera sound and steady band-specific noises, and for years was a “must have” for film mixing theaters.5

Figure 14.24 The Urei 565 filter set. The “Little Dipper.”

Dolby Laboratories' Cat. 43 playback-only background noise suppressor, which appeared in 1978, was an offshoot of the company's 360 Series second-generation A-type noise reduction system (see Figure 14.25). This, the first widely distributed broadband noise reduction device, was not a filter, but rather a four-band compander with a master threshold control. In ways never before possible, the Cat. 43 enabled rerecording mixers to suppress broadband noises and rescue dialogue from the background muck.
Just as DAT was a bridge between old and new worlds of film sound, so were the Little Dipper and the Cat 43 instrumental in moving us from where we were to where we are.
Understanding Broadband Noise Suppression
Traditionally, noise reduction is done in the dialogue premix. You edit, the mixer mixes. But as technology improves, plugins get cheaper and better, budgets degenerate, and mixes get shorter, you may find yourself performing noise reduction in your cutting room. It's not necessarily a positive trend, but you should know how to deal with it.
Noise reduction can miraculously save a scene. Or it can make your tracks sound like a cell phone. Here are the secrets to nursing your tracks through noise reduction:
- Talk to your supervising sound editor or mixer to come up with a plan. Who does what and how will it be done?
- If you are working offline, make fully edited safety copies of all regions you're going to process.
- Understand what each processor does.
- Get to know your noise problem so that you can intelligently attack it.
- Know when to stop.
Getting Answers from the Supervising Sound Editor
and Mixer
Discuss each noise problem with the mixer or supervising sound editor, and remember to ask the following questions:
- Can this problem be fixed, or will the lines be rerecorded (ADR)?
- Who'll fix each line? For each problem, determine if the editor or the mixer will do the processing.
- What sorts of processing will be used?
- If you plan to use inserted plugins, which ones are available in the mix room and what DSP limitations and latencies will be encountered?
Even an abbreviated version of a meeting like this will make for an enormously more productive mix. And you'll avoid those damning looks from the mixer during the dialogue premix that say “I can't believe you did that!”
Preparing for Noise Reduction
Many broadband noise reduction plugins have enormous latencies, so you can't use them as real-time processors amid your other tracks. If you did, your processed tracks would be miserably out of sync. As computers get faster and plugins smarter, you will find a “real time” mode that allows you to use the processor as a track insert. Before committing to this plan, verify that your plugin/computer combination can indeed handle this workflow. And don't forget to check the system in the mix room. Real time hardware processors, such as the Cedar DNS3000 or plugins like the Waves WNS, offer broadband processing with no discernable latency.
If you can't or don't use noise reduction as an insert, you must process the clips and create new soundfiles offline—one clip at a time. However onerous this task seems, there is an upside. Since you are processing each clip individually, you can pay special—and better—attention to each. This takes more time, but can yield much better results. However, replacing old clips with new can get you into serious trouble if you don't maintain order and keep track of what you've done.
Before offline processing you have to make a copy of the original region. Since any AudioSuite (or similar) operation will create a new soundfile,

Figure 14.26 The highlighted region of this soundfile needs to be processed. Any AudioSuite operation will create a new region without handles.

Figure 14.27 Before processing, delete the fades and open the handles. This will give you greater editing and fade options when working with the soon-to-be-created region.
open up the beginning and ending handles of the region before processing (see Figures 14.26 and 14.27). Just because the edit works well before noise reduction doesn't mean that the transition will be effective once the tracks are cleaned. And previously unheard background sounds (such as “Cut!”) may emerge after cleaning. Similarly, track cleaning may alter the balance between adjacent shots, necessitating a longer fade. Pulling out an extra bit of handle means you'll have to redo the fade after noise reduction is complete, but you'll be left with a better set of options to play with.6
Noise Reduction Tools
One reason noise reduction so often turns out miserably is that editors don't understand the tools. This is one of the key arguments that mixers have against editors reducing noise in the editing room rather than in the mix. You may have an impressive selection of tools at your disposal but use them incorrectly and you'll inflict damage. Typically, there are three types of tools for managing background noise:
- Filters. These equalizers, notches, buzz eliminators, and so on, are best suited for harmonic (tonal) noises.
- Interpolation processors. These tools were made to remove clicks and pops on vinyl, but can be used to remove impulsive noises in production recordings. As mentioned earlier, these may be effective in battling small clicks, radio microphone crackles, and maybe even distortion.
- Broadband processors. Originally designed to eliminate hiss on archival recordings, these multiband expanders are used for general-purpose noise reduction.
Most botched, artifact-laden noise reduction jobs happen during broadband processing. Because processors that remove broadband noises often have names like “Z-Noise,” “DeNoise,” “Denoiser,” or “Noise Suppressor,” it's not irrational to think that this is the place to head with all your noise problems. The result: having failed to use filters or interpolation processors to remove harmonic noises or unwanted transients, you end up asking too much of the broadband processor, which repays you with a signature “I've been noise reduced” sound. The trick is to identify your particular noise problem and then apply the correct processors in the right sequence.
A Classic Noise Reduction Plan
The following paragraphs describe a classic multipass noise reduction sequence. Once you understand the whys and hows of this plan (and have read the manuals), you should experiment with different sequences to see what works for a particular noise. The classic noise reduction plan looks like this.
- Filters
- Interpolation processors
- Broadband processors
- Spectrogram editors
Many modern noise reduction plugins can run several processes at the same time. This means that you can control and process harmonic and broadband background simultaneously. All manufacturers, however, recommend you remove impulsive noises before tackling steady-state broadband sounds.7
Rumble, Hum, and Buzz Removal
Create an FFT or interpolation display of your noise, and look at the low-frequency information (below 500 Hz), as shown in Figure 14.28.8 If you're chasing a harmonic problem like a rumble, hum, or buzz, you'll notice a distinct pattern. Look for the lowest-frequency peak—that's the fundamental frequency of the noise. You should easily see harmonics occurring at multiples of the fundamental frequency.
Write down the center frequencies of the fundamental and its harmonics, up to the tenth harmonic (or until you can't stand it any longer). Note the approximate “height” that each harmonic rises above the noise floor as well as its “width.” You'll use the width to calculate the Q for each filter and the height to determine the cut value (see Figure 14.29). Write all of this down
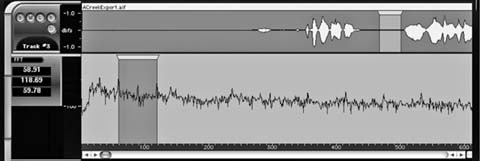
Figure 14.28 An FFT display created with soundBlade from Sonic Studio. This sample shows a classic North American hum, with peaks at approximately 30, 60, 120, 240 Hz, and so on. The frequency callout (left) reveals that the 60 Hz fundamental measure 58.91 Hz, indicating that the original analogue recording was at some point transferred off-speed.
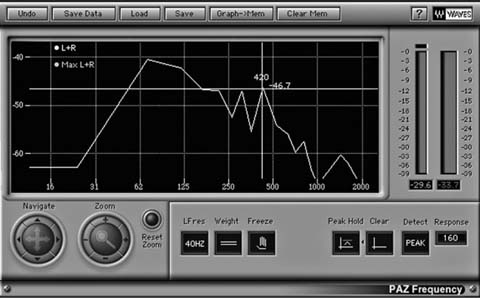
Figure 14.29 A Waves PAZ Frequency Analyzer displaying center frequency and amplitude of a harmonic.
or enter it into a spreadsheet (Figure 14.30), which will do the math for you if you set up a few formulas.
Use a multiband EQ to create a deep-cut filter for the fundamental and for each harmonic (see Figure 14.31). For each filter, enter center frequency and calculate Q (center frequency ÷ bandwidth). Set the attenuation to a couple of dBs less than the height to which each specific harmonic rose above the visual noise floor on the FFT display. You'll end up with several deep, narrow
Figure 14.31 Once you determine the center frequency, gain, and Q for the principal harmonics, you can use a multiband EQ to remove the harmonic noise. In this case, a Waves Q10 is set to the parameters shown in the spreadsheet in Figure 14.30.
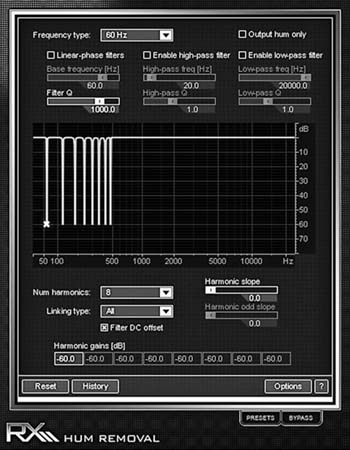
filters. These aren't notch filters because they're not infinitely deep; rather, they remove only what's necessary to reduce the noise back to the level of the existing noise floor. This should effectively eliminate hum, buzz, and rumble. If not, extend the filters further to the right to eliminate harmonics at higher frequencies and recheck the display to make sure you accurately measured the components of the noise.
If all this work seems silly, you can use a buzz removal processor. At their simplest, these filters find—or allow you to define—a fundamental frequency, after which they calculate the harmonics and create steep, narrow cuts, as seen in Figure 14.32.
Click and Crackle Removal
Earlier in this chapter you saw how to tone down short term clicks, crackles, and rustles using interpolation processors, often called declickers and decracklers. Sometimes you can succeed in taming long sections of impulsive damage by using these tools as inserts. If you do choose to remove clicks in real time, select a processor that has very little latency.
Broadband Noise Removal
Many manufacturers sell broadband noise reduction processors. They can make a hero or a fool out of you. The key to using them successfully is understanding what they do and what they don't do.
Broadband noise reduction devices—whether they work in real time or in offline processes—first take a sample of “pure noise,” ideally from a pause free of any valid signal.9 This serves as the blueprint of what's wrong with the sound. Next they convert the noise sample and signal from the time domain to the frequency domain by creating ever-updated FFTs. The FFT of the noise sample is divided into many narrow-frequency bins, in which the noise is reduced to a formula. Until recently, broadband processors were unable to attenuate simultaneously both tonal and broadband noise. This is the reason for the initial filtering pass in the classic noise reduction workflow. However, it's now often possible to address both at the same time (see Figure 14.33).
When the signal is played through the processor it, too, is assessed in the frequency domain. At each of the bins, the formula for the signal is compared to that of the noise sample. If the match is sufficient, then the sound within that bin is attenuated by a user-controlled amount. If there's no correlation between the noise formula and the incoming signal, no attenuation occurs in that bin since the dissimilar signal is likely valid audio rather than noise. This process is repeated for all of the frequency bins.
At this point there are usually control parameters for threshold and reduction. As would be expected, threshold determines the sound level at which processing begins; attenuation (or “reduction”) dictates what's done within each bin flagged as “noise.” If these settings are too aggressive, you'll hear very obvious artifacts. Back off first on the attenuation and then on the threshold (see Figure 14.34).
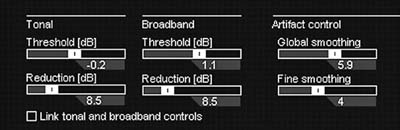
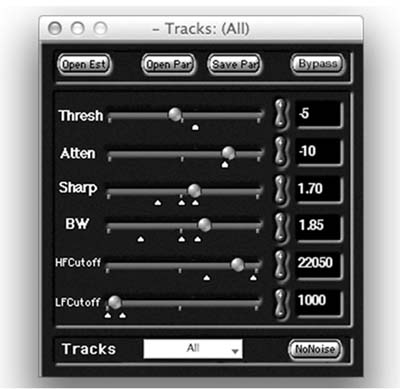
Figure 14.34 NoNOISE broadband denoiser control panel. Threshold and Attenuation govern where processing begins and by what amount. Sharpness and Bandwidth control how sound is recreated after noise reduction. Cutoffs determine what parts of the spectrum are not processed. These controls are common to most broadband denoisers.
The signal must now be recorrelated into a “normal” time domain sound. You usually have some control over this. “Sharpness” controls the slope between adjacent bins. The steeper the slope during the recombination process, the more effective the noise reduction but the “edgier” the sound. If you set the sharpness too high, you'll hear digital “swimming” artifacts, often called “bird chirping.” There's usually a control called something like “sharing” or “bandwidth” that determines the slope between adjacent bins during the recorrelation. The higher this setting, the warmer (but perhaps less articulate) the sound.
Low-frequency (LF) cutoff, if available on your processor, isn't a high-pass filter as you may think. Rather, it dictates the frequency beneath which there's no processing. If you're attacking traffic, set the LF cutoff to zero. If all you're fighting is hiss, set it to 2000 Hz or higher and you won't run the risk of damaging anything in your audio source below that level. Many processors have a high-frequency cutoff, which normally defaults to the Nyquist frequency. Change this setting if you're processing only low frequencies and want to leave higher frequencies unaffected.
All broadband noise removers are shackled by the fact that as they aim for greater resolution in the frequency domain, resolution in the time domain suffers. No way around it. Clever manufacturers offer options between frequency resolution and time resolution, giving you a bit of choice.
Ambient Noise Complexity
Very few background noises have but one component. A typical background noise will have harmonic elements from air conditioners or other machinery, ticking noises—from microphones or cables if not from speech—and broadband, random elements. Labeling a straightforward noise like air conditioning as “simple” is misleading. In addition to the obvious hissing air (solution = broadband denoise), there'll be harmonic sounds from the motor (solution = notch filters) and perhaps clicking from ineffective isolation springs or other causes (solution = declick interpolation). The answer is simple: don't run straight for the broadband. Think about the source of the noise and appropriately plan your processing. And don't think that once you find the “perfect” sequence you're off the hook: each noise reduction problem warrants its own solution.
Know When to Stop
Aside from picking the wrong noise reduction tool for the job, the most common way to bungle the process is not knowing when to quit. When you repeatedly listen to a noise, trying to get an even cleaner signal, you inevitably lose touch with the audio you're processing. Almost certainly you'll overprocess the tracks.
The antidote is annoyingly obvious: process less. You can always do more in the mix. Also, when you're happy with the noise reduction, leave it. Do something else. Take a walk and rest your ears. Listen to it later with a fresh ear to see what you think. If it passes this delayed listening test, it's probably acceptable.
To Process or Not to Process
A running battle exists between editors and rerecording mixers about processing. While there's something to be said for tracks arriving at the mix relatively clean, it's rare that an editor in a cutting room has the experience, tools, or acoustics to properly process them. Few things are more humiliating than listening to a mixer repeatedly say “If only I could get my hands on the original tracks.” In my experience, it's rare for a mixer to like the processing I've done in the cutting room, and more often than not my charmingly cooked tracks are greeted with disdain.
General hiss and background ambience reduction should ONLY be done during premix and final mix when the results can be judged against other sound elements. The vacuum of a dialog edit session is not a place to make broad, overall processing choices. Spot processing, like painting out car horns or distortions, can be done during the dialog edit when time permits but it must be completely seamless.
Richard Fairbanks, rerecording mixer
Confessionsofa Ex-Doofus-ItchyFooted Mutha
Sometimes it's appropriate for the dialogue editor to process certain tracks in the cutting room. Noise reduction, as we just saw, can be one such case. Another instance may be scenes in which one side of the conversation is wildly out of balance (for instance, a nearby truck was idling when one side of the scene was shot). In such cases, it's difficult even to edit the scene without some sort of processing.
Follow these rules and you can peacefully bring (some) processed tracks to the mix:
- If at all possible, talk to the mixer while you're still editing (I hope that by now I've impressed you with the fact that it's pretty important to talk with the mixer). Tell him what you have in mind and see if it will fly. Ask if there's any special layout to follow when including processed tracks amid the dialogue elements. Make deals as to what you'll cover and what you'll leave for the mix.
- Learn the capabilities of the mix room. What's easy to pull off in the mix? What isn't? Understand the mixer's tools and how they compare to yours, and then you'll make better choices.
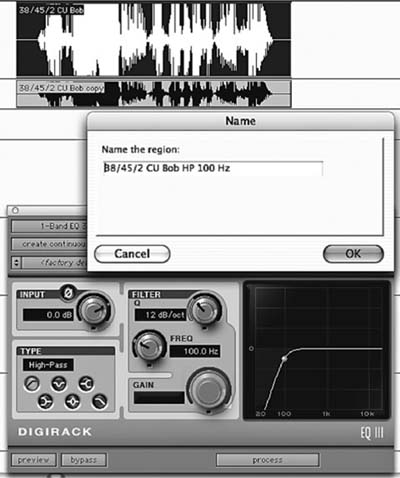
Figure 14.35 If you must perform noise reduction on a region, first make a copy. Mute this copy or place it onto a Junk track. After processing, add a suffix to the new region name that reminds you what processing you used. In this case, a 100 Hz high-pass filter was applied, as is reflected in the new region name.
- Always make an instantly accessible safety copy of each region or string of regions you're going to process. This will afford you easy A/B comparison when processing, and it will let you revert to the original with little embarrassment. The safety copy must be edited as completely as the processed region on the dialogue track so that it will be usable as a valid alternate.
Each time you process a region, you create a new file. When you name it, include information about the processing you did (see Figure 14.35).
The dialogue editor has become more detail-oriented, often removing some ticks previously left for the mixer. As expectations have increased and budgets decreased, editors have had to improve their speed and efficiency. Most have done an amazing job adapting.
Larry Benjamin, rerecording mixer
Act of Valor; The Good Wife
___________
1. Ely William Hill (1887–1962), “My Wife and My Mother-in-Law,” Puck, 6 November 1915.
2. See www.waves.com, www.sonicstudio.com, www.izotope.com, www.cedaraudio.com, www.sonnoxplugins.com.
3. Despite the mantra of the music recording world, “Keep the levels as hot as possible” (especially with 16-bit material), you must provide headroom for signal processing, since it will likely raise peak levels. Give your processors some extra bits with which to “think” and they'll perform better.
4. See www.soundminer.com, www.icedaudio.com, www.baseheadinc.com.
5. Will Shanks, “Analog Obsession: Classic Filters: The UA 550-A and UREI 565 Little Dipper,” Universal Audio WebZine, Volume 3, Number 3, May 2005. (www.uaudio.com/webzine/2005/may/text/content4.html).
6. Some workstations automatically create handles when performing offline processing. Consult your user manual.
7. There are many strategies for noise reduction. Some engineers suggest another sequence: reduction of clipping and overloads; removal of clicks and crackle; azimuth alignment; removal of stationary noise such as hum and broadband noise; removal of remaining unwanted sounds with a spectrograph editor. The sequence depends on the nature of the noise and the processors available to you.
8. An FFT, or Fast Fourier Transform, is a method of analyzing a signal in the frequency domain rather than in the time domain in which we live. FFTs (and occasionally Discrete Wavelet Transforms—DWTs) are the key building blocks in modern digital signal processing. Most DSP software manufacturers prefer FFT over DWT for audio applications due to wavelets' poor separation of frequency bands and difficulty in implementation.
9. Many broadband noise suppressors now allow you to create a noise signature “on the fly.” This is true—by necessity—of realtime processors such as the Cedar DNS series or Waves WNS. But if you are performing offline processing, it's always better to find a representative “pure” noise sample.