
Inserting pictures and other objects in a message
Using hyperlinks and bookmarks
Working with tables
Using proofing and editing tools
An Outlook email message is not limited to the formatting options covered in Chapter 5. Many of the most powerful things you can do with a message you are creating is to insert objects. This is a general term for all the various elements that Outlook lets you insert in a message—tables, pictures, clip art, and animations, just to name a few. This chapter also covers some of the advanced editing and proofing tools that Outlook provides.
If you have any experience using Word 2007, you will notice a lot of similarity between it and the Outlook editor. That's because the two programs share the same editing engine, so most of the editing capabilities you have in Word are also available in Outlook.
Email messages that you create with Outlook can be very sophisticated. They can include a variety of objects—a generic term for elements such as images and clip art. This section provides an overview of inserting these objects into your messages. It starts with an overview of what kinds of objects are available. Tables, which are a special kind of object, get their own section later in the chapter. You cannot add objects to plain text format messages.
Adding an object is not the same as attaching something to a message. When you add an object to a message, for example an image, it is displayed as part of the message. In contrast, an attachment does not display in the message.
The following sections provide details on the variety of objects that you can use in your email messages. What objects are available? Here are brief descriptions:
Picture: Any image, such as a digital photograph.
Smart Art: Flow charts, organizational charts, processes, and other types of diagrams.
Chart: Bar, line, and other chart types to illustrate numerical data.
Shapes: Various shapes such as rectangles, arrows, and triangles.
Hyperlink: A link that the message recipient can click to navigate to another location.
Bookmark: Identifies a location in a message that can be the target of a hyperlink.
Text Box: A rectangular box for entering text.
Quick Part: A selection of text and/or other message elements that you have saved for reuse.
Equation: A mathematical equation.
Horizontal Line: Just what it sounds like.
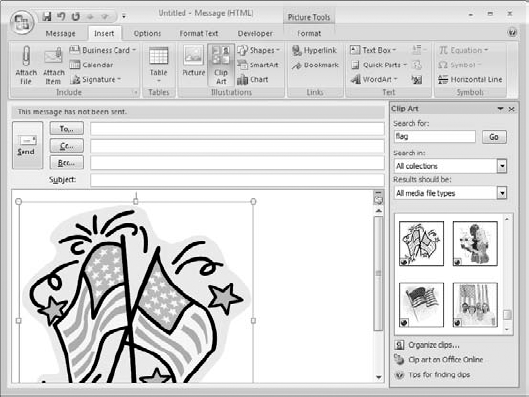
All objects have some things in common. After you insert it in the message the object will be selected as indicated by a border and handles, small circular or rectangular buttons on the border. You can see an example in Figure 6.1, which shows a selected clip art object.
When an object is selected you can work with it as I soon describe. To work on other parts of the message, click away from the object. To select the object again, click it. When an object is selected here are some of the actions you can take (some actions may not be applicable to all types of objects):
To delete the object, press Del.
To move the object, point at it—the mouse pointer will change to a four-headed arrow. Then drag to the desired position.
To change the object size, point at one of the handles at a corner or along an edge—the mouse pointer will change to a two-headed arrow. Then drag to the desired size.
To rotate the object, point at the extra handle extending from the top of the object—the mouse pointer will change to a curved arrow. Then drag to the desired orientation.
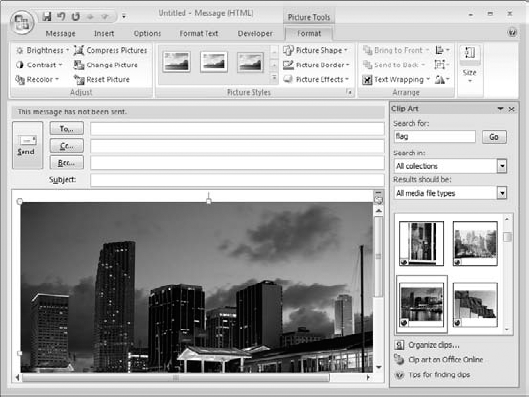
When a message object is selected, Outlook displays a Format ribbon at the top of the message window. The content of this ribbon depends on the type of object selected, and includes tools and commands for working with that type of object. For example, Figure 6.2 shows the ribbon displayed when a picture object is inserted. Some of the tools offered help you with changing picture borders, modifying brightness and contrast, changing text wrapping (how text flows around the picture), and special effects.
Some objects, such as Smart Shapes, also display a Design ribbon when selected. This ribbon provides access to additional commands for working with the selected object.
The remainder of this section shows you how to insert the various kinds of objects that Outlook messages support. First you learn about graphical objects, then text objects.
Some objects you can insert into an Outlook email message are graphical—that is, they are primarily visual in emphasis.
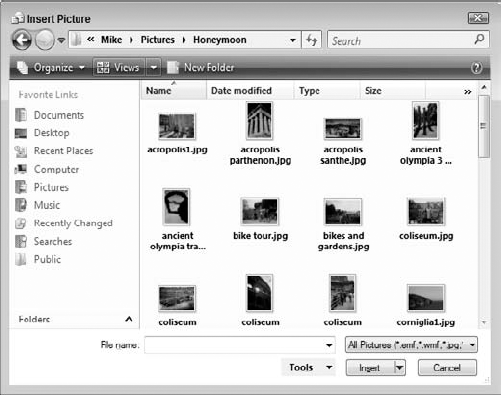
You can insert essentially any kind of image in an email message, including digital photographs, scans, and drawings. To insert an image in your email message:
Click the Picture button on the Insert ribbon. Outlook displays the Insert Picture dialog box (see Figure 6.3).
Navigate to the folder where the desired image is located.
If you want to view thumbnails of the images, click the Views button at the top right of the dialog box and select Thumbnails from the menu displayed.
Click the desired image.
Click the Insert button.
When most people hear "clip art" they think of small drawings used to illustrate or provide emphasis—for example, a flag, a dollar sign, a car, or a palm tree. This is indeed clip art, but the term has expanded to include photographs, sounds, and animations. Outlook lets you search for the clip art you want and then insert it in a message. To find and insert clip art:
Click the Clip Art button in the Illustrations section of the Insert ribbon. Outlook displays the Clip Art panel as shown in Figure 6.4.
In the Search For box, enter a term that describes what you are looking for.
Open the Search In list to select the clip art collections to be searched.
Open the Results Should Be list to select the types of clip art to be found.
Click the Go button. Outlook searches according to the parameters you entered and displays the results in the bottom part of the Clip Art panel.
Browse the results and double-click to insert a clip art item.
Click the X in the Clip Art panel title bar to close it.
Outlook's Smart Art elements let you add a wide variety of diagrams to an email message. These diagrams are designed to illustrate processes, cycles, relationships, hierarchies, and so on. To add a Smart Art object:
Click the Smart Art button on the Insert toolbar. Outlook displays the Choose a SmartArt Graphic dialog box as shown in Figure 6.5.
On the left side of the dialog box, select the category of graphic you are interested in.
In the center of the dialog box, click the specific diagram you want. It will be previewed on the right.
Click OK.

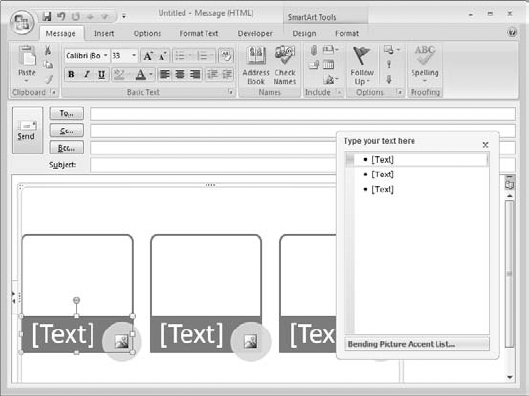
Once the Smart Art diagram has been inserted into the message, you edit it using the tools provided by Outlook. For example, Figure 6.6 shows a Bending List, one type of Smart Art diagram, selected for editing. Outlook provides a place for you to type in text as well as Design and Format ribbons for you to select commands related to the object.
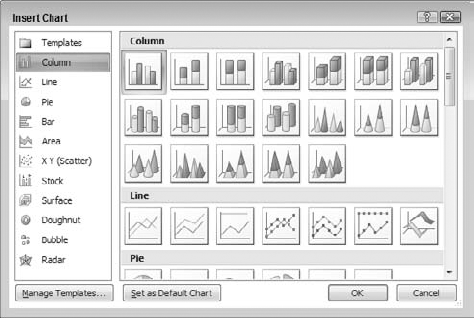
Inserting a chart into a message requires that you have Microsoft Excel installed. To insert a chart into a message, click the Chart button on the Insert ribbon. Outlook displays the Insert Chart dialog box as shown in Figure 6.7. You use this dialog box to select the type of chart that you want by clicking the sample from the gallery on the right. Then, click the OK button.
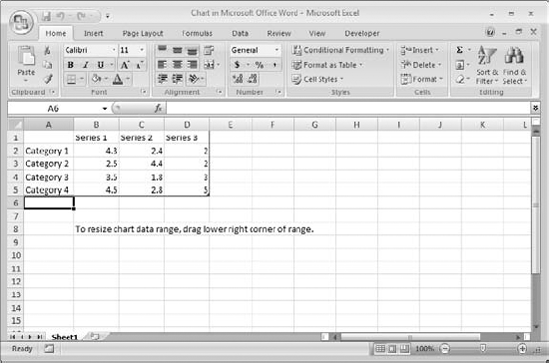
Next, Outlook inserts a chart in the message and opens, in Excel, a worksheet with some dummy data in it, as shown in Figure 6.8. At this point you can do one or more of the following:
Delete the dummy data and type in your own data.
Copy data from another workbook and paste it in.
Expand or contract the data range by dragging the lower-right corner of the blue outline (only the data in the outlined range will be included in the chart).
As you work, the chart in the message will be updated to reflect your changes.
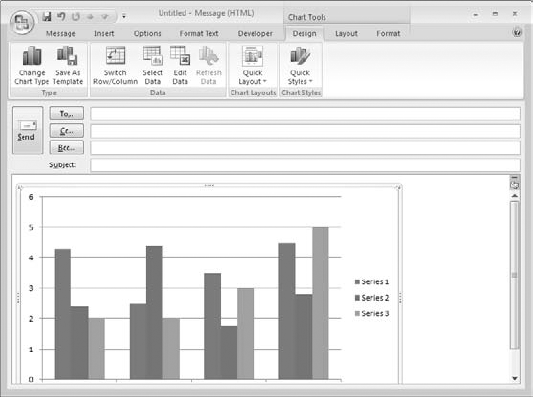
When have finished editing/entering your data, you can close Excel (with or without saving the data as your needs dictate). The chart will be in your message as shown in Figure 6.9. You can complete the message and send it, or you can make changes to the chart format and layout by right-clicking the chart and selecting commands from the popup menu (a topic beyond the scope of this book).
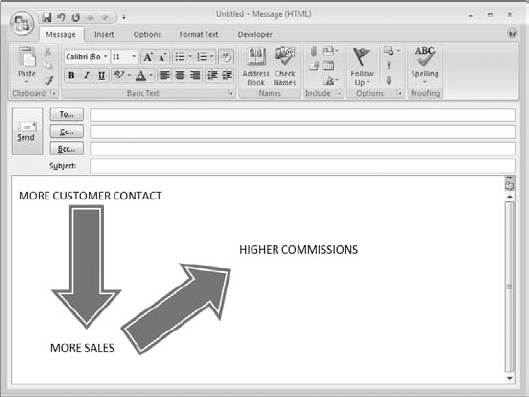
Outlook's Shape feature lets you insert a wide variety of shapes into an email message. Each shape is inserted as an image, and that's how it will appear to the message recipient. Figure 6.10 shows an email message with a couple of shapes in it.
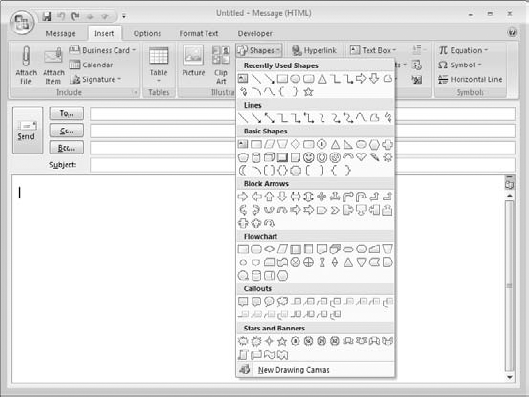
Click the Shapes button on the Insert ribbon. Outlook displays the Shapes menu as shown in Figure 6.11.
Click the shape you want to insert.
Drag in the message body to place the shape.
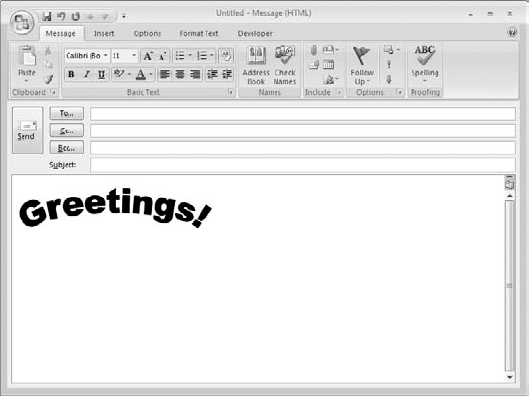
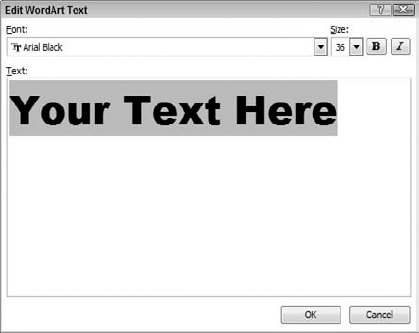
WordArt is a tool for creating attractive banners and headings. It is called WordArt because it originated as part of the word processing program Microsoft Word. Figure 6.12 shows an example of a message heading created using WordArt.
To add WordArt to a message:
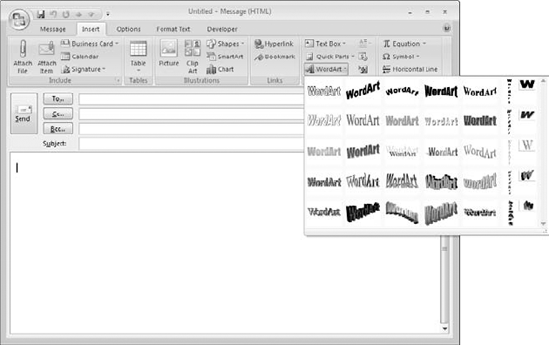
Click the WordArt button on the Insert ribbon. Outlook displays the WordArt menu as shown in Figure 6.13.
Click the desired style. Outlook displays the Edit WordArt Text dialog box as shown in Figure 6.14.
At the top of the dialog box, select the font and size for the WordArt.
In the box, type the text for the WordArt. Use the Bold and Italic buttons as desired to make some of the text boldface or italicized.
After you have inserted WordArt you can edit the text by right-clicking it and selecting Edit Text from the context menu.
Some of the objects you can insert into an email message are text-based. They are explained in this section.
A hyperlink is a clickable link in an email message. It acts just like a hyperlink on a web page. A hyperlink can point to several types of targets:
A bookmark that specifies a location in the current message. When the recipient clicks this kind of link, the message scrolls (if necessary) to bring the bookmark into view.
A web page. When the recipient clicks this kind of link, the page opens in the default web browser (for example, Internet Explorer).
An email address. When the recipient clicks this kind of link, a new email message is created with the address in the link inserted in the To field.
A file. When the recipient clicks this kind of link, they are prompted to download the file. The file must be in an Internet or network location accessible to the recipient.
To add a hyperlink to an email message:
If the text that will be the hyperlink is already in the message, select it. If not, place the editing cursor at the desired location in the message.
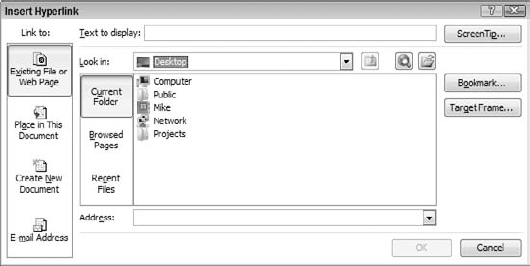
Click the Hyperlink button on the Insert ribbon. Outlook displays the Insert Hyperlink dialog box, shown in Figure 6.15.
If you selected text in step 1 it will be displayed in the Text to Display field. If not, enter it now.
On the left side of the dialog box, click the button that corresponds to the type of hyperlink you want to insert. Then:
If you select Existing File or Web Page, the dialog box will let you browse to the target file or page. You can also type in the address directly if you know it.
If you select Place in This Document, Outlook will display a list of bookmarks in the current message, from which you select the link target. You can also choose to link to the top of the message or to any headings in the message.
If you select New Document, Outlook lets you enter the name of the new document and to specify whether to edit the document now (as soon as the link is inserted) or later. In either case, Word opens for editing the new document.
If you select E-mail Address, Outlook lets you enter the email address and an optional subject for the message that will be created when the recipient clicks the link.
Click OK.
Hyperlinks are displayed by default as blue underlined text. You can change the target of a hyperlink by right-clicking it and selecting Edit Hyperlink from the context menu. To remove the link while leaving the text in the message, select Remove Hyperlink from the context menu.
To link to a location in your message, you must insert a bookmark. Here's how:
Place the editing cursor at the desired location in the message. Optionally you can select text at the location.
Click the Bookmark button on the Insert ribbon. Outlook opens the Bookmark dialog box.
If you selected text in step 1, it will be entered in the Bookmark Name field. You can accept this as the bookmark name or enter something else. If you did not select text in step 1, enter a unique name for the bookmark in this field.
Click OK.
Text marked as a bookmark does not display in any special way. It is just labeled "behind the scenes" as a bookmark.
To manage bookmarks, click the Bookmark button to display the Bookmark dialog box. Using this dialog box you can view existing bookmarks and delete ones you no longer need.
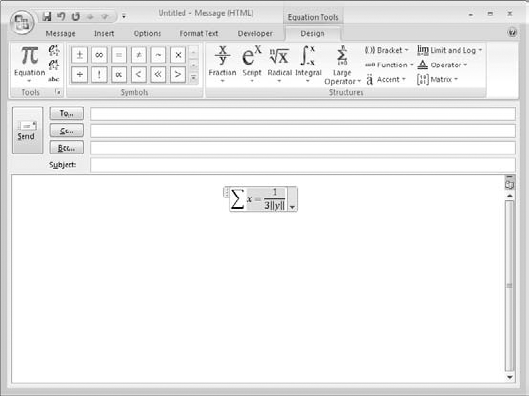
Outlook incorporates a powerful equation editor. Most of us will never need this, but if you are mathematically inclined you may find it useful. When you create an equation by clicking the Equation button on the Insert ribbon, Outlook enters a blank equation and displays the Design ribbon for equations. You can type equation elements directly into the equation box and also use the tools and commands on the ribbon. Figure 6.16 shows an equation being created in an email message.
When you send a message that includes an equation, the equation is converted to an image. The recipient can view the equation but not edit it.
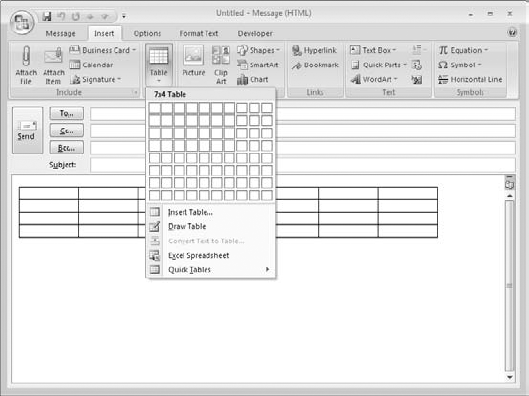
A table can be very useful for organizing and presenting information. Outlook provides you with several ways to create a table in an email message. You access these by clicking the Table button on the Insert ribbon.
When you click the Table button on the Insert ribbon, Outlook displays the menu shown in Figure 6.17. The quickest way to insert a table is to drag your mouse over the grid to highlight the desired number of table rows and columns. Outlook inserts a blank table of the specified size and you can start entering data.
Another way to draw a table is to select the Draw Table command on the Table menu. This command gives you more flexibility in creating a table with an unconventional row/column structure as shown in Figure 6.18.

When you select this command, the mouse pointer changes to a pencil icon when over the message body. You start by dragging in the message to define the outer boundary of the table. Then drag within the table to place vertical and horizontal lines to define cells. When you are finished, press Esc to exit table drawing mode.
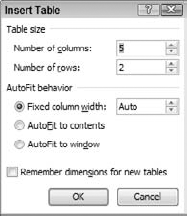
You can also create a table using the Insert Table command on the Table menu. This command brings up the Insert Table dialog box, shown in Figure 6.19. Specify the number of columns and rows in the Table Size section, and then select one of the AutoFit options:
Fixed Column Width: Select Auto to have column width set automatically based on the number of columns and the window width, or select a specific column width.
AutoFit to Contents: The width of each column in the table automatically increases or decreases to fit the data that the column contains.
AutoFit to Window: The width of the entire table adjusts to fit in the window width, and individual columns change accordingly.
If you select the Remember Dimensions for New Tables option, the size of the table (number of rows and columns) that you specify will be the new default the next time you display the Insert Table dialog box.
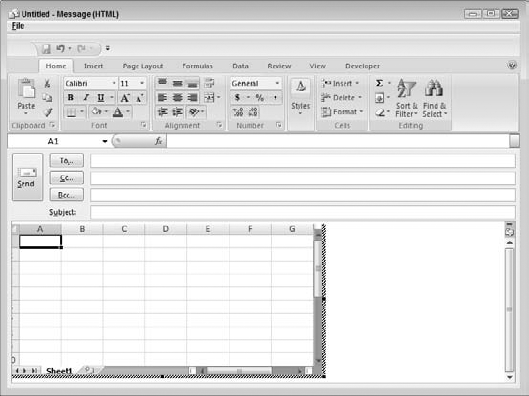
One of the commands on Outlook's Table menu is Excel Spreadsheet. When you select this command, Outlook inserts a small, blank Excel spreadsheet in your message, as shown in Figure 6.20. You will also notice that the ribbons at the top of the message have changed to Excel commands. You can add data, text, formulas, and other elements to the spreadsheet just as if you were working in Excel—which, in effect, you are. Using this command requires that you have Excel installed on your system.
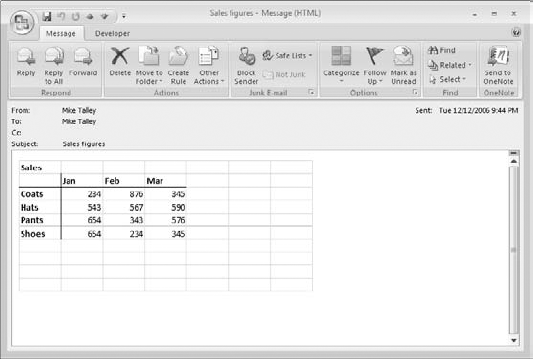
As soon as you click anywhere outside the spreadsheet, Outlook converts it to an image. You cannot change it in any way after this. You can add text and other elements to the message, address it, and so on. When you send the message the recipient receives the image as part of the message, as shown in Figure 6.21.
When you use this technique to create a table you cannot open an existing Excel spreadsheet inside the message—you are limited to what you can enter yourself. Nor can you save the spreadsheet that you create other than as an image. You can, however, open an existing spreadsheet in Excel and copy data to the spreadsheet in the message.
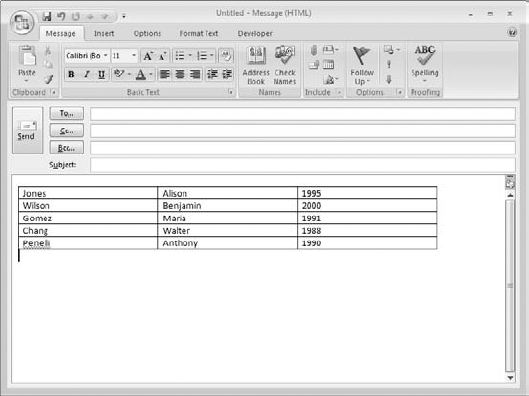
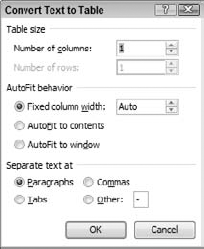
Outlook has the capability to look at regular—that is, non-table—text and convert it to a table. Each paragraph in the text becomes a row in the table. The text within the paragraph can be split up into columns based on tabs, commas, or another character that you specify. For example, Figure 6.22 shows text suitable for making into a table because the individual parts of each paragraph—last name, first name, and graduation year—are separated by commas. Figure 6.23 shows the table that was automatically created from this text.

To convert text to a table:
Select the text.
Click the Table button on the Insert ribbon.
Select Convert Text to Table to display the Convert Text to Table dialog box (see Figure 6.24).
In the Separate Text At section, select the desired separator. If you select Other, enter the desired separator character in the adjacent box.
If the Number of Columns value is not correct, change it as needed. You cannot change the number of rows.
Select the desired AutoFit option. These options were explained earlier in the section "Inserting a Table."
Click OK.
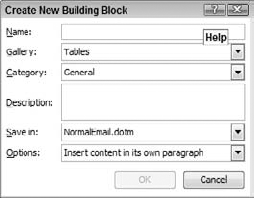
Outlook's Quick Tables feature lets you save tables you have created to a gallery. You can then insert the saved table into a message with a few clicks. A Quick Table is one of Outlook's building blocks, a feature that lets you save not only tables but sections of text and other message components for reuse.
To save a table as a Quick Table you must first create the table and apply all the formatting that you want saved with it, such as borders, shading, and column headers. Any data in a table is saved too, so you probably want to save the table before you add the data. Then:
Select the entire table by dragging over it with the mouse.
Click the Table button on the Insert ribbon.
Select the Quick Tables command from the Insert Table menu, then select Save Selection to Quick Tables Gallery from the next menu. Outlook displays the Create New Building Block dialog box as shown in Figure 6.25.
Enter a name for the saved table in the Name box.
Select the category for the table from the Category list, or select Create New Category to create a new category.
Optionally, enter a description of the table in the Description box.
From the Options list, select how the table will be inserted: as a separate paragraph, as a separate page, or on its own.
Click OK.
Outlook provides several tools to help you avoid errors in your email messages.
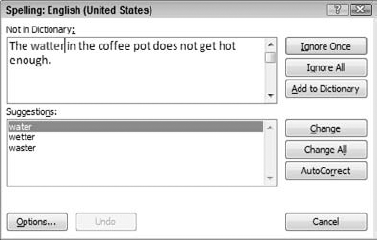
Outlook provides spelling and grammar checkers that can help you find errors in your messages. After composing a message, run these tools by clicking the Spelling button on the Message ribbon or by pressing F7. For each misspelled word, the Spelling and Grammar dialog box is displayed, as shown in Figure 6.26. The error—in this case the misspelled word "watter"—is highlighted in the top part of the box and suggested corrections, if any, are listed in the bottom. Actions you can take are
Ignore Once: Ignore this instance of the error but catch any others.
Ignore All: Ignore all occurrences of this error in the message.
Add to Dictionary: Add the flagged word to the dictionary.
Change: Change the flagged word to the correction selected in the Suggestions box.
Change All: Change all occurrences of the flagged word to the selected correction.
AutoCorrect: Change the flagged word to the selected correction and add the two words to the AutoCorrect list. AutoCorrect is covered later in this chapter.
When checking of grammar is enabled (I explain how to do this in a moment), sentence elements that Outlook thinks contain a grammar error are flagged and the Spelling and Grammar dialog box offers these options:
Ignore Once: Ignore this instance of the error.
Ignore Rule: Ignore the relevant grammar rule for the remainder of the grammar check.
Next Sentence: Stop checking the current sentence and move to the next sentence.
Change: Changes the text to the correction selected in the Suggestions box.
Explain: Displays information about why this was flagged as a grammar error.
If you are checking spelling only and want to enable grammar checking, select the Check Grammar option in the Spelling and Grammar dialog box. You can also turn this option on or off, along with other spelling and grammar options, as described in the next section.
To set spelling and grammar options, select Tools, Options from the main Outlook menu to open the Options dialog box and then click the Spelling tab. There are three elements on this tab:
Always Check Spelling before Sending: Select this option if you want Outlook to check spelling (and grammar, if selected) each time a message is sent.
Ignore Original Message Text in Reply or Forward: Select this option if you want the spelling/grammar checker to ignore quoted text when you reply to or forward a message.
Spelling and AutoCorrections: Click this button to set additional spelling and grammar options. You can also display these other spelling and grammar options by clicking the Options button in the Spelling and Grammar dialog box.
The spelling and grammar options are set in the Editor Options window as shown in Figure 6.27. The options in the top part of this window relate to spelling and grammar checking throughout Office (Outlook uses the same checker as the other Office programs). These are self-explanatory and you can set them as desired.
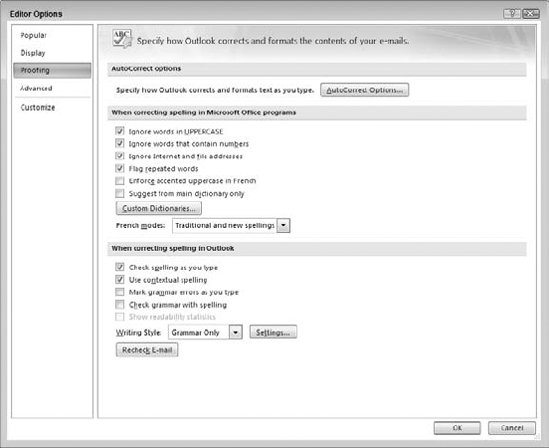
The other options relate to Outlook only and are as follows:
Check Spelling as You Type: Outlook detects misspelled words as you type and marks them with a red wavy underline.
Use Contextual Spelling: If you select this option, the spell checker will attempt to detect errors based on context. For example, "there" is a legitimate word but is wrong in this sentence (it should be "their"): "Linda told me that there vacation was a lot of fun."
Mark Grammar Errors as You Type: Outlook detects grammar errors as you type and marks them with a green wavy underline.
Check Grammar with Spelling: Always checks grammar when you do a spelling check.
Show Readability Statistics: Select this option to view readability statistics that use the average number of syllables per word and the average number of words per sentence to determine the grade-level readability. For example, a score of 8 indicates that the document should be understandable by someone with an 8th grade education. You must select the Check Grammar with Spelling option to enable the Show Readability Statistics option.
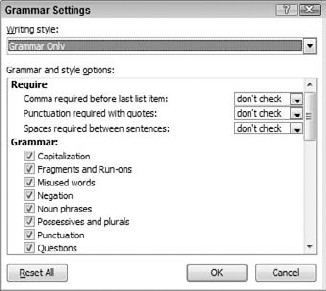
Writing Style: You can choose to check grammar only or both grammar and style. Click the Grammar Settings button to display the Grammar Settings dialog box (see Figure 6.28) where you specify the details of how grammar is checked.
Recheck E-mail: If you have changed any options while in the midst of a spelling/grammar check, resets the checker to start over from scratch.
When you have turned on the options to check grammar and/or spelling as you type, Outlook underlines errors as it detects them in the message. When you right-click an error that's flagged in this manner, Outlook displays a context menu with commands relevant to the error. For example, the menu displayed when you right-click a misspelled word offers Ignore, Ignore All, and Add to Dictionary commands as well as any suggested replacements the spell checker has found.
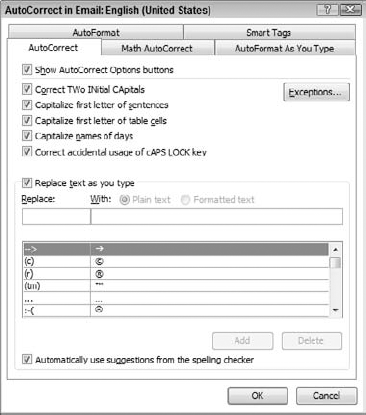
AutoCorrect is a feature that detects certain things in text you are typing and automatically changes them to something else. When enabled, AutoCorrect can:
Correct typing errors, such as when you mistakenly start a word with TWo INitial CApitals.
Insert symbols and other special characters automatically, such as replacing (c) with ©.
Automatically correct spelling errors you make frequently, such as replacing "abuot" with "about."
Ease entry of long words that you use frequently, such as replacing "Alb" with "Albuquerque."
AutoCorrect options are accessed as follows:
Select Tools, Options from the main Outlook menu to display the Options dialog box.
Click the Spelling tab.
Click the Spelling and AutoCorrection button to open the Editor Options window.
Click the AutoCorrect Options button.
The AutoCorrect options are shown in Figure 6.29. The options near the top of this dialog box are self-explanatory. Click the Exceptions button to view and define exceptions to the various AutoCorrect rules. For example, if you have the Correct TWo INitial CApitals option turned on, you can specify that "IDs" not be corrected.
The lower section of the AutoCorrect dialog box deals with replacing text as you type. If the option is turned on, each text item in the left column of the list will automatically be replaced with the corresponding text item in the right column. You work with this list as follows:
To add an item, enter the text to be replaced in the Replace field and the replacement text in the With box, then click Add.
To remove an item, select it in the list by clicking and then click the Delete button.
To modify an item, select it in the list by clicking and then edit the Replace and With fields as desired.
Outlook provides several other tools that can help you when you are composing the body of an email message.
Math AutoCorrect is like regular AutoCorrect but it works with mathematical and other symbols. It works mostly with keywords preceded by a backslash—for example, approx is replaced with
Place the editing cursor at the location in the message where you want the equation.
Click the Symbols button on the Insert ribbon.
Select Equation from the menu. Outlook inserts a math region into the message and displays a Design ribbon that offers various tools for working with equations (see Figure 6.30).
Enter and edit the equation as needed.
Click outside the math region to work on other parts of the message. Click the math region again to edit the formula.
To set Math AutoCorrect options:
Select Tools, Options from the main Outlook menu to display the Options dialog box.
Click the Spelling tab.
Click the Spelling and AutoCorrection button to open the Editor Options window.
Click the AutoCorrect Options button to display the AutoCorrect dialog box.
Click the Math AutoCorrect tab (shown in Figure 6.31).

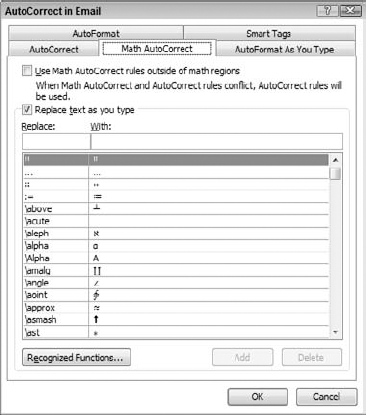
The first option, Use Math AutoCorrect Rules Outside of Math Regions, determines whether these rules apply just in math regions or throughout the entire message. The Replace Text as You Type option determines whether Math AutoCorrect is on or off. You add items to and delete items from the list as described for AutoCorrect in the previous section.
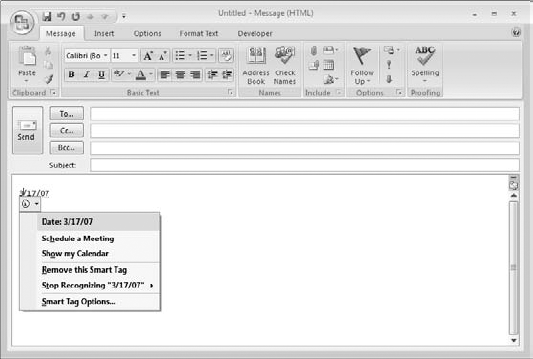
Smart Tags is a tool that lets Outlook recognize certain types of information in your messages, such as dates and telephone numbers. Then, Outlook marks the item with a dotted underline and, when the mouse cursor is near the item, displays a Smart Tag, or small button, next to the item. Clicking the Smart Tag displays a menu of commands relevant to the type of data item. For example, if the item is a date, the commands on the Smart Tag menu let you schedule a meeting, open your calendar, and so on. This is shown in Figure 6.32.
To set Smart Tag options:
Select Tools, Options from the main Outlook menu to display the Options dialog box.
Click the Spelling tab.
Click the Spelling and AutoCorrection button to open the Editor Options window.
Click the AutoCorrect Options button to display the AutoCorrect dialog box.
Click the Smart Tags tab (shown in Figure 6.33).
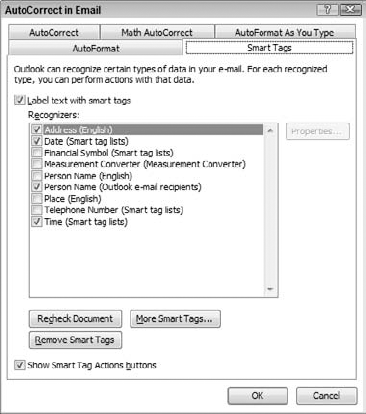
The option at the top of this dialog box, Label Text with Smart Tags, turns Smart Tags on or off. If this option is on, the types of data selected in the Recognizers list will be detected and marked with a tag.
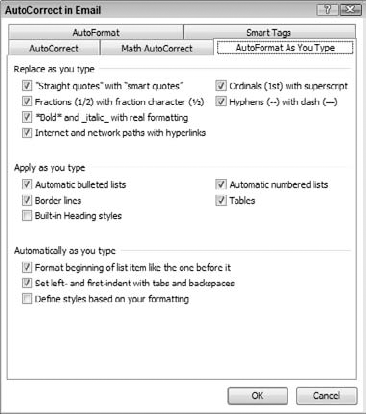
The AutoCorrect dialog box contains two tabs that control automatic formatting—the AutoFormat As You Type tab and the AutoFormat tab. The items on these tabs are similar in concept—Figure 6.34 shows the AutoFormat As You Type tab. You can turn these options on or off as suits your working style.
The Check Names command, located on the Message ribbon, verifies that the recipients of your message are all valid email addresses. Valid in this context does not mean that there is a working email account with the specified address, only that the address has the proper format ([email protected]). If all the recipients pass the test, no message is displayed. If possible, Outlook will correct the address. Otherwise you will see a dialog box in which you can select a recipient to make changes to the address.
The Editing button on the Format Text ribbon gives you access to the following features.
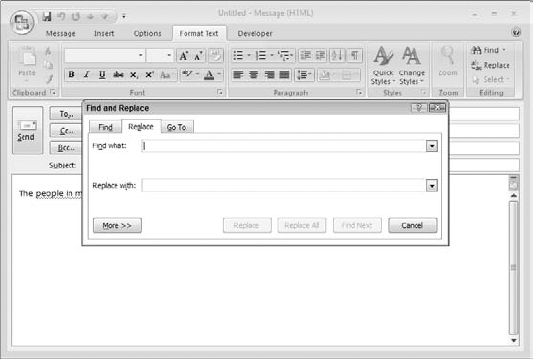
Selecting Find from the Editing menu (click the Editing button on the Format Text ribbon) displays the dialog box shown in Figure 6.35. You can see it has three tabs, one for each of the three functions discussed in this section.
The Find tab lets you locate text in your message. Enter the search text in the Find What field and then:
Click Find Next to highlight the next occurrence of the text in the message.
Click Find All to highlight all occurrences of the text in the message.
Click More to display additional search options such as matching case, finding whole words only, and finding formatting.
The Replace tab lets you locate specified text in the message and replace it with other text. It works the same as the Find tab except that in addition to a Find What field there is a Replace With field for you to enter the replacement text.
The Go To tab lets you quickly move to various locations in your message. This tool is useful primarily with long messages. You can, for example, move to a specified page number or table.
The days when email messages consisted of nothing but plain text are long gone. Outlook provides you with a rich set of tools for creating attractive email messages with complex formatting, embedded images and tables, and other elements to help you get your message across in the most effective way. Then, you can use Outlook's powerful proofing tools to catch errors before you send the message.