
WHAT YOU WILL LEARN IN THIS CHAPTER
How to make objects of a class serializable
The role of a
CArchiveobject in serializationHow to implement serialization in your own classes
How to implement serialization in the Sketcher application
How printing works with MFC
Which view class functions you can use to support printing
What a
CPrintInfoobject contains and how it's used in the printing processHow to implement multipage printing in the Sketcher application
With what you have accomplished so far in the Sketcher program, you can create a reasonably comprehensive document with views at various scales, but the information is transient because you have no means of saving a document. In this chapter, you'll remedy that by seeing how you can store a document on disk. You'll also investigate how you can output a document to a printer.
A document in an MFC-based program is not a simple entity — it's a class object that can be very complicated. It typically contains a variety of objects, each of which may contain other objects, each of which may contain still more objects. . . and that structure may continue for a number of levels.
You want to be able to save a document in a file, but writing a class object to a file represents something of a problem because it isn't the same as a basic data item like an integer or a character string. A basic data item consists of a known number of bytes, so to write it to a file only requires that the appropriate number of bytes be written. Conversely, if you know a value of type int was written to a file, to get it back, you just read the appropriate number of bytes.
Writing objects is different. Even if you write away all the data members of an object, that's not enough to be able to get the original object back. Class objects contain function members as well as data members, and all the members, both data and functions, have access specifiers; therefore, to record objects in an external file, the information written to the file must contain complete specifications of all the class structures involved. The read process must also be clever enough to synthesize the original objects completely from the data in the file. MFC supports a mechanism called serialization to help you to implement input from and output to disk of your class objects with a minimum of time and trouble.
The basic idea behind serialization is that any class that's serializable must take care of storing and retrieving itself. This means that for your classes to be serializable — in the case of the Sketcher application, this will include the CElement class and the shape classes you have derived from it — they must be able to write themselves to a file. This implies that for a class to be serializable, all the class types that are used to declare data members of the class must be serializable, too.
This all sounds rather tricky, but the basic capability for serializing your document was built into the application by the Application Wizard right at the outset. The handlers for the File
The code in the definition of CSketcherDoc that enables serialization of a document object is shown shaded in the following fragment:
class CSketcherDoc : public CDocument
{
protected: // create from serialization only
   CSketcherDoc();
   DECLARE_DYNCREATE(CSketcherDoc)

// Rest of the class...

// Overrides
   public:
   virtual BOOL OnNewDocument();
   virtual void Serialize(CArchive& ar);

// Rest of the class...

};
There are three things here that relate to serializing a document object:
The
DECLARE_DYNCREATE()macro.The
Serialize()member function.The default class constructor.
DECLARE_DYNCREATE() is a macro that enables objects of the CSketcherDoc class to be created dynamically by the application framework during the serialization input process. It's matched by a complementary macro, IMPLEMENT_DYNCREATE(), in the class implementation. These macros apply only to classes derived from CObject, but as you will see shortly, they aren't the only pair of macros that can be used in this context. For any class that you want to serialize, CObject must be a direct or indirect base because it adds the functionality that enables serialization to work. This is why the CElement class was derived from CObject. Almost all MFC classes are derived from CObject and, as such, are serializable.
Note
The Hierarchy Chart in the Microsoft Foundation Class Reference for Visual C++ 2010 shows those classes, which aren't derived from CObject. Note that CArchive is in this list.
The class definition also includes a declaration for a virtual function Serialize(). Every class that's serializable must include this function. It's called to perform both input and output serialization operations on the data members of the class. The object of type CArchive that's passed as an argument to this function determines whether the operation that is to occur is input or output. You'll explore this in more detail when considering the implementation of serialization for the document class.
Note that the class explicitly defines a default constructor. This is also essential for serialization to work because the default constructor is used by the framework to synthesize an object when reading from a file, and the synthesized object is then filled out with the data from the file to set the values of the data members of the object.
There are two bits of the SketcherDoc.cpp file containing the implementation of CSketcherDoc that relate to serialization. The first is the macro IMPLEMENT_DYNCREATE() that complements the DECLARE_DYNCREATE() macro:
// SketcherDoc.cpp : implementation of the CSketcherDoc class
//

#include "stdafx.h"
// SHARED_HANDLERS can be defined in an ATL project implementing preview, thumbnail
// and search filter handlers and allows sharing of document code with that project.
#ifndef SHARED_HANDLERS
#include "Sketcher.h"
#include "PenDialog.h"
#endif

#include "SketcherDoc.h"

#include <propkey.h>

#ifdef _DEBUG
#define new DEBUG_NEW
#endif

// CSketcherDoc


IMPLEMENT_DYNCREATE(CSketcherDoc, CDocument)

// Message maps and the rest of the file...
This macro defines the base class for CSketcherDoc as CDocument. This is required for the proper dynamic creation of a CSketcherDoc object, including members that are inherited from the base class.
The class implementation also includes the definition of the Serialize() function:
void CSketcherDoc::Serialize(CArchive& ar)
{
   if (ar.IsStoring())
   {
      // TODO: add storing code here
   }
   else
   {
      // TODO: add loading code here
   }
}
This function serializes the data members of the class. The argument passed to the function, ar, is a reference to an object of the CArchive class. The IsStoring() member of this class object returns TRUE if the operation is to store data members in a file, and FALSE if the operation is to read back data members from a previously stored document.
Because the Application Wizard has no knowledge of what data your document contains, the process of writing and reading this information is up to you, as indicated by the comments. To understand how you do this, let's look a little more closely at the CArchive class.
The CArchive class is the engine that drives the serialization mechanism. It provides an MFC-based equivalent of the stream operations in C++ that you used for reading from the keyboard and writing to the screen in the console program examples. An object of the MFC class CArchive provides a mechanism for streaming your objects out to a file, or recovering them again as an input stream, automatically reconstituting the objects of your class in the process.
A CArchive object has a CFile object associated with it that provides disk input/output capability for binary files, and provides the actual connection to the physical file. Within the serialization process, the CFile object takes care of all the specifics of the file input and output operations, and the CArchive object deals with the logic of structuring the object data to be written or reconstructing the objects from the information read. You need to worry about the details of the associated CFile object only if you are constructing your own CArchive object. With the document in Sketcher, the framework has already taken care of it and passes the CArchive object that it constructs, ar, to the Serialize() function in CSketcherDoc. You'll be able to use the same object in each of the Serialize() functions you add to the shape classes when you implement serialization for them.
The CArchive class overloads the extraction and insertion operators (>> and <<) for input and output operations, respectively, on objects of classes derived from CObject, plus a range of basic data types. These overloaded operators work with the object types and primitive types shown in the following table.
TYPE | DEFINITION |
|---|---|
| Boolean value, true or false |
| Standard single precision floating point |
| Standard double precision floating point |
| 8-bit unsigned integer |
| 8-bit character |
| 16-bit character |
| 16-bit signed integer |
| 32-bit signed integer |
| 64-bit signed integer |
| 64-bit unsigned integer |
| 16-bit unsigned integer |
| 32-bit unsigned integer |
| A |
| An object defining a size as a cx, cy pair |
| An object defining a point as an x, y pair |
| An object defining a rectangle by its upper-left and lower-right corners |
| Pointer to |
For basic data types in your objects, you use the insertion and extraction operators to serialize the data. To read or write an object of a serializable class that you have derived from CObject, you can either call the Serialize() function for the object, or use the extraction or insertion operator. Whichever way you choose must be used consistently for both input and output, so you should not output an object using the insertion operator and then read it back using the Serialize() function, or vice versa.
Where you don't know the type of an object when you read it, as in the case of the pointers in the list of shapes in our document, for example, you must only use the Serialize() function. This brings the virtual function mechanism into play, so the appropriate Serialize() function for the type of object pointed to is determined at runtime.
A CArchive object is constructed either for storing objects or for retrieving objects. The CArchive function IsStoring() returns TRUE if the object is for output, and FALSE if the object is for input. You saw this used in the if statement in the Serialize() member of the CSketcherDoc class.
There are many other member functions of the CArchive class that are concerned with the detailed mechanics of the serialization process, but you don't usually need to know about them to use serialization in your programs.
There are three levels of functionality available in your classes when they're derived from the MFC class CObject. The level you get in your class is determined by which of three different macros you use in the definition of your class:
MACRO | FUNCTIONALITY |
|---|---|
| Support for runtime class information |
| Support for runtime class information and dynamic object creation |
| Support for runtime class information, dynamic object creation, and serialization of objects |
Each of these macros requires that a complementary macro, named with the prefix IMPLEMENT_ instead of DECLARE_, be placed in the file containing the class implementation. As the table indicates, the macros provide progressively more functionality, so I'll concentrate on the third macro, DECLARE_SERIAL(), because it provides everything that the preceding macros do and more. This is the macro you should use to enable serialization in your own classes. It requires that the macro IMPLEMENT_SERIAL() be added to the file containing the class implementation.
You may be wondering why the document class uses DECLARE_DYNCREATE() and not DECLARE_SERIAL(). The DECLARE_DYNCREATE() macro provides the capability for dynamic creation of the objects of the class in which it appears. The DECLARE_SERIAL() macro provides the capability for serialization of the class, plus the dynamic creation of objects of the class, so it incorporates the effects of DECLARE_DYNCREATE(). Your document class doesn't need serialization because the framework only has to synthesize the document object and then restore the values of its data members; however, the data members of a document do need to be serializable, because this is the process used to store and retrieve them.
With the DECLARE_SERIAL() macro in the definition of your CObject-based class, you get access to the serialization support provided by CObject. This includes special new and delete operators that incorporate memory leak detection in debug mode. You don't need to do anything to use this because it works automatically.
The macro requires the class name to be specified as an argument, so for serialization of the CElement class, you would add the following line to the class definition:
DECLARE_SERIAL(CElement)
Note
There's no semicolon required here because this is a macro, not a C++ statement.
It doesn't matter where you put the macro within the class definition, but if you always put it as the first line, you'll always be able to verify that it's there, even when the class definition involves a lot of lines of code.
The IMPLEMENT_SERIAL() macro, which you place in the implementation file for the class, requires three arguments to be specified. The first argument is the name of the class, the second is the name of the direct base class, and the third argument is an unsigned 32-bit integer identifying a schema number, or version number, for your program. This schema number allows the serialization process to guard against problems that can arise if you write objects with one version of a program and read them with another, in which the classes may be different.
For example, you could add the following line to the implementation of the CElement class:
IMPLEMENT_SERIAL(CElement, CObject, 1)
If you subsequently modify the class definition, you would change the schema number to something different, such as 2. If the program attempts to read data that was written with a different schema number from that in the currently active program, an exception is thrown. The best place for this macro is as the first line following the #include directives and any initial comments in the .cpp file.
Where CObject is an indirect base class, as in the case of the CLine class, for example, each class in the hierarchy must have the serialization macros added for serialization to work in the top-level class. For serialization in CLine to work, the macros must also be added to CElement.
The overall process of serializing a document is illustrated in a simplified form in Figure 19-1.

The Serialize() function in the document object calls the Serialize() function (or uses an overloaded insertion operator) for each of its data members. Where a member is a class object, the Serialize() function for that object serializes each of its data members in turn until, ultimately, basic data types are written to the file. Because most classes in MFC ultimately derive from CObject, they contain serialization support, so you can almost always serialize objects of MFC classes.
The data that you'll deal with in the Serialize() member functions of your classes and the application document object are, in each case, just the data members. The structure of the classes that are involved and any other data necessary to reconstitute your original objects are automatically taken care of by the CArchive object.
Where you derive multiple levels of classes from CObject, the Serialize() function in a class must call the Serialize() member of its direct base class to ensure that the direct base class data members are serialized. Note that serialization doesn't support multiple inheritance, so there can only be one base class for each class defined in a hierarchy.
From the previous discussion, I can summarize the steps that you need to take to add serialization to a class:
Make sure that the class is derived directly or indirectly from
CObject.Add the
DECLARE_SERIAL()macro to the class definition (and to the direct base class if the direct base is notCObjector another standard MFC class).Declare the
Serialize()function as a member function of your class.Add the
IMPLEMENT_SERIAL()macro to the file containing the class implementation.Implement the
Serialize()function for your class.
Now, take a look at how you can implement serialization for documents in the Sketcher program.
To implement serialization in the Sketcher application, you must implement the Serialize() function in CSketcherDoc so that it deals with all of the data members of that class. You need to add serialization to each of the classes that specify objects that may be included in a document. Before you start adding serialization to your application classes, you should make some small changes to the program to record when a user changes a sketch document. This isn't absolutely necessary, but it is highly desirable because it enables the program to guard against the document being closed without saving changes.
There's already a mechanism for noting when a document changes; it uses an inherited member of CSketcherDoc, SetModifiedFlag(). By calling this function consistently whenever the document changes, you can record the fact that the document has been altered in a data member of the document class object. This causes a prompt to be automatically displayed when you try to exit the application without saving the modified document. The argument to the SetModifiedFlag() function is a value of type BOOL, and the default value is TRUE. If you have occasion to specify that the document was unchanged, you can call this function with the argument FALSE, although circumstances where this is necessary are rare.
There are only three occasions when you alter a document object:
When you call the
AddElement()member ofCSketcherDocto add a new element.When you call the
DeleteElement()member ofCSketcherDocto delete an element.When you move an element.
You can handle these three situations easily. All you need to do is add a call to SetModifiedFlag() to each of the functions involved in these operations. The definition of AddElement() appears in the CSketcherDoc class definition. You can extend this to:
void AddElement(CElement* pElement)    // Add an element to the list
{
  m_ElementList. push_back (pElement);
  SetModifiedFlag();                    // Set the modified flag
}
You can get to the definition of DeleteElement() in CSketcherDoc by clicking the function name in the Class View pane. You should add one line to it, as follows:
void CSketcherDoc::DeleteElement(CElement* pElement)
{
  if(pElement)
  {
    m_ElementList.remove(pElement);    // Remove the pointer from the list
    delete pElement;                   // Delete the element from the heap
    SetModifiedFlag();                  // Set the modified flag
  }
}
Note that you must only set the flag if pElement is not nullptr, so you can't just stick the function call anywhere.
In a view object, moving an element occurs in the MoveElement() member called by the handler for the WM_MOUSEMOVE message, but you only change the document when the left mouse button is pressed. If there's a right-button click, the element is put back to its original position, so you only need to add the call to the SetModifiedFlag() function for the document to the OnLButtonDown() function, as follows:
void CSketcherView::OnLButtonDown(UINT nFlags, CPoint point)
{
  CClientDC aDC(this);                 // Create a device context
  OnPrepareDC(&aDC);                   // Get origin adjusted
  aDC.DPtoLP(&point);                  // convert point to Logical

  if(m_MoveMode)
  {
    // In moving mode, so drop the element
    m_MoveMode = false;                // Kill move mode
    m_pSelected = nullptr;             // De-select the element
    GetDocument()->UpdateAllViews(0);  // Redraw all the views
    GetDocument()->SetModifiedFlag();  // Set the modified flag
    return;
  }
  // Rest of the function as before...
}
You call the inherited GetDocument() member of the view class to get access to a pointer to the document object and then use this pointer to call the SetModifiedFlag() function. You now have all the places where you change the document covered.
If you build and run Sketcher, and modify a document or add elements to it, you'll now get a prompt to save the document when you exit the program. Of course, the File
The first step is the implementation of the Serialize() function for the CSketcherDoc class. Within this function, you must add code to serialize the data members of CSketcherDoc. The data members that you have declared in the class are as follows:
protected:
  int m_PenWidth;                                 // Current pen width
  CSize m_DocSize;                                // Document size
  ElementType m_Element;                          // Current element type
  COLORREF m_Color;                               // Current element color
  std::list<CElement*> m_ElementList;             // List of elements in the sketch
These are the data members that have to be serialized to allow a CSketcherDoc object to be deserialized. All that's necessary is to insert the statements to store and retrieve these five data members in the Serialize() member of the class. However, there is a slight problem. The list<CElement*> object is not serializable because the template is not derived from CObject. In fact, none of the STL containers are serializeable, so you always have to take care of serializing STL containers yourself.
All is not lost, however. If you can serialize the objects that the pointers in the container point to, you will be able to reconstruct the container when we want to read it back.
Note
The MFC does define container classes such as CList that are serializable. However, if you used these in Sketcher, you would not learn about how you can make a class serializable.
You can implement serialization for the document object with the following code:
void CSketcherDoc::Serialize(CArchive& ar)
{
  if (ar.IsStoring())
  {
    ar << m_Color                      // Store the current color
       << static_cast<int>(m_Element)  // the current element type as an integer
       << m_PenWidth                   // and the current pen width
       << m_DocSize;                   // and the current document size

    ar << m_ElementList.size();        // Store the number of elements in the list

    // Now store the elements from the list
    for(auto iter =  m_ElementList.begin() ; iter != m_ElementList.end() ; ++iter)
ar << *iter; // Store the element} else {int elementType(0); // Stores element typear >> m_Color // Retrieve the current color>> elementType // the current element type as an integer>> m_PenWidth // and the current pen width>> m_DocSize; // and the current document sizem_Element = static_cast<ElementType>(elementType);size_t elementCount(0); // Count of number of elementsCElement* pElement(nullptr); // Element pointerar >> elementCount; // retrieve the element count// Now retrieve all the elements and store in the listfor(size_t i = 0 ; i < elementCount ; ++i){ar >> pElement;m_ElementList.push_back(pElement);}}}
For three of the data members, you just use the extraction and insertion operators that are overloaded in the CArchive class. This works for the data member m_Color, even though its type is COLORREF, because type COLORREF is the same as type long. The m_Element member is of type ElementType, and the serialization process won't handle this directly. However, an enum type is an integer type, so you can cast it to an integer for serialization, and then just deserialize it as an integer before casting the value back to ElementType.
For the list of elements, m_ElementList, you first store the count of the number of elements in the list in the archive, because you will need this to be able to read the elements back. You then write the elements from the list to the archive in the for loop. You use the << operator to write *iter, which is a pointer of type CElement*, to the archive. The serialization mechanism will recognize that *iter is a pointer and take care of writing the element pointed to by *iter to the archive.
The else clause for the if deals with reading the document object back from the archive. You use the extraction operator to retrieve the first four members from the archive in the same sequence that they were written. The element type is read into the local integer variable, elementType, and then stored in m_Element as the correct type.
You read the number of elements recorded in the archive and store it locally in elementCount. Finally, you use elementCount to control the for loop that reads the elements back from the archive and stores them in the list. Note that you don't need to do anything special to take account of the fact that the elements were originally created on the heap. The serialization mechanism takes care of restoring the elements on the heap automatically.
In case you are wondering where the list<CElement*> object comes from when you are deserializing an object, it will be created by the serialization process using the default constructor for the CSketcherDoc class. This is how the basic document object and its uninitialized data members get created. Like magic, isn't it?
That's all you need for serializing the document class data members, but serializing the elements from the list causes the Serialize() functions for the element classes to be called to store and retrieve the elements themselves, so you also need to implement serialization for those classes.
All the shape classes are serializable because you derived them from their base class, CElement, which, in turn, is derived from CObject. The reason that you specified CObject as the base for CElement was solely to get support for serialization. Make sure that the default constructor is actually defined for each of the shape classes. The deserialization process requires that this constructor be defined.
You can now add support for serialization to each of the shape classes by adding the appropriate macros to the class definitions and implementations, and adding the code to the Serialize() function member of each class to serialize its data members. You can start with the base class, CElement, where you need to modify the class definition as follows:
class CElement: public CObject
{
DECLARE_SERIAL(CElement)
  protected:
      int m_PenWidth;                        // Pen width
      COLORREF m_Color;                      // Color of an element
      CRect m_EnclosingRect;                 // Rectangle enclosing an element

   public:
      virtual ~CElement();
      virtual void Draw(CDC* pDC, CElement* pElement=0) {} // Virtual draw operation
      virtual void Move(const CSize& aSize){}            // Move an element

      CRect GetBoundRect() const;      // Get the bounding rectangle for an element
      virtual void Serialize(CArchive& ar);  // Serialize function for the class

protected:
  CElement(void);                            // Here to prevent it being called
};
You add the DECLARE_SERIAL() macro and a declaration for the virtual function Serialize(). You already have the default constructor that was created by the Application Wizard. You changed it to protected in the class, although it doesn't matter what its access specification is as long as it appears explicitly in the class definition. It can be public, protected, or private, and serialization still works. If you forget to include a default constructor in a class, though, you'll get an error message when the IMPLEMENT_SERIAL() macro is compiled.
You should add the DECLARE_SERIAL() macro to each of the derived classes CLine, CRectangle, CCircle, CCurve, and CText, with the relevant class name as the argument. You should also add a declaration for the Serialize() function as a public member of each class.
In the file Elements.cpp, you must add the following macro at the beginning:
IMPLEMENT_SERIAL(CElement, CObject, VERSION_NUMBER)
You can define the constant VERSION_NUMBER in the SketcherConstants.h file by adding the lines:
// Program version number for use in serialization
const UINT VERSION_NUMBER = 1;
You can then use the same constant when you add the macro for each of the other shape classes. For instance, for the CLine class you should add the line,
IMPLEMENT_SERIAL(CLine, CElement, VERSION_NUMBER)
and similarly for the other shape classes. When you modify any of the classes relating to the document, all you need to do is change the definition of VERSION_NUMBER in the SketcherConstants.h file, and the new version number applies in all your Serialize() functions. You can put all the IMPLEMENT_SERIAL() statements at the beginning of the file if you like. The complete set is:
IMPLEMENT_SERIAL(CElement, CObject, VERSION_NUMBER)
IMPLEMENT_SERIAL(CLine, CElement, VERSION_NUMBER)
IMPLEMENT_SERIAL(CRectangle, CElement, VERSION_NUMBER)
IMPLEMENT_SERIAL(CCircle, CElement, VERSION_NUMBER)
IMPLEMENT_SERIAL(CCurve, CElement, VERSION_NUMBER)
IMPLEMENT_SERIAL(CText, CElement, VERSION_NUMBER)
You can now implement the Serialize() member function for each of the shape classes. Start with the CElement class:
void CElement::Serialize(CArchive& ar)
{
  CObject::Serialize(ar);              // Call the base class function

  if (ar.IsStoring())
   {
     ar << m_PenWidth                  // the pen width
        << m_Color                     // Store the color,
        << m_EnclosingRect;            // and the enclosing rectangle
  }
  else
  {
     ar >> m_PenWidth                  // the pen width
        >> m_Color                     // the color
        >> m_EnclosingRect;            // and the enclosing rectangle
  }
}
This function is of the same form as the one supplied for you in the CSketcherDoc class. All of the data members defined in CElement are supported by the overloaded extraction and insertion operators, and so, everything is done using those operators. Note that you must call the Serialize() member for the CObject class to ensure that the inherited data members are serialized.
For the CLine class, you can code the function as:
void CLine::Serialize(CArchive& ar)
{
  CElement::Serialize(ar);             // Call the base class function

  if (ar.IsStoring())
  {
    ar << m_StartPoint                 // Store the line start point,
       << m_EndPoint;                  // and the end point
  }
  else
  {
    ar >> m_StartPoint                 // Retrieve the line start point,
       >> m_EndPoint;                  // and the end point
  }
}
Again, the data members are all supported by the extraction and insertion operators of the CArchive object ar. You call the Serialize() member of the base class CElement to serialize its data members, and this calls the Serialize() member of CObject. You can see how the serialization process cascades through the class hierarchy.
The Serialize() function member of the CRectangle class is simple:
void CRectangle::Serialize(CArchive& ar)
{
  CElement::Serialize(ar);             // Call the base class function
}
This only calls the direct base class Serialize() function because the class has no additional data members.
The CCircle class doesn't have additional data members beyond those inherited from CElement, either, so its Serialize() function also just calls the base class function:
void CCircle::Serialize(CArchive& ar)
{
  CElement::Serialize(ar);             // Call the base class function
}
For the CCurve class, you have rather more work to do. The CCurve class uses a vector<CPoint> container to store the defining points, and because this is not directly serializable, you must take care of it yourself. Having serialized the document, this is not going to be terribly difficult. You can code the Serialize() function as follows:
void CCurve::Serialize(CArchive& ar)
{
  CElement::Serialize(ar);             // Call the base class function
  // Serialize the vector of points
  if (ar.IsStoring())
  {
    ar << m_Points.size();             // Store the point count
    // Now store the points
    for(size_t i = 0 ; i< m_Points.size() ; ++i)
      ar << m_Points[i];
  }
  else
  {
    size_t nPoints(0);                 // Stores number of points
    ar >> nPoints;                     // Retrieve the number of points
    // Now retrieve the points
    CPoint point;
    for(size_t i = 0 ; i < nPoints ; ++i)
    {
      ar >> point;
      m_Points.push_back(point);
    }
  }
}
You first call the base class Serialize() function to deal with serializing the inherited members of the class. Storing the contents of the vector is basically the same as the technique you used for serializing the document. You first write the number of elements to the archive, then the elements themselves. The CPoint class is serializable, so it takes care of itself. Reading the points back is equally straightforward. You just store each object read from the archive in the vector, m_Points, in the for loop. The serialization process uses the no-arg constructor for the CCurve class to create the basic class object, so the vector<CPoint> member is created within this process.
The last class for which you need to add an implementation of Serialize() to Elements.cpp is CText:
void CText::Serialize(CArchive& ar)
{
  CElement::Serialize(ar);             // Call the base class function

  if (ar.IsStoring())
  {
      ar << m_String;                  // Store the text string
  }
  else
  {
      ar >> m_String;                  // Retrieve the text string
  }
}
After calling the base class function, you serialize the m_String data member using the insertion and extraction operators for ar. The CString class, although not derived from CObject, is still fully supported by CArchive with these overloaded operators.
That's all you have to do to implement the storing and retrieving of documents in the Sketcher program! The Save and Open menu options in the file menu are now fully operational without adding any more code. If you build and run Sketcher after incorporating the changes I've discussed in this chapter, you'll be able to save and restore files and be automatically prompted to save a modified document when you try to close it or exit from the program, as shown in Figure 19-2.
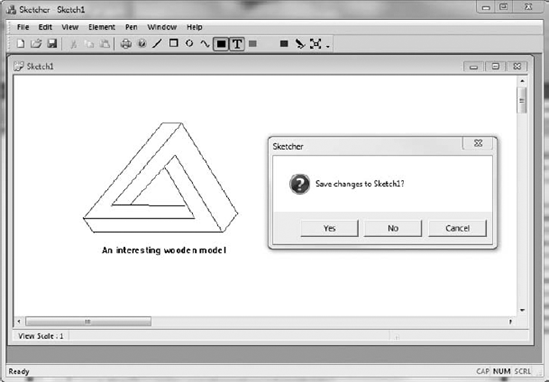
The prompting works because of the SetModifiedFlag() calls that you added everywhere you updated the document. If you click the Yes button in the screen shown in Figure 19-2, you'll see the File
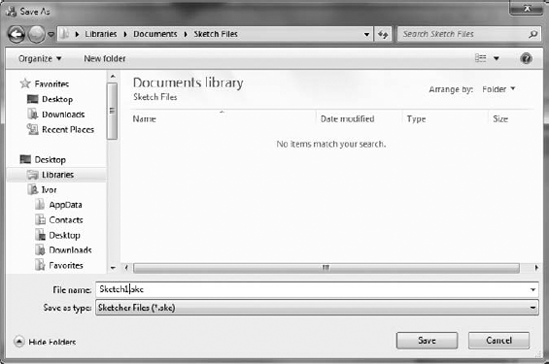
This is the standard dialog box for this menu item under Windows. If yours looks a little different, it's probably because you are using a different version of the Windows operating system from mine. The dialog is all fully working, supported by code supplied by the framework. The file name for the document has been generated from that assigned when the document was first opened, and the file extension is automatically defined as .ske. The application now has full support for file operations on documents. Easy, wasn't it?
It's time to take a look at how you can print a sketch. You already have a basic printing capability implemented in the Sketcher program, courtesy of the Application Wizard and the framework. The File
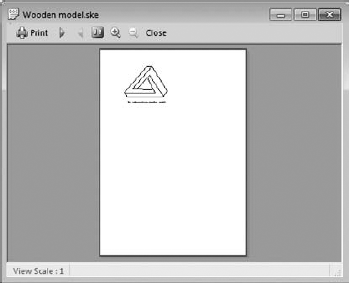
Whatever is in the current document is placed on a single sheet of paper at the current view scale. If the document's extent is beyond the boundary of the paper, the section of the document off the paper won't be printed. If you select the Print button, this page is sent to your printer.
As a basic capability that you get for free, it's quite impressive, but it's not adequate for our purposes. A typical document in our program may well not fit on a page, so you would either want to scale the document to fit, or, perhaps more conveniently, print the whole document over as many pages as necessary. You can add your own print processing code to extend the capability of the facilities provided by the framework, but to implement this, you first need to understand how printing has been implemented in MFC.
Printing a document is controlled by the current view. The process is inevitably a bit messy because printing is inherently a messy business, and it potentially involves you in implementing your own versions of quite a number of inherited functions in your view class.
Figure 19-5 shows the logic of the process and the functions involved. It also shows how the sequence of events is controlled by the framework and how printing a document involves calling five inherited members of your view class, which you may need to override. The CDC member functions shown on the left side of the diagram communicate with the printer device driver and are called automatically by the framework.
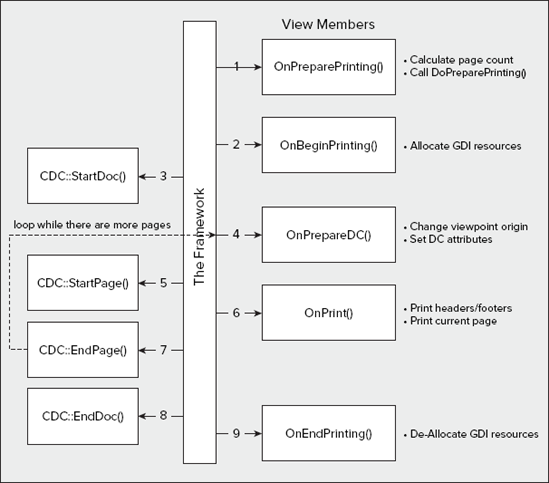
The typical role of each of the functions in the current view during a print operation is specified in the notes alongside it. The sequence in which they are called is indicated by the numbers on the arrows. In practice, you don't necessarily need to implement all of these functions, only those that you want to for your particular printing requirements. Typically, you'll want at least to implement your own versions of OnPreparePrinting(), OnPrepareDC(), and OnPrint(). You'll see an example of how these functions can be implemented in the context of the Sketcher program a little later in this chapter.
The output of data to a printer is done in the same way as outputting data to the display — through a device context. The GDI calls that you use to output text or graphics are device-independent, so they work just as well for a printer as they do for a display. The only difference is the device that the CDC object applies to.
The CDC functions in Figure 19-5 communicate with the device driver for the printer. If the document to be printed requires more than one printed page, the process loops back to call the OnPrepareDC() function for each successive new page, as determined by the EndPage() function.
All the functions in your view class that are involved in the printing process are passed a pointer to an object of type CPrintInfo as an argument. This object provides a link between all the functions that manage the printing process, so take a look at the CPrintInfo class in more detail.
A CPrintInfo object has a fundamental role in the printing process because it stores information about the print job being executed and details of its status at any time. It also provides functions for accessing and manipulating this data. This object is the means by which information is passed from one view function to another during printing, and between the framework and your view functions.
An object of the CPrintInfo class is created whenever you select the File
All the data members of CPrintInfo are public. The ones we are interested in for printing sketches are shown in the following table.
MEMBER | USAGE |
|---|---|
| A pointer to the |
| This is set to |
| A member of type |
| A member of type |
A value of type | |
| A value of type |
| This is of type |
| A |
| A |
A CPrintInfo object has the public member functions shown in the following table.
FUNCTION | DESCRIPTION |
|---|---|
| The argument specifies the number of the first page of the document. There is no return value. |
| The argument specifies the number of the last page of the document. There is no return value. |
| Returns the number of the first page of the document as type |
| Returns the number of the last page of the document as type |
| Returns the number of the first page of the document to be printed as type |
| Returns the number of the last page of the document to be printed as type |
When you're printing a document consisting of several pages, you need to figure out how many printed pages the document will occupy, and store this information in the CPrintInfo object to make it available to the framework. You can do this in your version of the OnPreparePrinting() member of the current view.
To set the number of the first page in the document, you need to call the function SetMinPage() in the CPrintInfo object, which accepts the page number as an argument of type UINT. There's no return value. To set the number of the last page in the document, you call the function SetMaxPage(), which also accepts the page number as an argument of type UINT and doesn't return a value. If you later want to retrieve these values, you can call the GetMinPage() and GetMaxPage() functions for the CPrintInfo object.
The page numbers that you supply are stored in the CPrintDialog object pointed to by the m_pPD member of CPrintInfo, and displayed in the dialog box that pops up when you select File
You now know what functions you can implement in the view class to manage printing for yourself, with the framework doing most of the work. You also know what information is available through the CPrintInfo object that is passed to the functions concerned with printing. You'll get a much clearer understanding of the detailed mechanics of printing if you implement a basic multipage print capability for Sketcher documents.
You use the MM_LOENGLISH mapping mode in the Sketcher program to set things up and then switch to MM_ANISOTROPIC. This means that the unit of measure for the shapes and the view extent is one hundredth of an inch. Of course, with the unit of size being a fixed physical measure, ideally, you want to print objects at their actual size.
With the document size specified as 3000 by 3000 units, you can create documents up to 30 inches square, which spreads over quite a few sheets of paper if you fill the whole area. It requires a little more effort to work out the number of pages necessary to print a sketch than with a typical text document because in most instances, you'll need a two-dimensional array of pages to print a complete sketch document.
To avoid overcomplicating the problem, assume that you're printing on a normal sheet of paper (either A4 size or 8 1/2 by 11 inches) and that you are printing in portrait orientation (which means the long edge is vertical). With either paper size, you'll print the document in a central portion of the paper measuring 7.5 inches by 10 inches. With these assumptions, you don't need to worry about the actual paper size; you just need to chop the document into 750 by 1000–unit chunks, where a unit is 0.01 inches. For a document larger than one page, you'll divide up the document as illustrated in the example in Figure 19-6.

As you can see, you'll be numbering the pages row-wise, so in this case, pages 1 to 4 are in the first row and pages 5 to 8 are in the second. A sketch occupying the maximum size of 30×30 inches will print on 12 pages.
To figure out how many pages a particular document occupies, you need to know how big the sketch is, and for this, you want the rectangle that encloses everything in the document. You can do this easily by adding a function GetDocExtent() to the document class, CSketcherDoc. Add the following declaration to the public interface for CSketcherDoc:
CRect GetDocExtent(); // Get the bounding rectangle for the whole document
The implementation is no great problem. The code for it is:
// Get the rectangle enclosing the entire document
CRect CSketcherDoc::GetDocExtent()
{
  CRect docExtent(0,0,1,1);            // Initial document extent
  for(auto iter = m_ElementList.begin() ; iter != m_ElementList.end() ; ++iter)
    docExtent.UnionRect(docExtent, (*iter)->GetBoundRect());

  docExtent.NormalizeRect();
  return docExtent;
}
You can add this function definition to the SketcherDoc.cpp file, or simply add the code if you used the Add
The OnPreparePrinting() function in the view class is called by the application framework to enable you to initialize the printing process for your document. The basic initialization that's required is to provide information about how many pages are in the document for the print dialog that displays. You'll need to store information about the pages that your document requires, so you can use it later in the other view functions involved in the printing process. You'll originate this in the OnPreparePrinting() member of the view class, too, store it in an object of your own class that you'll define for this purpose, and store a pointer to the object in the CPrintInfo object that the framework makes available. This approach is primarily to show you how this mechanism works; in many cases, you'll find it easier just to store the data in your view object.
You'll need to store the number of pages running the width of the document, m_nWidths, and the number of rows of pages down the length of the document, m_nLengths. You'll also store the upper-left corner of the rectangle enclosing the document data as a CPoint object, m_DocRefPoint, because you'll use this when you work out the position of a page to be printed from its page number. You can store the file name for the document in a CString object, m_DocTitle, so that you can add it as a title to each page. It will also be useful to record the size of the printable area within the page. The definition of the class to accommodate these is:
#pragma once

class CPrintData
{
  public:
    UINT printWidth;                   // Printable page width - units 0.01 inches
    UINT printLength;                  // Printable page length - units 0.01 inches
    UINT m_nWidths;                    // Page count for the width of the document
    UINT m_nLengths;                   // Page count for the length of the document
    CPoint m_DocRefPoint;              // Top-left corner of the document contents
    CString m_DocTitle;                // The name of the document

    // Constructor
     CPrintData():
      printWidth(750)                  // 7.5 inches
    , printLength(1000)                // 10 inches
      {}
};
The constructor sets default values for the printable area that corresponds to an A4 page with half-inch margins all round. You can change this to suit your environment, and, of course, you can change the values programmatically in a CPrintData object.
You can add a new header file with the name PrintData.h to the project by right-clicking the Header Files folder in the Solution Explorer pane and then selecting Add
You don't need an implementation file for this class. Because an object of this class is only going to be used transiently, you don't need to use CObject as a base or to consider any other complication.
The printing process starts with a call to the view class member OnPreparePrinting(), so check out how you should implement that.
The Application Wizard added versions of OnPreparePrinting(), OnBeginPrinting(), and OnEndPrinting() to CSketcherView at the outset. The base code provided for OnPreparePrinting() calls DoPreparePrinting() in the return statement, as you can see:
BOOL CSketcherView::OnPreparePrinting(CPrintInfo* pInfo)
{
   // default preparation
   return DoPreparePrinting(pInfo);
}
The DoPreparePrinting() function displays the Print dialog box using information about the number of pages to be printed that's defined in the CPrintInfo object. Whenever possible, you should calculate the number of pages to be printed and store it in the CPrintInfo object before this call occurs. Of course, in many circumstances, you may need information from the device context for the printer before you can do this — when you're printing a document where the number of pages is going to be affected by the size of the font to be used, for example — in which case, it won't be possible to get the page count before you call OnPreparePrinting(). In this case, you can compute the number of pages in the OnBeginPrinting() member, which receives a pointer to the device context as an argument. This function is called by the framework after OnPreparePrinting(), so the information entered in the Print dialog box is available. This means that you can also take account of the paper size selected by the user in the Print dialog box.
Assume that the page size is large enough to accommodate a 7.5-inch by 10-inch area to draw the document data, so you can calculate the number of pages in OnPreparePrinting(). The code for it is:
BOOL CSketcherView::OnPreparePrinting(CPrintInfo* pInfo)
{
  CPrintData*p(new CPrintData);             // Create a print data object
  CSketcherDoc* pDoc = GetDocument();       // Get a document pointer
  CRect docExtent = pDoc->GetDocExtent();   // Get the whole document area

  // Save the reference point for the whole document
  p->m_DocRefPoint = CPoint(docExtent.left, docExtent.top);

  // Get the name of the document file and save it
  p->m_DocTitle = pDoc->GetTitle();

  // Calculate how many printed page widths are required
// to accommodate the width of the documentp->m_nWidths = static_cast<UINT>(ceil(static_cast<double>(docExtent.Width())/p->printWidth));// Calculate how many printed page lengths are required// to accommodate the document length->m_nLengths = static_cast<UINT>(ceil(static_cast<double>(docExtent.Height())/p->printLength));// Set the first page number as 1 and// set the last page number as the total number of pagespInfo->SetMinPage(1);pInfo->SetMaxPage(p->m_nWidths*p->m_nLengths);pInfo->m_lpUserData = p; // Store address of PrintData objectreturn DoPreparePrinting(pInfo); }
You first create a CPrintData object on the heap and store its address locally in the pointer. After getting a pointer to the document, you get the rectangle enclosing all of the elements in the document by calling the function GetDocExtent() that you added to the document class earlier in this chapter. You then store the corner of this rectangle in the m_DocRefPoint member of the CPrintData object, and put the name of the file that contains the document in m_DocTitle.
The next two lines of code calculate the number of pages across the width of the document, and the number of pages required to cover the length. The number of pages to cover the width is computed by dividing the width of the document by the width of the print area of a page and rounding up to the next highest integer using the ceil() library function that is defined in the cmath header. For example, ceil(2.1) returns 3.0, ceil(2.9) also returns 3.0, and ceil(−2.1) returns −2.0. A similar calculation to that for the number of pages across the width of a document produces the number to cover the length. The product of these two values is the total number of pages to be printed, and this is the value that you'll supply for the maximum page number. The last step is to store the address of the CPrintData object in the m_lpUserData member of the pInfo object.
Don't forget to add a #include directive for PrintData.h to the SketcherView.cpp file.
Because you created the CPrintData object on the heap, you must ensure that it's deleted when you're done with it. You do this by adding code to the OnEndPrinting() function:
void CSketcherView::OnEndPrinting(CDC* /*pDC*/, CPrintInfo* pInfo){// Delete our print data objectdelete static_cast<CPrintData*>(pInfo->m_lpUserData);}
That's all that's necessary for this function in the Sketcher program, but in some cases, you'll need to do more. Your one-time final cleanup should be done here. Make sure that you remove the comment delimiters (/* */) from the second parameter name; otherwise, your function won't compile. The default implementation comments out the parameter names because you may not need to refer to them in your code. Because you use the pInfo parameter, you must uncomment it; otherwise, the compiler reports it as undefined.
You don't need to add anything to the OnBeginPrinting() function in the Sketcher program, but you'd need to add code to allocate any GDI resources, such as pens, if they were required throughout the printing process. You would then delete these as part of the clean-up process in OnEndPrinting().
At the moment, the Sketcher program calls OnPrepareDC(), which sets up the mapping mode as MM_ANISOTROPIC to take account of the scaling factor. You must make some additional changes so that the device context is properly prepared in the case of printing:
void CSketcherView::OnPrepareDC(CDC* pDC, CPrintInfo* pInfo)
{
  int scale = m_Scale;                       // Store the scale locally
  if(pDC->IsPrinting())
    scale = 1;                               // If we are printing, set scale to 1

  CScrollView::OnPrepareDC(pDC, pInfo);
  CSketcherDoc* pDoc = GetDocument();
  pDC->SetMapMode(MM_ANISOTROPIC);           // Set the map mode
  CSize DocSize = pDoc->GetDocSize();        // Get the document size
  pDC->SetWindowExt(DocSize);                // Now set the window extent

  // Get the number of pixels per inch in x and y
  int xLogPixels = pDC->GetDeviceCaps(LOGPIXELSX);
  int yLogPixels = pDC->GetDeviceCaps(LOGPIXELSY);

  // Calculate the viewport extent in x and y
  int xExtent = (DocSize.cx*scale*xLogPixels)/100;
  int yExtent = (DocSize.cy*scale*yLogPixels)/100;

  pDC->SetViewportExt(xExtent, yExtent);     // Set viewport extent
}
This function is called by the framework for output to the printer as well as to the screen. You should make sure that a scale of 1 is used to set the mapping from logical coordinates to device coordinates when you're printing. If you left everything as it was, the output would be at the current view scale, but you'd need to take account of the scale when calculating how many pages you needed, and how you set the origin for each page.
You determine whether or not you have a printer device context by calling the IsPrinting() member of the current CDC object, which returns TRUE if you are printing. All you need to do when you have a printer device context is set the scale to 1. Of course, you must change the statements lower down that use the scale value so that they use the local variable scale rather than the m_Scale member of the view. The values returned by the calls to GetDeviceCaps() with the arguments LOGPIXELSX and LOGPIXELSY return the number of logical points per inch in the x and y directions for your printer when you're printing, and the equivalent values for your display when you're drawing to the screen, so this automatically adapts the viewport extent to suit the device to which you're sending the output.
You can write the data to the printer device context in the OnPrint() function. This is called once for each page to be printed. You need to add an override for this function to CSketcherView, using the Properties window for the class. Select OnPrint from the list of overrides and then click <Add> OnPrint in the right column.
You can obtain the page number of the current page from the m_nCurPage member of the CPrintInfo object and use this value to work out the coordinates of the position in the document that corresponds to the upper-left corner of the current page. The way to do this is best understood using an example, so imagine that you are printing page seven of an eight-page document, as illustrated in Figure 19-7.
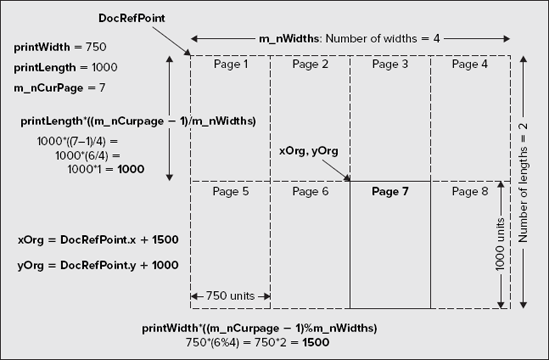
You can get an index to the horizontal position of the page by decrementing the page number by 1 and taking the remainder after dividing by the number of page widths required for the width of the printed area of the document. Multiplying the result by printWidth produces the x coordinate of the upper-left corner of the page, relative to the upper-left corner of the rectangle enclosing the elements in the document. Similarly, you can determine the index to the vertical position of the document by dividing the current page number reduced by 1 by the number of page widths required for the horizontal width of the document. By multiplying the remainder by printLength, you get the relative y coordinate of the upper-left corner of the page. You can express this in the following statements:
CPrintData* p(static_cast<CPrintData*>(pInfo->m_lpUserData));
int xOrg = p->m_DocRefPoint.x + p->printWidth*
                                          ((pInfo->m_nCurPage - 1)%(p->m_nWidths));
int yOrg = p->m_DocRefPoint.y + p->printLength*
                                           ((pInfo->m_nCurPage - 1)/(p->m_nWidths));
It would be nice to print the file name of the document at the top of each page and, perhaps, a page number at the bottom, but you want to be sure you don't print the document data over the file name and page number. You also want to center the printed area on the page. You can do this by moving the origin of the coordinate system in the printer device context after you have printed the file name. This is illustrated in Figure 19-8.
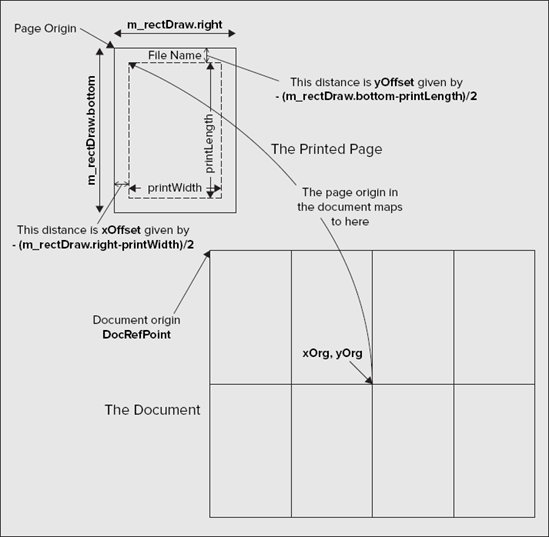
Figure 19-8 illustrates the correspondence between the printed page area in the device context and the page to be printed in the reference frame of the document data. Remember that these are in logical coordinates — the equivalent of MM_LOENGLISH in Sketcher — so y is increasingly negative from top to bottom. The page shows the expressions for the offsets from the page origin for the printWidth by printLength area where you are going to print the page. You want to print the information from the document in the dashed area shown on the page, so you need to map the xOrg, yOrg point in the document to the position shown in the printed page, which is displaced from the page origin by the offset values xOffset and yOffset.
By default, the origin in the coordinate system that you use to define elements in the document is mapped to the origin of the device context, but you can change this. The CDC object provides a SetWindowOrg() function for this purpose. This enables you to define a point in the document's logical coordinate system that you want to correspond to the origin in the device context. It's important to save the old origin that's returned from the SetWindowOrg() function as a CPoint object. You must restore the old origin when you've finished drawing the current page; otherwise, the m_rectDraw member of the CPrintInfo object is not set up correctly when you come to print the next page.
The point in the document that you want to map to the origin of the page has the coordinates xOrg-xOffset,yOrg-yOffset. This may not be easy to visualize, but remember that by setting the window origin, you're defining the point that maps to the viewport origin. If you think about it, you should see that the xOrg, yOrg point in the document is where you want it on the page.
The complete code for printing a page of the document is:
// Print a page of the documentvoid CSketcherView::OnPrint(CDC* pDC, CPrintInfo* pInfo) {CPrintData* p(static_cast<CPrintData*>(pInfo->m_lpUserData));// Output the document file namepDC->SetTextAlign(TA_CENTER); // Center the following textpDC->TextOut(pInfo->m_rectDraw.right/2, 20, p->m_DocTitle);CString str;str.Format(_T("Page %u"), pInfo->m_nCurPage);pDC->TextOut(pInfo->m_rectDraw.right/2, pInfo->m_rectDraw.bottom-20, str);pDC->SetTextAlign(TA_LEFT); // Left justify text// Calculate the origin point for the current pageint xOrg = p->m_DocRefPoint.x +p->printWidth*((pInfo->m_nCurPage - 1)%(p->m_nWidths));int yOrg = p->m_DocRefPoint.y +p->printLength*((pInfo->m_nCurPage - 1)/(p->m_nWidths));// Calculate offsets to center drawing area on page as positive valuesint xOffset = (pInfo->m_rectDraw.right - p->printWidth)/2;int yOffset = (pInfo->m_rectDraw.bottom - p->printLength)/2;// Change window origin to correspond to current page & save old originCPoint OldOrg = pDC->SetWindowOrg(xOrg-xOffset, yOrg-yOffset);// Define a clip rectangle the size of the printed area
pDC->IntersectClipRect(xOrg, yOrg, xOrg+p->printWidth, yOrg+p->printLength);OnDraw(pDC); // Draw the whole documentpDC->SelectClipRgn(nullptr); // Remove the clip rectanglepDC->SetWindowOrg(OldOrg); // Restore old window origin}
The first step is to initialize the local pointer, p, with the address of the CPrintData object that is stored in the m_lpUserData member of the object to which pInfo points. You then output the file name that you squirreled away in the CPrintData object. The SetTextAlign() function member of the CDC object allows you to define the alignment of subsequent text output in relation to the reference point you supply for the text string in the TextOut() function. The alignment is determined by the constant passed as an argument to the function. You have three possibilities for specifying the alignment of the text, as shown in the following table.
CONSTANT | ALIGNMENT |
|---|---|
| The point is at the left of the bounding rectangle for the text, so the text is to the right of the point specified. This is default alignment. |
| The point is at the right of the bounding rectangle for the text, so the text is to the left of the point specified. |
| The point is at the center of the bounding rectangle for the text. |
You define the x coordinate of the file name on the page as half the page width, and the y coordinate as 20 units, which is 0.2 inches, from the top of the page.
After outputting the name of the document file as centered text, you output the page number centered at the bottom of the page. You use the Format() member of the CString class to format the page number stored in the m_nCurPage member of the CPrintInfo object. This is positioned 20 units up from the bottom of the page. You then reset the text alignment to the default setting, TA_LEFT.
The SetTextAlign() function also allows you to change the position of the text vertically by OR-ing a second flag with the justification flag. The second flag can be any of those shown in the following table.
CONSTANT | ALIGNMENT |
|---|---|
| Aligns the top of the rectangle bounding the text with the point defining the position of the text. This is the default. |
| Aligns the bottom of the rectangle bounding the text with the point defining the position of the text. |
| Aligns the baseline of the font used for the text with the point defining the position of the text. |
The next action in OnPrint() uses the method that I discussed for mapping an area of the document to the current page. You get the document drawn on the page by calling the OnDraw() function that is used to display the document in the view. This potentially draws the entire document, but you can restrict what appears on the page by defining a clip rectangle. A clip rectangle encloses a rectangular area in the device context within which output appears. Output is suppressed outside of the clip rectangle. It's also possible to define irregularly shaped areas for clipping, called regions.
The initial default clipping area defined in the print device context is the page boundary. You define a clip rectangle that corresponds to the printWidth by printLength area centered in the page. This ensures that you draw only in this area and the file name and page number will not be overwritten.
After the current page has been drawn by the OnDraw() function call, you call SelectClipRgn() with a NULL argument to remove the clip rectangle. If you don't do this, output of the document title is suppressed on all pages after the first, because it lies outside the clip rectangle that would otherwise remain in effect in the print process until the next time IntersectClipRect() gets called.
Your final action is to call SetWindowOrg() again to restore the window origin to its original location, as discussed earlier in this chapter.
To get your first printed Sketcher document, you just need to build the project and execute the program (once you've fixed any typos). If you try File
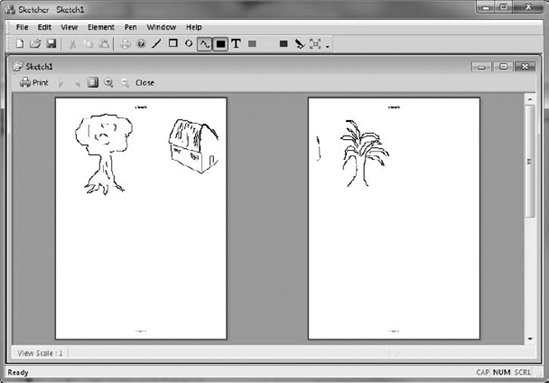
You get print preview functionality completely for free. The framework uses the code that you've supplied for the normal multipage printing operation to produce page images in the Print Preview window. What you see in the Print Preview window should be exactly the same as appears on the printed page.
As you know, serialization is the process of writing objects to a stream, and deserialization is the reverse: reconstructing objects from a stream. The .NET Framework offers several different ways to serialize and deserialize your C++/CLI class objects. XML serialization serializes objects into an XML stream that conforms to a particular XML schema. You can also serialize objects into XML streams that conform to the Simple Object Access Protocol (SOAP) specification, and this is referred to as SOAP serialization. A discussion of XML and SOAP is beyond the scope of this book, not because it's difficult — it isn't — but because to cover it adequately requires more pages than I can possibly include in this book. I'll therefore show you how to use the third and, perhaps, simplest form of serialization provided by the .NET Framework, binary serialization.
You'll also investigate how you can print sketches from CLR Sketcher. With the help given by the Form Designer, this is going to be easy.
Before you get into the specifics of serializing a sketch, let's get an overview of what's involved in binary serialization of your class objects. For binary serialization of your class objects to be possible, you have to make your classes serializable. You can make a ref class or value class serializable by marking it with the Serializable attribute, like this:
[Serializable]
public ref class MyClass
{
  // Class definition...
};
Of course, in practice, there may be a little more to it. For serialization to work with MyClass, all the class fields must be serializable, too, and often, there are fields that are not serializable by default, or fields that it does not make sense to serialize because the data stored will not be valid when it is deserialized, or fields that you just don't want serialized for security reasons. In this case, special measures are necessary to take care of the non-serializable class members.
Where a class has members that are not serializable, you can mark them with the NonSerialized attribute to prevent them from being serialized. For example:
[Serializable]
public ref class MyClass
{
public:
[NonSerialized]int value;
// Rest of the class definition...
};Here, the serialization process will not attempt to serialize the value member of a MyClass object. For this to compile, you need a using declaration for the System::Runtime::Serialization namespace.
Although marking a data member as non-serializable avoids the possibility of the serialization process failing with types you cannot serialize, it does not solve the problem of serializing the objects unless the non-serialized data can be happily omitted when you come to reconstruct the object when it is deserialized. You will typically want to take some special action in relation to the non-serialized fields.
You use the OnSerializing attribute to mark a class function that you want to be called when the serialization of an object begins. You can also identify a function that is to be called after an object has been serialized, by marking it with the OnSerialized attribute. This gives you an opportunity to do something about the non-serialized fields. For example:
[Serializable]public ref class MyClass { public:[NonSerialized]ProblemType anObject;[OnSerializing]void FixNonSerializedData(StreamingContext context){// Code to do what is necessary for anObject before serialization. . .}[OnSerialized]void PostSerialization(StreamingContext context){// Code to do what is necessary after serialization. . .}// Rest of the class definition... };
When a MyClass object is serialized, the FixNonSerializedData() function will be called before the object is serialized, and the code in here will deal with the problem of anObject not being serialized, perhaps by allowing some other data to be serialized that will enable anObject to be reconstructed when the MyClass object is deserialized. The PostSerialization() function will be called after a MyClass object has been serialized. The function that you mark with either the OnSerializing or the OnSerialized attribute must have a void return type and a parameter of type StreamingContext. The StreamingContext object that is passed to the function when it is called is a struct containing information about the source and destination, but you won't need to use this in CLR Sketcher.
You can also arrange for a member function to be called after an object is deserialized. The OnDeserializing and OnDeserialized attributes identify functions that are to be called before or after deserialization, respectively. For example:
[Serializable]public ref class MyClass { public:[NonSerialized]ProblemType anObject;[OnSerializing] void FixNonSerializedData(StreamingContext context) { // Code to do what is necessary for anObject before serialization... } [OnSerialized] void PostSerialization(StreamingContext context) { // Code to do what is necessary after serialization... }[OnDeserializing]void PreSerialization(StreamingContext context){// Code to do stuff before deserialization. . .}[OnDeserialized]void ReconstructObject(StreamingContext context){// Code to reconstruct anObject. . .}// Rest of the class definition... };
The PreSerialization() function will be called immediately before the deserialization process for a MyClass object starts. The ReconstructObject() function will be executed after the deserialization process for the object is complete, so this function will have the responsibility for setting up anObject appropriately. Functions that you mark with the OnDeserializing or OnDeserialized attributes must also have a void return type and a parameter of type StreamingContext.
To summarize, typically, you can prepare a class to allow objects of that class type to be serialized through the following five steps:
Mark the class to be serialized with the
Serializableattribute.Identify any data members that cannot or should not be serialized and mark them with
NonSerializedattributes.Add a public function with a return type of
voidand a single parameter of typeStreamingContextto deal with the non-serializable fields when an object is serialized, and mark the function with theOnSerializingattribute.Add a public function with a return type of
voidand a single parameter of typeStreamingContextto deal with the non-serialized fields when an object is deserialized, and mark the function with theOnDeSerializedattribute.Add a
usingdeclaration for theSystem::Runtime::Serializationnamespace to the header file containing the class.
Serializing an object means writing it to a stream, so you first must define the stream that is the destination for the data defining the object. A stream is represented by a System::IO::Stream class, which is an abstract ref class type. A stream can be any source or destination for data that is a sequence of bytes; a file, a TCP/IP socket, and a pipe that allows data to be passed between two processes are all examples of streams.
You will usually want to serialize your objects to a file, and the System::IO::File class contains static functions for creating objects that encapsulate files. You use the File::Open() function to create a new file or open an existing file for reading and/or writing. The Open() function returns a reference of type FileStream^ to an object that encapsulates the file. Because FileStream is a type that is derived from Stream, you can store the reference that the Open() function returns in a variable of type Stream^. The Open() function comes in three overloaded versions, and the version you will be using has the following form:
FileStream^ Open(String^ path, FileMode mode)
The path parameter is the path to the file that you want to open and can be a full path to the file, or just the file name. If you just specify an argument that is just a file name, the file will be assumed to be in the current directory.
The mode parameter controls whether the file is created if it does not exist, and whether the data can be overwritten if the file does exist. The mode argument can be any of the FileMode enumeration values described in the following table.
FILEMODE ENUMERATOR | DESCRIPTION |
|---|---|
| Requests that a new file specified by |
| Requests that an existing file specified by |
| Specifies that if the file specified by |
Specifies that the existing file specified by | |
| Specifies that the file specified by |
| The file specified by |
Thus, you could create a stream encapsulating a file in the current directory that you can write with the following statement:
Stream^ stream = File::Open(L"sketch.dat", FileMode::Create);
The file sketch.dat will be created in the current directory if it does not exist; if it exists, the contents will be overwritten.
The static OpenWrite() function in the File class will open the existing file that you specify by the string argument with write access, and return a FileStream^ reference to the stream you use to write the file.
To serialize an object to a file encapsulated by a FileStream object that you have created, use an object of type System::Runtime::Serialization::Formatters::Binary::BinaryFormatter, which you can create as follows:
BinaryFormatter^ formatter = gcnew BinaryFormatter();
You need a using declaration for System::Runtime::Serialization::Formatters::Binary if this statement is to compile. The formatter object has a Serialize() function member that you use to serialize an object to a stream. The first argument to the function is a reference to the stream that is the destination for the data, and the second argument is a reference to the object to be serialized to the stream. Thus, you can write a sketch object to stream with the following statement:
formatter->Serialize(stream, sketch);
You read an object from a stream using the Deserialize() function for a BinaryFormatter object:
Sketch^ sketch = safe_cast<Sketch^>(formatter->Deserialize(stream));
The argument to the Deserialize() function is a reference to the stream that is to be read. The function returns the object read from the stream as type Object^, so you must cast it to the appropriate type.
You have to do two things to allow sketches to be serialized in the CLR Sketcher application: make the Sketch class serializable and add code to enable the File menu items and toolbar buttons to support saving and retrieving sketches.
Add a using directive for System::Runtime::Serialization to the Sketch.h header file. While you are about it, you can copy the directive to the Elements.h header because you will need it there, too. Add the Serializable attribute immediately before the Sketch class definition to specify that the class is serializable:
[Serializable]
 public ref class Sketch
{
  // Class definition as before...
};
Although this indicates that the class is serializable, in fact, it is not. Serialization will fail because the STL/CLR container classes are not serializable by default. You must specify that the elements class member is not serializable, like this:
[Serializable]public ref class Sketch { private:[NonSerialized]list<Element^>^ elements; // Rest of the class definition as before... };
The class really is serializable now, but not in a useful way, because none of the elements in the sketch will get written to the file. You must provide an alternative repository for the elements in the list<Element^> container that is serializable to get the sketch elements written to the file. Fortunately, a regular C++/CLI array is serializable, and even more fortunately, the list container has a to_array() function that returns the entire contents of the container as an array. You can therefore add a public function to the class with the OnSerializing attribute that will copy the contents of the elements container to an array, and that you can arrange to be called before serialization begins. You can also add a public function with the OnDeserialized attribute that will recreate the elements container when the array containing the elements is deserialized. Here are the changes to the Sketch class that will accommodate that:
[Serializable]public ref class Sketch { private:[NonSerialized]list<Element^>^ elements;
array<Element^>^ elementArray;public:Sketch() : elementArray(nullptr){ elements = gcnew list<Element^>(); }[OnSerializing]void ListToArray(StreamingContext context){elementArray = elements->to_array();}[OnDeserialized]void ArrayToList(StreamingContext context){elements = gcnew list<Element^>(elementArray);elementArray = nullptr;}// Rest of the class definition as before... };
You have a new private data member, elementArray, that holds all the elements in the sketch when it is serialized to a file. You initialize this to nullptr in the constructor. When a Sketch object is serialized, the ListToArray() function will be called first, so this function transfers the contents of the list container to the elementArray array before serialization of the object takes place. The Sketch object containing the elementArray object is then written to the file. When a Sketch object is deserialized, the object is recreated containing the elementArray member, after which the ArrayToList() function is called to restore the contents of the elements container from the array. The array is no longer required, so you set it to nullptr in the function.
So far, so good, but you are not quite there yet. For a sketch to be serializable, all the elements in the sketch must be serializable, too, and there's the small problem of the Curve class that has an STL/CLR container as a member. Pen and Brush objects are not serializable, so something must be done about those before a sketch can be serialized.
First, though, you can add the Serializable attribute to the Element class and all its subclasses. You can also mark the pen member of the Element class with the NonSerialized attribute.
You can't serialize/deserialize a Pen or Brush object, but if you serialize the attributes of the pen or brush, you will be able to reconstruct it. You can add some members to the Element base class to store the attributes you need:
[Serializable]
public ref class Element abstract
{
  protected:
    Point position;
Color color;
System::Drawing::Rectangle boundRect;
Color highlightColor;
float penWidth;
DashStyle dashStyle;
[NonSerialized]
Pen^ pen;
// Rest of the class as before...
};I have shown all the additions for serialization as bold. There are two extra protected members of the class that store the pen width and the DashStyle property value for the element.
Pen objects are not used by the TextElement class, so you should only reconstruct the pen member of the Element class in the classes that define geometric shapes. You can add the following public functions to the Line, Rectangle, and Circle classes:
[OnSerializing]
    void SavePenAttributes(StreamingContext context)
    {
        penWidth = pen->Width;
        dashStyle = pen->DashStyle;
    }

    [OnDeserialized]
    void CreatePen(StreamingContext context)
    {
      pen = gcnew Pen(color, penWidth);
      pen->DashStyle = dashStyle;
    }
The SavePenAttributes() function will be called immediately before an object is serialized to fill out the penWidth and dashStyle members ready for serialization. The CreatePen() function will be called after an object has been deserialized, and it will re-create the pen object from the attributes saved by the serialization process.
In the TextElement class, you should mark the brush member with the NonSerialized attribute. You then must provide for reconstructing this object after deserializing a TextElement object.
The changes to the class definition for this are as follows:
[Serializable]public ref class TextElement : Element { protected: String^ text; Font^ font;[NonSerialized]SolidBrush^ brush; public:[OnDeserialized]
void CreateBrush(StreamingContext context){brush = gcnew SolidBrush(color);}// Rest of the class as before... };
The CreateBrush() function is called to reconstruct the brush member after an object is deserialized. No additional information is required to reconstruct the SolidBrush object, because it only needs to have the color member available, and that is serializable, anyway.
The Curve class needs to deal with the inherited pen member, and it must also take care of the vector container that isn't serializable. You can pull the same trick with the container in the Curve class as you did with the Sketch class container, so amend the class definition to the following:
[Serializable]public ref class Curve : Element { private:[NonSerialized]vector<Point>^ points;array<Point>^ pointsArray;public:Curve(Color color, Point p1, Point p2, float penWidth) : pointsArray(nullptr){ // Code for the constructor as before... }[OnSerializing]void SavePenAndVectorData(StreamingContext context){penWidth = pen->Width;dashStyle = pen->DashStyle;pointsArray = points->to_array();}[OnDeserialized]void RestorePenAndVectorData(StreamingContext context){pen = gcnew Pen(color, penWidth);pen->DashStyle = dashStyle;points = gcnew vector<Point>(pointsArray);pointsArray = nullptr;}// Rest of the class definition as before... };
It should be easy to see how this works. The points member is now non-serialized, but you have a new member of the class, pointsArray, that will store the points in a serializable form. The SavePenAndVectorData() function that is called immediately prior to serialization of an object sets up the penWidth, dashStyle, and pointsArray members ready for serialization. The RestorePenAndVectorData() function restores the pen and the vector container after a Curve object has been deserialized. Don't forget to add the using declaration for the System::Runtime::Serialization namespace to Sketch.h and Elements.h.
The menu items and toolbar buttons for file operations are already in place in CLR Sketcher. If you double-click the Click event property in the Properties window for the File
The Toolbox has standard dialogs for opening and saving files and you can use both of these. Drag an OpenFileDialog and a SaveFileDialog from the Toolbox to the Design window for Form1. You can change the (name) property values to saveFileDialog and openFileDialog. Change the values for the Title properties for both dialogs to whatever you want displayed in the title bar. You can also change the FileName property in the saveFileDialog to sketch; this is the default file name that will be displayed when the dialog is first used. It's a good idea to define a folder that will hold your sketches, so create one now; you could use something like C:CLR Sketches. You can specify the default directory as the value for the InitialDirectory property for both dialogs. Both dialogs have a Filter property that specifies the filters for the list of files that are displayed by the dialogs. The DefaultExt property value specifies a default extension for files, so set this to ske. You can set the value for the Filter property for both dialogs to
"CLR Sketches|*.ske| All files|*.*".
The default value of 1 for the FilterIndex property determines that the first file filter applies by default. If you want the second file filter to apply, set the value for FilterIndex to 2. Verify that the values for the ValidateNames and OverwritePrompt properties for the saveFileDialog have default values of true; this results in the user being prompted when an existing sketch is about to be overwritten.
Before you get into implementing the event handler for the File
private: System::Void Form1_MouseUp(System::Object^  sender,
System::Windows::Forms::MouseEventArgs^  e)
{
  if(!drawing)
  {
    mode = Mode::Normal;
    return;
  }
  if(tempElement)
  {
    sketch += tempElement;
    sketch->saved = false;           // Sketch has changed so mark it not saved
    tempElement = nullptr;
    Invalidate();
  }
  drawing = false;
}
The Form1_MouseDown() handler adds the TextElement object to the sketch, so saved should be set to false there:
private: System::Void Form1_MouseDown(System::Object^  sender,
System::Windows::Forms::MouseEventArgs^  e)
{
  if(e->Button == System::Windows::Forms::MouseButtons::Left)
  {
    firstPoint = e->Location;
    if(mode == Mode::Normal)
    {
      if(elementType == ElementType::TEXT)
      {
        textDialog->TextString = L"";        // Reset the text box string
        textDialog->TextFont = textFont;     // Set the font for the edit box
        if(textDialog->ShowDialog() == System::Windows::Forms::DialogResult::OK)
        {
          tempElement = gcnew TextElement(color, firstPoint,
                                                 textDialog->TextString, textFont);
          sketch += tempElement;
          sketch->saved = false;          // Sketch has changed so mark it not saved
          Invalidate(tempElement->bound); // The text element region
          tempElement = nullptr;
          Update();
        }
        drawing = false;
      }
      else
      {
        drawing = true;
      }
    }
  }
}
The Form1_MouseMove() function changes the sketch, so you must set saved to false in here, too:
private: System::Void Form1_MouseMove(System::Object^  sender,
 System::Windows::Forms::MouseEventArgs^  e)
{
  if(drawing)
  {
    // Code as before...
  }
  else if(mode == Mode::Normal)
  {
    // Code as before...
  }
  else if(mode == Mode::Move &&
                      e->Button == System::Windows::Forms::MouseButtons::Left)
  {  // Move the highlighted element
     if(highlightedElement)
     {
       sketch->saved = false;                     // Mark sketch as not saved
       Invalidate(highlightedElement->bound);     // Region before move
       highlightedElement->Move(e->X - firstPoint.X, e->Y - firstPoint.Y);
       firstPoint = e->Location;
       Invalidate(highlightedElement->bound);     // Region after move
       Update();
     }
   }
}
The handler for the Delete context menu item changes the sketch, so that has to be updated:
private: System::Void deleteContextMenuItem_Click(System::Object^  sender
System::EventArgs^  e)
{
  if(highlightedElement)
  {
    sketch->saved = false;                        // Mark sketch as not saved
    sketch -= highlightedElement;                 // Delete the highlighted element
    Invalidate(highlightedElement->bound);
    highlightedElement = nullptr;
    Update();
  }
}
Finally, the sendToBack() handler needs to be changed:
private: System::Void sendToBackContextMenuItem_Click(System::Object^  sender,
System::EventArgs^  e) {
  if(highlightedElement)
  {
    sketch->saved = false;                      // Mark sketch as not saved
    // Rest of the code as before...
  }
}
That's covered the saved state of the sketch. Now, you can implement the process of saving it.
You need a BinaryFormatter object to save a sketch, and a good place to keep it is in the Form1 class. Add a using declaration for the System::Runtime::Serialization::Formatters::Binary namespace to Form1.h, and add a new private member, formatter, of type BinaryFormatter^, to the Form1 class. You can initialize it to gcnew BinaryFormatter() in the initialization list for the Form1 class constructor.
Before you implement the Click event handler for the File
private: System::Void saveToolStripMenuItem_Click(
                                    System::Object^  sender, System::EventArgs^  e)
{
  SaveSketch();
}
This just calls a helper function that you will add shortly.
Here's how you can implement the handler for the Save As... menu item using another helper function:
private: System::Void saveAsToolStripMenuItem_Click(System::Object^  sender,
System::EventArgs^  e)
{
  SaveSketchAs();
}
The reason for using helper functions in this way is because the process for dealing with a Save operation can use the functionality that is required for a Save As... operation.
Add the SaveSketch() function as a private member of the Form1 class and implement it like this:
void SaveSketch(void)
  {
    if(sketch->saved)
      return;                // Nothing to do because the sketch was not modified

    if(sketchFilePath == nullptr)
    {
      // File has not yet been saved before, so show the save dialog
      SaveSketchAs();
    }
    else
    {
      // File has been saved before, so just save it using the same name
      Stream^ stream = File::OpenWrite(sketchFilePath);
formatter->Serialize(stream, sketch);stream->Close();}}
There are two courses of action, depending on whether the sketch has been saved previously. If the sketch is unchanged, there's nothing to do, so the function returns. If saved indicates that the sketch needs to be saved, there are two further possibilities:
The sketch has never been saved previously, which is indicated by
sketchFilePathhaving the valuenullptr. In this case, you callSaveSketchAs()to use the save dialog to save the sketch.The sketch has been saved before, in which case,
sketchFilePathwill refer to a valid path. In this case, you can save it using the existing file path.
To save the sketch when it has been saved previously, you obtain a reference to a FileStream object that you can use to serialize the sketch by calling the static OpenWrite() function that is defined in the File class. The argument to OpenWrite() is the existing file path for the sketch. You then serialize the sketch by calling the Serialize() function for the BinaryFormatter object. Finally, you call Close() for the stream to close the stream and release the resources.
You can add the SaveSketchAs() function to the Form1 class as a private function implemented like this:
// Saves the current sketch
void SaveSketchAs(void)
{
  if(saveFileDialog->ShowDialog() == System::Windows::Forms::DialogResult::OK)
  {
    Stream^ stream = File::Open(saveFileDialog->FileName, FileMode::Create);
    if(stream != nullptr)
    {
      formatter->Serialize(stream, sketch);
      stream->Close();
      sketchFilePath = saveFileDialog->FileName;
      sketch->saved = true;
    }
    else
    {
      MessageBox::Show(L"Failed to create sketch file stream!");
    }
  }
}
You display the file save dialog by calling its ShowDialog() function in the if condition. If the OK button closes the dialog, the user wants to complete the save operation, so you call the static Open() function to create a FileStream object for the file using the file name provided by the FileName property for the dialog object. You serialize the sketch to the file by calling the Serialize() function for the BinaryFormatter object, and close the stream. You save the file path from the dialog for use next time around, and set the saved member of the Sketch object to true.
If calling the Open() function in the File class fails, nullptr is stored in stream. In this case, you use the System::Windows::Forms::MessageBox class to display a message. The MessageBox class Show() function provides you with the opportunity to display a wide range of message boxes. You will see more of the possibilities later in this chapter.
Retrieving a sketch from a file is a little more complicated, because you have to consider the possibility for the current sketch to be overwritten. If there is a current sketch that has not been saved, you should give the user an opportunity to save it before reading the new sketch from a file. The Click handler for the File
private: System::Void openToolStripMenuItem_Click(
                                  System::Object^  sender, System::EventArgs^  e)
{
  Stream^ stream;
  if(!sketch->saved)
  {
    String^ message = L"The current sketch is not saved.
Save the current sketch?";
    String^ caption = L"Sketch Not Saved";
    MessageBoxButtons buttons = MessageBoxButtons::YesNo;

    // Displays the MessageBox to warn about unsaved sketch
    if (MessageBox::Show(this, message, caption, buttons) ==
                                          System::Windows::Forms::DialogResult::Yes)
    {
      SaveSketch();
    }
  }

  // Now open a new sketch
  if(openFileDialog->ShowDialog() == System::Windows::Forms::DialogResult::OK)
  {
    stream = openFileDialog->OpenFile();
    if(stream != nullptr)
    {
      sketch = safe_cast<Sketch^>(formatter->Deserialize(stream));
      stream->Close();
      sketch->saved = true;
      sketchFilePath = openFileDialog->FileName;
      Invalidate();
    }
  }
}
If the saved member of the current Sketch object is false, the current sketch has not been saved. Therefore, you display a message box offering the user the opportunity to save the current sketch. This version of the Show() function in the MessageBox class accepts four arguments: a reference to the current window, the message to be displayed, the caption for the message box, and a MessageBoxButtons value that determines the buttons to be included in the message box. MessageBoxButtons is an enumeration that includes the members OK, OKCancel, AbortRetryIgnore, YesNoCancel, YesNo, and RetryCancel. If the value returned from the Show() function in the MessageBox class corresponds to the Yes button being clicked, you call the SaveSketch() function to allow it to save the sketch.
The OpenFileDialog class provides an OpenFile() function that returns a reference to the stream encapsulating the file selected in the dialog. You deserialize the sketch from the file by calling the Deserialize() function for the formatter object, and close the stream. The sketch is obviously in a file, so you set the saved member of the sketch to true. You store the file name in sketchFilePath for use by subsequent save operations, and call Invalidate() to get the form repainted to display the sketch you have just loaded.
The File
private: System::Void newToolStripMenuItem_Click(
                                    System::Object^  sender, System::EventArgs^  e)
{
  SaveSketchCheck();
  sketch = gcnew Sketch();
  sketchFilePath = nullptr;
  Invalidate();
  Update();
}
The implementation is very simple. You call SaveSketchCheck() to check whether the current sketch needs to be saved and provide the opportunity for the user to do so. You then create a new Sketch object, rest the sketchFilePath member, and redraw the client area by calling Invalidate(), then Update().
Add SaveSketchCheck() as a private member of the Form1 class and implement it like this:
void SaveSketchCheck()
{
  if(!sketch->saved)
  {
    String^ message = L"The current sketch is not saved.
Save the current sketch?";
    String^ caption = L"Sketch Not Saved";
    MessageBoxButtons buttons = MessageBoxButtons::YesNo;

    // Displays the MessageBox to warn about unsaved sketch
    if ( MessageBox::Show(this, message, caption, buttons) ==
                                        System::Windows::Forms::DialogResult::Yes)
    {
      SaveSketch();
    }
  }
}At the moment, you can close the application by clicking on the close icon in the top-right corner of the form. This will close the application and lose the current sketch, if there is one. You really want to provide the possibility of saving the sketch before the application shuts down. Add a FormClosing event handler for the form by displaying the Property window for the form and double-clicking the FormClosing event. You can implement the event handler like this:
private: System::Void Form1_FormClosing(
     System::Object^  sender, System::Windows::Forms::FormClosingEventArgs^  e)
{
  SaveSketchCheck();
}
You just call SaveSketchCheck() to provide for the sketch being saved when necessary. That's all there is to it.
The toolbar buttons for saving and opening files and creating a new sketch do nothing at the moment. However, to make them work is trivial. All you have to do is to select the Click event handler for the File menu item corresponding to a button as the event handler for the button.
You now have a version of CLR Sketcher with saving and retrieving sketches fully operational.
You have a head start on printing a sketch because the Toolbox provides five components that support printing operations, including a page setup dialog and print and print preview dialogs. To print a sketch, you create an instance of the PrintDocument component, implement a PrintPage event handler for the PrintDocument, and call the Print function for the PrintDocument object to actually print the sketch. Of course, you also need to create Click event handlers for the menu items that are involved and display a few dialogs along the way, but let's start with the PrintDocument component.
Drag a PrintDocument component from the Toolbox window to the form in the Design window. This adds a PrintDocument member to the Form1 class. If you display the Properties window for the PrintDocument object, you can change the value of its (name) property to printDocument. Click the Events button and double-click the PrintPage event to create a handler for it. The PrintPageEventArgs^ parameter has a Graphics property that supplies a Graphics object that you can use to draw the sketch ready for printing, like this:
private: System::Void printDocument_PrintPage(
        System::Object^  sender, System::Drawing::Printing::PrintPageEventArgs^  e)
{
  sketch->Draw(e->Graphics);
}You need a print dialog to allow the user to select the printer and initiate printing, so drag a PrintDialog component from the Toolbox window to the form and change the (name) property value to printDialog. To associate the printDocument object with the dialog, select printDocument as the value of the Document property for the dialog from the drop-down list in the value column. Add a Click event handler for the File
private: System::Void printToolStripMenuItem_Click(
                                    System::Object^  sender, System::EventArgs^  e)
{
  if(printDialog->ShowDialog() == System::Windows::Forms::DialogResult::OK)
    printDocument->Print();
}
You display the dialog and, if the value returned from ShowDialog() is DialogResult::OK, you call the Print() function for the printDocument object to print the sketch. That's it! You added two lines of code here plus one line of code in the PrintPage event handler, and a basic printing capability for sketches is working.
Displaying the print dialog allows the user to choose the printer and change preferences for the print job before printing starts. Of course, you don't have to display the dialog to print the sketch. If you wanted to print the sketch immediately without displaying the dialog, you could just call the Print() function for the PrintDocument object.
In this chapter, you have implemented the capability to store a document on disk in a form that allows you to read it back and reconstruct its constituent objects using the serialization processes supported by MFC and the CLR. You have also implemented the capability to print sketches in the native C++ and C++/CLI versions of the Sketcher application. If you are comfortable with how serialization and printing work in the two versions of Sketcher, you should have little difficulty with implementing serialization and printing in any MFC or Windows Forms application.
WHAT YOU LEARNED IN THIS CHAPTER
TOPIC | CONCEPT |
|---|---|
Serialization | Serialization is the process of transferring objects to a file. Deserialization reconstructs object from data in a file. |
MFC Serialization | To serialize objects in an MFC application, you must identify the class as serializable. To do this you use the |
Serializable classes in an MFC application. | For a class to be serializable in an MFC application, it must have |
C++/CLI Serialization | To identify a C++/CLI class as serializable you must mark in with the Serialiable attribute. |
Serializing C++/CLI classes | For a class to be serializable in a C++/CLI application, you must:
|
Printing with the MFC | To provide the ability to print a document in an MFC application, you must implement your versions of the |
The | A |
Printing in a C++/CLI application | To implement printing in a Windows Forms application, add a |
Implementing the printing user-interface in a C++/CLI application | To implement the printing UI in a Windows Forms application, add a |