WHAT YOU WILL LEARN IN THIS CHAPTER
DLLs and how they work
When you should consider implementing a DLL
What varieties of DLLs are possible and what they are used for
How to extend MFC using a DLL
How to define what is accessible in a DLL
How to access the contents of a DLL in your programs
Chapter 9 discussed how a C++/CLI class library is stored in a .dll file. Dynamic link libraries (DLLs) are also used extensively with native C++ applications. A complete discussion of DLLs in native C++ applications is outside the scope of a beginner's book, but they are important enough to justify including an introductory chapter on them.
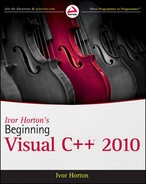
Almost all programming languages support libraries of standard code modules for commonly used elements such as functions. In native C++, you've been using lots of functions that are stored in standard libraries, such as the ceil() function that you used in the previous chapter, which is declared in the cmath header. The code for this function is stored in a library file with the extension .lib, and when the executable module for the Sketcher program was created, the linker retrieved the code for this standard function from the library file and integrated a copy of it into the .exe file for the Sketcher program. If you write another program and use the same function, it will also have its own copy of the ceil() function. The ceil() function is statically linked to each application and is an integral part of each executable module, as illustrated in Figure 20-1.
Although this is a very convenient way of using a standard function with minimal effort on your part, it does have its disadvantages as a way for several concurrently executing programs to make use of the same function in the Windows environment. A statically linked standard function being used by more than one program concurrently is duplicated in memory for each program using it. This may not seem to matter much for the ceil() function, but some functions — input and output, for instance — are invariably common to most programs and are likely to occupy sizable chunks of memory. Having these statically linked would be extremely inefficient.
Another consideration is that a standard function from a static library may be linked into hundreds of programs in your system, so identical copies of the code for them will be occupying disk space in the .exe file for each program. For these reasons, an additional library facility is supported by Windows for standard functions. It's called a dynamic link library, and it's usually abbreviated to DLL. This allows one copy of a function to be shared among several concurrently executing programs and avoids the need to incorporate a copy of the code for a library function into the executable module for a program that uses it.
A dynamic link library is a file containing a collection of modules that can be used by any number of different programs. The file for a DLL usually has the extension .dll, but this isn't obligatory. When naming a DLL, you can assign any extension you like, but this can affect how it's handled by Windows. Windows automatically loads dynamic link libraries that have the extension .dll. If they have some other extension, you will need to load them explicitly by adding code to do this to your program. Windows itself uses the extension .exe for some of its DLLs. You have likely seen the extensions .vbx (Visual Basic Extension) and .ocx (OLE Custom Extension), which are applied to DLLs containing specific kinds of controls.
You might imagine that you have a choice about whether or not you use dynamic link libraries in your program, but you don't. The Win32 API is used by every Windows program, and the API is implemented in a set of DLLs. DLLs are fundamental to Windows programming.
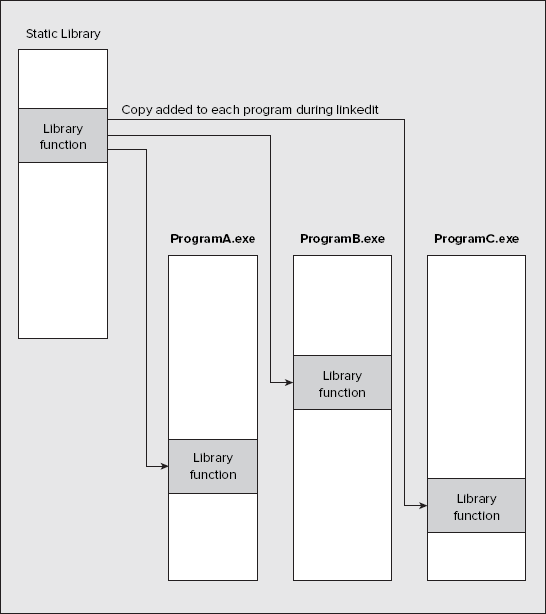
Connecting a function in a DLL to a program is different from the process used with a statically linked library, where the code is incorporated once and for all when the program is linked to generate the executable module. A function in a DLL is connected only to a program that uses it when the application is run, and this is done each time the program is executed, as Figure 20-2 illustrates.
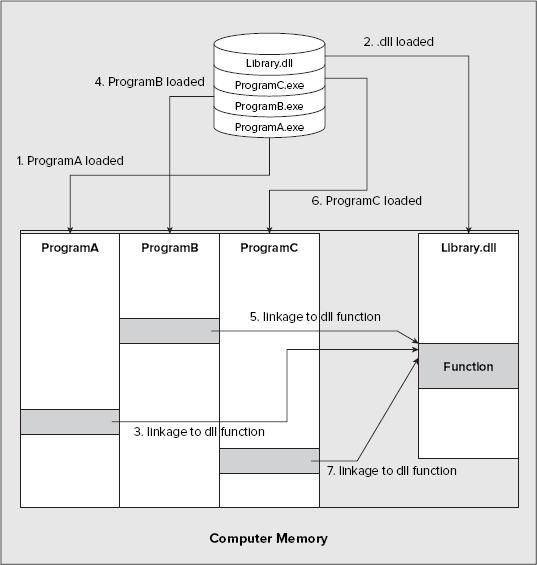
Figure 20-2 shows the sequence of events when three programs that use a function in a DLL are started successively and then all execute concurrently. No code from the DLL is included in the executable module of any of the programs. When one of the programs is executed, the program is loaded into memory, and if the DLL it uses isn't already present, it, too, is loaded separately. The appropriate links between the program and the DLL are then established. If, when a program is loaded, the DLL is already there, all that needs to be done is to link the program to the required function in the DLL.
Note particularly that when your program calls a function or uses a class that is defined in a DLL, Windows will automatically load the DLL into memory. Any program subsequently loaded into memory that uses the same DLL can use any of the capabilities provided by the same copy of the DLL, because Windows recognizes that the library is already in memory and just establishes the links between it and the program. Windows keeps track of how many programs are using each DLL that is resident in memory, so that the library remains in memory as long as at least one program is still using it. When a DLL is no longer used by any executing program, Windows automatically deletes it from memory.
MFC is provided in the form of a number of DLLs that your program can link to dynamically, as well as a library that your program can link to statically. By default, the Application Wizard generates programs that link dynamically to the DLL form of MFC.
Having a function stored in a DLL introduces the possibility of changing the function without affecting the programs that use it. As long as the interface to the function in the DLL remains the same, the programs can use a new version of the function quite happily, without the need for recompiling or relinking them. Unfortunately, this also has a downside: it's easy to end up using the wrong version of a DLL with a program. This can be a particular problem with applications that install DLLs in the Windows System folder. Some commercial applications arbitrarily write the DLLs associated with the program to this folder without regard for the possibility of a DLL with the same name being overwritten. This can interfere with other applications that you have already installed and, in the worst case, can render them inoperable.
Note
DLLs are not the only means of sharing classes or functions among several applications. COM (Component Object Model) objects provide another, more powerful way for you to create reusable software components. Using COM can be quite complicated, but the ATL (Active Template Library), which is a template-based class library, can make COM programming easier. There is quite a lot to learn if you want to use COM and/or ATL; however, both topics are outside the scope of this book.
The DLL that you'll create in this chapter is automatically loaded into memory when the program that uses it is loaded into memory for execution. This is referred to as load-time dynamic linking or early binding, because the links to the functions used are established as soon as the program and DLL have been loaded into memory. This kind of operation was illustrated in Figure 20-2; however, this isn't the only choice available. It's also possible to cause a DLL to be loaded after execution of a program has started. This is called runtime dynamic linking or late binding. The sequence of operations that occurs with late binding is illustrated in Figure 20-3.
Runtime dynamic linking enables a program to defer linking of a DLL until it's certain that the functions in a DLL are required. This enables you to write a program that can choose to load one or more of a number of DLLs based upon input to the program, so that only those functions that are necessary are actually loaded into memory. In some circumstances, this can drastically reduce the amount of memory required to run a program.
A program implemented to use runtime dynamic linking calls the Windows API function LoadLibrary() to load the DLL when it's required. The address of a function within the DLL can then be obtained via the function GetProcAddress(). When the program no longer has a need to use the DLL, it can detach itself from the DLL by calling the FreeLibrary() function. If no other program is using the DLL, it will be deleted from memory. I won't be going into further details of how this works in this book.
A DLL isn't limited to storing code for functions. You can also put other global entities such as classes, global variables, and resources into a DLL, including such things as bitmaps and fonts. The Solitaire game that comes with Windows uses a dynamic link library called Cards.dll, which contains all the bitmap images of the cards and functions to manipulate them. If you wanted to write your own card game, you could conceivably use this DLL as a base and save yourself the trouble of creating all the bitmaps needed to represent the cards. Of course, to use it, you would need to know specifically which functions and resources are included in the DLL.
You can also define static global variables in a DLL, including C++ class objects, so that these can be accessed by programs using it. The constructors for global static class objects are called automatically when such objects are created. You should note that each program using a DLL gets its own copy of any static global objects defined in the DLL, even though they may not necessarily be used by a program. For global class objects, this involves the overhead of calling a constructor for each. You should, therefore, avoid introducing such objects into a DLL unless they are absolutely essential.
You can't access just anything that's contained in a DLL. Only items that have been specifically identified as exported from a DLL are visible to the outside world. Functions, classes, global static variables, and resources can all be exported from a DLL, and those that are make up the interface to it. Anything that isn't exported can't be accessed from the outside. You'll see how to export items from a DLL later in this chapter.
Even though a DLL isn't executable as an independent program, it does contain a special variety of the main() function, called DllMain(). This is called by Windows when the DLL is first loaded into memory to allow the DLL to do any necessary initialization before its contents are used. Windows will also call DllMain() just before it removes the DLL from memory to enable the DLL to clean up after itself if necessary. There are also other circumstances in which DllMain() is called, but these situations are outside the scope of this book.
There are three different kinds of DLL that you can build with Visual C++ 2010 using MFC: an MFC extension DLL, a regular DLL with MFC statically linked, and a regular DLL with MFC dynamically linked.
You build this kind of DLL whenever it's going to include classes derived from the MFC. Your derived classes in the DLL effectively extend the MFC. The MFC must be accessible in the environment in which your DLL is used, so all the MFC classes are available together with your derived classes — hence the name "MFC extension DLL." However, to derive your own classes from the MFC isn't the only reason to use an MFC extension DLL. If you're writing a DLL that includes functions that pass pointers to MFC class objects to functions in a program using it, or that receive such pointers from functions in the program, you must create it as an MFC extension DLL.
Accesses to classes in the MFC by an extension DLL are always resolved dynamically by a link to the shared version of MFC that is itself implemented in DLLs. An extension DLL is created with the shared DLL version of the MFC, so when you use an extension DLL, the shared version of MFC must be available. An MFC extension DLL can be used by a normal Application Wizard–generated application. It requires the option Use MFC in a Shared DLL to be selected under the General set of properties for the project, which you access through the Project
This is a DLL that uses MFC classes linked statically. Use of the DLL doesn't require MFC to be available in the environment in which it is used, because the code for all the classes it uses is incorporated into the DLL. This bulks up the size of the DLL, but the big advantage is that this kind of DLL can be used by any Win32 program, regardless of whether or not it uses MFC.
This is a DLL that uses dynamically linked classes from MFC but doesn't add classes of its own. This kind of DLL can be used by any Win32 program, regardless of whether it uses MFC itself; however, use of the DLL does require the MFC to be available in the environment.
You can use the Application Wizard to build all three types of DLL that use MFC. You can also create a project for a DLL that doesn't involve MFC at all, by creating a Win32 project type using the Win32 Project template and selecting DLL in the application settings for the project.
How do you decide when you should use a DLL? In most cases, the use of a DLL provides a solution to a particular kind of programming problem, so if you have the problem, a DLL can be the answer. The common denominator is often sharing code among a number of programs, but there are other instances in which a DLL provides advantages. The kinds of circumstances in which putting code or resources in a DLL is a very convenient and efficient approach include the following:
You have a set of functions or resources on which you want to standardize and that you will use in several different programs. The DLL is a particularly good solution for managing these, especially if some of the programs using your standard facilities are likely to be executing concurrently.
You have a complex application that involves several programs and a lot of code, but that has sets of functions or resources that may be shared among several of the programs in the application. Using a DLL for common functionality or common resources enables you to manage and develop these with a great deal of independence from the program modules that use them, and can simplify program maintenance.
You have developed a set of standard application-oriented classes derived from MFC that you anticipate using in several programs. By packaging the implementation of these classes in an extension DLL, you can make using them in several programs very straightforward, and, in the process, provide the possibility of being able to improve the internals of the classes without affecting the applications that use them.
You have developed a brilliant set of functions that provide an easy-to-use but amazingly powerful toolkit for an application area that just about everybody wants to dabble in. You can readily package your functions in a regular DLL and distribute them in this form.
There are also other circumstances in which you may choose to use DLLs, such as when you want to be able to dynamically load and unload libraries, or to select different modules at run time. You could even use them to make the development and updating of your applications easier generally.
The best way of understanding how to use a DLL is to create one and try it out. Let's do that now.
This section examines two aspects of writing a DLL: how you actually write a DLL, and how you define what's to be accessible in the DLL to programs that use it. As a practical example of writing a DLL, you'll create an extension DLL to add a set of application classes to the MFC. You'll then extend this DLL by adding variables available to programs using it.
You can create an MFC extension DLL to contain the shape classes for the Sketcher application. Although this will not bring any major advantages to the program, it demonstrates how you can write an extension DLL without involving yourself in the overhead of entering a lot of new code.
The starting point is the Application Wizard, so create a new project by pressing Ctrl+Shift+N and choosing the project type as MFC and the template as MFC DLL.
This selection identifies that you are creating a project for an MFC-based DLL with the name ExtDLLExample. Click the OK button and select Application Settings in the next window displayed. The window looks as shown in Figure 20-4.
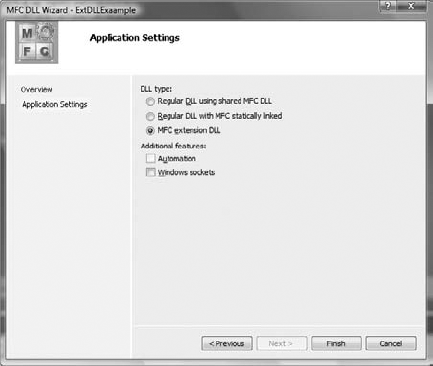
Here, you can see three radio buttons corresponding to the three types of MFC-based DLL that I discussed earlier. You should choose the third option, as shown in the figure.
The two checkboxes below the first group of three radio buttons enable you to include code to support Automation and Windows sockets in the DLL. These are both advanced capabilities within a Windows program, so you don't need either of them here. Automation provides the potential for hosting objects created and managed by one application inside another. Windows sockets provide classes and functionality to enable your program to communicate over a network, but you won't be getting into this as it's beyond the scope of the book. You can click the Finish button and complete creation of the project.
Now that the MFC DLL wizard has done its stuff, you can look into the code that has been generated on your behalf. If you look at the contents of the project in the Solution Explorer pane, you'll see that the MFC DLL wizard has generated several files, including a .txt file that contains a description of the other files. You can read what they're all for in the .txt file, but the two shown in the following table are the ones of immediate interest.
FILE NAME | CONTENTS |
|---|---|
| This contains the function |
| The information in this file is used during compilation. It contains the name of the DLL, and you can also add to it the definitions of those items in the DLL that are to be accessible to a program using the DLL. You'll use an alternative and somewhat easier way of identifying such items in the example. |
When your DLL is loaded, the first thing that happens is that DllMain() is executed, so perhaps you should take a look at that first.
If you look at the contents of dllmain.cpp, you will see that the MFC DLL wizard has generated a version of DllMain() for you, as shown here:
extern "C" int APIENTRY
DllMain(HINSTANCE hInstance, DWORD dwReason, LPVOID lpReserved)
{
   // Remove this if you use lpReserved
   UNREFERENCED_PARAMETER(lpReserved);

   if (dwReason == DLL_PROCESS_ATTACH)
   {
      TRACE0("EXTDLLEXAMPLE.DLL Initializing!
");

      // Extension DLL one-time initialization
      if (!AfxInitExtensionModule(ExtDLLExampleDLL, hInstance))
         return 0;
// Insert this DLL into the resource chain
// NOTE: If this Extension DLL is being implicitly linked to by
// an MFC Regular DLL (such as an ActiveX Control)
// instead of an MFC application, then you will want to
// remove this line from DllMain and put it in a separate
// function exported from this Extension DLL. The Regular DLL
// that uses this Extension DLL should then explicitly call that
// function to initialize this Extension DLL. Otherwise,
// the CDynLinkLibrary object will not be attached to the
// Regular DLL's resource chain, and serious problems will
// result.
new CDynLinkLibrary(ExtDLLExampleDLL);
}
else if (dwReason == DLL_PROCESS_DETACH)
{
TRACE0("EXTDLLEXAMPLE.DLL Terminating!
");
// Terminate the library before destructors are called
AfxTermExtensionModule(ExtDLLExampleDLL);
}
return 1; // ok
}There are three arguments passed to DllMain() when it is called. The first argument, hInstance, is a handle that has been created by Windows to identify the DLL. Every task under Windows has an instance handle that identifies it uniquely. The second argument, dwReason, indicates the reason why DllMain() is being called. You can see this argument being tested in the if statements in DllMain(). The first if tests for the value DLL_PROCESS_ATTACH, which indicates that a program is about to use the DLL, and the second if tests for the value DLL_PROCESS_DETACH, which indicates that a program has finished using the DLL. The third argument is a pointer that's reserved for use by Windows, so you can ignore it.
When the DLL is first used by a program, it's loaded into memory, and the DllMain() function is executed with the argument dwReason set to DLL_PROCESS_ATTACH. This results in the Windows API function AfxInitExtensionModule() being called to initialize the DLL and an object of the class CDynLinkLibrary created on the heap. Windows uses objects of this class to manage extension DLLs. If you need to add initialization of your own, you can add it to the end of this block. Any cleanup you require for your DLL can be added to the block for the second if statement.
You will use the DLL to contain the implementation of the Sketcher shape classes. Move the files Elements.h and Elements.cpp from the folder containing the source for Sketcher to the folder containing the DLL. Be sure that you move rather than copy the files. Because the DLL is going to supply the shape classes for Sketcher, you don't want to leave them in the source code for Sketcher.
You'll also need to remove Elements.cpp from the Sketcher project once you have copied it to the DLL project. To do this, open the Sketcher project, highlight Elements.cpp in the Solution Explorer pane by clicking the file, and then press Delete. If you don't do this, the compiler complains that it can't find the file when you try to compile the project. Follow the same procedure to get rid of Elements.h from the Header Files folder in the Solution Explorer pane.
You now need to add Elements.h and Elements.cpp to the extension DLL project, so open the ExtDLLExample project, select the menu option Project
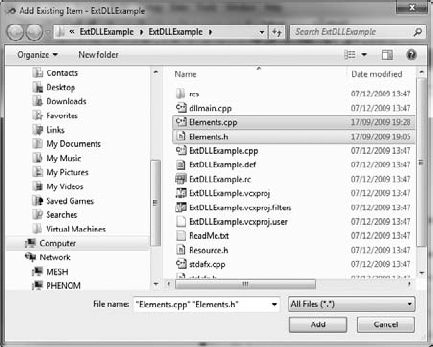
You can add multiple files in a single step by holding down the control key while you select from the list of files in the Add Existing Item dialog box. You should eventually see the files you have added in the Solution Explorer pane and all the shape classes displayed in the Class View pane for the project.
The shape classes use the constants VERSION_NUMBER and SELECT_COLOR that you have defined in the file SketcherConstants.h, so copy the definitions for these from the SketcherConstants.h file in the Sketcher project folder to the Elements.cpp file in the folder containing the DLL; you can place them immediately after the #include directives. Note that the VERSION_NUMBER and SELECT_COLOR variables are used exclusively by the shape classes, so you can delete them from the SketcherConstants.h file used in the Sketcher program or just comment them out.
The collection of entities in a DLL that can be accessed by a program that is using it is referred to as the interface to the DLL. The process of making an object part of the interface to a DLL is referred to as exporting the object, and the process of accessing an object that is exported from a DLL is described as importing the object.
The names of the classes defined in the DLL that are to be accessible in programs that use it must be identified in some way so that the appropriate links can be established between a program and the DLL. As you saw earlier, one way of doing this is by adding information to the .def file for the DLL. This involves adding what are called decorated names to the DLL and associating each decorated name with a unique identifying numeric value called an ordinal. A decorated name for an object is a name generated by the compiler, which adds an additional string to the name you gave to the object. This additional string provides information about the type of the object or, in the case of a function (for example), information about the types of the parameters to the function. Among other things, it ensures that everything has a unique identifier and enables the linker to distinguish overloaded functions from each other.
Obtaining decorated names and assigning ordinals to export items from a DLL is a lot of work and isn't the best or the easiest approach. A much easier way to identify the classes that you want to export from the DLL is to modify the class definitions in Elements.h to include the MFC macro AFX_EXT_CLASS before each class name, as shown in the following for the CLine class:
// Class defining a line object
class AFX_EXT_CLASS CLine: public CElement
{
  // Details of the class definition as before...
};
The AFX_EXT_CLASS macro indicates that the class is to be exported from the DLL. This has the effect of making the complete class available to any program using the DLL and automatically allows access to any of the data and functions in the public interface of the class.
AFX_EXT_CLASS is defined as __declspec(dllexport) when it appears within an extension DLL and __declspec(dllimport) otherwise. This means that you can use the same macro for exporting entities from a DLL and importing entities into an application. However, the dllexport and dllimport attributes provide a more general mechanism for exporting and importing entities in a DLL that you can use regardless of whether or not your DLL is an MFC extension, so I will use these in the example, rather than AFX_EXT_CLASS, which is available only with MFC.
Here's how you can use __declspec(dllexport) to export the CLine class from the DLL:
// Macro to make the code more readable#define SKETCHER_API __declspec(dllexport)// Class defining a line objectclass SKETCHER_API CLine: public CElement{ // Details of the class definition as before... };
You need to add SKETCHER_API to all the other shape classes, including the base class CElement, in exactly the way as with the CLine class. Why is it necessary to export CElement from the DLL? After all, programs create only objects of the classes derived from CElement, and not objects of the class CElement itself. One reason is that you have declared public members of CElement that form part of the interface to the derived shape classes, and that are almost certainly going to be required by programs using the DLL. If you don't export the CElement class, functions such as GetBoundRect()will not be available. Another reason is that you create variables of type CElement or CElement* in Sketcher, so you need the class definition available for such a definition to compile.
You have done everything necessary to add the shape classes to the DLL. All that remains is for you to compile and link the project to create the DLL.
You build the DLL in exactly the same way that you build any other project — by using the Build
Note
If you find the DLL build fails because Elements.cpp contains an #include directive for Sketcher.h, just remove it. On my system, the Class Wizard added the #include directive for Sketcher.h when creating the code for the CElement class, but it is not required.
You now have no information in the Sketcher program on the shape classes because you moved the files containing the class definitions and implementations to the DLL project. However, the compiler still must know where the shape classes are coming from in order to compile the code for the Sketcher program. The Sketcher application needs to include a header file that defines the classes that are to be imported from the DLL. It must also identify the classes as external to the project by using the __declspec(dllimport) qualification for the class names in the class definitions.
An easy way to do this is to modify the file Elements.h in the DLL project so that it can be used in the Sketcher project as well. What you need is for the class definitions in Elements.h to be qualified with __declspec(dllexport) when they are in the DLL project and qualified with __declspec(dllimport) when they are in the Sketcher project. You can achieve this by replacing the #define macro for the SKETCHER_API symbol in Elements.h with the following:
#ifdef ELEMENT_EXPORTS
#define SKETCHER_API   __declspec(dllexport)
#else
#define SKETCHER_API   __declspec(dllimport)
#endif
If the symbol ELEMENT_EXPORTS is defined, then SKETCHER_API will be replaced by __declspec(dllexport); otherwise, it will be replaced by __declspec(dllimport). ELEMENT_EXPORTS is not defined in Sketcher, so using the header in Sketcher will do what you want. All you need is to define ELEMENT_EXPORTS in the ExtDLLExample project. You can do this by adding the following to the stdafx.h header in the DLL project, immediately following the #pragma once directive:
#define ELEMENT_EXPORTS
Now you can rebuild the DLL project.
Now that you have copied the new version of the Elements.h file to the project, you should add it back into the project by right-clicking the Header Files folder in the Solution Explorer pane and selecting Add
When you rebuild the Sketcher application, the linker needs to have the ExtDLLExample.lib file identified as a dependency for the project, because this file contains information about the contents of the DLL. Right-click Sketcher in the Solution Explorer pane and select Properties from the pop-up. You can then expand the Linker folder and select Input in the left pane of the Properties window. Then enter the name of the .lib file as an additional dependency, as shown in Figure 20-6.

Figure 20-6 shows the entry for the debug version of Sketcher. The .lib file for the DLL is in the Debug folder within the DLL project folder. If you create a release version of Sketcher, you'll also need the release version of the DLL available to the linker and its .lib file, so you'll have to enter the fully qualified name of the .lib file for the release version of the DLL, corresponding to the release version of Sketcher. The file to which the properties apply is selected in the Configuration drop-down list box in the Properties window. You have only one external dependency, but you can enter several when necessary by clicking the button to the right of the text box for input. Because the full path to the .lib file has been entered here, the linker will know not only that ExtDLLExample.lib is an external dependency, but also where it is.
For the Sketcher application to compile and link correctly, the .lib file for the DLL must be available to the application. When you execute Sketcher, the .dll file is required. To enable Windows to find and load a DLL for a program when it executes, it's usual to place the DLL in your Windows System32 folder. If it's not in this folder, Windows searches the folder containing the executable (Sketcher.exe in this case). If it isn't there, you'll get an error message. To avoid cluttering up your System32 folder unnecessarily, you can copy ExtDllExample.dll from the Debug folder of the DLL project to the Debug folder for Sketcher. If you now build the Sketcher application once more, you'll find there is a problem. In particular, the Serialize() member of CSketcherDoc causes a LNK2001 linker error. The problem is with the operator>>() member of the CArchive class. There is a version of this function defined in the CArchive class that supports type CObject, and, in the original version of Sketcher, the compiler was happy to use this to deserialize CElement objects before storing them in the list container. With the CElement class now imported from a DLL, this no longer works. However, you can get around this quite easily. You can change the code in the Serialize() function that reads shape objects to the following:
size_t elementCount(0);            // Count of number of elements
    CObject* pElement(nullptr);        // Element pointer
    ar >> elementCount;                // retrieve the element count
    // Now retrieve all the elements and store in the list
    for(size_t i = 0 ; i < elementCount ; ++i)
    {
      ar >> pElement;
      m_ElementList.push_back(static_cast<CElement*>(pElement));
    }
Now, you store the address of the shape object that is to be deserialized as type CObject*. You then cast this to type CElement* before storing it in the list. With these changes, the Serialize() function will compile and work as before. Sketcher should now execute exactly as before, except that now it uses the shape classes in the DLL you have created.
From what you have just seen in the context of using the DLL you created in the Sketcher program, you can conclude that three files must be available to use a DLL in a program, as shown in the following table.
EXTENSION | CONTENTS |
|---|---|
| Defines those items that are exported from a DLL and enables the compiler to deal properly with references to such items in the source code of a program using the DLL. The |
| Defines the items exported by a DLL in a form, which enables the linker to deal with references to exported items when linking a program that uses a DLL. |
| Contains the executable code for the DLL, which is loaded by Windows when a program using the DLL is executed. |
If you plan to distribute program code in the form of a DLL for use by other programmers, you need to distribute all three files in the package. For applications that already use the DLL, only the .dll file is required to go along with the .exe file that uses it.
In this chapter, you've learned the basics of how to construct and use a DLL.
WHAT YOU LEARNED IN THIS CHAPTER
TOPIC | CONCEPT |
|---|---|
Dynamic link libraries | Dynamic link libraries provide a means of linking to standard functions dynamically when a program executes, rather than incorporating them into the executable module for a program. |
MFC DLLs | An Application Wizard–generated program links to a version of MFC stored in DLLs by default. |
Using DLLs | A single copy of a DLL in memory can be used by several programs executing concurrently. |
Extension DLLs | An extension DLL is so called because it extends the set of classes in MFC. An extension DLL must be used if you want to export MFC-based classes or objects of MFC classes from a DLL. An extension DLL can also export ordinary functions and global variables. |
Regular DLLs | A regular DLL can be used if you want to export only ordinary functions or global variables that aren't instances of MFC classes. |
Exporting classes from a DLL | You can export classes from an extension DLL by using the keyword |
Importing classes from a DLL | Using the |