
Browsing for cool apps
Searching for specific apps
Getting applications onto your iPhone
Managing iPhone apps
Updating apps to make them better
Voicing your opinion on apps
Reporting issues with recalcitrant iPhone apps
One of the best things about the iPhone these days is that you can download and install applications created by third parties, which is to say not created by Apple (the first party) or you (the second party). At the time of this writing, more than 85,000 applications are available and well over 1,000,000,000 (yes, a billion) apps have been downloaded. Some apps are free, other apps cost money; some apps are useful, other apps are lame; some apps are perfectly well-behaved, other apps quit unexpectedly (or worse). The point is that a lot of apps are out there and that some are better than others.
In this chapter, we take a broad look at iPhone apps. Don't worry: We have plenty to say about specific apps in Chapters 16 and 17.

You can obtain and install applications for your iPhone in two ways:
On your computer
On your iPhone
To use the App Store on your iPhone, it must be connected to the Internet. And, if you obtain an app on your computer, it isn't available on your iPhone until you sync it with your computer.
But before you can use the App Store on your iPhone or your computer, you first need an iTunes Store account. If you don't already have one, we suggest that you launch iTunes on your computer and click Sign In near the upper-right corner of the iTunes window and then click Create New Account and follow the on-screen instructions. Or, if you prefer to create your account on your iPhone rather than on your computer, follow the instructions near the end of Chapter 7.
Note
Let's put it this way: If you don't have an iTunes Store account, you can't download a single cool app for your iPhone. 'Nuff said.
Okay, start by finding cool iPhone applications using iTunes on your computer. Follow these steps:
Launch iTunes.
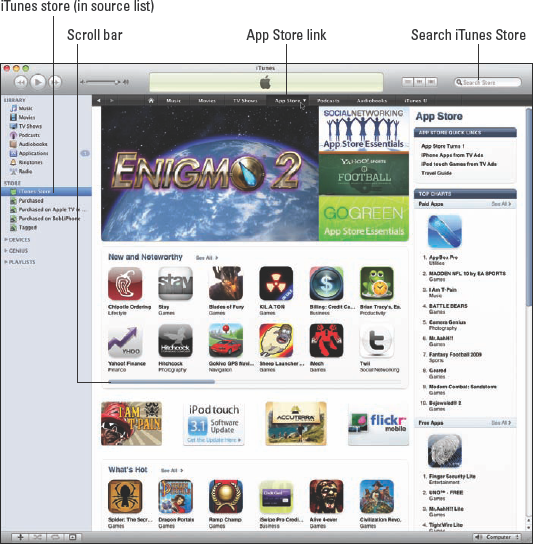
Click the iTunes Store in the source list on the left.
Click the App Store link.

After you have the iTunes App Store on your screen, you have a couple of options for exploring its virtual aisles. Allow us to introduce you to the various "departments" available from the main screen.
The main departments are featured in the middle of the screen, and ancillary departments appear on either side of them. We start with the ones in the middle:
Tip
The New and Noteworthy department has twelve visibleicons (Chipotle Ordering to Twill in Figure 14-1) representing apps that are — what else? — new and noteworthy.
Only 12 icons are visible, but the New and Noteworthy department actually has more than that. Look to the right of the words New and Noteworthy. See the words See All? That's a link; if you click it you'll see all apps in this department on a single screen. Or you can click and drag the scroll bar to the right to see more icons.
The What's Hot department actually displays 12 icons, though you can see only six of them (Spider to Civilization in Figure 14-1) representing apps that are popular with other iPhone users.
The Staff Favorites department, which appears below the What's Hot department, which is not visible in Figure 14-1.
Warning
Apple has a habit of redecorating the iTunes Stores every so often, so allow us to apologize in advance if things aren't exactly as described here.
You also see display ads for six featured apps between the New and Noteworthy department and the What's Hot department (I Am T Pain to Flickr Mobile in Figure 14-1).
Three other departments appear to the right of the main ones: Top Paid Apps, one of our favorite departments, Top Free Apps. A third department, Top Grossing Apps, is not visible in Figure 14-1. The number-one app in each department displays both its icon and its name; the next nine apps show text links only.
Finally, the App Store link near the top of the screen is also a drop-down menu (as are most of the other department links to its left and right). If you press and hold on most of these department links, a menu with a list of the department's categories appears. For example, if you press and hold on the App Store link, you can choose specific categories such as Books, Entertainment, and others from the drop-down menu, allowing you to bypass the App Store home page and go directly to that category.
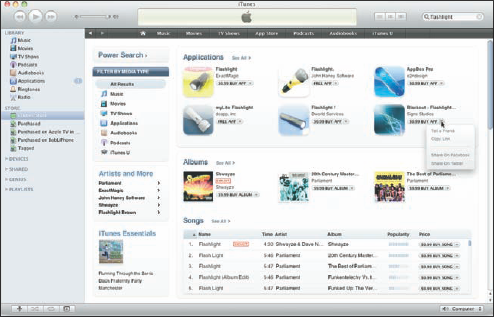
Browsing the screen is helpful, but if you know exactly what you're looking for, we have good news and bad news. The good news is that there's a faster way: Just type a word or phrase into the Search iTunes Store field in the upper-right corner of the main iTunes window, as shown in Figure 14-2, and then press Enter or Return to initiate the search.
The bad news is that you have to search the entire iTunes Store, which includes music, television shows, movies, and other stuff in addition to iPhone apps.
Ah, but we have more good news: Your search results are segregated into categories — one of which is Applications (see Figure 14-2). And, here's even more good news: If you click the See All link to the right of the word Applications, all iPhone applications that match your search word or phrase appear.
Tip
The little triangle to the right of each item's price is another drop-down menu (shown for the Blackout Flashlight app in Figure 14-2). This one lets you send an e-mail to a friend with a link to this product, copy the link to this product to the Clipboard so you can paste it elsewhere, or share this item on Facebook or Twitter.
Now that you know how to find apps in the App Store, this section delves a little deeper and shows you how to find out more about an application that interests you.
To find out more about an application icon, a featured app, or a text link on any of the iTunes App Store screens, just click it. A detail screen like the one shown in Figure 14-3 appears.
This screen should tell you most of what you need to know about the application, such as basic product information and a narrative description, what's new in this version, the language it's presented in, and the system requirements to run the app.
Tip
Bear in mind that the application description on this screen was written by the application's developer and may be somewhat biased. Never fear, gentle reader: In the next section, we show you how to find reviews of the application — written by people who have used it.
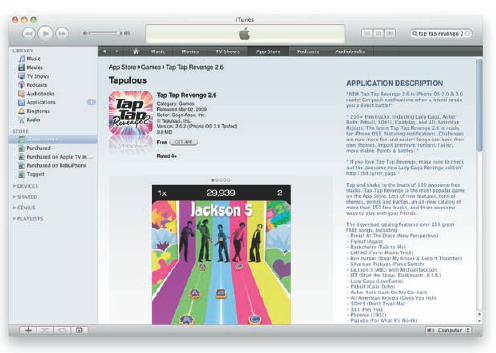
Figure 14-3. The detail screen for Tap Tap Revenge, a nifty little free game (similar to Guitar Hero) for your iPhone.
Notice that this application is rated 4+, as you can see below the Get App button, near the top of the screen shown in Figure 14-3. The rating means that this app contains no objectionable material. Here are the other possible ratings:
9+: May contain mild or infrequent occurrences of cartoon, fantasy, or realistic violence; or infrequent or mild mature, suggestive, or horror-themed content that may not be suitable for children under the age of 9.
12+: May contain infrequent mild language; frequent or intense cartoon, fantasy, or realistic violence; mild or infrequent mature or suggestive themes; or simulated gambling that may not be suitable for children under the age of 12.
17+: May contain frequent and intense offensive language; frequent and intense cartoon, fantasy, or realistic violence; mature, frequent, and intense mature, suggestive, or horror-themed content; sexual content; nudity; depictions of alcohol, tobacco, or drugs that may not be suitable for children under the age of 17. You must be at least 17 years old to purchase games with this rating.
One other feature of the detail pages that's worth mentioning is the collection of useful links below the application description. You can't see them in Figure 14-3, but the links include Tapulous Web Site, Tap Tap Revenge Support, All Applications By Tapulous, Tell a Friend, and others. We urge you to explore these links at your leisure.
If you scroll down the detail screen, near the bottom you find a series of reviews by the app's users. (You can't see these reviews in Figure 14-3.) Each review includes a star rating, from zero to five. If an app is rated four or higher, the application is probably well liked by people who own it.
If you could scroll down the screen shown in Figure 14-3, you'd see that this application has an average rating of 3½ stars based on 49,357 user reviews. You'd also see three or four recent reviews with their star ratings. And, if you care to read even more reviews, you can click the appropriate link below the recent reviews.
This part is simple. When you find an application you want to try, just click its Get App or Buy App button. At that point, you have to log in to your iTunes Store account, even if the application is free.
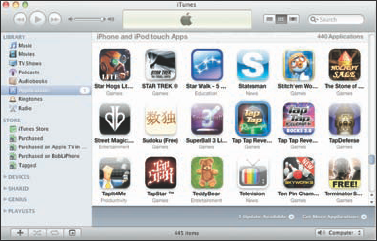
After you log in, the application begins downloading. When it's finished, the app appears in the Applications section of your iTunes Library, as shown in Figure 14-4.
Note
Downloading an application to your iTunes Library is only the first half of getting it onto your iPhone. After you download an app, you have to sync your iPhone before the application will be available on it.
Every so often, the developer of an iPhone application releases an update. Sometimes these updates add new features to the application, sometimes they squash bugs, and sometimes they do both. In any event, updates are usually a good thing for you and your iPhone, so it makes sense to check for them every so often. To do this using iTunes, click the Check for Updates link near the lower-right corner of the Applications screen. Note that if updates are available, as shown in Figure 14-4, the link says 1 Update Available rather than Check for Updates.
Tip
If you click the Get More Applications link next to the Check for Updates link, you find yourself back at the main screen of the iTunes App Store (refer to Figure 14-1).
Finding apps with your iPhone is almost as easy as finding them by using iTunes. The only requirement is that you have an Internet connection of some sort — Wi-Fi or wireless data network — to browse, search, download, and install apps.
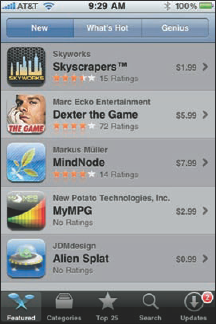
The first three icons at the bottom of the screen — Featured, Categories, and Top 25 — offer three ways to browse the virtual shelves of the App Store.
The Featured section has three tabs at the top of the screen: New (see Figure 14-5), What's Hot, and Genius. These three tabs represent three different pages full of apps. Genius is a new feature and perhaps the most interesting tab of all — it suggests apps you might enjoy based on the apps currently installed on your iPhone.
The Categories section works a little differently: It has no tabs, and its main page contains no apps. Instead, it offers a list of categories such as Games, Entertainment, Utilities, Music, and Lifestyle to name a few. Tap a category to see a page full of apps of that type. Each category's page has three tabs — Top Paid, Top Free, and Release Date — to make your browsing easier.
The Top 25 section works much the same as the Featured section. Its three tabs — Top Paid, Top Free, and Top Grossing — represent pages of the most popular apps that either cost money (paid and top grossing) or don't (free).
Tip
Each page displays roughly 20 to 25 apps, but you see only four or five at a time on the screen. Remember to flick up or down if you want to see the others.
Now that you know how to find apps in the App Store, the following sections show you how to find out more about a particular application.
To learn more about any application on any page, tap it to see a detail screen like the one shown in Figure 14-6.
Tip
Remember that the application description on this screen was written by the developer and may be somewhat blased.
Scroll down to the bottom of any detail screen, and you find a star rating for that application. It's also the link to that application's reviews; tap it to see a page full of them. At the bottom of that page is another link: More Reviews. Tap it to see (what else?) more reviews.
To download an application to your iPhone, tap the price button near the top of its detail screen. In Figure 14-6, it's the blue rectangle that says Free. You may or may not be asked to type your iTunes Store account password before the App Store disappears and the Home screen will reside, appears in its place, where the new application's icon. The new icon is slightly dimmed, with the word Loading beneath it and a blue progress indicator near its bottom, as shown in Figure 14-7.
By the way, if the app happens to be rated 17+, you see a warning screen after you type your password. You have to click the OK button to confirm that you're over 17 before the app downloads.
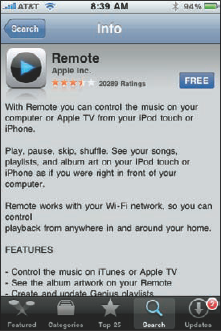
Figure 14-6. Remote, the free application from Apple, lets you control iTunes or AppleTV from your iPhone.
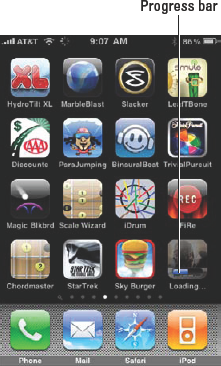
Figure 14-7. This app above the iPod icon is downloading; the blue progress bar indicates that it's half done.
Warning
The application is now on your iPhone, but it isn't copied to your iTunes library on your Mac or PC until your next sync. If your iPhone suddenly loses its memory (unlikely) or if you delete the application from your iPhone before you sync (as described later in this chapter), that application is gone forever. That's the bad news.
Tip
The good news is that after you've paid for an app you can download it again if you need to — from iTunes on your computer or the App Store app on your iPhone — and you don't have to pay for it again.
After you download an app to your iPhone, the next time you sync your phone, the application is transferred to your iTunes Applications library.
Note
If an application is less than 10MB, you can download it directly to the iPhone over the 3G cellular network or Wi-Fi. Larger programs require Wi-Fi or require you to sync up through iTunes on your PC or Mac.
As mentioned earlier in this chapter, every so often the developer of an iPhone application releases an update. If one of these is waiting for you, a little number in a circle appears on the Updates icon at the bottom of the screen. (That number happens to be 2 in Figures 14-5 and 14-6.) Tap the Updates icon if any of your apps needs updating.
If you tap the Updates button and see (in the middle of the screen) a message that says, "All Apps are Up-to-Date," none of the apps on your iPhone requires an update at this time. If apps need updating, they appear with Update buttons next to them. Tap the button to update the application. If more than one application needs updating, you can update them all at once by tapping the Update All button in the upper-right corner of the screen.
Warning
If you try to update an application purchased from any iTunes Store account except your own, you're prompted for that account's ID and password. If you can't provide them, you can't download the update.
That's almost everything you need to know about installing third-party applicationson your iPhone. However, you might find it helpful to know how to delete, review, or report a problem with an app.
You can delete an application in two ways: In iTunes on your computer or directly from your iPhone.
To delete an application in iTunes, click Applications in the source list and then do one of the following:
Click the application's icon to select it and then choose Edit

Right-click (or Control+click on a Mac) the application's icon and choose Delete.
Either way, you see a dialog box asking whether you're sure you want to remove the selected application. If you click the Remove button, the application is removed from your iTunes library, as well as from any iPhone that syncs with your iTunes library.
Here's how to delete an application on your iPhone:
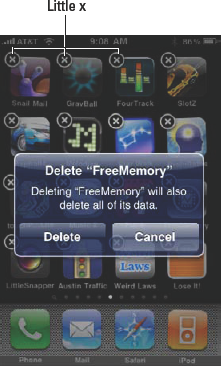
Press and hold any icon until all the icons begin to "wiggle."
Tap the little x in the upper-left corner of the application you want to delete, as shown in Figure 14-8.
A dialog box appears, informing you that deleting this application also deletes all its data.
Tap the Delete button.
Warning
Deleting an app from your iPhone this way doesn't get rid of it permanently. It remains in your iTunes library until you delete it from iTunes, as described earlier in this chapter. Put another way: Even though you deleted the application from your iPhone, it's still in your iTunes library. If you want to get rid of an application for good and for always after you delete it on your iPhone, you must also delete it from your iTunes library.
Sometimes you love or hate an application so much that you want to tell the world about it. In that case, you should write a review. You can do this in two ways: In iTunes on your computer or directly from your iPhone.
To write a review using iTunes, follow these steps:
Navigate to the detail page for the application in the iTunes App Store.
Scroll down the page to the Reviews section and click the Write a Review link.
You may or may not have to type your iTunes store password at this point.
Click the button for the star rating (1 to 5) you want to give the application.
In the Title field, type a title for your review.
In the Review field, type your review.
Click the Continue button when you're finished.
The Preview screen appears. If the review looks good to you, click the Submit button. If you want to add something or edit it, click the Edit button. If you decide not to review the app after all, click the Cancel button.
To write a review from your iPhone, follow these steps:
Tap the App Store icon to launch the App Store.
Navigate to the detail screen for the application.
Scroll down the page to the star rating item and tap it.
Tap the Write a Review button near the top of the Reviews screen.
You may or may not have to type your iTunes store password at this point.
Tap one to five of the dots at the top of the Submit Review screen to rate the application.
In the Review field, type your review.
Tap the Send button in the upper-right corner of the screen.
Whichever way you submit your review, Apple reviews your submission. As long as it doesn't violate the (unpublished) rules of conduct for app reviews, it appears in a day or two in the App Store, in the Reviews section for the particular application.
Every so often, you find an app that's recalcitrant — a dud that doesn't work properly or else crashes, freezes, or otherwise messes up your iPhone. When this happens, you should definitely report the problem so that Apple and the developer know about the problem and (hopefully) can fix it.
If you try to report a problem using iTunes on your computer, you click a number of times, only to end up at a Web page that says, "If you are having issues with your application, report the issue directly to the developer of the app by visiting the developer's website." Don't bother.
You can, however, report a problem from your iPhone. Here's how:
Tap the App Store icon to launch the App Store.
Navigate to the detail screen for the application.
Scroll down the page and tap the Report a Problem button.
You may or may not have to type your iTunes store password at this point.
Tap one of the three buttons to identify the type of problem you're reporting: This Application Has a Bug, This Application Is Offensive, or My Concern Is Not Listed Here.
Type your report in the Comments field.
Tap the Report button in the upper-right corner of the screen to submit the report.
There you have it — you now know everything you need to know to find, install, delete, review, and report problems with iPhone applications!
As Steve Jobs is so fond of saying in his keynotes, there is one last thing: In a few pages (Chapters 16 and 17, to be precise), to kick off the famous Part of Tens, we tell you about 20 of our favorite iPhone apps — 10 free and 10 that cost dough.