
Finding videos
Playing videos on your iPhone
Shooting video
Editing footage
Screening YouTube
Picture this scene: The smell of popcorn permeates the room as you and your family congregate to watch the latest Hollywood blockbuster. A motion picture soundtrack swells up. The images on the screen are stunning. And all eyes are fixed on the iPhone.
Okay, here comes the reality check. The iPhone is not going to replace a wall-sized high-definition television as the centerpiece of your home theater. But we do want to emphasize that with its glorious widescreen 3½-inch display — the best we've seen on a handheld device — watching movies and other videos on the iPhone can be a cinematic delight.

As you'll discover later in this chapter, if you own the iPhone 3GS, you can even shoot your own blockbuster footage. Let's get on with the show!
The video you'll watch on the iPhone generally falls into one of four categories:
Movies, TV shows, and music videos that you've downloaded directly to your iPhone or that reside in iTunes software on your PC or Mac that you synchronize with your iPhone. (For more on synchronization, refer to Chapter 3.) You can watch these by tapping the iPod icon at the bottom of the Home screen and then tapping Videos.
Note
Apple's own iTunes Store features dedicated sections for purchasing episodes of TV shows (from The Larry Sanders Show to Dora the Explorer) and movies (such as Gran Torino or Enchanted). The typical price as of this writing is $1.99 per episode for TV shows and $9.99 to $14.99 for feature films.
You can also rent some movies, typically for $2.99 or $3.99. You'll have 30 days to begin watching a rented flick, and 24 hours to finish once you've started. Such films appear in their own Rented Movies section on the video list, which you get to by tapping iTunes and then Videos. The number of days before your rental expires is displayed.
The boatload of video podcasts, just about all of them free, featured in the iTunes Store. Podcasts started out as another form of Internet radio, although instead of listening to live streams, you downloaded files onto your computer or iPod to take in at your leisure. There are still lots of audio podcasts, but the focus here is on video.
Homegrown videos from the popular YouTube Internet site. Apple obviously thinks highly of YouTube because it devoted a dedicated Home screen icon to the site. More on YouTube's special place in the iPhone later in this chapter.
The movies you've created in iMovie software or other software on the Mac or, for that matter, other programs on the PC. Plus all the other videos you may have downloaded from the Internet.
Note
You may have to prepare these videos so that they'll play on your iPhone. To do so, highlight the video in question after it resides in your iTunes library. Go to the Advanced menu in iTunes, and click Convert Selection for iPod/iPhone.
For more on compatibility, check out the "Are we compatible?" sidebar in this chapter (but read it at your own risk).
Now that you know what you want to watch, here's how to watch it:
On the Home screen, tap the iPod icon and then tap the Videos icon.
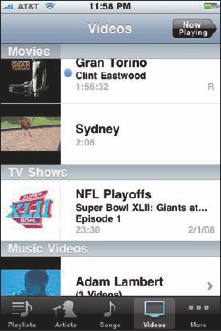
Your list of videos pops up. Videos are segregated by category — Movies, TV Shows, Music Videos, as shown in Figure 8-1 — although other categories such as Rented Movies and Podcasts may also appear. Listings are accompanied by thumbnail images and the length of the video.
Flick your finger to scroll through the list, and then tap the video you want to play.
You may see a spinning circle for just a moment and then the video will begin. We've found that on the truly snappy iPhone 3GS, the video starts playing without such a delay.
Turn the device to its side because the iPhone plays video only in landscape, or widescreen, mode.
For movies, this is a great thing. You can watch flicks as the filmmaker intended, in a cinematic aspect ratio.
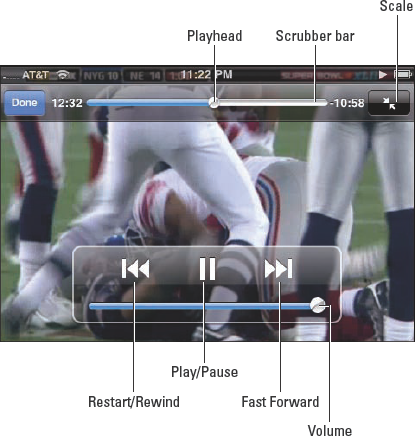
Now that the video is playing, tap the screen to display the controls shown in Figure 8-2.
Tap the controls that follow as needed:
To play or pause the video, tap the Play/Pause button.
Drag the volume slider to the right to raise the volume and to the left to lower it. Alternatively, use the physical Volume buttons to control the audio levels. If the video is oriented properly, the buttons will be to the bottom left of the iPhone.
Tap the Restart/Rewind button to restart the video or tap and hold the same button to rewind.
Tap and hold Fast Forward to advance the video. Or skip ahead by dragging the playhead along the Scrubber bar.
Tap the Scale button to toggle between filling the entire screen with video or fitting the video to the screen. Alternatively, you can double-tap the video to go back and forth between fitting and filling the screen.
Fitting the video to the screen displays the film in its theatrical aspect ratio. But you may see black bars above or below the video (or to its sides), which some people don't like. Filling the entire screen with the video may crop or trim the sides or top of the picture, so you aren't seeing the complete scene that the director shot.
Tap the screen again to make the controls go away (or just wait for them to go away on their own).
Tap Done when you've finished watching. (You have to summon the controls back if they're not already present.)
You return to the iPhone's video menu screen.
To delete a video manually, swipe left or right over the video listing. Then tap the small red Delete button that materializes. To confirm your intention, tap the larger Delete button that appears.
Tip
Sometimes you want to hear a song from a music video but don't want to watch it. Instead of tapping the Videos icon to grab that selection, choose the ditty by tapping the Songs or Artists icon instead.
The 3GS is the first iPhone to let you shoot video. If you bought one, you'll want to read this section to get the most out of the video camera built into your handset. If you don't have one, well we hope you'll stick with us anyway. You might own a 3GS someday, and even if you don't we kind of like having you around.
Here's how to shoot video on a 3GS phone:
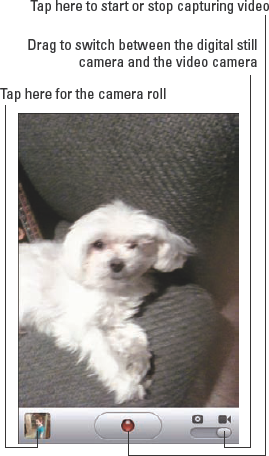
Tap the Camera icon on the Home screen.
Drag the little onscreen button at the bottom-right corner of the display from the camera position to the video camera position, as shown in Figure 8-3.
Tap the red record button on the bottom center to begin shooting a scene. You can capture video in portrait or landscape or landscape mode.
The button blinks and you see a counter timing the length of your video.
When you're done, tap the red button again to stop the recording.
Your video is automatically saved to the camera roll, alongside any other saved videos and still pictures.
Note
The 3GS shoots VGA video at up to 30 frames-per-second. That's tech jargon for full-motion video, and what it really means is your video won't be herky-jerky or look like it was shot in Jell-o. It isn't high definition, but we think you'll be quite satisfied.
We're going to assume that you captured some really great stuff — as well as some footage that belongs on the cutting room floor. That's not a problem because you can perform simple edits right on your iPhone 3GS.
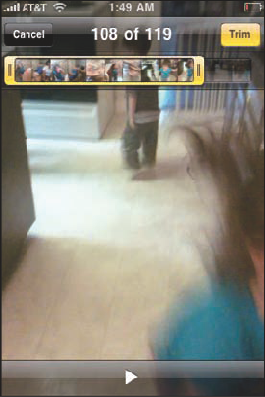
Tap a video recording to bring up the onscreen controls shown in Figure 8-4.
Drag the start and end points along the timeline to select only the video you want to keep. Hold your finger over the section to expand the timeline to make it easier to apply your edits.
You can tap the play button to preview the edit.
Tap Trim to save your changes
Warning
Make sure you're satisfied with your edit before tapping Trim. You can't undo this action once it's made.
YouTube has come to define video sharing on the Internet. The wildly popular site, now owned by Google, has become so powerful that American presidential hopefuls and even politicians in other countries campaign and hold debates there. As you might imagine, YouTube has also generated controversy. The site has been banned in some foreign countries. And Viacom has sued YouTube for more than $1 billion over alleged copyright infringements. (Let the lawyers fight over such matters.)
All the while, YouTube staked a humongous claim on mainstream culture. That's because YouTube is, well, about you and us and our pets and so on. It is the cyberdestination, as YouTube boldly proclaims, to "Broadcast Yourself."
Apple has afforded YouTube its own cherished icon on the Home screen. Many millions of videos are available on the iPhone, nearly the complete YouTube catalog.
Note
The back catalog of YouTube videos was converted to the H.264 video-compression standard that the iPhone and the iPod Touch (and another Apple product called Apple TV) can recognize.
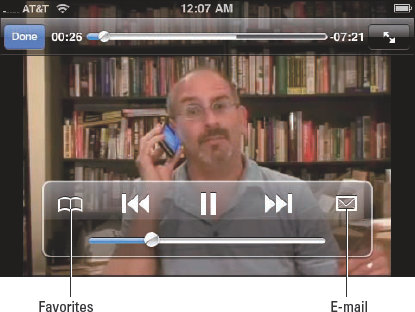
As with other videos, you can tap the screen when a YouTube video plays to bring up hidden video controls. Many of these controls are identical to the controls in Figure 8-2. But as Figure 8-5 shows, YouTube displays special controls of its own, notably for adding favorites and sending e-mail links of the video you're watching.
So where exactly do YouTubers find the videos that will offer them a blissful respite from their day? By tapping on any of the following:
Featured: Videos recommended by YouTube's own staffers.
Most Viewed: What the YouTube community is watching. Tap All to see the most watched YouTube videos of all time. Tap Today or This Week to check out the videos most currently in vogue.
Favorites: After stumbling on a video you like, add it to your Favorites by tapping the Favorites control. As part of the 3.0 software upgrade, you could log into your YouTube account with your user name and password to save and sync these favorites.
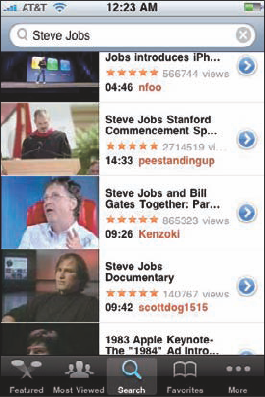
Search: Tap the Search icon, and then tap the blank YouTube search field at the top of the screen. Up pops one of the iPhone's virtual keyboards. Type a search phrase and then tap the Search button to generate results. (In Figure 8-6, we typed Steve Jobs.)
More: Tapping More leads to more buttons or icons. As in those that follow. . . .
Most Recent: Newly submitted videos.
Top Rated: The people's choice. YouTube's audience chooses the best.
History: Videos you recently viewed.
My Videos: The place for videos you star in.
Subscriptions: YouTube channels you subscribe to.
Playlists: Videos categorized into playlists show up here
Tip
Only four YouTube icons (besides the More button) appear at the bottom of the screen at any one time. If you'd prefer a different button than one of the four shown — Top Rated instead of Favorites, say — you can make it one of your Fab Four icons.
To change the icons shown on that first YouTube screen, tap More and then tap Edit. Then simply drag your preferred icon (Top Rated in this example) over the one you want to relegate to the YouTube bench (Favorites in this case). You can also rearrange the order of the icons by dragging them left or right.
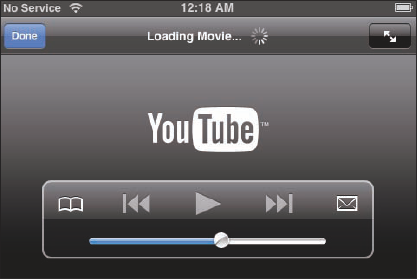
While the movie you've selected is downloading — and how fast it arrives depends on your network coverage from AT&T or Wi-Fi, as discussed in greater detail in Chapter 10 — you see a black-and-gray screen with video controls and the YouTube logo. This screen is shown in Figure 8-7. The controls disappear when the movie starts playing.
We were as enthralled as that harshest of critics Simon Cowell was by Paul Potts, the British mobile-phone worker turned opera singer. His star turn on the American Idol-like Britain's Got Talent has been immortalized on YouTube and watched by millions. Ditto for Susan Boyle. What is it about that show?
You can share a video as you are watching it by tapping the E-mail button (refer to Figure 8-5). When you do so, one of the iPhone's virtual keyboards pops up. iPhone has already filled in the e-mail subject line with the name of the video. And the body of the message is populated with a link to the video on YouTube. All you need to do is fill in the To field with the e-mail address of the person you are sending the link to along with any additional comments.
Alternatively, from the list of videos, tap the blue button with the right-pointing arrow to see all sorts of details on a particular video. You'll see a description of the video, the number of people who viewed it, the date it was added, and other information. From there, tap the Share button to bring up the e-mail program described in the preceding paragraph.
If you've given an iPhone to your kid or someone who works for you, you may not want that person spending time watching YouTube videos. You want him or her to do something more productive like homework or the quarterly budget.
That's where parental (or might we say "Mean Boss") restrictions come in. Please note that the use of this iron-fist tool can make you really unpopular.
Tap Settings, General, and Restrictions. Then tap Enable Restrictions. You'll be asked to establish or enter a previously established passcode. Twice. Having done so, tap YouTube so that the Off button rather than the On button is displayed. As part of the iPhone OS 3.0 software upgrade, you could also set restrictions based on movie ratings (PG or whatever).
If you made YouTube a no-no, when you return to the Home screen the YouTube icon is missing in action. Same goes for any other restricted activities. To restore YouTube or other privileges, go back into Restrictions, and tap Disable Restrictions. You'll have to reenter your passcode.
Tip
Restrictions can also be applied to iTunes, Safari, the App Store, Camera, and location settings, as you'll see when we delve into Settings further (see Chapter 13).
With that, let's roll the closing credits to this chapter.