
After spending a lot of quality time with our iPhones, it's only natural that we've discovered more than a few helpful hints, tips, and shortcuts. In this chapter, we share some of our faves.
Our first tip can help you type faster in two ways. One, it helps you type more accurately; two, it lets you type punctuation and numerals faster than ever before.

Over the course of this book, you find out how to tap, how to double-tap, and even how to double-tap with two fingers. Now we want to introduce you to a new gesture we like to call the slide.
To do the slide, you start by performing the first half of a tap. That is, you touch your finger to the screen but don't lift it up. Now, without lifting your finger, slide it onto the key you want to type. You'll know you're on the right key because it pop ups — enlarges.
First, try the slide during normal typing. Stab at a key and if you miss, rather than lifting your finger, backspacing, and trying again, do the slide onto the proper key. Once you get the hang of it, you'll see that it saves a lot of time and improves your accuracy as well.
Now here's the best part: You can use the slide to save time with punctuation and numerals, too. The next time you need to type a punctuation mark or number, try this technique:
Start a slide action with your finger on the 123 key (the key to the left of the Space key when the alphabetical keyboard is active).
Note
This is a slide, not a tap, so don't lift your finger just yet.
When the punctuation and numeric keyboard appears on-screen, slide your finger onto the punctuation mark or number you want to type.
Lift your finger.
The cool thing is that the punctuation and numeric keyboard disappears and the alphabetical keyboard reappears — all without tapping the 123 key to display the punctuation and numeric keyboard and without tapping the ABC key (the key to the left of the Space key when the punctuation and numeric keyboard is active).
Practice the slide for typing letters, punctuation, and numerals, and we guarantee that in a few days you'll be typing faster and more accurately.
Here are two related tips about autocorrection that can also help you type faster and more accurately.
First, before moving on from the subject of punctuation, you should know that you can type dont to get to don't, and cant to get to can't. We've told you to put some faith in the iPhone's autocorrection software. And that applies to contractions. In other words, save time by letting the iPhone's intelligent keyboard insert the apostrophes on your behalf for these and other common words.
Warning
We're aware of at least one exception. The iPhone cannot distinguish between it's, the contraction of "it is," and its, the possessive adjective and possessive pronoun.
Along those same lines, if the autocorrect suggestion isn't the word you want, instead of ignoring it, reject it. Finish typing the word and then tap the x to reject the suggestion before you type another word. Doing so makes your iPhone more likely to accept your word the next time you type it and less likely to make the same incorrect suggestion again.
Here you thought you were buying a tech book, and you get grammar and typing lessons thrown in at no extra charge. Just think of us as full-service authors.
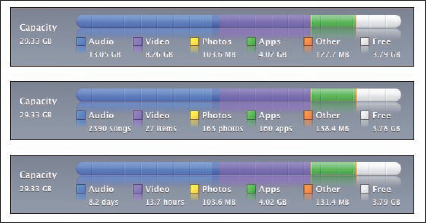
When your iPhone is selected in the source list in iTunes, you see a colorful chart at the bottom of the screen that tells you how your iPhone's capacity is being used by your media and other data.
By default, the chart shows the amount of space your audio, video, and photo files use on your iPhone in megabytes (MB) or gigabytes (GB). But you knew that. What you probably don't know is that when you click the colorful chart, it cycles through two more slightly different displays. The first click changes the display from the amount of space used to the number of items (audio, video, and photos) you have stored. Click once more, and the display changes to the total playing time for audio and video, as shown in Figure 18-1.
This is particularly helpful before you go on a trip. Knowing that you have 8.2 days of audio and 13.7 hours of video is far more useful than knowing how many gigabytes you're packing.
The Way-Cool Hidden iTunes Scrub Speed Tip
Here's the situation: You're listening to a podcast or audiobook and trying to find the beginning of a specific segment by moving the Scrubber left and right. The only problem is that the Scrubber isn't very precise and your fat finger keeps moving it too far one way or the other. Never fear — the iPhone OS 3.0 software has a wonderful (albeit somewhat hidden) fix. Just press your finger on the Scrubber (that little round dot on the Scrubber bar), but instead of sliding your finger to the left or right, slide it downward toward the bottom of the screen (see Figure 18-2). As you slide, the scrubbing speed changes like magic and the amount of change is displayed above the Scrubber bar. The default (normal) speed is called hi-speed scrubbing; when you slide your finger downward, the speed changes to half-speed scrubbing, then to quarter-speed scrubbing, and finally to fine scrubbing.
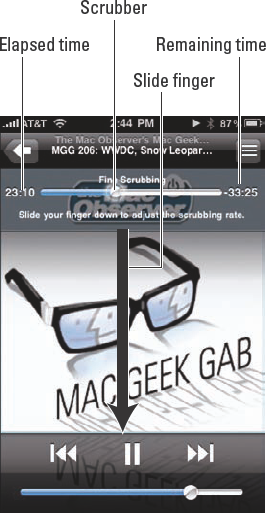
While you're sliding, keep an eye on the elapsed time and remaining time indicators because they provide useful feedback on the current scrubbing speed.
This scrub trick is easier to do than to explain, so give it a try.
The iPhone does something special when it encounters a phone number or URL in e-mail and SMS text messages. The iPhone interprets as a phone number any sequence of numbers that looks like a phone number: 1-123-555-4567, 555-4567, 1.123.555.4567, and so on. The same goes for sequences of characters that look like a Web address (URL), such as http://www.WebSiteName.com or www.WebSiteName.com. When the iPhone sees what it assumes to be a URL, it appears as a blue link on your screen.
If you tap a phone number or URL sequence like the ones just shown, the iPhone does the right thing. It launches the Phone application and dials the number for a phone number, or it launches Safari and takes you to the appropriate Web page for a URL. That's useful but somewhat expected. What's more useful and not so expected is the way Safari handles phone numbers and URLs.
Let's start with phone numbers. When you encounter a phone number on a Web page, give it a tap. A little dialog box appears on the screen displaying that phone number and offering you a choice of two buttons: Call or Cancel. Tap Call to switch to the Phone application and dial the number; tap Cancel to return to the Web page.
Here's another cool Safari trick, this time with links. If you press and hold a link rather than tapping it, a little floating text bubble appears and shows you the underlying URL.
Tip
You also see the underlying URL if you press and hold on a URL in Mail or Text. Having this information in Mail or Text is even more useful because it enables you to spot bogus links without switching to Safari or actually visiting the URL.
Finally, here's one last Safari trick. If you press and hold on most graphic images, a Save Image button appears. Tap it and the picture is saved to the camera roll in the Photos application.
Ever stumble on a Web page you just have to share with a buddy? The iPhone makes it dead simple. From the site in question, tap the + button at the bottom of the browser. Then tap the Mail Link to this Page button that appears on-screen. A mail message appears with the subject line prepopulated with the name of the Web site you're visiting, and the body of the message prepopulated with the URL. Just type something in the message body (or don't), supply your pal's e-mail address, and then tap the Send button.
You may have noticed that there's no home page Web site on the iPhone version of Safari as there is in the Mac and PC versions of the browser (and for that matter every other Web browser we know of). Instead, when you tap the Safari icon, you return to the last site you visited.
The trick is to create an icon for the page you want to use as your home page. This technique is called creating a Web clip of a Web page. Here's how to do it:
Open the Web page you want to use as your home page and tap the + button.
Tap the Add to Home Screen button.
An icon that will open this page appears on your Home screen (or one of your Home screens if you have more than one).
Tap this new Web clip icon instead of the Safari icon, and Safari opens to your home page instead of to the last page you visited.
Tip
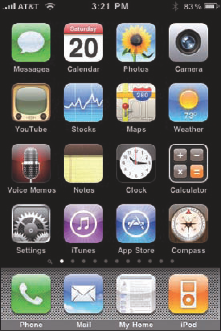
You can even rearrange the icons so that your home page icon, instead of the Safari icon, appears in the dock (the bottom row that appears on every home screen), as shown in Figure 18-3. See the tip in Chapter 1 for rearranging icons if you've forgotten how.
A tiny Massachusetts software company known as Ecamm Network is selling an inexpensive piece of Mac OS X software that lets you copy files from your computer to your iPhone and copy files from the iPhone to a computer. (There's no Windows version.) Better still, you can try the $19.95 program called PhoneView for a week before deciding whether you want to buy it. Go to www.ecamm.com to fetch the free demo.
In a nutshell, here's how it works. After downloading the software onto your Mac, double-click the program's icon to start it. To transfer files and folders to the iPhone (assuming there's room on the device), click the Copy to iPhone button on the toolbar, and then select the files you want to copy. The files are copied into the appropriate folder on the iPhone. Alternatively, you can drag files and folders from the Mac desktop or a folder into the PhoneView browser.
To go the other way and copy files from your iPhone to your computer, highlight the files or folders you want copied, and click the Copy from iPhone button on the toolbar. Select the destination on your Mac where you want to store the files, and then click Save. You can also drag files and folders from the PhoneView file browser onto the Mac desktop or folder. Or you can double-click a file in the PhoneView browser to download it to your Mac's Documents folder.
If you need access to the files on your iPhone, or if you want to use your iPhone as a pseudohard disk, PhoneView is a bargain.
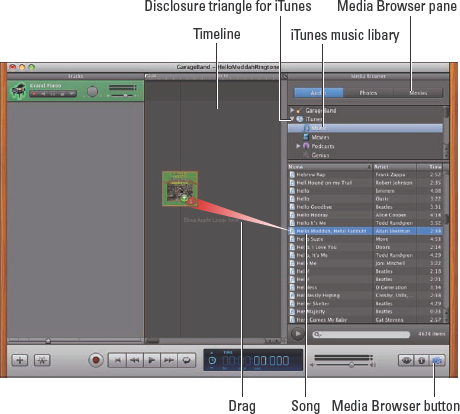
The ability to create free iPhone ringtones with Apple's GarageBand application (which is bundled with every Mac) was beyond the purview of the ringtone discussions in previous chapters. Creating those ringtones, however, is relatively easy. Start by launching GarageBand and creating a new Music project. Then:
Click the Media Browser button to reveal the media browser pane.
Click the disclosure triangle to reveal the contents of your iTunes library.
Click your iTunes music library to reveal its contents.
Click the song you want to turn into a ringtone and drag it onto the timeline (Hello Muddah, Hello Faddah! in Figure 18-4).
Warning
You can't use songs purchased from the iTunes store for ringtones if they are protected by Apple's digital rights management copy protection. GarageBand won't let you drag a protected song onto its timeline.
Tip
Apple stopped using copy protection for music files in April 2009. If you purchased the song after that, you're good to go. If you purchased the song before then, you can pay a small upgrade fee (30 cents at press time) to convert the song to iTunes Plus, Apple's new higher-quality, non-copy-protected format.
The bottom line is that you can make ringtones only from songs you've ripped yourself from CD or downloaded without rights management or other copy protection (such as MP3s from Amazon.com or files in Apple's iTunes Plus format).
Click in the middle of the Cycle Region and drag it to the portion of the song you want to use as your ringtone.
Fine-tune the start and end points by clicking and dragging the Cycle Region's left and right edges, as shown in Figure 18-5.
For best results, keep your ringtones under 30 seconds.
Click the Play button to hear your work. When you're satisfied with it, choose Share


The next time you sync, your new ringtone becomes available on your iPhone. To use it as your ringtone, tap Settings, Sounds, Ringtone, and then tap the ringtone in the list of available sounds. To associate the ringtone with a specific contact or contacts, find the contact in either the Contacts application or the Phone app's Contacts tab, tap Ringtone, and then tap the ringtone in the list of available sounds.
True confession: We threw in this final tip because, well, it helps people like us.
Permit us to explain. We hope you've admired the pictures of the iPhone screens that are sprinkled throughout this book. We also secretly hope that you're thinking what marvelous photographers we must be.
Well, the fact is, we couldn't take a blurry picture of the iPhone using its built-in (and undocumented) screen-grab feature if we wanted to.
Press the Sleep/Wake button at the same time you press the Home button, but just for an instant. The iPhone grabs a snapshot of whatever is on the screen.
The picture lands in the iPhone's camera roll; from there, you can synchronize it with your PC or Mac, along with all your other pictures. And from there, the possibilities are endless. Why, your picture could wind up just about anywhere, including in a For Dummies book.