
With iCal, you can manage your own time by creating calendars that help you to be where you're supposed to be when you're supposed to be there. You can also use to-do items to ensure that you accomplish important, or even not-so-important, tasks. As a personal calendar tool, iCal is very useful, and if that's all it did it would be worth using. However, iCal is also designed for calendar collaboration. You can publish calendars so that others can view your calendars in iCal running on their Macs. Likewise, you can subscribe to other people's calendars so that you see all calendar events of interest to you in one place.
Setting Up iCal
Managing Calendars, Events, and To-Do Items
Printing Calendars
Sharing Calendars
Subscribing to Calendars
Moving iCal Calendars onto an iPhone
iCal is a complete calendar tool that enables you to take control over your busy life and helps you coordinate with other people. In this section, you learn how to get started with iCal, from setting important preferences to configuring your calendars, events, and to-do items.
Before you jump into managing your calendars with iCal, take a few moments to configure some of its preferences so that it works the way you want. iCal's Preferences window has three tabs: General, Accounts, and Advanced.
On the General tab, here are the preferences you can set (see figure 9.1):
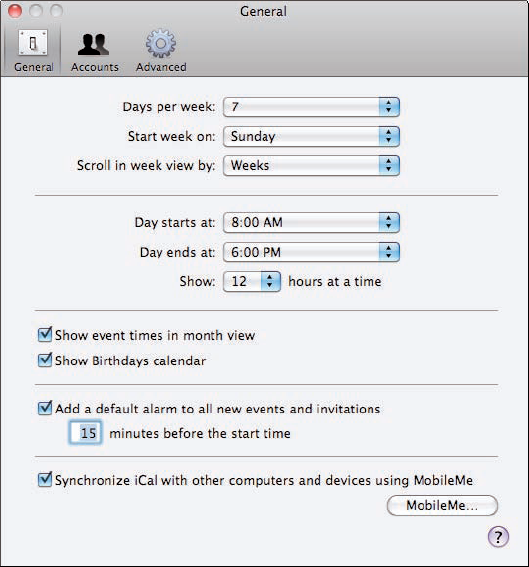
Days per week. On this pop-up menu, choose 7 if you want your calendars to include all 7 days in the week or 5 if you only want 5 days (the workweek) to be shown.
Start week on. On this pop-up menu, choose the first day of the week.
Scroll in week view by. This pop-up menu enables you to choose to scroll, when you are viewing iCal in the Weeks view, by weeks or days.
Day starts at, Day ends at, Show. Use these pop-up menus to show when your workday starts and ends and how many hours you want to be displayed on the calendar when you are viewing it in Day or Week view. The start and end times for your days don't really matter as iCal just shades hours outside of this period to indicate what you think the working part of each should be.
Show event times in month view. When enabled, the times associated with events are shown. While useful, this can really clutter the Month view if you have several events on the same days.
Show Birthdays calendar. Select this if you want iCal to display a calendar of birthdays for contacts you're managing in Address Book. This can be a helpful way to remember important people's birthdays because reminder events for those birthdays are added to iCal automatically.
Default alarms. Because one of the important functions of iCal is to remind you of events, in most cases you want to have alarms set for your events by default. Select the Add a default alarm to all new events and invitations check box and enter the number of minutes before the event you want the alarm to activate.
iCal synchronization. This check box takes you to the MobileMe pane so you can sync your calendars. More on this later.
The Accounts pane enables you to add calendars being managed elsewhere to iCal so you can view their events along with those that you create in iCal. iCal supports calendars from the following sources:
CalDAV. CalDAV is a set of standards for calendars to enable applications on different devices to share calendar information. The good news is that iCal supports these standards so if you have access to accounts that include CalDAV calendar information, you can access that information in iCal.
Exchange 2007. Perhaps the most useful kind, if you have a Microsoft Exchange 2007 account at your work or other organization, you can add your Exchange calendars to iCal. iCal also supports various Exchange functions, such as the ability to view other people's availability when you are setting up meetings. Unfortunately, many organizations are running older versions of Exchange that are not supported in iCal or don't allow external access to Exchange except through specialized network access. To see if your organization supports Exchange 2007 and client access from outside its firewall, contact your IT organization.
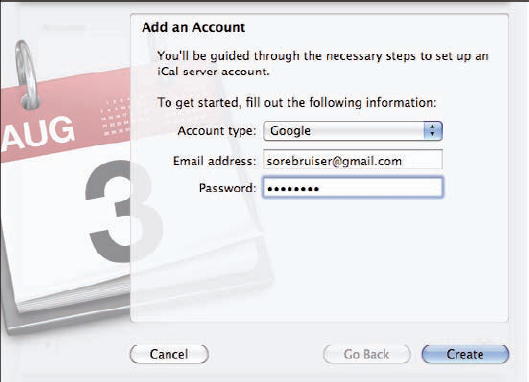
The steps to add calendar information from these sources are similar. A quick example showing how to add Google calendar information to iCal should be informative:
Open the Accounts tab of the iCal Preferences window.
Click the Add (+) button at the bottom of the account list shown on the left side of the window. The Add an Account sheet appears.
In the Account type pop-up menu, choose Google.
Type your Google account email address and password (see figure 9.2).
Click Create. You are logged in to the account you configured. If successful, you return to the Preferences window where you see the new account on the Accounts list.
Configure the options for the account, such as using the Refresh calendars pop-up menu to determine how often the calendar information from the account is updated.
Note
Cal doesn't support all options in all account types. For example, it doesn't support availability information from Google, whereas it does support that information for an Exchange 2007 account.
On the Advanced tab of the iCal Preferences window, you have the following options (see figure 9.3):
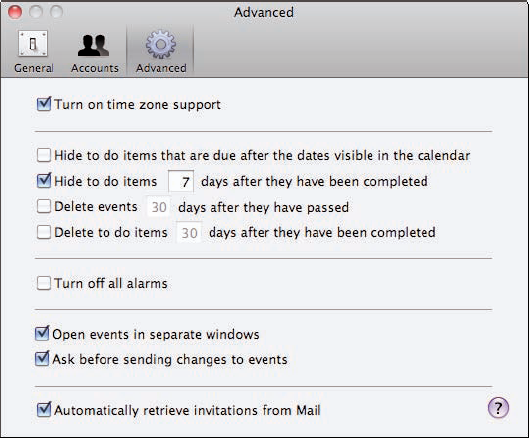
Time zone support. When you enable this, a time zone is associated with all of your iCal calendars and with each event you configure on those calendars. iCal automatically takes the time zone currently set for your MacBook Pro, but maintains the time zone associated with each event. This makes keeping events at the right time easier regardless of the time zone you happen to be in. For example, if you travel to a different time zone, you can simply choose that time zone in the iCal window and all event times are djusted according to the difference between iCal's time zone and the events' time zones. You should enable this feature even if you don't travel outside of your current time zone because it can still help you coordinate with events that are outside your time zone.
Hide. Use these check boxes and number field to hide to-do items that are due outside of the time shown on the calendar or that have been completed. For complete items, you can set how long they remain visible after they are completed.
Delete. Use these check boxes and number fields to determine if and when events and to-do items are deleted from your calendar. I don't recommend you allow either to be deleted because you lose the historical information in iCal, which can be a valuable resource for you.
Turn off all alarms. This feature is useful because when it is enabled, all alarms are temporarily disabled. Disable it to resume normal alarm functions.
Open events in separate windows. When this is selected and you open an event, it appears in a separate window instead of as a sheet attached to the event on the calendar. I find this setting makes events much easier to work with so you should give it a try.
Ask before sending changes to events. When you set up an event, you can invite others to it. This setting prompts you when you make a change to an event that has invitees. This prompt can help you prevent sending unnecessary or unintended messages to people you have invited, such as when you change the alarm setting on the event.
Automatically retrieve invitations from Mail. With this enabled, when you receive an email message containing an invitation, iCal automatically grabs the invitation and you use iCal to manage it, such as to accept or reject it.
There are two levels of calendars that you deal with when you use iCal. First, there is the overall calendar, which is what you see inside the iCal window. This calendar includes all the information being managed or shown by the application. On the second level are the individual calendars on which you create events and to-do items. There are many good reasons that you might want to create multiple calendars for your events and to-do items. The classic example is one calendar for work events and one calendar for personal events. When creating calendars, also consider publishing them. If there are some events you won't want to show in a published version, you can create a calendar for those events that you don't publish and another for those that you want to share.
On the other hand, you don't want to create so many calendars that they become unwieldy. In most situations, one to three calendars are ideal.
To create a calendar, follow these steps:
Click the New Calendar (+) button located in the bottom-left corner of the iCal window.
Type a name for the new calendar and press Return.
Open the calendar's contextual menu and choose Get Info.
Type a description of the calendar in the Description field.
Use the Color pop-up menu to associate a color with the calendar.
If you don't want alarms to be enabled for the new calendar, select the Ignore alarms check box.
Click OK. The changes you made are saved and you see the calendar's name in the color you selected.
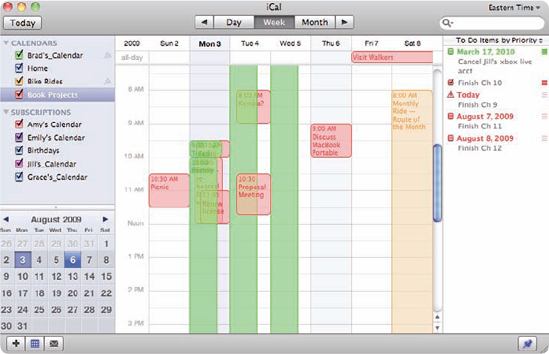
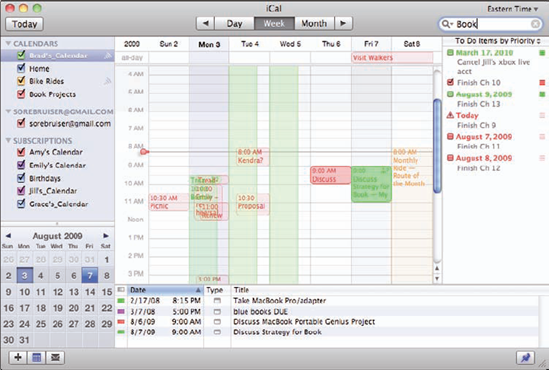
The calendars you are managing in iCal are shown in the upper-left pane of the window, organized into three sections. The CALENDARS section contains calendars you have created in iCal. The SUBSCRIPTIONS section shows calendars to which you've subscribed. You see other sections for any calendars coming from accounts you've added on the Accounts tab of the Preferences window. Figure 9.4 shows examples of each type (the wave icon indicates a calendar is being shared).
To include a calendar's events and to-do items in the calendar being displayed in the iCal window, select its check box. If you deselect a calendar's check box, its events and to-do items are hidden.
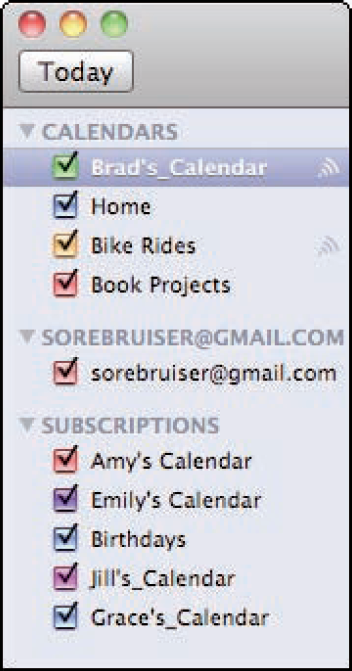
To remove a calendar, select it and press Delete. The calendar, along with all its events and to-do items, is removed from iCal. Most of the time, you're better off hiding a calendar because it won't appear in iCal anymore, but you can access its information at any time. When you delete a calendar, all its information goes with it.
You can use iCal events to plan periods of time. If one of those periods of time is a meeting, you can invite others to join by sending them an invitation. In addition to the time and date, you can include all sorts of useful information in iCal events, such as file attachments, URLs, and notes. To add an event to a calendar, perform the following steps:
Select the calendar on which you want the event to appear by clicking it.
Drag over the calendar to cover the time and date of the event. A new event appears on the calendar with its title selected.
Type the name of the event.
Press Return. The event name is saved and it appears in the color of the calendar with which it is associated (see figure 9.5).
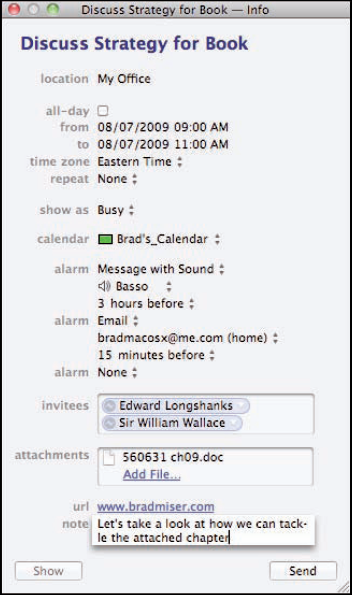
Double-click the event. What you see depends on the Open events in separate window setting. If this is enabled, you see a separate window showing all of the event's current and potential information with the name ready to be edited. If you don't have this enabled, a window pops up from the event that shows the event's name, from and to dates and times, time zone, and alarm information. The rest of these steps assume the separate window setting is enabled.
Edit the name if needed and type the event's location in the Location text box.
Use the all-day check box, from, to, time zone, and repeat tools to set the time and date of the event and whether it repeats or is a one-time event.
Use the show as pop-up menu to set your availability during the event. This enables other people who have access to your availability information to know if you are open for an event or not at this time.
Use the calendar pop-up menu to associate the event with a calendar.
Use the alarm tools to configure one or more alarms for the event. There are a number of actions you can choose for an alarm, such as a message with sound, email, sound only, and so on. The action you choose can present other tools to configure, such as to select an email address for an email alert. You can have as many alarms for an event as you want.
To add other people to the event, click Add Invitees and type the name or email address of the person you want to invite; if iCal finds a match for what you type, click it to enter the associated email address. Continue adding invitees by typing more email addresses in the Invitees box.
To associate a file with the event, click Add File and use the resulting Open dialog box to browse and select the file you want to attach.
Note
To choose people in your Address Book, choose Window

If a URL is associated with the event, type it in the url field or copy and paste it there.
Type text about the event in the notes field.
If you added people to the attendees list, click Send (see figure 9.6); if not, click Done. After you click Send, an email is created in your default email application, the event is attached to it, and the email is sent. After you click Done, changes that you made to the event are saved.

Check out these tips for managing events that you create:
You can change the calendar on which an event occurs by opening its contextual menu and selecting the event's new calendar.
You can change the date on which an event occurs by dragging it from one date in the calendar to another date.
As you configure events, icons appear at the top of the event on the calendar to indicate when an alarm has been set, whether the event is a repeating event, if people have been invited, and so on.
You can email an event to others by opening its contextual menu and selecting Mail Event. This is the same action that happens when you click Send for an event. The difference is that you can address the email that is created to anyone. When you use Send, the email is sent to only those people listed as attendees for the event. Your default email application opens and the event is included as an attachment. The recipient can then drag the attachment, which has the extension .ics, onto iCal to add it to her calendar.
When you change an aspect of a repeating event, such as an alarm, you're prompted to make the change to all the events or only to the current one. If you choose only the current one, the current event is detached from the series and is no longer connected to the other instances of the same event. This is indicated by (detached event) being appended to the frequency shown in the repeat section for the event.
If you use the Send command, you can use the event to track people's response to your invitation. The event's block on the calendar contains the icon of a person with a question mark, which indicates people have been invited, but have not responded to the event. As people add the event to their calendars, you'll see a green check mark next to their names when you open the event's Information window. This indicates that the attendee has accepted the event by adding it to his calendar. If an attendee hasn't added the event to his calendar, the name is marked with a question mark icon. This tracking doesn't occur when you use the Mail Event command.
You can use iCal to-do items to track just about any kind of action for which you are responsible. In this section, you learn how to create to-do items and how to complete them (by that, I mean how to mark them as complete — you're on your own to actually do the work).
Creating a to-do item is similar to adding an event, as you see in the following steps:
Select the calendar that you want the to-do item to be associated with.
Click in the To Do pane, open the contextual menu, and select New To Do, or press

Type the name of the to-do item and press Return.
Open the to-do item's contextual menu and select Get Info. If you selected the open events in separate window preference, the to-do item's information window appears.
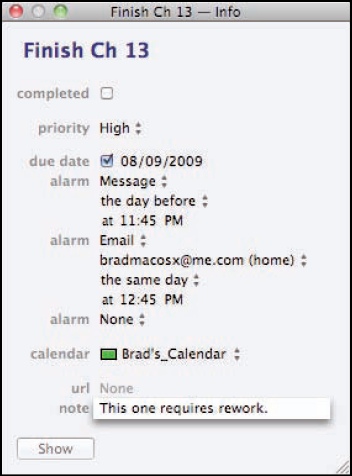
Edit the item's name as needed.
Use the priority pop-up menu to set the to-do item's priority.
If the to-do item has a due date, select the due date check box. Use the date field that appears to set the due date.
Use the alarm tools to set alarms for the to-do item. Like events, you can configure multiple alarms with different options.
Use the calendar pop-up menu to set the calendar with which the to-do item is associated.
If a URL is associated with the to-do item, type it in the url field.
Add notes in the note field (see figure 9.7).
Close the window. The changes you made to the to-do item are saved.
You manage your to-do items in the To Do pane, which appears on the right side of the iCal window. (If you don't see this pane, click the pushpin button at the bottom of the window). As you work with to-do items, keep the following points in mind:
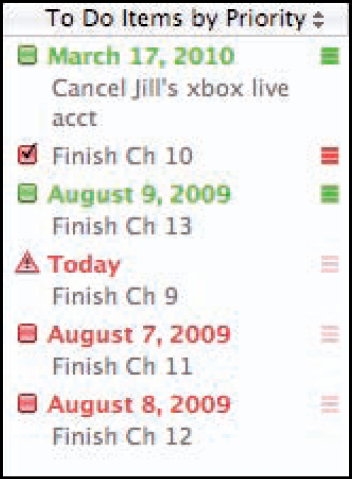
The priority of a to-do item is indicated by the number of bars that appear to the right of its name on the to-do items list. A high-priority item has three bars, a medium-priority item has two bars, and a low-priority item has one bar.
You can Ctrl+click a to-do item to open its contextual menu. With the commands on that menu, you can duplicate it, change the calendar with which it is associated, mark its priority, email it, open its Information window, or change the sort order for the to-do items pane.
When you email an event or a to-do item to someone, the recipient can add the item to his calendar by clicking its link or by dragging it onto his iCal window. If the automatically retrieve preference is enabled and the recipient uses Mail, the to-do item information is added automatically.
When you have completed a to-do item, mark it as complete by selecting the check box next to its name on the to-do list or by selecting the completed check box on the Info window. Depending on the preferences you set, it might continue to remain on the list or it might be removed.
When the due date for an item is the current date or the due date has passed, its complete check box becomes a warning icon to indicate that the item is due or overdue (see figure 9.8).
As you build your calendars in iCal, there are many ways you can view and manage events and to-do items. You can also print calendar information in a number of ways for those times when you want a hard copy.
Check out the following list to learn what you can do with the iCal window to control how information is displayed:
If you want to focus on specific events and to-do items, deselect the check boxes for the calendars that don't interest you, and their information is hidden.
The Mini Months tool shows you one or more months at a glance. You can show or hide this section by choosing View
In the Mini Months area, the current day is highlighted in muted blue. The current dates being displayed (such as a week if the calendar is displaying a week at a time) are shaded in gray. When you click a day, the day is highlighted in bright blue to show you it is the date in focus and the calendar view jumps to that date if it isn't visible. You can move between months displayed by clicking the Forward or Backward arrows next to the top month's label.
The line across the calendar with a pushpin at one end shows the current time.
In the center pane is the actual calendar. There are three views for this: Day, Week, and Month. You can change the view by clicking the related button.
You can jump to the current day by clicking the Today button. You can move ahead or back by clicking the Back or Forward arrows on each end of the view tool at the top of the iCal window.
If Time Zone Support is enabled, you can change the current time zone by choosing a time zone on the pop-up menu above the Search tool. Open the menu and choose Other. The Change time zone sheet appears. Click the map near a city in the time zone you want, and then choose the specific time zone on the Closest city pop-up menu. Click OK. The times and dates are adjusted according to the new time zone. From that point on, the time zone you selected appears on the menu so you can choose it to switch to that time zone.
If you click the Envelope button, the Notifications pane appears. This area shows you information about notifications, which you see only if you have set iCal to automatically receive invitations from Mail. When an invitation comes in, you can view it in the Notifications pane and accept, reject, or tentatively accept it.
Use the Search tool to search for events, to-do items, notes, titles, or combinations of information. To search, click the Magnifying Glass pop-up menu in the Search bar and choose the kind of search you want to do. (If you don't select anything, all calendar items are searched.) Type your search text; as you do, items that match your search are found. When you type search text, iCal's Search Results pane opens at the bottom of the window automatically (see figure 9.9). This pane lists all events and to-do items that meet your search criterion. To see an event on the calendar, select it on the Search Results pane. You can sort the list by any of the columns, such as Date or Type. When you are done with a search, click the Clear (x) button in the Search tool. The search is cleared and the Search Results pane closes.
Note
To change the calendar view to by Day, by Week, or by Month, press
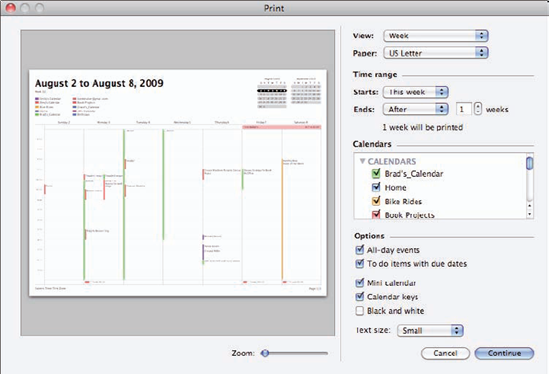
While having your calendar in an electronic format is very useful and practical (because you can take your MacBook Pro with you), there may be times when you'd like to have a hard copy of calendar information. You can use the iCal Print command to create paper versions of your calendar information by following these steps:
Choose File
Choose the view you want to print on the View menu.
Use the tools in the Time range section to define the time period to include in the printed version.
In the Calendars section, select the check box for each calendar whose information you want to be included in the printed version.
If you are printing to a black-and-white printer, select the Black and white check box.
On the Text size pop-up menu, choose the relative size of the text on the calendar.
Click Continue. The Print dialog box for the current printer appears.
Use the controls in the Print dialog box to configure the printer.
Click Print.
iCal is designed to be a collaborative calendar tool, and you can publish your calendars; other iCal users can subscribe to them to see your calendar information in iCal on their computers. You can also share your calendars with Windows users or even with Mac users who don't use iCal. Of course, you can subscribe to other people's calendars to add their information to your iCal window.
There are two basic ways to publish calendar information. If you have a MobileMe account and everyone with whom you want to share your calendar uses iCal, you can use the iCal Publish tool to make your calendar easy to add to their calendars. If you want to share your calendar with people who use Windows (or Mac users who don't use iCal) or you don't use MobileMe, it gets a little more complicated.
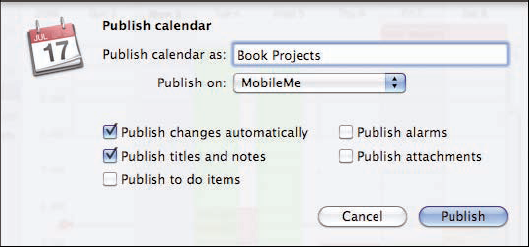
With your MobileMe account and iCal, it's simple to publish calendars for other people to view within their iCal application, as the following steps demonstrate:
Select the calendar you want to publish.
Choose Calendar
Type the name of the calendar as you want it to appear to someone with whom you share it.
Select MobileMe on the Publish on pop-up menu.
If you want changes that you make to your calendar to be published automatically, select the Publish changes automatically check box. In most cases, you should select this option so that your calendar is always up to date.
Use the other Publish check boxes to determine which elements of the calendar get published with it, including titles and notes, to-do items, alarms, and attachments.
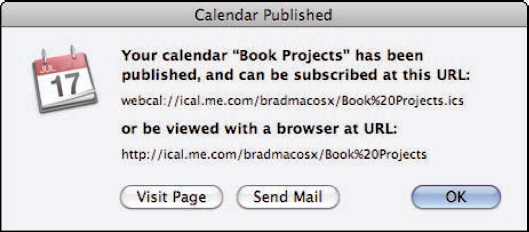
Click Publish. When the calendar has been published, you see the confirmation dialog box (see figure 9.12).
In the confirmation dialog box, you see the following:
The URL someone can use to subscribe to the calendar in iCal.
The URL to view the calendar on the Web.
The Visit Page button that takes you to the calendar on the Web.
The Send Mail button that creates an e-mail message you can send to iCal users to enable them to subscribe to your calendar.
Here are some additional points to consider when publishing your calendars:
When a calendar is published, the published icon (which looks like a radiating wave) appears next to the calendar's name on the list of calendars.
If you open a published shared calendar's contextual menu, you see several interesting commands. These include Unpublish, which removes the calendar from the Web; Send Publish Email, which enables you to send an email announcing the published calendar and its URL; Copy URL to Clipboard, which copies the calendar's URL to the Clipboard so you can paste it into documents; Refresh, which publishes any changes you have made to the calendar; Refresh All, which updates all of your published calendars; and Change Location, which enables you to move the calendar to a different site.
You can view your own shared calendar at any time from any computer by moving to its URL. This is a great way to maintain access to your own calendar when you aren't at your Mac. To get the URL, use the calendar's contextual menu to select Copy URL to Clipboard. Paste the URL into a Web browser to move to the calendar on the Web.
You can change a shared calendar by selecting the Get Info command. Use the tools in the calendar's Info sheet to make changes to the calendar's publishing and other settings.
Using MobileMe to publish calendars has two drawbacks. One is that you must have a MobileMe account, which seems kind of obvious. The other limitation is that your shared calendar can only be subscribed to by iCal users, which leaves Windows users out of the picture.
For either of these scenarios, you can publish your iCal calendars to a different server so that people can access them over the Web, including Windows users. While this isn't as convenient as subscribing to shared calendars in iCal, it does work.
You need to find and use a calendar server service to be able to publish calendars. There are many of these available, and a number of them are free to use. After you find the service you're going to use, create an account and then configure iCal to publish your calendars using that account.
The following steps explain how to publish an iCal calendar using the iCal Exchange service located at www.icalx.com (other services work similarly):
Go to
www.icalx.com.Create an account. Use any username and password that you want, as you only use this information to access your icalx account.
Move back to iCal.
Select the calendar you want to publish.
Choose Calendar
Type the name of the calendar as you want it to appear to someone with whom you share it. It's a good idea to remove spaces in the name by deleting them or replacing them with underscores.
On the Publish on pop-up menu, choose A Private Server. The Base URL, Login, and Password fields appear.
In the Base URL field, type
http://icalx.com/private/your_icalx_username/, where your_icalx_username is the username that you created in Step 2. This assumes that you want to create a private calendar, meaning one that requires a password to be able to view. If you don't want to require a password, replace private with public in the URL.Type your icalx username in the Login field and your icalx password in the Password field.
If you want changes that you make to your calendar to be published automatically, select the Publish changes automatically check box. In most cases, you should select this option so that your calendar is always up to date.
Use the other Publish check boxes to determine which elements of the calendar are published with it, including titles and notes, to-do items, alarms, and attachments.
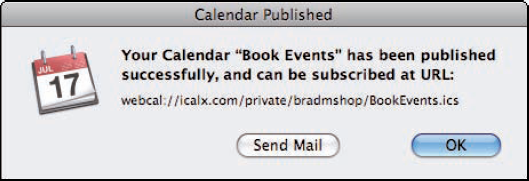
Click Publish. When the calendar has been published, you see the confirmation dialog box (see figure 9.13).
Click OK.
After you configure the calendar to be published in iCal, move back to icalx to complete the process:
Log in to your icalx account. You see the calendars that you've published on the Private Calendars or Public Calendars lists.
Click the passwords link under the your account section on the left side of the screen.
Click add a password.
Type the username that you want to provide to people to enable them to access your calendar.
Type the password that you want to provide to people to enable them to access your calendar.
Select the calendars that you've published and want to share by selecting their check boxes.
Click Save Changes. The calendar is protected with the password you created.
When people share their calendars with you through the iCal Publishing tools, you can subscribe to those calendars to add them to your iCal window.
You can add published calendars to iCal by performing the following steps:
Choose Calendar
Type the URL for the calendar to which you want to subscribe. URLs for calendars published with MobileMe start with
webcal://ical.me.com.Click Subscribe. The Subscribing configuration sheet appears, where you can name the calendar, assign it a color, and choose whether you want the calendar's associated alarms, attachments, and to-do items.
If you want the calendar's information to be refreshed automatically, select the frequency at which you want the refresh to occur on the Auto-refresh pop-up menu.
Click OK. The calendar is added to the Subscriptions section of your iCal window, and you can view it just like your own calendars. You can't add information to a calendar to which you've subscribed.
Many public calendars are available to which you can subscribe. For example, most professional sports teams have calendars that show games and other events. You can also find DVD release calendars, TV schedules, and many other types of calendars to subscribe to. Just like shared calendars, when you subscribe to public calendars, the events on those calendars are shown in your iCal window. To find and subscribe to public calendars, do the following steps:
Choose Calendar
Browse the available calendars by category, such as Most recent, Most popular, Alphabetical, or Staff picks.
Click the Download button for the calendar to which you want to subscribe. You move into iCal and the Subscribe to calendar sheet appears. The calendar's URL is filled in automatically.
Click Subscribe. The Subscribe to configuration sheet appears, where you can name the calendar, assign it a color, and choose whether you want the calendar's associated alarms, attachments, and to-do items.
If you want the calendar's information to be refreshed automatically, select the frequency at which you want the refresh to occur on the Auto-refresh pop-up menu.
Click OK. The calendar is added to the Subscriptions section of your iCal window, and you can view it just like your own calendars. If you configured the calendar to be refreshed automatically, iCal keeps it current.
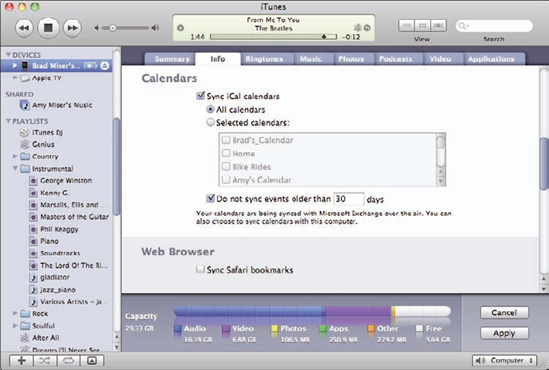
If you have an iPhone, you can synchronize your iCal calendars with the Calendar on the iPhone (this also works with an iPod touch). Here's how:
Move into iTunes.
Select the iPhone on the Source list.
Click the Info tab (see figure 9.14).
Scroll down until you see the Calendars section.
Select the Sync iCal calendars check box.
Configure iCal to move all calendars or selected calendars on to your iPhone.
If you want to prevent older events from syncing, select the Do not sync events older than check box and type the number of days in the box.
Click Apply. Each time you sync your iPhone, its calendar is updated with changes that you make in iCal, and changes that you make on the iPhone calendar are moved into iCal.
Note
If you have a MobileMe account, you can sync your calendars on your iPhone wire-lessly. Just configure your MobileMe account on the iPhone and ensure the Calendars setting is ON. This is very similar to syncing contacts on an iPhone through MobileMe. See Chapter 6 for the details.