
Capturing light is the essence of photography. In fact, the name used to describe the craft, photography, is a combination of the Greek words photo meaning light and graphi meaning writing, so photography is fundamentally light writing. You use lenses and cameras and storage devices to capture those images that tell your visual stories and for many photographers, that's what photography is all about — the gear. I know I was certainly that way when I started my photography career. I thought photography was more about the gadgets than actually capturing light in all its many forms. Fortunately, at some point I began to see light in a new way and that shift has profoundly affected my photographic work and made it more fun. I want to share that shift in thinking with you, along with various practical ways for you to manage, manipulate, and expose the light.
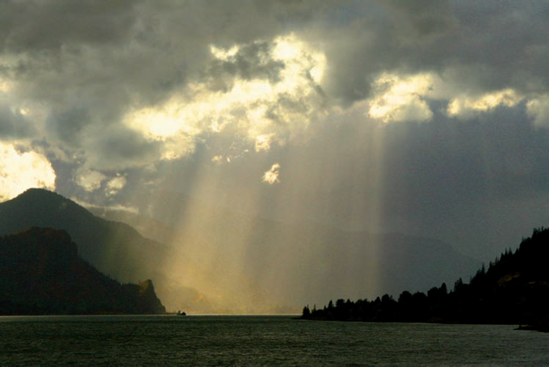
Crepuscular rays of sunlight fall on the Columbia River in late afternoon in the Columbia Gorge. Lighting conditions of this quality can change in a heartbeat, so being ready to quickly change exposure settings ensures you get the shot. Exposure: ISO 200, f/10, 1/640 second.
Light and its effects in photography can more easily be understood by making an analogy to painting. In this analogy, your digital sensor is the artist's canvas, the camera and lens combinations are the brushes, and the light is your paint. With this light you can create bold colors or pastels, heavy or soft shadows, or no shadows at all. You can also use this light to define or diminish form with highlights and shadows. Light can be used to make the subject stand out from the background or it can be manipulated to provoke an emotional response from the viewer. The power of light is vast and by learning as much as you can about it, you begin to see it in all its many forms.
The problem with light for many photographers is that they are so familiar with it in everyday life, so used to its presence, that they don't really see it and take it for granted. They get excited when they see the subject or scene they want to photograph and see only that, without taking into account what the light is doing, where it's coming from, and where it's going. As a result, they might overlook a slight camera angle adjustment or lens change that could make a world of difference in the final outcome of the photo. I rarely come upon images wholly made, in the field or on location, and often I see something happening with the light that is different from my original intent. Learning to see the light before you trip the shutter takes time, but once you do it raises the quality of your work and makes you a much better visual communicator. In the next section, I discuss some of the types of light you're likely to find and share some of the nomenclature photographers use to discuss the many types of light.
Ambient light simply refers to any light you find when you are attempting to photograph and is also referred to as available light. All ambient light has color characteristics that can be described by the Kelvin scale, which is discussed in full later in this chapter. Ambient light can be any type of light at all and can range from fluorescent to tungsten to daylight and most certainly contributes some form of color to your scene or subject. Realizing what this ambient light consists of and having a good idea of its color temperature and the resulting effect it has on your photograph is critical to creating successful photography.
You also need to pay attention to the sources of ambient light and whether they conflict with one another. Mixed light sources can be a challenge but are much more easily handled once they are identified. It is common in flash photography that the light from the flash can look too blue or cool compared to the warmer light of the interior or setting. Later I discuss adding gels to strobes to match the lighting found on location. I also explain how the shutter speed controls the brightness value of the ambient lighting of the background when using flash.
Many times, ambient light is reflected back on to your subject. If this reflected light is a problem, it can most easily be corrected by changing the angle of the shot, the background, or both. When you photograph people, the color of the room they are in can have an effect on the outcome and can modify and filter the light to reflect warm, cool, or greenish light back on to the subject.
Hard light is undiffused light that strikes a subject directly from its source such as the light from the sun on a cloudless day. Hard light can be identified by the strong highlights it creates on the scene or subject. It also increases the contrast in the image with extremely well-defined shadows and is generally avoided when photographing people. Hard light can accentuate texture and detail in the subject depending on the angle of lighting. It is often used in moderation to provide a hair light for portraits or an edge light for products to make them stand out from a background. Mixed with soft light, a moderate amount of hard light can help define form, create separation, and increase a sense of dimensionality in the image.
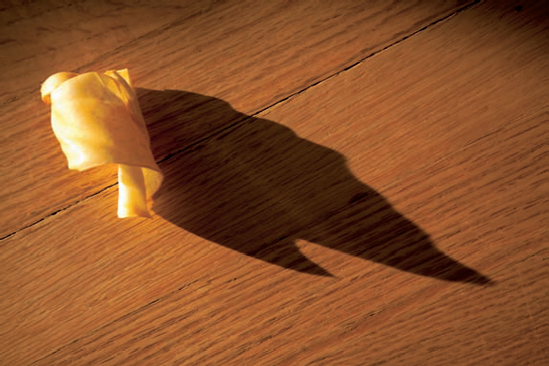
Figure 1.1. My dog's rawhide chew toy casts a well-defined shadow on the floor, indicative of the hard light quality of the direct, late-afternoon sun. Do you see a shape in the shadow that reminds you of something? Seeing light is about seeing the absence of light also. Exposure: ISO 3200, f/3.2, 1/1000 second.
Soft light is broadly defined as any light that is diffused or reflected by some material to scatter the light rays so that they strike the subject from various angles. This type of light fills in the shadows a bit and reduces the intensity of highlights. Soft lighting is the preferred choice for portrait photography because of its natural depiction of skin, hair, and clothing, moderate contrast, and overall pleasing visual effects. Soft light is most commonly found on a cloudy day where the light from the sun passes through the clouds and scatters, producing less intense shadows, softer transfer edges to shadows, and more diffused highlights. Soft light from overcast days can look slightly cool in your images, so setting your camera to the cloudy white balance setting brings back some necessary warmth to the image. Soft light can also be created in the studio by using lighting modifiers to diffuse the hard light emitted from the direct flash, such as umbrellas, softboxes, and beauty dishes. Much like hard light, too much soft light can reduce shadows and have a detrimental effect on the image by reducing contrast and making the image look flat. In these situations, I try to find some color-contrasting elements to work into the image to give it some edge.
To produce the desirable soft light for your subjects, you must use diffusion to spread out the light and make it more even. Diffusion involves passing hard light through some type of semitransparent material to scatter the light rays so that they strike the subject from various angles. In these instances, the diffuser effectively becomes the light source in place of the original source.
While the sun is extremely large in reality, it is very far away and thereby a very small light source that produces hard light on a cloudless day. When clouds come between you and the sun, they diffuse the light and also make the light source larger because of their closer proximity to the earth. A larger light source produces softer light in much the same way that any light source is softer the closer it is to the subject. You can make great macro shots of insects and flowers with a speedlight because of the relative sizes of the light source and subjects. Conversely, a light source produces harder light the farther it is from the subject. Understanding this relationship between the size of the light source and the size of the subject helps you produce hard or soft light in any photographic situation.

Photographers striving for the most depth of field for a particular image might assume that all they have to do to attain it is to use their smallest aperture. But using small apertures may introduce the undesirable phenomenon known as diffraction to your images. Diffraction occurs when light is squeezed through a small opening such as when you're using small apertures. As the light rays bend over the edge of the obstructing object, in this case your aperture blades, the light rays tend to vibrate and disperse the light and this can result in a softly focused image. The problem lies in the fact that when light passes through a large aperture, a very small percentage of light that strikes the sensor is diffracted, but the amount of diffracted light increases as you stop down the lens to the point where more of the diffracted light reaches the sensor.
This is often a problem for photographers who regularly need the maximum depth of field for their images that a smaller aperture affords. Check images shot using your smallest aperture on the computer to see if they are affected by diffraction. You may need to open up a stop or so if you find the amount of diffraction unacceptable.
Lens flare is an optical effect that most photographers experience as unwanted colored objects that cause a degradation of image quality. You can avoid lens flare in your images by using a lens hood or blocking the light that falls on the face of your lens. When hard, direct light enters your camera lens from an angle, it bounces around inside the lens and reflects back and forth between the lens elements. These elements are often coated with special solutions that sometimes mingle with the stray light rays to form multicolored halos, hexagons, or octagons that mimic your aperture's shape. These can be avoided by using a lens hood, your hand, or a piece of cardboard to shade the front of your lens. By doing this, you bring back all the clarity, contrast, and color the shot needs to be successful.
The luminance value of a subject is the amount of light that is returned from a certain area of your subject. Luminance depends on the angle of light and also the angle of the viewer's eye when looking at the subject. Photographers speak of luminance in reference to the amount of light that returns to the camera from a subject and how bright in the image that subject appears. In an ideal world, the luminance of the subject would equal the luminance of the lighting source, but this is rarely the case. The luminance values of a subject can only be equal to and not greater than the brightness of the source. Taking into account the luminance of a subject, the photographer controls the subject's brightness in the image by managing the aperture and the shutter speed.
The efficiency of a subject refers to how much light is reflected back to the camera from its surface or color. When photographers speak of a subject's efficiency they also take into consideration how much light they need to expose it correctly in a photograph compared to the surrounding tones and elements in the picture. A shiny white car is doubly efficient because of its color and also its surface shine. When exposing an image, you must be aware of the subject's surface finish and color and how large the subject appears in the photo. A black sweater or dog would exhibit low efficiency and would need lots of light or exposure to make up for the dark material's absorption of light.
Specularity is the ability of light to travel in a straight line and produce direct mirrored highlights of its source in highly reflective surfaces. This is seen in the reflected highlights of the sun in an automobile's chrome bumper or paint job. Streetlights and the small decorative strands of lights used to adorn holiday displays are examples of points of light. In speaking about reflected lighting qualities, a diffused highlight refers to the subject's color that brightly shows through, compared to a specular highlight, which is the reflection or mirror image of the light source itself.
The direction of the light is important because it determines where the highlights and shadows fall and the amount of three-dimensionality in the photograph. Shadows add depth to a scene and the photographer has to determine the direction of the lighting on the subject to either show or hide detail. Lighting direction is controlled in the studio by moving the actual lighting around. On location it's done by posing, changing the position of the subject, shooting at a specific time of the day, or adding supplemental lighting to accent what ambient light is already there. This section looks at the four main ways of lighting your subject.
For most photography uses, front lighting is the least desirable because it produces flat results with all the shadows falling away from the camera. This is the lighting effect caused by using on-camera flash and is the main reason many photographers have an aversion to flash photography. Front lighting fills in all the nooks and crannies on the surface of the subject, eliminates textures, and removes the shadows that help define form and complement the highlights. Front lighting can also cause special confusion for the viewer because the lighting is flat, illuminating everything the same.
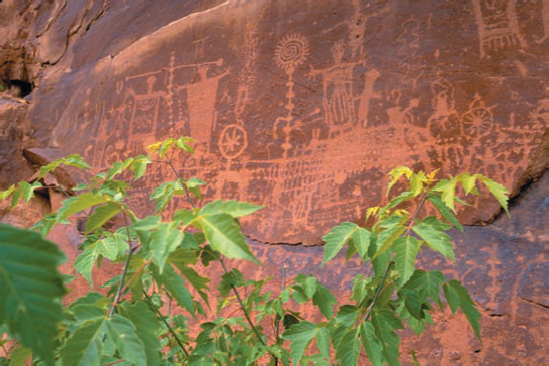
Figure 1.5. In this front lit scene of petroglyphs from the Utah desert, there are no shadows to give the viewer a sense of depth and dimension. I tried to work some visual interest into the scene by stepping back and including the green bushes to add color contrast to the red rock wall. Exposure: ISO 100, f/11, 1/250 second.
Side lighting occurs when the light strikes the scene or subject from a low angle off to one side and can be used for dramatic pictorial effects of shadows under hard lighting conditions. The lower the light source is the longer the shadows are and the brighter the highlights are on the side of the subject facing the light source. Side lighting is a great technique when you want to show texture and surface qualities of an object.
Side lighting creates highlights and shadows across the side of the subject that faces the camera and can have a dramatic effect on portraits. This lighting is often employed in food, fashion, and catalog photography to accentuate the product and add separation from the background. By placing the side or rim highlights against a darker-toned background, more dimension is created.

Overhead lighting occurs when the light source is directly over the top of the subject, such as the light from the sun at noon on a cloudless day. The top of the subject receives a strong highlight from the light source and the shadows are directly underneath and very noticeable. Overhead lighting is often used in the studio with reflector cards off to either side of the subject to kick fill light back into the side that faces the camera. Depending on the material they are made from, the reflectors only return a percentage of the top light and can be moved closer or angled to increase or decrease this percentage.

Figure 1.7. It was late morning when I photographed this bicyclist with overhead sun. I used my flash on TTL mode to brighten up any shadows. Exposure: ISO 100, f/16, 1/25 second.
Overhead lighting for outdoor photography is not so forgiving. Photographers tend to avoid this kind of lighting for architectural, landscape, portrait, and nature work and others simply call it bad light and go photograph something else. Photographers who don't have this luxury have incorporated flash and flash techniques into their repertoire to fill in the heavy downward shadows on people or objects that may appear in the images. For portraits, the strong downward shadows of the eyes and chin must be filled in for the people to look natural, and flash is perfect for this type of lighting by adding light where you need it.

Figure 1.8. Top and side lighting can be a creative way to separate your subject from a darker background as in this photograph of some fresh New Jersey corn. Late afternoon sunlight from above right illuminates the top and right side of the corn and background flowers. Exposure: ISO 500, f/2.8, 1/2000 second.
Figure 1.9. Bottom lighting is generally avoided for most photography but is often employed for its unsettling effect in horror movies. My mild-mannered friend Keegan holds a speedlight in his lap while I trigger it wirelessly to create the psycho effect. Exposure: ISO 400, f/5.6, 1/200 second.
The opposite effect of top lighting is bottom lighting and is generally avoided for most photography subjects. Because people are conditioned to expect lighting to come from above such as the sun or interior lighting from a ceiling, bottom lighting produces an eerie effect in (and psychological reaction to) photos of people that are lit this way. This type of lighting is successfully exploited for horror and monster movies to create an emotionally disconcerting response in the viewer.
Backlighting your subject can produce dramatic results but can be one of the most challenging lighting techniques to manage properly. If the most light for your image is coming from the rear, that means that the side of the subject that faces the camera is in shadow and must be compensated for with additional light or exposure. The camera's internal light meter is hard pressed to get this type of exposure correct because of the bright backlighting, strong shadows in the front, and drastic difference between the lighting levels.
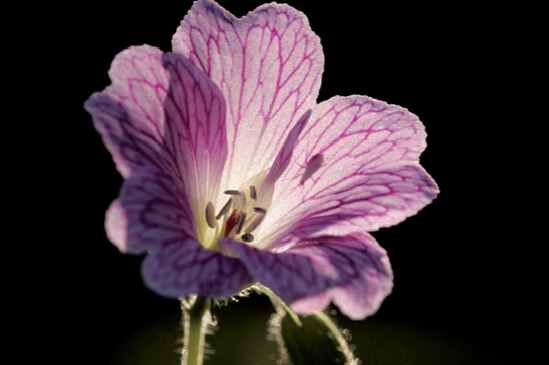
Figure 1.10. Strong, late-afternoon backlighting illuminates this wild geranium flower against a darker shadowed background. It was only after I started to compose the image with my macro lens that I noticed the insect silhouette on the opposite side. Exposure: ISO 100, f/8, 1/125 second.
Figure 1.11. Reception hall lighting backlights the wedding band in this photo where I noticed the lighting effect and turned off my speedlight to prevent it from firing. I underexposed by 1/2 stop to darken the silhouette against the brighter background. Exposure: ISO 1000, f/2.8, 1/125 second.
At this point, you have several options available to you to manage or manipulate the lighting scenario. If your subject is fairly transparent, such as a flower or foliage, opening the aperture slightly produces enough exposure and the lighting position helps saturate the colors even more.
You could add supplementary light into the photo with a reflector card or speedlight, or you could underexpose slightly to create a dramatic silhouette. Either way, backlighting is a fun and exciting way to add depth and drama to your photos.
Light, whether it is sunlight, moonlight, fluorescent light, or light from a speedlight, has a color that can be measured using the Kelvin scale. This measurement is also known as color temperature. One of the advantages of using a digital camera is the ability to measure the color temperature of light through the lens. If your camera is set to the Auto white balance (AWB) setting, it automatically adjusts the white point for the shot you are taking. However, using Auto white balance all the time can result in inconsistent images from shot to shot as the lighting conditions change even slightly. It's better to use one of your camera's white balance presets or perform a custom white balance setting for each lighting situation you encounter.
Tip
If you shoot JPEG images, the white balance is set in the camera by the preset you choose. If you shoot RAW images, the white balance setting is only "noted," and you can set or adjust the white balance in the RAW conversion program after the image is captured.
The whole point of setting the white balance in the camera is to achieve a neutral balance to the colors under all conditions of light, not to make a picture too orange or too blue. The white balance setting in the camera compensates for a shift in the color temperature of the scene by shifting back the opposite direction. For example, setting the camera to the Cloudy white balance preset (6500K) and shooting in bright sun will add some warmth to the photo. If you set the camera to the Incandescent white balance and shoot outdoors in daylight the image will appear bluish. White balance can be used creatively to warm up or cool down an image, but it's best not to overdo it so that the image looks unnatural.
Consider these approaches regarding white balance for shooting scenes in different lighting conditions:
Higher color temperatures appear cooler. If your digital camera is set to a white balance setting that represents higher color temperatures (above 5000K), the colors in your images appear more blue, or cooler.
Lower color temperatures appear warmer. Setting your digital camera to a white balance setting that represents lower color temperatures (below 5000K) makes the colors in your images appear more reddish orange, giving a much warmer appearance to skin tones.
Speedlight flashes are set to 5000-5500K. Most speedlight flash units produce light with a color temperature of around 5000-5500K. When shooting subjects with lots of ambient light and flash, try the different white balance presets on your digital camera to see which ones you like, gel the flashes to match the ambient, or just keep your camera set on the AWB or the Flash preset. Adding colored gels to your flash is a technique used to balance the light from the flash with the available light of the scene.
Auto white balance (AWB) settings can be very accurate. Today's digital cameras are accurate in measuring a subject's white balance. Setting your digital camera to Auto white balance often results in a correctly color-temperature-balanced image in a broad range of photographic situations. This setting, however, may exhibit inconsistency. The reason for this is that the color of light reflected in one shot to another can be slightly different because elements change within the scene, so the choice made by AWB from shot to shot will likely change. Even though the white balance may change slightly from shot to shot, AWB is my go-to setting when pressed for time in very difficult lighting situations.
Shoot in RAW format for ultimate control of white balance. Most dSLR models can shoot images in the manufacturer's proprietary RAW mode. When shooting your images in RAW format instead of JPEG, you can adjust the white balance of your images during or after transfer of the files to your computer. By using the RAW conversion software that was included with your camera or using Apple's Aperture, Adobe Camera Raw, or Adobe Photoshop Lightroom, you can adjust the white balance of an image after you import it into the computer.
Similar to Fahrenheit and Celsius, Kelvin is a temperature scale normally used in the fields of physics and astronomy, where absolute zero (0K) denotes the absence of all heat energy. The Kelvin scale was devised by heating a metal bar referred to as a black body radiator to specific temperatures and noting the color changes as the temperature increases.
For most people, the color scale of Kelvin and color temperature is opposite of what you generally think of as "warm" and "cool" colors. On the Kelvin scale, red is the lowest temperature, increasing through orange, yellow, and white, to shades of blue at the highest temperatures. Most present-day dSLRs offers three basic approaches to setting white balance. This gives you flexibility to use different approaches in different shooting scenarios.
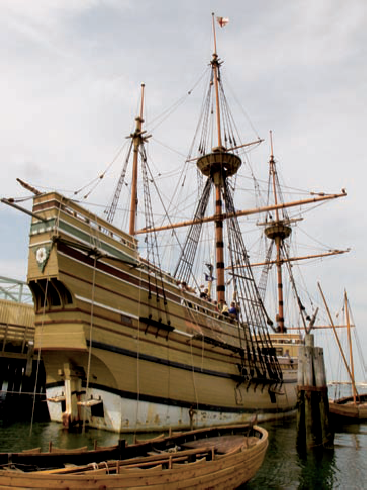
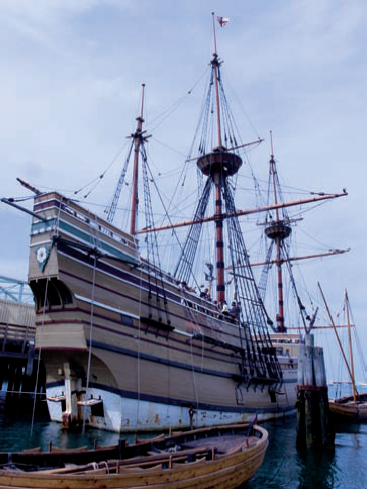
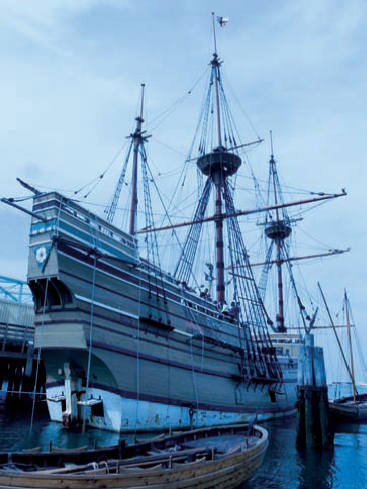
White balance options give you a variety of ways to ensure color that accurately reflects the light in the scene. You can set the white balance by choosing one of the preset options included with your camera, by setting a specific Kelvin color temperature, or by setting a custom white balance that is specific to the scene and lighting. The next series of images shows the difference in white balance settings from a photo of the Mayflower II shot outdoors in Plymouth, Massachusetts. Each photo represents a different white balance setting, with color temperatures ranging from 2850K to 6500K. The lower the color temperature, the warmer the image appears. The higher the color temperature, the cooler or more blue the image appears. The goal of white balance is to achieve color neutrality in the image, so the value must be set in such a way as to offset the light in the scene and the white balance setting on the camera. In practical application it is all about compensating and correcting the light and camera settings. Remember it's called white balance for a reason.
Tip
Don't fall into the habit of always relying on the Auto white balance (AWB) setting, especially in mixed light or other difficult lighting situations. Once you decide on your scene, it takes less than a minute to perform and set a custom white balance.
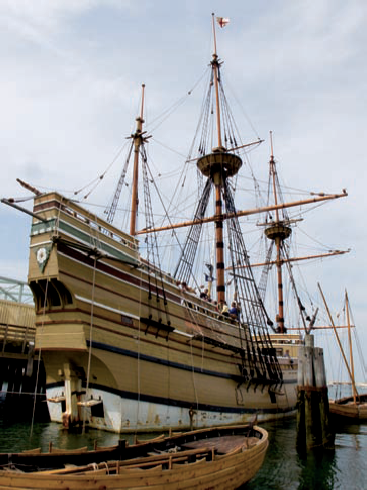
Figure 1.12. Daylight white balance, 5500K. Exposure for all Mayflower II images: ISO 100, f/8, 1/800 second.


Here are some tips that provide a starting point for using each of the three white balance methods:
Use a preset white balance setting. For outdoor shooting, especially in clearly defined lighting conditions such as bright daylight, an overcast sky, or in fluorescent light, using one of your camera's preset white balance settings produces accurate color in most cases. The exception is shooting in mixed light and using the Auto white balance (AWB) setting, which I feel produces less than ideal color reproduction. Otherwise, the preset white balance settings have very good color, hue accuracy, and are convenient to use in many types of lighting conditions.
Set a specific color temperature. With this option, you set the specific light temperature manually. This is the best approach to use for studio shooting when you know the temperature of your strobes. If you happen to own a color temperature meter, this is a great option to use in non-studio situations as well. I use the color temperature white balance settings in any situation where I'm sure of the specific light temperature.
Set a custom white balance. Setting a custom white balance is an option that produces very accurate color because the white balance is set precisely for the light temperature of the scene. To use this option, you shoot a white or gray card such as the one included with this book, select the image of the card, and the camera imports the color data and uses it to set the image color. You can use the custom white balance as long as you shoot in the same light, but if the light changes or you add a speedlight, you have to repeat the process to set a new custom white balance. For JPEG capture, this is an accurate technique that is highly recommended.
Daylight is a global term used to describe a wide array of lighting conditions attributed to the sun as it arcs across the sky. The term is attributed to camera films that were said to have a daylight white balance of 5000 degrees Kelvin but were only precisely accurate for a short time of the day. Daylight can include light on sunny and cloudy days as well as the light in shaded areas. Light during the day can range from bright red and yellow in the mornings to clear white light at midday then back to the warmer red and yellow tones of late afternoon. These short times of sunrise and sunset lighting conditions are considered the best times to photograph by landscape and nature photographers because of the beautiful warm light and long shadows. The term alpenglow was actually coined to refer to these golden hours of warm light as it fell upon the Alps. Lighting taking on these warmer qualities has to do with the angle of the sun along with the direction and distance these rays have to travel through the earth's atmosphere.
Because of the sun's position, less clear white and blue light is allowed to pass through the atmosphere and as the light rays travel farther and farther they become redder and redder. When something does finally block their path, such as your subject at these times, the light appears much warmer in red-, orange-, and yellow-toned light. As the sun starts to set, many of these light rays are scattered and reflected away and the light from the sun appears less intense. As the sun sets, it appears to change from white to yellow and finally to red.
As the day progresses the longer, warmer wavelengths of light pass through the earth's atmosphere and are broken up into smaller wavelengths by moisture, dust, or reflected back into the sky. These much shorter wavelengths of light are the reason why the sky appears blue during the day and the light from the sun appears clear or a neutral white.
Tungsten or incandescent light sources are mostly encountered indoors in the form of ordinary household light bulbs. As the wattage and filament used to produce the bulbs varies, so does the color temperature of the light emitted, which must be accounted for by the photographer. Supplemental light bulbs for photographic applications are often referred to as hot lights, not for their constant 3200K rating but for the fact that they produce a lot of heat and can be quite uncomfortable lighting for subjects. Because of this, very few photographers use hot lights anymore, or if they do, they prefer to use the newer, cooler fluorescent versions.
There is also wide variance in the wattage and color output among various manufacturers' bulbs, so it is important perform a custom white balance to really dial in the camera to produce the most accurate color.
Figure 1.19. The interior of this pub in downtown Boston is accurately rendered using the Tungsten white balance setting on the camera. A small bit of daylight from a window on the left just outside the frame graces the dining room table on the right with slightly bluish light. Exposure: ISO 1600, f/3.5, 1/15 second.
Because of the deep blue cast produced by the Tungsten white balance setting when used for outdoor shooting, I prefer to use it for outdoor portraiture when using flash for the intense blue it produces in the sky and shadows of the background. You must add a gel to your flash, specifically one Color Temperature Orange (CTO) gel to compensate for the blue cast of the tungsten setting and get clean white light for your subject. You can warm up the flash lighting even more by adding additional gels in smaller intensities.
Depending upon the time of day, I may also have to use the high-speed sync capabilities of my camera and flash system to keep the ambient light levels manageable. This is a favorite technique to produce intense color with interesting effects.
Fluorescent lighting, found nearly everywhere, is the preferred type of lighting for large offices, department stores, and just about any other locations that require large light output from cool, quiet fixtures. Fluorescent light is created by sending an electrical current through a sealed glass tube that is filled with a gas. The electrical current causes the chemical phosphors inside the tube to glow and thus produce the light. Because different vendors use various phosphors in the manufacturing of fluorescent bulbs they produce slightly different colors of light that often appear white to the human eye.
Camera sensors, however, see this light as quite different and you need to adjust for this. Fluorescent bulbs come in many types with names such as designer white, cool white, daylight white, and neutral white that all vary slightly in the color temperature of light that they produce. Because of this wide variance, some cameras now include two different settings for fluorescent light sources to try to get as close as possible to a neutral white balance.
Unless color corrected, most fluorescent light sources produce an unpleasant green colorcast in your photos. Equally important is the fact that a fluorescent light's color temperature can change on a moment-to-moment basis because of even slight fluctuations in the electrical current. Photographers who are interested in lighting would be wise to become more acclimated with fluorescent lighting because it is quickly becoming more widespread as more of the population becomes more environmentally conscious and switches to fluorescent bulbs for their lower power consumption and quality of light.
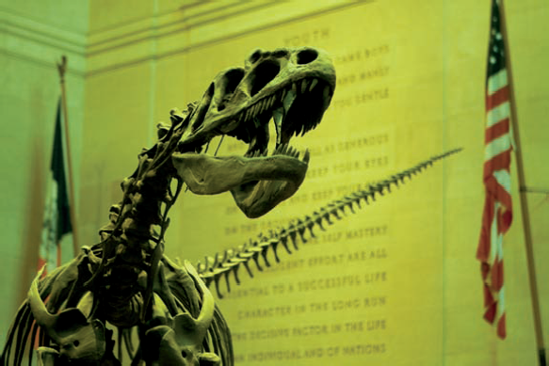
Figure 1.21. When you photograph a subject under fluorescent lighting with the camera set to Daylight White Balance, the discrepancy in lighting temperatures is evident in the overall greenish cast and must be compensated in the camera or on the computer later on. Exposure: ISO 1000, f/2.8, 1/40 second.
There are a few ways to manage shooting under fluorescent light on locations. You can set your digital camera to one of the Fluorescent white balance settings or shoot in RAW format and color correct later on your computer. To add more punch to photos I create in fluorescent light environments, I have found great success by setting my camera to its Fluorescent white balance setting and adding a speedlight fitted with a green gel to match the ambient fluorescent light.
Neon lighting and the vast array of lighting options such as halogen, mercury vapor, and so on, present challenges for the digital photographer to accurately measure and record the light and color. If you are using flash, add color gels to the speedlight to match the flash's output to the ambient lighting conditions. The problem is that it is very hard to determine the type of ambient light on a consistent basis. As if this weren't challenging enough, when you add a third light source, such as daylight coming into the scene from a window, all bets are off and you have to decide which light sources are the most important and go from there. My best advice is to try your white balance presets and check the results on your camera's LCD monitor. If that fails to produce the results you seek, perform a custom white balance or delve into your camera's Kelvin temperature capabilities to tweak the light as best you can. While I always recommend getting the exposure and white balance as accurate as possible in-camera, mixed light sources such as neon and others may require a bit of tweaking in post-production.

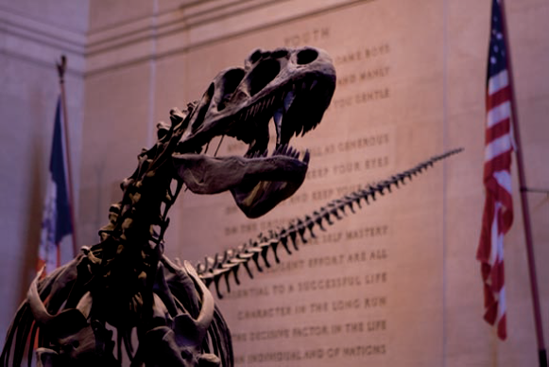
Figure 1.23. T-Rex photographed inside a toy store under a mixture of neon, halogen, fluorescent, and incandescent light sources. While it may take a few moments to perform a custom color balance in a location like this, I prefer to shoot in the RAW format and adjust my Auto white balance (AWB) setting and color correct to taste later on the computer.
If you'd rather be out shooting images instead of behind a computer color correcting them, then getting a handle on white balance is important. Different shooting assignments, the type and consistency of light, and the amount of time you have to set up the camera before and during a shoot are some of the factors that may influence your decision about which white balance approach you choose.
Mixed light scenes, such as those with tungsten and daylight, can be very difficult in getting accurate or visually pleasing image color. Two options work well to get neutral color quickly in mixed lighting scenes. If you're shooting RAW capture, one option is to shoot a gray or white card as described in Appendix C, and use that image as your white balance benchmark. The second option is to create a custom white balance by shooting the same gray or white card image and have the camera use that image as the custom white balance.
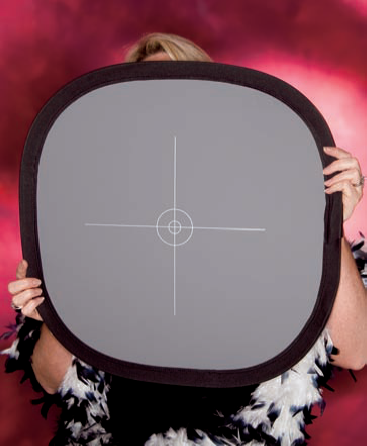
Figure 1.24. To perform a custom white balance in the studio, I have the model hold up a gray target in front of her face to accurately measure the light falling on it from the strobes, and then I zoom in to fill the frame with only the gray target to create a custom white balance. Exposure: ISO 200, f/3.5, 1/200 second.
Setting a custom white balance ensures that white is rendered as white in the specific light you're shooting in. It is quick to set, and is a great way to ensure accurate color. Every camera manufacturer has a slightly different way to perform a custom white balance, so check your camera manual for the specific way to do this on your camera, or better yet, pick up the Digital Field Guide that is specific to your camera model. It will include a detailed step by step procedure for you to do this.
When you finish shooting in the light where you set the custom white balance setting and move to a different type of lighting, remember to reset the white balance option to one of the presets or perform another custom white balance setting for the new lighting conditions.