
Aperture is another camera control that changes the quantity of light that reaches the camera's image sensor. While the shutter speed controls the amount of time that light is allowed to reach the sensor, the aperture controls the intensity of light that strikes it. Sometimes referred to as the diaphragm or iris, the aperture is an electronically controlled mechanical opening the light has to pass through in order to make an image. The size of this hole is variable and can be adjusted by the photographer. Aperture is designated by f numbers, with a lower f number signifying a larger opening allowing more light, and a higher f number representing a smaller opening that lets in less light. Understanding aperture and its effect on your photography makes your images stronger and more dynamic.

My daughter Brenna leaps over a hay bale maze at a pumpkin farm in Yakima, Washington. I used a large aperture to blur the background and to keep the focus on her, along with a fast shutter speed to freeze the action. Exposure: ISO 400, f/4, 1/2000 second.
The relationship between shutter speed and aperture is much easier to understand if you consider a bucket that you are trying to fill with water. In this analogy, the bucket is your sensor and the water represents the amount of light allowed to fall on the image sensor. You can add water to the bucket with a straw, drop by drop, in which case the bucket eventually gets filled over a long time. Alternatively, you can use a fire hose for a short burst and the bucket will fill rather quickly. The aperture is the size of the water stream into the bucket and the shutter speed is the time it takes to fill it.
You gain creative control over the elements in your photograph by making conscious decisions about which aperture to pick. Today's digital cameras include controls for changing the aperture on either the front or back of the camera, usually in the form of a dial, and also are configurable to allow exposure adjustment in increments of 1/2 or 1/3 stops to facilitate fine-tuning of the exposure. While the controls for the aperture are located on the camera, the actual aperture resides inside the lens and is only stopped down to the preselected aperture at the moment of exposure.
This relationship between the aperture and what you normally see in the viewfinder needs to be understood before you can get predictable results with your photography. The camera must maintain the largest aperture for whatever lens is attached to it to give you a bright view through the viewfinder and speedy autofocus and metering. Reducing the light values entering the camera slows these systems down and makes the image in the viewfinder too dark for you to see. By shooting images of the same subject at varying apertures you begin to learn the language of the f-stop and with time develop an understanding of how those choices affect the near and far elements in your photographs.
A lot happens when you take a picture. On dSLR cameras, you press the Shutter Release button, the aperture closes, the reflex mirror flips up, and the shutter opens to make the exposure. Of all these operations, the aperture and what it controls may be the hardest to grasp. The most important thing to think about regarding the aperture is that the larger the f-number, the smaller the aperture opening, and the smaller the f-number, the larger the opening. I know that sounds confusing, but there is a solid reason for it. The f-number is derived by dividing the size of the aperture opening by the focal length of the lens.
Imagine you are shooting wedding photos with a 100mm lens set to a medium aperture of f/8. This reveals that the size of the aperture opening is 12.5mm, or 1/8 of the total 100mm of the lens. Photographers replace the 1 in the fraction with an f/ and thereby refer to aperture settings as f/8, f/16, f/22, and so on. For example, 1/4 or 1/8 of the focal length is referred to as f/4 or f/8. Thinking this way makes it easy to see that if you need more light to make an image with a 100mm lens, you switch to f/4, which creates an aperture opening of 25mm. A bigger opening means more light. If you remember that f-stops are fractions of the total focal length of the lens, it becomes much easier to understand the relationship of the numbers as to how much light they let in.
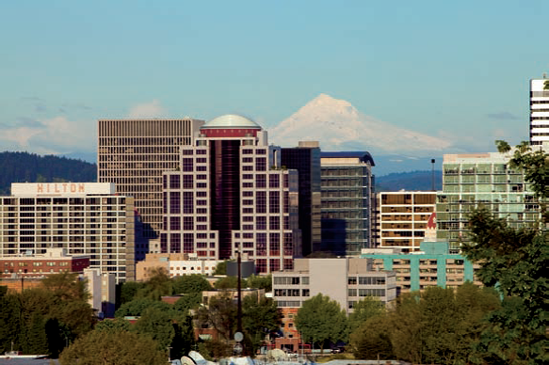
Figure 4.1. The Portland, Oregon, skyline with Mount Hood in the background required a small f-stop to achieve the desired depth of field. Exposure: ISO 500, f/11, 1/400 second.
You can control the aperture with today's digital cameras in a number of ways. Several models include special scene modes such as Close-up, Portrait, and Landscape for specific shooting situations. My advice would be to try them in a pinch to see what kind of results they produce, but don't spend a lot of time shooting in them. You can do a much better and more accurate job in Programmed Auto, Aperture Priority, or Manual mode.
Programmed Auto and Aperture Priority modes are quick modes to switch to when the action picks up. Many photographers choose these modes because you can adjust the aperture to let more or less light in and the camera automatically changes the shutter speed to compensate for the change. This makes shooting on the fly fun and easy.
In Programmed Auto mode, the camera picks safe aperture and shutter speed combinations that avoid the extremes depending on the information received from the camera's onboard light meter. You turn a dial to your preferred exposure setting and the camera does the rest. This mode is a great way to learn the relationship between aperture and shutter speed as you see how the camera compensates for each exposure change.
Manual mode is the choice of many photographers who want to control all aspects of the exposure. Shooting in Manual mode means it can be very easy to under- or overexpose your images if you are not paying close attention to the changes in lighting, but it affords the most creative control of all. Even though you are picking both the aperture and shutter speed values, the camera still gives you feedback via the built-in light meter as to how your settings stack up in terms of your ISO settings and a proper exposure.
All lenses used for photography produce only one true plane or area of focus but include areas of adequate focus in front of this plane and also behind it. When you focus your lens on an object exactly 10 feet away, it may appear that some things a bit closer or farther away are also in focus. In reality, the only true point or plane of focus is at precisely 10 feet. The appearance of sharpness in front of or behind the area of true focus is referred to as depth of field (DOF). The aperture is the main factor that determines the DOF in your images. A large aperture creates a shallow depth of field while a small aperture yields a deep depth of field. Understanding and manipulating DOF with aperture and magnification via lens selection makes your images so much stronger by placing the viewer's attention exactly where you want it.
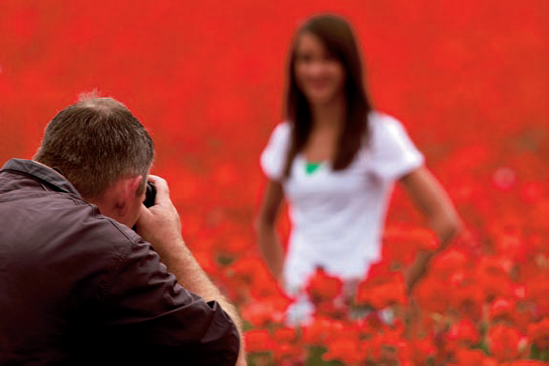
Figure 4.2. I captured photographer Ted Miller creating senior portraits of a young lady at a nearby poppy field. A large aperture was used for a 350mm lens to keep the focus only on him and blur the entire background. Exposure: ISO 50, f/5.6, 1/250 second.
Depth of field is where the magic of apertures becomes evident, but it is one of the hardest concepts of photography to understand. The problem is in the approach many people take to photography by usually shooting in the safe auto modes and never really seeing the benefits of choosing the aperture because their photos look okay for the most part. Furthermore, the lenses that come with camera kits don't show all that much difference between f/8 and f/16 without seeing it on the computer, making it difficult to grasp the creative power and advantages of controlling the depth of field. DOF comes in various strengths for the many picture-taking situations you encounter.
Selective focus means limiting the depth of field and is the ideal approach for many picture-taking situations where you want to blur out a background or foreground to keep your subject in the viewer's eye.
By controlling the aperture, you control how great or small the range of acceptable focus is in your photograph and where the viewer's eye lingers.
You can apply selective focus anywhere in the frame, but the closer you are to your subject and the farther it is from the background, the more dramatic your results are. Selective focus can be employed anytime you want to manage the elements in your photograph for maximum impact.
You control the depth of field in your photograph by aperture and lens selection. You achieve a greater depth of field by using small apertures and a shallow depth of field by using large ones. Lens selection also plays a part in DOF because when the magnification is small, such as when using wide-angle lenses, the DOF is great. As the magnification of the subject increases, the depth of field decreases. Choosing the right lens for the shot you see in your mind's eye comes with visualizing how you want the subject to look.
Many digital cameras include a dedicated button for checking the depth of field of the scene called a Depth-of-Field Preview button. When this button is pushed, the lens is temporarily stopped down to the preselected aperture setting so you can see the range of the depth of field for that f-stop in the viewfinder. When you stop down to f/11 or f/16 the scene becomes extremely dark, almost too dark to see, and certainly too dark to focus with unless you are in a very bright environment. Give your eyes a few seconds to adjust and look for elements in the scene achieving greater sharpness. Adjust the aperture to a higher f-stop number for greater depth of field and a lower number for less. When you're pleased with what you see in the viewfinder, release the Depth-of-Field Preview button and shoot the picture.
A shallow depth of field can be employed by selecting an aperture of f/5.6 and under when you only want a small part of the scene or plane of focus to be sharp in the final image. A shallow depth of field is very useful for separating your subject from a busy or distracting background. The widest aperture on your lens provides the shallowest depth of field and is often referred to as shooting wide open. You can further reduce the DOF by moving in closer to your subject, moving your subject farther away from the background, or switching to a longer focal length lens.
You often see shallow depth of field in sports action, wedding, and product photos, and these images are all indicative of a very large aperture. You must pay particular attention to focusing when using large apertures because the margin of error is high if the lens is not focused properly on the subject. With such a small window of acceptable focus when shooting wide open, special care must be taken when focusing; otherwise a set of blurry photos could be the result.

The middle aperture settings between f/6.3 and f/11 are considered safe to use because of the ample depth of field they provide, which is neither deep nor shallow. There used to be a saying among photojournalists that the secret to a great shot was "f/8 and be there." The middle f-stops are usually where your lens is the sharpest and the range of focus is very forgiving if your focus is slightly off.
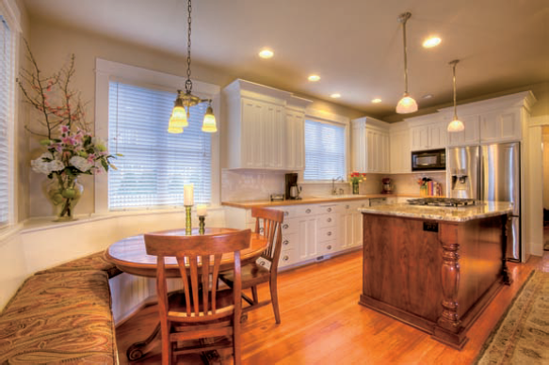
Maximum depth of field is often sought for landscape, interior design, and architectural photography where a large expanse of area must be rendered tack sharp throughout the image. This is achieved by setting a very small aperture for your lens and then selecting a corresponding shutter speed. This often necessitates using a tripod unless you are in a very brightly lit scene or location.
Lenses with a single focal length are often referred to as prime lenses and have a constant maximum aperture. For example, a 50mm f/1.4 lens has a focal length of 50mm and a maximum aperture of f/1.4. Zoom lenses, with a range of focal lengths in one lens, come in two types: variable and constant aperture.
Variable aperture zoom lenses use different maximum apertures as the lens is zoomed and the focal length increases or decreases. They're still capable of all the other f-stops up to the smallest aperture, but as the focal length changes so does the maximum aperture. This maximum aperture variance is clearly designated on the lens barrel or on the face of the lens around the front lens element as in Figure 4.8.
Suppose you are shooting with a 70-300mm f/4-f/5.6 variable aperture lens at a sporting event. When the lens is set to the 70mm zoom setting you can achieve a maximum aperture of f/4, and when the lens is fully zoomed out to 300mm the maximum aperture changes to f/5.6. The maximum aperture changes automatically as you zoom in or out through the range and this is communicated to you via the viewfinder or LCD readout on the outside of the camera.
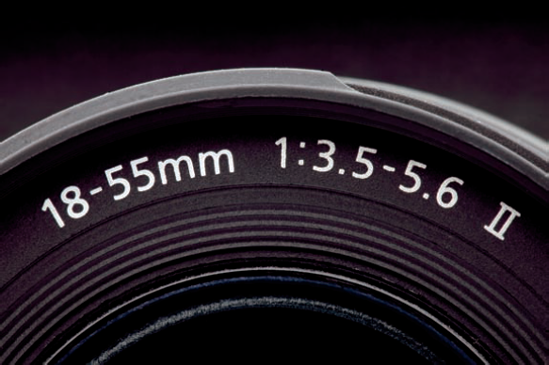
Figure 4.8. This 18-55mm zoom lens is a variable aperture lens with a maximum aperture range of f/3.5 at the 18mm focal length and f/5.6 at the 55mm focal length.
The camera makes this adjustment for you in any of the shooting modes but can be especially vexing in Aperture Priority mode where you have specifically chosen the largest aperture setting of f/4. You compose your shot of the action as 70mm and purposely choose f/4 to blur the background and allow you to shoot with a faster shutter speed. However, when you zoom in to get a tighter shot of the scene, the aperture changes to f/5.6 and automatically drops the shutter speed 1 stop to compensate for the loss of light from the smaller aperture. This is a problem because now you may be in a shutter speed range that is too slow for the lighting conditions to nail the action, which could cause the scene to blur from camera shake.
Why are variable aperture lenses so popular? There are two parts to the answer. They are less expensive to manufacture because they are smaller than constant aperture lenses and use less sturdy materials in their construction thereby making them more compact and lightweight. Variable aperture zoom lenses are often included in kits when you purchase a new dSLR body and their cost is a fraction of their bigger, heavier cousins in the same focal-length range. Couple the size and weight factor along with the significant cost savings and you can see why many photographers don't mind losing that extra stop.
If this is the type of zoom lens on your camera, do not fret over that lost f-stop. Here are a few tips to consider to still get the images you desire when using variable aperture zooms:
Recompose the shot by moving in. If the largest aperture is important to you for its ability to blur the background or other qualities, try zooming out to attain that maximum f-stop while physically moving in closer to the subject for the same look to the composition.
Raise the ISO to keep the same shutter speed. When the shutter speed drops to a lower speed to compensate for the loss of 1 stop of light when you zoom in, raise the ISO to get back to the speed you were using with the larger aperture.
Move the subject farther away from the background. Create more distance physically between the subject and the background by looking around for a different shooting angle. This works great with portraits and you can achieve the same look as the image shot with a larger aperture.
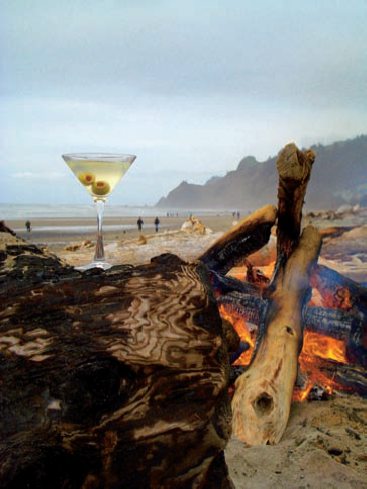
Figure 4.9. A point-and-shoot camera in Aperture Priority mode with a variable aperture lens was used to make this image of a cocktail and a bonfire on the beach along the Oregon coast. Even with an aperture of f/9, there is still adequate depth of field throughout the scene to render the fire, people, and mountains acceptably sharp. Exposure: ISO 100, f/9, 1/100 second.
Any lens that has only one focal length uses a constant aperture and is considered a prime lens. These lenses offer the full range of apertures no matter where you focus or how you compose the shot.
Some photographers swear by prime lenses for this factor and the quality of images they deliver. Prime lenses are slightly more difficult to compose with because you have to physically move your body to frame the shot instead of just zooming the lens. For this reason, along with image quality, many photographers choose more expensive zoom lenses that include a constant aperture. The maximum aperture of these lenses remains constant at all the focal lengths the lens can provide. That means a 70-200mm f/2.8 zoom lens keeps its maximum aperture of f/2.8 throughout the zoom range. It also means that lens is heavier than its variable aperture counterpart and physically larger. Photographers often refer to these lenses as fast glass because their maximum apertures are in the f/2.8 to f/4 neighborhood.

Figure 4.10. This 24-70mm constant aperture zoom lens shows its designation as such on the side of the lens barrel. It maintains an available aperture of f/2.8 throughout its zoom range.
Constant aperture lenses are the first pick by professional photographers who can't afford to compromise on image quality and are willing to pay considerably more for that constant f-stop throughout the zoom range. These lenses are usually classified in your manufacturer's professional line and are more durable, weather sealed, and made with better quality materials that add weight and bulk to the lens. Some are made with higher-quality, special low-dispersion glass that transmits light better than a standard lens.
If you accept the considerable increase in price, the major advantages of constant aperture zoom lenses are:
They are excellent in low light. Because they usually have a 1- to 2-stop larger maximum aperture than variable aperture lenses, they work better in many low-light situations such as weddings, concerts, and nighttime photography.
The aperture remains the same throughout the zoom range. The maximum aperture is available from the shortest to the longest focal length, meaning you have the full range of apertures to choose from over the zooming range of your lens.
Autofocus works faster. A larger aperture means the camera has more light to work with and the auto focusing system works faster. More light also means a brighter image in the viewfinder, which can speed up manual focusing and composing the image as well.
Only you can decide if these lenses are worth the extra expense by considering the type of photography you do. Most manufacturers release new camera bodies with some new features every 12-18 months but lens debuts are much less frequent than that. You may want to consider purchasing a better lens rather than upgrading camera bodies next time a new one comes out. For photographers who shoot a variety of events like I do, having a lens with a constant aperture that delivers a brighter image in the viewfinder is a necessity and a true joy to work with.
The most popular size of constant aperture lenses across many manufacturers is the 70-200mm f/2.8 zoom lens. Canon, Nikon, Sigma, Sony, and Tamron all make them with various cosmetic differences, but they offer varying performance and flexibility that lens affords across a wide range of price points. Adding Image Stabilization or Vibration Reduction to the lens further increases the cost, but this technology allows you to shoot at slower shutter speeds than you normally would be able to with a comparable zoom lens without it.
Macro and close-up photography involves filling the frame with your subject, and to do that you almost always have to get closer to it. This type of photography can be very rewarding, and special attention must be paid to camera placement and aperture in order to get adequate depth of field. As you move closer to your subject, the magnification rate increases and the depth of field begins to diminish. Even very small apertures may not be able to give you the depth of field your subject requires. With insects and flowers, your depth of field may be less than an inch using your smallest aperture.
The biggest hurdle photographers face when creating successful macro photography is getting the proper lighting and depth of field for their subject. They understand the need for very small apertures, but this often puts them into the predicament of having to use slow shutter speeds to get enough light into the camera. This can be solved by using a tripod if you're in the studio or taking static shots indoors, but in the field a tripod is not always a practical solution because of the time and room it takes to set up.
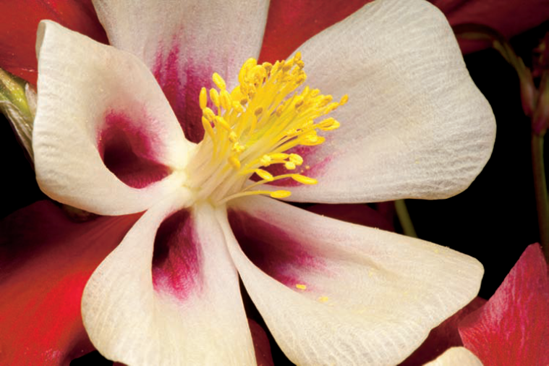
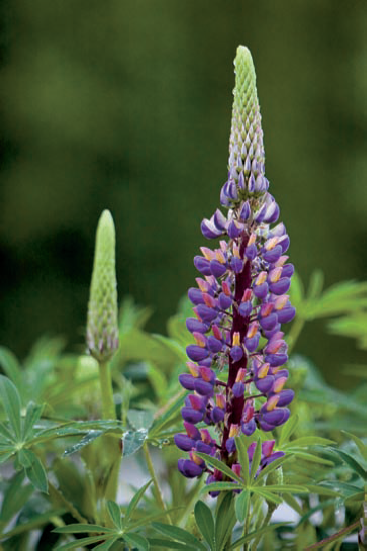
Figure 4.11. This columbine flower was lit by holding a speedlight with a small softbox diffuser directly over the top of it. Because the light source is bigger than the subject, the lighting looks soft. Exposure: ISO 100, f/32, 1/160 second, f/32, ISO 100.
Working very close to the subject in order to fill the frame with it also means that any movement in the frame is greatly exaggerated, so a higher shutter speed is necessary to produce a sharp image. You must also watch the relationship between the subject and the background and make sure they do not interfere. Remember the camera's aperture only stops down to the f-stop you selected at the moment of exposure, so when you compose the image you are looking at the scene through your lens's widest aperture. Check your camera's Depth-of-Field Preview if it has one and recompose the shot if the background takes attention away from your subject.
I often use an external speedlight and a small softbox diffuser, either handheld or on a bracket attached to the camera, when taking close-up and macro photos. This allows me to use the aperture of my choice at a shutter speed I can safely handhold, leave the tripod in the van, and work faster. When the light source is larger than the subject, you get soft light even if it comes from a hard source like a speedlight flash. By shooting small objects with a softbox-equipped speedlight, I actually can get softer light that looks natural. If the background goes too dark as to look unnatural, I add a second speedlight to light the background and trigger it wirelessly.