
Just because the sun is setting and light is quickly fading does not mean you have to pack up your camera gear and stop shooting for the day. Actually, the fun is just beginning. This time opens up an exciting realm for creating low-light and nighttime photography. This chapter gives you the insights you need to make dazzling images in low or almost nonexistent light of a wide range of subjects and scenes. I also discuss several techniques for shooting special scenes such as firework displays and nightscapes, as well as tips for shooting High Dynamic Range and infrared photography.
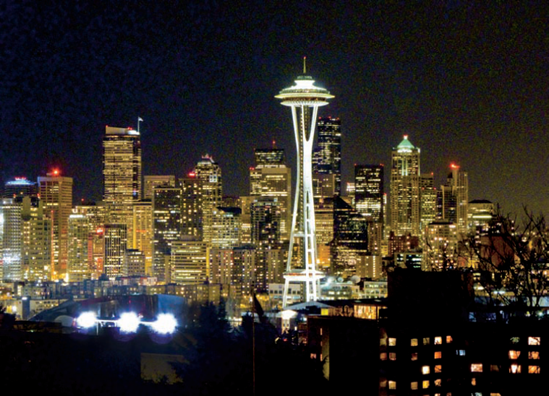
The nighttime Seattle skyline was photographed handheld with a small camera from Queen Anne Hill. Even though I strongly recommend using a tripod and remote switch for shots like this, I didn't have them with me at the time and had to compensate with camera exposure controls. Exposure: ISO 1600, f/4.5, 1/1.7 second.
Many photographers who participate in my workshops and classes relate to me the classic story of attempting night and low-light photography a time or two, being displeased with the results, and giving up and moving on to other types of photo work. Their reasons for abandoning night photography vary. For some, the final images are not representational of the scenes they photographed. Others grow frustrated because they have a limited working knowledge of the vast recording capabilities of their digital cameras. Although it's true that the longer exposures and higher ISOs required for this kind of photography can add an intolerable amount of digital noise to some of the images, advancements in camera and software technologies have made reducing that noise easier and more streamlined as well. Many of today's camera manufacturers have included low-light noise reduction at higher ISOs as a menu feature in their latest model cameras. Check to see if it's included in your camera's functions and if it is, turn it on now as you begin to explore this exciting way of capturing light.
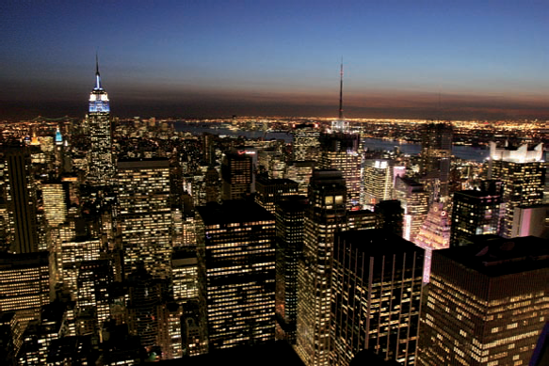
Figure 11.1. The New York skyline showing the Empire State Building and Times Square, photographed handheld from the top of Rockefeller Center looking southwest. For the best results when making images such as this, always use a tripod and remote switch. I didn't have them with me at the time and had to use a high ISO, large aperture, and a slow shutter speed to get a sharp image. Exposure: ISO 1600, f/2.8, 1/25 second.
Making images at night or in low-light situations can be vexing for many photographers. To do it right, you need to develop an awareness of the subtleties of light and the ability to estimate an exposure because your camera's built-in light meter was not totally designed to meter low levels of light falling on the sensor over longer exposures. Add to this awareness some supplementary equipment, and you are well on your way to shooting great images long after the sun has left the sky.
The first issue you need to consider when shooting low-light or night images is whether you want to shoot handheld or use a tripod. That single factor determines what options and camera setting flexibility you have at your disposal for the shooting session. I shoot loads of nighttime images both ways, but it is always my first consideration if I should use a tripod or not. Having a tripod along creates many more opportunities to get perfect exposures and also eliminates camera movement, allowing for rock-steady images. If I want to stay highly mobile and don't want to incur the added weight of carrying a tripod along, I may pass on making long exposure images unless I can find something secure to place my camera on. In that case, I would use my camera's self-timer mode to trigger the shutter.
Should you decide to use a tripod, it's a good idea to go to your location early, before the sun sets, to scope out your scene, get into position, and set up your camera. Many cameras include an illuminated LCD on the top that shows all the exposure settings lit up to help you see. If your camera doesn't include this feature, a small mini-flashlight works just as well. With your camera set to Scene mode and securely fastened to your tripod, follow this approach to get started:
Set the ISO to the lowest native value on your camera, which is usually ISO 100 or 200, and focus the lens on your subject or scene. You can use your lowest ISO because you use longer exposures to make up the difference in the light-gathering capability of your camera, and this technique helps cut down on extraneous digital noise in the image. The longer you shoot and the darker it gets, the more you have to bump up the ISO, but this is a good place to start.
Set your camera to Manual mode and start with an aperture of f/11 or f/16. This ensures an adequate focus and depth of field in case you are slightly off on focusing because of the low light levels. An added bonus of using a small aperture is that any spectral highlights in the scene such as street lights, holiday lights, or traffic signals appear in the photo as star points, an added zing to make the picture pop. The in-camera light meter's effectiveness is limited in extreme situations such as this and should be regarded as only a starting point. You can get much better results by shooting a few test frames and reviewing your exposures on the camera's LCD monitor.
As the light level diminishes, change your exposure settings. If you are not using a tripod, you will have to slow down your shutter speed, increase the aperture setting, or raise your ISO setting to be able to shoot handheld. Be sure to review the image on your camera's rear LCD monitor to ensure you're getting the exposure you want, paying close attention to your camera's histogram display. The histogram may be weighted toward the left or darker side. This is perfectly okay because you want your low-light or nighttime images to have more dark tones to look authentic.
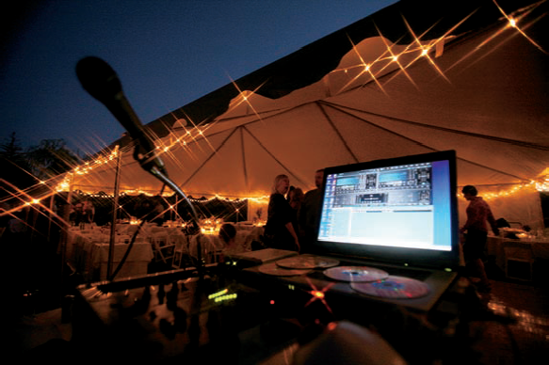
Figure 11.2. This image was shot handheld from the DJ's station at a summertime outdoor wedding reception. A screw-on cross-screen filter was used to produce the star points on the decorative mini-lights. If I had used a tripod, a small aperture setting would have produced a similar effect. Exposure: ISO 1600, f/2.8, 1/30 second.
As with all other kinds of photography, you always have three options in low-light and nighttime shooting situations to control and manage the light that strikes the sensor in your camera: changing the ISO to amplify the digital sensor signal, opening the aperture to allow more light to reach the sensor, or leaving the shutter open for a longer period of time. It's the proper mixture of these three ingredients that makes up the recipe for producing dynamic images in lower light levels.
I consider ISO settings to be the least romantic of the camera's exposure controls, and aperture and shutter speeds much more powerful tools to determine the creativity of your pictures. At the same time, the ISO has to be properly set to allow you the flexibility and broadest range of using the other two controls creatively, which is why I usually set this value first.
Using high ISOs allows you to use a proper shutter speed to ensure that any moving subject is sharp and not blurry in the final image. The challenge in these instances is to establish the slowest possible shutter speed you can use and still freeze the action. For performers on a dark stage or people standing fairly still this is around 1/60 second, but you have to be careful because anything slower than this may lead to blur of the subject, even if you are using a tripod. For more active subjects an even faster shutter speed is necessary. Set the ISO just high enough to achieve the shutter speed you need to stop the action in the scene.
As digital technology improves, most popular camera manufacturers have greatly increased the usable ceiling on ISO ranges, allowing reduced noise or noise-free images at ISO values unheard of only a few years ago. My latest camera is capable of producing images at 25,600 ISO, which I rarely use, but it's comforting to know I have access to this astoundingly unbelievable technology, once considered nearly impossible.
While I strongly recommend using a tripod and remote switch or cable release for nighttime images, it is not always convenient to do so. In several examples earlier in this chapter, that was exactly the situation I found myself in. That did not stop me from making images because I knew I could let a large amount of light into the camera by using my largest aperture for each particular lens. The largest aperture you have depends on the lens you are using, and with variable aperture zoom lenses this value becomes smaller as you increase focal length.
The only disadvantage when using your largest aperture is a loss of depth of field, although this is usually not much of a problem with cityscapes and images that are all focused at infinity. For other types of images where you have a foreground element, use a flash to illuminate it or be sure to focus on the most important part of the photo, because limited depth of field means that everything behind and in front of the focus point is rendered out of focus.

For photographing many nighttime or low-light subjects, an easy solution is to extend the time the shutter is open, allowing more of the available light to reach the sensor. This is a good method to employ with stationary objects such as architecture or cityscapes. You simply keep dialing down the shutter speed until you achieve an acceptable exposure based on the camera's LCD monitor image and histogram. The camera's sensor has the ability to record way more light than you can see with your eyes, but for this type of work it needs longer exposures in which to do so. Most cameras' built-in light meters do not accurately measure light over long exposures consistently, so for this reason it's wise to stick to Manual exposure mode when shooting with slow shutter speeds. In addition, longer shutter speeds always necessitate the use of a sturdy tripod and a remote switch or self-timer for optimally sharp images.
Another cool thing to photograph with long shutter speeds is light trails of traffic, planes, firework displays, and amusement park rides. As the illuminated object streaks through the frame, it leaves trails of light from its path. In order to create successful light trail photos, use a slow enough shutter speed to make the individual lights look like streaks of color in your photo. If you only used a medium or short shutter speed, the object wouldn't move very far and the streaking effect would be very short. When you leave the shutter open for an extended period of time, the object has time to move across the width of the frame creating long light trails. It's best to contrast these light trails visually with something stationary in the frame to give the photo some context.
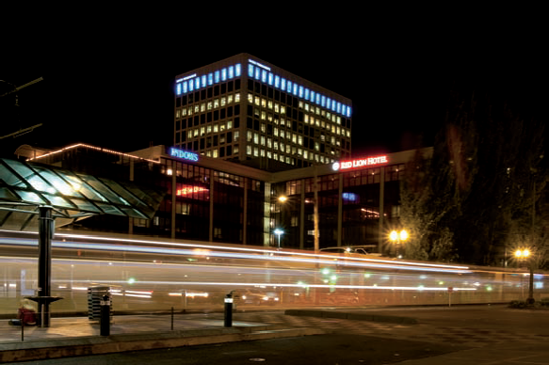
Figure 11.5. Cities are great places to look for and photograph light trails. This light rail train streaks through the scene and looks ghost-like as it crosses the intersection. Exposure: ISO 250, f/22, 15 seconds.
Employing long shutter speeds is a great way to handle subjects that do not move, and some interesting effects can be realized when you photograph this way. However, there are a few downsides to shooting longer exposures you may need to consider:
Noise. With most cameras, digital noise is evident in images shot with longer exposures even when using low ISOs. This is not so much of a problem if you print small-size prints or use the images online, but it is readily apparent when you make larger-size prints. Noise Ninja (
www.picturecode.com) is a very affordable software program that is the industry standard for reducing excessive noise in digital camera images or scans.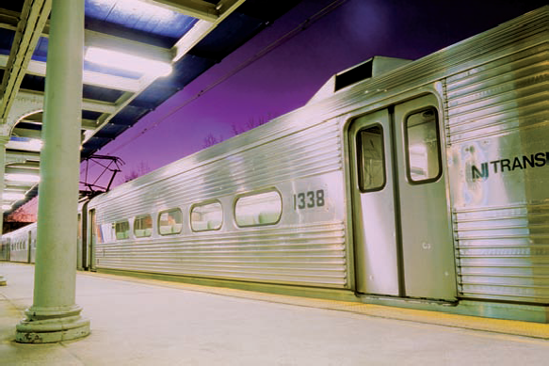
Figure 11.6. Do you see any people in this shot from the Trenton, New Jersey, train station? In the time it took to make this exposure about 20 people walked between my tripod-mounted camera and the train as I held the shutter open for 1 minute. Because no one paused in the frame, the low-light level and long exposure time combined to render them invisible. If you look closely at the very far-left edge of the frame, you can see a slight blur of people exiting another door of the train. Exposure: ISO 100, f/22, 60 seconds.
Movement. Over long exposures, anything moving that stays in the frame is blurry. Any action in the frame, or even people standing still, may not be tack-sharp, creating an image situation many photographers refer to as ghosting.
Camera shake. Even with the camera mounted on a tripod, tripping the Shutter Release button with your finger can cause the entire image to be blurry or soft. Also, while bridges can be great places to shoot pictures from, heavy traffic makes them vibrate and this is transferred to the legs of your tripod. If you need to shoot images from bridges or unstable platforms, use the fastest shutter speeds you possibly can to minimize any vibration and check the camera's LCD monitor at full enlargement to ensure sharpness.
Over many years of shooting pictures long after the sun has gone down, I have found certain techniques that consistently produce a high yield of stunning images. The two most important accessories for successful nighttime, low-light, neon, or firework displays are a tripod and a cable release or remote switch trigger. A tripod guarantees a rock-steady platform for the camera, necessary for sharp images over long exposures, and the cable release affords vibration-free camera operation. Add to these a camera that has the ability to lock up the dSLR's mirror prior to making the exposure. Locking up the mirror removes any vibration the camera may experience by the mirror flipping up to make the exposure. By using these tools, you are on your way to getting the sharpest images possible.
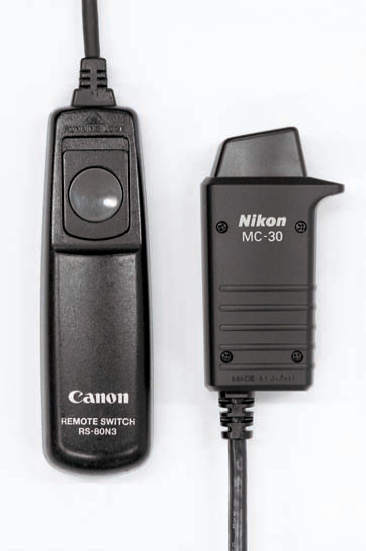
Figure 11.7. Remote switches or cable releases, such as the Canon RS-80N3 on the left and the Nikon MC-30 on the right, ensure sharp images by allowing you to trip the shutter without actually having to press the Shutter Release button on the camera and possibly vibrating the camera during the exposure.
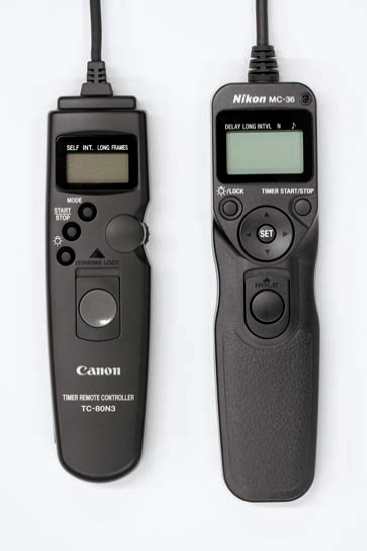
Figure 11.8. Timer remote controls, also known as intervalometers, such as the Canon TC-80N3 on the left and the Nikon MC-36 on the right, allow you to take a series of photos at set intervals. You can use them to time a very long exposure.
Tripods come in many sizes, weights, and price points. The best tripod is one you take with you and use, so spend some time at a good camera shop with a wide selection trying them out. Take into consideration whether you plan to take it on hikes and day trips or just drive to the locations. Most tripod legs are made of aluminum, which provides an inexpensive camera support system, or carbon fiber, which while lighter than aluminum can be very expensive. Choose a tripod that can securely support your camera and lenses that also suits your budget.
Camera remote switches or cable releases also come in several styles. The two most popular versions, such as ones pictured in Figure 11.7, can handle both short and long exposures. The more expensive ones are called intervalometers or timer remote controls and can be programmed to take a series of photographs at set intervals, such as one shot every 10 seconds for 1 minute, or one shot every hour for 3 days. You can also use these to time a very long exposure. On most cameras the longest shutter speed available is 30 seconds, but the timer remote can be programmed to expose for whatever length of time your shot requires, whether it's a minute or several hours. Remote switches are indispensable for tripping the shutter without actually pressing the Shutter Release button on the camera. Check your camera body for a port to plug it into. Some manufacturers even have a small infrared triggering device, used for self-portraits and group shots predominantly, but which work well for nighttime photography, too. If your camera is not capable of accepting these accessories, you can always use your self-timer to fire the camera.
In addition, I suggest following these extra methods to get great low-light photos in challenging shooting situations:
Shoot the moon. The moon can be a great extra light source for nighttime images. On a clear evening the moon can be very bright and helpful in illuminating your scene. For images of the full moon, remember it's daytime on the moon if it's all lit up so use the Moony f/11 rule, which suggests setting an exposure such as ISO 200, f/11, 1/200 second to record the details of the moon's surface.
Bracket your exposures. In shooting situations where it's hard to read the light coming from many different light sources, bracket your exposures in full stops by shutter speed adjustments. This way, your focus and depth of field remain constant in case you decide to go the HDR route (explained later in this chapter) later on. Bracketing assures you get the exposure you want.
Build your exposures for fireworks and lightning. A neat technique for layering several fireworks and lightning strikes into one frame involves setting your camera to Bulb, then opening the shutter and using a black card to block the light from reaching your lens. When using this technique you can use a medium to small aperture and a low ISO setting. You take the card away quickly when the lightning strikes or fireworks pop. This way you can build several of these occurrences into one spectacular image.
Use the camera's LCD monitor to review your image. A huge advantage in digital photography is the ability to quickly review the image you just made on the camera's LCD monitor and make adjustments for the next image. This single development alone has considerably sped up learning for new photographers to be able to get the shots they want properly exposed in a wide variety of lighting conditions.
My advice for shooting nighttime and low-light images is to have fun and yet be careful. No shot is worth putting yourself or others in danger. Many great subjects for this kind of work are found in urban settings, so be wise and keep your peripheral vision active, or better yet, bring along a friend and impress him or her with your nighttime photography skills!
Infrared is a spectrum of light that extends beyond the range in which you normally see and can mimic the look of standard night or low-light images with unnatural relationships between the tonality of objects. Digital cameras actually have an infrared filter or blocker installed between the lens and the image sensor that only allows the visible light spectrum to be recorded. Infrared photography records all the colors of the visible spectrum as well as some of the near-infrared wavelengths that are not visible. Infrared photography can also create a surreal moonlit or nighttime feel to images by producing dark skies and brighter than normal tones.
Although most natural objects strongly reflect infrared rays, no consistent relationship exists between the color of an object and the amount of infrared rays that are reflected. For this reason, many photographers are drawn to infrared photography as a means of creative expression for its surreal, other-worldly effects.
Infrared photography is often distinguished in landscape photography by extremely dark skies and an unnatural relationship between other colors in the visible spectrum. Foliage, for instance, along with clouds, appears as brighter values that make it stand out. To make infrared images, you need to filter out the visible light and only allow the near-infrared and infrared spectrum through to the image sensor.
You can achieve this effect several ways. The most expensive way that yields the purest results is to have a visible light-blocking filter installed in front of your digital camera's sensor to replace the camera's normal IR cut filter. Some photographers who shoot lots of infrared photos have this service performed on an older or spare dSLR body, but the downside is that camera can now be only used for infrared photography.
A more convenient method is to use an infrared filter (misnamed because they don't actually filter infrared) on your camera lens. These filters usually appear nearly opaque as black or deep red glass. Because they block most or all of the visible light, you need very long exposures, so you always want to use a tripod and remote switch. Focusing is critical, so compose and focus with the filter off because it is too dense to see through, then reapply it to your lens and make the exposure. Infrared light focuses at a slightly different point than visible light, so make sure that you use an aperture that provides adequate depth of field.
By far the easiest technique is to apply the approximate effect with software, such as Adobe Photoshop or Lightroom, which is the method I used to produce the wildflower image in this section. This way, you can apply the effect to any of your images to see if you like the results before spending any more money on the filter or costly camera modification.
High Dynamic Range or HDR photography has become extremely popular for the way it replicates your eye's range of perceiving light in a single photograph. HDR images are created by merging a series of bracketed images in software programs that pick the best tones of each of the selected images and combine them into one. Ideally, your bracketed images should include exposures that properly record the highlight, midtone, and shadow areas of the scene. This is often beneficial in nighttime scenes where it's difficult to establish an exposure that will accurately render the image. The proper exposure for darker areas of the image will blow out the highlights of light fixtures and buildings and as an added bonus can create some surreal and other-worldly lighting effects and tonality to your images.
You can create an HDR image with just two exposures, but for the full effect, I recommend using three to five images to give the software a greater range of tones to work with. Be sure to adjust your exposure by changing the shutter speed only and not the aperture. Changing the aperture between images results in varying depths of field and a soft-focused final image once the files are combined. Because you are combining several exposures of the same scene, a tripod is mandatory for sharp results, although the software includes some controls for reducing ghosting artifacts for foliage and water or moving objects or people.
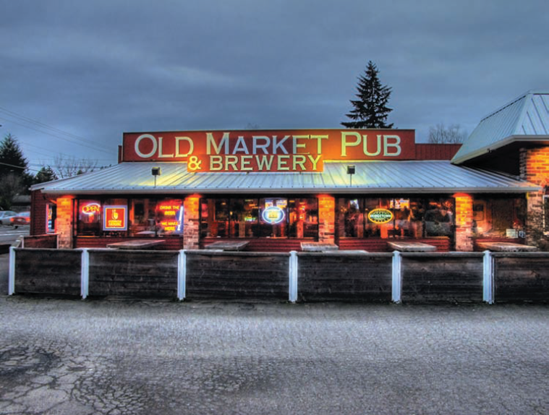
Figure 11.9. This image of the Old Market Pub was created by merging five exposures in Photomatix Pro 3. Exposure: ISO 200, f/4, varying shutter speeds.
The most popular software for creating HDR images as of this writing is Photomatix Pro 3 from HDRsoft (www.hdrsoft.com). The software creates a tone-mapped HDR file by combining your bracketed images into one file that you can adjust further using several sliders to tweak the image to create the look you want. The final image can then be saved as an 8- or 16-bit TIFF file or as a JPEG.