
Successful wildlife photography requires equal parts passion, stamina, and technical expertise. Many beginning photographers are drawn to this area of photography for its excitement and the desire to make beautiful and dramatic images of the natural world. Wildlife and pet photography can be an immensely satisfying pastime for photographers who possess a love for nature and the many species that inhabit this earth. This chapter gives you some things to think about when photographing wildlife or pets using natural light or flash. I explain preparation for these types of shoots, the lighting, exposure, and shooting modes to use to produce the best results, and the best equipment choices. I wrap up with some pro tips learned over time and in the field.
This Southern Masked Weaver was photographed at the Oregon Zoo with a 70-200mm zoom lens and a 2X converter. Exposure: ISO 500, f/5.6, 1/80 second.
Beginning wildlife and pet photographers must know the correct exposure and shooting modes to use. You can have the best equipment available, but if your exposures are not right on, your images will not matter to anyone. As I emphasize throughout this book, developing sensitivity to the lighting conditions and how light falls on subjects aids you to confidently make exposure decisions in those lighting situations that can fool and trick your camera's sophisticated light metering system.
I always recommend using the lowest ISO setting possible for the subject matter and lighting conditions. The speed of your subject may push you to the limits of your equipment's light-gathering capabilities and the only option left is to boost your ISO rating. Modern cameras, however, handle these adjustments with ease and are getting better all the time, delivering low-noise images at ISO ratings once considered impossible.
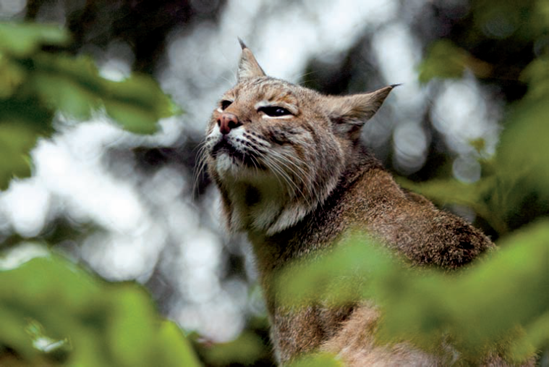
Figure 15.1. This bobcat was photographed behind a mesh screen that affects the background bokeh but not the subject. By shooting with a fairly large aperture and carefully composing to hide any man-made structures, you can approximate shots from the wild. Exposure: ISO 2000, f/5.6, 1/3200 second, −1 EV.
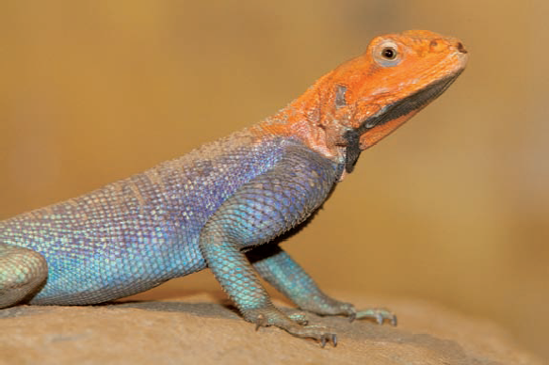
Figure 15.2. Lizards move around very quickly, so you have to shoot fast. A bit of flash perks up the beautiful colors of the lizard's skin. Exposure: ISO 3200, f/11, 1/20 second.
Many times, your wildlife photography is conducted in poor or low-light conditions, so it is critical to have a good working knowledge of your camera's controls and to be able to make quick changes to the exposure mix as the action develops or moves to different lighting scenarios. Many animals avoid bright sunlight and prefer to stick to the cooler and less obvious shadowed areas of their habitat. Some have evolved the ability to blend into the background of their natural environment, either as a defense mechanism or as a way to sneak up on prey. In either case, you still want a clean image of your subject that stands out against an authentic background. Proper exposure and shooting modes are the ways to attain this and selecting an ISO setting that allows you the greatest flexibility of camera controls is a good place to start.
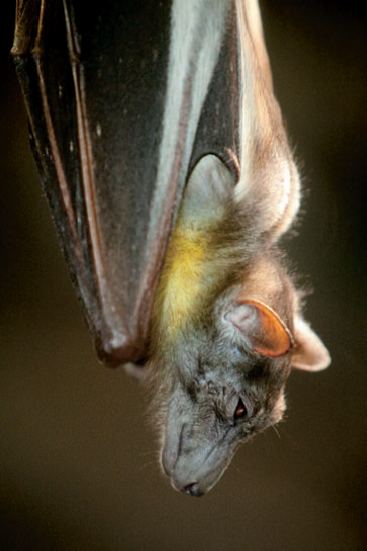
Figure 15.3. Behind glass in the Oregon Zoo's bat lair, this bat was beginning to drowse after feeding. Exposure: ISO 3200, f/5.6, 1/60 second, −0.3 EV.
Many outdoor photographers choose Aperture Priority mode for creating stunning images of wildlife and pets. Aperture Priority mode is the fastest way of controlling the subject to background focus ratio and depth of field to separate the wildlife from the background. This keeps the subject tack sharp while the background, no matter how busy, is reduced to a palette of pleasing out-of-focus tones. Lenses with good bokeh characteristics are especially adept at producing this effect.

Figure 15.4. Nice bokeh and a shallow depth of field place all the emphasis on this little Boston terrier friend. Exposure: ISO 1000, f/5.6, 1/800 second, −1 EV.
Shooting in Aperture Priority mode and setting the aperture to its largest lens opening accomplishes two important aspects to making your wildlife or pet images stand out:
Limited depth of field. For any particular lens, setting it to its largest aperture (smallest number) will produce the least amount of depth of field, ideal when the subject appears to blend into the background or when you want to minimize the distraction of the man-made enclosures found in zoos. This shallow depth of field should still be deep enough to include most of your subject's body.
Fast shutter speed. By shooting in Aperture Priority mode and using the largest aperture setting for your lens, you force the camera to automatically choose the fastest shutter speed available for that particular lighting level, ensuring you get the sharpest image possible of your subject. Shooting in Aperture Priority mode and using the largest aperture setting of your lens allows more light to strike the sensor in a shorter amount of time. You still need to check the camera's LCD to make sure the shutter speed selected is fast enough for your subject. Otherwise, raise your ISO speed and reshoot.
Your next consideration is metering mode and for this I recommend two: Scene metering and Spot metering modes if your camera has them, as most modern dSLRs do. There are times when each one will have benefits over the other and knowing when to use them helps you save time and get the results you look for. Knowing how each one reads the light will help you do this.
Here's a brief overview of the two modes I find most useful for wildlife and pet photography:
Scene metering mode. This mode is best utilized when you are able to fill your frame with your subject and your lighting is even and consistent. Scene metering mode is a complex metering system whereby a scene is divided into zones. The overall exposure is based on evaluating each of these zones individually and taking an average of the total light readings. Once the light is measured, the camera determines the best exposure. Scene metering works best with differently toned subjects and situations where you have drastic changes in light levels in the frame. You may still have to adjust your exposure further in this mode when you work with a large bright or dark subject.
Spot metering mode. Your camera's Spot metering mode usually covers around 5 percent of the viewfinder area. It takes a precise exposure reading only at the very center of the frame and ignores the rest of the scene's tones. Spot metering mode is helpful when there are extremes in the brightness areas of a scene or when a subject is backlit or is brightly illuminated and the background is dark. Spot metering is also highly beneficial for close-up and macro/micro photography.
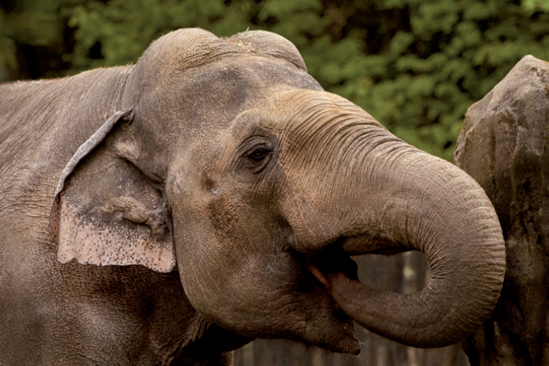
Figure 15.5. Evaluative metering mode was used to photograph this African elephant feeding. Tight composition hides all the evidence of the zoo's enclosure. Exposure: ISO 100, f/5.6, 1/125 second.

Figure 15.6. Spot metering mode and flash were used to photograph this marsupial, held in its owner's hands. Exposure: ISO 1000, f/5/6, 1/25 second.
Note
Most camera manufacturers refer to their Scene metering mode by different nomenclature. Canon calls its Evaluative metering, Nikon uses Matrix metering, and Sony cameras employ Multi-segment metering. Choose the one that's right for your camera.
Although there is no better way to get great wildlife and pet pictures than knowing the traits and habits of your subject, using the right gear for the job can make your life easier, your ability to shoot faster, and your keeper images more plentiful. The following is a brief breakdown of equipment I take whenever the chance for wildlife photography is part of the plan:
Tripod or monopod. A stable camera platform is mandatory for acquiring sharp images in the field. Having a lightweight but sturdy tripod such as those from Bogen/Manfrotto, Gitzo, or Cullman is indispensable. In addition, a versatile ball or joystick head with a sturdy quick-release plate increases the steadiness and speed of composing on the fly when photographing wildlife or quickly moving pets.
Fast telephoto lenses. Many animals in wilderness and even in zoos can be difficult or too dangerous to get close enough to make a good image. For this you need a telephoto lens of at least 200mm, preferably 400mm or 600mm in focal length. The prime benefit of a telephoto lens is that it permits you to get optically closer without getting physically closer to your subjects by giving you a narrower angle of view. This narrow angle of view provides less coverage of the scene, allowing you to compose tighter shots and exclude distracting elements from the image. Fast telephoto lenses have a maximum aperture setting of f/2.8.
Teleconverters/extenders. You can increase the focal length of almost any lens by using an extender. An extender (sometimes called a teleconverter) is a lens set in a small barrel, mounted between the camera body and a regular lens. Most manufacturers offer two versions, a 1.4X and 2.X, that are compatible only with certain lenses in the series. Extenders do not affect the minimum focusing distance of the lens they are mounted behind, but the magnification is multiplied by 1.4X or 2.0X, depending on the type used. For example, using a 2X extender with a 600mm lens doubles the focal length of the lens to 1200mm. Using a 1.4X extender would increase a 600mm lens to 840mm. Extenders generally do not change camera operation in any way, but they do reduce the amount of light transmission reaching the image sensor and along with that, some image quality loss.
Remote Switch. A good companion tool when using a tripod, a remote switch plugs into a special port on your camera and replicates all function of the camera's AF/Shutter Release button to insure vibration-free operation for macro or timed exposure work. Identical to the Shutter Release button on your camera, the remote button is pressed halfway down to focus, then all the way down to take the picture. A remote switch is great to use when photographing wildlife because it allows you to be aware of your surroundings when working in the field and make eye contact with your pet to get its best expressions when photographing it.
Polarizer and neutral density filters. A circular polarizer can enhance the saturation and color of certain types of skins and fur as well as reduce reflections on surfaces. Circular polarizers are specifically designed for use with autofocus cameras and come with a rotating bezel to secure the filter to the camera, allowing the filter to freely rotate to polarize the light.
Weatherproof camera and lens sleeves. Some cameras sport extensive weatherproofing seals and gaskets around the battery compartment, memory card compartment, and all the camera control buttons. Some camera bags, such as those from Lowepro and Think Tank Photo, include water-repellant bags or sleeves that fold compactly and attach to one of the camera bag's interior compartments. For extremely severe weather, you can buy a variety of weatherproof camera protectors from Vortex Media (
www.stormjacket.com).Sound maker or whistle specific to the animal. Lots of outdoor stores have bird or dog whistles or sound makers that attract a wide variety of wildlife. Use sparingly to attract animals, and then put them away so as not to confuse your subject into thinking there is food or a mate close by.
Much of the same gear I use for travel and landscape photography goes with me on wildlife shoots or when photographing pet portraits for friends. Keep these ideas in mind the next time you're stalking big game — photographically, of course!
Photographing your pet is a great way to get started in the realm of animal photography. Your little friend already is comfortable with you and you are both able to read each other's moods. Engage your pet or have someone else do it as you start noticing backgrounds that work for portraits. Have treats and snacks available and always reward good behavior.
I also recommend a trip to a zoo or wildlife reserve to hone your skills and get you in the mental zone of photographing animals in a more natural habitat. If you have a photo trip or safari vacation coming up where there stands a good chance of seeing some major wildlife, zoos are a great resource for practicing your wildlife photography skills and to make decisions on exposure and white balance.
A trip to the zoo clues you in to how your camera technique is working for this particular genre of photography. Shooting in Continuous mode improves the chances of getting great shots of animal behavior, but is not very effective when using flash. Check to see if your zoo allows you to use flash when photographing the exhibits and if so, bring it along. You want to switch to Single-shot mode when using flash to allow some gaps of time for the flash to recycle. To maximize the reach of your flash when photographing wildlife, most of the time you need to adjust your flash's exposure compensation setting when using a lens longer than 200mm. Most camera-mounted speedlights have a zoom range up to 200mm. This doesn't mean you can't use it with a lens longer than that. Adjusting the flash exposure compensation to add more exposure can get more range out of your flash if you are using it with a longer lens, but you may experience slower recycling times and shorter battery life.
Commercially available flash extenders like the Better Beamer (www.naturephotographers.net) extend the reach of your flash by a reported +2 f-stops of light over greater distances. Flash extenders attach to the speedlight's flash head, usually with Velcro or tape and contain a Fresnel lens positioned a few inches in front of the flash face to focus and condense the light for transmission over longer distances.
Whatever equipment you decide to take into the field, keep these ideas in mind for dramatic, compelling images of wildlife and pets:
Focus on the eyes. Eyes are the most dramatic feature in pet and animal portraits. With any animate subject, as long as the eyes are in focus, the photo registers as sharp.
Use contrast for composition strength. The viewer's eye is always drawn to areas of greater contrast — a light subject against a dark field and vice versa. In addition, the sense of sharpness of a photograph is greatly increased by the skillful use of contrast.
Zoom your lens. Whenever possible, zoom out to the telephoto setting to fill the frame with your subject. This allows you to remain inconspicuous to the animal, enabling you to catch it acting naturally and also helps limit the amount of depth of field the lens can produce.
Go low. The same advice for photographing children applies to photographing wildlife and pets. Try shooting from their eye level to see the world from their perspective. This places them naturally in the environment without any distortion from an extreme angle of view. I recommend photographing pets this way because you can get some amazing portraits with only a 100mm lens. Have some treats nearby if you want to photograph the pet doing some stunts.
Get as close to glass or obstructions as you can. Many times, especially in zoos and wildlife parks, the animals are behind some sort of barrier keeping the animal separate from the people. This is great from a safety standpoint but not from a photographic one. I have found that a good workaround for longer lenses is to decrease the camera-to-barrier distance to increase the barrier-to-subject distance. Focus so that only the subject retains any depth of field. If you are shooting at your largest aperture, the barrier or any imperfections in glass virtually disappear.
Be ready for action. With active animals, try shooting in Shutter Priority mode to increase the likelihood of getting sharp images. To freeze the action, I start at 1/250 second and go up from there to attain crisp wildlife images. If your largest aperture still prevents your camera from hitting those shutter speeds, remember to boost the ISO for more flexibility in choosing exposure settings.
Be careful. Know the behavior patterns of the animals you're photographing and always be aware of their proximity to you. Even domesticated animals like horses and dogs can be intimidated if they do not know you. Keep your peripheral vision on alert and never get into situations without an escape plan.
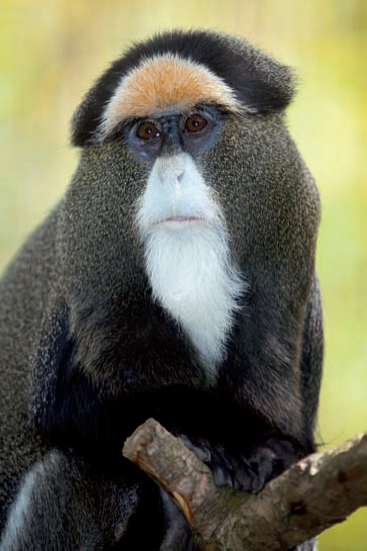
Figure 15.11. I used flash to bring up the value of this DeBrazza's monkey and to even out the exposure between the bright background and the low-lit subject. Exposure: ISO 500, f/5.6, 1/200 second, −0.3 EV.
Having the desire and passion for animal photography is a great place to start, but with that passion comes the added responsibility to do no harm to the insects, reptiles, or animal subjects that find their way in front of your lens. Respect what you are photographing. Learn all that you can about your subjects, their habits, feeding times, and behaviors because the more you learn about your favorite critters, the more picture-taking opportunities you think of and encounter. Also remember that no photograph is worth upsetting the safety and welfare of the animal or yourself. Leave the habitat the way you found it for all who come after you to enjoy.