
Successful landscape and nature photography involves seeing the light before making the exposure and submerging yourself in the natural beauty of your surroundings. It also pays for you to be flexible enough to switch gears and shoot something else when the light is not working to your satisfaction for your particular subject matter. Knowing when to add a reflector or additional light source is also an important skill.
Being sensitive to the time of day and what nuances of light you have at your disposal are key to coming back with images you can be proud of. Knowing what shooting modes to use and having the right gear are important, too, whether you're on a short hike or an extended vacation to some exotic location.
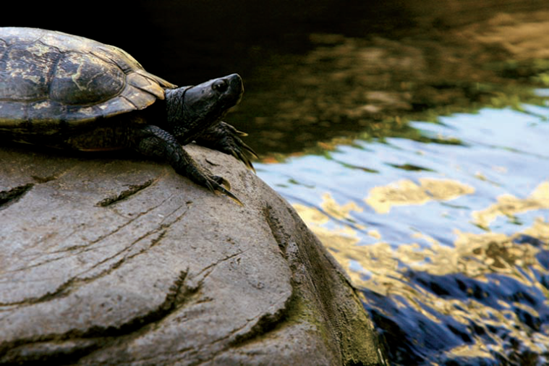
A rock-bound turtle about to take the plunge into the stream. Exposure: ISO 500, f/5.6, 1/400 second.
Landscape and nature photography is one of the best ways to bring many shooting disciplines together to create the best images you can. The wide array of subjects, the unpredictability of weather, and the simple pleasure of immersing yourself in the natural world are irresistible lures.

Figure 10.1. Lenticular clouds over Mount Hood in Oregon fill the sky after sunset. Exposure: ISO 640, f/8, 1/250 second, −1EV.
Before you go out into the field and learn landscape and nature techniques, look at some gear that can make your job much more enjoyable. Here's my list of gear recommendations for shooting landscape and nature images:
Tripod and/or monopod. A lightweight but sturdy tripod such as those from Bogen/Manfrotto, Gitzo, and Cullman are indispensable to shooting rock-solid landscape and nature images. In addition, a versatile joystick or ball head with a sturdy quick-release plate increases the steadiness and speed of shooting, and is near mandatory for shooting with long lenses and exposures. If you want to shoot a lot of macro or panoramic imagery, you may need a tripod designed specifically for those types of photography.
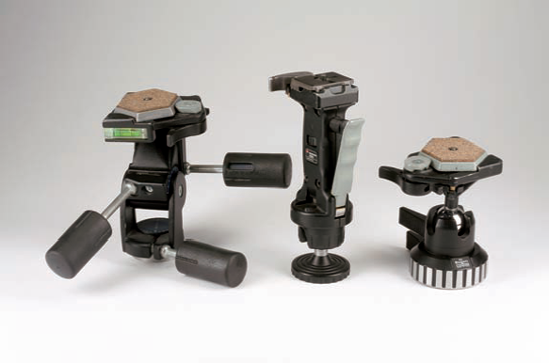
Figure 10.2. The three types of tripod heads I use when shooting landscape and nature photos all have quick-release mounting plates. The three-way pan/tilt head (on the left) allows individual adjustments of pan, tilt, and height positions. The joystick (in the middle) and the ball head (on the right) provide quick adjustment of all axes to compose and shoot quickly changing compositions.
One or two dSLR camera bodies. Ideally, you should have a backup camera with you in case anything goes wrong. This is especially important in inclement weather and in locations where the camera is exposed to blowing dust, sand, rain, or heavy moisture. You may, of course, pass on bringing the second body for local shooting. But if you spend any time packing, driving, or hiking to a location only to experience a problem with your gear, your time and the trip are wasted.
Weatherproof camera case. Keeping your camera equipment warm and dry will benefit you in many shooting situations. Moisture can wreak havoc on your camera's ability to focus or get a clear shot especially when coming inside after skiing, snowboarding, or photographing a swim meet. Toss a few desiccant packets that come with all kinds of packaging into your camera bag to keep it dry on the inside too. Some can be dried out in the oven or microwave and used again and again. Storing the camera in a weatherproof case until it warms up avoids condensation forming inside the camera.
Memory cards. The number of memory cards that you carry depends on how many images you typically shoot and the length of your hike or shooting session. I usually carry a variety of SanDisk or Lexar cards in sizes ranging from 2GB to 8GB.
Spare camera batteries and battery charger. Live by the battery, die by the battery. Especially in cold weather that reduces the shooting time for the battery, it's important to have plenty of spare batteries available. Keep the batteries covered with the supplied cover. In cold weather, place fresh batteries inside your jacket and near your body to keep them warm.
Laptop computer or portable storage device. Backing up images on site — either to a laptop or a handheld hard drive — is an essential part of the workflow throughout the day. Unless I have to, I won't delete images from the memory cards after loading them onto the computer or handheld device until I have burned a CD or DVD so that I have two copies of the images at all times.
Remote switch or interval timer. A good companion tool when using a tripod, a remote switch or interval timer replicates all functions of the camera's AF/Shutter Release button to insure vibration-free operation for macro or timed exposure work. The remote button must be pressed halfway to focus, then all the way to take the picture. It also works with the camera to keep the shutter open for even longer Bulb time exposures for subjects such as star trails and nighttime cityscapes. An interval timer allows you to shoot sequential photos that depict action and can be used to make a video clip of all the images, approximating animation.
For vacation, travel, or long-distance landscape work, some additional items to consider include:
Cellphone and/or GPS location device. A GPS unit will also allow you to store coordinates of favorite locations and geo-tag your image files with longitude and latitude values that are retrievable in many image browsers.
Notebook and pen. Write down your impressions of the area, especially first impressions that can help you define your creative inspiration of the place and, subsequently, your approach to shooting.
Plastic bags. These are useful for storing anything and everything in inclement weather and keeping your sensitive electronic gear dry.
Multipurpose tool. This valuable tool can solve all kinds of unexpected problems in the field, from camera repair to fixing clothing or camping gear malfunctions.
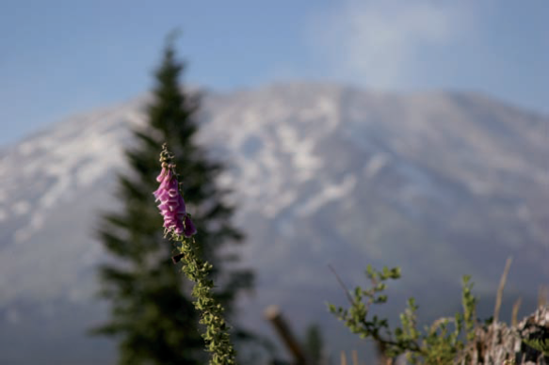
Figure 10.4. It's all about mood with landscape and nature photography. While Mount St. Helens smolders in the background, soft afternoon side lighting illuminates these foxglove flowers positioned in front of a darker pine tree for greater visibility and contrast. Exposure: ISO 200, f/5.6, 1/1250 seconds.
The most useful filters in landscape and nature photography, often referred to as outdoor photography, include the circular polarizer, neutral density or split-field neutral density filters, and a few warm-up filters. Here's a brief overview of each type of filter I use:
Polarizer. Polarizers deepen blue skies, reduce glare on nonmetallic surfaces to increase color saturation, and remove spectral reflections from water and other reflective surfaces. Polarizers come in two flavors, linear and circular. Linear polarizers are used on film cameras that do not have an autofocusing system. Circular polarizers are specifically designed for use with autofocus cameras because they allow the autofocusing beam to pass through unobstructed to achieve focus.
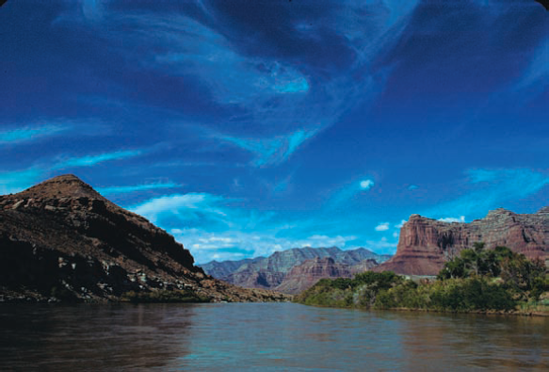
Figure 10.5. The polarizing filter, when rotated properly, adds contrast, yields deep blue skies, reduces reflections from surface glare of foliage, and saturates landscape colors, as in this shot from the Green River, Utah. Exposure: ISO 100, f/11, 1/250 second.
A circular polarizer attaches to the lens, and you rotate it to reduce reflected polarized light. Maximum polarization occurs when the lens is at right angles (45°) to the sun. With wide-angle lenses, uneven polarization can occur, causing part of the sky to be darker than other areas of the sky. Pass on the polarizer when making panoramic images as the unevenly toned sky it produces may be difficult for the software to blend easily.
Neutral density filters. Neutral density (ND) filters work like sunglasses for your camera. When photographing waterfalls, for example, even at your lowest ISO setting you can't use the slow shutter speed/aperture combination you'd like to because there's way too much light. ND filters allow you to still get the shot by cutting the light transmission. They come in various strengths in 1/2 stop increments up to 8 stops to allow you to shoot longer exposures in bright environments.
Variable neutral density filters. Singh-Ray's Vari-ND Variable Neutral Density Filter (
www.singh-ray.com/varind.html) allows you to continuously control the amount of light passing through your lens up to 8 EV (exposure values), making it possible to use narrow apertures and slow shutter speeds even in more brightly lit scenes to show the fluid motion of a waterfall, the motion of clouds, or flying birds. The filter is pricey, but it is a handy addition to the gear bag.Graduated neutral density filters. These filters allow you to hold back a bright sky from 1 to 3 f-stops to balance foreground exposure. They are usually half clear and half neutral density and are used in lens-mounted trays where you slide the filter up or down, depending on your composition. They are available in hard or soft transition types and in different densities. With this filter, you can darken the sky without changing its color; its brightness is similar to that of the landscape and it appears in the image as it appears to your eye.
Warm-up filters. Originally designed to correct blue deficiencies in light or certain brands of film, warm-up filters correct the cool bias of the light, and you can use them to enhance the naturally warm light of early morning and late afternoon. Warm-up filters come in several strengths, such as the 81 (weakest), 81A, 81B, 81C, 81D, and 81EF (strongest). For greatest effect, combine a warm-up filter with a polarizer. You can also apply the warm-up effect during image editing in Photoshop or other software programs that offer those adjustments.
Natural lighting effects change throughout the day, from dawn to dusk. By knowing the predominant characteristics as the day progresses, you can use the changing quality, color, and intensity of light to your advantage.
Look for strong side lighting, either early or late in the day, to emphasize details and show texture at its best. Take the time to study your subject from many different angles with your camera to your eye, to see were the light falls on it. Once you locate the optimum angle and point of view for your camera, go ahead and marry the camera to your tripod. Finding that view with only your camera is a faster way of working than wrestling with your tripod trying to find a workable composition.
However, finding the light is only half of the story. Exposing so that the light is rendered as it appears to the photographer's eye is the essential second half of the story, along with ensuring that the color is rendered accurately.
In predawn hours, the cool blue and gray hues of the night sky dominate and create a soft, shadowless light. This is the time to capture subtle, moody images of landscape formations, bodies of water, and close-ups of hoarfrost or dew on leaves, grass, flowers, and insects. I also look to capture the fog or mist that tends to hang low over valleys and water. At these times I am mindful of photographer Eliot Porter's quote that "Sometimes you can tell a large story with a tiny subject" and look for reasons to break out my close-up gear.
Note
See Chapter 15 for more information on macro photography.
Contrast is low as the sun's crepuscular rays (sometimes referred to as "god beams" or "angel beams") are scattered by clouds, trees, and atmospheric dust as they cut through the atmosphere at a low angle. Landscape, fashion, and portrait photographers often use the light available during and immediately after sunrise. During sunrise, tall structures such as buildings and trees are lit by the sun while the rest of the landscape appears cool and shadows are filled in by light from the sky.
In broad terms, both sunrise and sunset register in approximately at 2000Kelvin (K). The Kelvin degree scale measures the color temperature of light with the lower temperatures appearing reddish or warmer and the higher temperatures appearing bluer or cooler. To get the best color, you can set a custom white balance, which is detailed in Chapter 1. If you are fortunate enough to have a color temperature meter, then setting the K white balance option to the color temperature meter reading provides the best results. If you are shooting RAW images, you also can adjust the color temperature after capture in the proprietary software that came with your camera, Adobe Camera Raw, or Adobe Lightroom, making your field work just a little bit easier.
As the sun rises in the sky on a typical clear day, the quality of light becomes more intense as the angle between the sun and earth increases, allowing more light rays to pass through the thinner earth's atmosphere. The color temperature also rises and loses its warmth to become white as it heads toward 5500K.The first two hours after sunrise typically provide ideal light for nature, landscape, and travel photography because the contrast isn't too extreme, the color temperature is still a bit warm, the sky is bluer because the sun is still close to the horizon, and long shadows reveal texture and depth in the landscape.
During midday hours, the warm and cool colors of light equalize to create a light the human eye perceives as white or neutral. On a cloudless day, midday light often is considered too harsh and contrasty for landscape shooting and produces flat and lifeless results. However, midday light is effective for photographing images of the graphic shadow patterns of solid objects, architecture, flower petals, and leaves made translucent by backlighting with the sun, and natural and man-made structures.
For midday pictures, the Daylight, Cloudy, or Open Shade white balance settings on your camera are good choices to start with.
Immediately before, during, and following sunset, the warmest and most intense color of natural light occurs. The predominantly red, yellow, and gold light creates vibrant colors, while the low angle of the sun creates soft contrasts that define and enhance textures and shapes. These sunset colors create rich landscape and cityscape photographs. The warmth of light at sunset is different from sunrise because the sun is striking more things in the landscape such as dust and pollution in the evening and less so in the morning. As a result, morning light is more clear and neutral than evening light because the dust has settled to a certain degree and the air has become clearer overnight.
Figure 10.9. Midday is a great time to break out that wide-angle lens and look for compositions that work with the sun directly overhead. Washington State's Takalak Lake. Exposure: ISO 800, f/14, 1/500 second, −1 EV.
The last hour before sunset, the Golden Hour, brings even lackluster scenes to life. Once again, long shadows stretch to reveal texture and detail, particularly when the sun is at a right angle to the camera.
With the sun below the horizon, light is reflected onto the landscape from the sky. This is a good time to use long shutter speeds to record movement in the landscape area, whether the movement is water washing up to the shore, people passing by, or trees and grasses swaying in the breeze. The first 30 minutes after sunset is an ideal time to capture the soft pastel sky colors reflected in a still lake or on the ocean.
Note
For more on exposure compensation, see Chapter 2.
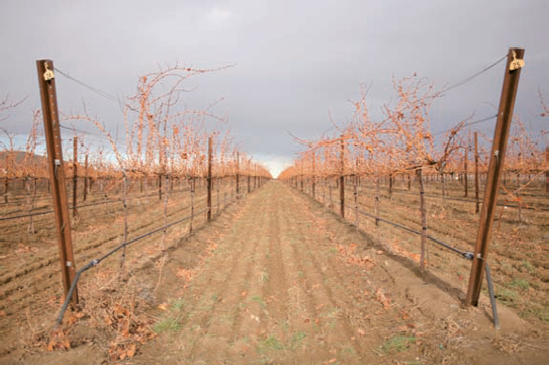
Figure 10.10. This vineyard row was used to create depth and a vanishing point in this otherwise flatly lit landscape during a cloudy midday. Compositional techniques can overcome the flattening effect of the ambient nondirectional light. Exposure: ISO 400, f/8, 1/3200 second, +1 EV.
Here are some of the techniques that you can use when shooting outdoor images:
Focus one-third of the way into the scene. This technique approximates hyperfocal focusing, and though it is not as accurate, it works reasonably well. For sweeping landscapes where there's no obvious center of interest such as a person, object, or wildlife, focus the lens approximately a third of the way into the scene. The depth of field for distant subjects extends approximately twice as far beyond the point of focus as it does in front.
Pre-visualize the image. If you're shooting a sunset scene, decide if you want to capture foreground detail or show trees, hills, and buildings as silhouettes. If you want to show foreground detail, meter the foreground directly by excluding the sky and sun from the viewfinder, and then use a neutral density graduated filter to tone down the sky so that it isn't blown out. If you decide to let the foreground go to silhouette, include less foreground in the frame by tilting the camera upward slightly to feature more sky. Or switch to a telephoto lens, and pick out one or two elements, such as trees or a building, to silhouette.
Research before you go. Most landscape photographers agree that you can never do too much research on the place you're traveling to before you leave. The more you know about the area, what its defining characteristics are, and what areas the locals frequent, the better the chances that you will come away with unique images that capture the spirit of the locale.
Learn how to photograph rainbows. To capture the strongest color of a rainbow, position the rainbow against a dark background such as stormy clouds, a hill, or trees. You may have to drive several miles to do this. Being in the right place at the right time and having your camera with you will increase the odds you'll get better pictures of rainbows. Preparation, perseverance, and a little bit of luck can help too. You can underexpose the image by about 1/3 or 1/2 f-stop to increase the intensity and saturation of the colors.
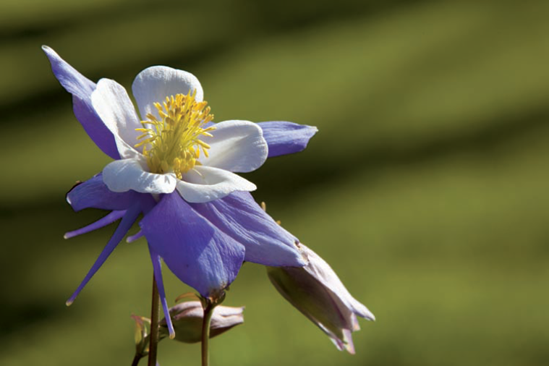
Figure 10.13. The combination of the strong diagonal shape of the flower juxtaposed with the strong diagonal shadows in the background gives this image a visual tension and depth. Late-afternoon side lighting creates pleasing texture in this columbine flower and the graphic shadows in the background. Exposure: ISO 320, f/16, 1/125 second.
Use side, back, or cross-lighting. Frontal lighting is often chosen by inexperienced photographers who only see the subject and not the light falling on it. Front light creates images that lack texture and depth because the shadows fall away from the camera and out of view. Instead shoot so that the sun is on one side of the camera with light striking the scene at an angle. Side lighting provides the strongest effect for polarizing filters given maximum polarization occurs in areas of the sky that are at right angles to the sun.
Include people in the landscape. People added to landscape images provide a sense of scale and perspective. Many times, the scale of subjects in the natural world is difficult to perceive without an easily recognizable object such as a person to give a reference point.
Find new ways to capture iconic landmarks. Some landmarks such as the Grand Canyon have been photographed at every angle, with every lens, and in every light possible. Spend some time thinking about how to get a fresh take on iconic landmarks to make your images distinctive.
Use a lens hood. You can avoid lens flare by keeping lenses clean and using a lens hood to prevent stray light from striking the front lens element. Alternatively, you can also use your left hand to block light from refracting inside your lens.
Use selective focusing for creative effect. The opposite of maximum depth of field is choosing to render only a small part of the scene in sharp focus using limited depth of field. This technique is effective with any lens set to a wide aperture with a close subject as the point of focus while the rest of the scene is thrown well out of focus. The falloff of sharpness is increased as the magnification increases and the aperture gets larger.
Meter a bright sky. To get a proper exposure for a bright sky, meter the light on the brightest part of the sky using your camera's Spot metering mode. If the sun is above the horizon, take the meter reading without the sun in the frame and from an area of the sky that is next to the sun.