
Many experts in the field consider effective task management second only to organization in determining your success in achieving peak personal productivity. And while I don't have an opinion about whether task management is first or second in terms of importance, I'm clear that without effective task management, you have little hope of achieving the peak personal productivity and work/life balance you seek.
Therefore, this chapter covers best productivity strategies and practices for doing task management in Outlook. You manage your workload and personal responsibilities in Outlook through a judicious use of the Tasks module and the TaskPad in Outlook 2003 and To-Do Bar in Outlook 2007.
The Tasks module is the place where you keep and manage your complete to-do list. The task list that appears in the TaskPad in the Outlook 2003 Calendar module and the To-Do Bar in every Outlook 2007 module is designed to give you a quick look at pending tasks with upcoming due dates. Both the TaskPad and To-Do Bar show all overdue tasks in red and tasks with forthcoming due dates in black. The Outlook 2007 To-Do Bar even goes so far as to automatically group the tasks by due day into Today, This Week, Next Week, and Next Month groups.
To introduce you to this very important topic, I've broken the subject of task management with Outlook down into three simple components: the definition of a task, task management via the TaskPad or To-Do Bar, and task management via the Tasks module.
Before going on to find out about how Outlook helps you manage your tasks, you need to be clear about what sets a task apart from other Outlook items, especially appointments and events on your calendar. Simply put, a task represents some discrete action that you plan to get done that may entail a single step or a whole series of steps.
A task is similar to an appointment or event that you place on your Outlook calendar in that it's something you plan to get done by a particular date (and, sometimes, by a particular time). Therefore, you normally give a task both a planned start date and due date.
However, a task can differ significantly from an appointment or event on your calendar, especially when the task is sufficiently complex to warrant the charting of its progress during the period between the start and due date. For example, the task of preparing a final PowerPoint sales presentation for the monthly marketing meeting is an example of a complex task, one that may require several weeks of preparation and work.
During the period between your start date and due date, you may mark your overall progress on a complex task such as creating the sales slide presentation through a series of several milestones (for example, gathering sales information for the presentation, creating the initial presentation in PowerPoint, editing and formatting the design presentation, and checking the final presentation). Reaching the next milestone in the series then represents achieving a new level of progress in your goal of completing the task. (In an Outlook task, such levels are measured as percentages of completion, with 0% meaning that you've yet to begin the task and 100% meaning that you've completed the task.)
Note
In my opinion, the question of whether or not to record the milestones for a complex task as individual tasks on your Outlook task list depends largely on how you how work best. If you find that you need periodic Outlook reminders to help you stay on course and reach your milestones, then by all means, enter each milestone as an individual task. On the other hand, if you find it sufficient to have just the overall due date staring you in the face, then instead of taking the time to record a bunch of simple tasks, stick with recording just the single, master task. In that case, however, just be sure to list your milestones as notes in the list box of this master task and to open the task in the Tasks module and update the % Complete setting whenever you reach a milestone.
The TaskPad automatically appears whenever you're in the Calendar module (Ctrl+2) of Outlook 2003. The Outlook TaskPad gives you a quick way both to enter new tasks and to track them.
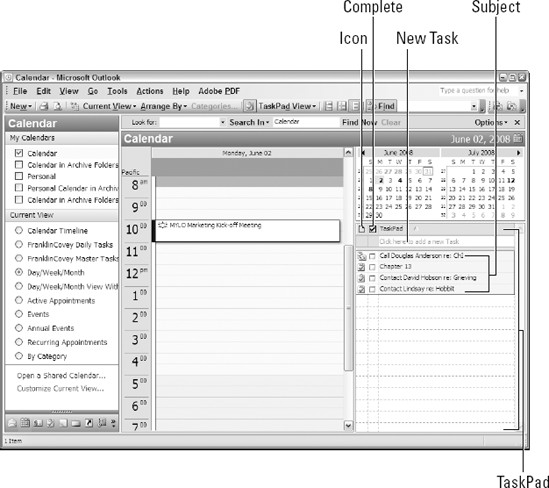
Figure 12-1 shows the Calendar module in Outlook 2003. The TaskPad appears in the pane on the far-right side of the window, immediately beneath the Date Navigator.
The Outlook 2003 TaskPad itself is divided into three columns: Icon, Complete, and Subject. You click the task Icon in front of a listed task to select that task. You click its Complete check box to mark the task as completed (whereupon Outlook displays the entire task in strikeout text). And the Subject field displays as much of the task description as fits within the current width of the TaskPad (which you can increase by dragging the border between it and the Calendar Information Viewer to the left).
Note
Keep in mind that, by default, the Outlook 2003 TaskPad displays all uncompleted tasks sorted by their due dates in ascending order (present to future). This means that you see overdue tasks first, followed by tasks with no due date. Then you see the tasks that have the current date as their due date (which just happened to be the due date automatically assigned to all new tasks you add in the TaskPad) followed by those with future due dates. To list the tasks in the TaskPad by due date in descending order (future to present), click the TaskPad subject header at the top of the third column. Outlook resorts the list in descending due date order, as indicated by the triangle now pointing downward instead of upward.
To add a new task on the TaskPad, you simply click in the Subject column in the top row immediately above the very first listed task. Basically, this means clicking anywhere in the area that contains the light gray text, "Click Here to Add to New Task."
As soon as you click in this area, the light gray text disappears, replaced by a flashing cursor. Outlook also adds a Complete check in front of the now empty text box. You then type a short description of the task in this text box and press Enter when you finish.
Tip
To help ensure that your task descriptions are brief and always to the point, make them into commands that begin with an active verb followed by a simple object, such as Call Dr. Bennett, Schedule appt with A. Smith, E-mail John, and Complete Q2 sales report.
After you press Enter, Outlook adds the new task to the TaskPad list. You can then later refine and update the details of the task, including specifying the start date and due date, adding notes, associating the task with a contact in your address book, assigning categories to the task, and logging your progress by opening the task's dialog box. To do this, you double-click either the task in the TaskPad in the Calendar module or the Information Viewer of the Tasks module or right-click the task in these locations and then choose Open from its shortcut menu.
Outlook's View menu contains two command items related to the display of the TaskPad:
TaskPad: Select this command to hide or redisplay the TaskPad. When the TaskPad is hidden, Outlook displays the Date Navigator at the top of the Navigation Pane.
TaskPad View: Select this command to display a continuation menu with options for changing which tasks are displayed in the task list. The view options on this submenu include All Tasks, Today's Tasks (the default), Active Tasks for Selected Days, Tasks for the Next Seven Days, Overdue Tasks, Tasks Completed on Selected Days, and Include Tasks with No Due Date.
Note
When you select the Active Tasks for Selected Days view, Outlook displays all incomplete tasks with due dates on or before the date selected in the Date Navigator. This means that the TaskPad shows you daily tasks when only the current date is selected in the Date Navigator, but it displays tasks with upcoming due dates when you select future days in the Date Navigator (by dragging through them). This particular TaskPad view, therefore, offers a highly effective means of controlling the contents of this task list as well as a quick-and-easy way to glance over future obligations without having to sort the list again in order to be able to select other options on the View menu.
Outlook 2007's To-Do Bar represents a significantly enhanced version of the TaskPad in Outlook 2003. As such, the To-Do Bar now appears in Outlook 2007 in every single module. This even includes the Tasks module, where the To-Do Bar's a bit of overkill and can usually be dispensed with no adverse effects (simply by pressing Alt+F2).
Figure 12-2 shows the To-Do Bar as it appears in Outlook 2007 when the Calendar module is current and the next three days are displayed in the Information Viewer of Calendar (after selecting them in the Date Navigator).
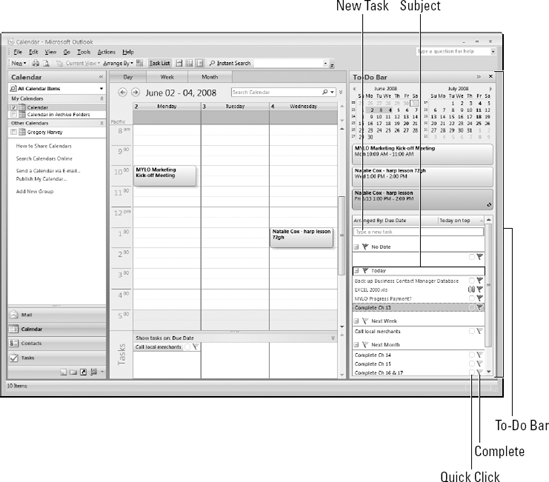
As you can see in this figure, Outlook 2007 automatically arranges the tasks (called to-do items) displayed in the tasks list at the bottom of the To-Do Bar into groups such as No Date, Today (which includes overdue tasks), This Week, Next Week, and Next Month, with the groups arranged by due date in ascending order (present to future). You can collapse any of these groups so that only the group heading is displayed by clicking its Collapse button (indicated by the minus sign) and then expand a contracted group to once again display all of its tasks by clicking the group's Expand button (indicated by the plus sign).
You should note that the to-do items in tasks list in the To-Do Bar are divided into three fields or columns: Subject, Quick Click, and Complete. The Subject field displays a short description of the task. The Quick Click field enables you to assign whatever category you've designated as the Quick Click category to a task simply by clicking (and then coloring) its empty rectangle. The Complete field shows the follow-up flag associated with the task's due date and enables you to mark a particular task on the list as completed simply by clicking its flag icon.
To add a new to-do item to the task list in the To-Do Bar, click the text box containing the light gray text, "Type a New Task." As soon as you click in this area, the light gray text disappears and is replaced by a flashing cursor in the now empty text box. You then type a short description of the task in this text box and then press Enter when finished.
After you press Enter, Outlook adds the new to-do item to the task list in the To-Do Bar as part of the Today group by automatically assigning the current date as both the start date and due date. You can then later modify and update the details of the task, including changing the start date and/or due date, adding notes, and recording your progress on the task by opening the task's dialog box. To do this, either double-click the task in the task list in the To-Do Bar or Tasks module or right-click the task and then choose Open from the top of the shortcut menu that appears.
The Outlook Tasks module (Ctrl+4) is the place to go when you need a complete look at all your tasks, both those that you've already completed and those you've yet to complete. By default, the Tasks module displays all these tasks in your to-do list in a simple table layout, which is called, appropriately enough, Simple List. (If you aren't in Simple List view, choose View
The great thing about the Tasks module is that, in addition to the Simple List view, the program offers a number of other useful ready-made views you can apply to the tasks in your to-do list. Just choose View
And, when you need to see only the tasks on your to-do list that are currently overdue, you can do this simply by switching to the Overdue Tasks view. When you need to see just the tasks with due dates in the upcoming week, switch to the Next Seven Days list. And when you need to remind yourself just how far you've come in achieving peak productivity by getting on top of your obligations, you can switch to the Completed Tasks to see all the tasks that you've successfully completed!
Tip
Switch to the Task Timeline view to see your tasks represented graphically as bars extended over time (with the beginning of the bar representing the planned start date and the end of the bar the due date) against a scale of hours, weeks, or days (depending upon whether you select the Day, Week, or Month display on the View menu). This view is perfect for immediately spotting overlapping tasks that may represent conflicts in terms of your time and energy and ability to meet to their due dates.
One of my pet peeves with the Outlook Tasks module is that its default Simple List view continues to show all tasks that I complete, albeit in strike-out text, along with the ones that are still pending. And although it makes me feel good, on the one hand, to see all the to-do items displayed in the Tasks module that I've gotten done, it does tend to distract me from the ones that still need doing.
Note
Keep in mind that you can always temporarily filter the completed tasks out of the task list in the Tasks module by making Active Tasks the current Tasks module view (by clicking the Active Tasks option button in the Navigation Pane). That way, you're no longer thrown off course by the completed tasks and can concentrate solely on the tasks that are still pending.
Note
If you'd rather not have to look at the completed tasks in the default Simple List view or other common views such as Detailed View, Next Seven Days, and By Category, you can easily round them up periodically using the Completed Tasks view and then move them to another folder for safekeeping. Here's how:
Create a new, custom Completed Tasks folder. (Ctrl+Shift+E opens the Create a New Folder dialog box, which you can use to create this custom folder.)
The Completed Tasks folder can even be a subfolder of the Outlook Tasks folder, if you want.
Select the Completed Tasks view in the Tasks module to filter out all active tasks and display only the completed ones.
Select all these tasks (Ctrl+A) before you right-click the highlighted block of tasks and then choose Move to Folder from its shortcut menu.
Make sure that your Completed Tasks custom folder is selected and then click OK in the Move Items dialog box.
Outlook moves all of the completed tasks into the Completed Tasks folder, leaving the current view of your Task module empty.
Then, to remove the filter and once again display your active tasks in the Tasks module, choose View
Outlook makes it really easy to add a new task. You can open an Untitled – Task dialog box (with the Task tab selected, similar to the one shown in Figure 12-3) from any Outlook module by pressing Ctrl+Shift+K. You can also quickly enter a new task as a to-do item in the task list portion of the Outlook 2003 TaskPad in the Calendar module or as a to-do item in the tasks list portion of the Outlook 2007 To-Do Bar in any module, as described in the "Task Management with the Outlook 2003 TaskPad" and "Task Management with the Outlook 2007 To-Do Bar" sections, earlier in the chapter.
When you enter a new task as a to-do item in the Click Here to Add a New Task text box in the TaskPad or in the Type a New Task text box in the To-Do Bar, you can enter only a short description of the task in the Subject field. (If you want to modify the start date and due date or enter other details or notes, you have to open its Task dialog box by double-clicking the task or right-clicking it and then choosing Open from its shortcut menu.)
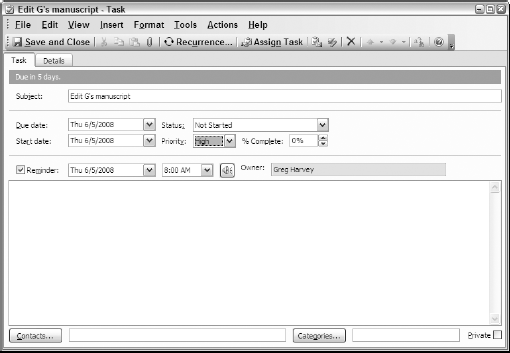
When, however, you enter a new task in the Untitled – Task dialog box, you can not only enter a longer description for the Subject field in its text box but fill in or modify any of the following fields:
Due Date: Outlook doesn't automatically assign a due date to a new task entered into the Untitled – Task dialog box. To specify the due date for the new task, click the Due Date's drop-down button and then click the date in the drop-down Date Navigator. Note that if you try to specify a due date that comes before the start date you've assigned the task, Outlook displays an alert dialog box informing you of this fact, and when you click OK to close the alert dialog box, the program doesn't update the Due Date field.
Start Date: Outlook doesn't automatically assign a start date to a new task entered into the Untitled – Task dialog box. To specify the start date for the new task, click the Start Date's drop-down button and then click the date in the version of the Date Navigator that drops down. Note that if you specify a start date without specifying a due date, Outlook assigns the same date to both the Due Date and Start Date fields. And if you specify a start date that comes after the due date you've assigned, Outlook automatically adjusts the date in the Due Date field so that it's the same as the one entered in the Start Date field.
Status: Outlook assigns Not Started as the default status for a new task. To assign a different status to the task, click the Status drop-down button and then select the new status (In Progress, Completed, Waiting on Someone Else, or Deferred).
Priority: Outlook assigns Normal as the default priority for a new task. To assign a different priority to the new task, select either Low or High from the Priority drop-down list.
% Complete: When you create a new task, by default, Outlook considers it zero-percent complete. To indicate a different percentage rate of complete, type a number into the % Complete text box or use the upward-pointing spinner button to select a new percentage (25%, 50%, 75%, or 100%).
Reminder: Outlook doesn't automatically alert you when a task is about to come due. To have Outlook display an alert dialog box reminding you of an impending task, click the Reminder check box and then select the date and time you want this alert displayed in its associated drop-down list boxes. To prevent a sound from being played when the reminder alert dialog box is displayed or to change the sound that's played, click the Reminder Sound button (the one with speaker icon) and then click the Play This Sound check box to mute the reminder or Browse to select a new alert sound using an existing sound file in a folder on your computer before you click OK.
Owner: If you're the one to whom the Outlook program is licensed, then, by default, you're listed as the owner of each new task. To specify another user as the owner of the task (for whom any reminders should toll or to whom any task request responses should be sent), select your name in the Owner text box and then replace it by typing in the name of the new owner.
In addition to editing these fields on the Task tab, you can also enter notes into the list box that appears immediately below the row with the Reminder and Owner fields. And, in Outlook 2003, you can associate the task with particular contacts in your address book, assign categories to it, or mark it as private by using the Contacts or Categories button and Private check box that appear on the final row of the dialog box.
Note
In Outlook 2007, you can add categories to a new task by clicking the Categorize button or make it private by clicking the Private button, both in the Options group. To add a contact to the list box of a new task, click the Insert tab and then click the Attach Item button to open the Insert Item dialog box. Then click the Contacts folder in the Look In list box and then click the name of the contact to add in the Items list box below before you click OK.
While the fields on the Task tab enable you to record basic information about the new task, the fields on the Details tab enable you to document your work on the task. Display these fields by clicking the Details tab in Outlook 2003 or the Details button in the Show group of the Task tab in Outlook 2007.
You can then use any of the following fields to document your work and progress on the new task:
Date Completed: Select the date that you actually complete the task — especially when this date differs from the due date — by clicking the Date Completed drop-down button and then clicking the date on the Date Navigator that drops down.
Total Work: Enter the total number of hours, days, or weeks you expect to work on the project. Type the units (hours, days, or weeks) after the value (as in 45 hours).
Actual Work: Enter the number of hours, days, or weeks you worked on the project up to now using the same units (hours, days, or weeks) as you specified in the Total Work field.
Mileage: Enter any driving mileage associated with completing the task — especially if this mileage is reimbursable or tax-deductible — in this text box.
Billing Information: Enter any billing information, such as the hourly rate, the address of the company to bill, and the name of the person to whom you'll send the bill.
Companies (Company in Outlook 2007): Enter the names and/or contact information of relevant companies (clients, suppliers, and so forth).
Update List: When you assign a task to others (see "Assigning a task," later in this chapter), this text box displays your name and the names of any other people who received the task request.
Create Unassigned Copy: Click this button to send a copy of the task to someone other than the person or people you've assigned it to (thus, this button remains unavailable as long as the Update List field is empty, indicating that no task request has been sent asking someone else to take it on).
After you click the Save and Close button in the Task dialog box (which is no longer the Untitled – Task dialog the moment you enter a task description in the Subject field text box), Outlook adds the task as an item to the task list on the TaskPad or To-Do Bar as well as to the to-do list in the Tasks module (depending upon the due date you specify).
Whenever you need to update a task or edit its settings, just open its Task dialog box again by double-clicking its to-do item in the TaskPad or To-Do Bar or Task Module or by right-clicking it and then choosing Open from its shortcut menu.
Tip
You can quickly create a new task from any other Outlook item (including an e-mail message, appointment, contact, or note) simply by selecting its module and then dragging the item to the Navigation pane and dropping it on the Tasks navigation button. Outlook then opens a new task dialog box containing the information in the Outlook item where you can fill in all the pertinent information as outlined in this section before clicking the Save and Close button to add it to your to-do items on your tasks list.
Some of the tasks that you add to your to-do list in Outlook are repetitive in nature, reoccurring at set intervals (like turning in your mileage or sales receipts before the end of the month). When you record a task that you know is going to repeat at specific intervals, you can specify it as a recurring task. That way, you don't have to manually copy the task and adjust its due date for each subsequent occurrence.
To indicate that a task is recurring, open its Task dialog box and then click the Recurrence button located on the Standard toolbar in Outlook 2003 or in the Options group on the Task tab of the Ribbon in Outlook 2007. Outlook then opens a Task Recurrence dialog box similar to the one shown in Figure 12-4.
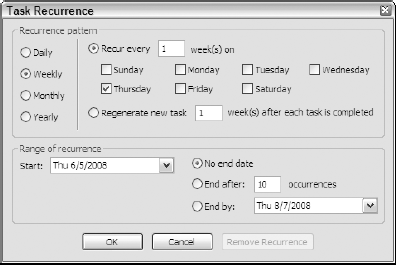
Here, you indicate the recurrence pattern by selecting the interval in the Recurrence Pattern section at the top (Daily, Weekly, Monthly, or Yearly). If the task naturally reoccurs at so many weeks after the current task is completed, click the Regenerate New Task option button and then enter the number of weeks in its associated text box. After specifying the recurrence pattern, you indicate the start and stop date (if any) for the recurring task in the Range of Recurrence area of the Task Recurrence dialog box.
As soon as you close the Task Recurrence dialog box (by clicking OK) and the Task dialog box (by clicking Save and Close), a new icon appears for the task in the Icon column in the TaskPad, To-Do Bar, and Tasks module, indicating that it's a recurring task. And the moment you mark this occurrence of the task as complete (either by clicking the Complete column in the TaskPad or To-Do Bar or right-clicking the task in the Tasks module and choosing Mark Complete from its shortcut menu), Outlook automatically adds another occurrence of the task to your to-do list (with a new due date that's a day, week, month, or year ahead, depending upon your Recurrence Pattern selection) until you reach the stop date or the last occurrence you've specified in the Range of Recurrence settings.
When you add a new task to your to-do list in Outlook, the task belongs to you alone, unless and until you decide to farm it out by assigning the task to someone else.
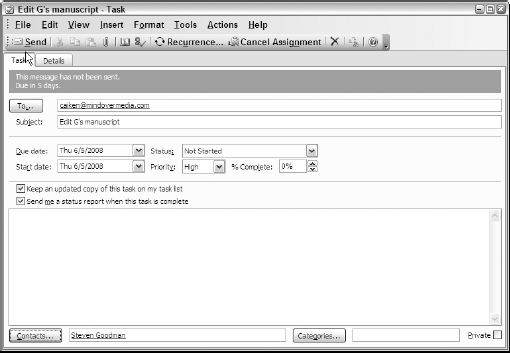
The process for assigning a task to another person is very similar to that for sending meeting requests to potential meeting participants. (See Chapter 10 for more on sending meeting requests.) After you click the Assign Task button in the menu bar of the task's Task dialog box, Outlook modifies the Task dialog box by adding a To text box and a message at the top indicating that the task reassignment message has not yet been sent (see Figure 12-5).
After you select the e-mail address of the person to whom you want to reassign the task (by clicking the To button and then clicking the name in the Select Task Recipient dialog box) and then click the Send button, Outlook e-mails a task request to him or her.
When you return to the task list in the TaskPad, To-Do Bar, or Tasks Module, the icon for the to-do item you just assigned to someone else is changed. To indicate that the task is in the process of being reassigned, Outlook adds a Hand icon below the normal icon denoting a task — the clipboard with check mark icon across it. When you reopen the Task dialog box, the person to whom you sent the task request is now listed as the owner of the task, and a message indicating that you're currently waiting for a response from this person appears at the top of the Task tab.
Meanwhile, the task request e-mail message that your task recipient receives in his or her Outlook Inbox displays the subject of the task in the e-mail Subject line in the Mail Navigation viewer. When the recipient selects the message, the number of days until the due date, the due date, status, priority, and percent complete information appear in the Info Bar at the top of the Reading Pane, right below the Accept and Decline buttons.
When the task recipient accepts the task assignment by clicking Accept and then clicking OK in the Accepting Task dialog box, you automatically receive an e-mail in your Inbox, indicating that the task has been accepted. The task recipient can then update you on the progress he or she makes on the task simply by clicking the Send Status Report button after updating the % Complete field in the Task dialog box. When he or she completes the task and marks it as complete, you also automatically receive an e-mail in your Inbox, indicating the task is now complete. In addition, Outlook automatically marks the task as complete in the task list in the TaskPad or To-Do Bar, as well as in the Task module.
Should your task recipient refuse to accept the task you've tried to assign to him or her by clicking the Decline button at the top of the task request's Info Bar, Outlook sends you an e-mail indicating that your task recipient has declined the task. In such a case, when you reopen the task's Task dialog box, you're still listed as the owner (although the to-do item continues to carry the icon of the hand-under-the-clipboard, indicating that you tried to reassign the task).
To remove this icon indicating that the task is in the process of being reassigned and restore the task as a normal to-do item on your Outlook task lists, open the Task dialog box and then choose Action