
Although, the Contacts module comes third in the series of Outlook's major components, most folks treat this module as if it were number two on the list — right there behind Mail. Very few Outlook e-mail users are completely unfamiliar with its rudimentary features, and many use it to maintain their entire online address book.
In terms of personal productivity, the most important aspects of using the Contacts module include the ability to efficiently generate new records that store all the vital information you need about a new person or business, create new e-mail messages from existing contact records, and use views and categories to filter and sort your contacts list both for printing and exporting to other applications such as Microsoft Word for mail merge production. You can find all these aspects of using the Outlook Contacts module covered in this chapter.
Outlook makes it a snap to add a new contact to your address book. If you're in the Contacts module, you simply press Ctrl+N to open an Untitled – Contact dialog box (similar to the one shown in Figure 11-1). If you're in any other Outlook module, you press Ctrl+Shift+C to open this same dialog box.
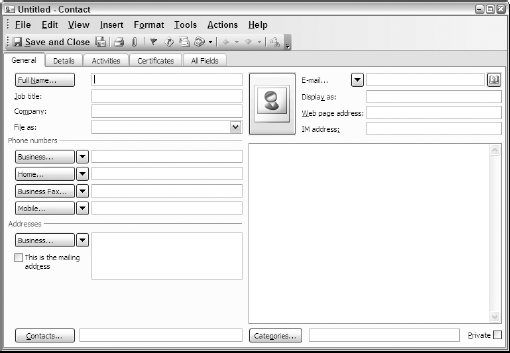
Figure 11-1. Adding basic information for a new contact using the fields on the General tab of the Outlook 2003 Contact dialog box.
If you happen to be in the Mail module and have received a message from someone you need to add to the Contacts address book, you do this by right-clicking the name and e-mail address that appears at the top of the message in the Outlook Reading Pane and then choosing Add to Outlook Contacts from the shortcut menu. Outlook then opens a new Contact dialog box for the person — one that already has the Full Name, File As, E-Mail, and Display As fields filled in (using the selected name and e-mail address information).
Tip
If someone sends you an e-mail that contains his or her vCard (virtual business card — see Chapter 9 for more information), you can add a contact record for him or her with all the vCard information already filled in the appropriate fields. Simply double-click the name of the vCard attachment — it's the file with the .vcf extension — in the header area at top of the Outlook Reading Pane to call up the Open Mail Attachment dialog box. Click the dialog box's Open button to have the program open a new Contact dialog box with most of its fields filled in using the information on the vCard.
Note in Figure 11-1 that the Outlook 2003 Contact dialog box contains a series of tabs in addition to the default General tab. These additional tabs (which appear as buttons within the Show group on the Contact tab of the Outlook 2007 Ribbon) are Details, Activities, Certificates, and All Fields. Although most of the information you want to keep on your business and personal contacts is covered by the fields found on the General tab, for a few of your contacts you may want to use some of the fields found on the Details tab as well.
Figure 11-2 shows you the fields on the Details tab of the Outlook 2003 Contact dialog box. As you can see, the fields that appear on this tab include both business and personal details as well as online meeting information and an alternative, less-busy e-mail address to use.
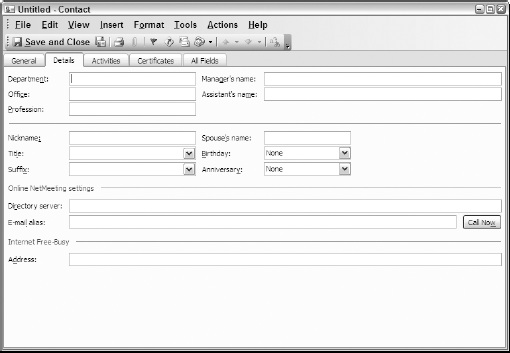
Figure 11-2. Adding more information about a new contact using fields on the Details tab of the Outlook 2003 Contacts dialog box.
Note
If you're adding a new record for a contact from the same company as someone who's already in your address book, you can save yourself from manually entering the company name, Web site address, basic business phone number, and business address by having Outlook 2007 use the existing record as the basis for a new one. To do this, first, open the existing record of the person in your address book with the same company information. Next, click the drop-down button on the Save & New button found in the Actions group on the Contact tab and then select New Contact From Same Company. Outlook then creates a new record for the company that you can personalize by entering the contact's name in the Full Name text box. As soon as you press Tab after entering the contact's name, Outlook replaces the company name with the person's name in the File As field, and you can then proceed to enter the person's e-mail address and edit his or her phone number before you save the record by clicking the Save & Close button.
Note
Don't hesitate to assign categories to your new contacts right when you add them to your address book. A helpful division here would involve deciding whether a new contact belongs in the Business category or the Personal category. If you divide your contacts up right from the start, then whenever you select the By Category view in the Contacts module, Outlook automatically separates the business people from your friends and family. To add a new contact to the various categories that apply, open the record in the Contacts module by double-clicking it and then click the Categories button (in Outlook 2003) and select the check boxes for all the appropriate categories in the Available Categories list box before you click OK. In Outlook 2007, click Categorize button in the Options group of the Contact tab and then click the color of each category that applies.
When you first begin working with Outlook's Contacts module, the program displays all the records for all contacts you add to your address book in alphabetical order using a card layout. (Address cards in Outlook 2003 are shown in Figure 11-3, and business cards in Outlook 2007 are shown in Figure 11-4.)
As with the other Outlook modules, you can easily switch the Contacts module from this default view into one of the other predefined views. In Outlook 2003, you do this either by clicking the option button in front of the name of the view in the Current View section of the Navigation Pane (Detailed Address Cards, Phone List, By Category, By Company, By Location, or By Follow-up Flag) or by choosing View
Note
In Outlook 2007, you can switch views by clicking the option button in front of the view name in the Current View section of the Contacts Navigation Pane (Address Cards, Detailed Address Cards, Phone List, By Category, By Company, By Location, or Outlook Data Files). You can also switch views by choosing View
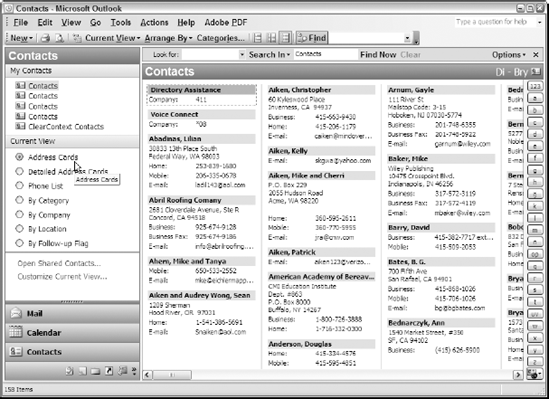
Figure 11-3. Viewing the contacts in my Outlook 2003 address book in the default Address Cards view.

Figure 11-4. Viewing the contacts in my Outlook 2007 address book in the default Business Cards view.
Sometimes, despite your best efforts, you end up with duplicate records in your Outlook Contacts address book. Outlook does its best to prevent this by trying to alert when you're about to create a new record with the same name as an existing one, but sometimes those duplicates still sneak in there. (This has happened to me once when I merged records from an old address book kept on an old computer with a new address book I had just started on a new computer, and I forgot to prohibit duplicates during the importing.)
Note
One of the quickest ways to locate duplicate records so that you can eliminate one of the copies is to make Phone List the current view in the Contacts module and then sort the contact records in the table alphabetically on either the Full Name or File As field.
Figure 11-5 illustrates how you might do this. For this figure, I first switched the view in my Contacts module to Phone List by clicking the Phone List option button in the Navigation Pane. Then, I clicked the Full Name column header one time to sort the table by first and then last name in reverse alphabetical order (Z to A). I then noticed right away that somehow my address book has duplicate entries for Richard Redmond, one of which I can get rid of right away by clicking and then pressing the Delete.
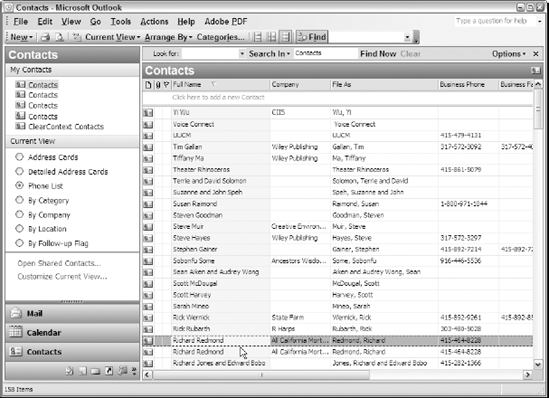
Figure 11-5. Finding duplicate contacts by switching to the Phone List view and then sorting the records in descending order (Z to A) by the Full Name.
Then, after scrolling through the entire sorted Phone List and making sure that there are no other duplicates that I need to remove, I can return the list to regular alphabetical order (A to Z) by clicking the Full Name column header a second time before returning the Contacts module to its default Address Cards view by clicking the Address Cards option button.
You can customize any of the Contacts module's predefined views or create new custom views for Contacts just as you can for any other Outlook module. To customize an existing view, make it current in the Contacts module before choosing View
Note
If you're like me and you want to keep a phone list printout of your contacts that you know will print out on a minimum number of pages, you can create a custom view that displays just the fields you want printed in the order you want to see them. Since I consistently use the basic Business and Personal Contact categories in order to separate professional from personal contacts, I created two custom views for this job: Business Phone List and Personal Phone List.
The custom Business Phone List view uses a Table view type to display a list of records using only the following Contacts fields in this order: Icon, Flag Status, Full Name, Company, Business Phone, Business Fax, Mobile Phone, and Web Page. In addition, the business phone list is sorted alphabetically in A to Z order by the Full Name field and filtered with the Business category so that only business contacts appear in it (see Figure 11-6).
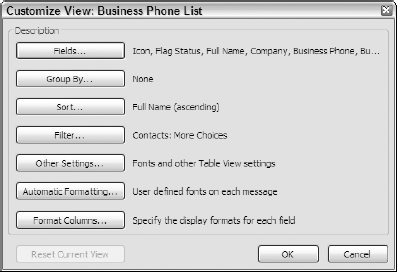
To sort the custom Business Phone list in this manner, you click the Sort button in the Customize View dialog box and then, in the Sort dialog box that appears, select Full Name from the Sort Items By drop-down list as well as the Ascending option button. To filter this custom list, you click the Filter button in the Customize View dialog box and then, in the Filter dialog box that appears, click the More Choices tab where you select Business in the Categories drop-down list (assuming that you've set up a Business category and assigned it to particular business contacts in your address list).
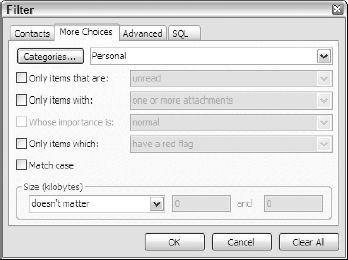
The Personal Phone List custom view likewise is built upon the Table view type, but its records contain only the following Contact fields in this order: Icon, Flag Status, Full Name, Home Phone, Mobile Phone, Business Phone, IM Address, and Web Page. In addition, this phone list is sorted in the same way by the same Full Name field. However, in this view, the list of contact records is filtered with the Personal category rather than Business so that just my personal contacts are included. To filter this list in this manner, click the
Filter button in its Customize View dialog box and then, in the Filter dialog box that appears (see Figure 11-7), click the More Choices tab where you select Personal in the Categories drop-down list.
Then, when it comes time to print out a new phone list either for my professional and personal contacts, all I have to do is follow these few steps:
In the Contacts module (Ctrl+3), click the Business Phone List or Personal Phone List option button (that are added automatically as soon as these custom views are created as described earlier) in the Navigation Pane.
Outlook makes the custom view you click the current one in the Contacts module.
Choose File

Outlook opens the Print Preview window (similar to the one shown in Figure 11-8), which shows the contact information that will print on the first page of the report. This window also shows you the total number of pages on the left side of the status bar.
Press the Page Down key to check out the contents of each page of the report.
To print all the fields (columns) used in the Business Phone List across a single page of the report, you need to change the page setup so that Outlook prints the report using the Landscape orientation.
Click the Page Setup button on the toolbar at the top of the Print Preview window.
Outlook opens the Page Setup: Table Style dialog box.
Click the Paper tab and then click the Landscape option button before clicking OK.
The Print Preview window now shows the currently displayed report page in landscape mode with all the fields (columns) on a single page. In addition, the number of total pages displayed on the status bar decreases significantly.
Click the Print button on the toolbar at the top of the Print Preview window.
Outlook closes the Print Preview window and then opens the Print dialog box.
Adjust any print settings that need tweaking (printer, print range along with the number of pages and copies) and then click OK.
Outlook closes the Print dialog box and sends your report to the selected printer.

Another thing you should know about organizing your contacts for maximum productivity is how to create and use a distribution list. A distribution list contains all the contacts that you routinely e-mail as a group. By creating a distribution list with the names of all the people in the group, you save a lot of time when you either need to send an e-mail to everyone in the group or set up a meeting with them.
To create a new distribution list, follow these steps:
Launch Outlook as you normally do and then press Ctrl+Shift+L.
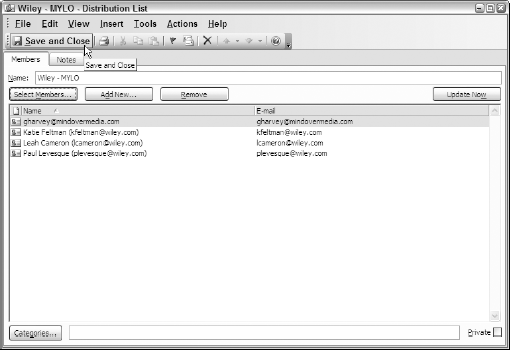
Outlook opens the Untitled – Distribution List dialog box, similar to the one shown in Figure 11-9.
Type in the name of the new distribution list in the Name text box.
Click the Select Members button.
Outlook opens the Select Members dialog box.
Ctrl+click the names of the people in your address book that are part of the new distribution list and then click the Members button before you click OK.
All the names you selected in the Select Members dialog box now appear listed in the Distribution List dialog box.
Click the Save and Close button.
Outlook closes the Distribution List dialog box and adds the new distribution list to your list of Contacts. (It appears under the name you assigned it and is identified with an icon of two heads in profile.)
After you create a distribution list, you can use it to send a message or meeting requests (see Chapter 10) to all of its members. All you do is right-click the name of the distribution list in the Contacts Information Viewer and then, in Outlook 2003, choose either New Message to Contact or New Meeting Request to Contact from the shortcut menu and in Outlook 2007, choose Create from the shortcut menu and New Message to Contact or New Meeting Request to Contact from the continuation menu.
Outlook then opens either an Untitled Message or Untitled – Meeting dialog box with the name of the distribution list automatically entered in its To text box. You can then fill in the rest of the e-mail message or meeting request fields as required before you click the Send button to send the message or meeting requests to all the people listed as part of the distribution list.
Tip
If you don't need to send the e-mail message or meeting request to all the members in the distribution list, click the plus sign in front of the distribution list name in the Untitled Message or Untitled – Meeting dialog box (and OK in the Expand List alert dialog box) to expand the list so that the e-mail addresses of all the members appears in the To box. You can then delete the addresses of those members who don't need to have a copy of the message or meeting request before you click the Send button.
You can put the contacts you keep in your address book to plenty of good uses. Here's a list of the more important contact-related things you can do to save time and make you as productive as possible in Outlook:
E-mailing: One of the quickest and easiest ways to send a new e-mail message is by opening the record of the contact you want to e-mail (by typing some or all of the contact's name in the Find a Contact text box on the Standard toolbar and then pressing Enter). Then, click the New Message to Contact button on the Standard toolbar in the Contact dialog box in Outlook 2003 or the E-Mail button in Outlook 2007 to open a new e-mail message already addressed to that contact in the To text box.
Calling: If your computer is set up to do automatic dialing, you can telephone a contact by pressing Ctrl+Shift+D (from any Outlook module) and then selecting the Contact in the New Call dialog box.
Web site browsing: If you entered the URL address of your contact's Web site into the Web Page Address text box of the contact record, you can browse the Web site simply by clicking the contact in the Information Viewer of the Contacts module and then pressing Ctrl+Shift+X. (You don't have to open the contact's card.)
Mapping: If you have to visit a new contact and need to see a map of his or her location, open his or her contact card in Outlook and then click the Display Map of Address button in Outlook 2003 or the Map button in Outlook 2007 (both use a road sign icon). Outlook then opens your Web browser and connects to the Live Search Maps page with your contact's address already displayed in the text box at the top of the page. All you have to do at that point to display a map of the address is to click the Search Maps button to the immediate right of the address text box.
Tracking activities: To review the e-mail history or upcoming tasks or appointments with a particular contact, open his or her contact card and then click the Activities tab (Outlook 2003) or the Activities button (Outlook 2007). To restrict the list of activities to a particular arena such as e-mail messages, journal entries, notes, or upcoming tasks and appointments, choose the item to display from the Show combo box's drop-down list.
Flagging for follow-up: You can easily flag a contact to remind yourself to do some sort of follow-up with him or her. Simply right-click the contact name and then choose Follow Up from the contextual menu that appears. In Outlook 2003, the program opens a Flag for Follow Up dialog box that enables you to select the type of flag (Follow Up, Call, Arrange Meeting, Send E-mail, or Send Letter) along with the due date and time before you click OK. In Outlook 2007, a continuation menu appears, on which you click the type of date flag to attach to the contact (Today, Tomorrow, This Week, Next Week, No Date, Custom, or Add Reminder).
Note that you can also assign the default flag to a selected contact in Outlook 2007 by pressing the Insert key and that, in Outlook 2007, after you flag a contact, his or her name appears in the Task List both in the To-Do Bar and Task module. (In Outlook 2003, the program merely adds a flag icon to the contact name in the Contacts module.)
Scheduling meetings: You can save time when scheduling a new meeting and sending out meeting requests by first selecting all the participants in the Contacts module. Ctrl+click each contact name (this is often easiest when using the Phone List view) to select them and then drag the selected contacts and drop them on the Calendar Navigation button. Outlook then opens an Untitled – Meeting dialog box with the e-mail addresses of all the contacts you selected already entered into the To text box. (See Chapter 10 for more information on scheduling a meeting and sending out meeting requests.)
Assigning tasks: You can assign a new task to a contact in your address book simply by clicking his or her name (Ctrl+click to select multiple contacts) in the Information Viewer of the Contacts module and then dragging and dropping it on the Tasks Navigation button. Outlook then opens a new Untitled – Task dialog box with the contact's e-mail address already listed in the To text box. (See Chapter 12 for details on assigning tasks.)
Sometimes, you may want to use the contacts you keep in your Outlook address book in other applications programs. For example, you might export the contact list over to a Microsoft Excel workbook file so you can use Excel's features to sort and filter its records (assuming that you're familiar with Excel or have my Excel 2003 For Dummies or Excel 2007 For Dummies [both published by Wiley] on hand — sorry, just couldn't resist the plug). You can then use Excel as the data file in a mail-merge procedure conducted in Microsoft Word.
To export the contacts in your address book to another file format for use with another application program, follow these steps:
Choose File
Outlook opens the first dialog box of the Import and Export Wizard.
Choose Export to a File from the Choose an Action to Perform list box and then click Next.
Outlook opens the Export to a File dialog box containing the Create a File of Type list box with all the file format choices you have when wanting to export a file. Click Microsoft Excel or Microsoft Access to export your contact data to a worksheet or data table that Excel or Access can open and work with. Click one of the other comma- or tab-separated file formats when exporting contacts for use with a DOS- or Windows-based application program that can read these file formats.
Click the name of the type of file you want to create in the Create a File of Type list box and then click the Next button.
Outlook opens the first version of the Export to a File dialog box, this one containing the Select Folder to Export From list box. This list box contains a standard folder tree with a complete hierarchy of the Outlook folders and subfolders that mirrors the folder tree that appears in the Navigation Pane when the Folder List button is selected. This is where you select the folder whose data you want to export by clicking its folder icon where it appears in the hierarchy.
Click the Contacts file icon in the folder hierarchy displayed in the Select Folder to Export From list box of the Export to a File dialog box and then click the Next button.
Outlook now opens a version of the Export to a File dialog box that contains just the Save Export File As text box. This text box is where you indicate the folder path and filename for the new data file before proceeding with the export.
Click the Browse button to open the Browse dialog box: Use the Save In drop-down list to select a new folder and then enter a new filename (or modify the existing filename if one is automatically supplied for your type of data file) in the File Name text box.
Click OK to close the Browse dialog box.
Click the Next button in the Export to a File dialog box.
Outlook opens the Export to a File dialog box with a Following Actions Will Be Performed list box containing the command to export the contacts in your Contacts folder. Before clicking its Finish button to export your contacts, you can use the Map Custom Fields button in the following step to ensure that only data from the fields you want in the new file are used.
(Optional) Click the Map Custom Fields button to open the Map Custom Fields dialog box. Click the Clear Map button to remove all entries from the To list box on the right and then drag all the fields in the From list box on the left and drop them into the To list box in the order in which they are to appear in the new export file. When you're finished, click OK to close the dialog box.
Now, you're ready to export your contact list to the new file.
Click the Finish button in the Export to a File dialog box.
Outlook displays an Import and Export Progress dialog box, showing the program's progress in exporting your contact records to the new file. After this dialog box closes, you can then open the new file using an appropriate program.
Warning
Exporting your Outlook contacts list to another file format is no substitute for periodically backing up all your Outlook data as outlined in Chapter 8. If your computer experiences a catastrophic crash that affects the ability to read the data on your hard drive, chances are good that your exported contact list files won't be readable either. Of course, if you do keep a copy of the exported file stored on a different disk or backup media and you do ever need to restore your contact list in Outlook, you can do so by importing the file into the program.