
As you're probably well aware, the invention of Post-it or "sticky" notes by 3M's Art Fry (and absolutely not the zany characters, Romy and Michele in the 1997 hit comedy movie, Romy and Michele's High School Reunion) forever changed the way people take and use short, individual notes. This is because Post-it notes not only enable you to quickly capture random thoughts and to-do items, but you then get to stick the notes in obvious places where you can't easily ignore them. (All around the computer monitor is one of my favorite places.)
As you soon discover, Outlook Notes are definitely modeled off of Post-it notes. Their icons resemble a pad of notes with the lower-left corner of the first note turned up, and they're even a canary yellow color (although you can change them to blue, green, pink, or white). Moreover, you can drag Outlook notes out of the Notes module and stick them anywhere you want on your Windows desktop. And with some skillful window placement, this makes it possible to have certain Outlook notes up while you're working on documents in other applications, such as a report in Word or financial statement in Excel. It also makes it possible to declutter the periphery of your computer screen.
This chapter shows you how to use Outlook notes to quickly capture your bright ideas (and find them again) as well as how to use them as visual reminders that stay in your face when you're using your computer but not working in Outlook. This chapter also introduces you to ways that you can effectively use the notes you keep in Microsoft's standalone note-taking program, OneNote 2007, in Outlook.
Outlook notes are definitely being underutilized by today's Outlook users. (Most don't even know they're there.) This is really too bad because Outlook notes can really help you achieve what many leading experts tout as one of productivity's most important aspects; namely, the ability to document all your random thoughts that just seem to pop into your head, often at the most unlikely times. These thoughts can run the gamut from pedantic lists of things you have to do, want to do, and might never do all the way to inspiring quotes, deep questions, astounding insights, and personal aspirations.
The theory here is that by getting all these types of things down on paper (all right, digitally stored in bits and bytes), you never have to go through the painful experience of remembering that you had a really great idea while at the same time not being able to remember exactly what it was. By documenting all your spontaneous ideas as Outlook notes, the worse that can happen is that you'll have to take a tiny bit of time searching for the note that contains them.
Note
I urge you to make good friends with the keyboard shortcut Ctrl+Shift+N, enabling you to create a new note from any Outlook module, and I hope that you then use this shortcut relentlessly to note every seemingly significant idea that pops into your head. Further, I suggest that you do this kind of routine note-taking without regard to whether the idea you're documenting would be better placed on your to-do list as a task item or on your calendar as an appointment or event. (I show you how to convert your Outlook notes into other Outlook items in "Using notes to create other Outlook items," later in this chapter.) Simply put, you should make every effort to get your idea fully documented by getting it completely recorded and saved. (Fortunately, Outlook notes are automatically saved without requiring you to click any button or press any other keyboard shortcut.)
When you press Ctrl+Shift+N in any Outlook module, the program opens a new note, similar to the one shown in Figure 13-1. As you can see in this figure, an Outlook note bears a strong resemblance to a physical Post-it note, except for the fact that the Outlook note is divided into the following three areas:
Title bar: This bar along the top of the note doesn't actually show the title of the note. (The text you enter on the first line in the body of the note serves as the note title.) It does, however, contain a Menu button that you click to open a menu of options, a blue Moving handle you drag to reposition the note on top of an application or Windows desktop, and a Close button you click to close the note. (Outlook automatically saves the note when you close it.)
Note body: This is the area in the middle that contains the text of the note.
Status bar: This bar along the bottom contains the Date stamp, which displays the note's creation date and time, and a Sizing handle you can drag to modify the height and width of the note.
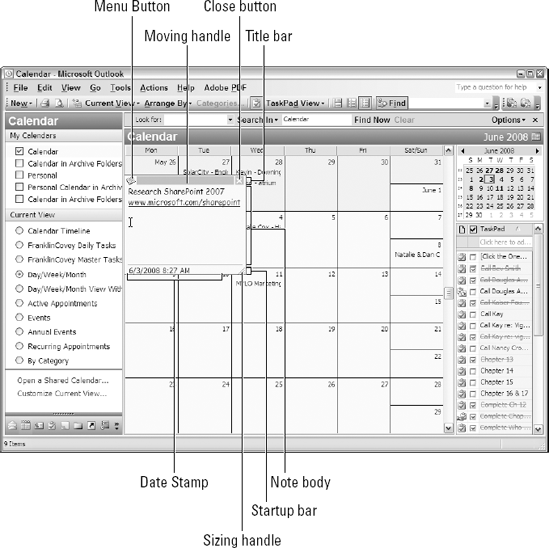
Figure 13-1. Creating a new note from the Outlook Calendar module using the Ctrl+Shift+N keyboard shortcut.
When you open a new note, Outlook automatically places the cursor/insertion point at the beginning of the first line in the note body. You can then start typing the text of the note, or you can paste any text in place (Ctrl+V) if you've previously copied the text to the Windows Clipboard (as you would if you wanted to store text in another document or Web page in Outlook note form).
If you type a Web address or e-mail address in the note body in a format that Outlook understands such as www.dummies.com or mailto: [email protected], the program automatically adds a live hyper-link to that Web or e-mail address. This means that when you click the Web address link in the note, Outlook actually launches your Web browser and takes you to the Web page associated with that address. Similarly, when you click an e-mail address link, Outlook opens a new e-mail message with that e-mail address in its To field.
Note
One thing clearly lacking in Outlook notes is the presence of scroll bars. This means that as you add more lines of text than fit in the current size of the note, Outlook moves existing lines of text up and out of sight to accommodate the new lines without also adding a vertical scroll bar to bring them back into view. This means that you either have to use the Sizing handle to increase the size of the note to display all the note text or press the ↑ and ↓ arrow keys to scroll through the text to display hidden lines.
Outlook's Menu button in the upper-left corner of an open note (refer to Figure 13-1) makes it easy to customize your note. The menu attached to this button contains a list of commands, many of which you're sure to be familiar with:
Color: (Outlook 2003 only) Enables you to assign a new note color
(Blue, Green, Pink, or White) that you can then use to group notes by selecting By Color as the current view in the Notes module.
Categories: (called Categorize in Outlook 2007) Enables you to assign categories to a note that you can use to group notes by selecting By Category as the current view in the Notes module. In Outlook 2007, assigning a category to a note also changes the note's color to the color used by the category.
Contacts: Enables you to associate the note with particular contacts in your address book. To associate a contact with a note, simply click the note's Menu button and then click the Contacts item to open the Contacts for Note dialog box. Here you can click the Contacts button to open the Selects Contacts dialog box, where you click the name of the contact and then click OK.
After associating a contact with a note, you can then call the contact, send him or her an e-mail, schedule a meeting, or open the contact's record from within the note. To perform one of these activities using a contact's information, you can double-click the contact's name in the Contacts for Note dialog box to open a dialog box with the contact's record and the use the appropriate buttons (E-Mail, Meeting, Call, and so on).
Print: Enables you to print the contents of the note.
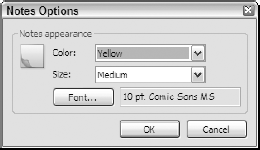
If you want to change the relative size of the notes you create and/or change their default font or font color, here's what you do:
Click the Note Options button in the Notes section of the Options dialog box (Tools
Options).
Outlook then opens the Note Options dialog box shown in Figure 13-2.
Click the Font button to open the Font dialog box where you can select a new font (or new font style, font size, or font color, if you want) for the appearance of the note text. Then click OK.
Click the Size drop-down button to select either the Small or Large size to change the relative size of the open note.
If you want to change the default note color from Yellow to another color, select a new color (Blue, Green, Pink, or White) from the Color drop-down menu.
Click OK to close the Note Options dialog box.
Earlier in the chapter, I make a case for getting in the habit of entering notes indiscriminately without regard to whether they'd be better off entered as some other Outlook item, including a new e-mail message in your Mail module, appointment or event in your Calendar module, to-do item in your Tasks module, or journal entry in your Journal module.
My rationale for suggesting this strategy is simple: Outlook makes it so easy to later move your notes to the appropriate module that you're better off worrying about nothing more than capturing the potential e-mail, contact, appointment, task, or journal entry information in note form.
For example, say you suddenly remember that you need to call your doctor to discuss some recent lab test results. So, you press Ctrl+Shift+N, type "Call Dr. Smith to discuss lab results," and then click the Close button. Now, you have an electronic sticky note in Outlook that you can drag onto your Windows desktop to remind you to make that call. However, this particular note really belongs on your Outlook to-do list rather than just being a visual reminder in virtual Post-it note form.
Therefore, to convert this note into a bona fide to-do item on your tasks list, simply open the Notes module (Ctrl+5) in Outlook and then drag and drop the note's icon onto the Tasks button in the Navigation Pane. Outlook responds by opening a Call Dr. Smith to Discuss Lab Results – Task dialog box with the date stamp and text of the note displayed in its list box. Then, all you have to do is assign the new task a due date and time and assign Dr. Smith as a contact (assuming that you don't know his phone number by heart) before you click the Save and Close button.
Alternatively, you could use this note to create a new appointment on your calendar rather than a to-do item on your tasks list. To do this, drag the Dr. Smith note icon onto the Calendar button in the Navigation Pane of the Notes module instead. This causes Outlook to open a Call Dr. Smith to Discuss Lab Results – Appointment dialog box where you can specify the date and time of the call before you click Save and Close to put it on your daily calendar.
Note
If you take down contact information in a note and want to use it as basis for creating a formal contact record for the person, drag its note icon onto the Contacts button in the Navigation Pane. Outlook opens a new Untitled – Contact dialog box with the person's contact information from the note entered into its list box. You then have to copy and paste pertinent pieces of contact information into their respective fields (Full Name, E-Mail, and so on) before you click Save and Close.
Not only can you use your Outlook notes as the basis for creating other Outlook items — including e-mail messages, contacts, tasks, appointments, and journal entries — but you can also create notes from any of these Outlook items. All you have to do is open the appropriate Outlook module and then drag and drop the item you want to appear in the new note onto the Notes button in the Navigation Pane.
After you drop the Outlook item on the Notes Navigation button, Outlook opens a new note on top of the Outlook program window containing the contents of that item. This item's text is inserted below a blank line and separated from it by a partial dotted line. You can then enter the subject of the note into this blank line and edit the item's text as needed.
Note
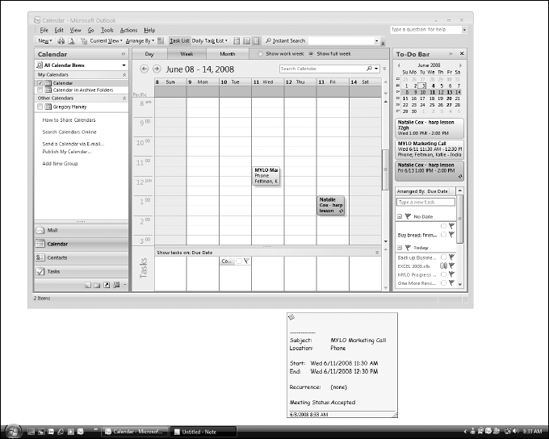
The primary reason for converting other Outlook items into notes is to use these notes as visual reminders on your Windows desktop. This means that you normally don't want to close the new note after creating it. The idea here is to drag the note outside of the confines of the Outlook program window and drop it somewhere else on your Windows desktop where it will never be out of sight and therefore out of mind.
Figure 13-3 illustrates this situation. This figure shows my Windows Vista desktop after dragging a new note that I created from an appointment on my calendar onto the desktop. Here, it will serve as a visual reminder when I minimize the Outlook program window in order to work in some other application.
One of the big advantages of keeping your notes electronically in Outlook is that you can use the program's search ability to quickly find the ones to which you need to refer. The steps for searching notes are really straightforward and very easy to follow:
If you're not already in the Notes module in Outlook, press Ctrl+5.
Outlook makes the Notes module current.
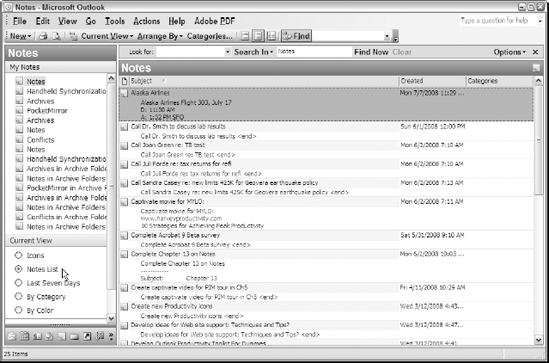
If your notes aren't displayed as a list in the Notes Information Viewer, click the Notes List option button in the Navigation Pane.
Outlook displays a list of your notes sorted alphabetically by Subject (see Figure 13-4).
Click the Look For text box in Outlook 2003 or the Search Notes text box in Outlook 2007 at the top of the Notes Information Viewer; then type in the text you want to search for in your notes in this text box. In Outlook 2003, you also click the Find Now button.
Outlook filters the list of notes so that only those notes containing the search text are displayed. You can then open any of the notes by double-clicking it in the list, and you can once again display all the notes in the list by clicking the Clear button in Outlook 2003 or the Clear Search button (the one with the X in it to the immediate right of the Search Notes text box) in Outlook 2007. Doing this clears the filter so that all your notes are once again listed in the Information Viewer.
Outlook makes it a snap to share your notes with other co-workers and clients via e-mail. All you have to do is right-click the note in the Notes module (Ctrl+5) and then choose Forward from its shortcut menu. Outlook then opens a new e-mail message that uses the subject of the note (the first line of text) as the Subject of the e-mail message and automatically appends the note to the message as an attachment.
Then, all you have to do is specify the e-mail recipients in the To, Cc, and/or Bcc fields, type any additional explanatory text in the body of the message, and click the Send button to share the note. When your recipients receive this e-mail, they can then open the note by double-clicking the attachment icon in header of the message and then drag it onto on their Windows desktop.
OneNote 2007 is the current version of Microsoft Office's standalone note-taking software program. This program offers sophisticated abilities not only for taking notes, but also for organizing them. It is particularly useful for students and workers in professions in any profession that relies heavily on note taking.
As part of Microsoft Office (although always sold separately from the rest of the Office bundles), OneNote is designed to work well with other Office applications, especially Outlook. For example, you can insert Outlook meeting details into OneNote where you can elaborate on them. (This is especially useful if you then use OneNote 2007 to take your meeting notes.) So, too, you can add tasks, appointments, and new contacts in Outlook from information you enter in OneNote 2007.
OneNote enables you to insert details of an appointment or meeting that you've placed on your Outlook calendar directly into its notes, including details such as the date, time, location, attendees, and subject. This feature enables you to use the essential meeting information stored in Outlook as the header for the meeting notes that you then take in OneNote.
To see how nicely this works, follow along with the steps for taking the details for a meeting scheduled on an Outlook calendar into a new page of notes in OneNote:
With OneNote open, click the Notebook button to open the notebook where you want to keep the meeting notes and then click the tab of a blank page at the top of the notebook to make it active or click the New Page button if no blank pages are available.
OneNote opens a new page in the current notebook.
Choose Insert
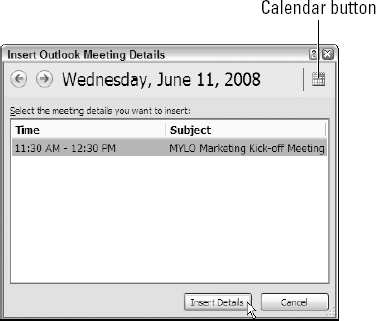
Outlook Meeting Details from the OneNote menu bar.OneNote opens the Insert Outlook Meeting Details dialog box, similar to the one shown in Figure 13-5.
Click the Calendar button to display the drop-down Date Navigator and then use it to select the date of the meeting you've scheduled on your Outlook calendar.
The Select The Meeting Details You Want to Insert list box in the Insert Outlook Meeting Details dialog box displays all of the appointments and meetings you've scheduled in Outlook on the date you select.
Click the meeting whose details are to be copied into OneNote in the Select The Meeting Details You Want to Insert list box and then click the Insert Details button.
Depending upon the level of your security settings, OneNote may then display an alert dialog box warning you that another program is asking you to allow this access. If this is the case, click the Allow Access check box in this alert dialog box and then click Yes.
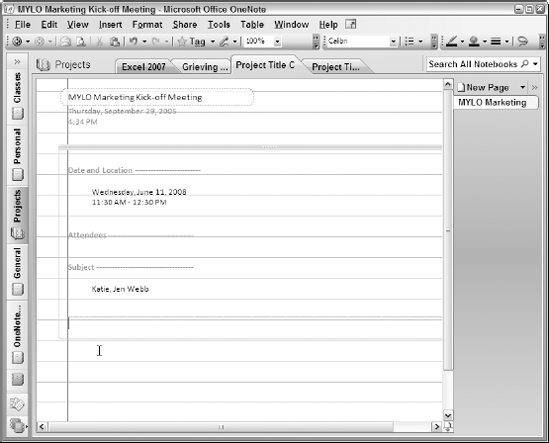
OneNote then inserts the meeting details into the new page of the currently open notebook, inserting the Subject field into the page's header box and the rest of details about date, time, attendees, and so on appearing in a separate text box below, as shown in Figure 13-6.
OneNote also enables you to convert information you store in the pages of its notebooks to bona fide Outlook items. These items include tasks, appointments, and contacts. Presumably, the idea here is that you're taking notes on your computer in OneNote during a meeting, presentation, or seminar, and as part of this note-taking you record information that you also want to appear in Outlook as a to-do item on your tasks list, an appointment on your calendar, or a contact record in your address book.
Creating a new Outlook task from a note in OneNote
To convert a note in a OneNote notebook into an Outlook task that appears as a to-do item in your Outlook task list, select the note's text box and then choose Insert
After you do this, the flag icon associated with the due date appears in front of the note in its text box in your open notebook in OneNote. In addition, this task appears as a to-do item in your tasks list in Outlook Tasks module (under the generic subject heading, Click the OneNote Link in Task Body for Details).
In the notebook in OneNote, you can then right-click the flag icon that appears in front of the note's text to change the task's due date, mark the task as complete, delete it from OneNote and Outlook, or to open the task's Outlook Task dialog box in OneNote. In Outlook, you can open the Task dialog box for this new to-do item by double-clicking the to-do item in the task list in the Tasks module, and in the dialog box you can modify the settings and details.
Creating a new Outlook appointment from a note in OneNote
To convert a note that you've recorded in a OneNote notebook into an appointment that appears on your Outlook calendar, select the note's text box in OneNote and then press Alt+Shift+A. (You can also choose Tools
OneNote then opens a new Outlook Appointment dialog box that appears on top of the OneNote program window with the text of the selected note copied into the list box that appears on its Appointment tab. You can then fill in the information for the missing fields, including the subject, location, start and end dates and times, as well as assign contacts and categories to the appointment before you click the Save and Close button to save this appointment on your Outlook calendar and close the Appointment dialog box.
Creating a new Outlook contact record from a note in OneNote
The process for converting a name, address, telephone number, and Web site address in OneNote into a new contact in your Outlook address book is almost identical to that for creating a new Outlook appointment. However, after selecting the text box of the note in OneNote that contains your contact information, you press Ctrl+Shift+C (or choose Tools
OneNote then opens a new Contact dialog box that appears on top of the OneNote window. This Outlook dialog box contains the contact information from the note in the OneNote notebook copied to its list box. You can then copy and paste the pieces of this contact information to the appropriate contact fields, such as Full Name, E-Mail, Web Page Address, and so forth before you click the Save and Close button to save this contact record in your Outlook address book and close the Contact dialog box.