Chapter 19. Beyond the Basics
So far, everything in this book has been about what you can do with Elements right out of the box. But as with many things digital, there’s a thriving cottage industry devoted to souping up Elements. Of course, signing up for a Photoshop.com account (Photoshop.com), gives you access to a lot of extra goodies from Adobe, but there’s a ton of other stuff available, too. You can add new brush shapes, Layer styles, actions, and fancy filters. Best of all, a lot of what’s out there is free. And many of the tools are especially designed to make Elements behave more like Photoshop. This chapter looks at some of these extras, how to manage the stuff you collect, and how to know when you really do need the full version of Photoshop instead. You’ll also learn about the many resources available for expanding your knowledge of Elements beyond this book.
Graphics Tablets
Probably the most popular Elements accessory is a graphics tablet, which lets you draw and paint with a pen-like stylus instead of a mouse. A tablet is like a souped-up substitute for a mouse: you control your onscreen cursor by drawing directly on the tablet’s surface—an action that many artists find offers them greater control. If trying to use the Lasso tool with a mouse makes you feel like you’re trying to write on a mirror with a bar of soap, then a graphics tablet is for you.
Note
Some deluxe-model graphics tablets act as monitors and let you work directly on your image. But you need to budget close to a thousand dollars for that kind of convenience.
Most tablets work like the one shown in Figure 19-1. You use the special pen on the tablet just as you would a mouse on a mousepad; any changes you make appear right on your monitor.
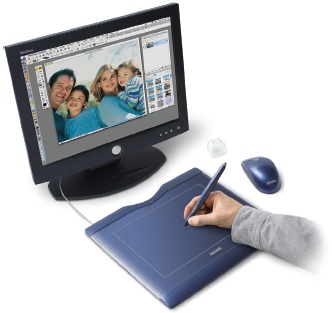
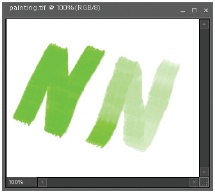
For most people, it’s much easier to control fine motions with a tablet’s pen than with a mouse. Moreover, when you use a tablet, many of the brushes and tools in Elements become pressure sensitive—the harder you press, the darker and wider the line becomes. The tablet pen lets you create much more realistic paint strokes, as shown in Figure 19-2.
When using the Brush tool, you’ll see Tablet Options (it’s a tiny black triangle) just to the right of the Airbrush setting in the Options bar. Many brushes and tools are automatically pressure sensitive when you hook up a tablet. You can choose whether to let the pressure control the size, opacity, roundness, hue jitter, and scatter for your brushes. (See Picking and Using a Basic Brush for more about Brush settings.)
With a tablet, you can also create hand-drawn line art—even if you don’t have an artistic bone in your body—by placing a picture of what you want to draw on the surface of the tablet and tracing the outline. Also, if you find constant mousing troublesome, you may have fewer hand problems when using a tablet’s pen. Most tablets come with a wireless mouse, which works only on the surface of the tablet. Or you can use your regular mouse on a mousepad or your desk the way you always do, if you like to switch back and forth between the stylus and a mouse.
Tablet prices now start at less than a hundred dollars, a big drop from what they used to cost. There are lots of different models, and their features vary widely. Sophisticated tablets offer more levels of sensitivity and respond when you change the angle at which you hold the stylus.
Wacom, one of the big tablet manufacturers, has some pretty nifty tablet demos on its Web site (www.wacom.com), if you click on the various product tours. You can’t actually simulate what it’s like to use a tablet, but the animations give you a good idea of what your life would be like if you went the tablet route.
Free Stuff from the Internet
You have to spend some money if you want a graphics tablet, but there’s a ton of free stuff—tutorials, brushes, textures, and Layer styles, for example—available online that you can add to Elements. Most of these add-ons say they work with Photoshop, but since Elements is based on Photoshop, you can use most of them in Elements, too.
Here are some popular places to go treasure hunting:
Adobe Exchange (www.adobe.com/cfusion/exchange/). On Adobe’s own Web site, you can find hundreds and hundreds of downloads, including more Layer styles than you could ever use, brushes, textures, and custom shapes (to use with the Shape tool). They’re all free, once you register. This site is one of the best resources anywhere for extra stuff. About 99 percent of the items listed are made specifically for Photoshop, but Photoshop’s brushes, swatches, textures, shapes, and Layer styles work with Elements, too. See the box on Beyond This Book for help with installing your finds in Elements.
Creative Mac (www.creativemac.com). Don’t let the name put you off. Almost everything on this site works in Windows, too. It’s not what it once was, but it’s still a wonderful source for specialty brushes, especially for tricky things like hair and skin.
MyJanee (www.myjanee.com). You’ll find lots of tutorials and free downloads on this site.
Sue Chastain (http://graphicssoft.about.com). This is another Web site with lots of downloads and many tutorials.
Panosfx (www.panosfx.com). Panos Efstathiadis produces some wonderful actions (see the section “When You Really Need Photoshop” later in this chapter) for Photoshop, and now he’s adapted many of them for Elements as well. Most are free; some cost a few dollars.
Optik Verve Labs (www.optikvervelabs.com). This is the home of Virtual Photographer, one of the most amazing plug-ins (add-on utilities) for Elements. Best of all, it’s free.
Hidden Elements (www.hiddenelements.com). Richard Lynch has been creating wonderful add-on tools for Elements practically as long as the program has existed. Some are free, many are not, but all are worth the investment.
Grant’s Tools (www.cavesofice.org/~grant/Challenge/Tools/index.html). Here’s another source of popular free tools for Elements, though it often takes a while for Grant to update it for new versions. But it’s well worth checking to find out.
If you’re willing to pay a little bit, you’ve got even more choices. You can find everything from more elaborate ways to sharpen photos to really cool collections of special edges and visual effects. Prices range from donationware (pay if you like it) to some quite expensive and sophisticated plug-ins that cost hundreds of dollars. You can also buy books like the Wow! series (Peachpit Press), which have loads of illustrations showing the styles available on the included CD.
Note
Elements 7 is based on Photoshop CS3, so CS3 downloads are compatible. Plug-ins and other goodies designed for older versions of Photoshop or Elements usually work with newer versions, but not the other way around. For example, a brush made for Photoshop CS3 works in Elements 7 but not Elements 3.
Mac plug-ins don’t work in Windows, and vice versa, but many plug-ins offer two versions, one for each platform. When buying a plug-in, check with the developer to be sure it works with Photoshop Elements, and if you’re using Windows Vista, check on Vista compatibility, as well.
With so many goodies available, it’s easy to find yourself overwhelmed trying to keep track of everything you’ve added to Elements. Your best bet is to make backup copies of anything you download so you’ll have it if you ever need to reinstall Elements.
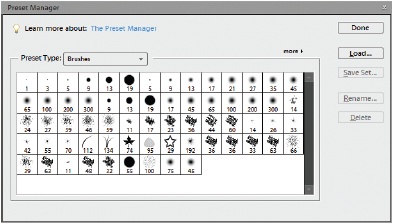
Elements also includes a Preset Manager (Figure 19-3) that can help manage certain kinds of downloads. Go to Edit → Preset Manager to launch it.
When You Really Need Photoshop
You can do an enormous amount with Elements, but some people do need the full version of Photoshop. For example, if you want the ability to write your own actions (little scripts, like macros, that automate certain things in Photoshop) or if you have to work extensively in CMYK mode, then you need Photoshop.
CMYK is the color mode used for commercial printing—it stands for Cyan, Magenta, Yellow, and blacK, which are the colors professional printers use. When you send a file to a print shop, the printer usually tells you it needs to be a CMYK file. You can’t convert files to CMYK in Elements. If you need CMYK files on a regular basis, it’s worth the extra price of Photoshop to avoid the aggravation. If you only occasionally need CMYK, you might just ask your printer about converting the file for you for an additional charge.
Note
Richard Lynch (www.hiddenelements.com) created a workaround for CMYK conversion for earlier versions of Elements. You may want to check his Web site to see what workarounds and other goodies he’s come up with for Elements 7.
In Photoshop you get more of everything: more choices, more tools, more settings, more types of adjustment layers, and so on.
Beyond This Book
You can do thousands of interesting things with Elements that are beyond the scope of this book. If you install the Photoshop Inspiration Browser, you have access to dozens of interesting tutorials right from Elements. Also, bookstores have loads of titles on Elements and Photoshop, and a lot of procedures are common to both programs. All kinds of specialized books on everything from color management to making selections to scrapbooking are available.
Note
If you’re looking to learn some photo-shooting and -editing techniques from a pro who’s been at it since the birth of digital cameras, check out Stephen Johnson on Digital Photography (O’Reilly).
In addition, you’ll find hundreds of tutorial sites on the Web. Besides those mentioned earlier in the chapter, other popular sites include:
Adobe (www.adobe.com). You’ll find plenty of free online training for Elements here.
Jay Arraich (www.arraich.com/elements/psE_intro.htm). This longtime Photoshop guru provides lots of Elements information, both basic and advanced.
Radiant Vista (www.radiantvista.com/workbench). This site’s Photoshop Workbench section features many video tutorials. They’re for full Photoshop, but many are applicable to Elements, too.
Photoshop Support (www.photoshopsupport.com/elements/tutorials.html). Despite the name, this site isn’t run by Adobe, but it does have a whole section of Elements tutorials.
YouTube (www.youtube.com). Yep, that’s right: You can find videos about almost anything on YouTube, including lots of Elements tutorials.
Photoshop Elements User (www.photoshopelementsuser.com). This is the Web site for a subscriber-only print newsletter, but it also includes some free online video tutorials, a forum, and a good collection of links. This is the only publication especially for Elements. Their forums are hosted at www.elementsvillage.com.
If you search Google, you’re sure to find a tutorial for any project you have in mind, although many of them are written for full Photoshop. In most cases, you can adapt them for Elements. If you get stuck or need help with any other aspect of Elements, there’s a very active online community that’s sure to have an answer for you. Besides the sites already mentioned, try:
Adobe Support forum (www.adobe.com/support/forums/index.html). Scroll down the page to the Photoshop forums and, in that group, you’ll find the Elements User-to-User forum, where you’ll find lots of helpful and friendly people. It’s your best bet for getting answers without calling Adobe support.
Digital Photography Review (www.dpreview.com). You’ll find many camera-specific forums on this site. You can also get a lot of Elements answers in the Retouching forum if you specify in your question that you’ve got Elements rather than Photoshop.
Retouch Pro (www.retouchpro.com). The forums here cover all kinds of retouching and artistic uses of Elements and Photoshop.
Many sites are devoted to scrapbooking using Elements. A good place to start is Scrapper’s Guide (www.scrappersguide.com), a commercial site run by Linda Sattgast.
No matter what you’re looking for—add-ons, tutorials, communities—try a Google search, and you’re sure to find a site that has what you want.
There’s no question about it: Once you get familiar with Elements, it’s addictive. Lots of other folks have found out how much fun this program is, and you shouldn’t have any trouble finding the answer to any question you have.
The only limit to what you can do with Elements is your imagination. Enjoy!