Chapter 6. Layers: The Heart of Elements
If you’ve been working mostly in the Quick Fix window so far, you’ve probably noticed that once you close your file, the changes you’ve made are permanent. You can undo actions while the file’s still open, but once you close it, you’re stuck with what you’ve done.
In Elements, you can keep your changes (most kinds, anyway) and still revert to the original image if you use layers, a nifty system of transparent sheets that keeps each element of your image on a separate sliver that you can edit. Layers are one of the greatest image editing inventions ever. By putting each change you make on its own layer, you can constantly rearrange the composition of your image, and add or subtract changes whenever you want.
If you use layers, then you can save your file and quit Elements, come back days or weeks later, and still undo what you did or change things around some more. There’s no statute of limitations for the changes you make when using layers.
Some people resist learning about layers because they fear layers are too complicated. But they’re actually very easy to use once you understand how they work. And once you get started with layers, you’ll realize that using Elements without them is like driving a Ferrari in first gear. This chapter gives you the information you need to get comfortable working with layers.
Understanding Layers
Imagine you’ve got a bare-bones drawing of a room you’re thinking about redecorating. To get an idea of your different decorating options, imagine that you’ve also got a bunch of transparent plastic sheets, each containing an image that changes the room’s look: a couch, a few different colors for the carpet, a standing lamp, and so on. Your decorating work is now pretty easy, since you can add and remove, and mix and match the transparencies with ease.
Layers in Elements work pretty much the same way. With layers, you can add and remove objects, and also make changes to the way your image looks. And you can modify or discard any changes later on.
Figure 6-1 shows an Elements file that includes layers. Each object in that flyer is on a different layer, so you can easily remove or rearrange things. (If you want to follow along with a layers-heavy file, you can download a version of this file from the Missing CD page at www.missingmanuals.com. Look for harvestfestwin.psd.)

Note
It’s important to understand that photos from your camera start out with just one layer. That means if you’ve got a photo like the one pictured in Figure 6-2, top, the individual objects—the two people, the ground they’re standing on, and so on—all exist on the same layer. At least they do until you select and place a particular object on its own layer. That said, Elements does occasionally generate layers for you. For example, Elements automatically creates layers when you do certain things, like move an object from one photo to another, or use the new Smart Brush tool (Correcting color with a brush), which thoughtfully puts the changes it makes on their own layer.
You can also use layers for many adjustments to your photos, giving yourself the chance to tweak or eliminate those changes later on. For instance, say you used Quick Fix’s Hue slider but then decided the next day you didn’t like what you did—you’re stuck (unless you can dig out a copy of your original). But if you’d used a Hue/Saturation Adjustment layer (Adding Fill and Adjustment Layers) to make the change, you could just throw out that layer and keep all your other changes intact. You can also use layers to combine parts of different photos, as shown in Figure 6-2.
Once you understand how to use layers, you’ll feel much more comfortable making radical changes to an image because mistakes are much easier to fix. Not only that, but by using layers, you can easily make lots of very sophisticated changes that are otherwise very difficult and time-consuming. But the main reason to use layers is for creative freedom. Layers let you easily create lots of special effects that would be very difficult otherwise.
The Layers Palette
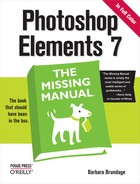
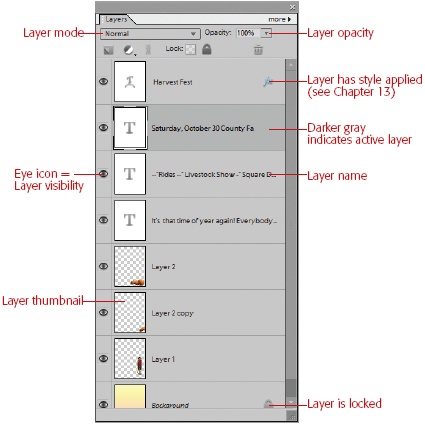
The Layers palette is your control center for any kind of layer-related action you want to perform, like adding, deleting, or duplicating layers. Figure 6-3 shows you the Layers palette for an image that already has lots of layers. Each layer displays its name and a little thumbnail icon previewing the layer’s contents. You can adjust the size of the icon or turn it off altogether if you prefer, as shown in Figure 6-4.
Tip
It helps to keep the Layers palette readily available whenever you work with layers, not only for the information it gives you, but because you can generally manipulate layers more easily from the palette than directly in your image. There are many changes, like renaming a layer, that you can make only in the palette.
The Layers palette usually contains one layer that’s active, meaning that any action you take, like painting, is going to happen on that layer (and that layer only). The active layer is darker so you can see which one it is.
Note
If you use the layer selection options described on Arranging layers with the Move tool, then you can wind up with multiple active layers or none, but for general working purposes, usually you want to have only one active layer.

When you look at an image that contains layers, you’re looking down on the stack of layers from the top, just the way you would with overlays on a drawing. The layers appear in the same order in the Layers palette—the top layer of your image is the top layer in the stack in the Layers palette. (Layer order is important because whatever is on top can obscure what’s beneath it.)
Elements lets you perform lots of different maneuvers right in the Layers palette. You can make a layer’s contents invisible and then visible again, change the order in which layers are stacked, link layers together, change the opacity of layers, add and delete layers—the list goes on and on. The rest of this chapter covers all these options and more.
The Background
The bottom layer of any image is a special kind of layer called the Background. If you bring any image or photo into Elements, then the first time you open it, you see its one existing layer is called Background. (That’s assuming that nobody else has already edited the file in Elements and changed things.) The name Background is only logical because whatever else you do will be on top of this layer.
Note
Elements has two exceptions to the first-layer-is-always-the-Background rule. First, if you create a new image by copying something from another picture, then you just have a layer called “Layer 0.” Second, Background layers can’t be transparent, so if you choose the Transparency option (Arranging layers with the Move tool) when creating a file from scratch, then you have a Layer 0 instead of a Background layer.
As for content, the Background can be totally plain or busy, busy, busy. A Background layer doesn’t mean that it literally contains the background of your photograph—your entire photo can be a Background layer. It’s entirely up to you to decide what’s on your Background layer, and what you place on other, newly added layers. With photographs, people often keep the photo’s image on the Background layer, and then perform adjustments and embellishments (like adding type) on other layers.
You can do a lot to Background layers, but there are a few things you can’t do: If you want to change a Background layer’s blending mode (see Blend Mode), opacity (Arranging layers with the Move tool), or position in the layer stack, then you need to convert that Background into a regular layer.
Tip
The Background and Magic Erasers automatically turn a Background layer into a regular layer when you click a background with them. If you have a single object on a solid background and you want transparency around the object, then one click with the Magic Eraser turns your background into a layer, eliminates a solid-colored background, and replaces it with transparency. (There’s more on the Eraser tools on Using the Eraser.)
You can change a Background layer to a regular layer by double-clicking the Background layer in the Layers palette. Or, if you try to make certain kinds of changes to the background (like using the Transform commands [Transforming Images]), then Elements prompts you to change the Background layer to a regular layer.
You can also transform a regular layer into a Background layer if you want. One reason to do this transformation is to send a layer zipping down to the bottom of the stack in a many-layered file. To do so:
In the Layers palette, click the layer you want to convert to a Background layer.
Select Layer → New → “Background from Layer”.
It may take a few seconds for Elements to finish calculating and to respond after you tell it what to do. The layer you’ve changed moves down to the bottom of the layer stack in the Layers palette, and automatically gets renamed “Background.”
Note
You can’t have more than one Background layer in an image. So what do you do if you want to change a regular layer to a Background layer and you’ve already got a Background layer? Well, you need to change the existing background into a regular layer first. Otherwise, the command is unavailable. (If you add a background from the Content palette, it automatically replaces the contents of your current background layer.)
Creating Layers
As you learned earlier in the chapter, your image doesn’t automatically have multiple layers. Lots of newcomers to Elements expect the program to be smart enough to put each object in a photo onto its own layer. It’s a lovely dream, but even Elements isn’t that brainy. To experience the joy of layers, you first need to add at least one layer to your image, which is what you’ll learn how to do in the next few sections.
Tip
It may help you to follow along through the next few sections if you get out a photo of your own or create a new file to use for practice. Or, you can download either the harvestfestwin.psd or leaves.jpg file from the Missing CD page at www.missingmanuals.com. (See Capturing Video Frames for details on how to create a new file; if you do so, choose a white background.)
Adding a Layer
Elements gives you several different ways to add new layers. You can use any of the following methods:
Choose Layer → New → Layer.
Press Shift+Ctrl+N.
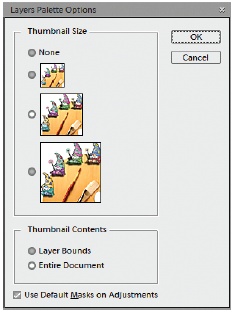
In the Layers palette, click the “Create a new layer” icon (the little square shown in Figure 6-5).
When you create a new layer using any of these commands, the layer starts out empty. You don’t see a change in your image until you use the layer for something (for example, painting on it). If you look at the Layers palette, then you see that any new layer you add appears just above the layer that was active when you created the new layer.
Note
The only practical limit to the number of layers your image can have is your computer’s processing power. But if you find yourself regularly creating projects with upward of 100 layers, you may want to upgrade to Photoshop, which has tools that make it easier to manage large numbers of layers.
Some actions create new layers automatically. For instance, if you copy and paste an object from another photo (see Layer Masks for instructions) or add artwork from the Content palette, then the object automatically arrives on its own layer. And that’s very handy for arranging the new item just where you want it, without disturbing the rest of your composition.
Deleting Layers
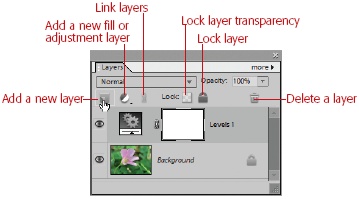
You can easily delete layers, if you decide you don’t want a particular layer anymore. Figure 6-6 shows the simplest way.
![To make a layer go away, either drag the layer to the Trash can icon on the Layers palette or, after selecting the layer, just click the “Delete layer” icon (the Trash can [where the cursor is here]). Elements responds by asking if you want to delete the active layer. Say yes, and it’s history. Once you delete a layer, it’s gone forever.](http://imgdetail.ebookreading.net/design/5/9780596521332/9780596521332__photoshop-elements-7__9780596521332__httpatomoreillycomsourceoreillyimages209799.png.jpg)
Elements also gives you a few other ways to delete a layer. You can:
Select Layer → Delete Layer.
Right-click the layer in the Layers palette, and then, from the pop-up menu, choose Delete Layer.
On the Layers palette, click the More button (the arrows), and then, from the pop-up menu, choose Delete Layer.
Duplicating a Layer
Duplicating a layer can be very useful. Many Elements commands, like filters or color modification tools, don’t work on a brand-new empty layer. This limitation poses a dilemma because if you apply those changes to the layer containing your main image, then you alter it in ways you can’t undo later. The workaround is to create a duplicate layer and make your changes on that new layer. Then you can ditch the duplicate later if you change your mind, and your original layer is safely tucked away unchanged.
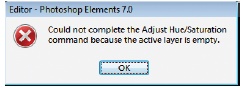
If all this seems annoyingly theoretical, try going to Enhance → Adjust Color → Adjust Hue/Saturation, for example, when you’re working on a new blank layer, and see what happens. You see the stern dialog box shown in Figure 6-7 if you try to work on a blank layer.
Note
Very rarely, you may still encounter the dreaded “no pixels are selected” warning. Several things can cause this, but the most common are too large a feather value on a selection (see the box on The Lasso Tools) or trying to work in the empty part of a layer that contains objects surrounded by transparency.
Elements gives you a few ways to duplicate an existing layer and its content. Select the layer you want to duplicate to make it the active layer, and then do one of the following:
Press Ctrl+J.
Choose Layer → Duplicate Layer.
In the Layers palette, drag the layer you want to copy to the “Create a new layer” icon.
In the Layers palette, right-click the Layer, and then, from the pop-up menu, choose Duplicate Layer.
Click the More button (the double arrows to the right of the Layers palette’s name), and then choose Duplicate Layer.
Creating a new layer using any of these methods copies the entire contents of the active layer into the new layer. You can then mess with the duplicate as much as you want without damaging the original layer.
Copying and Cutting from Layers
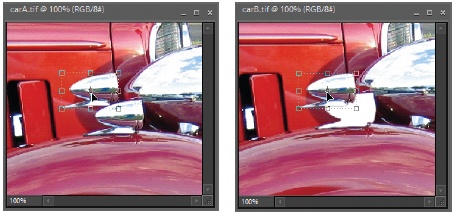
You can also make a new layer that consists of only a piece of an existing layer. (Helpful for things like applying a Layer style to one object from the layer, for instance.) But first you need to decide whether you want to copy your selection or cut it out and place it on the new layer.
What’s the difference? It’s pretty much the same as copying versus cutting in your word processing program. When you make a “New Layer via Copy”, the area you select appears in the new layer while remaining in place in the old layer, too. On the other hand, “New Layer via Cut” removes the selection from the old layer, and then places it on a new layer, leaving a corresponding hole in the old layer. Figure 6-8 shows the difference.
Once you’ve selected what you want to move or copy, your new layer is only a couple of keystrokes away.
New Layer via Copy. You can most easily copy your selection to a new layer by pressing Ctrl+J. (You can also go to Layer → New → “Layer via Copy”.) Whichever you use, if you don’t select anything beforehand, your whole layer gets copied. That makes it a good shortcut for creating a duplicate layer.
New Layer via Cut. To cut your selection out of your old layer and put it on a layer by itself, press Shift+Ctrl+J (or go to Layer → New → “Layer via Cut”). Just remember that you leave a hole in your original layer when you do this.
If for some reason you want to cut and move the entire contents of a layer, you can press Ctrl+A first, although usually it’s easier just to move your layer instead. Just drag it up or down the stack in the Layers palette to put it where you want it.
Tip
If you want to use a layer as the basis for a new document, Elements gives you a quick way to do so. Instead of copying and pasting, you can create a new document by going to Layer → Duplicate Layer. You get a dialog box containing a pull-down menu that gives you the option of placing the duplicate layer into your existing image, into any image currently open in the Editor, or into a new document of its own. (This maneuver works only from the menu. Ctrl+J doesn’t bring up the dialog box.)
Managing Layers
The Layers palette lets you manipulate your layers in all kinds of ways, but first you need to understand a few more of the palette’s cryptic little icons. Some of the things you can do with layers may seem tiresomely obscure when you first read about them, but once you’re actually using layers, you’ll quickly see why many of these options exist. The next few sections explain how to manipulate layers in several different ways: how to hide them, how to group them together, how to change the way you see them, and how to combine layers.
Making Layers Invisible
You can turn the visibility of layers off and on at will. This feature is tremendously useful, if you think about it. If the image you’re working on has a busy background, for example, you often find it hard to see what you’re doing when working on a particular layer. Making the Background layer invisible can really help you focus on the layer you’re interested in. To turn off visibility, in the Layers palette, click the eye icon to hide the layer. Click the eye once more to make the layer visible again.
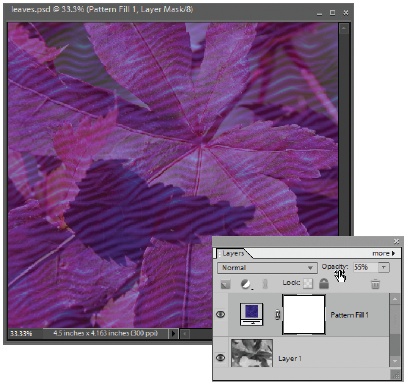
Adjusting Transparency
Your choices for layer visibility aren’t limited to on and off. You can create immensely cool effects in Elements by adjusting the opacity of layers. In other words, you can make a layer partially transparent so that what’s underneath it shows through.
To adjust the opacity of a layer, click the layer in the Layers palette, and then either:
Double-click in the Opacity box, and then type in the percentage of opacity you want.
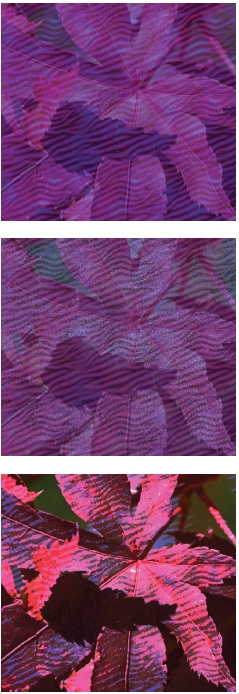
If you’d rather make the adjustment visually (as opposed to entering numbers), then click the triangle to the right of the Opacity percentage and adjust the pop-out slider, or just put your cursor on the word Opacity and “scrub” (drag) left for less opacity and right for more. (Figure 6-9 explains the advantage of scrubbing.) You can download leaves.jpg from the Missing CD page at www.missingmanuals.com, if you’d like to experiment with creating Fill and Adjustment layers (Adding Fill and Adjustment Layers) and changing their modes and opacity.
When you create a new layer using either the keyboard shortcut (Shift+Ctrl+N) or the menu (Layer → New → Layer), you can set the opacity right away in the New Layer dialog box. If you create a new layer by clicking the New Layer icon in the Layers palette, then you need to Alt+click the New Layer icon—the New Layer dialog box appears and you can change the opacity.
Note
You can’t change the opacity of a Background layer. You have to convert it to a regular layer first; Creating Layers explains how.
Locking Layers
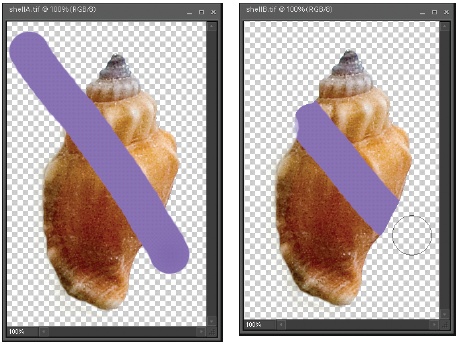
You can protect your image from yourself by locking any of the layers. Locking keeps you from changing a layer’s contents. You can also lock just the transparent parts of a layer—helpful when you want to modify an object that sits atop a transparent layer, like the seashell shown in Figure 6-10. When you do that, the transparent parts of your layer stay transparent no matter what you do to the rest of it. (You’re actually locking the pixels’ current transparency level, so if you have pixels that are only partly transparent, then they stay at their current transparency level, too.)
To lock the transparent parts of a layer, select the layer, and then, in the Layers palette, click the little “Lock transparent pixels” checkerboard. It works like a button, and it’s grayed out if you have no transparency in your photo. When you lock the transparency, a light gray padlock appears in the layers palette on the right side of the layer. To unlock, just click the checkerboard again.
To lock the contents of a whole layer so that no changes can be made to it, click the “Lock all” icon (the dark gray padlock in the Layers palette next to the checkerboard). A dark gray padlock appears in the layers palette at the right of your layer, and the “Lock all” icon shows a dark gray outline around it. Now if you try to paint on that layer or use any other tools, your cursor turns into the shape of the universal “no” symbol (circle with a diagonal line through it) as a reminder that you can’t edit that layer. You’ll also see a lock icon next to the layer name in the Layers palette. To unlock the layer, just click the “Lock all” icon once more.
Blend Mode
In the Layers palette, you also see another little menu that says “Normal” or, in the New Layer dialog box, “Mode: Normal”. This setting is for your blend mode. When used with layers, blend modes control how the objects in a layer combine, or blend, with the objects in the layer beneath it. By using different blend modes, you can make your image lighter or darker, or even make it look like a poster, with just a few bold colors in it. Blend modes can also control how some tools—those that have Blend Mode settings—change your image. Changing a tool’s blend mode can sometimes dramatically change the results you get.
Blend modes are an awful lot of fun once you understand how to use them. You can use them to fix under- or overexposed photos, or to create all kinds of special visual effects. You can also use some of the tools, like the Brush tool, in different blend modes to achieve different effects. The most common blend mode is Normal, in which everything you do behaves just the way you would expect: An object shows its regular colors, and paint acts just like, well, paint.
Blending and Smudging has lots more about how to use blend modes. For now, take a look at Figure 6-11, which shows how you can totally change the way a layer looks just by changing the layer’s blend mode.
Not every blend mode makes a visible change in every circumstance. Some of them may seem to do nothing—that’s to be expected. It just means that you don’t have a condition in your current image that’s responding to that particular mode change. See The High-Pass Filter for one example of a situation where a mode change makes an enormous difference.
Rearranging Layers
One of the truly amazing things you can do with Elements is move your layers around. You can change the order in which layers are stacked so that different objects appear in front of or behind each other. For example, you can position one object behind another if they’re both on their own layers. In the Layers palette, just grab the layer, and then drag it to where you want it.
Note
Remember, you’re always looking down onto the layer stack when you look at your image, so moving something up in the list moves it toward the front of the picture.
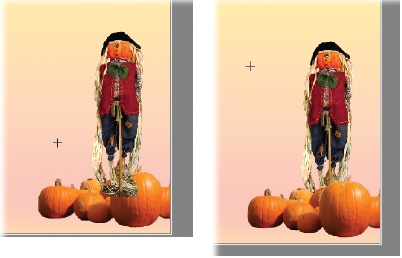
Figure 6-12 shows the early stages of the flyer for a Fall Harvest Festival (originally shown in Figure 6-1). The pumpkins are already in place, and the scarecrow was dragged in from another image. The scarecrow comes in at the top of the stack, in front of the pumpkins. You can put the scarecrow behind the pumpkins by simply dragging the scarecrow layer below the pumpkin layer in the Layers palette.
Note
A Background layer is the only kind of layer you can’t move. If you want to bring a Background layer to another spot in the layer stack, first convert the Background layer to a regular layer (Creating Layers), and then you can move it.
You can also move layers by going to Layer → Arrange, and then choosing the command of your choice:
Bring to Front (Shift+Ctrl+]) sends the selected layer to the top of the stack so the layer’s contents appear in the foreground of your image.
Figure 6-12. Left: When you bring a new element into an image, it comes in on top of the active layer. In this case that move happened to make the scarecrow the front object. Right: Move the new layer down in the stack, and the new object appears behind the existing content of the layers you move below, just as the scarecrow moves behind the pumpkins here.Bring Forward (Ctrl+]) moves the layer up one level in the Layers palette, so it appears one step closer to the front of your image.
Send Backward (Ctrl+[) moves the layer down one level so it’s sent back one step in the image.
Send to Back (Shift+Ctrl+[) puts the layer directly above the Background layer so it appears as far back as you can move anything.
Reverse (no keystroke shortcut) switches two layers’ locations in the stack; you must select two layers in the palette (by Ctrl+clicking, for example) before this command becomes available.
Tip
These commands (except Reverse) are now also available from the Move tool’s Options bar or by right-clicking in your photo when the Move tool is active. As a matter of fact, the Move tool can be a great way to rearrange layers in your image, as the next section explains.
Arranging layers with the Move tool
Using the Move tool, you can locate and arrange layers right in your image window, without trekking all the way over to the Layers palette. (If you need a refresher on Move tool basics, check out The Move tool.)
To arrange layers with the Move tool:
Activate the Move tool.
Click its icon in the Toolbox or press V.
Select the layer(s) you want to move.
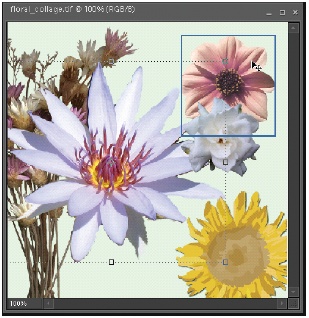
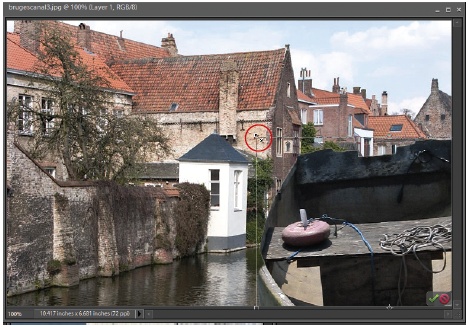
As soon as you activate the Move tool, you see the bounding box (the dotted lines) around the active layer in the Layers palette. As you move your cursor over the image, you see a blue outline around the layer the cursor is over—no matter how far down the layer stack the object is (see Figure 6-13). When you click to select the layer you want to move, a dotted line bounding box appears around that layer. Shift+click to select multiple layers, and the bounding box expands to include all that you’ve selected.
Figure 6-13. The Move tool lets you select objects from any layer, not just the active one. When you move the cursor over any object, you see the blue outline around its layer. Here, the water lily is the active layer (you can see the bounding box around it), but the Move tool is ready to select the pink flower, even though it’s not on the active layer. If all these outlines annoy you, then you can turn them off in the Options bar (via the Show Bounding Box or “Show Highlight on Rollover” checkboxes). If you want to force the Move tool to concentrate only on the active layer, then turn off Auto Select Layer.Move the Layer.
For example, choose Layer → Arrange, or click the Options bar’s Arrange Menu, or right-click inside the bounding box in the image. You see the same choices (“Bring to Front”, Bring Forward, and so on) described in the previous section, except for Reverse, which is available only from the Layer menu. You can also use keystroke shortcuts (again, except for Reverse).
Aligning and Distributing Layers
You can easily align objects in any image, thanks to the Move tool. The Move tool’s aligning feature arranges the objects on each layer so that they line up straight along their top, bottom, left, or right edges, or through their centers. So, for example, if you align the top edges of your objects, then Elements makes sure that the top of each object is exactly in line with the others.
You’ll also find it a breeze to evenly distribute the space between multiple objects. The Move tool’s distributing feature spaces out the distance between objects, also letting you choose edges or centers as a guide. If you distribute the top edges, for example, Elements makes sure there’s an even amount of space from the top edge of one object to another.
Tip
Distributing objects in this way is especially handy when you’re creating projects like those described in Chapter 15.
Aligning and distributing layers with the Move tool works much like rearranging layers:
Activate the Move tool.
Click its icon in the Toolbox or press V.
Select the objects you want to align.
This maneuver works only if each object is on its own layer. If you have multiple objects on one layer, then move them to their own layers, one at a time, by selecting each object, and then pressing Ctrl+Shift+J.
Shift+click inside the blue outline to select each layer you want to work with, or Shift+click in Layers palette to select the layers you want.
Choose how you want to align or distribute the objects by selecting from the Options bar menus.
The Align and Distribute menus both give you the same choices: Top Edges, Vertical Centers, Bottom Edges, Left Edges, Horizontal Centers, and Right Edges. You can most easily find the choice you want by looking at the little thumbnails next to each label—they show you exactly how your objects will line up.
Tip
You can apply as many different align and distribute commands as you like, as long as the layers you’re working with are still inside the bounding box. Figure 6-14 also gives you an example of how these commands work.
Grouping and Linking Layers
What if you want to move several layers at once? For instance, in the Harvest Festival image back on The Background, two layers have pumpkins on them. It’s kind of a pain to drag each one individually if you need to move them in front of the scarecrow. Fortunately, you don’t have to; Elements gives you a way to keep your layers united.
Linking layers
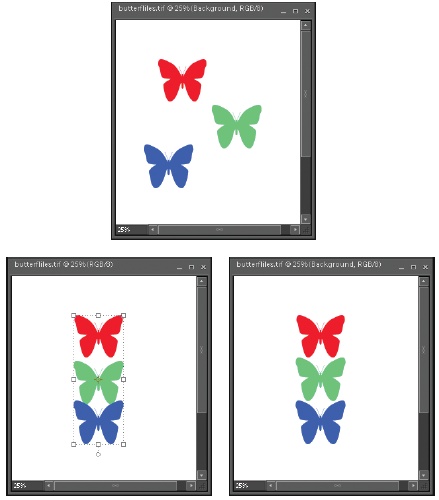
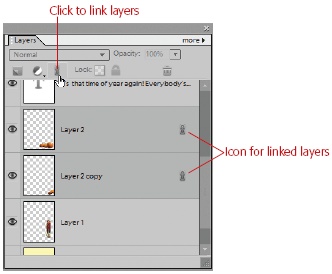
You can link layers together, and then they’ll travel as a unit, as shown in Figure 6-15.
If you want to remove a link between layers, then select the linked layers by clicking one, and then clicking the same chain icon to turn it off again. You can always merge the layers (covered in the next section) into one layer if you want. Sometimes, though, you’ll want to keep layers separate, while still being able to move the layers as a group. You perform this trick by linking. You can also use the layer selection choices, described in the box “Selecting Layers”, and skip the linking. As long as your layers all stay selected, they travel as a group. Linking’s advantage is that your layers stay associated until you unlink them. There’s no need to worry about accidentally clicking somewhere else in the palette and losing your selection group.
Note
The chain icon at the top of the Layers palette behaves like the “Lock Transparent Pixels” button does. You click the chain icon to link your layers, but it doesn’t look any different once you’ve got some layers linked together (contrast that with the way the “Lock All” transparency button looks pushed in when active). The Linked layer chain next to the layer name is the only hint you get that a layer is linked.
Grouping layers
An even more powerful way to combine separate layers is to group them. With grouping, you can let one layer influence the other layers it’s grouped with. Grouping layers isn’t anything like linking them. You can probably understand grouping most easily by looking at the example shown in Figure 6-16, which shows how you can crop an image on one layer using the shape of an object on another layer. (This kind of grouping is also called a clipping mask in Photoshop, and sometimes in Elements as well.)

Once the layers are grouped, you can still slide the top layer around with the Move tool to reposition it so that you see exactly the part of it that you want. So in Figure 6-16, the beach layer was maneuvered around till the sandpiper showed in the bottom of the shell shape.
To group two layers together, make the top layer (of the two you want to group) the active layer. Then choose Layer → “Group with Previous”. You can also group layers using the keyboard. First, make sure the top layer is the active layer, and then press Ctrl+G.
You can also group right in the Layers palette. Hold down Alt, and then, in the Layers palette, move your cursor over the dividing line between the layers. Click when you see two linked circles appear by your cursor. Now your layers are grouped.
If you get tired of the layer grouping or you want to delete or change one of the layers, then select Layer → Ungroup or press Shift+Ctrl+G to remove the grouping.
Merging and Flattening Layers
By now, you’ve probably got at least an inkling of how useful layers are. But there’s a downside to having layers in your image: They take up a lot of storage space, especially if you have lots of duplicate layers. In other words, layers make files bigger. Fortunately, you aren’t committed to keeping layers in your file forever. You can reduce your file size quite a bit—and sometimes also make things easier to manage—by merging layers or flattening your image.
Merging layers
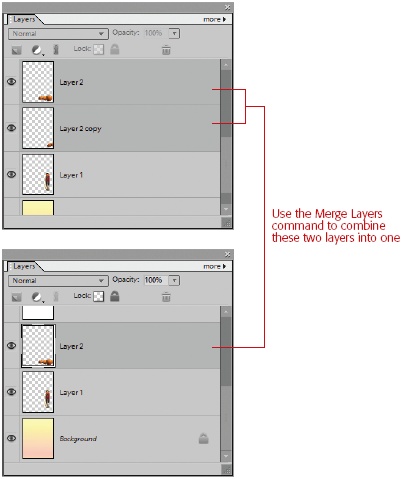
Sometimes you may have two or more separate layers that really could be treated as one layer, like the pumpkins shown in Figure 6-17. You aren’t limited to linking those layers together; once you’ve got everything arranged to your satisfaction, you can merge them together into one layer. Also, if you want to copy and paste your image, many times the standard copy and paste commands (Controlling the Selection Tools) copies only the top layer. So it helps to get everything into one layer, at least temporarily.
You’ll probably merge layers quite often when you’re working with multilayered files (for example, when you’ve got multiple objects that you want to edit simultaneously).
To merge layers, you have a few different options, depending on what’s active in your image at the time. You can get to any of the following commands from the Layers menu, or from the Layers palette’s More button, or use keystroke shortcuts.
Merge Down. This shortcut combines the active layer and the layer immediately beneath it. If the layer just below the active layer is hidden, then you don’t see this option in the list of choices. Keyboard shortcut: Ctrl+E.
Merge Visible. This shortcut combines all the visible layers into one layer. If you want to combine layers that are far apart, then just temporarily turn off visibility (by clicking the eye icon) for the ones in between and for any other layers that you don’t want to merge (Shift+Ctrl+E).
Merge Linked. Click any of your linked layers and you see this command, which joins the linked layers into one layer (Ctrl+E, just like Merge Down).
Merge Clipping Mask. You need to select the bottom layer of a layer group to see this command. Choose it, and the grouped layers join into one layer (Ctrl+E).
It’s important to understand that once you merge layers and save and close your file, you can’t just un-merge them again. While your file is still open, of course, you can use any of the undo commands (Escape Routes). But once you’ve gotten past the undo limit you’ve set in Preferences (The one rule of Elements), you’re stuck with your merged layers.
Tip
The box on Merging and Flattening Layers shows you another way to combine all your layers, while still keeping a separate copy of the individual layers.
Sometimes if your layer contains type or shapes drawn with the Shape tool, you can’t merge the layer right away. Elements asks you to simplify the layer first. Simplifying a layer means that you’ve converted its contents to a raster object. In other words, now it’s just a bunch of pixels, subject to the same resizing limitations as any photo. So, for example, if you have a type layer, then you can apply filters to the type or paint on it, but you can no longer edit the words. (See Ellipse for more about simplifying and working with shapes, and see Chapter 14 for working with type.)
Flattening an image
While layers are simply swell when you’re working on an image, they’re a headache when you want to share your image, especially if you’re sending it to a photo-printing service (their machines usually don’t understand layered files). And even if you’re printing at home, the large size of a layered file can make it take forever to print. Also, if you plan to use your image in other programs, very few non-Adobe programs are totally comfortable with layered files, so you may get some odd results if you feed them a layered file.
In these cases, you may want to squash everything in your picture into a single layer. You can do this easily in Elements by flattening your image. Do so by going to Layer → Flatten Image, or on the Layers palette, choose the More button (the double arrows) → Flatten Image. Or, to keep your original intact, save as a copy, and then turn off Layers in the Save As dialog box.
There’s no keystroke shortcut for flattening, because it’s something you don’t want to do by accident. Like merging, flattening is a permanent change. Many cautious Elements veterans always do a Save As, instead of a plain Save, before flattening. That way you have a flattened copy and still have your working copy with the layers intact, just in case. Organizer version sets (Saving Your Work) can help you here, too, because they let you save different states of your image. So, you could have a version with layers and a flattened version, too.
Adjustment and Fill Layers
Adjustment layers and Fill layers are special types of layers. Adjustment layers let you manipulate the lighting, color, or exposure of the layers beneath them. If you’re mainly interested in Elements to spruce up your photos, then you’ll probably use Adjustment layers more than any other kind of layer. Adjustment layers are great because they let you undo or change your edits later on if you want to.
You can also use Adjustment layers to take the changes you’ve made on one photo and reapply those changes to another photo (see the Note on Adding captions). And after you’ve created an Adjustment layer, you can limit future edits so they change only the area of your photo affected by the Adjustment layer.
You’ll find out much more about all the things you can do with Adjustment layers in the next few chapters. For now, you just need to learn how to create and manipulate them.
Fill layers are just what they sound like: layers filled with a color, a pattern, or a gradient (a rainbow-like range of colors). There’s more about gradients on Applying Gradients.
Tip
Digital photographers should check out the Photo Filter Adjustment layers, which let you digitally make the sort of adjustments that you used to do by attaching a colored piece of glass to the front of your camera’s lens. You can read more about what you can do with photo filters on Photo Filter.
Adding Fill and Adjustment Layers
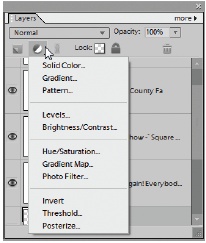
Creating an Adjustment or Fill layer is easy. In the Layers palette, just click the black-and-white circle, as shown in Figure 6-18. The button displays a menu of all the Adjustment and Fill layer choices in one list (the first three choices are Fill layers; the rest are Adjustment layers).
Whichever type of layer you choose, you get a dialog box that lets you tweak the layer’s settings (Invert, which doesn’t give you any choices, is the exception). After you make your choices, click OK, and the new layer appears.
Elements gives you three Fill layer choices: Solid Color, Gradient (a rainbow-like range of colors), and Pattern. See more about patterns on Applying Patterns, and gradients on Applying Gradients.
Here are the kinds of Adjustment layers you can select from:
Levels. This is a much more sophisticated way to apply Levels than using the Auto Levels button in Quick Fix or the Auto Level command from the Enhance menu. Using Levels has more information about using Levels. For most people, Levels is the most important Adjustment layer.
Brightness/Contrast. This does pretty much the same things as the Quick Fix adjustment (covered on Contrast).
Hue/Saturation. Again, it’s very much like the Quick Fix command (Using the Color sliders), only with slightly different controls.
Gradient Map. This is very tricky to understand, and is explained in detail on Saving Gradients. It maps each tone in your image to a new tone based on the gradient you select. That means you can apply a gradient so that the colors aren’t just distributed in a straight line across your image.
Photo Filter. Use Photo Filter to adjust the color balance of your photos by adding warming, cooling, or special effects filters, just like you might attach to the lens of a film camera. See Photo Filter.
Invert. This reverses the colors of your image to their opposite values, for an effect similar to a film negative. See Special Effects.
Threshold. Use this to make everything in your photo pure black and pure white. See Special Effects.
Posterize. Reduces the numbers of colors in your image to give a poster-like effect. See Special Effects.
You can change the settings for a Fill or Adjustment layer by highlighting the layer in the Layers palette, and then going to Layer → Layer Content Options, or, in the Layers palette, double-clicking the left icon for the layer. The layer’s dialog box reappears, and you can adjust its settings. Deleting Fill and Adjustment layers is a tad different from deleting a regular layer, as explained in Figure 6-19.

Layer Masks
Adjustment and Fill layers use something called a layer mask, which dictates which parts of the layer are affected when you make your changes (see Figure 6-20). By changing the area covered by the layer mask, you can control which part of your image the layer adjustments affect.
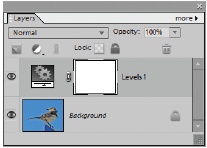
Full Photoshop uses layer masks for many other purposes, but in Elements, Adjustment and Fill layers are the only place you encounter a layer mask. The great thing about layer masks is that you can edit them by painting on them, as explained on Editing a layer mask. In other words, you can go back later and change the part of your image that the Adjustment layer affects.
Incidentally, the term layer mask may be a bit confusing if you’re thinking about masking with the Selection brush. With the Selection brush, masking prevents something from being changed. A layer mask really works the same way, but by definition, it starts out empty; in other words, you can use the mask to prevent your adjustment from affecting parts of the layer, but not until you mask out parts of your image by painting on the layer mask. So to begin with, your entire layer is affected by your change. You can learn how to edit layer masks on Editing a layer mask.
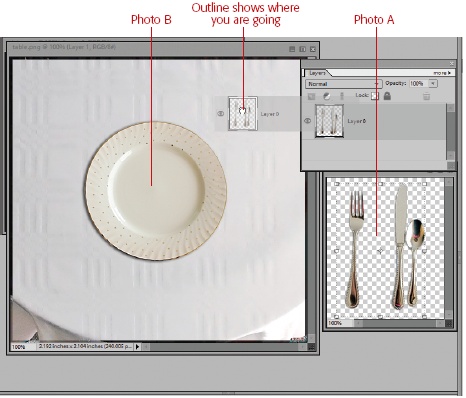
Moving Objects Between Images
If you use layers, then you can easily combine parts of different photos. Just put what you want from photo A into its own layer, and then drag it onto photo B. The trick is that you have to drag the layer from the Layers palette. If you try to drop one photo directly onto another photo’s window, then you’ll just wind up with a lot of windows stacked on top of each other (unless you activate the Move tool, described on The Move tool). Figure 6-21 shows you the correct way to move a layer between photos.
Note
In some earlier versions of Elements, you could also drag a photo directly from the Photo bin into another image. That maneuver doesn’t work in Elements 7.
But what if, rather than moving an entire layer, you just want to move a particular object—say, a person—to another layer? Just follow these steps:
Open both photos in Full Edit.
If you’re in Maximize mode, go to Window → Images, and then choose Tile or Cascade so you can see both photos at once.
Prepare both photos for combining.
Go to Image → Resize → Image Size, and then make sure both photos have the same pixels per inch (ppi) setting before you start (see Changing the Size of Your Image if you need a refresher on resizing and resolution). Why? If one photo is hugely bigger than the other, then the moved object could easily blanket the entire target image. You don’t absolutely have to perform this size balancing, but it’ll make your life a lot easier, since it helps avoid having your pasted object be enormous or tiny after you move it. See below for more advice about resolution when moving objects and layers.
Select what you want to move.
Use the selection tools of your choice (see Chapter 5 if you need help making selections). Add a one or two pixel feather to your selection (see The Lasso Tools) to avoid a hard, cut-out looking edge.
Move the object.
There are several ways to get material from one image to another:
Copy and Paste. Start by pressing Ctrl+C to copy the object from the first photo. Next, click the second photo to make it the active photo, and then press Ctrl+V to paste what you copied.
Use the Move Tool. Activate the Move Tool (The Move tool), and then drag from one photo to the other. As you’re moving, you may see a hole in the original where the selection was, but as long as you don’t let go till you get over the second photo, this fixes itself after you let go. (If seeing this bothers you, just Alt+drag to move a copy of the selection.)
Drag the layer. If the object you want to move is already on its own layer, surrounded by transparency, then you can just drag the layer from the layers palette of the first photo into the main image window of the photo where you want to put it.
It doesn’t matter which method you use—whatever you move appears on its own layer in the combined image.
If necessary, use the Move tool to position or scale the object after you’ve moved it, as shown in Figure 6-22.
See The Move tool for more about using the Move tool; scaling objects is covered on Adding Layer Styles.
Save your work when you’re done.
If you may want to make further adjustments to the moved object, then save your file as a TIFF or Photoshop (.psd) file to keep the layers. Remember that if you save your file as a JPEG, then you lose the layers, and you can’t easily change or move the new object anymore.
Here are a few points to keep in mind when copying from one image to another:
Watch out for conflicting resolution settings (see Resizing Images for Email and the Web). The bottom image (that is, the one receiving the moved layer or object) controls the resolution. So if you bring in a layer that’s set to 300 pixels per inch (ppi), and place it on an image that’s set to 72 ppi, then the object you’re moving is now set to 72 ppi; its overall size will increase proportionately as the pixels get spread out more.
Lighting matters. Objects that are lit differently stand out if you try to combine them. If possible, plan ahead and choose similar lighting for photos you’re thinking about combining.
Center your moved layer. If you’re dragging the layer and want your layer to center itself in the new image, then Shift+drag the layer.
Feather with care. A little feathering (The Lasso Tools) goes a long way toward creating a realistic result.
Note
If you’d like more practice using layers and moving objects between photos, visit the Missing CD page at www.missingmanuals.com, and download the Table Tutorial. It walks you through most of the basic layer functions.