Chapter 18. Online Albums and Slideshows
Last chapter, you learned how to email your photos. But what if you’ve got legions of friends? Do you have to email your pictures to everyone? Not with Elements, which makes it incredibly simple to post photos online, thanks to Photoshop.com, a one-stop shop where you share your photos and back them up online. You can create fancy online albums complete with professional-looking effects, courtesy of Flash, the ubiquitous Adobe program that’s responsible for zillions of nifty online animations.
Elements can also help you put together elaborate slideshows, complete with slick between-photo transitions like wipes and dissolves, clip art, and even audio. And for the perfect combination of high-tech wizardry and old-school charm, you can make digital flipbooks, simple slideshows that are easy to share with friends. Like the flipbooks of yore, these little shows can make a series of still photos appear to move, like an animated cartoon. Finally, Adobe has teamed up with Yahoo to give photo-taking map lovers a way to indulge both passions: customizable Yahoo maps sprinkled with photos detailing your latest road trip. In this chapter, you’ll learn the ins and outs of all these ways of sharing your photos.
Online Albums
Adobe calls these “albums,” but the online albums you create from Elements 7 aren’t just boring grid-like rows of photos like you see on most photo Web sites. Instead they’re elaborate Flash-based displays in which your photos do things like appear in an animation of old-fashioned slides dropped onto a table, and your friends sift through the pile and click the slides they want for a closeup view. Cool.
You can choose whether to share your album with the whole world or limit viewing to your family and friends. You won’t believe how easily you can create and share these elaborate online creations:
If your photos aren’t already in an album, create one.
Flip back to Albums and Smart Albums for details.
In the Organizer’s Album pane, click the name of the album you want to use.
If you want to change the order in which the photos display, now’s the time to do so. Just drag the photos to rearrange them.
Click the Share button (see Figure 18-1, circled).
If you’re already signed into Photoshop.com, you go straight to the Online Album wizard. If not, you get the sign-in screen first.
Figure 18-1. The circled button takes you to Photoshop.com. If you aren’t signed in, then you get a window to enter your password, or create an account if you don’t have one yet (see Photoshop.com for more about Photoshop.com). Once you’re signed in, you get taken to the Online Album wizard, a series of guided question screens that walks you through the process of creating your online gallery.Choose a different template, if you wish.
Elements starts you off by displaying your photos in an automatically playing fancy little slideshow where the thumbnails glide along beneath the larger image area. If you want something different, click Change Template (next to the album thumbnail). In the pane that appears, choose a template category from the pull-down menu, and then click around on the various template thumbnails that appear. When you see one you like, click Apply. The left side of the window gives you a large preview of what your photos will look like in the selected template, and there’s a text description of the template below the thumbnails area, too.
Note
In the template list, you see the same little blue and gold banners on some thumbnails that you see in the Content palette (The Favorites Palette). They mean the same thing here: If a template has a blue banner, you can download it to your computer for free (if you have a Photoshop.com account). If the banner is gold, you need a Plus account (the paid version) to download it. Once you download a template you won’t see the banner anymore.
Some templates play as a slideshow automatically, others are interactive, as explained in Figure 18-2. (If you don’t click Apply, then the last template style you clicked on gets applied when you move to the next step, but if that wasn’t what you wanted, don’t worry. You get another chance later to change the template.) Click Next to continue, or Cancel if you decide you don’t want to share your album.
If you don’t add your own title, then the album is boringly titled “My Photos.” Just highlight that text, and then type what you want. You can add a sub-title, too, if you like (just type what you want in the box provided), and choose whether or not to include captions you’ve added to your photos (turn on the checkbox). Click Refresh to see your title appear in the Preview area. Click Next when you’re done with this step.
Finally, share your new creation with your friends and family.
This last pane is where you decide who gets to see the album and what you want them to be able to do with it. If you want to show your work to the world, then choose “Share publicly with everyone”. If you want to keep your album private, choose “E-mail my friends only (don’t share publicly)”.
Then, in the box provided, type the message you want to send about the album, and then turn on the checkboxes next to the people you want to notify. This list is based on your Elements Contact Book (PDF slideshows). If you want to tell someone who’s not currently in the list, then you can create new Contact Book entries by clicking the Edit Recipients icon (above the right corner of the recipient’s list). Your chosen recipients receive an email with your message (plus a big Adobe ad) and a link to your album.
Tip
If you don’t want to hassle with creating contacts every time you invite different people to view an album, just send the invitation to yourself, copy the link from the email you receive, and then paste that into a regular email to send to your recipients. You can also just copy the URL from the address bar of your Web browser, once the album is posted on Photoshop.com.
Lastly, you can turn on two checkboxes if you want to let people download your photos or order prints right from the album’s Web page. Prints ordered this way come from Shutterfly.com.
Note
You can put your album into an existing album group if you have any setup. Just choose the group you want from the pull-down menu. (You can’t create a new group in the wizard.) See Searching for Photos for more about creating album groups. If you have so many albums it’s hard to keep track of them, or you just like to be very organized, then groups can be useful.
Click Share, and wait for the compliments on your photos and your Web design skills to pour in.
Note
If you aren’t in the US, then when you create an Online Album, you do so at Adobe’s Photoshop Showcase Web site (What’s New in Elements 7) rather than Photoshop.com. The procedure is exactly the same, and so are the templates available. However, your options for downloading and sharing the photos from the completed album may be different.


There are a few limitations to posting your album to Photoshop.com. It’s not really private, for one thing—anyone who can figure out your Photoshop.com Web address can see your albums, whether you invite them or not. And maybe you have friends with dial-up Internet connections—the online albums take forever to appear for those with a slow connection. Fortunately, Adobe gives you two other ways to share the galleries you build using the wizard: you can post them to your own Web site, or burn them to a CD or DVD and mail them to friends. The next section explains how.
Other Ways to Share
You’re not limited to creating these snazzy galleries at Photoshop.com. Even if you never sign up for a Photoshop.com account, you can still create the same galleries and impress friends with them, since you can also upload a gallery to your own Web site via FTP (File Transfer Protocol, the way you’d send any other files to your site), or just burn a CD or DVD.
To do either one, in the Organizer’s Albums pane, just right click the album’s name for a pop-out menu that gives you several options, including two for sharing:
Export to FTP. Choose this and the right side of the Organizer presents you with a pane where you can choose a different template if you like, or rename your album. Then enter the FTP address of your Web server (get this from your site host if you don’t know it), your username and password, and the name of the folder where you want Elements to place the gallery.
Then click Export. Elements builds your album and sends it to your server. If all goes well, you’ll have the same album on your site that you could have built at Photoshop.com. (The only options missing are the ones for printing and downloading.)
Tip
If you want to check to be sure that Elements can “see” your server, click “Test Access to Server”. Elements contacts your Web host and presents you with a window where you can watch the steps as it tries to log on and upload the file. As it completes each step a green checkmark appears. If you see the red “no” symbol, then there was a problem with that step and you have to figure out what went awry.
Export to CD/DVD. Here you get the same options for renaming and changing the template as you do for an FTP export, but instead of entering server information, you choose the drive to use to burn the disc and enter a name for the CD or DVD. Click Export, and Elements asks you to insert a disc. Put one in, then click OK. Elements burns the disc, then asks if you want to verify it. You do. Finally, it reminds you to label the completed disc before it ejects it.
Discs made this way play in a computer, not in a DVD player. If your friends use Windows, the disc should play automatically when they put it into their computer. If that doesn’t work (sometimes the Flash loading animation loops endlessly and the slideshow never runs), or if they’re using Macs, tell them to open the disc, navigate to the Root folder, and then double-click the Index.html file inside that. The slideshow plays in their Web browser.
You can share albums this way even if you also uploaded them to Photoshop.com. It’s a really handy way to make a very fancy slideshow.
Note
You can also choose one of these sharing methods when you first create an album in the Organizer’s Album pane—just click Share rather than Done at the bottom of the new album panel. After your album has been created, Sharing takes you to straight to Photoshop.com if you have an account there. (In other words, you won’t see the same options again.)
Slideshows
Online albums are about the easiest way you’ll find to make a fancy slideshow, but maybe you want more control than they give you, or maybe you’d like to add features like music or panning and zooming over your photos, à la Ken Burns. Elements makes it easy to create very slick little slideshows—some even with music and transitions between the images—that you can play on your PC or send to your friends.
By using the Slide Show feature, you can make extremely elaborate slideshows. If you prefer the simple life, you can quickly create a plain vanilla PDF slideshow in about as much time as it takes to email a photo.
The simple PDF slideshow is really straightforward to create, and looks quite impressive, but you can’t add audio to it or control how your slides transition. On the plus side, you can send a PDF slideshow to anyone, regardless of what operating system that person uses. As long as your recipients have Adobe Reader or another PDF-viewing program, they can watch your show.
The Slide Show Editor, on the other hand, lets you indulge your creativity big time. You can add all sorts of snazzy transitions, mix in sound in the form of background music or narration, add clip art, pan around your slides, and more. It’s a bit more complex to work with the Slide Show Editor than to make a PDF, but the real drawback to the Slide Show Editor comes in your choices for the final output. The slideshow you create isn’t as universally compatible as the PDF slideshow, as explained later in this chapter.
Note
If you plan to create a simple PDF slideshow, then you need to do all your photo editing beforehand. The Slide Show Editor, on the other hand, lets you edit as much as you like before you finalize your slideshow.
PDF Slideshows
Elements gives you two ways to create a PDF slideshow. The first, the Simple PDF slideshow, is very basic, just a quick run-through of the photos you choose. If you make a PDF in the Slide Show Editor, then you can create something slightly more elaborate.
Simple PDF slideshow
The hardest thing about creating a PDF slideshow in Elements is figuring out where to start. Elements hides the Simple PDF slideshow option under Share → More Options → PDF Slideshow. Once you find it, it’s as easy as sending an email. You can read more about it on PDF slideshows. This slideshow has no transitions, no clip art, and no custom type, but it’s the most compatible kind of slideshow you can make in Elements. And you can easily create a reasonable-sized file so anybody can watch it, no matter how underpowered their computer.
Making a PDF in the Slide Show Editor
You have another way to create a PDF slideshow, although it’s not as intuitive as the method just described. When you create a show in the Slide Show Editor, you can choose between saving your slide show as a Windows Media Video (WMV) file or a PDF. If you want to preserve your show’s multimedia bells and whistles, then you need to choose WMV. But then there’s that tantalizing PDF option. You may think this PDF slideshow sounds like the best of both worlds—a very compatible format and all the fancy effects you created with the Slide Show Editor.
Unfortunately, that’s not quite how it works. When you create a PDF this way, you lose the pan and zoom feature (Adding special effects), the audio, and the transitions that you set. You do keep any custom slides, text, and clip art that you added, though. On the whole, this feature’s best used when you’ve created a full-scale slideshow, but one or two of the people you want to send it to can’t view it in Windows Media format. The people who get the PDF can’t see everything the WMV recipients do, but it’s faster than trying to recreate a separate version for the WMV-challenged.
To create a PDF using the Slide Show Editor, just follow the instructions in the following section for creating a slideshow. When you’re ready to create your PDF, click Output, and then choose “Save As a File” in the Slide Show Output window that opens. On the right side of the Slide Show Output window, click the PDF File button. This step brings up a series of settings just for your PDF:
Slide Size. This setting starts out at Small. If you’re going to burn a CD, then you can choose a larger size. If you want to email the final file, then choose Small or Very Small for your images. You also have a Custom choice for when you want to create a size that’s different from one of the presets.
Loop. Turn this on, and the slideshow repeats over and over until your viewer stops it by pressing the Escape key.
Manual Advance. If you want recipients to be able to click their way through the slideshow instead of having each slide automatically advance to the next one, turn this on.
View Slide Show after Saving. Turn this on, and as soon as Elements is through creating your slideshow, it launches Adobe Reader so you can watch the results of your work.
Tip
If you want to make a PDF from an existing slideshow, in the Photo Browser, right-click the slideshow’s thumbnail, and then choose Edit. Once the Slide Show Editor opens, click Output → “Save As a File”.
When you’ve got everything set the way you want it, click OK to bring up the Save As dialog box. Name your file, and then save it.
Using the Slide Show Editor
The Slide Show Editor lets you add audio, clip art, and nifty slide-to-slide transitions. You also get several different ways to share your completed slideshow, including making a Video CD (VCD) or—if you also have Premiere Elements—a DVD that your friends can watch in a regular DVD player. If your operating system is Vista (Home Premium or Ultimate) or Windows Media Center Edition, then you can even send your slideshow to your TV and watch it there (as long as you have your television hooked up to your computer, Xbox 360, or other device that can play WMV files).
To get started, from the Organizer, select the images you want to include. You may want to set up an album (Albums and Smart Albums), which lets you control the order of your images. (You can change the order once you’re in the Slide Show Editor, but for large shows, you save time if you have things arranged in pretty much the correct order when you start.) You can also start with a single photo and, once you’re in the Slide Show Editor, click the Add Media button to add more photos. In any case, once you’ve got your initial photos selected, go to Create → Slide Show.
Slide Show Preferences
Once you choose to create a slideshow, Elements presents you with the Slide Show Preferences window before you get into the actual Slide Show Editor. You can click right past this window if you like, but it does give you some useful options for telling Elements how you want it to handle certain aspects of all your shows, like the duration of each slide and the color of the background. (You can also change these settings for a particular show in the Slide Show Editor itself.)
In the Slide Show Preferences, you can adjust:
Static Duration. This determines how long each slide displays before it moves on to the next one.
Transition. This setting tells Elements how to move from one slide to the next. You get many different transition styles to choose from, like a pinwheel effect or having the next slide move into view from the side. If you choose a different transition from the pop-out menu, then you can audition it in the little preview area at the right of the window, as explained in Figure 18-3.
Figure 18-3. You can set the slide duration and background color for all your slideshows in the Slide Show Preferences window. It’s also a great place to audition different transitions. If you want to see how a particular transition looks, select it from the Transition drop-down menu. You see it play in the little preview area on the right. If you choose a transition here, then Elements automatically applies it to every slide. But you can override this setting for individual slides in the Slide Show Editor’s Storyboard by clicking the transition you want to change, and choosing a different one.Transition Duration. Use this to set how fast you want the transitions to happen.
Background Color. Click the color square for the Elements Color Picker (see The Color Picker) if you want a different background color.
Apply Pan and Zoom to All Slides. If you set up the Pan and Zoom feature (explained later in this chapter) for one slide, turn this on, and the camera swoops around every slide.
Include Photo Captions as Text. If you want to display a photo’s Caption field, turn on this checkbox. (This works in reverse, too—you can hide your captions by just turning off this checkbox.)
Include Audio Captions as Narration. If you’ve recorded audio captions for your slides, leave this checkbox turned on if you want your audience to hear them.
Repeat Soundtrack Until Last Slide. Leave this checkbox turned on, and if you run out of music on your soundtrack, then Elements fixes things for you by repeating your song as many times as necessary.
Crop to Fit Slide. Turn on either of these checkboxes (for landscape- and portrait-oriented photos) and, if your image is too large for the slide, then Elements chops off the excess for you. However, it’s best to do any cropping (Cropping Pictures) yourself before starting your slideshow.
Preview Playback Options. Choose the quality for previewing your show while you’re working on it. The quality you pick for previewing doesn’t affect the quality of the final slideshow.

Once you’re through with these preferences, click OK. If you don’t want to see the preferences every time you start a new show, then just turn off “Show this dialog each time a new Slide Show is created”. You can still get back to the window at any time when you’re in the Slide Show Editor by going to Edit → Slide Show Preferences.
Creating your slideshow using the Slide Show Editor
After you click OK in the Slide Show Preferences dialog box, the Elements Slide Show Editor launches. It’s crammed with options, but everything is laid out very logically—in fact, it’s pretty similar to the Elements Full Edit window. You get a menu bar across the top of the window, but most of the commands here are available elsewhere via a button or a keystroke (like Ctrl+Z to undo your last action).
On the left side of the window, in the preview area, you see the slide you’re currently working on. There’s a Palette bin on the right side of the screen, and you can collapse it just like the Full Edit Palette bin, by clicking its edge when you want to get it out of your way. Collapsing the bin makes the preview space expand across the window. Click the hidden Palette bin’s edge again to bring the bin back onscreen.
At the bottom of the window, in the Storyboard, you see your slides and the transitions between them. (If you didn’t preselect any photos, the Storyboard just says “Click Here to Add Photos to Your Slide Show”.) Click a slide or transition here, and its properties (duration, background color, pan and zoom settings) appear in the Palette bin. If you don’t want to see the Storyboard anymore, go to the Slide Show Editor’s View menu, and then turn it off by removing the checkmark next to its name. You can turn it back on again there, too.
Tip
If you want to add photos to your slideshow, click the Add Media button at the top of the Slide Show Editor’s preview window. The advantage to bringing photos in this way (as opposed to selecting them before you start creating your slideshow) is that you can choose to use photos, videos, and audio clips that aren’t in the Organizer, by choosing either the “Photos and Video from Folder…” or the “Audio from Folder…” option and then navigating to the files you want. You can even edit your photos right in the Slide Show Editor. The disadvantage is that you have to choose each photo separately or you have no control over the order in which Elements brings them into the show.
You can finesse your show in lots of different ways in the Slide Show Editor. For instance, you can:
Edit your slide. You can make any kind of editing changes to your photo right here in the Slide Show Editor. In the preview window, just double-click your image, and then, using the choices that appear in the Properties palette (Figure 18-4), you can rotate your slide, change its size, crop it, and apply the Auto Smart Fix (Smart Fix) and the Auto Red Eye Fix (Smart Fix). If you want to do more substantial editing, then just click the More Editing button, and Elements whisks your slide over to Full Edit.
Figure 18-4. The three little thumbnails to the right of the Slide Show Editor’s Auto Smart Fix button let you change your photo to black and white or sepia and back to color again, if you change your mind. To change your slide to black and white or sepia, just click the button for the effect you want. To undo a color change you make here, click the Normal button. The changes you make with these buttons affect only the photo on your slide, not the original photo.Duration. You see a duration number (listed below each slide in the Storyboard and also in the Properties area) indicating how long a slide appears on the screen before it transitions to the next slide. Click the arrow to the right of the number (it’s very hard to see, but it’s there) for a pop-up menu that lets you change how long that particular slide appears onscreen. You don’t need to assign the same amount of time to each slide. You can also use the pull-down menu next to the slide’s thumbnail in the Properties palette, but only if you want to choose a duration between 3 and 7 seconds. Otherwise, in the Storyboard’s pull-down menu, use the Custom choice. (Click the transition time beneath the slide to see this menu.)
Transition. Elements gives you a lot of different ways to get from one slide to the next. These transitions appear in the Storyboard, and are represented by small thumbnail icons between the two slides they connect. (The transition icon changes to reflect the current transition style when you choose a new transition.)
On the right side of the Storyboard transition icon, you see a tiny arrow. Click it to see a pop-out menu listing all transitions, and then choose a different kind of transition, if you like.
Transitions have their own Properties palettes, which appear when you click a transition in the Storyboard. You can choose how long a transition is going to take and, for some transitions, the direction in which you want the transition to move.

If you like to make long slideshows, you’ll appreciate the Quick Reorder feature, explained in Figure 18-5. When you switch over to the Quick Reorder window, you see all your slides in a view that looks like a contact sheet, making it easy to reposition slides that would be annoyingly far apart if you had to move them in the Storyboard. In Quick Reorder, you can easily drag them to another spot in the lineup without the hassle of scrolling.

You can also change the order of all your slides by using the Slide Order drop-down menu above the right side of the Storyboard, although your choices there are limited. If you start a slideshow by first selecting your photos from the Organizer, then the Slide Order menu reads From Organizer, but you can choose Date (Oldest First), Date (Newest First), Random, Folder Location, Custom (this is what you see if you manually drag slides to new locations), and Reset (which puts your photos back in the order they were in when you first brought them into the Slide Show Editor).
Adding special effects
Elements gives you all kinds of ways to gussy up your slideshow, including adding clip art, text, and sound. If you want a slide that lists credits, for instance, start by creating a blank slide. (Click the slide immediately before the spot where you want the blank slide, and then, above the preview area, just click the Add Blank Slide button.) Elements produces a blank slide, to which you can then add whatever you like—your credits, for instance. Here’s a rundown of what you can add to your blank slide (or to any of your slides, for that matter, as shown in Figure 18-6). Just click the relevant button (Graphics, Text, or Narration) in the Extras section at the top of the palette to see your options.

Graphics. Elements gives you a whole library’s worth of clip art you can add to your slides. The art is divided into these categories: animals, backgrounds, costumes, flowers, food, frames, holidays and special occasions, home items, miscellaneous, ornaments, scrapbooks, sports and hobbies, and thought and speech bubbles.
Use the backgrounds on a blank slide, because they cover a whole slide, but the rest of the clip art can be added to slides that already have something on them. To add a piece of clip art to a slide, just double-click the clip art object’s thumbnail in the palette. It appears on your slide surrounded by a frame. You can grab the corners of the frame and drag them to resize the clip art object to the size you want, or use the slider in the Properties palette. You can also reposition clip art by dragging it. To remove it, right-click it, and then choose Delete.
Tip
If you play around with the costumes (hats, outfits, and glasses that you can paste onto your friends’ pictures), you may notice that you can’t rotate the clip art on the slide. If you want to adjust the angle for any of the clip art, here’s a workaround. All the art lives in C:ProgramDataAdobePhotoshop Elements7.0Slideshow Graphics if you have Vista. In Windows XP it’s C::DocumentsandSettingsAll UsersApplication DataAdobePhotoshop Elements7.0SlideshowGraphics. (Program Data and Application Data are hidden folders, so you need to turn on hidden folder viewing to see them.) Open your slide in Full Edit, and then add the clip art there (by importing it from the Graphics folder listed in the previous sentence). Then, use the Move tool (The Move tool) to place the clip art just so, and the transform commands (Transforming Images) to adjust the shape, if necessary. When you’re done, you can re-import your image into the Organizer as a version (Saving Your Work) and use the new version in your slideshow. You can also open the clip art images themselves, change them, and then save them as PNG files under a new name in the same folder as the originals, and they appear right in the clip art section along with the originals.
Text. You can add text to your slides, and also apply a number of fancy styles to your text. Click the Text button at the top of the palette, and then double-click the text style you like. The Edit Text window pops up. Type in the words you want to add to your slide. When you’re finished, click OK. The text appears in your slide, surrounded by a bounding box (dotted lines), which you can use to place the text where you want it.
Note
When the Edit Text window is active, you can’t click OK by pressing the Enter key. You just create a line break in your text. You need to click the actual OK button.
At the same time, the Text Properties palette appears at the lower right of the Slide Show Editor. You can change the font, size, color, and style in the palette. You can even choose a different color here for the drop shadow if you’re using shadowed text. If you want to edit text later on, just click the letters on the slide to bring back the text bounding box and the Text Properties.
Narration. You can record a narration for your slideshow if you wish. Just click the slide you want to add your voice to, and then, in the palette, click the Narration button. You see the recording window shown in Figure 18-7. (Of course, you need to have some kind of microphone hooked up to your PC to record your voice.)
Music. You can add a full-scale soundtrack to your slideshow. To do that, click the bottom of the Slide Show Editor where it says, “Click Here to add Audio to Your Slide Show”. In the window that opens, navigate to the audio you want, and then click Open. You can choose from any MP3, WAV, AC3, or WMA files you have on your PC.
Note
If you use iTunes, then you need to convert your iTunes AAC files to one of these formats before Elements acknowledges their existence. To do so, right-click any song name and choose, from the pop-up menu, “Convert Selection to MP3”.
Figure 18-7. Adding a narration to your slides is pretty simple. Just click the red Record button and start talking, and then click again when you’re done. Click the Play button to preview what you’ve got. If you don’t like how things turned out, click the Trash can icon, and then choose Delete This Narration. If you want to permanently save your narration as an audio caption for the original photo, then turn on “Save Narration as an Audio Caption”. You can also click the folder icon to the right of the recording controls to import an existing audio caption to use with this slide.You can make your slideshow fit the duration of the music, if you like. At the top of the Storyboard, click “Fit Slides to Audio”, and Elements spins out your slideshow to last the entire length of your song. Or, if you’d rather repeat a short audio clip over and over, go to Edit → Slide Show Preferences, and then turn on “Repeat Soundtrack Until Last Slide”. If you don’t choose either one, then Elements doesn’t make any attempt to synchronize the length of the soundtrack and the length of the slideshow.
Pan and Zoom. Filmmaker Ken Burns popularized this technique, where the camera moves around a still photo, giving the impression of motion. To create this effect in Elements, just click the slide you want to pan over. In the Properties palette, turn on the “Enable Pan and Zoom” checkbox.
Tip
If you’ve lost the Pan and Zoom properties because you double-clicked over to the slide’s Edit properties, then you can get back to Pan and Zoom by clicking once in the preview area outside the slide itself.
The Properties palette has two little thumbnails, Start and End. Click the Start thumbnail to choose where to begin panning over your photo. The pan frame appears in your photo, marking the spot where Elements will begin panning over your slide. Drag the frame to another place on the slide to change the starting point for your pan, or drag a corner to resize the frame.
Then, click the End thumbnail in the Properties palette and repeat the process to set the end point for panning and zooming. If you decide you want to edit the effect, then you can always click either thumbnail again to bring back the pan frame. You can also click the buttons between the thumbnails to swap where you start and end.
You can control the zoom level by how large you make your start and end frames. A small frame means the camera has to zoom in to fill the slide; an end frame that’s larger than the start frame makes the camera zoom out.
Note
Panning and zooming usually looks pretty jerky when you preview your slideshow, but it should be smooth in the final slideshow.
You can pan more than once on a slide, too. To do that, click “Add Another Pan and Zoom to This Slide”. If you want all your slides (or selected slides) to show the same pan and zoom you just set up, go to the Edit menu, and then, from the pop-out menu, choose what you want to do: “Apply Pan and Zoom to Selected Slide(s)” or “Apply Pan and Zoom to All Slides”.

Saving and sharing your slideshow
After all the work you’ve done creating your slideshow, needless to say, you want to save it. (If you forget, then Elements reminds you to do so when you exit the Slide Show Editor.)
Tip
You can watch a full-screen preview of your slideshow by clicking the button of the same name above the Palette bin, or by pressing F11. Press Escape (Esc) to get back to the Slide Show Editor window.
Before saving, you need to decide what you want to do with your slideshow (burn it to a CD, email it as a file, and so on). It’s important to remember that no matter what you choose (except for saving as a PDF), you’re going to end up with a Windows Media Video (WMV) file.
That doesn’t matter as long as everyone you want to share your slideshow with is using a computer or DVD player that uses a recent version of Windows Media Player. (It’s part of the Windows operating system [if you’ve disabled Windows updates you can download the latest version from Microsoft]; for Macs, you find a free plug-in at www.flip4mac.com.) But unfortunately, that’s not always the case. If you need to send a slideshow to someone who doesn’t have Windows Media Player, your options are to create a PDF file as explained on PDF Slideshows, upload your slideshow to YouTube (www.youtube.com) and send a link to your friends, or use other software to change the format to something your recipients have, like QuickTime, for example.
To see your Output options, click the Output button above the Slide Show Editor’s preview window. You get a new window (Figure 18-8) where you can choose from several ways to save and share your slideshow.
Save As a File. Choose this option to save your slideshow to your hard drive as a PDF or Windows Media Video (WMV) file. The PDF options are explained on Using the Slide Show Editor. If you choose WMV, you get several choices for size and quality. Choose the one that best suits how you plan to share your slideshow. (If you’re curious about the various choices, choose the one you want to know more about, and then click the Details button. You get a pop-up window giving more information about that size and its suggested uses.)
Burn to Disc. You can create a Video CD (VCD) using Elements. This is a disc that plays in a DVD player, just like a regular DVD, but you don’t need a DVD recorder to create one (because you’re just using a plain old CD). The downside is that VCD is a very tricky format—the quality is low, and you can expect to have some problems getting the discs to play in some DVD players. If you want to send VCDs, you may want to make a short test slideshow for your friends to be sure they can watch one before you invest a lot of time in creating a large project.
Tip
If you’d like to check which players can handle VCDs, or if you just want to know more about the format, head over to www.videohelp.com/vcd, where you’ll find links to lists of compatible players and a lot more information.
You can also choose to include other slideshows on the same disc if you turn on the “Include additional slide shows I’ve made on this disc” checkbox in the Output window. Then click OK to bring up the “Create a VCD with Menu” window where you can choose the slideshows you want to include.
In the “Create a VCD with Menu” window, you must choose between the NTSC or PAL formats for your disc. Choose PAL if you’re sending your slideshow to Europe or China; choose NTSC for most other areas, including the United States. Then click Burn to begin burning your disc.
Note
If you also have Adobe’s Premiere Elements software (and a drive that can create DVDs), then you can send your slideshow to Premiere Elements to make a true DVD. (If you have a DVD recorder, but no Premiere Elements, you can save your slideshow, and then use any other DVD-authoring software you’ve got loaded on your PC.)
Send to TV. If you have Vista Home Premium or Ultimate, or Windows Media Center Edition running on your PC, and your television is connected to your computer, or if you have a device like an Xbox360 that can play WMV files, you can send your slideshow straight to your TV for large-screen viewing. In the Output window, click “Send to TV”, and then type a name for your slideshow in the Name box. Next, choose the option in the Settings pull-down menu that correctly describes your TV, and then click OK. (If you aren’t sure what to choose in the Settings menu, click the Details button to learn more about the currently selected choice.)
Note
As long as you save your slideshow as a Slide Show (by clicking Save Project), you can always go back and edit it whenever you like. To edit an existing slideshow, in the Organizer, just right-click its thumbnail, and then from the pop-up menu, choose Edit. Elements opens your show in the Slide Show Editor so that you can make your changes. If you want to work on your slideshow again, then you need to save the actual Slide Show file, too, in addition to your PDF or WMV file, if you created one. You can’t edit PDFs or WMVs in the Slide Show Editor.

Flipbooks
In some ways, a flipbook is like a very simple slideshow without any transitions, audio, or fancy panning and zooming. After slogging through the last section, you may be thinking you’ve had enough slideshow options in Elements, thank you very much. But all that’s different about a flipbook is the speed at which the images appear. A flipbook’s frame rate (how fast one image appears and disappears) is very fast. When you put a stack of photos you took with your camera in burst mode into a flipbook, you can create an animation where the images change so fast it appears that your subject is moving.
Tip
Flipbooks are great for creating a time-lapse effect. For instance, if you take a photo of the building progress of your new house each day from the exact same spot, you can combine all the photos and watch your house go from an empty lot to finished in just a few seconds.
The flipbook effect is similar to an animated GIF (Creating Animated GIFs), but you can use JPEGs in your flipbook, so the image quality is much higher than with a GIF. The downside is that you can’t easily include a flipbook on a Web page. Your completed flipbook is a Windows Media file, so all you or your friends can do is watch it like a movie or regular slideshow. That said, Elements does give you several different output sizes, so you can pick one that’s suitable for watching on a regular television (although you need Adobe’s Premiere Elements or some other video creation program to make a version your television understands).
You may also want to create a flipbook to use as a plain old slideshow, since they’re quick to produce and easy to email. Regardless of how you plan to use your flipbook, here’s how to get started:
In the Organizer, select the photos you want to include.
You must choose at least two photos, or you’ll get a warning (instead of the Flipbook wizard) when you try to continue. You can’t add or delete photos once you’re in the wizard, so be sure you have all the photos you want before you start. You may want to make an album (Albums and Smart Albums) to help you keep track.
The flipbook displays your photos in order based on their file names or numbering. For example, files with names like img_0617.jpg, img_0618.jpg, and so on, appear in numerical order. The only control the Flipbook wizard gives you is that you can reverse the order of the entire group of images. See Renaming Your Files for advice on renaming a batch of photos using a sequential number scheme.
Go to Create → More Options → Flipbook.
The Flipbook wizard shows you the window in Figure 18-9. You can preview your flipbook by pressing the Play button below the image area.
Adjust your settings.
You have only a limited number of choices in the flipbook window. Because the images move so fast, flipbooks don’t let you use any kind of transitions between slides. All you can do is choose:
Playback Speed. Here’s where you control the number of frames per second (each photo is one frame). One frame per second is the slowest option, and even that’s pretty zippy for a regular slideshow. The more frames per second you choose, the faster and smoother the animation effect, and the shorter the total playback time for the flipbook.
Reverse Order. If you want to see your slides from last to first, instead of first to last, then turn on this checkbox.
Output Settings. These settings determine the final size of your flipbook. You get a variety of file formats to choose from. Computer Monitor is a good medium size that gives you a convenient balance between file size and image size. Web is a good size for use on a Web page (assuming your viewers have broadband Internet connections). E-mail creates a very tiny show that you can send to people with dial-up connections. You can also choose to create your flipbook as VCD-NTSC or VCD-PAL, or DVD-NTSC or DVD-PAL. NTSC is for video players in the United States and most other areas, and PAL is used in Europe and China. (If you choose any of these settings, then you need a program like Premiere Elements to create your final DVD for television viewing. Although you can create a flipbook in a format for use on a DVD, Elements can’t create the menus and extra files your DVD player needs in order to play the file.) Unfortunately, the VCD choices are subject to the same quality limitations discussed on Flipbooks. Figure 18-10 gives you more advice if you need help choosing a setting.
Loop Preview. Turn this box on, and your preview plays endlessly once you click the Play button, until you stop it by clicking the Pause button.
Create your flipbook.
When you’re happy with how your flipbook performs, click Output. If you want to make large changes, like adding or removing photos, or if you decide you don’t want to make a flipbook after all, then click Cancel. (You need to start from the beginning if you wish to change your photo selection.)
When you click Output, a new window opens where you must name and save your video, which automatically gets added to the Organizer. Then you’re all done.


Sharing Photos with Yahoo Maps
Elements gives you another fun way to share your photos online: placing them as virtual pins stuck in a Yahoo map. Your first reaction may be a yawn and, “So what? I know where I’ve been.” But this is actually a very cool feature.
It’s so great because you can choose to use a satellite view of the map, and in many places, you can zoom in to the level where you can see individual buildings. This means you can place your photos exactly where you took them. Want to sell your house? Find it on the map and attach your photos. Click the mountain lodge where you spent your vacation, and then attach your photos. Trace out the route of your trip to Europe, and then place the photos of each site you visited.
Once you’ve created your photo-speckled map, you aren’t limited to admiring your work on your own computer. You can create an Online Album to post it on the Internet, where your friends can click the pins on the map to view a slideshow of your photos for that spot, or send it straight to Flickr (www.flickr.com)—the enormously popular photo sharing site. Adobe has made this very easy by building the map feature right into the Organizer. You even find a map view in the Organizer, as explained in Figure 18-11.
Note
If your camera has built-in GPS (a Global Positioning System that always knows where the camera is), then Elements automatically reads your GPS data, and places your photos on the map. The camera writes the GPS coordinates into your EXIF data (see Saving Your Work). You don’t have to do a thing except enjoy the view. At least, that’s how it’s supposed to work. Unfortunately, some cameras write this information in places that Elements doesn’t expect to find it, so you may have to go back and add it manually.
To create a map with your photos, just follow these steps:
Place your photos on the Map.
You have several choices for getting photos onto the Map:
Right-click a photo thumbnail, and then choose “Place on Map”. You get a dialog box where you can enter the general location (London, for example, or North Carolina) or even the specific address where your photos should go.
Drag and drop photos where you want them when the Map pane is open. You may need to use the Map Move tool (more on how to use that in a moment) to reposition the photos exactly where you want them.
Assign a Place tag (Creating Categories and Tags) to a group of photos, and then place the tag on the map using either of the two previous methods. All photos with this Place tag get positioned on your map.
Tip
The map is pretty grabby. When you’re dragging in a photo to a location close to a spot where you already have photos, it may get sucked into the existing group, even though that’s not where you want it. Sometimes it’s easier to drop a photo some distance from where you want it, and then use the Move tool to bring it to a location close to existing pins.
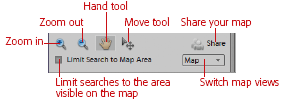
Figure 18-11. To see the Yahoo map pane, go to Display → Show Map at the Organizer’s upper right. Or right-click a photo or tag (label) and choose “Place on Map”, and then enter the location where you want to attach the photo. Once you’re in Map View, you can click a pin to see the photos attached to that spot. Click the large thumbnail on the little pop-out window for a full-screen slideshow of the pin’s photos with options like music and captions. Press the Esc key to get back to the map.Use the Map tools to adjust the view to your liking, and then use the Map Move tool (see Figure 18-12) to reposition your photos, if necessary. The more you zoom the view, the more accurate your placement.
Figure 18-12. The Map pane has its own little toolbox, used only to adjust your view of the map and to rearrange your photos, if necessary. Click one of the Zoom tools, and then click the map to zoom in or out. The area you click becomes the center of the map. The Hand tool works just like the regular Hand tool (The Hand Tool), but it only moves the Map around. The Map Move tool lets you reposition your photos on the map.Click any visible pin to display the little pop-up window you can see in Figure 18-13. To see a particular photo, click it in the little thumbnail strip along the bottom of the pop-up window.
The pin icon is always one pin for each location, no matter how many photos you have attached there. It would be nice if the number of pins corresponded to the number of photos, but whether you have 2 photos or 20 attached to a particular spot on the map, the icon shows one pin for any group of photos. If you have more than one pin in an area and you’re zoomed out too far to show each location, then the map shows a group of three pins, no matter how many pins actually are in the area.
When you’ve got all your photos positioned as you want them, share your map.
Click the Share button, and then choose how you want to share your map. Your choices are explained below. If you aren’t ready to share it yet, your pins stay on the map even if you don’t use the Share button—you don’t need to do anything special to save them for later.

The map pane gives you three ways to view the map. If you click the Map pull-down menu, you can see:
Map. This is like a standard street map: a drawing with street names and numbers on it.
Hybrid. Hybrid combines the satellite view and the map view, so you see a satellite photo with the street names marked on it.
Satellite. This is an aerial photo of the map area, taken by satellite, but the detail level is pretty amazing if you zoom it all the way in. (Not all areas have the same zoom level available. The map tells you if it can’t zoom to the maximum level.)
The Map pane also includes a little tool set below the map to help you get things arranged to your liking. You can see it in Figure 18-12.
The Zoom and Hand tools work like the regular Elements Zoom (The Zoom Tool) and Hand tools (The Hand Tool), but they work only on the map (not on the photos). The Map Move tool is very handy for repositioning photos. It’s tough to position your photos precisely on the first try. Click the Map Move tool, and then grab a pin and drag it where you want it. If you have multiple photos on a pin and you want to move only one photo, the easiest way is to right-click it, choose “Remove from Map”, and then add it in again.
Tip
The map can be a little cranky about scrolling long distances. If you find it’s hard to maneuver the map to the spot where you want to put your photos, try right-clicking a photo, choosing “Place on Map”, and then entering your area in the search box. You can always remove the photo (right-click, and then select “Remove from Map”) once the map shows the region you want.
If you’ve already placed a photo on a map, you can go right to that location by right-clicking the photo in the Photo Browser, and then choosing “Show on Map”. The Map pane opens, showing your photo’s current location. When you want to get rid of a photo, right-click it, and then choose “Remove from Map”. (You can do this in the Photo Browser or from its pin in the map.)
Once you’ve arranged all your photos to your satisfaction, you can share your map. Click the Share button and agree to the Yahoo Map terms of use (in that window, click Share), and you can choose whether to share to Photoshop.com (Photoshop Showcase if you’re not in the US) or Flickr. If you choose Photohop.com (Photoshop Showcase), then Elements sends your map to the Album wizard (see Online Albums). Just name your album, and then choose whether to share to Photoshop.com, export to a CD or DVD, or export your album to send to your own Web site. Online Albums are covered in detail starting on Online Albums. You can change from the Map template to another style of Online Album while you’re creating the album, if you like. Just click Change Template when you get to the Album Details pane of the wizard. Figure 18-13 shows a completed Yahoo Map Online Album.
Note
When you share a map, the Photo page that Elements generates automatically opens with the plain Map view showing, so you need to explain to friends how to change to one of the other views by clicking on the word Hybrid or Satellite, as they prefer, for a more realistic look.

If you choose Flickr, then a wizard appears and walks you through authorizing and uploading your photos. They’ll be displayed on Flickr’s map feature. The first time you send photos, you have to create a Flickr account if you don’t have one.